
Chapter 5. Bigger or Trickier Networks

In this chapter, we’ll build on the material in previous chapters to meet the real-life challenges of both large and small networks with relatively demanding applications or users. The sample configurations in this chapter are based on the assumption that your packet-filtering setups will need to accommodate services you run on your local network. We’ll mainly look at this challenge from a Unix perspective, focusing on SSH, email, and Web services (with some pointers on how to take care of other services).
This chapter is about the things to do when you need to combine packet filtering with services that must be accessible outside your local network. How much this complicates your rule sets will depend on your network design and, to a certain extent, on the number of routable addresses you have available. We’ll begin with configurations for official, routable IPv4 addresses as well as the generally roomier IPv6 address ranges. Then, we’ll move on to situations with as few as one routable IPv4 address and the PF-based work-arounds that make the services usable even under these restrictions.
A Web Server and Mail Server on the Inside: Routable IPv4 Addresses
How complicated is your network? How complicated does it need to be?
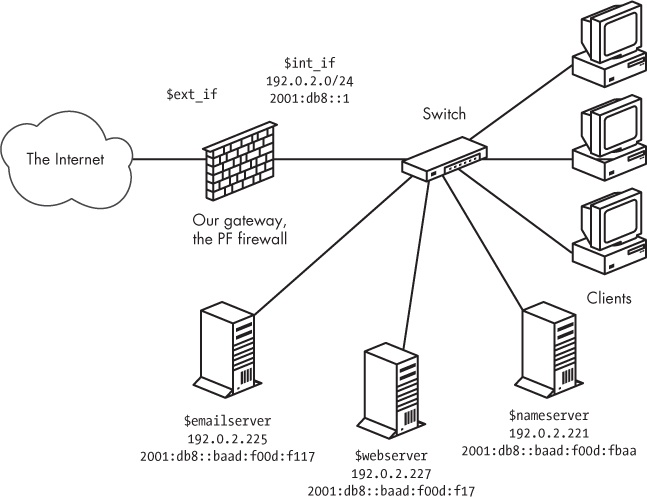
We’ll start with the baseline scenario of the sample clients from Chapter 3. We set up the clients behind a basic PF firewall and give them access to a range of services hosted elsewhere but no services running on the local network. These clients get three new neighbors: a mail server, a Web server, and a file server. In this scenario, we use official, routable IPv4 addresses because it makes life a little easier. Another advantage of this approach is that with routable addresses, we can let two of the new machines run DNS for our example.com domain: one as the master and the other as an authoritative slave.[25] And as you’ll see, adding IPv6 addresses and running a dual-stack network won’t necessarily make your rule set noticeably more complicated.
Note
For DNS, it always makes sense to have at least one authoritative slave server somewhere outside your own network (in fact, some top-level domains won’t let you register a domain without it). You may also want to arrange for a backup mail server to be hosted elsewhere. Keep these things in mind as you build your network.
At this stage, we keep the physical network layout fairly simple. We put the new servers in the same local network as the clients—possibly in a separate server room but certainly on the same network segment or switch as the clients. Conceptually, the new network looks something like Figure 5-1.
With the basic parameters for the network in place, we can start setting up a sensible rule set for handling the services we need. Once again, we start from the baseline rule set and add a few macros for readability.
The macros we need come rather naturally from the specifications:
Note
At this point, you’ve probably noticed that both the IPv4 and IPv6 addresses for our servers are placed fairly close together within their respective address ranges. Some schools of thought hold that in the case of IPv6, each interface should be allocated at least a /64 range if your total allocation can bear it. Others have advocated more modest allocations. The IETF’s current best practice document on the matter is RFC6177, available from the IETF website (http://www.ietf.org).
We assume that the file server doesn’t need to be accessible to the outside world, unless we choose to set it up with a service that needs to be visible outside the local network, such as an authoritative slave name server for our domain. Then, with the macros in hand, we add the pass rules. Starting with the Web server, we make it accessible to the world with the following:
pass proto tcp to $webserver port $webports
On a similar note, we let the world talk to the mail server:
pass proto tcp to $emailserver port $email
This lets clients anywhere have the same access as the ones in your local network, including a few mail-retrieval protocols that may run without encryption. That’s common enough in the real world, but you might want to consider your options if you’re setting up a new network.
For the mail server to be useful, it needs to be able to send mail to hosts outside the local network, too:
pass log proto tcp from $emailserver to port smtp
Keep in mind that the rule set starts with a block all rule, which means that only the mail server is allowed to initiate SMTP traffic from the local network to the rest of the world. If any of the other hosts on the network need to send email to or receive email from the outside world, they need to use the designated mail server. This could be a good way to ensure, for example, that you make it as hard as possible for any spam-sending zombie machines that might turn up in your network to deliver their payloads.
Finally, the name servers need to be accessible to clients outside our network who look up the information about example.com and any other domains for which we answer authoritatively:
pass proto { tcp, udp } to $nameservers port domainHaving integrated all the services that need to be accessible from the outside world, our rule set ends up looking roughly like this:
ext_if = "ep0" # macro for external interface - use tun0 or pppoe0 for PPPoE
int_if = "ep1" # macro for internal interface
localnet = $int_if:network
webserver = "{ 192.0.2.227, 2001:db8::baad:f00d:f17 }"
webports = "{ http, https }"
emailserver = "{ 192.0.2.225, 2001:db8::baad:f00d:f117 }"
email = "{ smtp, pop3, imap, imap3, imaps, pop3s }"
nameservers = "{ 192.0.2.221, 192.0.2.223,
                 2001:db8::baad:f00d:fbaa, 2001:db8::baad:f00d:ff00 }"
client_out = "{ ssh, domain, pop3, auth, nntp, http,
                https, cvspserver, 2628, 5999, 8000, 8080 }"
udp_services = "{ domain, ntp }"
icmp_types = "{ echoreq, unreach }"
icmp6_types = "{ echoreq unreach timex paramprob }"
block all
pass quick proto { tcp, udp } from $localnet to port $udp_services
pass log inet proto icmp all icmp-type $icmp_types
pass inet6 proto icmp6 icmp6-type $icmp6_types
pass proto tcp from $localnet to port $client_out
pass proto { tcp, udp } to $nameservers port domain
pass proto tcp to $webserver port $webports
pass log proto tcp to $emailserver port $email
pass log proto tcp from $emailserver to port smtp
This is still a fairly simple setup, but unfortunately, it has one potentially troubling security disadvantage. The way this network is designed, the servers that offer services to the world at large are all in the same local network as your clients, and you’d need to restrict any internal services to only local access. In principle, this means that an attacker would need to compromise only one host in your local network to gain access to any resource there, putting the miscreant on equal footing with any user in your local network. Depending on how well each machine and resource are protected from unauthorized access, this could be anything from a minor annoyance to a major headache.
In the next section, we’ll look at some options for segregating the services that need to interact with the world at large from the local network.
A Degree of Separation: Introducing the DMZ
In the previous section, you saw how to set up services on your local network and make them selectively available to the outside world through a sensible PF rule set. For more fine-grained control over access to your internal network, as well as the services you need to make it visible to the rest of the world, add a degree of physical separation. Even a separate virtual local area network (VLAN) will do nicely.
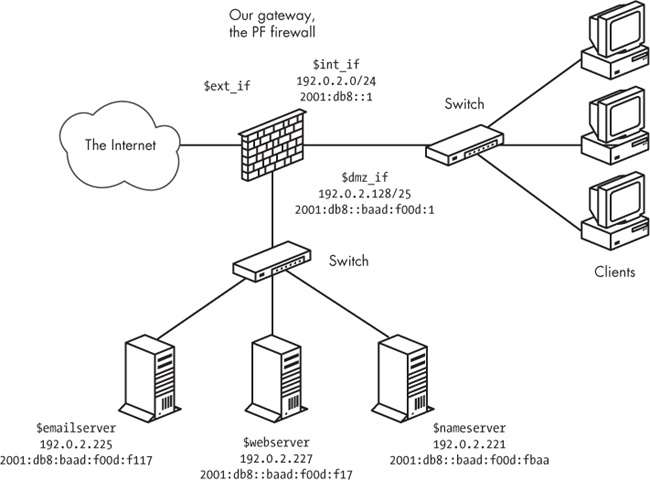
Achieving the physical and logical separation is fairly easy: Simply move the machines that run the public services to a separate network that’s attached to a separate interface on the gateway. The net effect is a separate network that isn’t quite part of your local network but isn’t entirely in the public part of the Internet either. Conceptually, the segregated network looks like Figure 5-2.
Note
Think of this little network as a zone of relative calm between the territories of hostile factions. It’s no great surprise that a few years back, someone coined the phrase demilitarized zone (DMZ) to describe this type of configuration.
For address allocation, you can segment off an appropriately sized chunk of your official address space for the new DMZ network. Alternatively, you can move those parts of your network that don’t have a specific need to run with publicly accessible and routable IPv4 addresses into a NAT environment. Either way, you end up with at least one more interface in your filtering configuration. As you’ll see later, if you’re really short of official IPv4 addresses, it’s possible to run a DMZ setup in all-NAT environments as well.
The adjustments to the rule set itself don’t need to be extensive. If necessary, you can change the configuration for each interface. The basic rule-set logic remains, but you may need to adjust the definitions of the macros (webserver, mailserver, nameservers, and possibly others) to reflect your new network layout.
In our example, we could choose to segment off the part of our address ranges where we’ve already placed our servers. If we leave some room for growth, we can set up the IPv4 range for the new dmz_if on a /25 subnet with a network address and netmask of 192.0.2.128/255.255.255.128. This leaves us with 192.0.2.129 through 192.0.2.254 as the usable address range for hosts in the DMZ. As we’ve already placed our servers in the 2001:db8::baad:f00d: 0/112 network (with a measly 65,536 addresses to play with), the easiest way forward for the IPv6 range is to segment off that network, too, and assign the interface facing the network an appropriate IPv6 address, like the one in Figure 5-2.
With that configuration and no changes in the IP addresses assigned to the servers, you don’t really need to touch the rule set at all for the packet filtering to work after setting up a physically segregated DMZ. That’s a nice side effect, which could be due to either laziness or excellent long-range planning. Either way, it underlines the importance of having a sensible address-allocation policy in place.
It might be useful to tighten up your rule set by editing your pass rules so the traffic to and from your servers is allowed to pass only on the interfaces that are actually relevant to the services:
pass in on $ext_if proto { tcp, udp } to $nameservers port domain
pass in on $int_if proto { tcp, udp } from $localnet to $nameservers
     port domain
pass out on $dmz_if proto { tcp, udp } to $nameservers port domain
pass in on $ext_if proto tcp to $webserver port $webports
pass in on $int_if proto tcp from $localnet to $webserver port $webports
pass out on $dmz_if proto tcp to $webserver port $webports
pass in log on $ext_if proto tcp to $mailserver port smtp
pass in log on $int_if proto tcp from $localnet to $mailserver
     port $email
pass out log on $dmz_if proto tcp to $mailserver port smtp
pass in on $dmz_if from $mailserver to port smtp
pass out log on $ext_if proto tcp from $mailserver to port smtp
You could choose to make the other pass rules that reference your local network interface-specific, too, but if you leave them intact, they’ll continue to work.
Sharing the Load: Redirecting to a Pool of Addresses
Once you’ve set up services to be accessible to the world at large, one likely scenario is that over time, one or more of your services will grow more sophisticated and resource-hungry or simply attract more traffic than you feel comfortable serving from a single server.
There are a number of ways to make several machines share the load of running a service, including ways to fine-tune the service itself. For the network-level load balancing, PF offers the basic functionality you need via redirection to tables or address pools. In fact, you can implement a form of load balancing without even touching your pass rules, at least if your environment is not yet dual-stack.
Take the Web server in our example. We already have the macro that represents a service, our Web server. For reasons that will become obvious in a moment, we need to reduce that macro to represent only the public IPv4 address (webserver = "192.0.2.227"), which, in turn, is associated with the hostname that your users have bookmarked, possibly www.example.com. When the time comes to share the load, set up the required number of identical, or at least equivalent, servers and then alter your rule set slightly to introduce the redirection. First, define a table that holds the addresses for your Web server pool’s IPv4 addresses:
table <webpool> persist { 192.0.2.214, 192.0.2.215, 192.0.2.216, 192.0.2.217 }Then, perform the redirection:
match in on $ext_if protp tcp to $webserver port $webports
        rdr-to <webpool> round-robin
Unlike the redirections in earlier examples, such as the FTP proxy in Chapter 3, this rule sets up all members of the webpool table as potential redirection targets for incoming connections intended for the webports ports on the webserver address. Each incoming connection that matches this rule is redirected to one of the addresses in the table, spreading the load across several hosts. You may choose to retire the original Web server once the switch to this redirection is complete, or you may let it be absorbed in the new Web server pool.
On PF versions earlier than OpenBSD 4.7, the equivalent rule is as follows:
rdr on $ext_if proto tcp to $webserver port $webports -> <webpool> round-robin
In both cases, the round-robin option means that PF shares the load between the machines in the pool by cycling through the table of redirection addresses sequentially.
Some applications expect accesses from each individual source address to always go to the same host in the backend (for example, there are services that depend on client- or session-specific parameters that will be lost if new connections hit a different host in the backend). If your configuration needs to cater to such services, you can add the sticky-address option to make sure that new connections from a client are always redirected to the same machine behind the redirection as the initial connection. The downside to this option is that PF needs to maintain source-tracking data for each client, and the default value for maximum source nodes tracked is set at 10,000, which may be a limiting factor. (See Chapter 10 for advice on adjusting this and similar limit values.)
When even load distribution isn’t an absolute requirement, selecting the redirection address at random may be appropriate:
match in on $ext_if proto tcp to $webserver port $webports
        rdr-to <webpool> random
Note
On pre–OpenBSD 4.7 PF versions, the random option isn’t supported for redirection to tables or lists of addresses.
Even organizations with large pools of official, routable IPv4 addresses have opted to introduce NAT between their load-balanced server pools and the Internet at large. This technique works equally well in various NAT-based setups, but moving to NAT offers some additional possibilities and challenges.
In order to accommodate an IPv4 and IPv6 dual-stack environment in this way, you’ll need to set up separate tables for address pools and separate pass or match rules with redirections for IPv4 and IPv6. A single table of both IPv4 and IPv6 addresses may sound like an elegant idea at first, but the simple redirection rules outlined here aren’t intelligent enough to make correct redirection decisions based on the address family of individual table entries.
Getting Load Balancing Right with relayd
After you’ve been running for a while with load balancing via round-robin redirection, you may notice that the redirection doesn’t automatically adapt to external conditions. For example, unless special steps are taken, if a host in the list of redirection targets goes down, traffic will still be redirected to the IP addresses in the list of possibilities.
Clearly, a monitoring solution is needed. Fortunately, the OpenBSD base system provides one. The relay daemon relayd[26] interacts with your PF configuration, providing the ability to weed out nonfunctioning hosts from your pool. Introducing relayd into your setup, however, may require some minor changes to your rule set.
The relayd daemon works in terms of two main classes of services that it refers to as redirects and relays. It expects to be able to add or subtract hosts’ IP addresses to or from the PF tables it controls. The daemon interacts with your rule set through a special-purpose anchor named relayd (and in pre–OpenBSD 4.7 versions, also a redirection anchor, rdr-anchor, with the same name).
To see how we can make our sample configuration work a little better by using relayd, we’ll look back at the load-balancing rule set. Starting from the top of your pf.conf file, add the anchor for relayd to insert rules as needed:
anchor "relayd/*"
On pre–OpenBSD 4.7 versions, you also need the redirection anchor:
rdr-anchor "relayd/*" anchor "relayd/*"
In the load-balancing rule set, we had the following definition for our Web server pool:
table webpool persist { 192.0.2.214, 192.0.2.215, 192.0.2.216, 192.0.2.217 }It has this match rule to set up the redirection:
match in on $ext_if proto tcp to $webserver port $webports
         rdr-to <webpool> round-robin
Or on pre–OpenBSD 4.7 versions, you’d use the following:
rdr on $ext_if proto tcp to $webserver port $webports -> <webpool> round-robin
To make this configuration work slightly better, we remove the redirection and the table (remember to take care of both sets in a dual-stack configuration), and we let relayd handle the redirection or redirections by setting up its own versions inside the anchor. (Don’t remove the pass rule, however, because your rule set will still need to have a pass rule that lets traffic flow to the IP addresses in relayd’s tables. If you had separate rules for your inet and inet6 traffic, you may be able to merge those rules back into one.)
Once the pf.conf parts have been taken care of, we turn to relayd’s own relayd.conf configuration file. The syntax in this configuration file is similar enough to pf.conf to make it fairly easy to read and understand. First, we add the macro definitions we’ll be using later:
web1="192.0.2.214"
web2="192.0.2.215"
web3="192.0.2.216"
web4="192.0.2.217"
webserver="192.0.2.227"
sorry_server="192.0.2.200"
All of these correspond to definitions we could have put in a pf.conf file. The default checking interval in relayd is 10 seconds, which means that a host could be down for almost 10 seconds before it’s taken offline. Being cautious, we’ll set the checking interval to 5 seconds to minimize visible downtime, with the following line:
interval 5 # check hosts every 5 seconds
Now, we make a table called webpool that uses most of the macros:
table <webpool> { $web1, $web2, $web3, $web4 }For reasons we’ll return to shortly, we define one other table:
table <sorry> { $sorry_server }At this point, we’re ready to set up the redirect:
redirect www {
       listen on $webserver port 80 sticky-address
       tag relayd
       forward to <webpool> check http "/status.html" code 200 timeout 300
       forward to <sorry> timeout 300 check icmp
}
This redirect says that connections to port 80 should be redirected to the members of the webpool table. The sticky-address option has the same effect here as the rdr-to in PF rules: New connections from the same source IP address (within the time interval defined by the timeout value) are redirected to the same host in the backend pool as the previous ones.
The relayd daemon should check to see whether a host is available by asking it for the file /status.html, using the protocol HTTP, and expecting the return code to be equal to 200. This is the expected result for a client asking a running Web server for a file it has available.
No big surprises so far, right? The relayd daemon will take care of excluding hosts from the table if they go down. But what if all the hosts in the webpool table go down? Fortunately, the developers thought of that, too, and introduced the concept of backup tables for services. This is the last part of the definition for the www service, with the table sorry as the backup table: The hosts in the sorry table take over if the webpool table becomes empty. This means that you need to configure a service that’s able to offer a “Sorry, we’re down” message in case all the hosts in your webpool fail.
If you’re running an IPv6-only service, you should, of course, substitute your IPv6 addresses for the ones given in the example earlier. If you’re running a dual-stack setup, you should probably set up the load-balancing mechanism separately for each protocol, where the configurations differ only in names (append a 4 or 6, for example, to the IPv4 and IPv6 sets of names, respectively) and the addresses themselves.
With all of the elements of a valid relayd configuration in place, you can enable your new configuration.
Before you actually start relayd, add an empty set of relayd_flags to your /etc/rc.conf.local to enable:
relayd_flags="" # for normal use: ""
Reload your PF rule set and then start relayd. If you want to check your configuration before actually starting relayd, you can use the -n command-line option to relayd:
$ sudo relayd -nIf your configuration is correct, relayd displays the message configuration OK and exits.
To actually start the daemon, you could start relayd without any command-line flags, but as with most daemons, it’s better to start it via its rc script wrapper stored in /etc/rc.d/, so the following sequence reloads your edited PF configuration and enables relayd.
$ sudo pfctl -f /etc/pf.conf
$ sudo sh /etc/rc.d/relayd start
With a correct configuration, both commands will silently start, without displaying any messages. (If you prefer more verbose messages, both pfctl and relayd offer the -v flag. For relayd, you may want to add the -v flag to the rc.conf.local entry.) You can check that relayd is running with top or ps. In both cases, you’ll find three relayd processes, roughly like this:
$ ps waux | grep relayd
_relayd   9153  0.0   0.1  776  1424  ??  S   7:28PM   0:00.01 relayd: pf update engine
(relayd)
_relayd   6144  0.0   0.1  776  1440  ??  S   7:28PM   0:00.02 relayd: host check engine
(relayd)
root      3217  0.0   0.1  776  1416  ??  Is  7:28PM   0:00.01 relayd: parent (relayd)
And as we mentioned earlier, with an empty set of relayd_flags in your rc.conf.local file, relayd is enabled at startup. However, once the configuration is enabled, most of your interaction with relayd will happen through the relayctl administration program. In addition to letting you monitor status, relayctl lets you reload the relayd configuration and selectively disable or enable hosts, tables, and services. You can even view service status interactively, as follows:
$ sudo relayctl show summary
Id      Type            Name                                 Avlblty Status
1       redirect        www                                          active
1       table           webpool:80                                   active (2 hosts)
1       host            192.0.2.214                          100.00% up
2       host            192.0.2.215                          0.00%   down
3       host            192.0.2.216                          100.00% up
4       host            192.0.2.217                          0.00%   down
2       table           sorry:80                                     active (1 hosts)
5       host            127.0.0.1                            100.00% up
In this example, the webpool is seriously degraded, with only two of four hosts up and running. Fortunately, the backup table is still functioning, and hopefully it’ll still be up if the last two servers fail as well. For now, all tables are active with at least one host up. For tables that no longer have any members, the Status column changes to empty. Asking relayctl for host information shows the status information in a host-centered format:
$ sudo relayctl show hosts
Id      Type            Name                              Avlblty Status
1       table           webpool:80                                active (3 hosts)
1       host            192.0.2.214                       100.00% up
                        total: 11340/11340 checks
2       host            192.0.2.215                       0.00%   down
                        total: 0/11340 checks, error: tcp connect failed
3       host            192.0.2.216                       100.00% up
                        total: 11340/11340 checks
4       host            192.0.2.217                       0.00%   down
                        total: 0/11340 checks, error: tcp connect failed
2       table           sorry:80                                  active (1 hosts)
5       host            127.0.0.1                         100.00% up
                        total: 11340/11340 checks
If you need to take a host out of the pool for maintenance (or any time-consuming operation), you can use relayctl to disable it, as follows:
$ sudo relayctl host disable 192.0.2.217In most cases, the operation will display command succeeded to indicate that the operation completed successfully. Once you’ve completed maintenance and put the machine online, you can reenable it as part of relayd’s pool with this command:
$ sudo relayctl host enable 192.0.2.217Again, you should see the message command succeeded almost immediately to indicate that the operation was successful.
In addition to the basic load balancing demonstrated here, relayd has been extended in recent OpenBSD versions to offer several features that make it attractive in more complex settings. For example, it can now handle Layer 7 proxying or relaying functions for HTTP and HTTPS, including protocol handling with header append and rewrite, URL-path append and rewrite, and even session and cookie handling. The protocol handling needs to be tailored to your application. For example, the following is a simple HTTPS relay for load balancing the encrypted Web traffic from clients to the Web servers.
http protocol "httpssl" {
          header append "$REMOTE_ADDR" to "X-Forwarded-For"
          header append "$SERVER_ADDR:$SERVER_PORT" to "X-Forwarded-By"
          header change "Keep-Alive" to "$TIMEOUT"
          query hash "sessid"
          cookie hash "sessid"
          path filter "*command=*" from "/cgi-bin/index.cgi"

          ssl { sslv2, ciphers "MEDIUM:HIGH" }
          tcp { nodelay, sack, socket buffer 65536, backlog 128 }
}
This protocol handler definition demonstrates a range of simple operations on the HTTP headers and sets both SSL parameters and specific TCP parameters to optimize connection handling. The header options operate on the protocol headers, inserting the values of the variables by either appending to existing headers (append) or changing the content to a new value (change).
The URL and cookie hashes are used by the load balancer to select to which host in the target pool the request is forwarded. The path filter specifies that any get request, including the first quoted string as a substring of the second, is to be dropped. The ssl options specify that only SSL version 2 ciphers are accepted, with key lengths in the medium-to-high range—in other words, 128 bits or more.[27] Finally, the tcp options specify nodelay to minimize delays, specify the use of the selective acknowledgment method (RFC 2018), and set the socket buffer size and the maximum allowed number of pending connections the load balancer keeps track of. These options are examples only; in most cases, your application will perform well with these settings at their default values.
The relay definition using the protocol handler follows a pattern that should be familiar given the earlier definition of the www service:
relay wwwssl {
          # Run as a SSL accelerator
          listen on $webserver port 443 ssl
          protocol "httpssl"
          table <webhosts> loadbalance check ssl
}
Still, your SSL-enabled Web applications will likely benefit from a slightly different set of parameters.
Note
We’ve added a check ssl, assuming that each member of the webhosts table is properly configured to complete an SSL handshake. Depending on your application, it may be useful to look into keeping all SSL processing in relayd, thus offloading the encryption-handling tasks from the backends.
Finally, for CARP-based failover of the hosts running relayd on your network (see Chapter 8 for information about CARP), relayd can be configured to support CARP interaction by setting the CARP demotion counter for the specified interface groups at shutdown or startup.
Like all others parts of the OpenBSD system, relayd comes with informative man pages. For the angles and options not covered here (there are a few), dive into the man pages for relayd, relayd.conf, and relayctl and start experimenting to find just the configuration you need.
A Web Server and Mail Server on the Inside—The NAT Version
Let’s backtrack a little and begin again with the baseline scenario where the sample clients from Chapter 3 get three new neighbors: a mail server, a Web server, and a file server. This time around, externally visible IPv4 addresses are either not available or too expensive, and running several other services on a machine that’s primarily a firewall isn’t desirable. This means we’re back to the situation where we do our NAT at the gateway. Fortunately, the redirection mechanisms in PF make it relatively easy to keep servers on the inside of a gateway that performs NAT.
The network specifications are the same as for the example.com setup we just worked through: We need to run a Web server that serves up data in cleartext (http) and encrypted (https) form, and we want a mail server that sends and receives email while letting clients inside and outside the local network use a number of well-known submission and retrieval protocols. In short, we want pretty much the same features as in the setup from the previous section, but with only one routable address.
Of the three servers, only the Web server and the mail server need to be visible to the outside world, so we add macros for their IP addresses and services to the Chapter 3 rule set:
webserver = "192.168.2.7"
webports = "{ http, https }"
emailserver = "192.168.2.5"
email = "{ smtp, pop3, imap, imap3, imaps, pop3s }"
With only one routable address and the servers hidden in NATed address space, we need to set up rules at the gateway that redirect the traffic we want our servers to handle. We could define a set of match rules to set up the redirection and then address the block or pass question in a separate set of rules later, like this:
match in on $ext_if proto tcp to $ext_if port $webports rdr-to $webserver
match in on $ext_if proto tcp to $ext_if port $email rdr-to $emailserver

pass proto tcp to $webserver port $webports
pass proto tcp to $emailserver port $email
pass proto tcp from $emailserver to port smtp
This combination of match and pass rules is very close to the way things were done in pre–OpenBSD 4.7 PF versions, and if you’re upgrading from a previous version, this is the kind of quick edit that could bridge the syntax gap quickly. But you could also opt to go for the new style and write this slightly more compact version instead:
pass in on $ext_if inet proto tcp to $ext_if port $webports rdr-to $webserver tag RDR
pass in on $ext_if inet proto tcp to $ext_if port $email rdr-to $mailserver tag RDR
pass on $int_if inet tagged RDR
Note the use of pass rules with rdr-to. This combination of filtering and redirection will help make things easier in a little while, so try this combination for now.
On pre–OpenBSD 4.7 PF, the rule set will be quite similar, except in the way that we handle the redirections.
webserver = "192.168.2.7"
webports = "{ http, https }"
emailserver = "192.168.2.5"
email = "{ smtp, pop3, imap, imap3, imaps, pop3s }"

rdr on $ext_if proto tcp to $ext_if port $webports -> $webserver
rdr on $ext_if proto tcp to $ext_if port $email -> $emailserver

pass proto tcp to $webserver port $webports
pass proto tcp to $emailserver port $email
pass proto tcp from $emailserver to any port smtp
DMZ with NAT
With an all-NAT setup, the pool of available addresses to allocate for a DMZ is likely to be larger than in our previous example, but the same principles apply. When you move the servers off to a physically separate network, you’ll need to check that your rule set’s macro definitions are sane and adjust the values if necessary.
Just as in the routable-addresses case, it might be useful to tighten up your rule set by editing your pass rules so the traffic to and from your servers is allowed to pass on only the interfaces that are actually relevant to the services:
pass in on $ext_if inet proto tcp to $ext_if port $webports rdr-to $webserver
pass in on $int_if inet proto tcp from $localnet to $webserver port $webports
pass out on $dmz_if proto tcp to $webserver port $webports
pass in log on $ext_if inet proto tcp to $ext_if port $email rdr-to $mailserver
pass in log on $int_if proto tcp from $localnet to $mailserver port $email
pass out log on $dmz_if proto tcp to $mailserver port smtp
pass in on $dmz_if from $mailserver to port smtp
pass out log on $ext_if proto tcp from $mailserver to port smtp
The version for pre–OpenBSD 4.7 PF differs in some details, with the redirection still in separate rules:
pass in on $ext_if proto tcp to $webserver port $webports
pass in on $int_if proto tcp from $localnet to $webserver port $webports
pass out on $dmz_if proto tcp to $webserver port $webports
pass in log on $ext_if proto tcp to $mailserver port smtp
pass in log on $int_if proto tcp from $localnet to $mailserver port $email
pass out log on $dmz_if proto tcp to $mailserver port smtp
pass in on $dmz_if from $mailserver to port smtp
pass out log on $ext_if proto tcp from $mailserver to port smtp
You could create specific pass rules that reference your local network interface, but if you leave the existing pass rules intact, they’ll continue to work.
Redirection for Load Balancing
The redirection-based load-balancing rules from the previous example work equally well in a NAT regime, where the public address is the gateway’s external interface and the redirection addresses are in a private range.
Here’s the webpool definition:
table <webpool> persist { 192.168.2.7, 192.168.2.8, 192.168.2.9, 192.168.2.10 }The main difference between the routable-address case and the NAT version is that after you’ve added the webpool definition, you edit the existing pass rule with redirection, which then becomes this:
pass in on $ext_if inet proto tcp to $ext_if port $webports rdr-to <webpool> round-robin
Or for pre–OpenBSD 4.7 PF versions, use this:
rdr on $ext_if proto tcp to $ext_if port $webports -> <webpool> round-robin
From that point on, your NATed DMZ behaves much like the one with official, routable addresses.
Note
You can configure a valid IPv6 setup to coexist with a NATed IPv4 setup like this one, but if you choose to do so, be sure to treat inet and inet6 traffic separately in your PF rules. And contrary to popular belief, rules with nat-to and rdr-to options work in IPv6 configurations the same as in IPv4.
Back to the Single NATed Network
It may surprise you to hear that there are cases where setting up a small network is more difficult than working with a large one. For example, returning to the situation where the servers are on the same physical network as the clients, the basic NATed configuration works very well—up to a point. In fact, everything works brilliantly as long as all you’re interested in is getting traffic from hosts outside your local network to reach your servers.
Here’s the full configuration:
ext_if = "re0" # macro for external interface - use tun0 or pppoe0 for PPPoE
int_if = "re1" # macro for internal interface
localnet = $int_if:network
# for ftp-proxy
proxy = "127.0.0.1"
icmp_types = "{ echoreq, unreach }"
client_out = "{ ssh, domain, pop3, auth, nntp, http, https,
                446, cvspserver, 2628, 5999, 8000, 8080 }"
udp_services = "{ domain, ntp }"
webserver = "192.168.2.7"
webports = "{ http, https }"
emailserver = "192.168.2.5"
email = "{ smtp, pop3, imap, imap3, imaps, pop3s }"
# NAT: ext_if IP address could be dynamic, hence ($ext_if)
match out on $ext_if from $localnet nat-to ($ext_if)
block all
# for ftp-proxy: Remember to put the following line, uncommented, in your
# /etc/rc.conf.local to enable ftp-proxy:
# ftpproxy_flags=""
anchor "ftp-proxy/*"
pass in quick proto tcp to port ftp rdr-to $proxy port 8021
pass out proto tcp from $proxy to port ftp
pass quick inet proto { tcp, udp } to port $udp_services
pass proto tcp to port $client_out
# allow out the default range for traceroute(8):
# "base+nhops*nqueries-1" (33434+64*3-1)
pass out on $ext_if inet proto udp to port 33433 >< 33626 keep state
# make sure icmp passes unfettered
pass inet proto icmp icmp-type $icmp_types from $localnet
pass inet proto icmp icmp-type $icmp_types to $ext_if
pass in on $ext_if inet proto tcp to $ext_if port $webports rdr-to $webserver
pass in on $ext_if inet proto tcp to $ext_if port $email rdr-to $mailserver
pass on $int_if inet proto tcp to $webserver port $webports
pass on $int_if inet proto tcp to $mailserver port $email
The last four rules here are the ones that interest us the most. If you try to reach the services on the official address from hosts in your own network, you’ll soon see that the requests for the redirected services from machines in your local network most likely never reach the external interface. This is because all the redirection and translation happens on the external interface. The gateway receives the packets from your local network on the internal interface, with the destination address set to the external interface’s address. The gateway recognizes the address as one of its own and tries to handle the request as if it were directed at a local service; as a consequence, the redirections don’t quite work from the inside.
The equivalent part to those last four lines of the preceding rule set for pre–OpenBSD 4.7 systems looks like this:
rdr on $ext_if proto tcp to $ext_if port $webports -> $webserver
rdr on $ext_if proto tcp to $ext_if port $email -> $emailserver

pass proto tcp to $webserver port $webports
pass proto tcp to $emailserver port $email
pass proto tcp from $emailserver to any port smtp
Fortunately, several work-arounds for this particular problem are possible. The problem is common enough that the PF User Guide lists four different solutions to the problem,[28] including moving your servers to a DMZ, as described earlier. Because this is a PF book, we’ll concentrate on a PF-based solution (actually a pretty terrible work-around), which consists of treating the local network as a special case for our redirection and NAT rules.
We need to intercept the network packets originating in the local network and handle those connections correctly, making sure that any return traffic is directed to the communication partner who actually originated the connection. This means that in order for the redirections to work as expected from the local network, we need to add special-case redirection rules that mirror the ones designed to handle requests from the outside. First, here are the pass rules with redirections for OpenBSD 4.7 and newer:
pass in on $ext_if inet proto tcp to $ext_if port $webports rdr-to $webserver
pass in on $ext_if inet proto tcp to $ext_if port $email rdr-to $mailserver
pass in log on $int_if inet proto tcp from $int_if:network to $ext_if
port $webports rdr-to $webserver
pass in log on $int_if inet proto tcp from $int_if:network to $ext_if
port $email rdr-to $mailserver
match out log on $int_if proto tcp from $int_if:network to $webserver
port $webports nat-to $int_if
pass on $int_if inet proto tcp to $webserver port $webports
match out log on $int_if proto tcp from $int_if:network to $mailserver
port $email nat-to $int_if
pass on $int_if inet proto tcp to $mailserver port $email
The first two rules are identical to the original ones. The next two intercept the traffic from the local network, and the rdr-to actions in both rewrite the destination address, much as the corresponding rules do for the traffic that originates elsewhere. The pass on $int_if rules serve the same purpose as in the earlier version.
The match rules with nat-to are there as a routing work-around. Without them, the webserver and mailserver hosts would route return traffic for the redirected connections directly back to the hosts in the local network, where the traffic wouldn’t match any outgoing connection. With the nat-to in place, the servers consider the gateway as the source of the traffic and will direct return traffic back the same path it came originally. The gateway matches the return traffic to the states created by connections from the clients in the local network and applies the appropriate actions to return the traffic to the correct clients.
The equivalent rules for pre–OpenBSD 4.7 versions are at first sight a bit more confusing, but the end result is the same.
rdr on $int_if proto tcp from $localnet to $ext_if port $webports -> $webserver
rdr on $int_if proto tcp from $localnet to $ext_if port $email -> $emailserver
no nat on $int_if proto tcp from $int_if to $localnet
nat on $int_if proto tcp from $localnet to $webserver port $webports -> $int_if
nat on $int_if proto tcp from $localnet to $emailserver port $email -> $int_if
This way, we twist the redirections and the address translation logic to do what we need, and we don’t need to touch the pass rules at all. (I’ve had the good fortune to witness via email and IRC the reactions of several network admins at the moment when the truth about this five-line reconfiguration sank in.)
Filtering on Interface Groups
Your network could have several subnets that may never need to interact with your local network except for some common services, like email, Web, file, and print. How you handle the traffic from and to such subnets depends on how your network is designed. One useful approach is to treat each less-privileged network as a separate local network attached to its own separate interface on a common filtering gateway and then to give it a rule set that allows only the desired direct interaction with the neighboring networks attached to the main gateway.
You can make your PF configuration more manageable and readable by grouping logically similar interfaces into interface groups and by applying filtering rules to the groups rather than the individual interfaces. Interface groups, as implemented via the ifconfig group option, originally appeared in OpenBSD 3.6 and have been adopted in FreeBSD 7.0 onward.
All configured network interfaces can be configured to belong to one or more groups. Some interfaces automatically belong to one of the default groups. For example, all IEEE 802.11 wireless network interfaces belong to the wlan group, while interfaces associated with the default routes belong to the egress group. Fortunately, an interface can be a member of several groups, and you can add interfaces to interface groups via the appropriate ifconfig command, as in this example:
# ifconfig sis2 group untrusted
For a permanent configuration, the equivalent under OpenBSD would be in the hostname.sis2 file or the ifconfig_sis2= line in the rc.conf file on FreeBSD 7.0 or later.
Where it makes sense, you can then treat the interface group much the same as you would handle a single interface in filtering rules:
pass in on untrusted to any port $webports
pass out on egress to any port $webports
If by now you’re thinking that in most, if not all, the rule-set examples up to this point, it would be possible to filter on the group egress instead of the macro $ext_if, you’ve grasped an important point. It could be a useful exercise to go through any existing rule sets you have and see what using interface groups can do to help readability even further. Remember that an interface group can have one or more members.
Note that filtering on interface groups makes it possible to write essentially hardware-independent rule sets. As long as your hostname.if files or ifconfig_if= lines put the interfaces in the correct groups, rule sets that consistently filter on interface groups will be fully portable between machines that may or may not have identical hardware configurations.
On systems where the interface group feature isn’t available, you may be able to achieve some of the same effects via creative use of macros, as follows:
untrusted = "{ ath0 ath1 wi0 ep0 }"
egress = "sk0"
The Power of Tags
In some networks, the decision of where a packet should be allowed to pass can’t be made to map easily to criteria like subnet and service. The fine-grained control the site’s policy demands could make the rule set complicated and potentially hard to maintain.
Fortunately, PF offers yet another mechanism for classification and filtering in the form of packet tagging. The useful way to implement packet tagging is to tag incoming packets that match a specific pass rule and then let the packets pass elsewhere based on which identifiers the packet is tagged with. In OpenBSD 4.6 and later, it’s even possible to have separate match rules that tag according to the match criteria, leaving decisions on passing, redirecting, or taking other actions to rules later in the rule set.
One example could be the wireless access points we set up in Chapter 4, which we could reasonably expect to inject traffic into the local network with an apparent source address equal to the access point’s $ext_if address. In that scenario, a useful addition to the rule set of a gateway with several of these access points might be the following (assuming, of course, that definitions of the wifi_allowed and wifi_ports macros fit the site’s requirements):
wifi = "{ 10.0.0.115, 10.0.0.125, 10.0.0.135, 10.0.0.145 }"
pass in on $int_if from $wifi to $wifi_allowed port $wifi_ports tag wifigood
pass out on $ext_if tagged wifigood
As the complexity of the rule set grows, consider using tag in incoming match and pass rules to make your rule set readable and easier to maintain.
Tags are sticky, and once a packet has been tagged by a matching rule, the tag stays, which means that a packet can have a tag even if it wasn’t applied by the last matching rule. However, a packet can have only one tag at any time. If a packet matches several rules that apply tags, the tag will be overwritten with a new one by each new matching tag rule.
For example, you could set several tags on incoming traffic via a set of match or pass rules, supplemented by a set of pass rules that determine where packets pass out based on the tags set on the incoming traffic.
The Bridging Firewall
An Ethernet bridge consists of two or more interfaces that are configured to forward Ethernet frames transparently and that aren’t directly visible to the upper layers, such as the TCP/IP stack. In a filtering context, the bridge configuration is often considered attractive because it means that the filtering can be performed on a machine that doesn’t have its own IP addresses. If the machine in question runs OpenBSD or a similarly capable operating system, it can still filter and redirect traffic.
The main advantage of such a setup is that attacking the firewall itself is more difficult.[29] The disadvantage is that all admin tasks must be performed at the firewall’s console, unless you configure a network interface that’s reachable via a secured network of some kind or even a serial console. It also follows that bridges with no IP address configured can’t be set as the gateway for a network and can’t run any services on the bridged interfaces. Rather, you can think of a bridge as an intelligent bulge on the network cable, which can filter and redirect.
A few general caveats apply to using firewalls implemented as bridges:
The interfaces are placed in promiscuous mode, which means that they’ll receive (and to some extent process) every packet on the network.
Bridges operate on the Ethernet level and, by default, forward all types of packets, not just TCP/IP.
The lack of IP addresses on the interfaces makes some of the more effective redundancy features, such as CARP, unavailable.
The method for configuring bridges differs among operating systems in some details. The following examples are very basic and don’t cover all possible wrinkles, but they should be enough to get you started.
Basic Bridge Setup on OpenBSD
The OpenBSD GENERIC kernel contains all the necessary code to configure bridges and filter on them. Unless you’ve compiled a custom kernel without the bridge code, the setup is quite straightforward.
Note
On OpenBSD 4.7 and newer, the brconfig command no longer exists. All bridge configuration and related functionality was merged into ifconfig for the OpenBSD 4.7 release. If you’re running on an OpenBSD release where brconfig is available, you’re running an out-of-date, unsupported configuration. Please upgrade to a more recent version as soon as feasible.
To set up a bridge with two interfaces on the command line, you first create the bridge device. The first device of a kind is conventionally given the sequence number 0, so we create the bridge0 device with the following command:
$ sudo ifconfig bridge0 createBefore the next ifconfig command, use ifconfig to check that the prospective member interfaces (in our case, ep0 and ep1) are up, but not assigned IP addresses. Next, configure the bridge by entering the following:
$ sudo ifconfig bridge0 add ep0 add ep1 blocknonip ep0 blocknonip ep1 upThe OpenBSD ifconfig command contains a fair bit of filtering code itself. In this example, we use the blocknonip option for each interface to block all non-IP traffic.
Note
The OpenBSD ifconfig command offers its own set of filtering options in addition to other configuration options. The bridge(4) and ifconfig(8) man pages provide further information. Because it operates on the Ethernet level, it’s possible to use ifconfig to specify filtering rules that let the bridge filter on MAC addresses. Using these filtering capabilities, it’s also possible to let the bridge tag packets for further processing in your PF rule set via the tagged keyword. For tagging purposes, a bridge with one member interface will do.
To make the configuration permanent, create or edit /etc/hostname.ep0 and enter the following line:
up
For the other interface, /etc/hostname.ep1 should contain the same line:
up
Finally, enter the bridge setup in /etc/hostname.bridge0:
add ep0 add ep1 blocknonip ep0 blocknonip ep1 up
Your bridge should now be up, and you can go on to create the PF filter rules.
Basic Bridge Setup on FreeBSD
For FreeBSD, the procedure is a little more involved than on OpenBSD. In order to be able to use bridging, your running kernel must include the if_bridge module. The default kernel configurations build this module, so under ordinary circumstances, you can go directly to creating the interface. To compile the bridge device into the kernel, add the following line in the kernel configuration file:
device if_bridge
You can also load the device at boot time by putting the following line in the /etc/loader.conf file.
if_bridge_load="YES"
Create the bridge by entering this:
$ sudo ifconfig bridge0 createCreating the bridge0 interface also creates a set of bridge-related sysctl values:
$ sudo sysctl net.link.bridge
net.link.bridge.ipfw: 0
net.link.bridge.pfil_member: 1
net.link.bridge.pfil_bridge: 1
net.link.bridge.ipfw_arp: 0
net.link.bridge.pfil_onlyip: 1
It’s worth checking that these sysctl values are available. If they are, it’s confirmation that the bridge has been enabled. If they’re not, go back and see what went wrong and why.
Note
These values apply to filtering on the bridge interface itself. You don’t need to touch them because IP-level filtering on the member interfaces (the ends of the pipe) is enabled by default.
Before the next ifconfig command, check that the prospective member interfaces (in our case, ep0 and ep1) are up but haven’t been assigned IP addresses. Then configure the bridge by entering this:
$ sudo ifconfig bridge0 addm ep0 addm ep1 upTo make the configuration permanent, add the following lines to /etc/ rc.conf:
ifconfig_ep0="up"
ifconfig_ep1="up"
cloned_interfaces="bridge0"
ifconfig_bridge0="addm ep0 addm ep1 up"
This means your bridge is up and you can go on to create the PF filter rules. See the if_bridge(4) man page for further FreeBSD-specific bridge information.
Basic Bridge Setup on NetBSD
On NetBSD, the default kernel configuration doesn’t have the filtering bridge support compiled in. You need to compile a custom kernel with the following option added to the kernel configuration file. Once you have the new kernel with the bridge code in place, the setup is straightforward.
options BRIDGE_IPF # bridge uses IP/IPv6 pfil hooks too
To create a bridge with two interfaces on the command line, first create the bridge0 device:
$ sudo ifconfig bridge0 createBefore the next brconfig command, use ifconfig to check that the prospective member interfaces (in our case, ep0 and ep1) are up but haven’t been assigned IP addresses. Then, configure the bridge by entering this:
$ sudo brconfig bridge0 add ep0 add ep1 upNext, enable the filtering on the bridge0 device:
$ sudo brconfig bridge0 ipfTo make the configuration permanent, create or edit /etc/ifconfig.ep0 and enter the following line:
up
For the other interface, /etc/ifconfig.ep1 should contain the same line:
up
Finally, enter the bridge setup in /etc/ifconfig.bridge0:
create
!add ep0 add ep1 up
Your bridge should now be up, and you can go on to create the PF filter rules. For further information, see the PF on NetBSD documentation at http://www.netbsd.org/Documentation/network/pf.html.
The Bridge Rule Set
Figure 5-3 shows the pf.conf file for a bulge-in-the-wire version of the baseline rule set we started in this chapter. As you can see, the network changes slightly.
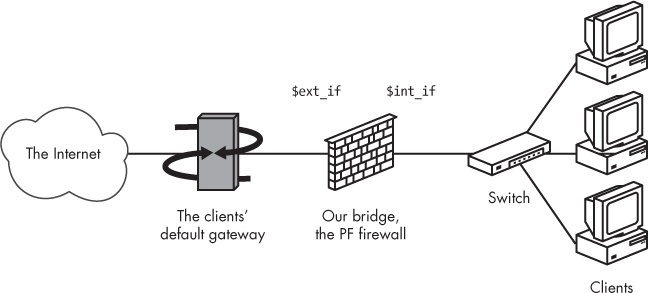
The machines in the local network share a common default gateway, which isn’t the bridge but could be placed either inside or outside the bridge.
ext_if = ep0
int_if = ep1
localnet= "192.0.2.0/24"
webserver = "192.0.2.227"
webports = "{ http, https }"
emailserver = "192.0.2.225"
email = "{ smtp, pop3, imap, imap3, imaps, pop3s }"
nameservers = "{ 192.0.2.221, 192.0.2.223 }"
client_out = "{ ssh, domain, pop3, auth, nntp, http, https,
                446, cvspserver, 2628, 5999, 8000, 8080 }"
udp_services = "{ domain, ntp }"
icmp_types = "{ echoreq, unreach }"
set skip on $int_if
block all
pass quick on $ext_if inet proto { tcp, udp } from $localnet
        to port $udp_services
pass log on $ext_if inet proto icmp all icmp-type $icmp_types
pass on $ext_if inet proto tcp from $localnet to port $client_out
pass on $ext_if inet proto { tcp, udp } to $nameservers port domain
pass on $ext_if proto tcp to $webserver port $webports
pass log on $ext_if proto tcp to $emailserver port $email
pass log on $ext_if proto tcp from $emailserver to port smtp
Significantly more complicated setups are possible. But remember that while redirections will work, you won’t be able to run services on any of the interfaces without IP addresses.
Handling Nonroutable IPv4 Addresses from Elsewhere
Even with a properly configured gateway to handle filtering and potentially NAT for your own network, you may find yourself in the unenviable position of needing to compensate for other people’s misconfigurations.
Establishing Global Rules
One depressingly common class of misconfigurations is the kind that lets traffic with nonroutable addresses out to the Internet. Traffic from nonroutable IPv4 addresses plays a part in several denial-of-service (DoS) attack techniques, so it’s worth considering explicitly blocking traffic from nonroutable addresses from entering your network. One possible solution is outlined here. For good measure, it also blocks any attempt to initiate contact to nonroutable addresses through the gateway’s external interface.
martians = "{ 127.0.0.0/8, 192.168.0.0/16, 172.16.0.0/12,
              10.0.0.0/8, 169.254.0.0/16, 192.0.2.0/24,
              0.0.0.0/8, 240.0.0.0/4 }"

block in quick on $ext_if from $martians to any
block out quick on $ext_if from any to $martians
Here, the martians macro denotes the RFC 1918 addresses and a few other ranges mandated by various RFCs not to be in circulation on the open Internet. Traffic to and from such addresses is quietly dropped on the gateway’s external interface.
Note
The martians macro could easily be implemented as a table instead, with all of the table advantages as an added bonus for your rule set. In fact, if you view the loaded rules in a rule set that contains this combination of macro and rules, you’ll see that macro expansion and rule-set optimization most likely replaced your list with one table per rule. However, if you roll your own table, you’ll get to pick a nicer name for it yourself.
The specific details of how to implement this kind of protection will vary according to your network configuration and may be part of a wider set of network security measures. Your network design might also dictate that you include or exclude address ranges other than these.
Restructuring Your Rule Set with Anchors
We’ve mentioned anchors a few times already, in the context of applications such as FTP-proxy or relayd that use anchors to interact with a running PF configuration. Anchors are named sub–rule sets where it’s possible to insert or remove rules as needed without reloading the whole rule set.
Once you have a rule set where an otherwise unused anchor is defined, you can even manipulate anchor contents from the command line using pfctl’s -a switch, like this:
echo "block drop all" | pfctl -a baddies -f -
Here, a rule is inserted into the existing anchor baddies, overwriting any previous content.
You can even load rules from a separate file into an anchor:
pfctl -a baddies -f /etc/anchor-baddies
Or you can list the current contents of an anchor:
pfctl -a baddies -s rules
Note
There are a few more pfctl options that you’ll find useful for handling anchors. See the pfctl man page for inspiration.
You can also split your configuration by putting the contents of anchors into separate files to be loaded at rule-set load time. That way it becomes possible to edit the rules in the anchors separately, reload the edited anchor, and, of course, do any other manipulation like the ones described above. To do this, first add a line like this to pf.conf:
anchor ssh-good load anchor ssh-good from "/etc/anchor-ssh-good"
This references the file /etc/anchor-ssh-good, which could look like this:
table <sshbuddies> file "/etc/sshbuddies"
     pass inet proto tcp from <sshbuddies> to any port ssh
Perhaps simply to make it possible to delegate the responsibility for the table sshbuddies to a junior admin, the anchor loads the table from the file /etc/sshbuddies, which could look like this:
192.168.103.84
10.11.12.13
This way, you can manipulate the contents of the anchor in the following ways: Add rules by editing the file and reloading the anchor, replace the rules by feeding other rules from the command line via standard input (as shown in the earlier example), or change the behavior of the rules inside the anchor by manipulating the contents of the table they reference.
Note
For more extensive anchors, like the ones discussed in the following paragraphs, it’s probably more useful to use include clauses in your pf.conf if you want to maintain the anchors as separate files.
The concept hinted at previously (specifying a set of common criteria that apply to all actions within an anchor) is appealing in situations where your configuration is large enough to need a few extra structuring aids. For example, “on interface” could be a useful common criterion for traffic arriving on a specific interface because that traffic tends to have certain similarities. For example, look at the following:
anchor "dmz" on $dmz_if {
    pass in proto { tcp udp } to $nameservers port domain
    pass in proto tcp to $webservers port { www https }
    pass in proto tcp to $mailserver port smtp
    pass in log (all, to pflog1) in proto tcp from $mailserver
                 to any port smtp
}
A separate anchor ext would serve the egress interface group:
anchor ext on egress {
    match out proto tcp to port { www https } set queue (qweb, qpri) set prio (5,6)
    match out proto { tcp udp } to port domain set queue (qdns, qpri) set prio (6,7)
    match out proto icmp set queue (q_dns, q_pri) set prio (7,6)
    pass in log proto tcp to port smtp rdr-to 127.0.0.1 port spamd queue spamd
    pass in log proto tcp from <nospamd> to port smtp
    pass in log proto tcp from <spamd-white> to port smtp
    pass out log proto tcp to port smtp
    pass log (all) proto { tcp, udp } to port ssh keep state (max-src-conn 15,
        max-src-conn-rate 7/3, overload <bruteforce> flush global)
}
Another obvious logical optimization if you group rules in anchors based on interface affinity is to lump in tags to help policy-routing decisions. A simple but effective example could look like this:
anchor "dmz" on $dmz_if {
    pass in proto { tcp udp } to $nameservers port domain tag GOOD
    pass in proto tcp to $webservers port { www https } tag GOOD
    pass in proto tcp to $mailserver port smtp tag GOOD
    pass in log (all, to pflog1) in proto tcp from $mailserver
                 to any port smtp tag GOOD
    block log quick ! tagged GOOD
}
Even if the anchor examples here have all included a blocking decision inside the anchor, the decision to block or pass based on tag information doesn’t have to happen inside the anchor.
After this whirlwind tour of anchors as a structuring tool, it may be tempting to try to convert your entire rule set to an anchors-based structure. If you try to do so, you’ll probably find ways to make the internal logic clearer. But don’t be surprised if certain rules need to be global, outside of anchors tied to common criteria. And you’ll almost certainly find that what turns out to be useful in your environment is at least a little different from what inspired the scenarios I’ve presented here.
How Complicated Is Your Network?—Revisited
Early on in this chapter, we posed the questions “How complicated is your network?” and “How complicated does it need to be?” Over the subsections of this chapter, we’ve presented a number of tools and techniques that make it possible to build complex infrastructure with PF and related tools and that help manage that complexity while keeping the network administrator sane.
If you’re in charge of one site where you need to apply all or most of the techniques we’ve mentioned in this chapter, I feel your pain. On the other hand, if you’re in charge of a network that diverse, the subsequent chapters on traffic shaping and managing resource availability are likely to be useful to you as well.
The rest of this book deals mainly with optimizing your setup for performance and resource availability, with the exception of one chapter where we deviate slightly and take on a lighter tone. Before we dive into how to optimize performance and ensure high availability, it’s time to take a look at how to make your infrastructure unavailable or hard to reach for selected groups or individuals. The next chapter deals exclusively with making life harder for the unwashed masses—or perhaps even well-organized criminals—who try to abuse services in your care.
[25] In fact, the example.com network here lives in the 192.0.2.0/24 block, which is reserved in RFC 3330 for example and documentation use. We use this address range mainly to differentiate from the NAT examples elsewhere in this book, which use addresses in the “private” RFC 1918 address space.
[26] Originally introduced in OpenBSD 4.1 under the name hoststated, the daemon has seen active development (mainly by Reyk Floeter and Pierre-Yves Ritschard) over several years, including a few important changes to the configuration syntax, and it was renamed relayd in time for the OpenBSD 4.3 release.
[27] See the OpenSSL man page for further explanation of cipher-related options.
[28] See the “Redirection and Reflection” section in the PF User Guide (http://www.openbsd.org/faq/pf/rdr.html#reflect).
[29] How much security this actually adds is a matter of occasional heated debate on mailing lists such as openbsd-misc and other networking-oriented lists. Reading up on the pros and cons as perceived by core OpenBSD developers can be entertaining as well as enlightening.