Where Is the Custom Control Stored on the Memory Card?
If you take the time to look at the contents of your camera’s memory card on your computer once you’ve saved a Custom Picture Control, you’ll find a new folder called NIKON with a subfolder called CUSTOMPC. This folder contains any Custom Picture Controls you might have saved, each with a filename ending in “.NCP.” For instance, the STANDARD-EX4 Custom Picture Control we saved to the memory card in destination 03 is saved to the memory card as PICCON03.NCP in the CUSTOMPC subfolder. If I had used the first destination location (01), the filename would have been PICCON01.NCP. Therefore, you should realize that the memory card destination locations 01–99 are actually individual files in the CUSTOMPC folder, with a range of file names from PICCON01.NCP to PICCON99.NCP. Now you can access the saved custom controls for sharing or for backup to your computer.

Figure 3.16A – Choosing a Color space
Here’s how to select your favorite Color space:
- 1. Choose Color space from the Photo Shooting Menu and scroll to the right (figure 3.16A, image 1).
- 2. Select the Color space setting that you want to use, keeping in mind that Adobe RGB has a larger color gamut (figure 3.16A, image 2). Adobe RGB is better for commercial printing and publication, whereas sRGB may be better for social media use, snapshots, home printing, and movies. Press the OK button to lock in your choice.
Now, let’s look a little more deeply into how Color space works.
Which Color Space Is Best Technically?
There is a large color space used by the graphics industry called CIELAB, which approximates human vision (figure 3.16B). Adobe RGB covers about 50 percent of the CIELAB color space, whereas sRGB uses only 35 percent. In other words, Adobe RGB has a wider gamut. That means Adobe RGB gives your images access to significantly higher levels of color, especially cyans and greens.

Figure 3.16B – Color space graphs
Another important consideration for those who will be sending their work to companies that use offset printing—such as book and magazine publishers—is that Adobe RGB maps very well to the CMYK offset printing process. If you are shooting commercial work, you may want to seriously consider Adobe RGB. Stock photo shooters are nearly always required to shoot in Adobe RGB.
Once a JPEG file is created, in-camera or in-computer, the color gamut for both Adobe RGB and sRGB is compressed into the same number of color levels. A JPEG has only 256 levels for each of its red, green, and blue (RGB) channels. However, since Adobe RGB takes its colors from a wider spectrum, you will have a better representation of reality when there are lots of colors in your image.
Of course, when shooting in NEF (RAW), the Color space setting is just a convenience for initial display in your computer before the RAW file is converted to another format, such as JPEG. A RAW file’s Color space can be changed after the fact to Adobe RGB, sRGB, or another Color space if one is available in your RAW conversion software.
To simplify your RAW workflow, you still may want to consider using Adobe RGB so that you don’t have to add Color space conversion to the tasks you must perform for RAW conversion. If you’re a commercial shooter, just leave your camera set to Adobe RGB for convenience. Again, It really doesn’t matter when you are shooting in NEF (RAW) format because the Color space can easily be changed after the fact in post-processing, with no damage to the image. If you are a RAW shooter and regularly post-process your images, you should consider using Adobe RGB, just for convenience.
There are some drawbacks to using Adobe RGB, though. The sRGB color space is widely used in printing and display devices. Even many local labs print using sRGB because so many point-and-shoot digital camera users bring their pictures to them in that format. If you try to print directly to some ink-jet printers using the Adobe RGB color space, the colors may not be as brilliant as with sRGB because many ink-jets are designed for home printing and sRGB. For Internet usage, such as for posting images on social media, sRGB is the expected norm and may make more saturated-looking JPEG images on most computer monitors and smart devices.
For JPEG or TIFF shooters, it is much more critical that the best Color space setting is used because once the image is made, the Color space cannot be changed. Yes, you can modify and resave a JPEG file, changing its color balance somewhat, but that lowers the quality of a JPEG image from recompression losses, and it is hard to get a good color balance when major changes of that type are made. If you are shooting JPEG, get it exactly right when you take the picture and your images will be much better. JPEGs are not really designed for heavy post-processing—they should be considered a final product. If you really want to modify your images after the fact, learn how to process RAW files instead.
If you are shooting JPEG images for money, such as for stock images, or magazine and book printing, most places expect that you’ll be using Adobe RGB. It has a wider gamut of colors, so it’s the quality standard for commercial printing.
Technical Note: If you print to devices that do not support color management, use ExifPrint, or print directly on some household printers or at superstore kiosk printers, the print’s colors may not be as vivid when using Adobe RGB. JPEG pictures taken in Adobe RGB color space are DCF compliant. Applications and devices that support the DCF protocol will select the correct color space automatically. If you shoot in TIFF, the camera will imbed an ICC color profile when you shoot in Adobe RGB. Applications and devices that support color management will automatically select the correct color space setting when using the TIFF file. It is a good idea to familiarize yourself with the capabilities of the device you are about to use so you can determine its color space capabilities. Nikon View NX 2, Nikon Capture NX-D, and Nikon automatically select the correct color space when opening your pictures.
Settings Recommendation: I use Adobe RGB most of the time because I shoot a lot of nature with a wide range of color and I don’t want to change Color spaces later on in final RAW to JPEG conversion. I want color that’s as accurate as my camera will give me. Adobe RGB has a wider range of colors, so it can be more accurate when a wide range of colors is present in your subject. If you are shooting Optimal quality JPEGs (JPEGs with a star) for commercial purposes, I would still carefully consider using Adobe RGB. Even with a JPEG’s limited color capacity, the colors in the JPEG represent a broader range of color when you use Adobe RGB. However, if you are just shooting JPEG snapshots or movies, there is no need to worry about this. Leave the camera set to sRGB and have fun.
Active D-Lighting
(User’s Manual: Page 286, Menu Guide: Page 53)
Active D-Lighting is used to help control contrast in your images. Often, the range of light around the subject is broader than your camera’s sensor can capture fully.
Although the D500 has excellent dynamic range, it is still possible for the range of light in some situations to exceed the range of the sensor’s light-capturing capability. Or, you may just want to have less image contrast.
The D500 allows you to “D-Light” the image and bring out additional shadow detail, or in other words, lower the image contrast. This extends the dynamic range by opening up the shadows and protecting the highlights. One of the downsides of using Active D-Lighting could be additional noise in shadow details. The D500 has excellent noise control, though, so this is less of a problem than with other cameras.
Active D-Lighting has these six levels:
- A Auto
- H* Extra High
- H High
- N Normal
- L Low
- Off (no Active D-Lighting)

Figure 3.17A – Choosing an Active D-Lighting level
Here are the steps to select an Active D-Lighting level:
- 1. Choose Active D-Lighting from the Photo Shooting Menu and scroll to the right (figure 3.17A, image 1).
- 2. Select one of the Active D-Lighting levels (figure 3.17A, image 2) and press the OK button to save your setting. Refer to figure 3.17C to see how each level affects the image.
Additionally, you can open the Active D-Lighting menu without using the Photo Shooting Menu directly. Instead, you can press the i button and select it from the Quick Menu screen (figure 3.17B).

Figure 3.17B – Opening Active D-Lighting from the Quick Menu screen
Use these steps to change Active D-Lighting quickly:
- 1. Press the i button once (figure 3.17B, image 1), which will cause the Quick Menu screen to appear.
- 2. Scroll to the Active D-Lighting position and scroll to the right (figure 3.17B, image 2).
- 3. The Active D-Lighting screen will now appear, allowing you to change quickly to a different level (figure 3.17B, image 3).
Now let’s take a look at how Active D-Lighting affects a series of images (figure 3.17C).

Figure 3.17C – Active D-Lighting samples
Basically, Active D-Lighting will help bring out detail in areas of your image that are hidden in shadow due to excessive image contrast. It also tends to protect the highlights from blowing out, or becoming pure white with no detail. Figure 3.17C shows a series of six images with Active D-Lighting set to its various levels. I chose a rosebush scene with heavy shadow and bright highlights (heavy contrast) to see how these six levels performed.
Notice how the Active D-lighting system tends to progressively open the shadows and reign in the highlights. It lowers the overall contrast of the image. At the H* Extra high level, the colors may change a little and you may have a slight HDR (high dynamic range) look, with lower shadow-to-highlight contrast.
Settings Recommendation: You should experiment with the Active D-Lighting settings to see which you like best. Active D-Lighting has the effect of lowering contrast, and some people do not like low-contrast images. Also, whenever you recover lost detail from shadows, there may be extra noise in the recovered areas.
This function can be useful for JPEG shooters in particular. Since you shouldn’t modify a JPEG file after shooting it, it’s important that the image is created exactly right in the first place. When you are shooting in a high-contrast setting, such as in direct sunlight, some degree of Active D-Lighting may help rein in the contrast.
Honestly, before my Nikon D800 and now my D500, I didn’t use Active D-Lighting very often because it added noise in the darker areas it opened up. Things have changed with the D800/D810/D750/D500 line. I have determined that Active D-Lighting doesn’t seem to make as much noise as with previous Nikons. I am quite impressed with the intelligence of the camera, and when I must get a good shot, such as at a wedding ceremony, I am now more open to setting Active D-Lighting to Auto. It has the added benefit of reining in the highlights, too, so I keep more detail in a bride’s dress, which can be hard to do when shooting with flash in a lowlight room.
Experiment with this by shooting images in a high-contrast and a low-contrast setting at all the various levels of Active D-Lighting. You’ll see how the camera reacts and you can better decide how you’ll use this functionality.
Long Exposure NR
(User’s Manual: Page 286, Menu Guide: Page 53)
Long exposure NR (noise reduction) is designed to combat visual noise in long exposures. Long-exposure noise is a little different from grainy-looking high-ISO sensitivity noise due to its cause. Nikon says long-exposure noise appears as “bright spots, randomly spaced bright pixels, or fog.” Why does this happen? During longer exposures, the imaging sensor can start to warm up a little, especially in warm ambient temperatures. This causes a condition called amp noise, in which warmer sections of the imaging sensor start to display more foggy noise than other sections.
Additionally, when pixels are left turned on for a longer period of time, a few of them may become brighter than normal and record an improper color, often bright red. Those off-color, hot pixels should be removed by the camera. Long exposure NR does just that.
Long-exposure noise is best handled by this Long exposure NR function, whereas high-ISO noise is well handled by High ISO NR (see the next section). Sometimes, when you are shooting long exposures at higher ISO settings, both may be needed!
Nikon warns that images taken at shutter speeds longer than 1 second without Long Exposure NR may exhibit more long-exposure noise than is acceptable for normal images. There are two settings for Long exposure NR, as shown in figure 3.18A.
- On: When you select On and the exposure goes over 1 second, the camera will take two exposures with the exact same time for each. The first exposure is the normal picture-taking exposure. The second is a dark-frame subtraction exposure, in which a second exposure is made for the same length of time as the first one but with the shutter closed. The noise (hot pixels and fog) in the dark frame image is examined and then subtracted from the original image. It is really quite effective and beats having to blur the image to get rid of noise. I’ve taken exposures of around 30 seconds and had perfectly usable results. The only drawback is that the exposure time is doubled because two exposures are made. The dark frame exposure is not written to the memory card, so you’ll have only one image, with much less noise, in the end. While the dark frame image is being processed, the words Job nr will blink on camera displays. During this second exposure, while Job nr is flashing, you cannot use the camera. If you turn it off while Job nr is flashing, the camera still keeps the first image; it just doesn’t do any noise reduction on it. If Long exposure NR is set to On, the frame advance rate may slow down a little in Continuous release mode, and the capacity of the in-camera memory buffer will drop while the image is being processed.
- Off: If you select Off, then, of course, you will have no long exposure noise reduction with exposures longer than 1 second.

Figure 3.18A – Choosing a Long exposure NR setting
Here are the steps to choose a Long exposure NR setting:
- 1. Choose Long exposure NR from the Photo Shooting Menu and scroll to the right (figure 3.18A, image 1).
- 2. Select either On or Off (figure 3.18A, image 2) and press the OK button to save your setting.
You can also open the Long exposure NR menu by pressing the i button and selecting Long Exposure NR from near the end of the menu.

Figure 3.18B – Opening Long exposure NR from the i button menu
Use these steps to change Long exposure NR quickly with the i button menu:
- 1. Press the i button once (figure 3.18B, image 1). This will cause the Quick Menu screen to appear (figure 3.18B, image 2). Scroll to the Long exposure NR position and press the OK button.
- 2. The Long exposure NR screen will now appear, allowing you to turn it On or Off (figure 3.18B, image 3) by highlighting your choice and pressing the OK button.
Settings Recommendation: I like the benefits of Long exposure NR. I shoot a lot of waterfall and stream shots where I often need exposures of several seconds to really blur the water. Also, I like to take midnight shots of the sky and shots of city scenes at night. Even though it may slow down the frame rate slightly and allow me fewer images in the in-camera memory buffer for burst shooting, I still use it most of the time.
If I were a sports or action shooter using Continuous release mode, I might leave Long exposure NR turned Off. It’s unlikely I would be using exposures longer than 1 second, and I would want maximum frames per second as well as the ability to cram as many images into the camera buffer as possible. I wouldn’t want my camera to slow down while writing images to the memory card.
Your style of shooting will govern whether this function is useful to you. Ask yourself one simple question: “Do I often shoot exposures longer than one second?” If so, you may want Long exposure NR set to On. Compare how the images look with and without it. I think you’ll like Long exposure NR.
Pixel Problems
What’s the difference in a stuck pixel, a hot pixel, and a dead pixel on the camera’s imaging sensor? Pixel problems are often discussed on the Internet because they damage an otherwise pristine image. Let’s briefly consider the three problem pixels.
- Stuck Pixel: This type of pixel is receiving power from the camera, so it is not a dead pixel. However, the pixel has lost its mind, in a sense, and ignores the actual shades it should be recording. The pixel will display in one color that does not change from picture to picture. The most common color seems to be red, although you might see another color. The key is that a stuck pixel is stuck on one color all the time, and that color does not match the surrounding pixels that are reporting correct color shades. It is always present in the image in the same spot and does not disappear.
- Hot Pixel: This pixel problem is very common. Even the most expensive cameras suffer from them—even brand-new cameras! They come and go from various places and can have almost any color; although, again, the ones I see are usually red (maybe because that’s the most noticeable color). These off-color pixels are caused by heat in the sensor and sometimes even from high-ISO settings (above ISO 800). Camera manufacturers try to map out pixels that tend to become hot pixels before the camera leaves the factory. However, due to the variability of where they are located at different levels of heat and ISO settings, it is impossible to map them out fully. This type of pixel is often removed by the camera’s two noise reduction functions: Long exposure NR and High ISO NR, with Long Exposure NR being the most effective.
- Dead Pixel: A dead pixel is a defective pixel on the camera’s sensor. It is not receiving power, or it is no longer able to function when power is applied. It could appear as a tiny dark spot in your image that does not change position from picture to picture. Or, it could appear as an off-color pixel due to Bayer-filter demosaicing errors. Normally, cameras come from the factory with all dead pixels mapped out. However, if a pixel dies over time, you will see evidence of the dead pixel once it is completely dead. Once a pixel dies, it usually stays nonfunctional.
High ISO NR
(User’s Manual: Page 286, Menu Guide: Page 54)
High ISO NR (High ISO Noise Reduction) lessens the effects of digital noise in your images when you use high ISO sensitivity (exposure gain) settings by using a blurring and resharpening method.
Nikon doesn’t specify the exact ISO level at which High ISO NR kicks in. I suspect that a small amount of noise reduction occurs at around ISO 400–800 and gradually increases as the ISO gets higher.
The D500 has better noise control than most cameras, so it can shoot up to ISO 1600 with little noise. However, no digital camera (that I know of) is completely without noise, so it’s a good idea to use some noise reduction above a certain ISO sensitivity.
If High ISO NR is turned Off, the camera still does a small amount of noise reduction— less than the Low setting. Therefore, at higher ISO settings there will always be some noise reduction.
You can control the amount of noise reduction by choosing one of the four High ISO NR settings: High, Normal, Low, or Off. Shoot some high-ISO exposures and decide for yourself which settings you are comfortable with.

Figure 3.19A – High ISO NR – Off to High correction samples
Figure 3.19A is a sample image of my 1940s Westclox Big Ben clock at ISO 51,200 with High ISO NR set to Off, Low, Normal, and High settings. The red rectangle in the little picture of the clock indicates the area that is shown in the four larger images. These images were shot with no flash of the dark subject at the camera’s highest normal ISO sensitivity setting. It is a worst-case noise scenario (other than the super Hi 0.3–5 ISOs above the normal range).
High ISO NR works by first blurring and then resharpening the image more and more as you increase the setting from Low to High. By blurring the image, the camera blends the grainy noise into the surroundings to make it less visible. Some mild resharpening is applied to restore image sharpness. This whole process tends to make the image lose a little detail at the highest noise reduction settings.
However, I am quite amazed at the high sharpness level of extremely high ISO levels, even at the High noise reduction setting. The noise (grain) pattern is better than many cameras I’ve used. This is one incredible DX camera!
Now let’s see how to enable the various High ISO NR levels.

Figure 3.19B – Setting High ISO NR
Use the following steps to choose a High ISO NR setting:
- 1. Choose High ISO NR from the Photo Shooting Menu and scroll to the right (figure 3.19B, image 1).
- 2. Select one of the noise reduction levels: High, Normal, Low, or Off (figure 3.19B, image 2) and then press the OK button to save your setting.
The D500 also allows you to control the High ISO NR function by using the i button menu.

Figure 3.19C – Setting High ISO NR (alternate screens)
- 3. Press the i button (figure 3.19C, image 1)
- 4. Select High ISO NR from the end of the menu (last item), and press the OK button (figure 3.19C, image 2).
- 5. Select one of the noise reduction levels: High, Normal, Low, or Off (figure 3.19B, image 3) and then press the OK button to save your setting.
Settings Recommendation: I leave High ISO NR set to Low or Normal. I do want some noise reduction above ISO 1600. However, since any form of noise reduction blurs the image, I don’t go too far with it. I shoot RAW, so it really makes no difference because I can change everything later in the computer. If I were shooting JPEG, it would make a serious difference. Why not test a few images at high ISO sensitivity settings with High ISO NR turned On to see which setting you like? Remember that you can use a different choice for each Photo shooting menu bank setting (A–D) to configure your camera for different shooting styles.
What Is Noise?
Have you ever tried to listen to a high-fidelity sound system while children are playing in the same room? It seems like the louder you turn up the music, the louder the kids get. However loud the volume of the music player, the children laughing and running around degrades the pure sound you desire. There is a high child-to-music noise ratio that interferes with your enjoyment of your songs. After a while, you simply have to ask the kids to leave the room.
Noise in a digital image is somewhat similar. You want pure, clean images when you take pictures, but digital noise interferes with the clarity. The higher you turn the camera’s ISO sensitivity, the more digital noise degrades your image. The noise-to-signal ratio can damage the picture. How can you make the visual noise go away? Use High ISO NR, that’s how!
Vignette Control
(User’s Manual: Page 286, Menu Guide: Page 54)
Vignette control allows you to reduce the amount of vignetting (slight darkening) that many lenses have in the corners at wide-open apertures. The angle at which light strikes a sensor on its edges is greater than the angle at which rays go straight through the lens to the center areas of the sensor.
Because of the increased angle, some light falloff occurs at the extreme edges of the frame, especially at wide apertures, because more of the lens element is in use. Imaging sensors have microlenses over the photosites that help reduce vignetting, but it is still there in varying degrees with different lenses.
In recognition of this fact, Nikon has provided the Vignette control setting. It can reduce the vignetting effect to a large degree. If more vignette control is required, you can use Photoshop or Nikon Capture NX-D (or other software) to remove it.

Figure 3.20A – Vignette control choices
Figure 3.20A shows a sample of what the Vignette control can accomplish on its own. I shot four pictures of the sky with an AF-S Nikkor 50mm f/1.4G lens at f/1.4 (wide-open aperture). Each picture has more Vignette control applied, from Off to High.
Let’s see how to configure the Vignette control for edge light falloff reduction with your lenses.

Figure 3.20B – Vignette control range
Here are the steps to choose a Vignette control level for your D500:
- 1. Choose Vignette control from the Photo Shooting Menu and scroll to the right (figure 3.20B, image 1).
- 2. Select a level from the list; I chose Normal in figure 3.20B, image 2. Then press the OK button to lock in the level.
The Vignette control does not apply to the following:
- Movies
- Multiple exposures
Settings Recommendation: The camera defaulted to Normal from the factory, so I have been shooting most of my images with it set to Normal. I like this control. It does help remove vignetting in the corners when I shoot with the aperture wide open. I have not noticed any additional noise or image degradation in the corrected areas. I suggest leaving your camera set to Normal at all times unless you are shooting with a lens that has a greater tendency to vignette, in which case you can increase it to High. Even High does not seem to fully remove the vignetting when a lens is wide open, so this is not an aggressive algorithm that will leave white spots in the corners of your images. Why not shoot a few shots with your lenses at wide aperture and see how Vignette control works with your lens and camera combinations?
Remember, you can remove vignetting in the computer with post-processing software if the camera’s Vignette control setting does not entirely remove the problem.
Auto Distortion Control
(User’s Manual: Page 286, Menu Guide: Page 55)
Auto distortion control is designed to automatically reduce barrel and pincushion distortion in your images. It will try to keep lines straight but may crop the edges of your image in the process. This function may be best used by architectural photographers who are very concerned about keeping lines and edges straight, for obvious reasons.
The Auto distortion control is designed to be used with Nikkor G, E, and D lenses; not PC, fisheye, and aftermarket lenses, nor movies. Using the control may slow down the image processing functions of the camera as distortion is calculated and removed.
What is barrel and pincushion distortion?

Figure 3.21A – Extreme examples of barrel (left) and pincushion (right) distortion
Figure 3.21A shows a greatly exaggerated sample of the two distortion types. If you have a lens that does this, you might want to dispose of it, unless it is a fisheye or extreme wide angle, of course.
To prevent even mild cases of these two distortion types from ruining images that contain straight lines, you can use this control. Of course, if you are out shooting nature shots or portraits, it is unlikely that you will gain much benefit from this function. If you need automatic barrel and pincushion distortion control, you will already know it from previous work. Most of us will leave this turned off.

Figure 3.21B – Auto distortion control
Use these steps to enable or disable Auto distortion control:
- 1. Choose Auto distortion control from the Photo Shooting Menu and scroll to the right (figure 3.21B, image 1).
- 2. Select On or Off (figure 3.21B, image 2) and then press the OK button to save the setting.
Settings Recommendation: If you are a photographer who really needs this function, you will already know it. If you question whether it will benefit you, it probably won’t. I prefer to remove distortion in software on my computer because I am working with a much larger image and can more easily see what needs to be done. This is an automatic function in the D500 and, like most automatic functions, does great sometimes and has little benefit most of the time. However, this may be a handy function for times when you are out in the field shooting and you need some distortion correction immediately. Just watch out and allow for edge cropping as the camera removes the distortion it detects.
Flicker Reduction
(User’s Manual: Page 287, Menu Guide: Page 55)
Flicker reduction helps control the banding or flicker you may see when photographing under certain lighting types, such as fluorescent and mercury-vapor lighting. These types of lights do not output a constant stream of light. Instead, they rapidly pulse the light at a rate that is much faster than a human can normally detect. However, this flickering light can affect photographs and cause exposure problems.
The Nikon D500 has the ability to time the taking of a photograph to reduce the effects of this flickering. When you press the Shutter-release button under those types of lights, the camera will carefully fire the shutter during a full brightness pulse of the light, leading to better exposures.
The Flicker reduction function defaults to off, so the camera will not perform flicker reduction out of the box. The camera still warns you when it detects flickering light by flashing the word FLICKER in the bottom right of the Viewfinder. Therefore, even without Flicker reduction turned on, you will still receive the FLICKER warning when flickering light is detected, giving you the opportunity to enable Flicker reduction.
The frame rate can be affected when Flicker reduction is in place. If you rarely shoot important pictures under fluorescent or mercury-vapor lighting, you may want to ignore the function. If you are bothered by the FLICKER indicator in the Viewfinder, you can disable it.
Let’s see how to enable and disable Flicker reduction and also how to turn the FLICKER indicator on and off.

Figure 3.22A – Enabling or disabling Flicker reduction
Use these steps to enable or disable the Flicker reduction function:
- 1. Follow the screen flow shown in figure 3.22A, images 1 and 2 (Flicker reduction > Flicker reduction setting) until you arrive at the third screen in the series.
- 2. Choose Enable or Disable from the menu (figure 3.22A, image 3) and then press the OK button to save your selection.

Figure 3.22B – Enabling or disabling the FLICKER indicator
Use these steps to enable or disable the FLICKER reduction indicator in the Viewfinder:
- 1. Follow the screen flow shown in figure 3.22B, images 1 and 2 (Flicker reduction > Flicker reduction indicator) until you arrive at the third screen in the series.
- 2. Choose On or Off from the menu (figure 3.22B, image 3) and then press the OK button to save your selection.
In figure 3.22B, image 4, you can see the location of the FLICKER indicator in the view-finder—when it is enabled (On).
Settings Recommendation: I enable both Flicker reduction and its indicator because I often shoot events where there is fluorescent light (graduations and weddings). If you rarely shoot indoor events under flickering lighting, you could leave the actual function disabled and leave the Flicker reduction indicator active. That way, you will receive a warning when Flicker reduction may be helpful and can enable the function only when needed.
If you are primarily an outdoor sports shooter and photograph under natural light only, you can safely disable both functions. Doing so will ensure that you have the maximum shooting frame rate so that you can fill up the camera’s buffer with hundreds of variations of your moving images. Be careful, though, if you are shooting night sports under artificial lighting. Why not leave the Flicker reduction indicator active so that you receive a warning when it detects that those bright lights in the stadium are indeed mercury-vapor and are flickering?
Auto Bracketing Set
(User’s Manual: Page 287, Menu Guide: Page 56)
Auto bracketing set lets you choose how bracketing works for each of the camera’s bracketing methods. You can set up bracketing for the exposure system (AE), flash, White balance, and Active D-Lighting.
Let’s start by reviewing the five types of bracketing on the D500. I’ll explain how to use bracketing in an upcoming subsection:
- AE & flash: When you set up a session for bracketing, the camera will cause any type of normal pictures you take to be bracketed, whether they are standard exposures or you are using flash. See how to bracket in the next subsection.
- AE only: Your bracketing settings will affect only the exposure system and not the flash.
- Flash only: Your bracketing settings will affect only the flash system and not the exposure.
- WB bracketing: White balance bracketing works the same as exposure and flash bracketing, except it is designed for bracketing color in mired values, instead of bracketing light in EV step values. WB bracketing is not available with image quality settings of NEF (RAW) or NEF (RAW) + JPEG.
- ADL bracketing: In this case, you are bracketing Active D-Lighting (ADL) in up to five separate exposures. The next higher level of ADL is used on each selected exposure.
External Camera Controls for Bracketing
First let’s examine the controls used to set up your camera for all five bracketing methods.

Figure 3.23A – Controls for Auto bracketing: (1) BKT button, (2) Main command dial, (3) Sub-command dial
You’ll use the BKT button (1) and the Main command dial (2) or Sub-command dial (3) to change the bracketing values. Use figure 3.23A as an external control guide for the rest of this section.
Now let’s consider each of the bracketing methods that use the controls shown in figure 3.23A.
AE & Flash Bracketing (Includes AE Only and Flash Only)
Exposure bracketing (AE & flash) allows you to bracket a series of images using ambient light and/or a Speedlight flash unit. You can later combine these images into a high dynamic range (HDR) image with greater than normal dynamic range, as seen in figure 3.23B.

Figure 3.23B – Five-image bracket combined in Photomatix Pro to a single HDR image
In figure 3.23B you will find a sample five-image bracket with 1.0 EV step between each exposure. I combined the five images using Photomatix Pro software (http://www.hdrsoft.com) and was pleased with the final result. The main image was created with a bracketed series of five shots—the pictures underneath the main image—using the same settings shown on the Control panel in figure 3.23D, image 1, as discussed in step 4 of the bracketing step-by-step method.
AE & flash, AE only, and Flash only all use bracketing in exactly the same manner and are all considered in this one section.

Figure 3.23C – AE and flash bracketing (top three types in screen 2)
Here are the steps to configure AE and flash bracketing for results similar to what is seen in figure 3.23B:
- 1. Select Auto bracketing set from the Photo Shooting Menu and scroll to the right (figure 3.23C, image 1).
- 2. Choose AE & flash (or AE only, or Flash only) and press the OK button to lock in the setting (figure 3.23C, image 2).
- 3. Next, open the Information display by pressing and releasing the info button, and then press and hold the BKT button (figure 3.23A, image 1). Note: You can also see this same information on the Control panel on top. I am using the Information display in figure 3.23D to make the symbols in the graphics appear larger in the book for ease of viewing.

Figure 3.23D – Auto bracketing (AE & flash)
- 4. When you hold down the BKT button, you will see symbols on your camera’s Information display (and Control panel) similar to the ones shown in figure 3.23D. The symbols will initially be 0F and 1.0 at the top of the screen (if not previously changed), and there may be no lines hanging below the −/+ scale. You will set both of those values as you create the bracket. The number of shots in the bracket appears on the top center of the Information display (and Control panel), as shown in each screen in figure 3.23D as 5F, –2F, and +3F. You can shoot up to 9 frames (9F) in an AE & flash, AE only, or Flash only bracket. The number of small vertical lines hanging below the –...... 0 ......+ scale equals the number of shots in the bracket. The position of those lines represents the EV spread of the shots in the bracket. In figure 3.23D, image 1, for instance, you can count five lines hanging below the −/+ scale, and there is one stop of exposure between each line. Those five shots are represented by the 5F in image 1.
- 5. While holding the BKT button, turn the rear Main command dial (figure 3.23A, image 2) to select the number of shots in the bracket (up to 9). The number of shots can have a plus sign, minus sign, or no sign next to it (figure 3.23D). Select a number with a plus sign if you want the bracket to take only normal and overexposed shots. Select a number with a minus sign if you want the bracket to take only normal and underexposed shots. If you want the bracket to take exposures that are evenly distributed on both sides of the scale, select a number that has no plus or minus sign in front of it.
- 6. The front Sub-command dial (figure 3.23A, image 3) controls the EV steps between each exposure in the bracket. This value appears on the top right of each screen in figure 3.23D as 1.0, 0.3, and 0.3. While holding the BKT button, rotate the front Sub-command dial to select the EV step value between each image in the bracket, in steps of 1/3, 1/2, or 1 EV. (The EV step value is set in Custom Setting Menu > b Metering/exposure > b2 EV steps for exposure cntrl. You can use Custom Setting Menu > e Bracketing/flash > e7 Bracketing order to set the order of the exposures. We’ll discuss this in a later chapter in the section titled Custom Setting e7: Bracketing Order (page 292). The default order is normal > underexposed > overexposed. You can change it to underexposed > normal > overexposed if you’d like.) Following are detailed explanations of the values on images 1, 2, and 3 of figure 3.23D:
Figure 3.23D, image 1, shows a five-shot bracket on the camera’s Information display (and Control panel) with 1.0 EV step between each image. You can tell there are five shots by the 5F at the top center along with the number of lines hanging below the scale. The 1.0 means that there is 1.0 EV step (1 stop) between each exposure in the bracket. The fact that the 5F has no plus or minus sign in front of it tells us that the bracket uses exposures that are normal, overexposed, and underexposed.
Figure 3.23D, image 2, shows a two-image bracket with 0.3 EV steps (1/3 stop) between each exposure. Notice the minus sign before the 2F symbol (–2F). This means that the bracket is configured to take only normal and underexposed shots—no overexposed ones. The bracketed images are on the minus side of the –/+ scale.
Figure 3.23D, image 3, represents a three-image bracket with 0.3 EV steps between each exposure. The bracket is configured to take only normal and overexposed shots (+3F).
- 7. Once you have configured your bracket, press the Shutter-release button to take each bracketed picture in the series. As you take each image, one of the lines that hang down below the –/+ scale will disappear. When they are all gone, your bracket is complete. If you have your camera set to one of the Continuous release modes (CL or CH), you can shoot the number of frames in your bracket by holding down the Shutter-release button. Once the bracket is complete, the camera will stop firing.
Note about flash bracketing: If you are using a Speedlight flash unit to light the bracketed series, it may or may not be able to keep up with bracketed shots taken in Continuous-release mode. If you fully dump the flash power between shots, you’ll have to wait for the next shot. Here’s a short review:
- BKT button plus rear Main command dial = number of exposures
- BKT button plus front Sub-command dial = EV step value of bracketed exposures (1/3, 1/2, or 1 EV step)
Settings Recommendation: I normally bracket with a 1 EV step value (1 stop) so that I can get a good spread of light values in high dynamic range (HDR) images. In most cases, I will do a three- to five-image bracket, with one or two images overexposed and one or two images underexposed by 1 stop. This type of bracketing allows me to combine detail from the highlight and dark areas in-computer for the HDR exposures everyone is experimenting with these days.
WB Bracketing
The process for WB bracketing (white balance bracketing) is similar to the process for flash or exposure bracketing; you even use the same controls (figure 3.23A). No form of AE or flash bracketing will work during the time that Auto bracketing set is set to WB bracketing.
WB bracketing does not work when your camera is in NEF (RAW) and NEF (RAW) + JPEG modes, in fact, the bracketing controls will not even respond unless you are using a JPEG only mode. Why? Because White balance information is stored with the RAW image but is not directly applied to the image. You can change the White balance after the fact when you are shooting RAW, so bracketing a RAW image does not make sense.
Now let’s examine how to select WB bracketing, and then bracket the white balance.

Figure 3.23E – Auto bracketing set – WB bracketing
Here are the steps to configure WB bracketing:
- 1. Select Auto bracketing set from the Photo Shooting Menu and scroll to the right (figure 3.23E, image 1).
- 2. Choose WB bracketing (figure 3.23E, image 2) and press the OK button.

Figure 3.23F – WB bracketing (White balance)
- 3. You will use the controls shown in figure 3.23A to choose the number of shots in the bracket, examples of which are 3F, A3F, or B3F, as seen in figure 3.23F at the top of the Information display (and also on the top Control panel). Press and release the info button to open the Information display on the Monitor. Then press and hold the BKT button while turning the rear Main command dial left or right to select the number of shots, up to nine shots total (9F). In figure 3.23F, the 3F, A3F, and B3F symbols show the number of images (3), as do the lines hanging below the +/+ scale. Table 3.1 and step 4 describe what these mean.

Table 3.1 – Camera display symbols, number of shots, amber/blue changes, and bracketing order
- 4. You control the white balance color differences by bracketing toward amber or blue (A or B), using the symbols on the camera displays (Information display and Control panel), as described in Table 3.1. Each increment of color difference is called a mired and is controlled by the number at the top right of the display screens in figure 3.23F. Change the mired number by holding the BKT button while turning the front Sub-command dial left or right, up to three maximum. Each number represents multiple mired. Choose 1, 2, or 3, where 1=5 mired, 2=10 mired, and 3=15 mired. Figure 3.23F, image 1, shows a 5 mired difference (1), image 2 shows a 15 mired difference (3), and image 3 shows a 10 mired difference (2). Following are detailed explanations of the values on images 1, 2, and 3 of figure 3.23F:
Figure 3.23F, image 1, shows a three-image bracket on the camera’s Control panel, with a 5 mired difference (1) in color between each image. One has more amber, one is normal, and one has more blue (3F).
Figure 3.23F, image 2, shows a three-image bracket with a 15 mired difference (3) between each image, in the amber direction only (A3F).
Figure 3.23F, image 3, shows a three-image bracket with a 10 mired color difference (2) in the blue direction only (B3F). If you do not see an A (A3F) or B (B3F) in the image number position at top center, it simply means that the bracket goes in both directions, such as amber > normal > blue or normal > amber > blue, according to how you have Custom Setting Menu > e Bracketing/flash > e7 Bracketing order set.
- 5. Press the Shutter-release button to take the bracketed picture series. Interestingly, you do this by taking one picture. The camera takes that picture, reapplies the color filtration for each image in the bracket, and then saves each image as a separate image file with a new consecutive file number and bracketed color value. This works very differently from AE or flash bracketing, where you have to fire off each individual frame of the bracket. WB bracketing is very easy because you only have to set the bracket in the Control panel and take one picture. The series of images in the bracket (up to nine) simply appears on your memory card. Nikons are fun!
What Is Mired?
Changes to mired simply modify the color of your image, in this case toward amber (reddish) or blue. In effect, changing mired toward amber or blue warms or cools the image. The color changes are applied directly to the image by the camera when shooting JPEGs or are saved as markers when shooting RAW images. You don’t have to worry about mired values unless you are a color scientist.
You can just determine whether you like the image the way it is or would prefer that it be warmer or cooler and bracket accordingly. WB bracketing toward the A direction warms the image, whereas the B direction cools it. Technically, a mired is calculated by multiplying the inverse of the color temperature by 106.
I’d rather let my camera figure mired values and then judge them with my eye, wouldn’t you? Remember, if you shoot in RAW, you can modify color values later in your computer. Otherwise, they are applied permanently to JPEG files.
ADL Bracketing
ADL bracketing (ADL stands for Active D-Lighting) is designed to let you shoot a normal image and then a series of up to four additional images with Active D-Lighting applied to each at progressively higher levels.
As you set ADL bracketing from two to five shots, you are setting the camera to switch to a higher ADL level for each consecutive shot. The progressive levels are Off, L Low, N Normal, H High, and H* Extra High.

Figure 3.23G – Auto bracketing set – ADL bracketing
Here are the steps to use ADL bracketing:
- 1. Select Auto bracketing set from the Photo Shooting Menu and scroll to the right (figure 3.23G, image 1).
- 2. Choose ADL bracketing (figure 3.23G, image 2) and press the OK button.
- 3. Using the controls shown in figure 3.23A, hold down the BKT button and turn the rear Main command dial to select the number of frames you want in the bracket (two to five images). You’ll see ADL at the top of the Information display (AdL in the Control panel) and the number of frames in the bracket series at the top right (5F). Figure 3.23H shows a bracket of five frames (5F), which means that the camera will use all five available levels of Active D-Lighting (Off, L Low, N Normal, H High, and H* Extra high) as the five images are taken (Auto Active D-Lighting is ignored). On the Information display (figure 3.23H) you will see the Amount field, which shows the full progression of the ADL bracket (OFF L N H H*), which stands for Off (OFF), Low (L), Normal (N), High (H), and Extra high (H*). On the Control panel (not pictured), you’ll be able to see vertical hanging lines under the –/+ scale for each increment of the ADL bracket instead. Custom Setting Menu > e Bracketing/flash > e7 Bracketing order does not apply to ADL bracketing.
- 4. Press the Shutter-release button to take each shot in the bracketed series. As each shot is taken, you’ll see one of the vertical lines just under the −/+ scale disappear on the top Control panel (only). If you have your camera set to one of the Continuous-release modes (CL or CH), you can shoot the number of frames in your bracket by holding down the Shutter-release button. Once the bracket is complete, the camera will stop firing.

Figure 3.23H – ADL bracketing
Settings Recommendation: This is a great way to capture very important shots and try to get extra shadow detail and highlight protection in some of them. You may not need ADL bracketing on all shots, but on important images where you are slightly off on your exposure selection, ADL will help to open shadows and mildly protect the highlights.
Of course, if you shoot in RAW mode, you can apply ADL in-computer. I don’t bracket ADL very often, but I’m glad to know it’s there when I need it.
One final note about bracketing of any type: turn it off when you’re done! I often forget and then wonder why my camera keeps under- and overexposing a series of images. Only after wasting several images do I realize that I left bracketing turned on. You’ll see what I mean if you use AE & flash bracketing often, as I do.
Multiple Exposure
(User’s Manual: Page 287, Menu Guide: Page 56)
Multiple exposure is the process whereby you take more than one exposure on a single frame, or picture. Most of us will only do double exposures, which is two exposures on one frame.
Multiple exposure requires you to figure out the exposure values carefully for each exposure segment so that in the final picture, all the combined exposures equal one normal exposure. In other words, if you are going to create a nonmasked double exposure, your background will need two exposures at half the normal exposure value to equal one normal exposure.
The D500 allows us to figure out our own exposure settings and input them manually or gives us Overlay mode to help us with exposure calculations.
There are only four steps to setting up a Multiple-exposure session, but we must access several Photo Shooting Menu screens to perform these four steps. The steps are as follows:
- Select the number of shots you want to take from the Photo Shooting Menu screens.
- Select an Overlay mode to determine how you want to control exposure.
- Choose whether you are shooting one image or a series of images.
- Take the picture.

Figure 3.24A – Setting up Multiple exposure basics
Use the following steps to configure one or a series of multiple exposures (figure 3.24A):
- 1. Select Multiple exposure from the Photo Shooting Menu and scroll to the right (figure 3.24A, image 1).
- 2. Select Number of shots and scroll right (figure 3.24A, image 2).
- 3. Enter the number of shots you wish to take—any number between 2 and 10—and press the OK button (figure 3.24A, image 3).
- 4. Select Overlay mode and scroll right (figure 3.24A, image 4).
- 5. Select one of the Overlay modes (table 3.2) and press the OK button (figure 3.24A, image 5).

Table 3.2 – Overlay mode choices and descriptions
- 6. This brings you back to the Multiple exposure selection on the Photo Shooting Menu (figure 3.24A, image 6). At this point you must reenter the Multiple exposure system and choose whether you want one Multiple exposure or a series (figure 3.24B). Figure 3.24B continues where figure 3.24A stops. It shows the final step of choosing how many multiple exposure images you want to take in this session.

Figure 3.24B – Choosing one multiple exposure or a series of multiple exposures
- 7. Select Multiple exposure mode and scroll to the right (figure 3.24B, image 1).
- 8. Choose On (series) if you want to take more than one distinct Multiple exposure image or On (single photo) for just one Multiple exposure picture, and then press the OK button and your camera is ready to take the multiple exposure.
Once you’ve selected the number of shots (step 2), the camera remembers the value and comes back to it for the next session. To repeat another Multiple exposure series with the same settings, you’ll have to use the screens in figure 3.24B again. Start over with step 7 later. That prepares the camera to do the Multiple exposure series (or single photo) in the same way as last time. The camera remembers the previous settings until you reset them using the screens in figure 3.24A.
Note: You can assign the BKT button to allow you to select Multiple exposure settings with external camera controls (instead of bracketing). We will consider how in the chapter Custom Setting Menu, under the subheading f1 Custom control assignment on (page 294).
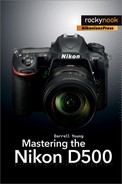
Figure 3.24C – Sample Multiple exposure images
Settings Recommendation: Multiple exposure images can be a lot of fun to create (figure 3.24C). I often shoot Multiple exposure images with two people in the frame. One person leaves after the first half of the exposure is taken, while the other stays carefully still. When finished, you will have a normal picture of one person and the background, but the person that left halfway through the Multiple exposure will be ghosted. That means you’ll be able to see the background right through her. It’s even more fun if you have the person that leaves touch the other person during the first half of the Multiple exposure. Maybe have her put a hand on the other person’s shoulder or wrap her arms around him.
If the person who stays for the entire exposure is very careful not to move at all, she will remain sharp and the image will certainly raise eyebrows later.
You can also do this with just one person, as the second picture in figure 3.24C shows. Just make sure she leaves halfway through the Multiple exposure.
HDR (High Dynamic Range)
(User’s Manual: Page 287, Menu Guide: Page 57)
HDR (high dynamic range) asks the camera to combine two JPEG or TIFF exposures into a single image. It is not available in NEF (RAW) modes.
HDR combines details from an underexposed shot and an overexposed shot into one good, normally exposed picture with much greater dynamic range than normal. In figure 3.25A, you can see a sample, with the two images on the left combined, in-camera, to create the third image.

Figure 3.25A – HDR combination sample
HDR (high dynamic range) in the D500 is a form of simple bracketing that allows you to create an HDR image without setting up a bracketing series using the BKT button. There are three settings under HDR (high dynamic range):
- HDR mode: This setting has three options: On (series), On (single photo), and Off. When On (series) is selected, the camera will keep shooting its two-image HDR brackets until you set HDR mode to Off. When On (single photo) is chosen, the camera will take a single HDR bracket for one image. Off means the camera does not create an HDR image.
- Exposure differential: You can choose how many stops (EV) there will be between the two images that are later combined. The choices are 1 EV, 2 EV, 3 EV, and Auto. Use 1, 2, or 3 EV when you want to make the decision; choose Auto when you want to let the camera decide. If you control the amount of Exposure differential, be careful to choose only what is needed or you may experience under- or overexposure in the final combined image. If a two-image exposure bracket is insufficient, you may want to investigate the exposure bracketing system connected to the BKT button. (Note: We previously discussed how to use the camera’s bracketing system in this chapter under the heading Auto Bracketing Set (page 163). With it you can do up to a nine-shot bracket.)
- Smoothing: This allows you to choose smoothing for the boundaries between the two images. Three choices are available: Low, Normal, and High. Each subject’s boundaries are different, so you may have to experiment with these settings. Higher values make a smoother combined image. Watch out for uneven shading with some subjects.

Figure 3.25B – Choosing an HDR mode
First let’s examine how to configure the three settings and prepare for HDR shooting. Use these steps to enable HDR mode for a single picture or a series:
- 1. Follow the screen flow shown in figure 3.25B, images 1 and 2 (HDR (high dynamic range) > HDR mode) until you arrive at the third screen in the series.
- 2. Decide whether you want to make one or a series of HDR images and choose accordingly: On (single photo) for a single image or On (series) for a series of images (figure 3.25B, image 3).
- 3. Press the OK button to prepare the camera for shooting in HDR mode.
When the D500 is set to HDR mode, you will see an HDR symbol displayed on the camera’s Control panel and on the Information display (Monitor). It will go away when HDR mode is set to Off. Now let’s look into configuring the Exposure differential setting.

Figure 3.25C – Choosing an Exposure differential setting
Use the following steps to choose an Exposure differential setting:
- 1. Follow the screen flow shown in figure 3.25C, images 1 and 2 (HDR (high dynamic range) > Exposure differential) until you arrive at the third screen in the series.
- 2. Choose one of the four settings, according to how much exposure variance you want between the two images that will be combined into one. Use Auto to let the camera decide, or choose from 1 EV to 3 EV (figure 3.25C, image 3). If you have a high-contrast subject, you may want to try the 3 EV level first to see if it works best. For low- to medium-contrast subjects, choose 1 EV or 2 EV. Press the OK Button to lock in your choice.
Finally, let’s see how to configure the Smoothing selection for the best image edge boundary control.

Figure 3.25D – Choosing a Smoothing setting
Use these steps to configure Smoothing for the HDR image combination:
- 1. Follow the screen flow shown in figure 3.25D, images 1 and 2 (HDR (high dynamic range) > Smoothing) until you arrive at the third screen in the series.
- 2. Select High, Normal, or Low. You will need to experiment and observe the differences in image boundaries when you vary this setting. Press the OK button to choose your Smoothing level.
Now it’s time to take an HDR picture or three. Here are some things you will need to know during and after the HDR process:
- The camera will take two exposures when you press the Shutter-release button all the way down once. It is a good idea to have the camera on a tripod during low-light HDR operations or you may have some nasty, blurry images as a result. If you do choose to handhold in low light, please brace yourself and do not allow camera movement. When light is very bright, the HDR process can be quite fast. It is much slower when light is low, taking several seconds to deliver a combined image.
- HDR will be displayed in the Control panel, on the Information display, and in Live view (Monitor) as soon as you enable HDR (high dynamic range).
- HDR will start blinking on the Control panel during the initial exposures.
- HDR will display in the upper-right side of the Monitor during Live view HDR shooting. During HDR exposure and image combination, the Live view screen will not display anything.
- Job nr will flash in the Viewfinder during image combination.
- Job nr (blinking) will be displayed in the Control panel while the images are being combined.
- The edges of the image may be cropped out, so do not allow important parts of the subject to touch the edges if possible.
- If you detect shadows around bright objects or halos around dark objects, you can reduce this effect by setting Smoothing to a lower level.
- You cannot select any form of NEF (RAW) shooting when you’re already using HDR (high dynamic range), only JPEG or TIFF. HDR (high dynamic range) is grayed out on the Photo Shooting Menu when you’re using NEF (RAW).
Note: You can assign the BKT button to allow you to select HDR settings with external camera controls (instead of bracketing). See the chapter Custom Setting Menu, under the subheading f1 Custom Control Assignment (page 294).

Figure 3.25E – Morton’s Overlook with sunbeams in the Great Smoky Mountains, TN, USA, near sunset. Five-image HDR with 1 stop EV difference between each image. Combined in Photomatix Pro 5. AF-S Nikkor 24–70mm f/2.8 ED lens at 70mm, f/22, ISO 100, on tripod using MUP mode.
Settings Recommendation: I am a big fan of bracketing and HDR. You’ll often find me on top of some Appalachian mountain shooting a five-bracket HDR shot of the valley below. Beautiful things can be done with HDR. I do not like the shadowless HDR that some photographers shoot. To me it looks fake and seems faddish. However, HDR, when used correctly, can help create images that the camera could not normally take due to excessive light range. If you are really into HDR or would like to be, check out the excellent second edition of Practical HDRI, by Jack Howard, published by Rocky Nook.
Photoshop has built-in software for HDR, or you can buy a less costly dedicated package, such as Photomatix Pro by HDRsoft. I’ve been using Photomatix Pro for several years to combine my bracketed images into carefully tone-mapped HDR images.
There are some limitations to in-camera HDR, which is why people really serious about it use the main bracketing system and combine their images using professional HDR software. However, HDR (high dynamic range) in the D500 is an easy way to knock off a few quick HDRs for those times when only an HDR will do. Give it a try!
Interval Timer Shooting
(User’s Manual: Page 287, Menu Guide: Page 58)
Interval timer shooting allows you set up your camera to shoot a series of images over time. Make sure you have a full battery or are connected to a full-time power source, such as the Nikon EH-5b AC adapter, for shooting images over long periods.
Interval timer shooting is different than the setting covered in the next main section, Time lapse photography, in that it does not create a movie at the end of the image series. When the camera is done with the Interval timer shooting session, you simply have a series of images taken over a period of time.
There are four steps involved in configuring Interval timer shooting:
- Choose a start time
- Choose an interval
- Choose the number of intervals and the number of shots per interval
- Enable or disable Exposure smoothing
Let’s carefully consider how to configure your Interval timer choices.
Configuring an Interval Timer Shooting Session
The screens in figure 3.26A look a little daunting; it might help you to realize that the bottom third of screens 2 through 6 are informational in nature. They display the choices you make in the top half of each screen.
Note: You can start the timer immediately by selecting the Start selection from the menu. However, we will save that step for last because we have configured nothing for the Interval timer. Therefore, we will skip Start at the top of the Interval timer Photo Shooting Menu (figure 3.26A, image 2) and begin by setting up Start options (figure 3.26A, image 3).

Figure 3.26A – Interval timer shooting configuration
Use the following steps to configure an Interval timer shooting session:
- 1. Select Interval timer shooting from the Photo Shooting Menu and scroll to the right (figure 3.26A, image 1).
- 2. Skip over the Start selection for now because we have not configured any of the Interval timer settings yet (figure 3.26A, image 2). Later, after you have configured the Interval timer, you can simply come back and select Start to begin the timer. The camera will remember the settings from your last configuration of the Interval timer and you can use them again by selecting Start and pressing the OK button (or the Multi selector center button).
- 3. Choose Start options and scroll to the right (figure 3.26A, image 3).
- 4. The Start options screen will display two choices, Now and Choose start day and start time (figure 3.26A, image 4). Choose Now if you want to start the timer three seconds after you select Start and press the OK button. If you would rather select a specific date and time to start the timer, simply select Choose start day and start time from the Start options menu and scroll to the right (figure 3.26A, image 5).
- 5. The Choose start day and start time screen will now appear (figure 3.26A, image 6). The Start date is always presented in the Month/Day (MM/DD) format, while the time is presented in a 24-hour (international time) format. If you are not using the Now selection from the previous step, move to the Start date field and enter the month and day, such as: 06/20
Please notice that the Start date (06/20) is highlighted in yellow in the informational section that appears on the lower third of image 6 (red arrow). As you set the Interval timer functions, you will see each of them appear in this informational area. After the timer is fully configured you can use this section to quickly see whether you want to use current settings or modify them in a future session.
Next, scroll over to the H field and enter an hour in international time format (e.g., 15 = 3 PM). Enter the time at which you want the intervals to begin. The selectable hour (H) range is from 00 (midnight) to 23 (11 p.m.). After you have entered an hour setting, enter a minute setting. The selectable minute (M) range is from 00 to 59. If you wanted to start at 3:30 p.m., you would insert the following:
15:30
Once you’ve entered the time, press the OK button to lock it in. Check the informational section below, which will show the entry. My camera reflects 06/20 15:30, or June 20th at 3:30 p.m. in figure 3.26A, image 6.

Figure 3.26B – Choosing an Interval
- 6. The camera will now return to the Interval timer shooting menu. Choose the Interval setting on the Interval timer shooting screen and scroll to the right (figure 3.26B, image 1).
- 7. You will now see the interval selection fields with selections representing Hours: Minutes' Seconds" in the following format (figure 3.26B, image 2): 00:00' 00"
The first two zeros represent the hours, the second set represents minutes, and the third set seconds. Since we want to start out with an interval of 10 seconds, let’s set the screen to look like this: 00: 00' 10"
Once you’ve entered the time, press the OK button to lock it in.

Figure 3.26C – Choosing the number of intervals and number of shots per interval
- 8. Now we’ll choose the number of intervals and shots per interval by selecting No. of intervals×shots/interval and scrolling to the right (figure 3.26C, image 1).
- 9. You will be presented with a screen where you can select the number of intervals (No. of intervals) times the number of shots per interval (shots/interval), as seen in figure 3.26C, image 2. Number of intervals × number of shots = total shots. These values are gathered in this format:
0000 × 0 = 0000
You can set the number of intervals (0000) anywhere between 0001 and 9999. You can set the number of shots taken per interval anywhere between 1 and 9. If, for example, you want to shoot six intervals, and take two pictures during each interval, set your camera so that it looks like this (figure 3.26C, image 2): 0006 × 2 = 00012
This means that there will be six intervals (0006) of 10 seconds each (set in step 7) and that the camera will take two pictures for each interval (x 2), for a total of 12 pictures (00012). In other words, 2 pictures will be taken every 10 seconds over a period of 60 seconds, for a total of 12 images at the end of the series (0006 intervals x 10 seconds each = 60 seconds). The maximum number of images that can be taken in one Interval timer session is 89991.

Figure 3.26D – Choosing an Exposure smoothing setting
- 10. Next, you may select Exposure smoothing (figure 3.26D, image 1), which allows the camera to adjust the exposure of an image so that it matches the exposure of the previous image, when using P, S, and A modes under the Mode button. If you use M mode, you must have Photo Shooting Menu > ISO sensitivity settings > Auto ISO sensitivity control set to On, or Exposure smoothing will not work. Choose Exposure smoothing from the Interval timer shooting screen and scroll to the right (figure 3.26D, image 1).
- 11. Select On or Off for Exposure smoothing and press the OK button to finish the configuration of the Interval timer shooting system (figure 3.26D, image 2).

Figure 3.26E – Starting the Interval timer shooting session
- 12. You are now ready to Start the Interval timer using the settings displayed in the informational section on the lower third of the Interval timer shooting screen (figure 3.26E). When you select Start, as shown in figure 3.26E, image 1, and press the OK button, a Timer Active message will briefly appear on your camera’s Monitor (figure 3.26E, image 2). If you look at the top Control panel, you will see the abbreviated word INTVL flashing. INTVL will continue to flash as long as the Interval timer is in operation.
Pause, Cancel, or Restart an Interval Timer Shooting Session
You may need to pause or cancel the Interval timer while it is counting down to the start time you set in Shooting options, or when the timer is already active and taking pictures. The Interval timer will continue to function and count down even if you have switched the camera off. Therefore, once you have activated the timer you will need to use the screens shown in figure 3.26F to pause or cancel it. Let’s see how to do it.

Figure 3.26F – Pausing or canceling an Interval timer shooting session
Use these steps to pause or cancel an Interval timer shooting session:
- 1. Select Interval timer shooting from the Photo Shooting Menu and scroll to the right (figure 3.26F, image 1).
- 2. Choose Pause to temporarily stop the timer, or Off to cancel the session (figure 3.26F, image 2).
- 3. Press the OK button to lock in your choice.

Figure 3.26G – Restarting or canceling an Interval timer shooting session
If you have previously paused the Interval timer and would like to restart or cancel it, use the following steps:
- 1. Select Interval timer shooting from the Photo Shooting Menu and scroll to the right (figure 3.26G, image 1).
- 2. Select Restart, which allows you to continue your Interval timer session, or Off, which lets you cancel the session (figure 3.26G, image 2).
- 3. Press the OK button to lock in your choice.
Note: If the memory card fills up during a shooting session and has no more room for images, the timer will remain active, but the camera will stop taking pictures. You can resume shooting after you have either deleted some pictures or inserted another memory card.
Interval timer shooting will pause if you select the Self-timer position on the Release mode dial. You must turn the dial away from the Self-timer mode position before you can restart the timer.
During pauses, you can replace batteries and memory cards without ending the Interval timer session. To restart the session and continue where it left off, you must use the Photo Shooting Menu screens shown in figure 3.26G.
Please remember that pausing the session does not affect Interval timer settings. If for any reason the camera cannot continue Interval timer photography, it will display a warning on the Monitor.
Skipping Intervals: The camera will skip an interval if any of the following occurs for longer than eight seconds:
- Any photographs from the previous session are not yet taken
- The memory card is full
- Single-servo AF is active and the camera is unable to focus (the camera refocuses before each shot)
The camera will then try again at the next interval.
Photo Shooting Menu Banks: Changes to Interval timer shooting apply to all four of the Photo shooting menu banks (A to D). Therefore, changing to a different Photo shooting menu bank during a session does not interrupt the Interval timer. However, resetting a Photo shooting menu bank will cancel the Interval timer and reset the timer to factory default settings.
Bracketing Info: Be sure to adjust any bracketing for the exposure, flash, or Active D-Lighting (ADL) before you start Interval timer shooting. Bracketing overrides the number of shots, so you may not get what you expected if any kind of bracketing is active. Also, according to Nikon, “If White balance bracketing is active during an Interval timer session, the camera will take one shot at each interval and process it to create the number of copies specified in the bracketing program.”
Settings Recommendation: Please learn to use this function! It is complicated, but if you read this section carefully and practice using Interval timer shooting as you read, you’ll learn it quickly. This type of photography allows you to shoot things like flowers gradually opening or the sun moving across the sky. Have some fun with it!
Author’s Conclusion
Congratulations! You have fully configured one of the camera’s four Photo shooting menu banks. Now set up the rest of the banks according to your own ideas on how you want them to behave.
Using the four available Photo shooting menu banks allows you a great deal of flexibility in how your camera operates. You can switch between four different camera types, in a sense.
The information on the Movie Shooting Menu in the next chapter will allow you to set up a different configuration for when you want to shoot video. The settings for photo and movie shooting are separated into two individual menus. Let’s learn about the new advanced video settings and go make some great movies!