
Live View
When shooting still images in Live view mode, you can assign one of three different settings to the Multi selector center button.
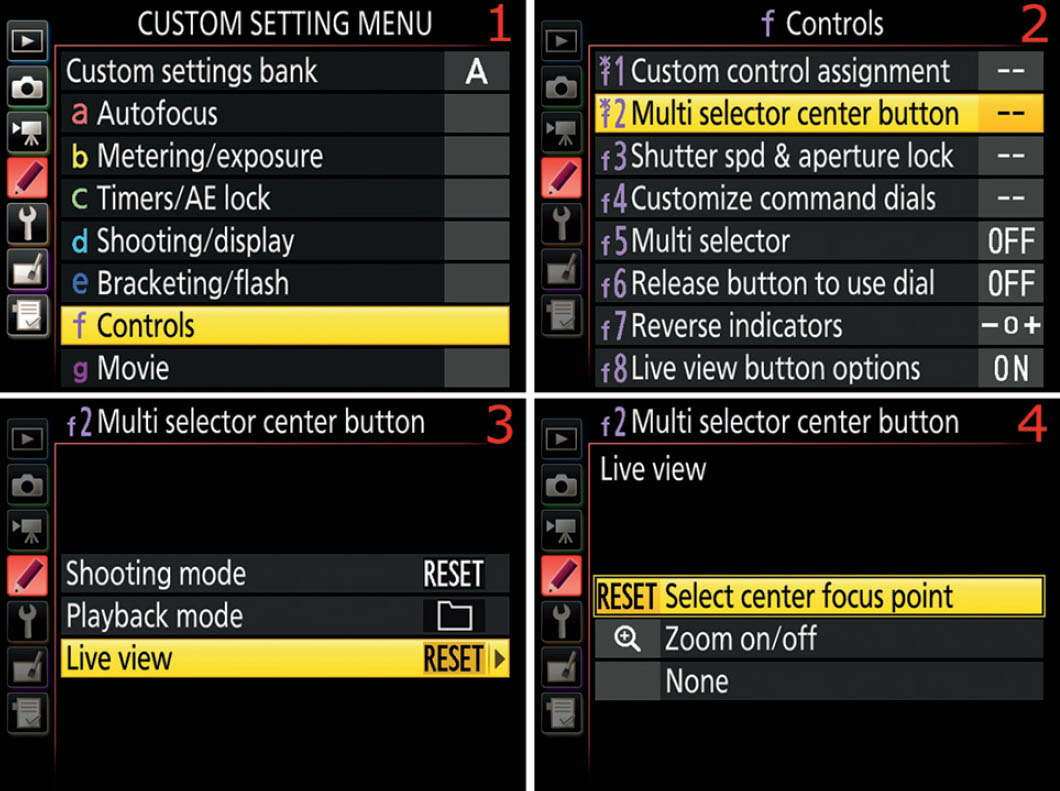
Figure 5.43G – Multi selector center button (Live view mode)
Use the following steps to choose how the Multi selector center button functions in Live view mode:
- 1. Follow the screen flow shown in figure 5.43G, images 1–3 (f Controls > f2 Multi selector center button > Live view) until you arrive at the fourth screen in the series.
- 2. Choose one of the three settings, according to your needs (figure 5.43G, image 4). Please refer to the list following these steps to decide which functionality you like best. If you select Zoom on/off, there will be another screen presented to you so that you can choose a magnification level for the Zoom on/off function. Figure 5.43H shows the screen with magnification choices. Press the OK button to lock in the setting.
Here are descriptions of each of the functions available:
- Select center focus point: When you are using Live view, you can scroll the little contrast-detection focus square to any point of the Monitor for excellent focusing with the AF-ON button or Shutter-release button (halfway down). Unfortunately, moving the little focus square around the screen is time-consuming. If you want to return the focus square to the center of the screen at any time and have this Select center focus point mode selected, just press the Multi selector center button and the focus square pops to the middle of the Monitor.

Figure 5.43H – Multi selector center button (Live view mode – Zoom on/off)
- Zoom on/off: The Live view contrast-detection autofocus system allows you to zoom into your subject quite deeply so that you can focus very accurately. You could use the Playback zoom in button or Thumbnail/Playback zoom out button to zoom in and out, or you can configure this function and use the Multi selector center button to zoom in and out instead. With Zoom on/off, you can select one of three levels of magnification for focusing in Live view mode. When you want to zoom into the live image to focus on your subject in a very accurate way, simply press the Multi selector center button and the camera will immediately jump to a zoom position of 50 percent for Low magnification, 100 percent for Medium magnification (1:1), and 200 percent for High magnification. Use the screens found in figure 5.43H to select a magnification level (Low, Medium, or High). Figure 5.43H starts where figure 5.43G leaves off. This works similarly to functions found under Playback mode > Zoom on/off (figure 5.43E) except it is working with a live subject on the Monitor in Live view.
- None: If you press the Multi selector center button while in Live view, it has no effect.
Settings Recommendation: I have my camera set so that when I press the Multi selector center button in Shooting mode, it jumps to the center AF point. It saves time because I don’t have to scroll back manually.
When I press the Multi selector center button in Playback mode, I have the camera show me a luminance histogram. I absolutely adore being able to see a histogram for an image I just took by pressing the Multi selector center button instead of scrolling to the histogram screen. This saves time by letting me see my camera’s histogram when I need it most, right after taking the picture.
When using Live view mode, I leave my camera set to Select center focus point because it takes so long to scroll the little focus square around the Monitor. I find it quite nice to be able to pop the focus square to the center by pressing the Multi selector center button.
Custom Setting f3: Shutter Spd & Aperture Lock
(User’s Manual: Page 302, Menu Guide: Page 111)
Shutter spd & aperture lock is an interesting function that allows you to lock the shutter speed at the currently selected value when shooting in Shutter-priority (S) or Manual (M) mode. You can also lock the aperture at its current value when you are shooting in Aperture-priority (A) or Manual (M) mode. This function does not apply to and will not work when shooting in Programmed auto (P) mode.

Figure 5.44 – Selecting Shutter spd & aperture lock
Use the following steps to keep your shutter speed or aperture from changing, according to which exposure mode you are using:
- 1. Follow the screen flow shown in figure 5.44, images 1 and 2 (f Controls > f3 Shutter spd & aperture lock) until you arrive at the third screen in the series.
- 2. When you are using Aperture-priority (A) mode, Shutter speed lock will be grayed out and unavailable. When you are using Shutter-priority (S) mode, Aperture lock will be grayed out and unavailable. If you have the camera set to Manual (M) mode, Shutter speed lock and Aperture lock are both available (figure 5.44, image 3). When the camera is set to Programmed-auto (P) mode, the entire Shutter spd & aperture lock function is grayed out and nonselectable. Select Shutter speed lock or Aperture lock (according to which exposure mode you are currently using) and scroll to the right (figure 5.44, image 3).
- 3. Choose either On or Off from the list. In figure 5.44, image 4, Off has been chosen for Aperture lock. On locks the setting (Shutter speed or Aperture), whereas Off allows you to continue adjusting that setting. (The screens for Shutter speed lock are not shown in figure 5.44. They work exactly the same way as Aperture lock.) Press the OK button to lock in the setting.
Settings Recommendation: If I were shooting in a studio, under carefully controlled lighting, and wanted to lock the shutter speed or aperture to a value that will not change throughout the session, this function will do the job well. It can be a protection for when you do not want a value to change.
Custom Setting f4: Customize Command Dials
(User’s Manual: Page 302, Menu Guide: Page 111)
Customize command dials does exactly what it sounds like—it lets you change how the Command dials operate. There are several operations you can modify:
- Reverse rotation
- Change main/sub
- Aperture setting
- Menus and playback
- Sub-dial frame advance
Let’s examine each of these items and the screens and steps used to change them.

Figure 5.45A – Customize command dials
Use the following steps to change the functionality of the Command dials:
- 1. Follow the screen flow shown in figure 5.45A, images 1 and 2 (f Controls > f4 Customize command dials) until you arrive at the third screen in the series.
- 2. Choose one of the five selections from the list (figure 5.45A, image 3) and then scroll to the right.
- 3. Use the screens and steps under each of the following sections to configure the various functions (figures 5.45B to 5.45G).
Reverse Rotation
Reverse rotation allows you to change what happens when you rotate the Command dials in a certain direction, including those on a mounted MB-D17 battery pack. You can reverse Command dial operations with this setting. There are two selections:
- Exposure compensation: When you press and hold the Exposure compensation button and turn the Sub-command dial clockwise, it decreases the amount of compensation. If you place a check mark in this box and select Done, the camera will increase the amount of compensation when you turn the Sub-command dial clockwise.
- Shutter speed/aperture: Normally, when the D500 is set to Aperture-priority (A) or Manual (M) mode and you rotate the Sub-command dial clockwise, the aperture gets smaller. If you put a check mark next to Shutter speed/aperture and select Done, the aperture will instead get larger when you turn the Sub-command dial clockwise. The same goes for shutter speed in Shutter-priority (S) and Manual (M) modes. Normally, turning the rear Main command dial clockwise slows down the shutter speed. If you put a check mark next to Shutter speed/aperture and select Done, the shutter speed will instead get faster when you turn the Main command dial clockwise. Finally, when you override the aperture setting in Programmed auto (P) mode by turning the Main command dial clockwise, instead of decreasing the size of the aperture, it increases it.

Figure 5.45B – Customize command dials (Reverse rotation)
Here are the steps to change the rotation direction of the Command dials:
- 1. Continuing from figure 5.45A, image 3, select Reverse rotation and scroll to the right (figure 5.45B, image 1).
- 2. Using the Multi selector pad, highlight Exposure compensation or Shutter speed/aperture and scroll to the right to set a check mark in the corresponding small check box (figure 5.45B, image 2). In figure 5.45B, image 3, a check mark is in both of the selections. Press the OK button to lock in the setting.
Settings Recommendation: I leave the Command dials rotation set to factory default. I find life confusing enough without my camera working backward. Of course, if you come from a different camera brand than Nikon and are used to the dials working in the opposite direction, you may feel more comfortable reversing them on your D500.
Change Main/Sub
Change main/sub allows you to swap the functionality of the two Command dials. The rear Main command dial will take on the functions of the front Sub-command dial, and vice versa.
You can configure the camera so that this reversal of the Main and Sub command dials applies to both the Exposure setting (aperture and shutter speed) and the Autofocus setting (Autofocus modes and AF-area modes).
Exposure Setting
The Exposure setting subfunction allows you to switch the Main and Sub functionality of the Command dials for changing the aperture and shutter speed. Normally, the aperture is controlled by the front Sub-command dial, and the shutter speed is controlled by the rear Main command dial. However, when switched, that is reversed.
Let’s consider the three settings you can choose under this subfunction and see how they each affect the actions of the Command dials.
Here are the three setting variations:
- On: By selecting On, you reverse the functionality of the two Command dials so that the Sub-command dial controls shutter speed while the Main command dial controls aperture.
- On (Mode A): This special mode sets the camera so that the Main command dial controls the aperture when using Aperture-priority (A) mode only.
- Off: The functionality of the Command dials is set to the factory default. The Main command dial controls the shutter speed while the Sub-command dial controls the aperture.
Let’s examine how to choose one of these settings.
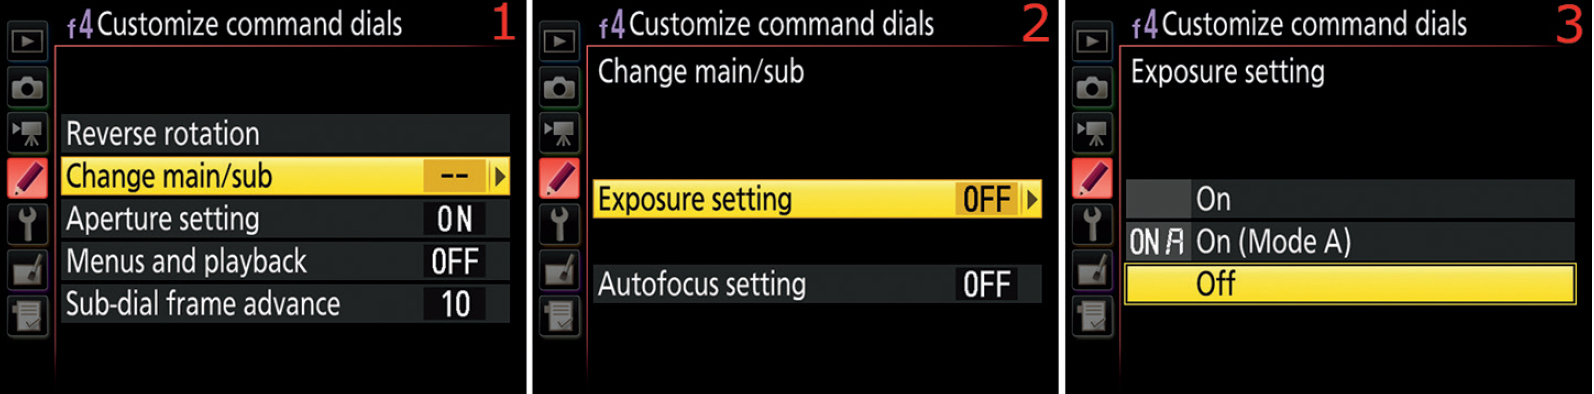
Figure5.45C – Customize command dials (Change main/sub – Exposure setting)
Here are the steps to swap the functionality of the Command dials for the Exposure setting:
- 1. Continuing from figure 5.45A, image 3, select Change main/sub and scroll to the right (figure5.45C, image 1).
- 2. Choose Exposure setting from the Change main/sub menu and scroll to the right (figure5.45C, image 2).
- 3. Select one of the three settings: On, On (Mode A), or Off (figure5.45C, image 3). Press the OK button to lock in the setting.
Settings Recommendation: I leave the Command dials set to factory default (Off). I’ve been using Nikons for too many years to change Command dial functionality now. However, you may have valid reasons for swapping the Command dial functionality. If so, it’s very easy.
Autofocus Setting
When adjusting the Autofocus setting you will hold in the AF-mode button (just under the Lens release button) and turn one of the Command dials while watching the modes change on the Control panel. Normally, the rear Main command dial controls the Auto-focus mode (i.e., AF-S, AF-C) and the front Sub-command dial controls the AF-area mode (e.g., Single-point AF, Group-area AF, Dynamic-area AF). However, you can reverse that with the Change main/sub > Autofocus setting subfunction.
Here is a list of the two settings within this subfunction and what each does:
- On: By selecting On, you reverse the functionality of the two Command dials so that the front Sub-command dial controls the Autofocus mode (i.e., AF-S, AF-C) and the rear Main command dial controls the AF-area mode (e.g., Single-point AF, Group-area AF, Dynamic-area AF).
- Off: The functionality of the Command dials is set to the factory default. The front Sub-command dial controls the AF-area mode (e.g., Single-point AF, Group-area AF, Dynamic-area AF) and the rear Main command dial controls the Autofocus mode (i.e., AF-S, AF-C).
Let’s see how to choose one of these settings.

Figure 5.45D – Customize command dials (Change main/sub – Autofocus setting)
Here are the steps to swap the functionality of the Command dials for the Autofocus setting:
- 1. Continuing from figure 5.45A, image 3, select Change main/sub and scroll to the right (figure 5.45D, image 1).
- 2. Choose Autofocus setting from the Change main/sub menu and scroll to the right (figure 5.45D, image 2).
- 3. Select On or Off (figure 5.45D, image 3). Press the OK button to lock in the setting.
Settings Recommendation: Again, I see no reason to reverse the functionality of the Command dials because I have trained my muscle memory over the last several years to work with the normal Main and Sub command dial functions. However, if you have recently come from a different camera brand over to the new Nikon D500 and are used to the dials working in reverse, or you just prefer it that way, by all means reverse how the Command dials work.
Aperture Setting
There are two selections that allow you to modify how the camera treats CPU lenses that have aperture rings on them (non-G lenses):
- Sub-command dial: This is the factory default setting. The aperture is set using the Sub-command dial. If you select this setting and are using a non-G or E lens with an old-style aperture ring, you will need to set and lock it (if available) to the smallest aperture and then use the Sub-command dial to change apertures.
- Aperture ring: This setting allows those with older non-G type lenses with a CPU to use the lens’s aperture ring to adjust the aperture instead of using the Sub-command dial. The EV increments will be displayed in only 1 EV steps when this is active. If you are using a G- or E-type lens with no aperture ring, you clearly can’t set the aperture with a nonexistent aperture ring, so the camera ignores this setting.
Note: When a non-CPU lens is used, the aperture ring must always be used to set the aperture instead of the Sub-command dial.

Figure 5.45E – Customize command dials (Aperture setting)
Here are the steps to change the style of Aperture setting:
- 1. Continuing from figure 5.45A, image 3, select Aperture setting and scroll to the right (figure 5.45E, image 1).
- 2. Select Sub-command dial or Aperture ring from the list (figure 5.45E, image 2). Press the OK button to lock in the setting.
Settings Recommendation: I leave Aperture setting set to Sub-command dial. I have some older AF Nikkors that I still like using, so I keep them locked at their smallest aperture settings and use the Sub-command dial to change their apertures. I don’t adjust apertures with the old aperture ring on the lens unless I’m using older non-CPU, manual focus AI or AI-S lenses.
Menus and playback
Menus and playback is designed for those who do not like to use the Multi selector pad for viewing image Playback or Info screens. It also allows you to use the Command dials for scrolling though menus. There are two selections for how the menus and image playback work when you would rather not use the Multi selector pad:
- On: While viewing images during playback, turning the Main command dial to the left or right scrolls through the displayed images. Turning the Sub-command dial left or right scrolls through the data and histogram screens for each image. While viewing menus, turning the Main command dial left or right scrolls up or down in the screens. Turning the Sub-command dial left or right scrolls left or right in the menus. The Multi selector pad button works normally, even when this is set to On. This setting simply allows you two ways to view your images and menus instead of one. Also, when you are using thumbnail viewing of multiple images on the Monitor, turning the rear Main command dial moves left and right in the list of thumbnail images, while the front Sub-command dial moves up and down in the list of thumbnails.
- On (image review excluded): This works exactly the same as On, with one exception. When you use On alone (previous setting) and take a picture, the picture will show up on the Monitor and you can then use the Command dials to review images other than the one you just took. However, if you select On (image review excluded) instead of just On, you will not be able to examine other images with the Command dials when an image pops up for review after you take it. In other words, image review with the Command dials is excluded just after you take a picture. You can view only the picture you just took unless you use the Multi selector pad, not the Command dials, to scroll through the other images taken previously. You can still use the Command dials for Playback image review (after pressing the Playback button)—just not immediately after taking an image, when it first pops up on the Monitor.
- Off: This is the default action. The Multi selector pad is used to scroll through images and menus.

Figure 5.45F – Customize command dials (Menus and playback)
Here are the steps used to configure Menus and playback:
- 1. Continuing from figure 5.45A, image 3, select Menus and playback and scroll to the right (figure 5.45F, image 1).
- 2. Select one of the three settings (figure 5.45F, image 2). Press the OK button to lock in the setting.
Settings Recommendation: I have my camera set to On for Menus and playback. I like the fact that I can use the Multi selector pad or the Command dials to move around in my camera’s menus and images. Try this one out; you may like it too!
Sub-Dial Frame Advance
With the huge memory cards available today, you may find yourself having hundreds or even thousands of images on a single memory card. Have you ever had to scroll through a large number of images to find an image you want to look at more closely?
Nikon has come to our rescue with a function that lets you move around more efficiently within a large number of images, or even multiple folders, on a memory card.
This function is closely tied to the previous function, Menus and playback. Please review that function for details. If you have On or On (image review excluded) enabled under Menus and playback, you can use the following functionality:
- 10 frames: When you rotate the front Sub-command dial during full-frame playback, the camera will jump forward or backward 10 frames at a time, skipping over the frames in between.
- 50 frames: When you rotate the front Sub-command dial during full-frame playback, the camera will jump forward or backward 50 frames at a time, skipping the frames in between.
- Protect: When you rotate the front Sub-command dial during full-frame playback, the camera will jump to the next or previous protected file (marked with the Protect key symbol).
- Still images only: When you rotate the front Sub-command dial during full-frame playback, the camera will jump to the next or previous still image (including protected images), skipping all movies.
- Movies only: When you rotate the front Sub-command dial during full-frame playback, the camera will jump to the next or previous video (movie), skipping all images.
- Folder: When you rotate the front Sub-command dial during full-frame playback, the camera will move between folders. If there is only one folder on the memory card, the Sub-command dial does nothing.
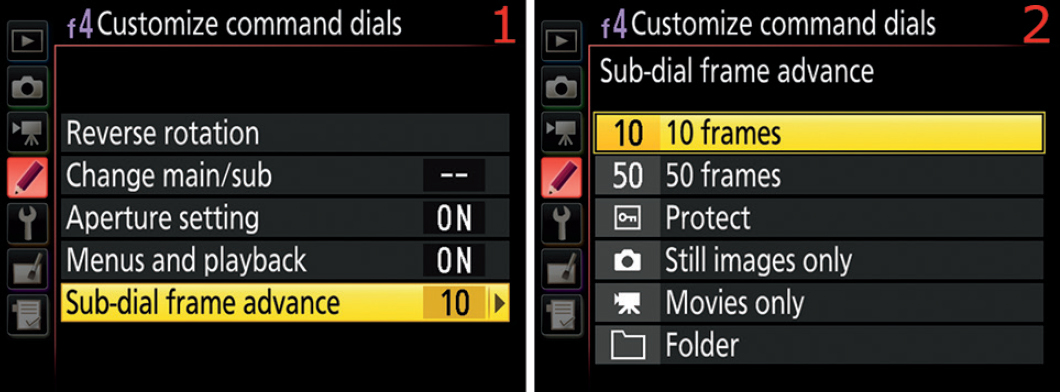
Figure 5.45G – Customize command dials (Sub-dial frame advance)
Use these steps to choose a Sub-dial frame advance setting:
- 1. Continuing from figure 5.45A, image 3, select Sub-dial frame advance and scroll to the right (figure 5.45G, image 1).
- 2. Select one of the six settings, referring to the previous list (figure 5.45G, image 2). Press the OK button to lock in the setting.
Note: If you do not have On or On (image review excluded) set in Menus and playback (previous subheading), the camera will not respond to any settings in the Sub-dial frame advance function. When you rotate the front Sub-command dial during full-frame playback, nothing will happen.
Settings Recommendation: I have my camera set to Folders because I often use different folders to separate the images on my camera’s memory card. I currently shoot with 64GB SanDisk cards and they will hold hundreds of RAW images and thousands of JPEGs. As memory cards increase in size and the larger ones become more affordable, I can foresee a time when this function will become even more important.
Custom Setting f5: Multi selector
(User’s Manual: Page 302, Menu Guide: Page 114)
The Multi selector function allows you to set the camera’s Multi selector pad so that any usage of it resets the Standby timer, which also turns on the exposure meter, using the delay timeout found in Custom Setting Menu > c Timers/AE lock > c2 Standby timer. This allows the light meter to stay on after you’ve used the Multi selector pad until the Auto meter-off delay timeout expires.
Here are descriptions of the two available settings:
- Reset standby timer: This setting is a handy way to restart the Standby timer for various reasons, but primarily to turn on the exposure meter without pressing the Shutter-release button halfway down. Maybe you’d like to meter the subject but not cause autofocus to start, so instead of using the Shutter-release button to turn the meter on, you can use the Multi selector pad. I find this to be a useful function for another reason. I’ll often want to move an AF point around the Viewfinder, but the light meter has gone off, so it won’t move. I have to press the Shutter-release button halfway down to activate the meter and then scroll the AF point around the Viewfinder. When Reset standby timer is selected, any usage of the Multi selector pad causes the light meter to come on. Custom setting c2 Standby timer controls how long it stays on; the default is 6 seconds.
- Do nothing: The Standby timer does not restart its timeout delay when you press the Multi selector pad.

Figure 5.46 – Multi selector
Here are the steps used to configure the Multi selector function:
- 1. Follow the screen flow shown in figure 5.46, images 1 and 2 (f Controls > f5 Multi selector) until you arrive at the third screen in the series.
- 2. Choose one of the two selections based on the previous list (figure 5.46, image 3). Press the OK button to lock in the setting.
Settings Recommendation: Using this function can be handy for those who use the Multi selector pad to move the active AF point around the Viewfinder because you can start doing so immediately, without the intermediate step of pressing the Shutter-release button halfway down.
However, since restarting the Standby timer turns on the camera’s light metering system, it will require more battery power throughout your shooting session if the meter comes on more often. I set my camera to Restart standby timer because I still prefer to use the Multi selector to move the active AF point.
Custom Setting f6: Release Button to Use Dial
(User’s Manual: Page 302, Menu Guide: Page 114)
Release button to use dial allows those who don’t like to or cannot hold down buttons and turn a Command dial at the same time to change to an easier method. This function may be very useful to people with limited hand strength, allowing them to operate the camera more easily.
The function works with the following buttons only:
- +/– Exposure compensation button
- +/– Flash compensation button (Flash button)
- AF-mode button
- BKT button
- FORMAT buttons
- ISO button
- Metering button
- MODE button
- Thumbnail/Playback zoom out (Flash) button
- QUAL button
- WB button
- Any programmable button that has Active D-Lighting assigned to it through Custom setting f1 Custom control assignment
There are two settings under this function. Let’s examine them and then look at the screens and steps to modify Release button to use dial:
- Yes: This setting changes a two-step operation into a three-step operation. Normally, you would press and hold down a button while rotating a Command dial. When you select Yes under Release button to use dial, the camera allows you to press and release a button, rotate the Command dial, then press and release the button again. The initial button press locks the button so that you do not have to hold your finger on it while turning the Command dial. Once you have changed whatever you are adjusting, you must press the button a second time to unlock it.
- No: This is the default setting. You must press and hold a button while rotating the Command dials in order to change camera functionality.
If the exposure meter turns off or you press the Shutter-release button halfway while the Yes operation is active, you must press the original button again to restart the action. You can set the exposure meter to No limit or a longer timeout in Custom Setting Menu > c Timers/AE lock > c2 Standby timer to prevent the exposure meter from turning off after a few seconds. This may make the function more useful if you have weak hands or must move slowly.

Figure 5.47 – Release button to use dial
Here are the steps to configure Release button to use dial:
- 1. Follow the screen flow shown in figure 5.47, images 1 and 2 (f Controls > f6 Release button to use dial) until you arrive at the third screen in the series.
- 2. Choose Yes or No (figure 5.47, image 3). Press the OK button to lock in the setting.
Settings Recommendation: I haven’t found this function useful for myself. However, a person with certain physical limitations may find this to be a very useful function.
Custom Setting f7: Reverse Indicators
(User’s Manual: Page 303, Menu Guide: Page 115)
Reverse indicators lets you change the direction of your camera’s exposure displays. Normally, anytime you see the exposure indicators in your camera’s Control panel, Viewfinder, or the Information display, the – is on the left and the + is on the right.
Figure 5.48A shows the Information display with the exposure indicator. The first image shows the normal (default) exposure indicator direction (underexposure on left). The second image shows the Information display with the exposure indicators reversed (overexposure on left).

Figure 5.48A – Reversed indicators on the Information display (see red arrows)

Figure 5.48B – Reverse indicators
Here are the steps to reverse the direction of all camera exposure indicators:
- 1. Follow the screen flow shown in figure 5.48B, images 1 and 2 (f Controls > f7 Reverse indicators) until you arrive at the third screen in the series.
- 2. Choose one of the two selections from the list. In figure 5.48B, image 3, the normal exposure indicator direction is selected (default). Press the OK button to lock in the setting.
Settings Recommendation: If you have been using an older Nikon SLR or DSLR, you may find the exposure indicator scale on your D500 somewhat jarring at first. Newer Nikon DSLRs default to a reversed exposure indicator compared to older Nikons.
Having used Nikons since way back in 1980, I was quite used to my camera’s exposure scale having the plus on the left and the minus on the right. When I first started using a Nikon that reversed this scale, it aggravated me to no end, and I changed it back to the “normal” +/– setting.
However, after thinking about it for a while, I realized that the histogram works in a –/+ direction, with dark on the left and bright on the right. I use the histogram frequently, so I changed the indicator direction back to the factory default of –/+. I have now used it this way for some time and it is beginning to make sense and feel more natural.
However, if you feel uncomfortable seeing the meter indicator working “backward,” you may want to change the exposure indicator to the “correct” direction. If you do change it, you may also want to reverse the Exposure compensation direction with Custom Setting Menu > f controls > f4 Customize command dials > Reverse rotation > Exposure compensation (see the previous section Custom Setting f4: Customize Command Dials on page 321). Otherwise, you will notice that the Exposure compensation setting works backward from the reversed direction of the exposure indicator. It’s a good thing we still have a choice about reversing things!
Custom Setting f8: Live View Button Options
(User’s Manual: Page 303, Menu Guide: Page 115)
The Live view button options function provides several options for controlling how the Live view (Lv) button works. Let’s examine each of the options and then discuss how to choose one.
- Enable: This is the default setting. The Lv button opens up the Live view system, which allows you to use the Monitor on the back of the camera to frame pictures, instead of the Viewfinder.
- Enable (standby timer active): This setting works just like the default Enable setting— pressing the Lv button opens the Live view system. However, with this setting selected, the Lv button will not activate the Live view system unless the Standby timer (page 263) is active (light meter is turned on).
- Disable: Pressing the Lv button does nothing. This completely disables the Live view system for both still images and video.

Figure 5.49 – Live view button options
Use the following steps to control how the Lv button works:
- 1. Follow the screen flow shown in figure 5.49, images 1 and 2 (f Controls > f8 Live view button options) until you arrive at the third screen in the series.
- 2. Choose one of the three selections from the menu (figure 5.49, image 3), referring to the previous list. Press the OK button to lock in the setting.
Settings Recommendation: If you don’t need or want Live view mode, you can now turn it off completely by setting this function to Disable. I use Live view for both still image shooting and video recording at times, so I leave this function set to Enable. If you want the Lv button to work only while the light meter is active, set the function to Enable (standby timer active).
Custom Setting f9: [Backlight] Switch
(User’s Manual: Page 303, Menu Guide: Page 115)
The Backlight switch control position has been on the Power switch for many generations of Nikon cameras—controlling the backlight for the Control panel. However, the D500’s Power switch Backlight position can potentially control three functions: the Control panel backlight, the illuminated button backlights, and the Information display (rear Monitor) backlight.
When you push the switch (figure 5.50A), you can turn on the backlight for the Control panel and illuminated buttons only (not including the Information display), or you can set the switch so that it enables all backlights, including the backlight for the Information display, without requiring you to press the info button.

Figure 5.50A – Backlight switch position around Shutter-release button
In figure 5.50A, the red arrow points to the tiny Backlight switch icon on the camera’s Power switch.
The Control panel and illuminated buttons are paired when it comes to their backlight timeouts. They have a different backlight timeout than the Information display. In fact, the Control panel/illuminated buttons and the Information display use different functions to control when their backlights turn off.
The Control panel and illuminated buttons backlight timeout is controlled by Custom Setting Menu > c Timers/AE lock > c2 Standby timer. The Information display backlight timeout is controlled by Custom Setting Menu > c Timers/AE lock > c4 Monitor off delay > Information display. You can set these two timeouts first, and when you activate the Backlight switch, both timers will start counting down separately, with one important caveat.
When you are using the Information display screen on the rear Monitor, it keeps the light meter active for as long as it is displayed. Therefore, if you have Custom Setting Menu > c Timers/AE lock > c4 Monitor off delay > Information display set to a long value, such as 1 min (one minute), the Information display will time out first at the end of its 1 min delay, and then the Control panel and illuminated buttons backlights will start their countdown, using the delay set in Custom Setting Menu > c Timers/AE lock > c2 Standby timer.
This sounds a bit confusing, but think of it this way: Because the Control panel/illuminated buttons timeout is tied in with the light meter timeout, the Control panel backlight will stay on longer than the Information display by the amount you have set in Custom Setting Menu > c Timers/AE lock > c2 Standby timer. If that value is the default of 6 s (six seconds), that means the Control panel/illuminated buttons backlights will time out six seconds after the Information display times out.
Here is a list of the two settings and explanations of what they accomplish:
- LCD backlight: When you select the Backlight position on the Power switch, only the Control panel LCD and illuminated buttons will light up.
- [Backlight] and information display: When you select the Backlight position on the Power switch, the Control panel LCD, illuminated buttons, and Information display will all light up.
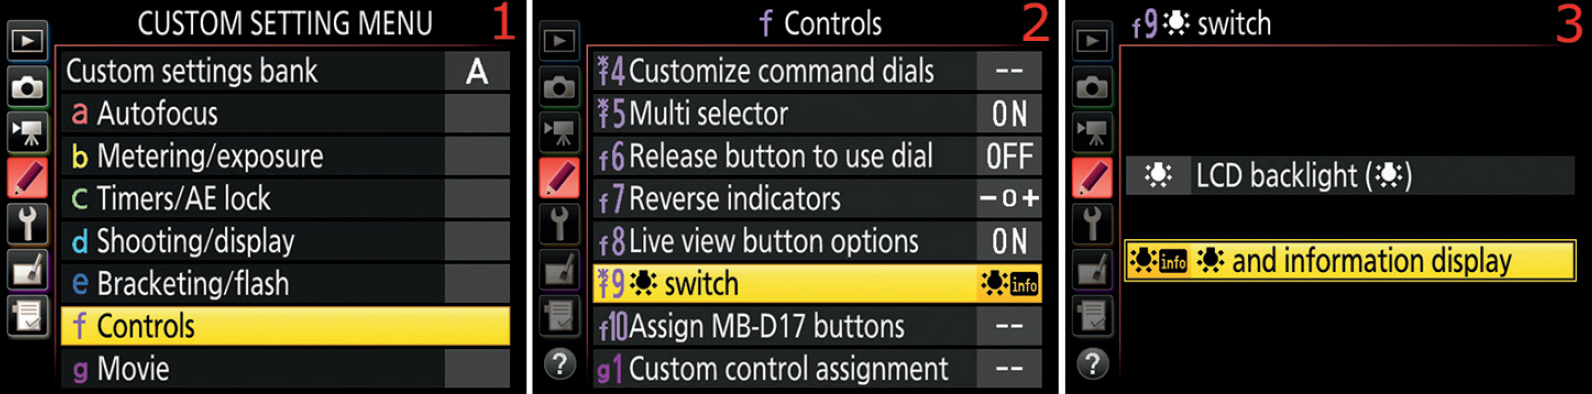
Figure 5.50B – [Backlight] switch
Here are the steps to select what the Backlight switch controls:
- 1. Follow the screen flow shown in figure 5.50B, images 1 and 2 (f Controls > f9 [Backlight] switch) until you arrive at the third screen in the series.
- 2. Choose one of the two types on the menu (figure 5.50B, image 3), referring to the previous list. Press the OK button to lock in the setting.
Settings Recommendation: Although this function could be useful if you use the Information display frequently, I suspect that many D500 users do not depend on the Information display as often as those who own lower-cost Nikons. The lower-end cameras are more and more Information display-centered, since many of their users came over from the point-and-shoot world and expect that easy, shortcut style of camera configuration.
However, with that said, since I started doing more night photography, I am finding the [Backlight] and information display setting to be quite useful. It’s nice to have that Information display screen immediately available for making camera adjustments in the dark.
Custom Setting f10: Assign MB-D17 Buttons
(User’s Manual: Page 303, Menu Guide: Page 116)
The Assign MB-D17 buttons function allows you to assign various Button options to the buttons found on the Nikon MB-D17 battery pack. In fact, the f10 Assign MB-D17 buttons function is very similar to the f1 Custom control assignment function, using many of the same Button options.
Because the f1 and f10 assignment functions are identical in many ways, I will cover how to make a Button option assignment here in this section (f10), and provide a direct page reference to the description of what each option does in the previous section (f1). In other words, I’ll use the large explanatory lists for the Button press and Button press + Command dial options in the f1 Custom control assignment section (starting on page 294) as the reference for what each Button option does here in Custom setting f10.
MB-D17 Button Press Options
First let’s see which Button press options can be assigned to which MB-D17 battery pack buttons (table 5.3), in alphabetical order. Each option has a page number reference to the large options lists in Custom setting f1.

Table 5.3: Button press options for the MB-D17 battery pack (X=Yes, blank=No)
** Because the Same as camera AF-ON button setting (shown in table 5.3) is not listed in the previous Button options lists, we will discuss how it works in the upcoming subsection titled Same as Camera AF-ON Button (page 339).
MB-D17 Button Press + Command Dial Options
Next let’s examine which Button press + Command dial options can be assigned to which MB-D17 battery pack buttons (actually, only the Fn button; table 5.4).

Table 5.4 – Button press + Command dial options for the MB-D17 battery pack (X=Yes, blank=No)
MB-D17 Multi Selector Direction Movement Options
Finally, let’s examine the MB-D17’s Multi selector direction key movement (left/right/up/down) options.

Table 5.5: Multi selector options for the MB-D17 battery pack (X=Yes, blank=No)
** The Same as multi selector setting (shown in table 5.5) works differently on the MB-D17 than the same function for the camera’s Multi selector. Therefore, we will examine this particular function in the upcoming subsection titled Same as Camera Multi Selector (page 340).
Assigning a Button Option to an MB-D17 Button
Now that we have examined which buttons can receive an assignment on the MB-D17, let’s see how to actually make an assignment.
Figure 5.51A shows the screens used to make Button option assignments for the buttons on the MB-D17 battery pack. Use the screen flow shown in figure 5.51A, images 1 and 2 (f Controls > f10 Assign MB-D17 buttons) until you reach the third screen in the series. There are four available assignment types, as seen in image 3: Fn button, Fn button + [Command dial], AF-ON button, and Multi selector.

Figure 5.51A – Assigning a Button press option to the MB-D17 Fn button
Let’s examine each of these four settings and see how to make an assignment to each of the available buttons.
MB-D17 Fn Button Press Option Assignment
First we will consider how to make an assignment to the Fn button found on the MB-D17 battery pack.

Figure 5.51B – Assigning a Button press option to the MB-D17 Fn button
Use these steps to assign a Button press option to the MB-D17 Fn button:
- 1. Figure 5.51B begins where figure 5.51A leaves off. Highlight the Fn button selection and scroll to the right (figure 5.51B, image 1).
- 2. Choose one of the 16 available Button press options (figure 5.51B, image 2), referring to the Button Press Options List on page 297 for a description of what each option accomplishes. Press the OK button to lock in the option for that button.
When you press the Fn button, the Button option you’ve selected will execute.
MB-D17 Fn Button Press + Command Dial Option Assignment
Next let’s see how to make an assignment to the MB-D17 Fn button to be used in combination with a Command dial.

Figure 5.51C – Assigning a Button press + Command dial option to the MB-D17 Fn button
Use these steps to assign a Button press + [Command dial] option to the MB-D17 Fn button:
- 1. Figure 5.51C begins where figure 5.51A leaves off. Highlight the Fn button + [Command dial] selection and scroll to the right (figure 5.51C, image 1).
- 2. Choose one of the 12 available Button press + Command dial options (figure 5.51C, image 2), referring to the Button Press + Command Dial Options List on page 303 for a description of what each option accomplishes. Press the OK button to lock in the option for that button.
When you press and hold the MB-D17 Fn button and turn a Command dial, the Button option you’ve selected will execute.
MB-D17 AF-ON Button Press Option Assignment
Next let’s see how to make a Button press assignment to the MB-D17’s AF-ON button.

Figure 5.51D – Assigning a Button press option to the MB-D17 AF-ON button
Use these steps to assign a Button press option to the MB-D17 AF-ON button:
- 1. Figure 5.51D begins where figure 5.51A leaves off. Highlight the AF-ON button selection and scroll to the right (figure 5.51D, image 1).
- 2. Choose one of the 10 available Button press options (figure 5.51D, image 2), referring to the Button Press Options List on page 297 for a description of what each option accomplishes. Press the OK button to lock in the option for that button.
When you press and hold the MB-D17 AF-ON button, the Button option you’ve selected will execute.
MB-D17 Multi Selector Direction Movement Option Assignment
Next let’s see how to make a direction movement (left/right/up/down) assignment to the MB-D17’s Multi selector.

Figure 5.51E – Assigning a direction movement option to the MB-D17 Multi selector
Use these steps to assign a direction movement option to the Multi selector on the MB-D17 battery pack:
- 1. Figure 5.51E begins where figure 5.51A leaves off. Highlight the Multi selector selection and scroll to the right (figure 5.51E, image 1).
- 2. Choose one of the two available selections. The Same as camera multi selector setting is discussed in the upcoming subsection titled Same as Camera Multi Selector (page 340). If you choose Focus point selection, the camera will move the active AF point around the Viewfinder so that you can choose the best position on your subject for accurate autofocus. Press the OK button to lock in the option.
When you press the MB-D17 Multi selector in a specific direction (left/right/up/down), the direction movement option you’ve selected will execute.
Same as Camera AF-ON Button
There is a selection under the AF-ON button setting that is not included in the Button press options list (f1 Custom control assignment) called Same as camera AF-ON button. Let’s examine the setting and discuss what it does.

Figure 5.51F – Same as camera AF-ON button. Use this screen flow: f Controls > f10 Assign MB-D17 buttons > AF-ON button > Same as camera AF-ON button.
When you are choosing one of the 10 Button press options for the MB-D17’s AF-ON button, you can select Same as camera AF-ON button (figure 5.51F, image 3). This setting is very simple. It causes the MB-D17’s AF-ON button to imitate the camera’s AF-ON button. Therefore, if you select Same as camera AF-ON button, whatever Button option you have previously assigned to the camera’s AF-ON button will also apply to the MB-D17’s AF-ON button.
Same as Camera Multi Selector
There is a Button option named Same as camera multi selector listed under f1 Custom control assignment for the camera’s Multi selector pad. However, the button option of the same name for the MB-D17 battery pack works differently. Therefore, we will discuss it here.
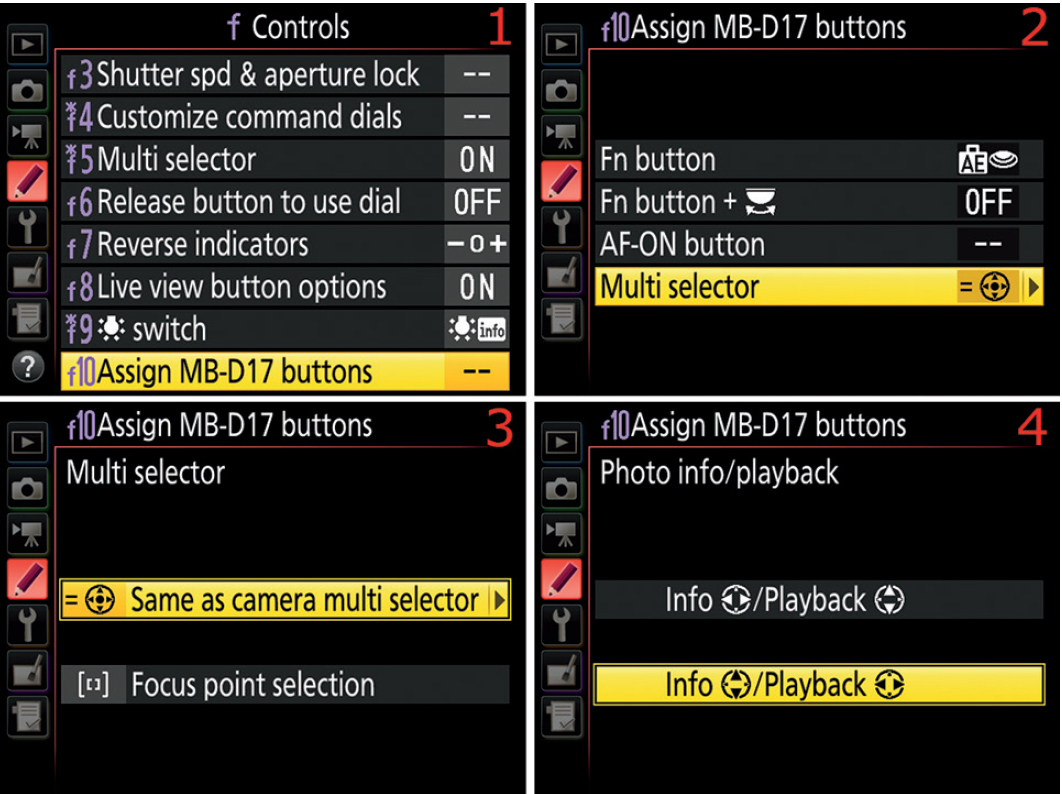
Figure 5.51G – Same as camera multi selector. Use this screen flow: f Controls > f10 Assign MB-D17 buttons > Multi selector > Same as camera multi selector.
The setting called Same as camera multi selector allows you to select what happens when you use the MB-D17’s Multi selector’s left/right/up/down buttons while examining pictures on the camera’s Monitor.
Normally, when you are looking at pictures you have taken, you will press left or right on the MB-D17’s Multi selector to scroll back and forth through your images (default Info/Playback subsetting, highlighted in figure 5.51G, image 4). Pressing up or down on the Multi selector allows you to scroll through the Focus point, Highlights, RGB histogram, Shooting data, and Overview screens (if each Playback type is selected under Playback Menu > Playback display options, see page 29).
However, by selecting the nondefault Info/Playback subsetting, you reverse the directions, so that pressing up or down on the MB-D17’s Multi selector scrolls through the pictures and pressing left or right scrolls through all the information screens.
If, instead, you choose Focus point selection (figure 5.51G, image 3), the MB-D17’s Multi selector will move the active AF point around the Viewfinder, rather than move among images and Playback information screens on the Monitor.
Section Seven: g Movie
Custom Setting g1
Within the g Movie menu you’ll find one Custom setting in the D500:
- g1 – Custom control assignment
Custom Setting g1: Custom Control Assignment
(User’s Manual: Page 303, Menu Guide: Page 119)
The Custom control assignment function allows you to assign specific Button press and Button press + Command dial options to various camera buttons when you have the camera set to Movie live view mode only.
These assignments are completely separate from any Button option assignments you have made in previous functions because they apply only when you have the camera in Live view mode for capturing video. They do not interfere with other button assignments you have made outside of Movie live view mode, and when you exit Movie live view your still-image button assignments will still be in place.
There are a total of 13 assignable Button options. Let’s first examine which buttons will accept Movie live view assignments (table 5.6), then we will consider what each assignment does, and, finally, we’ll see how to make the assignments.
Movie Live View Button Press Options
Table 5.6 examines which buttons will accept which Button press option assignments.

Table 5.6: Button press options for Movie live view (X=Yes, blank=No)
The upcoming list will consider what each of the 13 Button press options listed in table 5.6 accomplishes.
Movie Live View Button Press Options List
This list provides you with a description of each Button press option that is selectable when you are using Movie live view mode, in alphabetical order.
The italicized words Assigned button in the upcoming list represent the button to which an assignment is being made.
- AE/AF lock: This allows you to lock AE (exposure) and AF (focus) on the last meter and autofocus system readings when you hold down the Assigned button.
- AE lock (Hold): This function causes AE (exposure) to lock on the last meter reading when the Assigned button is pressed and released once. It stays locked until you press the Assigned button again or the exposure meter turns off.
- AE lock only: This allows you to lock AE (exposure) on the last meter reading when you hold down the Assigned button.
- AF lock only: This allows you to lock the AF (focus) system on the last autofocus reading when you hold down the Assigned button.
- Exposure compensation +: By pressing the Assigned button, you ask the camera to override the meter and add extra exposure (+) when you press the Pv button. When you set the camera to Exposure compensation + (plus) for the Pv button, the D500 automatically selects the Exposure compensation − (minus) setting for the Fn1 button, and gives you an on-screen notice that says, “Exposure compensation has been assigned to the Fn1 and preview buttons.” At that point, the Pv and Fn1 buttons are paired. If you try to change Pv button to another setting, the camera will give you a terse warning: “Fn1 button exposure compensation assignment has been canceled.”
- Exposure compensation −: By pressing the Assigned button, you ask the camera to override the meter and subtract exposure (−) when you press the Fn1 button. When you set the camera to Exposure compensation − (minus) for the Fn1 button, the D500 automatically selects the Exposure compensation + (plus) setting for the Pv button, and gives you an on-screen notice that says, “Exposure compensation has been assigned to the Fn1 and preview buttons.” At that point, the Fn1 and Pv buttons are paired. If you try to change Fn1 button to another setting, the camera will give you a terse warning: “Preview button exposure compensation assignment has been canceled.”
- Index marking: If you have Index marking enabled while you are recording a movie, you can set an index mark at the current frame position by pressing the AE-L/AF-L button. This index mark does not actually appear in the movie itself. It is, however, available when you are viewing and editing movies. We will discuss the Index marking functionality in more detail in the chapter titled Movie Live View (page 342).
- None: Pressing the Assigned button when in Movie live view mode does nothing.
- Power aperture (close): By selecting this function, you ask the camera to close (stop down) the aperture to a smaller setting when you press and hold the Fn1 button. This is accomplished automatically without you having to turn any dials; just pressing the Fn1 button closes the aperture smoothly. This function works in conjuction with the Power aperture (open) setting in this list. When Power aperture (close) is assigned to the Fn1 button, the D500 automatically assigns Power aperture (open) to the Pv button. If you break that partnership by trying to assign one of the other selections (e.g., Index marking, None) to the Fn1 button, the camera will give you the following message: “Preview button power aperture assignment has been canceled.” Power aperture assignments are available only in exposure modes A and M, and they cannot be used while Photo shooting info is being displayed. When you adjust the aperture, the display may flicker.
- Power aperture (open): By selecting this function, you ask the camera to open the aperture to a larger opening when you press and hold the Pv button. This is accomplished automatically without you having to turn any dials; just pressing the Pv button opens the aperture smoothly. When you set the camera to Power aperture (open) for the Pv button, the D500 automatically selects the Power aperture (close) setting for the Fn1 button, and gives you an on-screen notice that says, “Power aperture has been assigned to the Fn1 and preview buttons.” At that point, the Pv and Fn1 buttons are paired. If you try to change Pv button to another setting, the camera will give you a terse warning: “Fn1 button power aperture assignment has been canceled.” Power aperture assignments are available only in exposure modes A and M, and they cannot be used while Photo shooting info is being displayed. When you adjust the aperture, the display may flicker.
- Record movies: If you are going to shoot movies for a while instead of taking still images, you can select this setting and the camera will enter Movie live view mode whenever you press the Shutter-release button halfway down. Once in Movie live view mode, you can focus by pressing the Shutter-release button halfway down again. Then press the Shutter-release button all the way down to start recording the movie. To stop recording the movie, simply press the Shutter-release button all the way down again. When you have this function selected, the camera behaves more like a true movie camera than a still camera. You cannot, of course, take still images when using this function because the Shutter-release button is set to enter, focus, start, and stop movie recording.
- Take photos: If you are in the middle of recording a movie and you absolutely must have a still image of something going on in the frame, you can acquire a 16:9 aspect ratio image by pressing the Shutter-release button all the way down. The camera will stop recording the movie and take a still image with a pixel ratio of 5568 × 3128 (17.4 MP). This image will closely match the format of an HDTV and many modern computer monitors; it is shorter and wider than a normal 3:2 aspect ratio still image taken outside of Movie live view mode.
- View photo shooting info: This function allows you to view shooting information for still images when using Movie live view mode. Normally, the camera displays the shutter speed, aperture, and ISO sensitivity (recording information) for a potential movie at the bottom of the Monitor. When you press the Assigned button, the camera toggles the display to show the shutter speed, aperture, and ISO sensitivity (shooting information) for still image creation instead. Pressing the Assigned button again toggles the display back to recording information for Movies.
Movie Live View Button Press + Command Dial Options
Table 5.7 examines which buttons will accept which Button press option assignments.

Table 5.7 – Button press + Command dial options for Movie live view (X=Yes, blank=No)
The upcoming list will consider what each of the two Button press + Command dial options listed in table 5.7 accomplishes.
Movie Live View Button Press + Command Dial Options List
These Button press + Command dial options are applicable to three of the five buttons used during Movie live view (table 5.7). As in previous lists, the italicized words Assigned button represent the button to which an assignment is being made.
- Choose image area: When you are shooting with a movie frame size of 1920×1080 (1080p), you can press the Assigned button and rotate a Command dial to change the Image area. Your Image area choices are DX and 1.3x. The Live view will change on the Monitor to reflect the new Image area size. You cannot make this change while recording a movie.
- None: Nothing happens when you press the Assigned button and rotate a Command dial.
Making Movie Live View Button Assignments
Let’s examine each of the five programmable buttons for Movie live view and how to make a Button option assignment to each one. Figure 5.52A shows the screen flow used to open the g1 Custom control assignment screen.
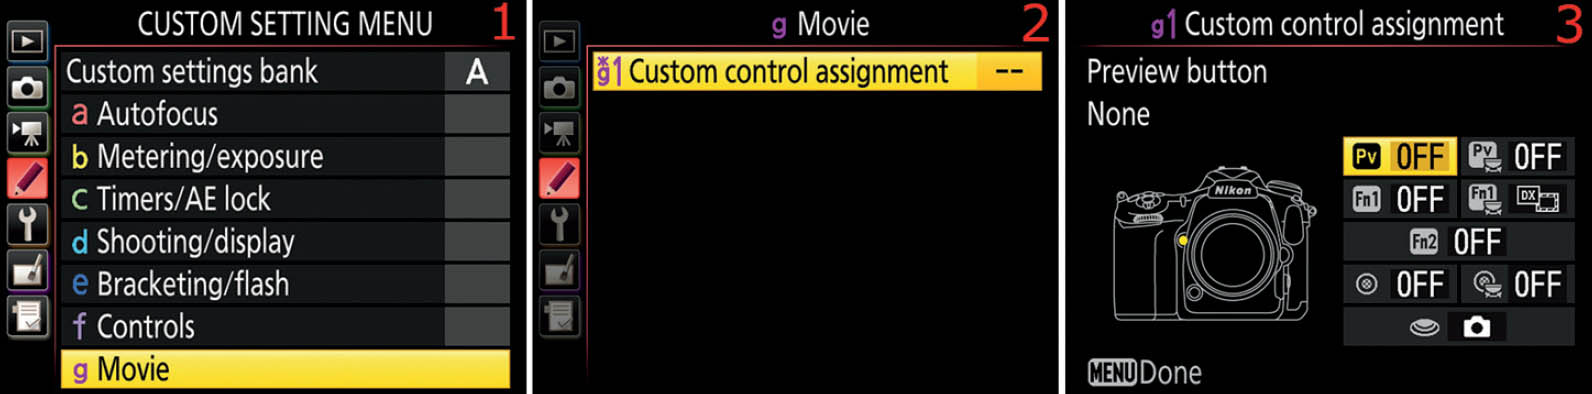
Figure 5.52A – The Screen flow used to open the g1 Custom control assignment screen is as follows: Custom Setting Menu > g Movie > g1 Custom control assignment
Refer to the previous Live View Menu Button Press Options List (page 342) and Live View Menu Button Press + Command Dial Options List (page 344) to determine which of the Button options you want to assign to each button in the following screens (figures 5.52B to 5.52I).
Pv Button Press

Figure 5.52B – Pv Button press options
Figure 5.52B starts where figure 5.52A leaves off. Use the screen shown in image 2 to select the Button press option you want to use for the Pv button. Press the OK button to save your selection.
Pv Button Press + Command Dial

Figure 5.52C – Pv Button press + Command dial options
Figure 5.52C starts where figure 5.52A leaves off. Use the screen shown in image 2 to select the Button press + Command dial option you want to use for the Pv button. Press the OK button to save your selection.
Fn1 Button Press

Figure 5.52D – Fn1 Button press options
Figure 5.52D starts where figure 5.52A leaves off. Use the screen shown in image 2 to select the Button press option you want to use for the Fn1 button. Press the OK button to save your selection.
Fn1 Button Press + Command Dial
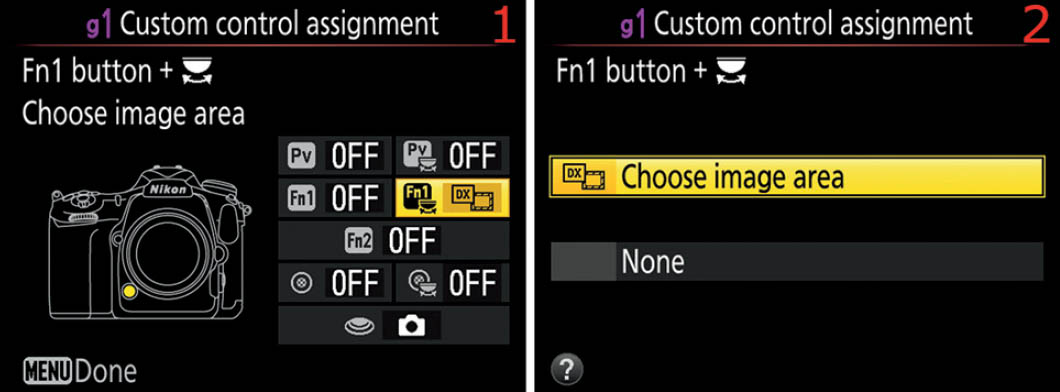
Figure 5.52E – Fn1 Button press + Command dial options
Figure 5.52E starts where figure 5.52A leaves off. Use the screen shown in image 2 to select the Button press + Command dial option you want to use for the Fn1 button. Press the OK button to save your selection.
Fn2 Button Press

Figure 5.52F – Fn2 Button press options
Figure 5.52F starts where figure 5.52A leaves off. Use the screen shown in image 2 to select the Button press option you want to use for the Fn2 button. Press the OK button to save your selection.
Sub-Selector Center Button Press

Figure 5.52G – Sub-selector center Button press options
Figure 5.52G starts where figure 5.52A leaves off. Use the screen shown in image 2 to select the Button press option you want to use for the Sub-selector center button. Press the OK button to save your selection.
Sub-Selector Center Button Press + Command Dial

Figure 5.52H – Sub-selector center Button press + Command dial options
Figure 5.52H starts where figure 5.52A leaves off. Use the screen shown in image 2 to select the Button press + Command dial option you want to use for the Sub-selector center button. Press the OK button to save your selection.
Shutter-Release Button Press

Figure 5.52I – Shutter-release Button press options
Figure 5.52I starts where figure 5.52A leaves off. Use the screen shown in image 2 to select the Button press option you want to use for the Shutter-release button. Press the OK button to save your selection.
Author’s Conclusion
Using the Shooting Banks and Custom Banks Together
Now that you have set up and named one of the Custom settings banks, it is time to configure all the Custom settings banks with different shooting styles in mind. Once you have each Photo shooting menu bank and Custom settings bank configured, you can use them together.
Often, I use a combination of Photo shooting menu bank A and Custom settings bank A. But nothing prevents you from using Photo shooting menu bank B with Custom settings bank D, or Photo shooting menu bank C with Custom settings bank A. Choose whatever combination you’d like to use. That’s where the camera’s extreme flexibility comes in.
Your D500 can change the way it shoots on the fly, in much less time than it takes to talk about it. Now that you’ve read this over, set up a few banks on your camera. Give it some serious thought and then do it. Think of the ways you most often take pictures, and configure your D500 for each of those ways. Your camera will be customized to you!
Now, let’s move into the next menu system—the Setup Menu—and configure the camera’s basic setup. This menu is very important for initial camera configuration, but only a few of its functions are used after initial setup.