
Now it’s time to fire up your Nikon D3400 and take some photos. The easy part is turning on the power—the Off-On switch is on the right side, concentric with the shutter release button. Turn on the camera, and, if you mounted a lens and inserted a fresh battery and memory card—as I prompted you in the last chapter—you’re ready to begin. You’ll need to select a release mode, exposure mode, metering mode, focus mode, and, if need be, elevate the D3400’s built-in flash.
But first, you need to learn how to use the screen that allows you to make most of the key adjustments and settings available with the D3400: the information edit display. Some of these choices can also be made using the menu system, as you’ll learn in Chapters 4 and 5, but the information edit display is almost always faster.
Using the Information Edit Display
You can use the information edit display to change many of the D3400’s basic settings. You shouldn’t skip this section, because it provides basic information on how to change settings, including choosing exposure, metering, and autofocus modes.
There are two “information” buttons on the D3400, which can lead to confusion among new owners of this camera. The pair is shown in Figure 2.1. At right you can see the Info button; its sole function is to turn the rear-panel LCD display on (if it’s not visible) or off (if it is). Turning off the LCD information display when you’re using the viewfinder saves power and can avoid a distraction that can be annoying when shooting in dark surroundings, such as a concert.

Figure 2.1 Information edit button (left); Info button (right).
At left in the figure is the information edit or i button, which is located in the lower-left corner of the back of the camera, next to the color LCD. The information edit (i) button is pressed once to produce the shooting information display (see Figure 2.2) if it is not visible, and then a second time to activate the information edit display (see Figure 2.3), which is the screen you can use to make many adjustments.
The difference between the two is simple: the Info button just turns the shooting information screen on or off; the information edit (i) button allows you to make changes to the settings shown. Throughout most of this book I will just refer to the information edit button as the i button. Here’s a breakdown of how they work:
- Info button. Press to toggle the shooting information screen on or off. That’s all it does.
- Information edit (i) button. If the LCD monitor is blank, press once to go directly to the information edit display. If a screen is already displayed, the i button toggles between the shooting information screen and the information edit screen.

Figure 2.2 Press the Info button to turn the shooting information screen on or off.

Figure 2.3 Pressing the i button gives you access to the information edit screen to modify your options.
The shooting information display is a useful status screen. (Shown in the figure is the “Classic” version. The default “Graphic” version is also available; in Chapter 5, I’ll show you how to switch between Classic and Graphic modes using the Info Display Format entry in the Setup menu.) For most of the changes described in this chapter, press the information edit (i) button again to access the information edit screen, which allows you to modify the most frequently accessed options as I describe.
To change any settings, follow these steps:
- Overkill reminder. If the LCD screen is blank, press the i button (it’s the bottom button to the left of the LCD) to access the information edit screen.
- Highlight the setting to be changed. Use the multi selector pad’s left/right/up/down buttons to navigate to the settings at the bottom of the screen to the option you want to change.
- Access settings screen. Press the OK button in the center of the multi selector pad to produce a screen where you can change options, as seen in Figure 2.4. The available settings screens include image size, image quality, ISO, focus modes, and other settings.
- Select option. Use the up/down buttons to move the yellow highlighting to the desired option within the settings screen.
- Confirm. Press the OK button to confirm your choice.
- Exit. Press the i button to exit the screen.

Figure 2.4 Choose your settings.
Choosing a Release Mode
This section shows you how to choose from single-frame, continuous mode, quiet shutter release, self-timer mode, and remote control modes.
This shooting mode determines when (and how often) the D3400 makes an exposure. If you’re coming to the dSLR world from a point-and-shoot camera, you might have used a model that labels these options as drive modes, dating back to the film era when cameras could be set for single-shot or “motor drive” (continuous) shooting modes. Your D3400 has six release (shooting/drive) modes: Single frame, Continuous (Burst), Quiet Shutter Release, Self-timer, 2-Second Delayed Remote, and Quick Response Remote. Set any of these using the information edit screen.
Press the release mode button, located on the back of the camera, just southwest of the multi selector pad to access the release mode screen, which is similar to the ISO screen shown earlier in Figure 2.4. Scroll down to select the exact release mode you want. A thumbnail appears at left to provide a hint about what that release mode is used for. Press the i button to back out of the screen, or the OK button to confirm your highlighted choice and exit.
- Single frame. In this mode, a picture is taken each time the shutter release is pressed down all the way.
- Continuous. The camera records images at roughly a 5-frames-per-second rate as long as the shutter button is held down, or until an area of memory in the camera called a buffer fills, and the D3400 stops shooting until enough pictures are written to the memory card to allow more to be captured. Continuous shooting is useful for grabbing action shots of sports, or for capturing fleeting expressions (especially of children).
- Quiet Shutter Release. Think of this as a “quieter” shooting mode rather than a true “quiet” mode. In this mode, the camera takes a single picture when the shutter button is pressed all the way down, just as in Single frame mode. However, the camera’s internal beeper won’t chirp when autofocus is achieved, and after the shutter trips, capturing the image, the camera’s viewing mirror doesn’t flip back down until you release the shutter button. So, taking a picture in Quiet Shutter Release mode results in a single “clunk” sound as the mirror flips up and the shutter opens/closes, eventually followed by a second “clunk” when you release pressure on the shutter button. Theoretically, that’s quieter than the “beep-clunk-clunk” heard in Single frame mode.
- Self-timer. In this mode, press the shutter release down all the way, and the camera takes a picture 10 seconds later. You can also specify 2-, 5-, 10-, and 20-second delays in the Setup menu’s Self-timer entry, as well as tell the camera to fire off from 1 to 9 shots when the timer has elapsed. (Chapter 5 will show you how to do this.) Multiple shots are a good way to thwart those accidental (or intentional) blinkers or yawners who might otherwise spoil a family portrait.
The self-timer is a good way to get into the picture yourself, or to allow the vibration induced in a tripod-mounted camera to settle down after you’ve “punched” the shutter release. A white lamp on the front of the camera will blink while the timer counts down, then remain on continuously for about two seconds just before the picture is taken. Any time you use the camera on a tripod (with the self-timer or otherwise) make sure there is no bright light shining on the viewfinder window; if so, cover it or replace the rubber eyecup with the DK-5 eyepiece cap and block the window.

Note
If you plan to dash in front of the camera to join the scene, consider using manual focus so the D3400 won’t refocus on your fleeing form and produce unintended results. (Nikon really needs to offer an option to autofocus at the end of the self-timer cycle.)
- 2-Second Delayed Remote/Quick Response Remote. If you want to use the ML-L3 infrared remote, you’ll need to change the release mode to either of these two settings: 2s Delayed Remote (shutter releases two seconds after you press the button on the ML-L3 IR remote) or Quick Response Remote (the shutter trips immediately when the button is pressed). Once you’ve selected either of these two release modes, the camera then “looks” for the remote signal for a period of time you specify using Remote On Duration setting in the Setup menu, where you can choose from 1, 5, 10, or 15 minutes. As with the self-timer, make sure there is no bright light shining on the viewfinder window; if so, block the window, either with the optional DK-5 eyepiece cap, or shade it with your hand (without touching the camera).
Selecting a Shooting Mode
This section shows you how to choose an exposure mode. If you’d rather have the D3400 make all of the decisions for you, just rotate the mode dial to the green Auto setting and jump to the section titled “Reviewing the Images You’ve Taken.” If you’d rather choose one of the Scene modes, tailored to specific types of shooting situations, or try out the camera’s semi-automatic modes, continue reading this section.
The Nikon D3400 has three types of shooting modes, advanced modes/exposure modes, a second set, which Nikon labels Scene modes, and a third type of mode called Special Effects (represented by the EFFECTS position on the mode dial). The advanced modes include Programmed-auto (or Program mode), Aperture-priority auto, Shutter-priority auto, and Manual exposure mode. These are the modes you’ll use most often after you’ve learned all your D3400’s features, because they allow you to specify how the camera chooses its settings when making an exposure, for greater creative control.
The Scene modes take full control of the camera, make all the decisions for you, and don’t allow you to override the D3400’s settings. They are most useful while you’re learning to use the camera, because you can select an appropriate mode (Auto, Auto/No Flash, Portrait, Landscape, Child, Sports, Close-up, or Night Portrait) and fire away. You’ll end up with decent photos using appropriate settings, but your opportunities to use a little creativity (say, to overexpose an image to create a silhouette, or to deliberately use a slow shutter speed to add a little blur to an action shot) are minimal. The D3400 also has a Guide mode, with four simplified menus, Shoot, View/Delete, Retouch, and Setup, that provides fast access only to the most frequently used settings. I’ll explain Guide mode later in this chapter, after you’ve had an introduction to the three types of options that are available in its menus. I’ll cover EFFECTS in Chapter 4.
Choosing a Scene Mode
The eight Scene modes can be selected by rotating the mode dial on the top right of the Nikon D3400 to the appropriate icon (shown in Figure 2.5).

Figure 2.5 Rotate the mode dial to select an automated “Scene” mode.
The Scene modes are:
- Auto. In this mode, the D3400 makes all the exposure decisions for you, and will pop up the internal flash if necessary under low-light conditions. The camera automatically focuses on the subject closest to the camera (unless you’ve set the lens to manual focus), and the autofocus assist illuminator lamp on the front of the camera will light up to help the camera focus in low-light conditions.
- Auto (Flash Off). Identical to Auto mode, except that the flash will not pop up under any circumstances. You’d want to use this in a museum, during religious ceremonies, concerts, or any environment where flash is forbidden or distracting.
- Portrait. Use this mode when you’re taking a portrait of a subject standing relatively close to the camera and want to de-emphasize the background, maximize sharpness, and produce flattering skin tones. The built-in flash will pop up if needed.
- Landscape. Select this mode when you want extra sharpness and rich colors of distant scenes. The built-in flash and AF-assist illuminator are disabled.
- Child. Use this mode to accentuate the vivid colors often found in children’s clothing, and to render skin tones with a soft, natural-looking texture. The D3400 focuses on the closest subject to the camera. The built-in flash will pop up if needed.
- Sports. Use this mode to freeze fast-moving subjects. The D3400 selects a fast shutter speed to stop action, and focuses continuously on the center focus point while you have the shutter release button pressed halfway. However, you can select one of the other two focus points to the left or right of the center by pressing the multi selector left/right buttons. The built-in electronic flash and focus assist illuminator lamp are disabled.
- Close-up. This mode is helpful when you are shooting close-up pictures of a subject from about one foot away or less, such as flowers, bugs, and small items. The D3400 focuses on the closest subject in the center of the frame, but you can use the multi selector right and left buttons to focus on a different point. Use a tripod in this mode, as exposures may be long enough to cause blurring from camera movement. The built-in flash will pop up if needed.
- Night Portrait. Choose this mode when you want to illuminate a subject in the foreground with flash (it will pop up automatically, if needed), but still allow the background to be exposed properly by the available light. The camera focuses on the closest main subject. Be prepared to use a tripod or a vibration-resistant lens like the 18-55 VR kit lens to reduce the effects of camera shake. (You’ll find more about VR and camera shake in Chapter 10.)
Choosing an Advanced Mode
If you’re very new to digital photography, you might want to set the camera to P (Program mode) and start snapping away. That mode will make all the appropriate settings for you for many shooting situations. If you have more photographic experience, you might want to opt for one of the semi-automatic modes, or even Manual mode. These advanced modes all let you apply a little more creativity to your camera’s settings. Figure 2.6 shows the position of the modes described next.
- P (Program). This mode allows the D3400 to select the basic exposure settings, but you can still override the camera’s choices to fine-tune your image, while maintaining metered exposure, as I’ll describe in Chapter 6.
- S (Shutter-priority). This mode is useful when you want to use a particular shutter speed to stop action or produce creative blur effects. Choose your preferred shutter speed, and the D3400 will select the appropriate f/stop for you.
- A (Aperture-priority). Choose when you want to use a particular lens opening, especially to control sharpness or how much of your image is in focus. Specify the f/stop you want, and the D3400 will select the appropriate shutter speed for you.
- M (Manual). Select when you want full control over the shutter speed and lens opening, either for creative effects or because you are using a studio flash or other flash unit not compatible with the D3400’s automatic flash metering.

Figure 2.6 Rotate the mode dial to select an advanced mode.
Choosing a Metering Mode
This section shows you how to choose the area the D3400 will use to measure exposure, giving emphasis to the center of the frame; evaluating many different areas of the frame; or measuring light from a small spot in the center of the frame.
The metering mode you select determines how the D3400 calculates exposure. You might want to select a particular metering mode for your first shots, although the default Matrix metering is probably the best choice as you get to know your camera. (It is used automatically in any of the D3400’s Scene modes.) I’ll explain when and how to use each of the three metering modes later. To change metering modes, use the information edit screen. (You can also specify metering mode using the Shooting menu, as I’ll describe in Chapter 6.)
- Access information edit screen. Press the i button twice and navigate to the metering selection using the multi selector buttons.
- View options. Press OK to select the option.
- Select metering mode. Use the multi selector up/down buttons to choose Matrix, Center-weighted, or Spot metering (described below and represented by the icons shown in Figure 2.7).
- Confirm setting. Press OK to confirm your choice.
- Exit. Press the i button to exit, or just tap the shutter release button.
- Matrix metering. The standard metering mode; the D3400 attempts to intelligently classify your image and choose the best exposure based on readings from a 420-segment color CCD sensor that interprets light reaching the viewfinder using a database of hundreds of thousands of patterns.
- Center-weighted metering. The D3400 meters the entire scene, but gives the most emphasis to the central area of the frame, measuring about 8mm.
- Spot metering. Exposure is calculated from a smaller 3.5 mm central spot, about 2.5 percent of the image area.
You’ll find a detailed description of each of these modes in Chapter 6.

Figure 2.7 Metering mode icons are (top to bottom): Matrix, Center-weighted, Spot.
Choosing Focus Modes
This section shows how to select when the D3400 calculates focus: all the time (continuously), only once when you press a control like the shutter release button (single autofocus), or manually when you rotate a focus ring on the lens.
The Nikon D3400 can focus your pictures for you, or allow you to manually focus the image using the focus ring on the lens (I’ll help you locate this ring in Chapter 3). Switching between automatic and manual focus is easy. You can move the AF/MF (autofocus/manual focus) or M/A-M (manual fine-tune autofocus/manual) switch found on most lenses (but not on some kit lenses) mounted on your camera. If you want to use manual focus and your lens does not have either type of switch, you can use the Shooting menu entry, described in Chapter 4, instead.
When using autofocus, you have additional choices. The D3400 has eleven autofocus zones that can be used to zero in on a particular subject area in your image. (See Figure 2.8.) In addition, you can select when the D3400 applies its focusing information to your image prior to exposure. I’ll describe both in the next two sections.

Figure 2.8 The D3400 can select which of eleven focus zones to use, or allow you to make the choice, depending on the autofocus area mode you specify.
Choosing Autofocus-Area Mode
You can set the AF-area mode using the information edit screen.
- Press the i button twice and navigate to the AF-area mode selection (it’s second from the left in the bottom row) using the multi selector buttons.
- Press OK to select the option.
- Use the multi selector up/down buttons to choose Single-point AF, Dynamic-area AF, 3D-tracking (11 points), or Auto-area AF (described below).
- Press OK to confirm your choice.
- Press the i button to exit, or just tap the shutter release button.
The four modes, described in more detail in Chapter 7, are as follows:
- Single-point. You always choose which of the eleven points are used, and the Nikon D3400 sticks with that focus bracket, no matter what. This mode is best for non-moving subjects.
- Dynamic-area. You can choose which of the eleven focus zones to use, but the D3400 will switch to another focus mode when using AF-C or AF-A mode (described next) and the subject moves. This mode is great for sports or active children.
- 3D-tracking (11 points). You can select the focus zone, but when not using AF-S mode, the camera refocuses on the subject if you reframe the image.
- Auto-area. This default mode chooses the focus point for you, and can use distance information when working with a lens that has a G or D suffix in its name. (See Chapter 10 for more on the difference between G/D lenses and other kinds of lenses.)
Choosing Focus Mode
When you are using Program, Aperture-priority, Shutter-priority, or Manual exposure mode, you can select the autofocus mode when the D3400 measures and locks in focus prior to pressing the shutter release down all the way and taking the picture. The focus mode is chosen using the information edit screen.
- Press the i button twice and navigate to the focus mode selection (it’s at left in the bottom row) using the multi selector buttons.
- Press OK to select the option.
- Use the multi selector up/down buttons to choose AF-A, AF-S, AF-C, or M (described next).
- Press OK to confirm your choice.
- Press the i button to exit, or just tap the shutter release button.
The four focus modes when not using live view are as follows (there are additional autofocus modes, including Face Priority, available when shooting in live view):
- Auto-servo AF (AF-A). This default setting switches between AF-C and AF-S, as described below.
- Single-servo AF (AF-S). This mode, sometimes called single autofocus, locks in a focus point when the shutter button is pressed down halfway, and the focus confirmation light glows at bottom left in the viewfinder. The focus will remain locked until you release the button or take the picture. This mode is best when your subject is relatively motionless.
- Continuous-servo AF (AF-C). This mode, sometimes called continuous autofocus, sets focus when you partially depress the shutter button (or other autofocus activation button), but continues to monitor the frame and refocuses if the camera or subject is moved. This is a useful mode for photographing sports and moving subjects.
- Manual focus (M). When focus is set to manual, you always focus manually using the focus ring on the lens. The focus confirmation indicator in the viewfinder provides an indicator when correct focus is achieved.
Adjusting White Balance and ISO
This section describes some optional features you can select if you feel you need to choose the white balance or change the camera’s sensitivity setting.
There are a few other settings you can make if you’re feeling ambitious, but don’t feel ashamed if you postpone using these features until you’ve racked up a little more experience with your D3400. If you like, you can custom-tailor your white balance (color balance) and ISO (sensitivity) settings. I’ll explain more about what these settings are, and why you might want to change them, in Chapter 4. To start out, it’s best to set white balance (WB) to Auto, and ISO to ISO 200 for daylight photos, and ISO 400 for pictures in dimmer light. (Don’t be afraid of ISO 1600, however; the D3400 does a much better job of producing low-noise photos at higher ISOs than many other cameras.) You’ll find complete recommendations for both of these settings in Chapter 4. You can adjust either one now using the information edit screen, as described multiple times in this chapter. I won’t repeat the instructions again. The WB (for white balance) and ISO settings are third and fifth from the left in the top row in the information edit screen (respectively).
Reviewing the Images You’ve Taken
Here you’ll discover how to review the images you’ve taken in a basic way. I’ll provide more detailed options for image review in Chapter 4.
The Nikon D3400 has a broad range of playback and image review options, and I’ll cover them in more detail in Chapter 4. For now, you’ll want to learn just the basics. Here is all you really need to know at this time, as shown in Figure 2.9:
- Display an image. Press the Playback button (marked with a white right-pointing triangle) at the upper-left corner of the back of the camera to display the most recent image on the LCD.
- Scroll among images. Spin the command dial left or right to review additional images. You can also use the multi selector left/right buttons. Press right to advance to the next image, or left to go back to a previous image.
- Change image information display. Press the multi selector button up or down to change among overlays of basic image information or detailed shooting information. I’ll show you how to specify the types of information shown in Chapter 4.
- Magnify/reduce image on screen. Press the Zoom In button repeatedly to zoom in on the image displayed; the Zoom Out button reduces the image. A thumbnail representation of the whole image appears in the lower-right corner with a yellow rectangle showing the relative level of zoom. At intermediate zoom positions, the yellow rectangle can be moved around within the frame using the multi selector.

Figure 2.9 Review your images.
- Protect images. Press the Protect button to mark an image and shield it from accidental erasure (but not from reformatting of the memory card).
- Delete current image. Press the Trash button twice to remove the photo currently being displayed.
- Exit playback. Press the Playback button again, or just tap the shutter release button to exit playback view.
You’ll find information on viewing thumbnail indexes of images, automated playback, and other options in Chapter 4.
Using the Built-in Flash
This section provides a quick introduction to your camera’s built-in flash. You’ll find more information on flash photography in Chapter 11.
Working with the D3400’s built-in flash (as well as external flash units like the Nikon SB-500) deserves a chapter of its own, and I’m providing one (see Chapter 11). But the built-in flash is easy enough to work with that you can begin using it right away, either to provide the main lighting of a scene or as supplementary illumination to fill in the shadows.
The built-in flash will pop up automatically as required in Auto, Portrait, Child, Close-up, and Night Portrait Scene modes. To use the built-in flash in Manual, Aperture-priority, Shutter-priority, or Program modes, just press the flash pop-up button (shown in Figure 2.10). When the flash is fully charged, a lightning bolt symbol will appear at the right side of the viewfinder display. When using P (Program) and A (Aperture-priority) exposure modes, the D3400 will select a shutter speed for you automatically from the range of 1/200th to 1/60th seconds. In S (Shutter-priority) and M (Manual) modes, you select the shutter speed from 1/200th to 30 seconds.

Figure 2.10 The pop-up electronic flash can be used as the main light source or for supplemental illumination.
Transferring Photos to Your Computer
When you’re ready to transfer your photos to your computer, you’ll find everything you need to know in this section.
The final step in your picture-taking session will be to transfer the photos you’ve taken to your computer for printing, further review, or image editing. Your D3400 allows you to print directly to PictBridge-compatible printers and to create print orders right in the camera, plus you can select which images to transfer to your computer. I’ll outline those options in Chapter 4.
I always recommend using a card reader attached to your computer to transfer files, because that process is generally a lot faster and doesn’t drain the D3400’s battery. However, you can also use a cable for direct transfer (an extra-cost option because Nikon no longer includes a USB cable in the box), which may be your only option when you have the cable and a computer, but no card reader (perhaps you’re using the computer of a friend or colleague, or at an Internet café).
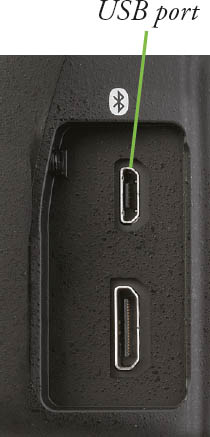
Figure 2.11 Images can be transferred to your computer using a USB cable.
To transfer images from the camera to a Mac or PC using the USB cable:
- Turn off the camera.
- Pry back the cover that protects the D3400’s USB port, and plug the USB cable furnished with the camera into the USB port. (See Figure 2.11.)
- Connect the other end of the USB cable to a USB port on your computer.
- Turn on the camera. The operating system itself, or installed software such as Nikon ViewNX-i usually detects the camera and offers to copy or move the pictures. Or, the camera appears on your desktop as a mass storage device, enabling you to drag and drop the files to your computer.
To transfer images from a Secure Digital card to the computer using a card reader, as shown in Figure 2.12, do the following:
- Turn off the camera.
- Slide open the memory card door and remove the SD card.
- Insert the Secure Digital card into your memory card reader. Your installed software detects the files on the card and offers to transfer them. The card can also appear as a mass storage device on your desktop, which you can open and then drag and drop the files to your computer.

Figure 2.12 A card reader is the fastest way to transfer photos.
Using the Guide Mode
The Nikon D3400 is one of the few Nikon digital SLRs to have a clever “mode” installed right on the mode dial in the form of the Guide mode, shown in Figure 2.13. This mode gives you fast access to some of the most-used commands, through an easy-to-navigate series of screens that lead you right through accessing the functions you need to shoot, view, or delete your photos, or set up the D3400 camera.
The Guide mode doesn’t really need much in the way of instructions—once you rotate the mode dial to the GUIDE position you can easily figure out what you want to do by following through the menus and prompts. But that’s the whole idea—the Guide mode is designed for absolute new-bies to the Nikon D3400, who want to do simple tasks without the need to read even the abbreviated instructions provided in the manual. Of course, I’m going to provide instructions for using this menu, anyway, because the mere thought of going out and taking pictures with nothing but training wheels for support is frightening for some who’ve purchased the D3400 camera as their first digital camera or digital SLR.
Rotate the mode dial to GUIDE and the LCD lights up with the screen, as shown in Figure 2.13. If it is not visible, press the MENU button located to the left of the LCD to make it appear. You can choose guides for shooting, viewing/deleting images, retouching photos, and setting up your camera. Use the left/right buttons on the multi selector pad to highlight Shoot, View/Delete, Retouch, or Set up, and then press the OK button in the center of the pad.
Shoot Options
If you choose Shoot, you’ll see a simple menu like the one shown in Figure 2.14. There are only two options, Easy Operation and Advanced Operation. You can use the up/down buttons to highlight one, then press the multi selector right button to view that menu.

Figure 2.13 Rotate the mode dial to GUIDE to use the ultra-easy Guide mode.

Figure 2.14 Easy Operation corresponds to the Scene modes located on the mode dial.
Easy Operation
This mode lists functions like Auto, No Flash, Distant Subjects, Close-ups, Sleeping Faces, Moving Subjects, Landscapes, Portraits, Night Portraits, and Photograph Night Landscapes. (If you haven’t jumped directly to this section from the beginning of the chapter, you might recognize that some of these options correspond to the Scene modes that are also built into the mode dial.) Just follow these steps:
- Select mode. The first page of the Easy Operation choices is shown in Figure 2.15. You can scroll with the multi selector’s up/down buttons to view them all. Select one by highlighting it and pressing the right multi selector button.
- Instruction screen appears. You’ll be shown a screen explaining the mode you’ve selected and its functions. For example, if you’ve selected Sleeping Faces, the screen says “The camera is now in ‘Child’ mode with the flash off and the release mode set to ‘Quiet shutter release.’” This screen usually (but not always) lingers for a few seconds to give you time to read it, then proceeds to the next step. You can jump to that step immediately by pressing the right button.
- Select Shooting Mode or More Settings. The next screen, seen at left in Figure 2.16, allows you to choose whether to frame your shot using the optical viewfinder, use live view to take still photos while viewing the actual sensor image on the LCD monitor on the back of the camera, or shoot movies. You can also scroll down to More Settings to set things like Flash Mode, Release Mode, or ISO sensitivity (Figure 2.16, right). Press the right button or OK to switch to your selected shooting mode, or to use More Settings.
- Take Photos. When the D3400 exits the Guides, you can shoot photos using the chosen mode until you rotate the mode dial from the Guide position to another setting, or turn the camera off.

Figure 2.15 Choose any of these available easy operations and you’ll be shown a screen with instructions on how to take the picture.

Figure 2.16 Select a shooting mode or more settings (left); additional settings are available, too (right).
Advanced Operation
This choice is as easy to use as Easy Operation, but it may ask you to manually make some settings on the camera to get the effect you’re asking for. It includes eight options: Soften Backgrounds, Bring More into Focus, Freeze Motion (People), Freeze Motion (Vehicles), Show Water Flowing, Capture Reds in Sunsets, Take Bright Photos, and Take Dark (low key) Photos. (See Figure 2.17, left.)
Selecting any of them sets up the camera for that type of picture, and provides you with a screen of information explaining how to take the picture. For example, with Soften Backgrounds, the D3400 will ask you to choose a lower f/stop so the background will blur (Figure 2.17, right). Nikon’s choice of words isn’t always the best: by “lower f-number” they mean a larger f/stop, which happens to have a smaller absolute number. For example, f/6.3 is a “lower” number than f/8, which means it is a larger f/stop and provides less depth-of-field that results in a slightly blurrier background. Don’t worry: I’ll explain all about f/stops and exposure (Chapter 4) and depth-of-field (Chapter 5).

Figure 2.17 Choose an advanced option (left) and the D3400 will show you how to use it (right).
View/Delete Options
This screen has five options you can select to activate functions (when not in Guide mode). These include View Single Photos, View Multiple Photos, Choose a Date (select images to view from a calendar of dates), View a Slide Show, and Delete Photos.
Retouch Options
This screen has six options for retouching functions: Trim, Filter Effects (cross screen), Filter Effects (soft), Photo Illustration, Miniature Effect, and Selective Color.
Set Up Options
This screen has 13 options that correspond to the choices available in the Shooting and Setup menus that I’ll describe in detail in Chapters 4 and 5. The choices available include Image Quality, Image Size, Auto Off Timers, Date Stamp, Display and Sound Settings, Movie Settings, Playback Display Options, Clock and Language, Format Memory Card, HDMI, Airplane Mode, Smart Device Connection, and Slot Empty Release Lock. You can explore them in Guide mode if you like, or read how and why you might want to change these options in Chapters 4 and 5.