
For an entry-level camera, the Nikon D3400 has a remarkable number of options and settings you can use to customize the way your camera operates. Not only can you change shooting settings used at the time the picture is taken, but you can adjust the way your camera behaves. Indeed, if your D3400 doesn’t operate in exactly the way you’d like, chances are you can make a small change in the Playback, Shooting, and Setup menus that will tailor the D3400 to your needs.
This chapter will help you sort out the settings for two of the D3400’s menus. These are the Playback and Shooting menus, which determine how the D3400 displays images on review, and how it uses many of its shooting features to take a photo. I’ll cover the Setup and Retouch menus in Chapter 5.
As I’ve mentioned before, this book isn’t intended to replace the manual you received with your D3400, nor have I any interest in rehashing its contents. You’ll still find the original manual useful as a standby reference that lists every possible option in exhaustive (if mind numbing) detail—without really telling you how to use those options to take better pictures. There is, however, some unavoidable duplication between the Nikon manual and this chapter, because I’m going to explain all the key menu choices and the options you may have in using them. You should find, though, that I will give you the information you need in a much more helpful format, with plenty of detail on why you should make some settings that are particularly cryptic.
I’m not going to waste a lot of space on some of the more obvious menu choices in these chapters. For example, you can probably figure out, even without my help, that the Beep option in the Setup menu with the solid-state beeper in your camera sounds off during various activities (such as the self-timer countdown). In this chapter, I’ll devote no more than a sentence or two to the blatantly obvious settings and concentrate on the more confusing aspects of D3400 setup, such as autofocus. I’ll start with an overview of using the D3400’s menus themselves.
Anatomy of the Nikon D3400’s Menus
For this entry-level camera, Nikon has tried to simplify the menu system, reducing five separate menu listings found in more upscale cameras in the Nikon line (Playback, Photo Shooting, Movie Shooting, Custom Settings, and Setup) to three. (The Custom Settings menu has been banished, and its options distributed among the three remaining menus.) There are also two “bonus” menus: the Retouch menu, which contains functions you can apply to your images rather than operational options; and the Recent Settings menu, which simply displays the 20 most recent menu items you’ve accessed. If you’ve never used a Nikon digital SLR before, this chapter will help you learn how to access and apply all these choices and, most importantly, why you might want to use a particular option or feature. The Nikon D3400’s menu lineup is quite sound, and easy to learn.
If you’re switching from a previous Nikon dSLR, you really need this chapter. As always, in making its menu improvements, Nikon continues to confound long-time users by changing the names of many menu items, shuffling their order, and hiding old favorite options in places you might never think to look. (Entries for redefining Fn button options, the AE-L/AF-L control, and AE lock are now tucked away under a heading called “Buttons,” for example.) Nikon must certainly love menu layouts, because it uses so many different versions of them in its various digital SLR cameras, with little consistency beyond family resemblance among them.

Figure 4.1 The most recently accessed menu appears when you press the MENU button.
If you’re lucky enough to be able to work with more than one Nikon camera, you also gain the opportunity to learn several different menu systems in the bargain. It’s fortunate that so many menu options are duplicated in the information edit screen, because you can change many settings there and avoid the Lewis Carroll–like trip through Menuland entirely.
The MENU button and basic operation of the D3400’s menus are simple. Press the MENU button, located second from the top at the left side of the LCD monitor. The menus consist of a series of five separate screens with rows of entries, as shown in Figure 4.1. (Note that when the D3400 is set to the green Auto icon on the mode dial, or Scene modes, some menu choices are not available.)
There are three columns of information in each menu screen.
- The left-hand column includes an icon representing each of the top-level menu screens. From the top in Figure 4.1, they are Playback (right-pointing triangle icon), Shooting (camera icon), Setup (wrench), Retouch (a paintbrush), and Recent Settings (a tabbed page), with Help access represented by a question mark at the bottom of the column.
- The center column includes the name representing the function of each choice in the currently selected menu. For example, Image Review represents the menu entry for turning automatic playback of each image shot on or off.
- The right-hand column has an icon or text that shows either the current setting for that menu item or text or an icon that represents the function of that menu entry. In Figure 4.1, a trash can icon shows that you can use the Delete entry for removing images, while the text ON appears next to the Rotate Tall entry, indicating that the D3400 has been set to rotate vertical images on the LCD monitor.
Navigating among the various menus is easy and follows a consistent set of rules.
- Press MENU to start. Press the MENU button to display the main menu screens.
- Navigate with the multi selector pad. The multi selector pad, located to the right of the LCD monitor, has indents at the up/down/left/right positions. Press these “buttons” to navigate among the menu selections. Press the left button to move highlighting to the left column; then press the up/down buttons to scroll up or down among the five top-level menus.
- Highlighting indicates active choice. As each top-level menu is highlighted, its icon will first change from black-and-white to yellow/amber, white, and black. As you use the multi selector’s right button to move into the column containing that menu’s choices, you can then use the up/down buttons to scroll among the individual entries. If more than one screen full of choices is available, a scroll bar appears at the far right of the screen, with a position slider showing the relative position of the currently highlighted entry.
- Select a menu item. To work with a highlighted menu entry, press the OK button in the center of the multi selector on the back of the D3400 or just press the right button on the multi selector. Any additional screens of choices will appear, like the one you can see in Figure 4.2. You can move among them using the same multi selector movements.
- Choose your menu option. You can confirm a selection by pressing the OK button or, frequently, by pressing the right button on the multi selector once again. Some functions require scrolling to a Done menu choice, or include an instruction to set a choice using some other button.
- Leaving the menu system. Pressing the multi selector left button usually backs you out of the current screen, and pressing the MENU button again usually does the same thing. You can exit the menu system at any time by tapping the shutter release button. If you haven’t confirmed your choice for a particular option, no changes will be made.
- Quick return. The Nikon D3400 “remembers” the top-level menu and specific menu entry you were using (but not any submenus) the last time the menu system was accessed (even if you have subsequently turned the camera off), so pressing the MENU button brings you back to where you left off.
The top-level menus are color coded, and a bar in that color is displayed underneath the menu title when one of those menus is highlighted. The colors are Playback menu (blue); Shooting menu (green); Setup menu (orange); Retouch menu (purple); and Recent Settings (gray). Note that the descriptions for each menu entry in Chapters 4 and 5 include a list of options, usually with a default value noted. If no default value is listed, there is none for that menu command.
Playback Menu Options
The blue-coded Playback menu entries are used to select options related to the display, review, and printing of the photos you’ve taken. The choices you’ll find include:
- Delete
- Playback Folder
- Playback Display Options
- Image Review
- Auto Image Rotation
- Rotate Tall
- Slide Show
- Rating
- Select to Send to Smart Device
Delete
Options: Selected (default), Select Date, All
Choose this menu entry and you’ll be given three choices: Selected, Select Date, and All. If you choose Selected, you’ll see an image selection screen like the one shown in Figure 4.2. Then, follow these instructions:

Figure 4.2 Images selected for deletion are marked with a trash can icon.
- Review thumbnails. Use the multi selector up/down/left/right buttons to scroll among the available images.
- Examine image. When you highlight an image you think you might want to delete, press the Zoom In button to temporarily enlarge that image so you can evaluate it further. When you release the button, the selection screen returns.
- Mark/unmark images. To mark an image for deletion, press the Zoom Out/Thumbnail button (not the Trash button). A trash can icon will appear overlaid on that image’s thumbnail. To unmark an image, press the Zoom Out/Thumbnail button again.
- Remove images. When you’ve finished marking images to delete, press OK. A final screen will appear asking you to confirm the removal of the image(s). Choose Yes to delete the image(s) or No to cancel deletion, and then press OK. If you selected Yes, then you’ll return to the Playback menu; if you chose No, you’ll be taken back to the selection screen to mark/unmark images.
- Exit. To back out of the selection screen, press the MENU button.

Using the Delete menu option to remove images will have no effect on images that have been marked as protected with the Protect key.
Keep in mind that deleting images though the Delete process is slower than just wiping out the whole card with the Format command, so using Format is generally much faster than choosing Delete: All, and also is a safer way of returning your memory card to a fresh, blank state.
Playback Folder
Options: D3400 (default), All, Current
Images created by your Nikon D3400 are deposited into folders on your memory card. These folders have names like 100D3400 or 101D3400, but you can change those default names to something else using the Folders option in the Setup menu, described later in Chapter 5.
With a freshly formatted memory card (formatting is covered under the Setup menu), the D3400 starts with a default name: 100D3400. When that folder fills with the maximum of 999 images, the camera automatically creates a new folder numbered one higher, such as 101D3400. If you use the same memory card in another camera, that camera will also create its own folder (say, 102NCD40 for a Nikon D40). Thus you can end up with several folders on the same memory card, at least one for each camera the card is used in, until you eventually reformat the card and folder creation starts anew. In Chapter 5, in the section on the Setup menu, I’ll show you how to create folders with names you select yourself using the Storage Folder option.
This menu item allows you to choose which folders are accessed when displaying images using the D3400’s Playback facility. Your choices are as follows:
- D3400. The camera displays the images in the folder with the indicated name.
- All. All folders containing images that the D3400 can read will be accessed, regardless of which camera created them. You might want to use this setting if you swap memory cards among several cameras and want to be able to review all the photos. You will be able to view images even if they were created by a non-Nikon camera if those images conform to a specification called the Design Rule for Camera File systems (DCF).
- Current. The D3400 will display only images in the current Active Folder, as specified in the Setup menu. For example, if you have been shooting heavily at an event and have already accumulated more than 999 shots and the D3400 has created a new folder for the overflow, you’d use this setting to view only the most recent photos, which reside in that new current folder. You can change the current folder to any other specific folder on your memory card using the Active Folder option in the Setup menu, described in Chapter 5.
Playback Display Options
Options: None (Image Only), Highlights, RGB Histogram, Shooting Data, Overview
You’ll recall from Chapter 2 that a great deal of information, available on multiple screens, can be displayed when reviewing images. This menu item helps you reduce/increase the clutter by specifying which information and screens will be available.

Figure 4.3 Choose Playback Display options.
The former presents you with a screen of possible display screens, which I showed you in the previous chapter. You can scroll among the options and select from None (image only); Highlights; RGB Histogram; Shooting Data (three different screens); and Overview. (See Figure 4.3.)
To activate or deactivate an info option, scroll to that option and press the right multi selector button to add a check mark to the box next to that item. Press the right button to unmark an item that has previously been checked.
Image Review
Options: On (default), Off
There are certain shooting situations in which it’s useful to have the picture you’ve just shot pop up on the LCD monitor automatically for review. Perhaps you’re fine-tuning exposure or autofocus and want to be able to see whether your most recent image is acceptable. Or, maybe you’re the nervous type and just want confirmation that you actually took a picture. Instant review has saved my bacon a few times; for example, when I was shooting with studio flash in Manual mode and didn’t notice that the shutter speed had been set to (a non-syncing) 1/320th second by mistake.
A lot of the time, however, it’s a better idea to not automatically review your shots in order to conserve battery power (the LCD monitor is one of the major juice drains in the camera) or to speed up or simplify operations. For example, if you’ve just fired off a burst of eight shots at 5 fps during a football game do you really need to have each and every frame display as the D3400 clears its buffer and stores the photos on your memory card? Or, when you’re shooting at an acoustic concert, wouldn’t it be smart to disable image review so the folks behind you aren’t hit with a blast of light from that luminous 3-inch LCD every time you take a picture? This menu operation allows you to choose which mode to use:
- On. At this default setting, image review is automatic after every shot is taken.
- Off. Images are displayed only when you press the Playback button.
Auto Image Rotation
Options: On (default), Off
This command tells the D3400 to embed information indicating how the camera was rotated when the picture was taken, enabling the camera and compatible software to read this data and rotate the image during review or editing.
Rotate Tall
Options: On (default), Off
When you rotate the D3400 to photograph vertical subjects in portrait (tall), rather than landscape (wide) orientation, you probably don’t want to view them tilted onto their sides later on, either on the camera LCD monitor or within your image viewing/editing application on your computer. The D3400 is way ahead of you. It has a directional sensor built in that can detect whether the camera was rotated when the photo was taken and hide this information in the image file itself.
The orientation data is applied in two different ways. It can be used by the D3400 to automatically rotate images when they are displayed on the camera’s LCD monitor, or you can ignore the data and let the images display in non-rotated fashion (so you have to rotate the camera to view them in their proper orientation). Your image-editing application, such as Adobe Photoshop Elements, can also use the embedded file data to automatically rotate images on your computer screen.
But either feature works only if you’ve told the D3400 to place orientation information in the image file so it can be retrieved when the image is displayed. You must set Auto Image Rotation to On. Once you’ve done that, the D3400 will embed information about orientation in the image file, and both your D3400 and your image editor can rotate the images for you as the files are displayed.
This menu choice deals only with whether the image should be rotated when displayed on the camera LCD monitor. (If you de-activate this option, your image-editing software can still read the embedded rotation data and properly display your images.) When Rotate Tall is turned off, the Nikon D3400 does not rotate pictures taken in vertical orientation, displaying them as shown in Figure 4.4, left. The image is large on your LCD screen, but you must rotate the camera to view it upright.
When Rotate Tall is turned on, the D3400 rotates pictures taken in vertical orientation on the LCD monitor screen so you don’t have to turn the camera to view them comfortably. However, this orientation also means that the longest dimension of the image is shown using the shortest dimension of the LCD, so the picture is reduced in size, as you can see in Figure 4.4, right.
So, turn this feature On (as well as Auto Image Rotation in the Playback menu), if you’d rather not turn your camera to view vertical shots in their natural orientation, and don’t mind the smaller image. Turn the feature Off if, as I do, you’d rather see a larger image and are willing to rotate the camera to do so.
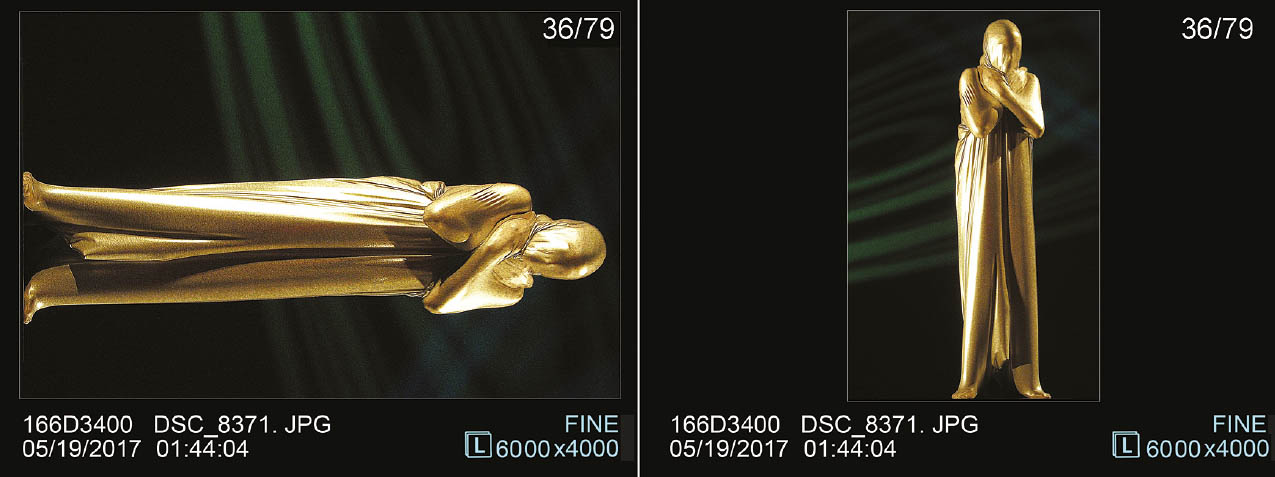
Figure 4.4 With Rotate Tall turned off (left), vertical images appear large on the LCD monitor, but you must turn the camera to view them upright. With Rotate Tall turned on (right), vertical images are shown in a smaller size, but oriented for viewing without turning the camera.
Slide Show
Options: Start, Image Type, Frame Interval
The D3400’s Slide Show feature is a convenient way to review images in the current playback folder one after another, without the need to manually switch between them. To activate, just choose Start from this entry in the Playback menu. If you like, you can choose Frame Interval before commencing the show in order to select an interval of either 2, 3, 5, or 10 seconds between “slides.”
During playback, you can press the OK button to pause the “slide show” (in case you want to examine an image more closely). When the show is paused, a menu pops up, as shown in Figure 4.5, with choices to restart the show (by pressing the OK button again); change the interval between frames; or to exit the show entirely.

Figure 4.5 Press the OK button to pause the slide show, change the interval between slides, or to exit the presentation.
As the images are displayed, press the up/down multi selector buttons to change the amount of information presented on the screen with each image. For example, you might want to review a set of images and the settings used to shoot them. At any time during the show, press the up/down buttons until the informational screen you want is overlaid on the images.
As the slide show progresses, you can press the left/right multi selector buttons to move back to a previous frame or jump ahead to the next one. The slide show will then proceed as before. Press the MENU button to exit the slide show and return to the menu, or the Playback button to exit the menu system totally. As always, while reviewing images, you can tap the MENU button to exit the show and return to the menus, or tap the shutter release button if you want to remove everything from the screen and return to shooting mode.
At the end of the slide show, as when you’ve paused it, you’ll be offered the choice of restarting the sequence, changing the frame interval, or exiting the slide show feature completely.
Rating
Options: Apply zero to five stars
Rating allows you to mark pictures according to quality using a 5-star system, or mark them using any other criterion you want to use (if you make up your own categories corresponding to the number of stars). If you want to apply a quality rating to images or movies you’ve shot (or use the rating system to represent some other criteria), you can use this entry to give particular images one, two, three, four, or five stars, or turn the rating off.
Suppose you were photographing a track meet with multiple events. You could apply a one-star rating to jumping events, two stars to relays, three stars to throwing events, four stars to hurdles, and five stars to dashes. Then, using the Image Jump feature, you could review only images of one particular type.
With a little imagination you can apply the rating system to all sorts of categories. At a wedding, you could classify pictures of the bride, the groom, guests, attendants, and parents of the couple. If you were shooting school portraits, one rating could apply to First Grade, another to Second Grade, and so on. Given a little thought, this feature has many more applications than you might think. There are two ways to add ratings, using this menu entry to rate one or multiple images, or directly from playback view to mark images one at a time. To use this menu entry:
- Select Rating from the Playback menu and press the right multi selector button.
- A screen appears allowing you to browse through the image.
- Highlight an image. You can press the Zoom In button to view it full frame.
- With the Zoom Out button held in, use the up/down multi selector buttons to choose a rating from 0 to five stars. You can also press the Trash button to mark the picture for later deletion.
- Press OK to confirm and finish.
- When done rating, choose MENU to exit.
You can also rate images without using the menu:
- In Playback mode, display an image in full-frame or zoom views, or use thumbnail view to highlight it.
- Press the i button to show playback display options Rating and Retouch.
- Select Rating and press OK.
- Press the left/right multi controller buttons to choose from 0 to five stars. You can also press the Trash button to mark the picture for later deletion.
- Press OK to confirm and exit.
Select to Send to Smart Device
Options: Select Image(s), Deselect All
Use this to mark images you want to upload to a smart device using the D3400’s SnapBridge capabilities, described in Chapter 9.
Shooting Menu Options
The Shooting menu options (see Figure 4.6) are likely to be the most frequently accessed settings, with changes made to one or more of them during a particular session fairly common. You might make such adjustments as you begin a shooting session, or when you move from one type of subject to another. Nikon makes accessing many changes easiest through the information edit screen via the i button, and I recommend that method for making changes to the entries duplicated there. You can readily see the current settings for any of these—and the other settings visible on the shooting information screen—and then press the i button, use the multi selector directional buttons to navigate to the entry you want to use, press OK, and make your change in a few seconds. Using the equivalent Shooting menu entries usually takes a little longer.

Figure 4.6 Common shooting settings can be changed in this menu.
This section explains the options of the Shooting menu and how to use them. The options you’ll find in these green-coded menus include:
- Reset Shooting Menu
- Image Quality
- Image Size
- ISO Sensitivity Settings
- White Balance
- Set Picture Control
- Color Space
- Active D-Lighting
- Noise Reduction
- Vignette Control
- Auto Distortion Control
- Focus Mode
- AF-Area Mode
- Built-in AF-Assist Illuminator
- Metering
- Flash Cntrl for Built-In Flash/Optional Flash
- Movie Settings
Reset Shooting Menu
Options: Yes
If you select Yes, the Shooting menu settings shown in Table 4.1 will be set to their default values. It has no effect on the settings in other menus, or any of the other camera settings.

You’d want to use this Reset option when you’ve made a bunch of changes (say, while playing around with them as you read this chapter), and now want to put them back to the factory defaults. Your choices are Yes and No.
Image Quality
Options: NEF (RAW)+JPEG Fine, NEF (RAW), JPEG Fine, JPEG Normal (default), JPEG Basic
You can choose the image quality settings used by the D3400 to store its files. The quickest way to do that is with the information edit screen. You can also use this menu option, if you prefer. There is no real advantage to using this menu instead of the information edit screen. (See Figure 4.7.)

Figure 4.7 Choose image size options here.
- Level of JPEG compression (Fine, Normal, Basic). To reduce the size of your image files and allow more photos to be stored on a given memory card, the D3400 uses JPEG compression to squeeze the images down to a smaller size. This compacting reduces the image quality a little, so you’re offered your choice of Fine (a 1:4 reduction), Normal (1:8 reduction), and Basic (1:16) compression. You can see examples of the results of compression in Figure 4.8. I’ll explain more about JPEG compression later in this section.
- JPEG, RAW, or both. You can elect to store only JPEG versions of the images you shoot, or you can save your photos as RAW images, which Nikon calls NEF, for Nikon Electronic Format files. RAW images consume more than twice as much space on your memory card. Or, you can store both a RAW and a JPEG Basic file at once as you shoot. Many photographers elect to save both a JPEG and a RAW, so they’ll have a JPEG Basic version that might be usable as-is, as well as the original “digital negative” RAW file in case they want to do some processing of the image later. You’ll end up with two different versions of the same file: one with a .jpg extension, and one with the .nef extension that signifies a Nikon RAW file.
To choose the combination you want, access the Shooting menu, scroll to Image Quality, and select it by pressing OK or the multi selector right button. Scroll to highlight the setting you want, and either press OK or push the multi selector right button to confirm your selection.

Figure 4.8 JPEG Fine compression yields little image quality loss (top); extreme compression produces visible loss of detail (bottom).
In practice, you’ll probably use the JPEG Fine or NEF (RAW)+JPEG Fine selections most often, although beginners concerned about squeezing many images onto a card, or who display them only online may prefer a more compact JPEG setting. Why so many choices, then? There are some advantages to using the JPEG Normal and JPEG Basic settings. Settings that are less than max allow stretching the capacity of your memory card so you can shoehorn quite a few more pictures onto a single memory card. That can come in useful when on vacation and you’re running out of storage, or when you’re shooting non-critical work that doesn’t require 24 megapixels of resolution (such as photos taken for real estate listings, web page display, photo ID cards, or similar applications). Some photographers like to record RAW+JPEG Fine so they’ll have a moderate-quality JPEG file for review only and no intention of using for editing purposes, while retaining access to the original RAW file for serious editing.
For most work, using lower resolution and extra compression is false economy. You never know when you might actually need that extra bit of picture detail. Your best bet is to have enough memory cards to handle all the shooting you want to do until you have the chance to transfer your photos to your computer or a personal storage device.
However, reduced image quality can sometimes be beneficial if you’re shooting sequences of photos rapidly, as the D3400 is able to hold more of them in its internal memory buffer before transferring to the memory card. Still, for most sports and other applications, you’d probably rather have better, sharper pictures than longer periods of continuous shooting. Do you really need 10 shots of a pass reception in a football game, or six slightly different versions of your local basketball star driving in for a lay-up?
JPEG vs. RAW
You’ll sometimes be told that Nikon’s NEF or RAW files are the “unprocessed” image information your camera produces, before it’s been modified. That’s nonsense. RAW files are no more unprocessed than camera film is after it’s been through the chemicals to produce a negative or transparency. Your digital image undergoes a significant amount of processing before it is saved as a RAW file.
A RAW file is more similar to a film camera’s processed negative. It contains all the information captured by the sensor, but with no sharpening and no application of any special filters or other settings you might have specified when you took the picture. Those settings are stored with the RAW file so they can be applied when the image is converted to a form compatible with your favorite image editor. However, using RAW conversion software such as Adobe Camera Raw or Nikon Capture NX, you can override those settings and apply settings of your own. You can select essentially the same changes there that you might have specified in your camera’s picture-taking options.
RAW exists because sometimes we want to have access to all the information captured by the camera, before the camera’s internal logic has processed it and converted the image to a standard file format. RAW doesn’t save as much space as JPEG. What it does do is preserve all the information captured by your camera after it’s been converted from analog to digital form.
So, why don’t we always use RAW? Some photographers avoid using Nikon’s RAW NEF files on the misguided conviction that they don’t want to spend time in an image editor. But, if your basic settings are okay, such work is optional, and needs to be applied only when a particular image needs to be fine-tuned.
Although some photographers do save only in RAW format, it’s common to use RAW+JPEG Fine, or, if you’re confident about your settings, just shoot JPEG and eschew RAW altogether. In some situations, working with a RAW file can slow you down a little. RAW images take longer to store on the memory card, and must be converted from RAW to a format your image editor can handle, whether you elect to go with the default settings in force when the picture was taken, or make minor adjustments to the settings you specified in the camera.
As a result, those who depend on speedy access to images or who shoot large numbers of photos at once may prefer JPEG over RAW. These photographers include wedding and sports shooters, who may take hundreds to more than a thousand pictures within a few hours.
JPEG was invented as a more compact file format that can store most of the information in a digital image, but in a much smaller size. JPEG predates most digital SLRs and was initially used to compress files for transmission over slow dial-up connections. JPEG provides smaller files by compressing the information in a way that loses some image data. JPEG remains a viable alternative because it offers several different quality levels. At the highest-quality Fine level, you might not be able to tell the difference between the original RAW file and the JPEG version. If you don’t mind losing some quality, you can use more aggressive Normal compression with JPEG to cut the size again.
Image Size
Options: Large (default), Medium, Small
The next menu command in the Shooting menu lets you select the resolution, or number of pixels captured as you shoot with your Nikon D3400. Your choices range from Large (L—6,000 × 4,000 pixels, 24 megapixels), Medium (M—4,496 × 3,000 pixels, 13.5 megapixels), and Small (S—2992 × 2,000 pixels, 6 megapixels). There are no additional options available from the Image Size menu screen. Keep in mind that if you choose NEF (RAW) or NEF (RAW)+JPEG Fine, only the Large image size can be selected. The other size options are grayed out and unavailable.
ISO Sensitivity Settings
Options: ISO Sensitivity (default, Auto); Auto ISO Sensitivity Control (default, Off); Maximum Sensitivity; Minimum Shutter Speed
ISO governs how sensitive your Nikon D3400 is to light. Low ISO settings, such as ISO 100 or ISO 200 mean that you may have to use wider lens openings or slower shutter speeds. Faster ISO settings, on the other hand, let you take pictures in lower light levels, with faster shutter speeds (say, to freeze action) or with smaller lens openings (to produce a larger range in which objects are in sharp focus). I’ll explain all these factors in more detail in Chapter 6.
This menu entry allows you to set an ISO sensitivity value, from ISO 100 (at the low end) through ISO 25600. You can also choose Auto, which allows the Nikon D3400 to change the ISO setting as you shoot if the setting you have made isn’t high enough to produce the best combination of shutter speed and lens opening for a sharp picture. The Auto feature can be used when you’re working in Auto, Scene, Program, Shutter-priority, Aperture-priority, or Manual exposure modes. This feature can be used both with available-light shots, and those using electronic flash.
Auto ISO is available with P, S, A, and M exposure modes when you’re using a type E or type G lens (lens types are explained in Chapter 10). When Auto ISO is active, if the ISO rating that you’ve chosen doesn’t provide enough sensitivity to take an optimal picture (that is one that is well-exposed, but also has a shutter speed that’s fast enough to stop action, and an aperture that produces an acceptable range of sharpness), the camera can increase the ISO automatically.
This capability can be a convenience (and, at times, a life-saver), but is also fraught with pitfalls. For example, it is possible that the D3400 could, if not given some guidance, choose an ISO setting far higher than what you intended, producing pictures that might be unacceptably graining for a given purpose. In such cases, you might have preferred to keep your original ISO setting and optimize exposure through some other means, such as supplementary flash or using a tripod with a longer shutter speed.
Fortunately, the D3400 does not easily lead you astray. Automatic ISO shifts are possible only if you’ve activated that feature in this menu, and, when implemented by the camera, you’re given fair warning by an ISO-Auto indicator on the shooting information screen and in the viewfinder. Better yet, you can lay down some rules that the D3400 will use before it meddles with the ISO setting you originally specified.
The lower half of the ISO sensitivity settings screen has three choices. One of them, On/Off, is self-explanatory; you can enable or disable the ISO Auto feature by choosing the appropriate option. The other two, available only when Auto is turned on, are Max. Sensitivity and Min. Shutter Speed. These lead you to separate screens you can use to lay down the ground rules. Here’s a quick explanation of how your options operate:
- Off. Set ISO Sensitivity Auto Control to Off, and the ISO setting will not budge from whatever value you have specified. Use this setting when you don’t want any ISO surprises, or when ISO increases are not needed to counter slow shutter speeds. For example, if the D3400 is mounted on a tripod, you can safely use slower shutter speeds at a relatively low ISO setting, so there is no need for a speed bump.
- On. At other times, you may want to activate the feature. For example, if you’re hand-holding the camera and the D3400 set for Program (P) or Aperture-priority (A) mode wants to use a shutter speed slower than, say, 1/30th second, it’s probably a good idea to increase the ISO to avoid the effects of camera shake. If you’re using a telephoto lens (which magnifies camera shake), a shutter speed of 1/125th second or higher might be the point where an ISO bump would be a good idea. In that case, you can turn on the ISO Sensitivity Auto Control, or remember to boost the ISO setting yourself.
- Maximum sensitivity. If the idea of unwanted noise bothers you, you can avoid using an ISO setting that’s higher than you’re comfortable with. This parameter sets the highest ISO setting the D3400 will use in ISO-Auto mode. You can choose from ISO 200, 400, 800, 1600, 3200, or 6400, as the max ISO setting the camera will use. Use a low number if you’d rather not take any photos at a high ISO without manually setting that value yourself. Dial in a higher ISO number if getting the photo at any sensitivity setting is more important than worrying about noise.
- Minimum shutter speed. You can decide the shutter speed that’s your personal “danger threshold” in terms of camera shake blurring. That is, if you feel you can’t hand-hold the camera at a shutter speed slower than 1/30th second, you can tell the D3400 that when the metered exposure will end up with a speed slower than that, ISO-Auto should kick in and do its stuff. When the shutter speed is faster (shorter) than the speed you specify, ISO-Auto will not take effect and the ISO setting you’ve made yourself remains in force. The default value is 1/30th second, because in most situations, any shutter speed longer/slower than 1/30th is to be avoided, unless you’re using a tripod, monopod, or looking for a special effect. If you’re working with a telephoto lens and find even a relatively brief shutter speed “dangerous,” you can set a minimum shutter speed threshold of 1/250th second. Of course, lenses with vibration reduction (VR) built in can raise your minimum shutter speed threshold preference.
White Balance
Options: Auto (default), Incandescent, Fluorescent (seven types), Direct Sunlight, Flash, Cloudy, Shade, Preset Manual
The Shooting menu’s White Balance settings are considerably more flexible than those available from the information edit screen, so you may want to use this menu entry instead. The information edit screen lets you choose one of six predefined settings, plus Auto and PRE (which is a user-definable white balance you can base on the lighting in a scene of your choice). The White Balance menu, on the other hand, has more choices of presets, and gives you the additional option of fine-tuning the white balance precisely.
Different light sources have difference “colors,” at least as perceived by your D3400’s sensor. Indoor illumination tends to be somewhat reddish, while daylight has, in comparison, a more bluish tinge. If the color balance the camera is using doesn’t match the light source, you can end up with a color rendition that is off-kilter, as you can see in Figure 4.9.
This menu entry allows you to choose one of the white balance values from among Auto, incandescent, seven varieties of fluorescent illumination (the information edit screen only lets you switch to whichever fluorescent setting you define here), direct sunlight, flash, cloudy, shade, a specific color temperature of your choice, or a preset value taken from an existing photograph or a measurement you make.

Figure 4.9 Adjusting color temperature can provide different results of the same subject at settings of 3,400K (left), 5,000K (middle), and 2,800K (right).
When you select the White Balance entry on the Shooting menu, you’ll see an array of choices like those shown in Figure 4.10. (One additional choice, PRE Preset Manual is not visible until you scroll down to it.) Choose the predefined value you want by pressing the multi selector right button, or press OK.
If you choose Fluorescent, you’ll be taken to another screen that presents seven different types of lamps, from sodium-vapor through warm-white fluorescent down to high-temperature mercury-vapor. If you know the exact type of non-incandescent lighting being used, you can select it, or settle on a likely compromise. Press the multi selector right button again or press OK to select the fluorescent lamp variation you want to use.
When you’ve finished choosing a fluorescent light source and for all other predefined values (Auto, Incandescent, Direct Sunlight, Flash, Cloudy, or Shade), you’ll next be taken to the fine-tuning screen shown in Figure 4.11 (and which uses the incandescent setting as an example). The screen shows a grid with two axes, a blue/amber axis extending left/right, and a green/magenta axis extending up and down the grid. By default, the grid’s cursor is positioned in the middle, and a readout to the right of the grid shows the cursor’s coordinates on the A-B axis (yes, I know the display has the end points reversed) and G-M axis at 0,0.
You can use the multi selector’s up/down and right/left buttons to move the cursor to any coordinate in the grid, thereby biasing the white balance in the direction(s) you choose. The amber-blue axis makes the image warmer or colder (but not actually yellow or blue). Similarly, the green/magenta axis preserves all the colors in the original image, but gives them a tinge biased toward green or magenta. Each increment equals about five mired units, but you should know that mired values aren’t linear; five mireds at 2,500K produces a much stronger effect than five mireds at 6,000K. If you really want to fine-tune your color balance, you’re better off experimenting and evaluating the results of a particular change.

Figure 4.10 The White Balance menu has predefined values, plus the option of setting a preset you measure yourself.

Figure 4.11 Specific white balance settings can be fine-tuned by changing their bias in the amber/blue, magenta/green directions—or along both axes simultaneously.
When you’ve fine-tuned white balance, an asterisk appears next to the white balance icon in both the Shooting menu and shooting information screen shown on the LCD monitor, as a tip-off that this tweaking has taken place.
Using Preset Manual White Balance
If automatic white balance or one of the predefined settings available aren’t suitable, you can set a custom white balance using the Preset Manual menu option. You can apply the white balance from a scene, either by shooting a new picture on the spot and using the resulting white balance (Measure) or using an image you have already shot (Use Photo). To perform direct measurement from your current scene using a reference object (preferably a neutral gray or white object), follow these steps:
- Place the neutral reference under the lighting you want to measure.
- Choose Preset Manual from the White Balance screen in the Shooting menu (you may need to scroll down to see it).
- Select Measure from the screen that appears by scrolling to it and pressing the multi selector right button or pressing OK.
- A warning message appears, Overwrite existing preset data? Choose Yes.
- An instructional message appears for a few seconds telling you to take a photo of a white or gray object that fills the viewfinder under the lighting that will be used for shooting. Do that!
- After you’ve taken the photo, if the D3400 was able to capture the white balance data, a message Data Acquired appears on the shooting information screen, and the PRE white balance setting is shown. If the D3400 was not able to capture white balance data, a pop-up message appears, and you should try again.
The preset value you’ve captured will remain in the D3400’s memory until you replace that white balance with a new captured value. You can also use the white balance information from a picture you’ve already taken, using the Use Photo option, as described next:
- Choose Preset Manual from the White Balance menu.
- Select Use Photo.
- The most recently shot picture will appear, with a menu offering to use This Image or Select Image.
- Press OK to use the displayed image, or choose Select Image to specify another picture on your memory card.
- If you want to select a different image, you can choose which folder on your memory card, then navigate through the selected images, using the standard D3400 image selection screen shown several times previously in this chapter.
- When the photo you’d like to use is highlighted, press OK to select it.
- You’ll be returned to the Shooting menu, where you can press the MENU button to exit, or just tap the shutter release.
A WHITE BALANCE LIBRARY
Consider dedicating a low-capacity memory card to stow a selection of images taken under a variety of lighting conditions. If you want to “recycle” one of the color temperatures you’ve stored, insert the card and select it with the Use Photo option.
Set Picture Control
Options: Various
The pictures you take with your D3400 can be individually fine-tuned in an image editor, of course, but you can also choose certain kinds of adjustments that are made to every picture, as you shoot, using the camera’s Picture Controls options. While there are only seven predefined styles offered: (Standard, Neutral, Vivid, Monochrome, Portrait, Landscape, and Flat), you can edit the settings of any of those styles (but not rename them) so they better suit your taste.
In Set Picture Controls, available only in P, S, A, and M modes, choose from one of the predefined styles and follow these steps:
- Choose Set Picture Control from the Shooting menu. The screen shown in Figure 4.12 appears. Note that Picture Controls that have been modified from their standard settings have an asterisk next to their name.
- Scroll down to the Picture Control you’d like to use.
- Press OK to activate the highlighted style. (Although you can usually select a menu item by pressing the multi selector right button; in this case, that button activates editing instead.)
- Press the MENU button or tap the shutter release to exit the menu system.

Figure 4.12 You can choose from seven predefined Picture Controls.
Editing a Picture Control Style
You can change the parameters of any of Nikon’s predefined Picture Controls. You are given the choice of using the quick adjust/fine-tune facility to modify a Picture Control with a few sliders, or to view the relationship of your Picture Controls on a grid. To make adjustments to any Picture Control except the Monochrome style, follow these steps:
- Choose Set Picture Control from the Photo Shooting menu.
- Scroll down to the Picture Control you’d like to edit.
- Press the multi selector right button to produce the adjustment screen shown in Figure 4.13.
- Use the Quick Adjust slider to exaggerate the attributes of the Portrait, Landscape, Standard or Vivid styles (Quick Adjustments are not available with other styles, including Neutral, Monochrome, or Flat).
- Scroll down to the Sharpening, Clarity, Contrast, Brightness, Saturation, and Hue sliders with the multi selector up/down buttons, then use the left/right buttons to decrease or increase the effects. A line will appear under the original setting in the slider whenever you’ve made a change from the defaults. Note: You can’t adjust contrast and brightness when Active D-Lighting (discussed later in this chapter) is active. A helpful icon at upper right in the dialog box will alert you when ADL is enabled. Turn it off to make those Picture Control adjustments.
- Instead of making changes with the slider’s scale, you can move the cursor to the far left and choose A (for auto) when working with the Sharpening, Clarity, Contrast, and Saturation sliders. The D3400 will adjust these parameters automatically, depending on the type of scene it detects.
- Press the Trash button to reset the values to their defaults.
- Press OK when you’re finished making adjustments.
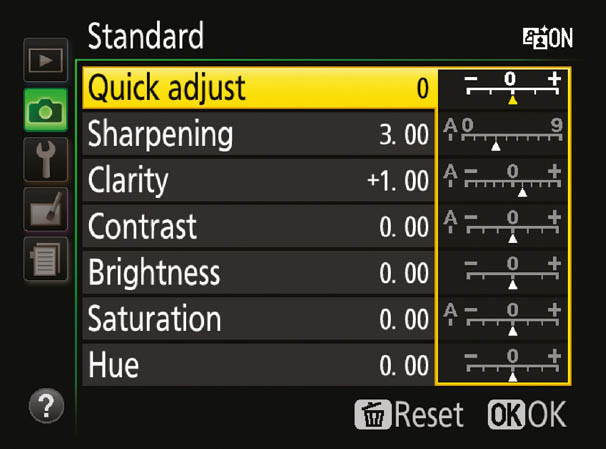
Figure 4.13 Sliders can be used to make quick adjustments to your Picture Control styles.
CLARIFYING CLARITY
The Sharpening, Contrast, Brightness, Saturation, and Hue parameters are virtually self-explanatory, because you’ve probably worked with them many times in Photoshop or another image editor. The use for Clarity, however, may be unclear to you. Think of Clarity as a type of sharpening/enhancing effect applied to the mid tones of an image. High values produce contrasty and vivid images with darkened colors and improved detail in the midtones. Low values reduce midtone detail and flatten colors. The D3400 applies +1 Clarity by default to Standard, Vivid, Landscape, and Monochrome Picture Controls.
Although some of the color choices seem to overlap, you’ll get very different looks when choosing between Filter Effects and Toning. Filter Effects add no color to the monochrome image. Instead, they reproduce the look of black-and-white film that has been shot through a color filter. That is, Yellow will make the sky darker and the clouds will stand out more, while Orange makes the sky even darker and sunsets more full of detail. The Red filter produces the darkest sky of all and darkens green objects, such as leaves. Human skin may appear lighter than normal. The Green filter has the opposite effect on leaves, making them appear lighter in tone. Figure 4.14 shows the same scene shot with no filter, then Yellow, Green, and Red filters.
The Sepia, Blue, Green, and other toning effects, on the other hand, all add a color cast to your monochrome image. Use these when you want an old-time look or a special effect, without bothering to recolor your shots in an image editor. You can see toning effects in Figure 4.15.

Figure 4.14 No filter (upper left); Yellow filter (upper right); Green filter (lower left); and Red filter (lower right).

Figure 4.15 Sepia (upper left); Blue (upper right); Green (lower right); and Purple (lower left).
Editing the Monochrome style is similar, except that the parameters differ slightly. Sharpening and Contrast are available, but instead of Saturation and Hue, you can choose a filter effect (Yellow, Orange, Red, Green, or none) and choose a toning effect (black-and-white, plus seven levels of Sepia, Cyanotype, Red, Yellow, Green, Blue Green, Blue, Purple Blue, and Red Purple). (Keep in mind that once you’ve taken a JPEG photo using a Monochrome style, you can’t convert the image back to full color. Shoot using RAW+JPEG, and you’ll get a monochrome JPEG, plus the RAW file that retains all the color information.)
When you press the Zoom In button, the adjustment toggles between manual setting and automatic. Each of these provides varying amounts of five different attributes: sharpness, clarity, contrast, saturation, and hue. The individual parameters affect your images in various ways.
- Sharpness. This affects the contrast of the edges or outlines of your image, making a photo look more or less sharp.
- Clarity. Sharpening and enhancing of the midtones, as mentioned earlier.
- Contrast. This factor affects an attribute called tone compensation, which controls whether detail is visible or lost in the brightest areas and darkest areas of your image. An image with high contrast shows less detail in the highlights and shadows, but produces a more dramatic appearance. A lower contrast image has more detail in those areas, but, if contrast is too low, the image may appear to be flat and dull.
- Saturation. The richness of the colors is determined by the saturation setting. For example, a deep red rose is fully saturated, while one that appears more pinkish is still, technically, red, but the color is less saturated and more muted.
- Hue. Think of hue as rotating all the colors in an image around a color wheel. Positive hue adjustments bias reds toward the orange end of the spectrum, greens more toward the blue, and blues become purplish. Going the other way around the wheel, reds become more purple, blues more green, and greens become more yellow.
Color Space
Options: sRGB (default), Adobe RGB
The Nikon D3400’s Color Space option gives you the choice of two different color spaces (also called color gamuts), named Adobe RGB (because it was developed by Adobe Systems in 1998), and sRGB (supposedly because it is the standard RGB color space). These two color gamuts define a specific set of colors that can be applied to the images your D3400 captures.
You’re probably surprised that the Nikon D3400 doesn’t automatically capture all the colors we see. Unfortunately, that’s impossible because of the limitations of the sensor and the filters used to capture the fundamental red, green, and blue colors, as well as that of the phosphors used to display those colors on your camera and computer monitors. Nor is it possible to print every color our eyes detect, because the inks or pigments used don’t absorb and reflect colors perfectly.
Instead, the colors that can be reproduced by a given device are represented as a color space that exists within the full range of colors we can see. That full range is represented by the odd-shaped splotch of color shown in Figure 4.16, as defined by scientists at an international organization back in 1931. The colors possible with Adobe RGB are represented by the larger, black triangle in the figure, while the sRGB gamut is represented by the smaller white triangle.
Regardless of which triangle—or color space—is used by the D3400, you end up with 16.8 million different colors that can be used in your photograph. (No one image will contain all 16.8 million!) But, as you can see from the figure, the colors available will be different.
Adobe RGB is what is often called an expanded color space, because it can reproduce a range of colors that is spread over a wider range of the visual spectrum. Adobe RGB is useful for commercial and professional printing. You don’t need this range of colors if your images will be displayed primarily on your computer screen or output by your personal printer.
The other color space, sRGB, is recommended for images that will be output locally on the user’s own printer, as this color space matches that of the typical inkjet printer fairly closely. While both Adobe RGB and sRGB can reproduce the exact same 16.8 million absolute colors, Adobe RGB spreads those colors over a larger portion of the visible spectrum, as you can see in the figure. Think of a box of crayons (the jumbo 16.8 million crayon variety). Some of the basic crayons from the original sRGB set have been removed and replaced with new hues not contained in the original box. Your “new” box contains colors that can’t be reproduced by your computer monitor, but which work just fine with a commercial printing press.

Figure 4.16 The outer figure shows all the colors we can see; the two inner outlines show the boundaries of Adobe RGB (black triangle) and sRGB (white triangle).
Active D-Lighting
Options: On (default), Off
D-Lighting is a feature that improves the rendition of detail in highlights and shadows when you’re photographing high-contrast scenes (those which have dramatic differences between the brightest areas and the darkest areas that hold detail). It’s been available as an internal retouching option that could be used after the picture has been taken, and has been found in Nikon’s lower-end cameras (by that I mean the Coolpix point-and-shoot line) for some time, and has gradually worked its way up through the company’s dSLR products. You’ll find this post-shot feature in the Retouch menu.
A new wrinkle, however, is the Active D-Lighting capability introduced with Nikon’s recent cameras, which, unlike the Retouch menu post-processing feature, applies its improvements while you are actually taking the photo. That’s good news and bad news. It means that, if you’re taking photos in a contrasty environment, Active D-Lighting can automatically improve the apparent dynamic range of your image as you shoot, without additional effort on your part. However, you’ll need to disable the feature once you leave the high-contrast lighting behind, and the process does take some time to apply as you shoot. You wouldn’t want to use Active D-Lighting for continuous shooting of sports subjects, for example. There are many situations in which the selective application of D-Lighting using the Retouch menu is a better choice. Figure 4.17 shows a typical example.

Figure 4.17 No D-Lighting (left); Active D-Lighting (right).
For best results, use your D3400’s Matrix metering mode, so the Active D-Lighting feature can work with a full range of exposure information from multiple points in the image. Active D-Lighting works its magic by subtly underexposing your image so that details in the highlights (which would normally be overexposed and become featureless white pixels) are not lost. At the same time, it adjusts the values of pixels located in midtone and shadow areas so they don’t become too dark because of the underexposure. Highlight tones will be preserved, while shadows will eventually be allowed to go dark more readily. Bright beach or snow scenes, especially those with few shadows (think high noon, when the shadows are smaller) can benefit from using Active D-Lighting.
You have just two choices: Off and On. You’ll want to experiment to see which types of situations can benefit your shooting the most.
Noise Reduction
Options: On (default), Off
Visual noise is that awful graininess caused by long exposures and high ISO settings, and which shows up as multicolored specks in images. This setting, the first on the second page of the Shooting menu (see Figure 4.18), helps reduce noise, which is rarely desirable in a digital photograph. There are easier ways to add texture to your photos.

Figure 4.18 The second page of the Shooting menu.
High ISO noise commonly appears when you raise your camera’s sensitivity setting above ISO 800. This type of visual noise appears as a result of the amplification needed to increase the sensitivity of the sensor. While higher ISOs do pull details out of dark areas, they also amplify non-signal information randomly, creating noise.
A similar noisy phenomenon occurs during long time exposures, which allow more photons to reach the sensor, increasing your ability to capture a picture under low-light conditions. However, the longer exposures also increase the likelihood that some pixels will register random phantom photons, often because the longer an imager is “hot” the warmer it gets, and that heat can be mistaken for photons.
While high ISO settings are the usual culprit, some noise is created when you’re using shutter speeds longer than eight seconds. Extended exposure times allow more photons to reach the sensor, but increase the likelihood that some photosites will react randomly even though not struck by a particle of light. Moreover, as the sensor remains switched on for the longer exposure, it heats, and this heat can be mistakenly recorded as if it were a barrage of photons.
While noise reduction does minimize the grainy effect, it can do so at the cost of some sharpness. This menu setting can be used to activate or deactivate the D3400’s noise-canceling operation.
- Off. This default setting disables the default level of noise reduction (the D3400 applies some noise reduction at all times, even when you select Off). Use it when you want the maximum amount of detail present in your photograph, even though higher noise levels will result. This setting also eliminates the delay caused by the more aggressive noise reduction process that occurs after the picture is taken (this delay is roughly the same amount of time that was required for the exposure). If you plan to use only lower ISO settings (thereby reducing the noise caused by high ISO values), the noise levels produced by longer exposures may be acceptable. For example, you might be shooting a waterfall at ISO 100 with the camera mounted on a tripod, using a neutral-density filter and a long exposure to cause the water to blur. (Try exposures of 2 to 16 seconds, depending on the intensity of the light and how much blur you want.) (See Figure 4.19.) To maximize detail in the non-moving portions of your photos for the exposures that are eight seconds or longer, you can switch off long exposure noise reduction.
- On. When exposures are eight seconds or longer, the Nikon D3400 takes a second, blank exposure to compare that to the first image. (While the second image is taken, the warning Job nr appears in the viewfinder.) Noise (pixels that are bright in a frame that should be completely black) in the “dark frame” image is subtracted from your original picture, and only the noise-corrected image is saved to your memory card. Because the noise-reduction process effectively doubles the time required to take a picture, you won’t want to use this setting when you’re rushed. Some noise can be removed later on, using tools in your image editor.

Figure 4.19 A long exposure with the camera mounted on a tripod produces this traditional waterfall photo.
Vignette Control
Options: High, Normal (default), Low, Off
Some lenses may not be up to the challenge of covering the frame evenly, producing darkening in the corners of your images at certain focal lengths. (See Figure 4.20.) You generally won’t have this problem with full-frame (FX) lenses, which were designed to cover an area much larger than the D3400’s DX format. Indeed, the otherwise superb original version of the Nikon 70-200 f/2.8 VR zoom exhibited vignetting on full-frame cameras, but performed like a champ on DX models.

Figure 4.20 Darkened corners caused by vignetting (top); corrected (bottom).
If you consistently encounter vignetting, this option may help. It reduces darkening at the periphery of images when using non-DX/non-perspective control lenses of the G and D type. (I will explain the nomenclature of Nikon’s lens alphabet soup in Chapter 10.) You can choose from High, Normal, Low, and Off. It’s difficult to quantify exactly how much corner-brightening each setting provides. Your best bet is to shoot some blank walls of a single color with lenses that seem to have this problem, and try a few at each of the settings. Then select the value that best seems to counter vignetting with your particular lenses.
Auto Distortion Control
Options: Off (default), On
Wide-angle lenses can produce a bowing-in effect, called barrel distortion, that’s most noticeable at the edges of images. Telephoto lenses can produce the opposite effect, an inward-bending effect called pincushion distortion. If you notice this problem in your pictures, you can partially nullify the effects by using Auto Distortion Control. If you have no distortion problems, leave it off, because the less manipulation of your images in the camera, the better. I’ll explain these distortions in more detail in Chapter 10.
Focus Mode
Options: Viewfinder, Live View/Movies
You can select a focus mode for the D3400 to use when working with P, S, A, or M exposure modes. You can choose modes separately for use when shooting using the optical viewfinder and when shooting stills or movies in live view. I’ll explain how to choose a focus mode in Chapter 7.
- Viewfinder. Select from AF-A (Auto-servo AF), AF-S (Single-servo AF), AF-C (Continuous-servo AF), and Manual focus.
- Live View/Movies. Choose from AF-S (Single-servo AF), AF-C (Continuous-servo AF), and Manual focus.
AF-Area Mode
Options: Single-point AF, Dynamic-area AF, 3D-tracking (11 points)
This entry is a duplication of the autofocus area mode options in the information edit menu, as described in Chapter 1, but with the addition of options for choosing an autofocus zone when using live view, too. You’ll find more about autofocus and focus modes in Chapter 7. When you select this entry, you’ll be given a choice of Viewfinder and Live View/Movie modes.
To recap, the four choices when using the viewfinder to compose your images are as follows:
- Single-point. You always choose which of the eleven points are used, and the Nikon D3400 sticks with that focus bracket, no matter what. This mode is best for non-moving subjects.
- Dynamic-area. You can choose which of the eleven focus zones to use, but the D3400 will switch to another focus mode when using AF-C or AF-A mode and the subject moves. This mode is great for sports or active children.
- 3D-tracking (11 points). You can select the focus zone, but when not using AF-S mode, the camera refocuses on the subject if you reframe the image.
- Auto-area. This default mode chooses the focus point for you, and can use distance information when working with a lens that has a G or D suffix in its name. (See Chapter 10 for more on the difference between G/D lenses and other kinds of lenses.)
If you’re using live view to shoot stills or are shooting movies, you can specify four different AF-area selection modes:
- Face-priority AF. The D3400 detects faces and automatically chooses those faces to focus on.
- Wide-area AF. When shooting non-portrait subjects, such as landscapes, you can select the focus zone using the multi selector.
- Normal-area AF. Most useful when the camera is mounted on a tripod, you can select any area on the live view frame to focus on.
- Subject-tracking AF. Autofocus will lock onto a subject and keep focus on that subject even if it moves throughout the frame.
I’ll explain the mysteries of autofocus in detail in Chapter 7.
Built-in AF-Assist Illuminator
Options: On (default), Off
Use this setting to control the AF-assist lamp built into the Nikon D3400 when using the optical viewfinder.
- On. This default value will cause the AF-assist illuminator lamp to fire when lighting is poor, but only if Single-servo autofocus (AF-S) or Automatic autofocus (AF-A) are active, or you have selected the center focus point manually and either Single-point or Dynamic-area autofocus (rather than Auto-area autofocus) has been chosen. It does not operate in Manual focus modes, in AF-C mode, or when AF-A has switched to its AF-C behavior, nor when Landscape or Sports scene modes are used.
With some lenses, the lens hood can block the AF-assist lamp’s illumination; you may have to remove the hood in low-light situations. Your hand may also block the lamp.
- Off. Use this to disable the AF-assist illuminator. You’d find that useful when the lamp might be distracting or discourteous (say, at a religious ceremony or acoustic music concert), or your subject is located closer than one foot, eight inches or farther than about 10 feet. One downside of turning AF-assist off is that the D3400 may be unable to focus accurately in situations where it really, really needs the extra light from the supplementary lamp. You may have to focus manually in such situations.
Metering
Options: Matrix metering, Center-weighted metering, Spot metering
This is a duplicate of the settings you can make from the information edit screen. I’ll explain each of the Nikon D3400’s three metering modes in more detail in Chapter 6. As I explained in Chapter 1, the three modes are as follows:
- Matrix metering. The standard metering mode; the D3400 attempts to intelligently classify your image and choose the best exposure based on readings from a 420-segment color CCD sensor that interprets light reaching the viewfinder using a database of hundreds of thousands of patterns.
- Center-weighted metering. The D3400 meters the entire scene, but gives the most emphasis to the central area of the frame, measuring about 8mm in diameter.
- Spot metering. Exposure is calculated from a smaller 3.5 mm central spot, about 2.5 percent of the image area.
Flash Cntrl for Built-In Flash/Optional Flash
Options: TTL, Manual
This setting is used to adjust the features of the Nikon D3400’s built-in pop-up electronic flash, or optional Nikon SB-300, SB-400, or SB-500 add-on flash units, or other Nikon-compatible flash, which fit in the accessory shoe on top of the camera. (The label of this setting changes to Optional Flash when a compatible external unit is mounted.) Its settings are in force when you are using Program, Shutter-priority, Aperture-priority, or Manual exposure modes (but not when using any of the Scene modes). You can read more about using the D3400’s flash capabilities in Chapter 11.
You have two options with this setting:
- TTL. When selected, the built-in flash or external flash operate in iTTL (intelligent through the lens) exposure mode to automatically choose an exposure based on measuring the light from a “pre-flash” (fired an instant before the picture is taken) as it reflects back to the camera. Use this setting under most circumstances. As you’ll learn in Chapter 11, the D3400 can even balance the flash output with the daylight or other illumination to allow the flash to fill in dark shadows or provide supplementary light.
- Manual. In this mode, the flash always fires using a preselected output level, which ranges from full power to 1/32 power. Use this mode when you want a certain exposure for every shot, say, to deliberately under- or overexpose an image for a special effect.
Movie Settings
Options: Frame Size/Frame Rate, Movie Quality, Microphone, Wind Noise Reduction, Flicker Reduction
The Movie Settings entries are explained in more detail in Chapter 8. You have the following choices:
- Frame Size/Frame Rate. Choose your resolution. Use the Movie Settings entry in the Shooting menu. Or, when live view is activated, and before you start shooting your video clip, you can select the resolution/frame rate of your movie. All use progressive scan, in which all the lines are captured one after another in order. Your options are as follows:
- 1920 × 1080 at 60/50 fps, progressive scan (60p/50p)
- 1920 × 1080 at 30/25 fps, progressive scan (30p/25p)
- 1920 × 1080 at 24 fps, progressive scan (24p)
- 1280 × 720 at 60/50 fps, progressive scan (60p/50p)
- Movie Quality. Choose High quality (to capture up to 10 minutes of action at 60p, or 20 minutes at 30p and 24p) or Normal quality (for up to 20 minutes at 60p or 29 minutes, 59 seconds of video per clip at 30p and 24p).
- Microphone. Here, you can set audio sensitivity for the built-in microphone. Choose from Auto Sensitivity, Manual Sensitivity, or Microphone Off. With the Manual Sensitivity setting, a set of volume unit (VU) meter bars appears on the menu screen showing the current sound levels. Press the right directional button to access a screen where you can select a manual sensitivity level from 1 to 20.
- Wind Noise Reduction. Gusts of wind can interfere with clear recording of your desired audio, so this options allows you to turn a built-in wind noise reduction feature on or off. In quiet surroundings you’ll want to disable the feature for overall better sound quality.
- Flicker Reduction. Reduces flicker and banding under fluorescent or mercury vapor illumination in both Live View and Movie modes. Select Auto to allow the camera to choose the correct frequency, or manually select 50Hz or 60Hz.