How to Read Construction Drawings
In This Chapter
![]()
- Learning how to read construction drawings
- Knowing what to expect in a set of plans
- Understanding terms on architectural plans
- Comparing three sets of tiny house floor plans
Though architectural plans provide the vital information you need to build a house, until you learn how to read them, they can appear as perplexing as a 1,000-piece puzzle. Fortunately, with time and guidance, you’ll start to see the method behind the madness and understand how it all comes together.
In this chapter, we cover details on how to read a set of architectural plans. We talk about each set of components and how to make sense of it all. We also illustrate three examples of tiny houses:
- A 28' Tiny House On Wheels (THOWs) with a loft
- A 24' Tiny House On Wheels (THOWs)
- A 20' × 18' tiny house on a fixed, permanent foundation
A quality set of working drawings should include:
- Title page
- Foundation plan
- Floor plan
- Electrical plan
- Plumbing plan
- Elevations
- Framing plan
- Sections
- Details
Let’s explore each component and learn what information each contains.
Title pages contain important pieces of information about a construction project. Though a lot of the text is in small print, it’s very important that you read and understand it all. It might contain important disclaimers from the designer and/or notes on how to proceed with local building departments. Title pages should also contain a table of contents as well as a symbol legend defining the notations used throughout the plans.
Study the symbol legend on the title page closely so that you understand exactly what each one’s telling you. Let’s follow along with the symbol legend in the following figure, which was taken from a set of tiny house plans. When looking at the building section flag, note that the bottom number calls out the page on which the section detail is found. In this case, the building section flag is referring to page A3.1. The top figure indicates that the actual building section number is (1), and that it is on page A3.1.
There’s an arrow, of sorts, on the building section flag as well. This arrow shows the orientation of the building section. Finally, the long line that extends down from the flag shows the precise location in which the building section is cut on the floor plan.
The detail flag identifies areas that are illustrated in more precise detail on a different page. The top number identifies the detail number, and the bottom number identifies the page on which the detail drawing is located.
The final symbol on the legend is an exterior elevation flag. Like the building section flag, this symbol has an arrow, which depicts the direction of view. This symbol also shows the same breakdown of page and elevation numbers as shown previously.

Each of these symbols contain important reference information. Learn how to read them before starting your construction process to optimize your build.
By studying the plans and following the detail paths, you can learn a lot about the house—from general notes to the finest details. Be sure to familiarize yourself with the plans before you start construction or order any materials.
In some cases, you might find discrepancies between the general plans and the construction details. In those instances, it’s customary to heed the more detailed instructions rather than the general instructions. However, to be safe, read the title page fully and make sure the architect/designer didn’t specifically address how they want you to handle those situations.
For homes built on permanent foundations, a title page includes plat information on a plot plan and details exactly where the house should be built on the lot as well as all setback details from property lines, wells, septic systems, waterways, and the like. Homes built on wheels likely won’t include a plot plan because they’re mobile in nature.
Title pages might include other notes, such as a glossary of terms and abbreviations, design load criteria, building data (for example, square footages), and safety notes. Be sure to read all this information!
Because the home will be built on a trailer, many tiny house plans don’t include a foundation plan per-se. Instead, they’ll typically include trailer construction plans from which a reputable fabricator can create the trailer. Engineered tiny house trailer plans are essential for a safe THOWs build. Most off-the-shelf, non-tiny house—specific trailers aren’t engineered to support the weight of a tiny house.

In a complete set of THOWs plans, you should find trailer plans, which can be taken to any reputable trailer manufacturer.
Trailer plans should include framing member dimensions as well as callouts on the type and grade of metal required. They should also include details on axles and their placement on a trailer. Hold-down locations should be marked, including anchor points for the house to the trailer, as well as anchor points for the trailer to the ground anchoring system.
For homes on permanent foundations, plans should include details on concrete footer locations, as well as specific construction details. If you’re building a concrete foundation, you should see notes for the inclusion of rebar, as well as the overall size of the foundation walls. Finally, you should see details about proper drainage away from the home along with information on any in-ground drainage lines necessary to keep the foundation dry.
Floor plans outline a structure’s layout and should include information on things such as heating appliances, utilities, flooring types, specialty cabinet locations, room layouts, window and door locations, and more. You can see examples of floor plans on figures found later in this chapter.
It’s common for window and door schedules to appear on the same page as the floor plans. These schedules describe window and door details, including rough opening, finished size, glazing requirements (for example, tempered glass), number of each unit in each size, and header heights. You should be able to place your window and door order directly from these schedules and know exactly what size openings your framing should use.
As mentioned earlier, the symbols used on a floor plan direct you to other views, such as elevations, building sections, and construction details. Always follow the information in the symbols to the most detailed drawing in the plans before starting any aspect of the build. In other words, start on the floor plan, zoom in to a building section, and zoom in again to specific construction details.

In this figure, two images illustrate how to read building section flags and details.
Let’s look at an example set of plans to explain this concept. Find the flag in the left image that says 1/A3.1, which is located on the top of the image toward the middle. This flag is telling you to look at Detail 1, which can be found on page A3.1.
Now look at the right image. It shows you building section 1 on page A3.1. You can see several other detail flags and a building section flag on Detail 1. If you had the full set of plans in front of you, you would follow each of these detail paths until you reached the last one.
The good news is that this system is used in nearly all residential construction drawings, so once you learn how to read plans, you’ll be able to decode pretty much any of them.
TINY TIP
You might find some general notes on a floor plan as well. It’s not uncommon for architects and designers to call out specific safeguards such as “general contractor to verify all dimensions,” or “home to be constructed in accordance with all local laws and codes.” As much as these notes offer protection to the architect, they also raise important points that should be followed.
Electrical Plan
In smaller homes, electrical layouts are often included on the floor plan itself. You can study this detail in figures later in this chapter. Sometimes, however, they’re placed on a separate drawing. An electrical plan doesn’t show where to place your wires. Instead, it depicts the locations of switches, plugs, lighting, and safety detectors. An electrical plan also marks the location of the main electrical panel and anything else specifically related to the electrical system.
Exactly how you run your wiring is up to you. Also, you won’t find specific information on how many circuits should be used or which parts of the home should be connected to the same circuits. That’s up to you, too. Be sure to plan out your circuits ahead of time.
Other details not typically included on most electrical plans are the recommended wire type and gauge. The most common wire type used in residential construction is nonmetallic sheathed cable or NM-B (Romex). The most common sizes are 14g and 12g. There are specific requirements for some circuits within a home, which is dictated by the National Electrical Code (NEC) and something you’ll have to investigate per local requirements.
Most architectural plans don’t include an actual plumbing plan; usually those details are left for a professional plumber. Designing a plumbing system is challenging in a THOWs with height restrictions when it comes to vent stack designs. You might want to discuss your proposed plumbing layout with a plumber before you start framing to make sure it will work as intended.
On plans with plumbing details, you’ll typically be shown the layout in 3D perspective, enabling you to see how the vent, waste lines, and water lines all interact. Plumbing plans also include gas lines, if applicable, in their layout.
Elevations
An elevation drawing enables you to see a proposed structure in a 2D view as though you were looking at it from street level. You can view examples of elevations on figures found later in this chapter. Sometimes an interior view might be represented in elevation form as well, such as a kitchen or bathroom cabinet layout.
It’s common for elevation drawings to contain information on siding type, trim details, finish floor materials, overall building heights (marked from grade), and window identification badges that relate to both the floor plan and the window schedule. A window or door identification badge is simply a number or letter assigned to the window labeled in the window or door schedule. This enables you to see which windows and doors go where clearly.
Framing Plan
Framing details provide information on framing member sizing, spacing (such as 2×4 studs, 16" o.c.), as well as any sheathing that should be included in the wall assembly. Also, you’ll find any specific notes regarding nailing patterns, if they vary from industry standards and codes. Specialty hardware, anchors, strapping, or other fasteners will be included in these framing plans, too.
In some cases, a general note about framing details will be placed alongside a long arrow to describe a specific area. That note might read something like “4×4 ceiling joists, 24" o.c. placed over the loft frame.”

Framing plans outline how wall, floor, ceiling, and roof assemblies should come together.
In order to understand sectional views, imagine cutting a house with a knife along a specific line (section line), and then laying that view flat. By dissecting the house this way, you can see the inner workings of the walls, roof, floor, and anything else the section line intersects. As mentioned previously, this plan is where you’ll most likely see wall assembly details.
You’ll most likely find two sections in a tiny house, one cutting each direction across the house. In more complex homes, you may see more than two sections. It’s customary to see detail circles on each section. These circles indicate that there are even more comprehensive views available to describe a detail. As mentioned earlier, be sure to follow those detail paths all the way to the highest level on the plans.

Building sections illustrate what a house looks like if you slice it along the section line. They provide a glimpse into framing and finish material systems.
As the name implies, details provide the closest, most accurate view of any aspect on a set of plans. They’re often used to show how roof intersections should be built, how the house to foundation/trailer connection should be made, and/or how the trim details should come together.

Construction details illustrate how various assemblies come together. A good set of construction drawings could have a dozen or more details.
The more details a set of plans contains, the easier it will be to construct the house. After all, you’ll have a greater understanding of how everything comes together when you can see it in detail and from several angles.
In this section, we share three floor plans and elevations showcasing some tiny house examples. They might be a great point of inspiration as you begin to design your own dream tiny house. Two of these tiny houses are on wheels while one is on a fixed foundation.
24' Tiny House On Wheels (THOWs)
This 24' version of the hOMe tiny house is great for those wanting something a bit easier to tow but with enough space for day-to-day living for one to two people. One of the great features of this tiny house is that it offers a downstairs sleeping area. The original design calls for a sofa sold by IKEA, which converts easily into a queen-size bed while also providing storage for the bedding during daytime.
One can easily build a loft over the kitchen and bathroom area and have enough space for a set of stairs (as shown in the drawing). If one doesn’t want the loft, the space where the stairs are could be incorporated into the kitchen, thus creating more counter space.
If you prefer not to sleep on a sofa, you can certainly place a mattress and frame where the sofa currently sits and incorporate back cushions so that the bed becomes a comfortable seating area during the day. If you opt for the loft option, you can fit a queen-size mattress up there as well as clothes storage furniture.
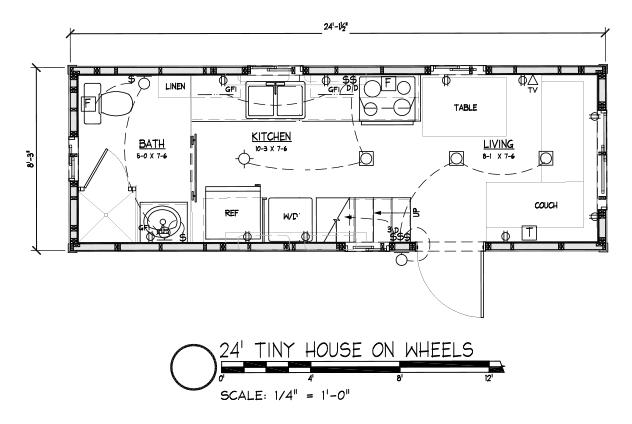
This 24' version of hOMe can be built with or without a sleeping loft. It boasts a nice size kitchen, bathroom, and comfortable seating area, which can convert into a bed at night.
This 24' tiny house boasts a comfortably sized galley kitchen large enough for regular appliances. There’s space for a washer and dryer combo and a comfortably sized bathroom with its own full-size sink. It incorporates a dining/work table large enough to comfortably seat three people. The table can be folded down during the day when more open floor space is desired.

This elevation shows the 24' hOMe on wheels, which can be built with or without a loft.
Tiny House On Wheels (THOWs) with Two Lofts
This 28' design is what we’ve been calling home since 2013. It’s large enough for us to live and work in full-time. It’s also spacious enough to serve as home base for our 20-year-old son and 17-year-old daughter who live full-time on our land with us. Though they do have their own sleeping cabins just a few feet from hOMe, the tiny house is where we all spend the bulk of our days.
The 28’ hOMe design incorporates a comfortable set of stairs, a full-size kitchen with full-size appliances, tons of storage, home office for two, comfortably sized bathroom, and two lofts. It’s also large enough for our two dogs and one cat.
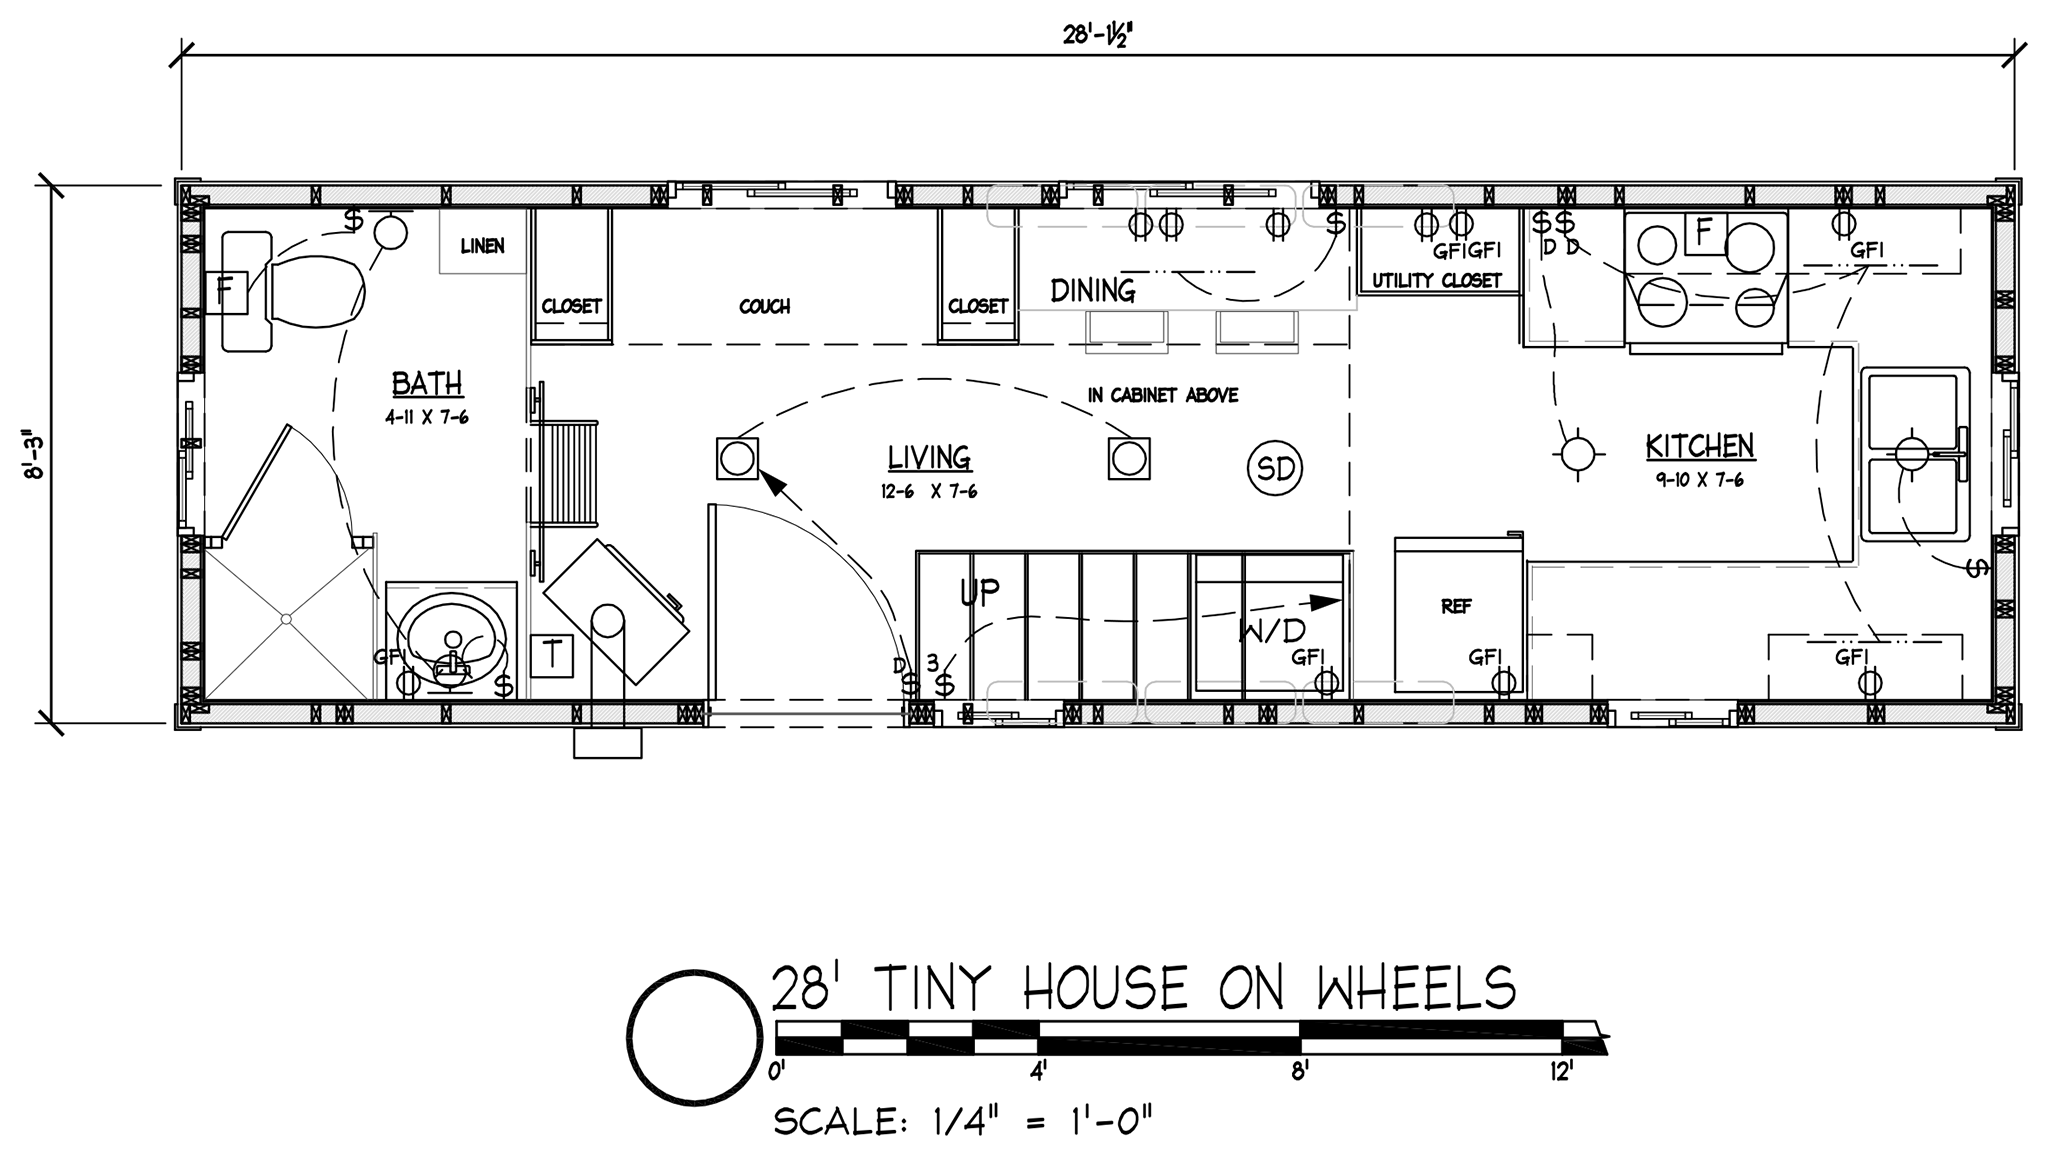
This 28' version of the hOMe tiny house contains two lofts, a set of stairs to the main loft, a full-size kitchen, and a comfortable bathroom.
This 28' layout can also be configured to incorporate a downstairs sleeping area. The U-shaped kitchen can be reconfigured into a galley setup in the middle of the tiny house; then, the end space can be used as a separate bedroom, creating the potential of three separate sleeping areas (two lofts and one downstairs bedroom).

This elevation shows our hOMe 28’ Tiny House On Wheels (THOWs).
One of the lofts could be eliminated and then the kitchen could be moved to the center of the home. A raised floor could be added in the living area on the opposite end of the bathroom. A sliding bed frame can be hidden under a raised floor during the day and pulled out at night. Because beds are typically only used during sleeping hours, it’s very efficient to create a bedroom scenario that doesn’t take up any space during waking hours.
This tiny house designed by Chris Keefe of Organic Forms Design, LLC, is only 377 square feet, but it packs a surprising number of features. A full-size bathroom is large enough for a standard bathtub as well as a stacked washer and dryer unit. The sink vanity is quite spacious as well.
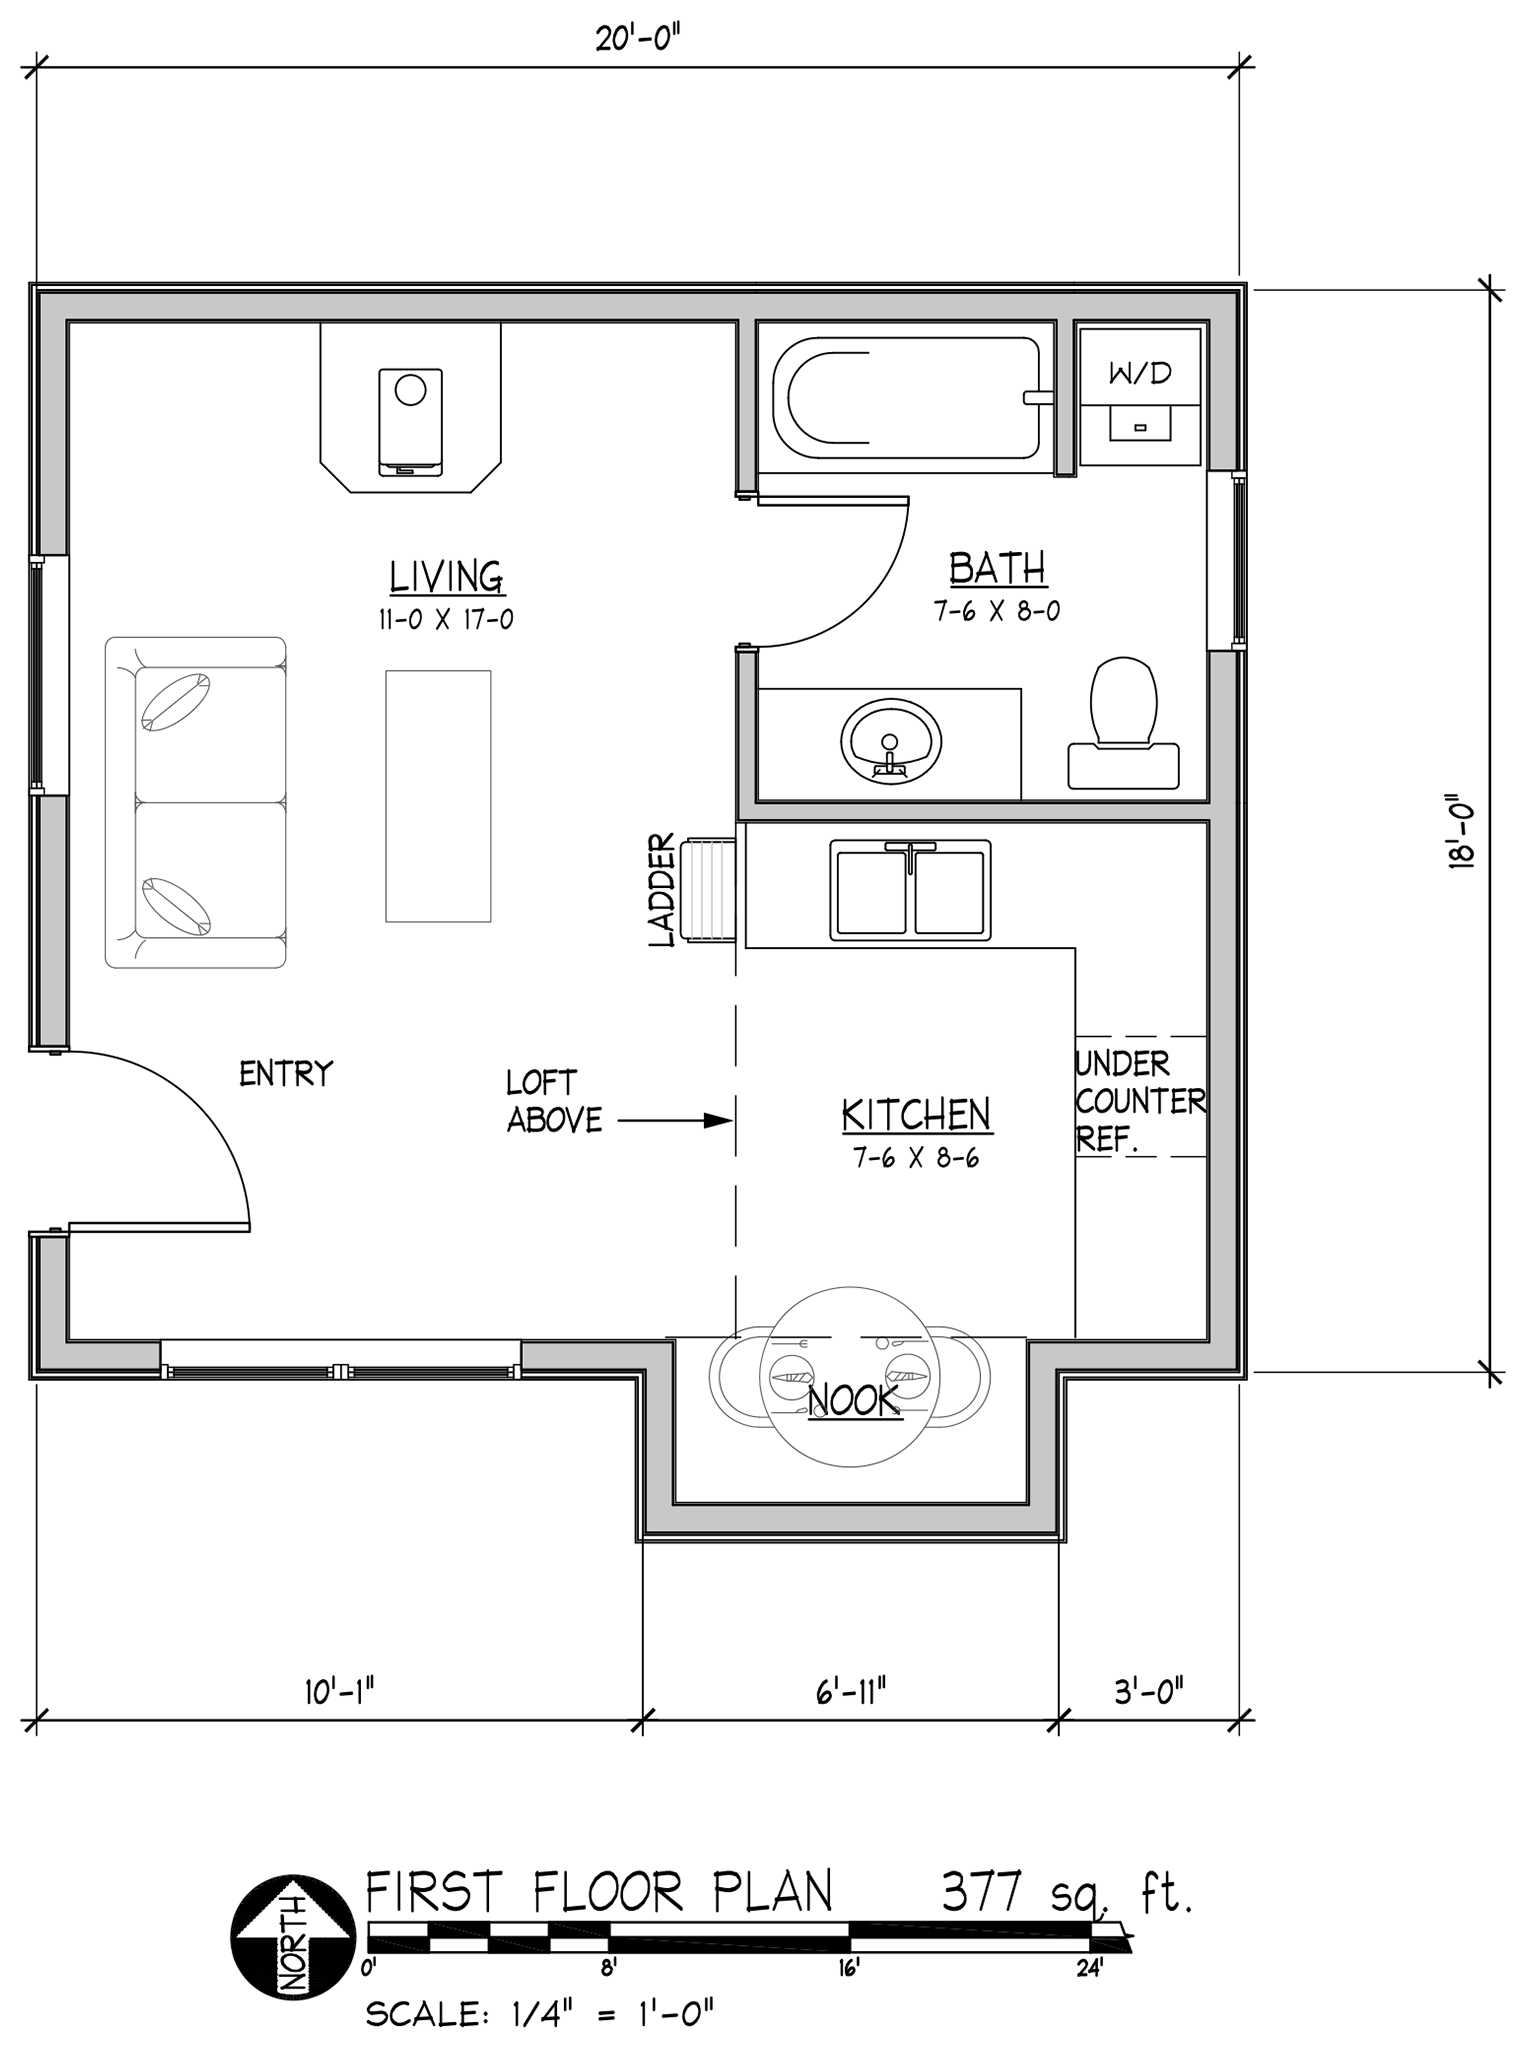
This 377-square-foot Tiny House On Foundation (THOF) is large enough for a full-size bathroom, functional kitchen, eating nook, standard furniture, free-standing wood burning stove, and a sleeping loft above the kitchen. Also, the loft can be extended on top of the bathroom.

This elevation shows the 377-square-foot tiny house on a fixed foundation.
If desired, the kitchen is large enough for standard appliances as well as full-size upper and lower cabinets. The eating nook comfortably seats three to four people.
The bedroom is in the loft, but you could certainly incorporate it into a studio setup with either a Murphy bed in the living room or a sleeper couch serving as the bed. The living room can be configured in various ways with either a sectional couch or smaller seating units, allowing more open floor space for movement.
You can install a wood-burning stove or open up that floor space by installing a mini-split or wall-mounted heater. As you can see, there are various options for how to set up the living room and plenty of space exists for adding storage cabinetry.
The space behind the front door is perfectly suited for a coat rack and shoe storage area. The large window between the front door and eating nook could be swapped out with a patio door leading to a deck.
The overall height of this 377-square-foot tiny house is 18'6". Because it’s not on wheels, the owner is free to make it as tall as desired. Adding this height translates to a sleeping loft that’s much more comfortable for moving around.
Though this cabin is still technically a tiny house, you can see just how much space is available. This space is certainly large enough for two adults to live in full-time, and could even work for a family of four. By extending the loft to pass over the bathroom as well as the kitchen, two bedrooms can easily fit upstairs.
- There are several details and components that go into a set of architectural plans, and knowing how to read them is a huge asset.
- A good set of architectural plans should include a title page, foundation plan, floor plan, electrical plan, plumbing plan, elevations, framing plan, sections, and details.
- Once you learn how to read one set of plans, you’ll have the skills to read a wide range of them.