
![]()
Developing Exchange Online Solutions
In this chapter you’ll create a client application that accesses the Exchange Online server in your Office 365 account. Exchange Online 2013 exposes a lot of features through Exchange Web Services (EWS) to client applications such as Outlook and Outlook Web App. Your custom application can use these same features as well. I will show you how to
- Connect to the Exchange Online server using the autodiscover process. The actual server that is hosting your Exchange instance can change, so you should always use the autodiscover process instead of hard-coding the connection string.
- Access the mailbox items stored in Exchange. Think of Exchange as a specialized database containing objects such as e-mails, appointments, tasks, and contacts, which are organized in a hierarchy of folders. You can view, modify, and create these objects programmatically.
- Determine the availability of someone or a group of people. Exchange provides a feature that allows you to see when people will be available based on their calendars. You can also use this feature to suggest windows of time when the specified group of people and resources will be available.
- Subscribe to notifications when certain events occur, such as the arrival of a new message. Your custom application can receive these notifications and take appropriate actions. I will show you both push- and pull-type subscriptions.
You’ll create a Windows Presentation Foundation (WPF) application that will communicate with Exchange. To save you some time in designing the form, you can download the XAML file from www.apress.com and paste it into your project. This simply defines the visual controls that are used on the form. We will explain how to write the code-behind for each of the functions that you’ll implement. Along the way, we’ll explain how each works.
Creating the Visual Studio Project
Launch Visual Studio 2013 and create a new project and solution. Enter the project name ExchangeApp, as shown in Figure 6-1.
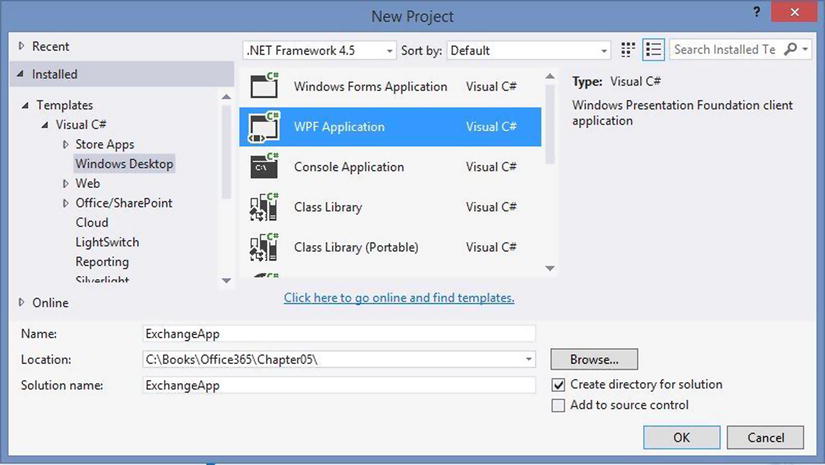
Figure 6-1. Creating a Visual Studio project
Click the OK button to create the project and solution. The MainWindow.xaml file will be opened and show a blank form.
Designing the Form
Select the XAML tab to see all of the code. Download the MainWindow.xaml file from www.apress.com and paste the XAML code from it into your local file. Switch to the Design tab, and the form should look like Figure 6-2.
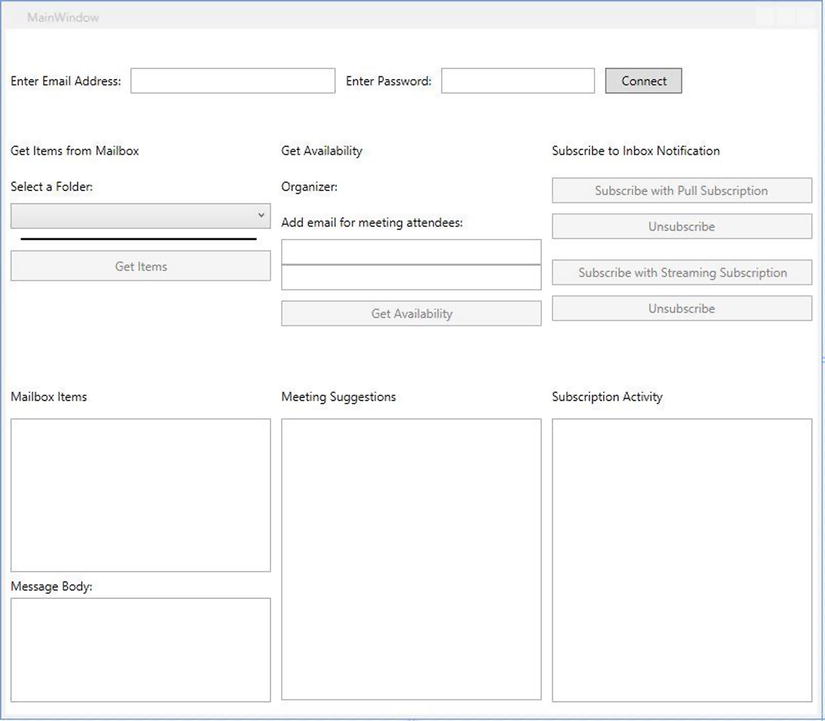
Figure 6-2. The main window form design
The form is divided into four areas that correspond to the four basic functions that you will implement in this chapter. The section across the top contains the controls you’ll use to connect to the Exchange server. The other areas of the form consist of three columns that will be used to implement the remaining functions. From left to right the columns are for:
- Querying the mailbox contents
- Checking for availability
- Subscribing to inbox notifications
Preparing the Visual Studio Project
Before we explain the coding that is required, you’ll first make some changes in the project’s environment. You’ll install the managed API and add the necessary reference in your project.
Installing the EWS Managed API
The features in Exchange Online are exposed to client applications through EWS. However, instead of calling the web service directly, you’ll use a managed API. You’ll need to install the API on your client machine. You can download the installation file (.msi) at www.microsoft.com/download/en/details.aspx?id=13480.
![]() Note The term managed API refers to the fact that the assemblies are written in .NET and run under the same management processes as any other .NET-based coding. This results in the code being compiled into the Common Language Runtime (CLR) and then compiled further upon the first execution. The alternative would be native code, which is compiled to machine language and run directly against the core services of the OS.
Note The term managed API refers to the fact that the assemblies are written in .NET and run under the same management processes as any other .NET-based coding. This results in the code being compiled into the Common Language Runtime (CLR) and then compiled further upon the first execution. The alternative would be native code, which is compiled to machine language and run directly against the core services of the OS.
When you run this installation file, you’ll see the dialog box shown in Figure 6-3.
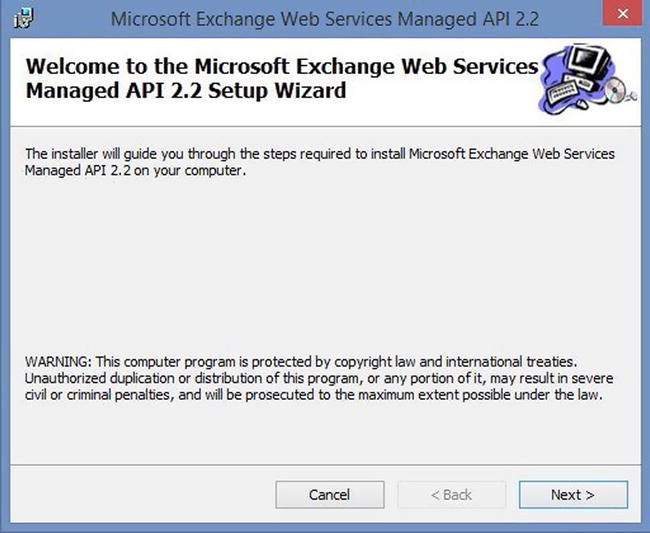
Figure 6-3. Installing the EWS Managed API
You’ll be presented with several more dialog boxes; you can use all the default values to complete the installation.
Adding a Reference
When it has finished, you’ll need to add a reference to your project.
- Right-click the ExchangeApp project in Solution Explorer and click the Add Reference link.
- Select the Browse tab and browse to the C:Program FilesMicrosoftExchangeWeb Services2.2 folder shown in Figure 6-4.
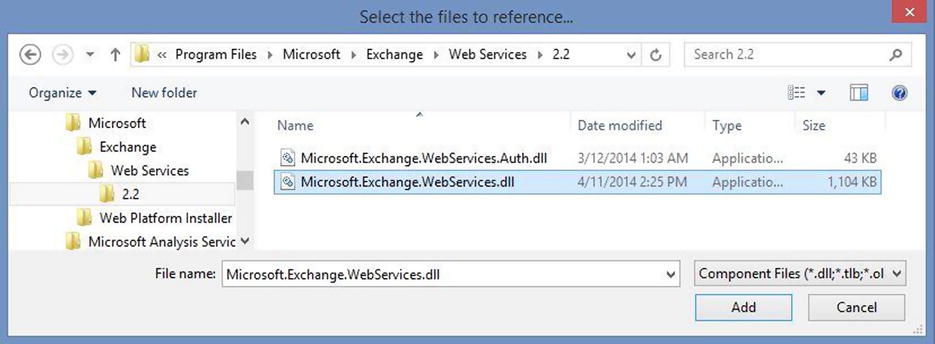
Figure 6-4. Browsing for the Managed API
- Select the Microsoft.Exchange.WebServices.dll file, as shown in Figure 6-5. Click the OK button to create the reference.
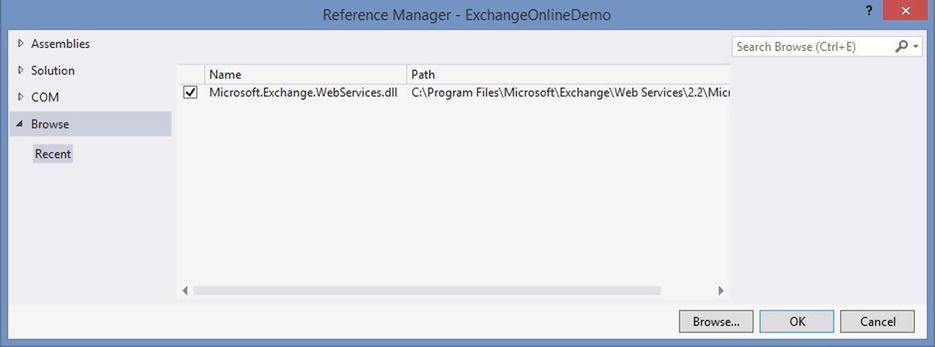
Figure 6-5. Adding a reference to the EWS Managed API
Creating the Data Class
To help organize the code, you’ll create a separate class that contains the code used to communicate with Exchange via the managed API. The logic in the code-behind class, MainWindow.xaml.cs, provides the glue for moving the Exchange data to the form controls.
Right-click the ExchangeApp project in Solution Explorer and select the Add and then Class links. In the Add New Item dialog box, enter the class name ExchangeDataContext.cs. Then click the Add button to create the class. Add the following namespaces to this file:
using Microsoft.Exchange.WebServices.Data;
using Microsoft.Exchange.WebServices.Autodiscover;
using System.Windows;
Open the MainWindow.xaml.cs code-behind file and add the following namespaces:
using System.Web;
using Microsoft.Exchange.WebServices.Data;
using System.Windows.Threading;
Connecting to Exchange with Autodiscover
Now you’re ready to implement the four functions we listed at the beginning of the chapter:
- Connecting to the Exchange Online server
- Accessing mailbox items
- Determining availability
- Subscribing to notifications
Before you can do anything else, you’ll need to connect to the Exchange server. We’ll start with that feature. You will first add the logic in the ExchangeDataContext class that calls the autodiscover process. Then you’ll implement the click event in the code-behind class.
Implementing the ExchangeDataContext Class
Go to the ExchangeDataContext class and add the code shown in Listing 6-1 to the class definition.
Listing 6-1. Connecting to the Exchange Server
private ExchangeService _service;

public ExchangeDataContext(string emailAddress, string password)
{
    _service = GetBinding(emailAddress, password);
}

public ExchangeService GetService()
{
    return _service;
}

static ExchangeService GetBinding(string emailAddress, string password)
{
    // Create the binding.
    ExchangeService service =
        new ExchangeService(ExchangeVersion.Exchange2013_SP1);

    // Define credentials.
    service.Credentials = new WebCredentials(emailAddress, password);

    // Use the AutodiscoverUrl method to locate the service endpoint.
    try
    {
        service.AutodiscoverUrl(emailAddress, RedirectionUrlValidationCallback);
    }
    catch (AutodiscoverRemoteException ex)
    {
        MessageBox.Show("Autodiscover error: " + ex.Message);
    }
    catch (Exception ex)
    {
        MessageBox.Show("Error: " + ex.Message);
    }

    return service;
}

static bool RedirectionUrlValidationCallback(String redirectionUrl)
{
    // Perform validation.
    // Validation is developer dependent to ensure a safe redirect.
    return true;
}
This code is used to return an ExchangeService class. This defines a private _service member that is created by the class constructor. The GetService() method simply returns this private member.
The real work is done in the GetBinding() method. This method first creates an instance of the ExchangeService class. Notice that the constructor takes a version parameter. The managed API allows you to specify which version of Exchange you want to use. It then supplies the credentials, which consist of the e-mail address associated with the inbox and a password.
Finally, the AutodiscoverUrl() method is called. This is where the API does the work of finding the appropriate Exchange server and setting up the connection. This method takes a few seconds to complete. The code also handles exceptions. Finally, a callback is created to validate any redirects that may be configured for this inbox.
Modifying the Code-Behind Class
Add the following methods to the MainWindow.xaml.cs code-behind file:
private ExchangeDataContext _context;
private void btnConnect_Click(object sender, RoutedEventArgs e)
{
    _context = new ExchangeDataContext(txtEmailAddress.Text, txtPassword.Password);
    EnableButtons();
}

protected void EnableButtons()
{
    btnGetAvailability.IsEnabled = true;
    btnGetItems.IsEnabled = true;
    btnPullSubscribe.IsEnabled = true;
    btnStreamSubscribe.IsEnabled = true;
}
When the Connect button is clicked, this code will create an instance of the ExchangeDataContext class, passing in the credentials that were specified on the form. Now that the application is connected to the Exchange server, the EnableButtons() method enables the other buttons that you will implement shortly.
Accessing the Folder Contents
The next function that you will implement is displaying the contents of the selected folder.
Retrieving Items from Exchange
Add the methods shown in Listing 6-2 to the ExchangeDataContext class.
Listing 6-2. Reading the Mailbox Items
public List<Folder> GetFolders(FolderId parentFolderID)
{
    return _service.FindFolders(parentFolderID, null).ToList();
}

public List<Item> GetMailboxItems(WellKnownFolderName folder)
{
    return _service.FindItems(folder, new ItemView(30)).ToList();
}

public Item GetItem(ItemId itemId)
{
    List<ItemId> items = new List<ItemId>() { itemId };

    PropertySet properties = new PropertySet(BasePropertySet.IdOnly,
        EmailMessageSchema.Body, EmailMessageSchema.Sender,
        EmailMessageSchema.Subject);
    properties.RequestedBodyType = BodyType.Text;
    ServiceResponseCollection<GetItemResponse> response =
        _service.BindToItems(items, properties);

    return response[0].Item;
}
These methods retrieve the various Exchange objects from the service.
- GetFolders() returns all child folders for the given parent.
- GetMailboxItems() returns all items within the given folder.
- GetItem() returns an item for the given ItemId. This method uses the BindToItems() method to populate only the properties specified in the PropertySet type parameter.
- The RequestedBodyType attribute is set to BodyType. Text since the application will display the information in a TextBox. HTML is returned by default.
Displaying the Mailbox Items
Add this code to the MainWindow class constructor, which will set up the event handler for the OnLoaded event:
this.Loaded += MainWindow_Loaded;
Then add the methods shown in Listing 6-3 to the MainWindow.xaml.cs code-behind class.
Listing 6-3. Displaying the Mailbox Contents
void MainWindow_Loaded(object sender, RoutedEventArgs e)
{
    BindWellKnownFolderList();
}

protected void BindWellKnownFolderList()
{
    //bind the known folders to the list box
    foreach(WellKnownFolderName folderName in
        Enum.GetValues(typeof(WellKnownFolderName)))
    {
        cboWellKnownFolders.Items.Add(folderName);
    }
}

private void btnGetItems_Click(object sender, RoutedEventArgs e)
{
    //check for given values
    if (string.IsNullOrWhiteSpace(txtEmailAddress.Text))
    {
        MessageBox.Show("You must enter an email address to proceed.");
        return;
    }

    if (cboWellKnownFolders.SelectedIndex < 0)
    {
        MessageBox.Show("You must select a folder to proceed");
        return;
    }

    //get items for the given folder and bind them to the list box
    lstItems.ItemsSource = _context.GetMailboxItems
        ((WellKnownFolderName)cboWellKnownFolders.SelectedItem);
}

private void lstItems_SelectionChanged(object sender, SelectionChangedEventArgs e)
{
    Item email = _context.GetItem(((Item)lstItems.SelectedItem).Id);

    txtMessageBody.Text = "From:" + ((EmailMessage)email).Sender
                                  + Environment.NewLine;
    txtMessageBody.Text += Environment.NewLine;
    txtMessageBody.Text += email.Body;
}

private void btnGetAvailability_Click(object sender, RoutedEventArgs e)
{
}

private void btnPullSubscribe_Click(object sender, RoutedEventArgs e)
{
}

private void btnPullUnsubscribe_Click(object sender, RoutedEventArgs e)
{
}

private void btnStreamSubscribe_Click(object sender, RoutedEventArgs e)
{
}

private void btnStreamUnsubscribe_Click(object sender, RoutedEventArgs e)
{
}
A ComboBox is populated when the application is loaded through the BindWellKnownFolderList() method. This ComboBox displays the default folders for Exchange. This method simply iterates through the WellKnownFolders enum and adds each item.
When the GetItems button is clicked, the GetMailboxItems() method is called from the DataContext class, and the results are bound to the lstItems ListBox. When an item is selected from the ListBox, the GetItem() method is called, and the results are used to populate the TextBox to display the sender and the body.
![]() Note The last five methods provide an empty event handler for each of the remaining command buttons on the form. You will need these to prevent compiler errors. You will provide the implementation later.
Note The last five methods provide an empty event handler for each of the remaining command buttons on the form. You will need these to prevent compiler errors. You will provide the implementation later.
Testing the Application
Now is a good time to pause and test the functions that you have already implemented. Press F5 to compile and launch the application. Enter the e-mail address for a mailbox that is hosted on Office 365 and the corresponding password, and then click the Connect button, as shown in Figure 6-6. It will take a few seconds for the autodiscover process to obtain the correct address.

Figure 6-6. Connecting to Exchange Online
When the application has connected, most of the command buttons will be enabled. Select a folder and click the Get Items button. The items in that folder should be shown in the Mailbox Items list. Select one of these items and the message box will be displayed below it. The form will look similar to Figure 6-7.
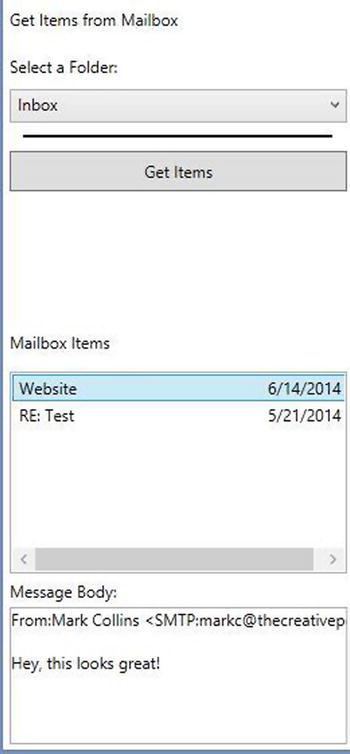
Figure 6-7. Displaying the mailbox items
Checking Availability
Exchange Online provides the ability to query the server for the availability of accounts based on their calendars. This provides the information necessary to schedule meetings when the desired participants are free. The meeting parameters, including the attendees, the time, and the duration of the meeting, are sent to the server. The service returns a list of possible meeting times with a quality setting based on the settings of the query.
![]() Note Availability is only provided for users with accounts on the Exchange Online server. This service does not query calendars outside of the Exchange server.
Note Availability is only provided for users with accounts on the Exchange Online server. This service does not query calendars outside of the Exchange server.
Retrieving the Availability Results
Add the method shown in Listing 6-4 to the ExchangeDataContext class.
Listing 6-4. Querying Availability from Exchange
public GetUserAvailabilityResults GetAvailability
    (string organizer,
     List<string> requiredAttendees,
     int meetingDuration,
     int timeWindowDays)
{
    List<AttendeeInfo> attendees = new List<AttendeeInfo>();

    //add organizer
    attendees.Add(new AttendeeInfo()
    {
        SmtpAddress = organizer,
        AttendeeType = MeetingAttendeeType.Organizer
    });

    //add required attendees
    foreach(string attendee in requiredAttendees)
    {
        attendees.Add(new AttendeeInfo()
        {
            SmtpAddress = attendee,
            AttendeeType = MeetingAttendeeType.Required
        });
    }

    //setup options
    AvailabilityOptions options = new AvailabilityOptions()
    {
        MeetingDuration = meetingDuration,
        MaximumNonWorkHoursSuggestionsPerDay = 4,
        MinimumSuggestionQuality = SuggestionQuality.Good,
        RequestedFreeBusyView = FreeBusyViewType.FreeBusy
    };

    GetUserAvailabilityResults results = _service.GetUserAvailability
        (attendees,
         new TimeWindow(DateTime.Now, DateTime.Now.AddDays(timeWindowDays)),
         AvailabilityData.FreeBusyAndSuggestions,
         options);

    return results;
}
This code provides the method for getting the availability suggestions for the given e-mail addresses. The attendees are added using the AttendeeInfo object. The account used to connect to the Exchange service is used as the organizer. The e-mail addresses added in the form are added as required attendees. The AttendeeOptions object is used to set the options for the search against the service, setting the following properties:
- MeetingDuration: How long the open window needs to be
- MaximumNonWorkingHoursSuggestionsPerDay: Whether the search should include suggestions during non-working hours
- MinimumSuggestionQuality: Only returns items of this value and above
- RequestedFreeBusyView: What type of data is returned
The attendees’ options are passed into the GetUserAvailabilityResults() service call along with the AvailabilityData setting. This property indicates whether to include suggestions in the result data.
Displaying the Results
Add the following code to the btnConnect_Click() method. This simply defaults the meeting organizer to the same inbox that you connected to.
lblOrganizer.Text += " " + txtEmailAddress.Text;
Replace the blank implementation of the btnGetAvailability_Click method with the code shown in Listing 6-5.
Listing 6-5. Implementing the Get Availability Button
private void btnGetAvailability_Click(object sender, RoutedEventArgs e)
{
    List<string> attendees = new List<string>();
    if (!string.IsNullOrWhiteSpace(txtAttendee1.Text))
    {
        attendees.Add(txtAttendee1.Text);
    }

    if (!string.IsNullOrWhiteSpace(txtAttendee2.Text))
    {
        attendees.Add(txtAttendee2.Text);
    }

    if (attendees.Count == 0)
    {
        MessageBox.Show("You must add at least one attendee to proceed.");
        return;
    }

    GetUserAvailabilityResults results =
        _context.GetAvailability(txtEmailAddress.Text, attendees, 30, 2);

    foreach (Suggestion suggestion in results.Suggestions)
    {
        foreach (TimeSuggestion time in suggestion.TimeSuggestions)
        {
            lstSuggestions.Items.Add(time);
        }
    }
}
When the Get Availability button is clicked, the attendees are added and passed into the GetUserAvailabilityResults() method in the DataContext. The returned suggestions are added to the lstSuggestions ListBox for display.
Testing the Availability Feature
Let’s test the availability feature:
- Press F5 to compile and start the application.
- Enter an e-mail address and password, and click the Connect button as you did before. Once the buttons are enabled, the meeting organizer will be set using the e-mail address that was used to log in.
- Specify another user or two and click the Get Availability button. The available time slots will be displayed in the suggestions list, as shown in Figure 6-8.

Figure 6-8. Displaying the availability results
Subscribing to Notifications
For the final function, you will set up a subscription to be notified when a new item is added to the inbox. There are three types of subscriptions:
- The first, called a pull notification, happens when the client makes periodic calls to check for updates since the last call. This works by subscribing to the notification service and then polling that service for changes. A watermark is set each time the service is polled. Any changes that occurred since the last watermark are returned. This can easily be done in application code, but it does require polling the service. Notifications are not sent back to the subscription object automatically. Either some type of user event must be used to trigger the application to check the service or some sort of timer must be used.
- The second is called streaming notification. With this type of notification, an event is raised automatically. This works by opening a constant connection with the Exchange service. Notifications occur automatically. An event handler is used to respond to any notifications that are received from the subscription. A streaming subscription can only be open for 30 minutes or less. Any application designed to be open longer than this must either restart a streaming subscription after 30 minutes or use another type of subscription.
- The third is called push notification. Push notification works by subscribing to a notification service, similarly to a pull notification, except that a listener service is set up to receive notification events. This typically involves a WCF service, or some other type of web service that can receive the online event. This requirement for a listening service means that our WPF application does not demonstrate push notification.
Setting Up Pull Notification
Replace the blank implementations of the btnPullSubscribe_Click and btnPullUnsubscribe_Click methods with the code shown in Listing 6-6.
Listing 6-6. Implementing Pull Notification
private PullSubscription _pullSubscription;
private StreamingSubscription _streamSubscription;
DispatcherTimer _timer;

private void btnPullSubscribe_Click(object sender, RoutedEventArgs e)
{
    ExchangeService service = _context.GetService();

    _pullSubscription = service.SubscribeToPullNotifications
        (new FolderId[] {WellKnownFolderName.Inbox}, 10, null, EventType.NewMail);
    txtSubscriptionActivity.Text
        += "Pull Subscription Created" + Environment.NewLine;

    //set up polling
    _timer = new DispatcherTimer();
    _timer.Interval = TimeSpan.FromSeconds(10);
    _timer.Tick += timer_Tick;
    _timer.Start();

    btnPullSubscribe.IsEnabled = false;
    btnPullUnsubscribe.IsEnabled = true;
}

void timer_Tick(object sender, EventArgs e)
{
    GetEventsResults results = _pullSubscription.GetEvents();

    txtSubscriptionActivity.Text
        += "Pull Subscription checked for new items" + Environment.NewLine;

    foreach (ItemEvent itemEvent in results.ItemEvents)
    {
        switch (itemEvent.EventType)
        {
            case EventType.NewMail:
                txtSubscriptionActivity.Text
                    += "Pull Subscription: New email received"
                    + Environment.NewLine;
                break;
        }
    }
}

private void btnPullUnsubscribe_Click(object sender, RoutedEventArgs e)
{
    _timer.Stop();

    _pullSubscription.Unsubscribe();

    txtSubscriptionActivity.Text
        += "Pull Subscription Unsubscribed" + Environment.NewLine;

    btnPullSubscribe.IsEnabled = true;
    btnPullUnsubscribe.IsEnabled = false;
}
When the Pull Subscribe button is clicked, a PullSubscription object is created. The WellKnownFolderName.Inbox enum is passed, along with a timeout of 10 (minutes) and the EventType.NewMail enum to send the subscription to be notified of any new items that are received in the inbox. The 10-minute timeout allows the subscription to expire if it is not polled within 10 minutes.
A DispatchTimer is set up to poll the PullSubscription object every 10 seconds. It uses the timer_Tick() method. This code calls the GetEvents() method, which checks for notifications and sets a new watermark. An event is recorded in the txtSubsctiptionActivity TextBox, and any notifications are processed. Each notification is recorded in the txtSubscriptionActivity TextBox as well.
The Pull Unsubscribe button stops the timer and calls the Unsubscribe() method, which ends the subscription. An event is recorded in the activity TextBox.
Using Streaming Notification
Replace the blank implementations of the btnStreamSubscribe_Click and btntreamUnsubscribe_Click methods with the code shown in Listing 6-7.
Listing 6-7. Implementing Streaming Notification
private void btnStreamSubscribe_Click(object sender, RoutedEventArgs e)
{
    ExchangeService service = _context.GetService();

    _streamSubscription = service.SubscribeToStreamingNotifications
        (new FolderId[] { WellKnownFolderName.Inbox }, EventType.NewMail);

    StreamingSubscriptionConnection connection =
        new StreamingSubscriptionConnection(service, 10);

    connection.AddSubscription(_streamSubscription);
    connection.OnNotificationEvent += connection_OnNotificationEvent;

    connection.Open();

    txtSubscriptionActivity.Text
        += "Stream Subscription Created" + Environment.NewLine;

    btnStreamSubscribe.IsEnabled = false;
    btnStreamUnsubscribe.IsEnabled = true;
}

void connection_OnNotificationEvent(object sender, NotificationEventArgs args)
{
    foreach(NotificationEvent notification in args.Events)
    {
        switch (notification.EventType)
        {
            case EventType.NewMail:
                Dispatcher.Invoke(new Action(
                    delegate()
                    {
                        txtSubscriptionActivity.Text
                            += "Stream Subscription: New email received"
                            + Environment.NewLine;
                    }));
                break;
        }
    }
}

private void btnStreamUnsubscribe_Click(object sender, RoutedEventArgs e)
{
    _streamSubscription.Unsubscribe();

    txtSubscriptionActivity.Text
        += "Stream Subscription Unsubscribed" + Environment.NewLine;

    btnStreamSubscribe.IsEnabled = true;
    btnStreamUnsubscribe.IsEnabled = false;
}
When the Stream Subscribe button is clicked, a streaming subscription is created using WellKnownFolderName.Inbox and EventType.NewMail parameter values to set up the service to notify the subscription object when a new item is received in the inbox. A StreamingSubscriptionConnection object is created and set to use the connection_OnNotificationEvent() method as its even handler. The connection is opened and the event is recorded in the activity TextBox.
Since this is a streaming subscription, it will receive notifications automatically from the service. It will then call the specified event handler. In this case, that is the connection_OnNotification() method. This method simply records the event into the activity TextBox. The Dispatcher.Invoke() method is used because the event handler is running on a different thread than the UI. To manipulate UI objects, the dispatcher must be used.
When the Stream Unsubscribe button is clicked, the Unsubscribe() method is called, which ends the subscription. The event is recorded in the activity TextBox.
Testing the Subscription Functions
Start the application and connect to the Exchange server as you have done before:
- After it has connected, click the Subscribe with Pull Subscription button.
- Then send an e-mail to this inbox (the one you just connected with).
- After a few minutes you should see the “New e-mail received” text appear in the Subscription Activity list, as shown in Figure 6-9. Click the Unsubscribe button to stop the polling.
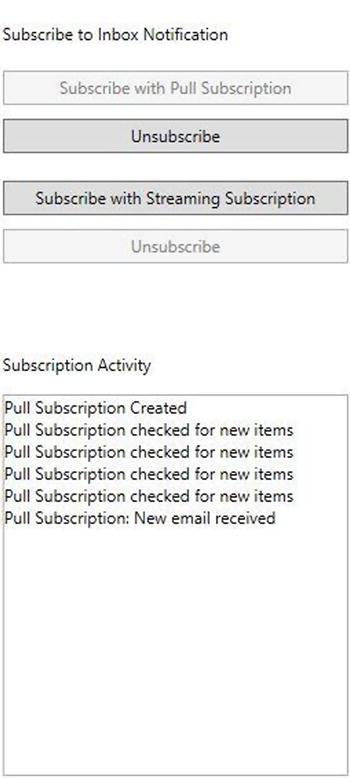
Figure 6-9. Testing the pull notification
- Now click the Subscribe with Streaming Subscription button and send another e-mail to this inbox.
- You should see the “New e-mail received” text appear shortly after the e-mail arrives. The form will look like Figure 6-10. Click the Unsubscribe button to stop the polling.

Figure 6-10. Testing the stream notification
Summary
In this chapter, you created a WPF application that does the following, for the purposes of demonstrating the features offered by EWS:
- Uses the autodiscover service to dynamically connect to Exchange Online by determining which service is currently used to host the specified mailbox
- Queries a mailbox and returns all items within a specified folder
- Checks availability of accounts for a requested meeting, displaying suggested times returned by the service
- Subscribes to notification services to respond programmatically to events occurring within the Exchange service
This type of development allows features typically found in Outlook to be included in your custom applications. This type of functionality has been available for a long time, and could be used as long as Exchange server was hosted within your network. Now this powerful set of features is available to you through the cloud.