
![]()
Introduction
Apache is arguably the most significant web server, indeed the May 2015 Netcraft survey reports that Apache runs 49% of the top million busiest sites, with Nginx reporting 22% and Microsoft 12%.
This chapter shows how to install and configure Apache on a range of Linux systems. Apache is a modular system; one module controls how Apache reports its status, which can be done through the command line or provided to visitors of the web site. Apache has another module that when enabled allows each user on the system to build their own web site within their home directory. One way Apache provides dynamic content is through the use of CGI scripts. These are programs that run on the web server to create the content that is served to the client. Apache has a robust logging system, including an error log that describes the state of the server and customizable access logs that record the requests made by clients. A single Apache server can serve multiple web sites through the use of virtual hosts. These virtual hosts can be distinguished by running on different ports; a server with multiple IP addresses can also differentiate them by address. One common use for virtual hosts is to allow Apache to serve both HTTP and HTTPS traffic. The chapter shows how to select SSL/TLS protocols, choose ciphers, and create a self-signed certificate. Basic authentication can be used to require clients to provide a valid username and password before being granted access to protected content.
ModSecurity is a web application firewall that can be used to protect web servers and web applications. It can be configured with publicly available rules from the OWASP ModSecurity Common Rule Set.
Apache is included as part of the default installation process for CentOS 5.x and 6.x systems. If it is not already installed, it can be added with the command
[root@regor ~]# yum install httpd
Though installed, the Apache service (named httpd; see Table 11-1) is not configured to start on boot; this is controlled from the command line via chkconfig or through the graphical system configuration manager in the same fashion as OpenSSH (c.f. Chapter 9 and Figure 9-1). The firewall must also be configured to allow traffic to the server. The CentOS firewall configuration tool has two different entries in the list of trusted services to allow traffic to the web server: one for “WWW (HTTP)” and one for “Secure WWW (HTTPS).”
Apache is installed on OpenSuSE from the command line with the command
kooshe:~ # zypper install apache2
Once installed, YaST can be used to configure the server to start on boot and to open the proper firewall ports (c.f. Chapter 9). The YaST firewall configuration tool also has two entries for allowed services named “HTTP Server” and “HTTPS Server,” though on older versions (e.g., OpenSuSE 11.0) they are named “Apache 2” and “Apache 2 (apache2-ssl).”
To install Apache on a Mint or an Ubuntu system, run the command
cgauss@california:~$ sudo apt-get install apache2
This installs Apache and configures it to start on boot. Mint and Ubuntu do not include a firewall as part of their default installation.
The host must have a static IP address and a name that is recorded in a DNS server; both clients and servers need to able to correctly query DNS.
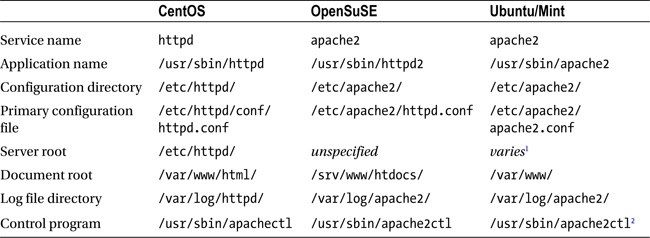
Different Linux distributions have adopted different conventions for Apache installation. The name of the service, the location and structure of the configuration files, even the name of the executable vary between distributions; these are summarized in Table 11-1. For example, the service command used to start, stop, restart, and find the status of the server takes different service names depending on the distribution. On CentOS the status command is
[root@canopus ~]# service httpd status
httpd (pid  2131) is running...
The corresponding command on Ubuntu 11.10 is
rdescartes@heart:~$ service apache2 status
Apache2 is running (pid 1074).
Table 11-1. Conventions for Apache Installation on Linux
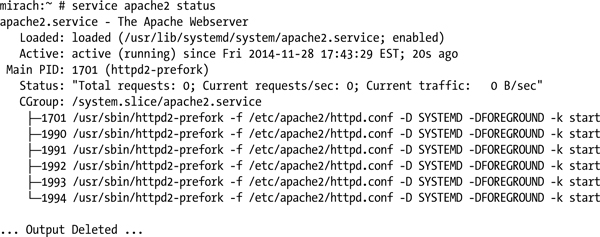
The result on OpenSuSE 13.1 (which uses systemd instead of SysVInit) is
Most distributions between 2008 and 2013 use a version of Apache 2.2, the exceptions being OpenSuSE 13.1, Ubuntu 13.10 and Mint 16, which use Apache 2.4. To find the installed version of Apache, run the application with the -v flag; for example, Mint 13 runs 2.2.22 by default:
enoether@helix ~ $ apache2 -v
Server version: Apache/2.2.22 (Ubuntu)
Server built:   Feb 13 2012 01:51:56
Apache is structured around a series of modules, which can either be compiled into the program or added dynamically. The precise set of compiled modules varies slightly between distributions. To see the compiled modules, run the application with the -l switch, seen here on OpenSuSE 11.0.
kooshe:~ # httpd2 -l
Compiled in modules:
  core.c
  prefork.c
  http_core.c
  mod_so.c
Most modules are loaded dynamically and determined by the Apache configuration.
The Apache control program can be used to start, stop, or restart the server. It can also be used to list all of the loaded modules, dynamic as well as static. On a default and unconfigured Mint 11 system the result is
cgauss@footprint /etc/apache2 $ apachectl -t -D DUMP_MODULES
apache2: Could not reliably determine the server’s fully qualified domain name, using 127.0.1.1 for ServerName
Loaded Modules:
 core_module (static)
 log_config_module (static)
 logio_module (static)
 mpm_worker_module (static)
 http_module (static)
 so_module (static)

 ... Output Deleted

 reqtimeout_module (shared)
 setenvif_module (shared)
 status_module (shared)
Syntax OK
Note the warning – the Apache configuration is not yet complete, as it has not been updated with the fully qualified domain name of the server.
If the control program is passed, only the -t switch, it checks the syntax of the configuration files and reports any errors.
cgauss@footprint /etc/apache2 $ apachectl -t
apache2: Could not reliably determine the server’s fully qualified domain name, using 127.0.1.1 for ServerName
Syntax OK
Apache can also be installed on Windows. Current; stand-alone versions of Apache are available from Apache Haus (http://www.apachehaus.com/) and the Apache Lounge (http://www.apachelounge.com/). Apache is also available in bundles for Windows that already include MySQL and PHP from XAMPP (https://www.apachefriends.org/index.html) and WampServer (http://www.wampserver.com/en/). The installation, configuration, and use of XAMPP is covered in Chapter 17.
Apache Configuration
The starting point for the configuration of Apache is the primary configuration file, located in the configuration directory. On CentOS systems, the primary configuration file is /etc/httpd/conf/httpd.conf. References to file locations in the main configuration file are made relative to ServerRoot, which on CentOS is set to /etc/httpd. Uncomment and configure the ServerName variable in the main configuration file with a line of the form
ServerName canopus.stars.example:80
Check the syntax of the configuration with the control program
[root@canopus ~]# apachectl -t
Syntax OK
Restart the server and verify that it is running
[root@canopus ~]# apachectl restart
[root@canopus ~]# service httpd status
httpd (pid  2129) is running...
Verify Apache is serving pages by visiting it with a web browser. An Apache test page should appear.
The primary location for files served by Apache is DocumentRoot, which has the value /var/www/html on a CentOS system. Files in DocumentRoot are served at the root of the web page; if a user requests http://server.example/page.html, then Apache (on CentOS) returns the page /var/www/html/page.html if it exists. If a user requests a directory, say http://server.example/directory, then Apache checks the value of DirectoryIndex for the name of a file to serve. On CentOS it is set to index.html, so if the user visits the base URL http://server.example/directory then Apache serves /var/www/html/directory/index.html if it exists. Add a page index.html to DocumentRoot, then use a browser to verify that the page is served.
On Ubuntu or Mint systems, the primary configuration file /etc/apache2/apache2.conf contains global settings. It uses Include directives to include all of the .conf and .load files in /etc/apache2/mods-enabled. The available modules are located in the directory /etc/apache2/mods-available so the administrator can enable a module simply by creating a link from the mods-enabled subdirectory to the proper file(s) in the mods-available subdirectory. Configuration for the web site(s) being served are stored in the directory /etc/apache2/sites-enabled/ and are also included by reference. The file /etc/apache2/ports.conf configures the port(s) on which Apache listens, and some version of Mint and Ubuntu use the file /etc/apache2/httpd.conf for local configuration information.
Add a ServerName directive to an Ubuntu or Mint Apache configuration by, for example, editing the primary configuration file /etc/apache2/apache.conf and adding the line
ServerName helix.nebula.example:80
Check the syntax of the configuration file, restart the server and check the status of the server with the commands
enoether@helix ~ $ sudo apache2ctl -t
Syntax OK
enoether@helix ~ $ sudo apache2ctl restart
enoether@helix ~ $ sudo service apache2 status
Apache2 is running (pid 2244).
Verify that Apache is serving pages by visiting the server with a browser. The installation process includes a simple default document in DocumentRoot for the default web site, located at /var/www/index.html.
On OpenSuSE systems, the primary configuration file /etc/apache2/httpd.conf loads more than a dozen individual configuration files that control portions of the server’s function. To configure Apache, to the start of the default web site configuration file /etc/apache2/default-server.conf add a line like
ServerName nunki.stars.example:80
Check the syntax of the configuration, restart the server, and verify it is running. The following is taken from OpenSuSE 12.1.

OpenSuSE does not include a test page; instead if it is started without a default document then attempts to access the web site return an Error 403 / Access Forbidden. Add a default web page index.html to DocumentRoot, located at /srv/www/htdocs then use a browser to verify that the page loads correctly.
OpenSuSE 13.1 uses Apache 2.4.6, but the default files retain some configuration directives from Apache 2.2. For example, the main configuration file /etc/apache2/httpd.conf has a DefaultType directive that is deprecated in Apache 2.4.
Enabling Apache Status
An Apache web server can be configured to return detailed information about its status, either through the web interface or through the control program. To do so, the dynamic module mod_status.so needs to be loaded. This is loaded by default on CentOS (in /etc/httpd/conf/httpd.conf) and in Mint/Ubuntu (in /etc/apache2/mods-enabled/status.load) with a directive of the form
LoadModule status_module /usr/lib/apache2/modules/mod_status.so
OpenSuSE uses the file /etc/apache2/sysconfig.d/loadmodule.conf to determine which modules are loaded by Apache. That file however, is created by a script, and manual changes to the file are overwritten.1 That script is controlled by the values in /etc/sysconfig/apache2. Update that file to include status in the APACHE_MODULES line:
APACHE_MODULES="status actions alias auth_basic authn_file authz_host authz_groupfile authz_default authz_user autoindex cgi dir env expires include log_config mime negotiation setenvif ssl userdir php5"
Restart Apache with the service command to ensure the module is loaded.
Once the status module is loaded, it needs to be configured. OpenSuSE includes the configuration file /etc/apache2/mod_status.conf with the content
<IfModule mod_status.c>
    <Location /server-status>
        SetHandler server-status
        Order deny,allow
        Deny from all
        Allow from localhost 127.0.0.1
    </Location>
</IfModule>
The structure of these directives is typical for directives throughout an Apache configuration. The <IfModule name>...</IfModule> blocks out a collection if directives that only apply if the module is loaded.
The <Location name>...</Location> directives block out a portion of the web site, and the directive <Location /server-status> refers to any URL of the form http://server.example/server-status. In fact, it applied to URLs with schemes other than http.
The SetHandler directive requires that any requests for the current location be parsed by the specified handler, in this case the server status module.
The remaining directives specify the hosts that are allowed to access the resource. In an Order directive, the second value is the default. If a host matches either all or none of the subsequent Deny and Allow directives, then the default action is taken; in this case the access is allowed. Multiple Allow and multiple Deny directives are permitted. Hosts can be specified by IP address, hostname, address with netmask, and address with CIDR specification. To allow the host spica.stars.example to access the server’s status, add the directive
Allow from spica.stars.example
With these Order directives, a user on the server itself that requests the status page http://localhost/server-status or http://127.0.0.1/server-status is permitted access, but the requests from the server itself to http://server.example/server-status are denied, as the server sees the request coming from server.example, rather than from localhost or 127.0.0.1.
Apache does not consider that exposing its status information is a serious security risk; in fact the page http://apache.org/server-status shows the server status page for apache.org and explicitly states that the page is deliberately made public. The status page at apache.org shows additional information about each request. To enable this behavior, one approach is to use the directive
ExtendedStatus On
This directive is global, and should occur outside any Location block.
Once status, with or without extended status, is enabled on the server the control program can be used to find out the status of the server
diphda:~ # apache2ctl status
Apache Server Status for localhost

Server Version: Apache/2.2.17 (Linux/SUSE) mod_ssl/2.2.17 OpenSSL/1.0.0c
Server Built: 2010-10-21 14:13:51.000000000 +0000
----------------------------------------------------------------
Current Time: Saturday, 29-Nov-2014 18:36:16 EST
Restart Time: Saturday, 29-Nov-2014 18:28:07 EST
Parent Server Generation: 0
Server uptime: 8 minutes 8 seconds
Total accesses: 4 - Total Traffic: 13 kB
CPU Usage: u0 s0 cu0 cs0
.0082 requests/sec - 27 B/second - 3328 B/request
1 requests currently being processed, 5 idle workers

W_____..........................................................
................................................................
................................................................
................................................................

Scoreboard Key:
"_" Waiting for Connection, "S" Starting up, "R" Reading Request,
"W" Sending Reply, "K" Keepalive (read), "D" DNS Lookup,
"C" Closing connection, "L" Logging, "G" Gracefully finishing,
"I" Idle cleanup of worker, "." Open slot with no current process
The process on other distributions is similar. On CentOS, there is commented out section of /etc/httpd/conf/httpd.conf for the server status and a commented out ExtendedStatus directive. On some versions of CentOS (e.g., 6.1), the package links is required before the command apachectl status works; it can be installed by
[root@regor ~]# yum install links
On Ubuntu and Mint, the file /etc/apache2/mods-enabled/status.conf is already configured and included. The use of the command apachectl status requires the text-only web browser Lynx to be installed on the system. Lynx can be installed on Mint or Ubuntu with the command
rdescartes@heart:~$ sudo apt-get install lynx
Later versions of Ubuntu (13.10) and Mint (16) run Apache 2.4, which uses Require directives instead of the Order/Deny/Allow combination. As an example, consider the directives
Require local
Require ip 10.0.2.55
Require host spica.stars.example
Together these allow access from the local system, the system with IP address 10.0.2.55, or the system named spica.stars.example. Both the ip and host specification allow wildcarding, including partial domain names, netmasks, and CIDR notation. To allow access from any location, use the directive
Require all granted
To instead deny access from all locations, use the directive
Require all denied
Although OpenSuSE 13.1 also uses Apache 2.4, it loads the module mod_access_compat and uses the older Order/Deny/Allow directives rather than Require.
Enabling Individual User Directories
Apache can be configured so that each local user can create their own web site by configuring files in their home directory. These are served via Apache on the URL http://server.example/~username.
To use user directories, Apache requires the module userdir_module, which is loaded by default on CentOS systems. On Ubuntu or Mint systems, create symlinks from userdir.load (which loads the module) and userdir.conf (which contains configuration directives for the module) from the directory /etc/apache2/mods-enabled to /etc/apache2/mods-available.
gleibniz@cabe:~$ sudo ln -s /etc/apache2/mods-available/userdir.conf /etc/apache2/mods-enabled/
gleibniz@cabe:~$ sudo ln -s /etc/apache2/mods-available/userdir.load /etc/apache2/mods-enabled/
On OpenSuSE, ensure the module userdir is in the list of APACHE_MODULES in /etc/sysconfig/apache2. As always, after loading or unloading modules, restart the server to commit the changes.
The configuration file /etc/apache2/mods-available/userdir.conf on an Ubuntu 12.10 system has the content
<IfModule mod_userdir.c>
        UserDir public_html
        UserDir disabled root

        <Directory /home/*/public_html>
                AllowOverride FileInfo AuthConfig Limit Indexes
                Options MultiViews Indexes SymLinksIfOwnerMatch IncludesNoExec
                <Limit GET POST OPTIONS>
                        Order allow,deny
                        Allow from all
                </Limit>
                <LimitExcept GET POST OPTIONS>
                        Order deny,allow
                        Deny from all
                </LimitExcept>
        </Directory>
</IfModule>
It begins by ensuring that the proper module is loaded with an IfModule directive. The first UserDir directive provides the name of the directory in the user’s home directory (which may need to be created) that will be used to share files. The example, public_html, means that the file /home/usermame/public_html/page.html would be served on the URL http://server.example/~username/page.html.
The second UserDir directive disables individual web pages for the root user. Rather than blacklist the users that are not allowed individual web pages, it is also possible to whitelist them with UserDir directives in the form
UserDir disabled
UserDir enabled cgauss egalois gmonge
This disables individual web pages for all users, then selectively enables them for three users: cgauss, egalois, and gmonge.
Next is a Directory directive; this is used to apply a set of options to one or more directories in the file system, including all files and subdirectories. Symbolic and hard links in the file system mean that the same file may be reachable by more than one possible path; for example on Ubuntu and Mint systems the files /etc/apache2/mods-available/userdir.conf and /etc/apache2/mods-enabled/userdir.conf point to the same content. The Directory directive is applied to the path Apache takes to the resource. The wildcard * matches names, but not names with subdirectories.
It is possible for more than one Directory directive to apply to a directory in the file system. In this case, all of the options are applied, beginning with the directive with the shortest match.
Apache can use per-directory files to configure Apache without modifying the main Apache configuration. The name of the directory configuration file is specified by the AccessFileName directive, which has the default value “.htaccess”. If a directory contains a file with the name .htaccess that contains Apache directives, these may be applied when Apache serves files from the directory. The AllowOverride directive specifies which directives from the .htaccess file can be applied. The directive in the example indicates that the .htaccess file in each user’s directory can control authorization, host access (including Order/Allow/Deny), document types, and directory indexing.
The Options directive configures a number of settings:
- MultiViews If a resource is available in multiple versions (say a web page in multiple languages), then the mod_negotiation module can be used to determine which resource to serve.
- Indexes If no default document (index.html) is present, return a directory listing.
- SymLinksIfOwnerMatch Apache should follow symbolic links, provided the target is owned by the same user as the owner of the link.
- IncludesNoExec Server side includes controlled by mod_include are permitted, save for cgi and cmd includes.
The configuration concludes with some limits; GET, POST and OPTIONS requests are allowed from all hosts, while all other HTTP requests, like HEAD and PUT are prohibited.
Ubuntu 13.10 and Mint 16 use Apache 2.4 rather than Apache 2.2 and are configured in the same fashion save for the use of Require directives rather than Order and Allow directives.
Configuration of user directories on a CentOS system is similar; a similar set of directives are present but commented out in /etc/httpd/conf/httpd.conf; they merely need to be enabled. One significant difference is that on CentOS the default file system permissions on the user’s home directory (700) do not allow the apache user to traverse through the user’s home directory. Change permissions on /home/username to 711 and permissions on /home/username/public_html (or whatever directory is being used) to 755.
SELinux on CentOS in enforcing mode can block access to per-user directories leaving only a “Permission denied” entry in the log files.
The situation on OpenSuSE systems is even easier, as it is correctly configured by default; it even includes the public_html directory in each user’s home directory when the user is created. Configuration for user directories is in the file /etc/apache2/mod_userdir.conf. One difference between OpenSuSE and CentOS/Mint/Ubuntu is that OpenSuSE does not allow the location of the individual user directories to change; they are fixed by a compile-time setting.
Directory Aliases
Apache uses aliases to map locations in the file system to locations in the web site. For example, the configuration file /etc/httpd/conf/httpd.conf on a CentOS system contains a section of the form
Alias /icons/ "/var/www/icons/"

<Directory "/var/www/icons">
    Options Indexes MultiViews FollowSymLinks
    AllowOverride None
    Order allow,deny
    Allow from all
</Directory>
These directives map URLs of the form http://server.example/icons/ to the directory /var/www/icons in the file system. Note the trailing forward slash in the URL; because the alias ended with a forward slash, a forward slash is required in the URL. Visitors to this URL are presented with a directory listing showing a collection of icon files; notice that the Indexes option is enabled in the Options directive for the Directory.
Other distributions are configured similarly; On Mint and Ubuntu systems these are configured in /etc/apache2/mods-enabled/alias.conf, while on OpenSuSE systems the configuration occurs in /etc/apache2/default-server.conf; in both cases URLs of the form http://server.example/icons/ are mapped to the directory /usr/share/apache2/icons. The Apache web site exhibits this same behavior as a visit to http://www.apache.org/icons/ shows.
Some distributions (e.g., Ubuntu 13.10) do not include Indexes in the list of Options. In this case, a user can visit the page http://server.example/icons/a.gif to obtain the image, but a visit to http://server.example/icons/ does not return the directory index.
CGI Scripts
Common Gateway Interface (CGI) scripts are programs that are run on the server to generate content served to the client. To use CGI scripts, Apache must load the appropriate dynamic module, cgi_module, and configure one or more directories with ScriptAlias.
On CentOS for example, cgi_module is loaded by default in /etc/httpd/conf/httpd.conf. There is a ScriptAlias directive with the form
ScriptAlias /cgi-bin/ "/var/www/cgi-bin/"
There is also a Directory directive of the form
<Directory "/var/www/cgi-bin">
    AllowOverride None
    Options None
    Order allow,deny
    Allow from all
</Directory>
The ScriptAlias directive tells the Apache to map the web site at http://server.example/cgi-bin to the file system at /var/www/cgi-bin. It also instructs Apache that if a user requests a file from this portion of the web site, then Apache should execute the file and return the output.
On Mint or Ubuntu systems, cgi_module is not loaded; it can be enabled by creating the correct link from the enabled modules to the available modules with
nabel@omega:~$ sudo ln -s /etc/apache2/mods-available/cgi.load /etc/apache2/mods-enabled/
There are existing directives in /etc/apache2/sites-enabled/000-default that map scripts located in the file system at /usr/lib/cgi-bin to the website at http://server.example/cgi-bin. On Mint or Ubuntu systems running Apache 2.2, these have the content:
ScriptAlias /cgi-bin/ /usr/lib/cgi-bin/
<Directory "/usr/lib/cgi-bin">
        AllowOverride None
        Options +ExecCGI -MultiViews +SymLinksIfOwnerMatch
        Order allow,deny
        Allow from all
</Directory>
The “+” and “-” symbols in the Options directive provide finer control over the options that are applied to the directory. As noted earlier, it is possible for multiple Directory options to apply to a directory in the file system; these are applied from the shortest directory to the longest. Normally, only one set of Options are applied: the last one. However, if each of the values in the Options directive start with either “+” or “-”, then earlier options settings are merged with later ones, rather than being overwritten. Options with “+” are applied; options with a “-” are removed if they were applied.
On Mint or Ubuntu systems running Apache 2.4 (Mint 16 and Ubuntu 13.10), configuration for CGI scripts is in the file /etc/apache2/conf-enabled/serve-cgi-bin.conf, which has the same structure save for the use of Require rather than Order and Allow.
OpenSuSE is already configured for CGI scripts; the module cgi is loaded from /etc/sysconfig/apache2, and configured in /etc/apache2/default-server.conf to map /srv/www/cgi-bin to the website at http://server.example/cgi-bin.
CGI scripts can be written in any language; Perl is a common choice. Here is a simple CGI script written in C, named web.c
Compile this program to web.cgi and store the executable in a CGI directory.
The program begins by printing the string “Content-type: text/html ”; this is required as output from CGI program, including both newlines. The program continues to build a valid HTML page, including a DOCTYPE and a title. It loops through all of the environment variables set for the program when it is run and returns these in a bulleted list. The web server communicates with the CGI programs through the environment variables; in fact the request method and full URI are included as environment variables. A CGI program can respond to a GET request with the environment data; POST requests also send data via stdin that needs to be parsed. The output from this program is shown in a browser in Figure 11-1.
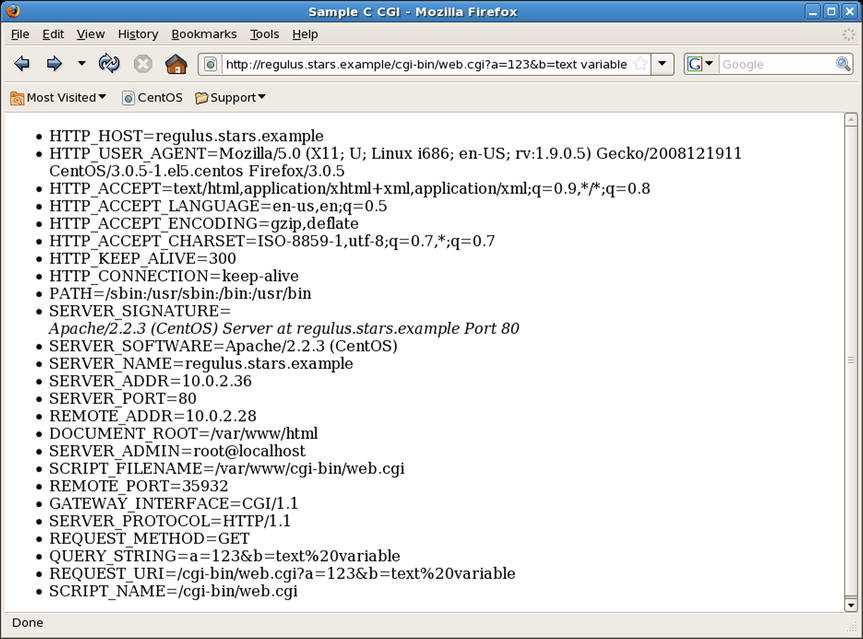
Figure 11-1. Browser Output of web.cgi Parsing a GET Request with Two Variables
Logs and Logging
Apache uses two kinds of logs: error logs and access logs. Access logs record requests made to the server, while the error log records problems with the server.
On CentOS systems, the location of the error log is specified in /etc/httpd/conf/httpd.conf by the directive
ErrorLog logs/error_log
The file location is specified relative to ServerRoot, which earlier in the file is set to /etc/httpd (recall Table 11-1); thus error logs are sent to /etc/httpd/logs/error_log. Because CentOS is configured so that /etc/httpd/logs is a symbolic link to /var/log/httpd, the error logs are sent to /var/log/httpd/error_log.
OpenSuSE does not specify a value for ServerRoot, so the full path of the error log file is required; the file /etc/apache2/httpd.conf contains the line
ErrorLog /var/log/apache2/error_log
On Mint and Ubuntu systems, the error log is /var/log/apache2/error.log; this is set in /etc/apache2/apache2.conf. On older systems it is done directly as on OpenSuSE, but on later systems it is done with a line of the form
ErrorLog ${APACHE_LOG_DIR}/error.log
The environment variable APACHE_LOG_DIR is set along with other environment variables in /etc/apache2/envvars.
Like syslog messages, Apache generates error messages at different levels: debug, info, notice, warn, error, crit, alert, and emerg. The level recorded in the error log is set by the value of LogLevel; all of the discussed distributions set this to warn by default.
The access log(s) record requests made of the server. The format of these logs is customizable via the LogFormat directive. In its most common use, LogFormat takes two arguments: a format string to determine what is logged, and a name for that logging format. For example CentOS in /etc/httpd/conf/httpd.conf defines four common formats: combined, common, referer, and agent with the directives
LogFormat "%h %l %u %t "%r" %>s %b "%{Referer}i" "%{User-Agent}i"" combined
LogFormat "%h %l %u %t "%r" %>s %b" common
LogFormat "%{Referer}i -> %U" referer
LogFormat "%{User-agent}i" agent
Mint and Ubuntu define these same named formats with the same format strings in /etc/apache2/apache2.conf and OpenSuSE does so in /etc/apache2/mod_log_config.conf; all four distributions also define other logging formats.
Components of a format string include the following:
- %b Response size (bytes) not including headers
- %h Name or IP address of the remote host
- %l The reported remote log name (generally just “-”)
- %p The port on the server
- %r The first line of the request
- %s The status code returned
- %t Time
- %u The reported remote user name (generally just “-”)
- %U The URL path requested
- %v The server name
- %{Referer}i The referer2 reported by the client
- %{User-Agent}i The user-agent reported by the client
If a format string directive includes “>” like %>s, then whenever the request has been internally redirected, the log entry should contain the final value.
The CustomLog directive takes as arguments file location and a defined log format, then tells Apache to record logs to that file with that format. On CentOS for example, the primary configuration file /etc/httpd/conf/httpd.conf contains the line
CustomLog logs/access_log combined
Thus the log file /var/log/httpd/access_log records requests in the combined log format. Mint and Ubuntu have a similar line in /etc/apache2/sites-enabled/000-default to use the combined log format to store logs in /var/log/apache2/access.log. OpenSuSE keeps its configuration in /etc/sysconfig/apache2, which is then written to /etc/apache2/sysconfig.d/global.conf; it records logs in /var/log/apache2/access_log using the combined format.
Another directive that can be used to configure logging is TransferLog. It specifies only the location of the log file; its format is determined by the most recent LogFormat that is not used to define a name. Consider the pair of directives:
LogFormat "%h %l %u %t "%r" %>s %b
TransferLog /var/log/apache2/access_log
These use the specified format (equivalent to the common log format) and send logs to the file /var/log/apache2/access_log.
As an example of typical access log entries, here are the results of a pair of requests: the first to the main page, which returned the Apache default page, and a second request to the server-status page.
10.0.2.28 - - [29/Nov/2014:15:57:12 -0500] "GET / HTTP/1.1" 403 5039 "-" "Mozilla/5.0 (X11; U; Linux i686; en-US; rv:1.9.0.5) Gecko/2008121911 CentOS/3.0.5-1.el5.centos Firefox/3.0.5"
10.0.2.28 - - [29/Nov/2014:15:57:12 -0500] "GET /icons/apache_pb.gif HTTP/1.1" 200 2326 "http://atria.stars.example/" "Mozilla/5.0 (X11; U; Linux i686; en-US; rv:1.9.0.5) Gecko/2008121911 CentOS/3.0.5-1.el5.centos Firefox/3.0.5"
10.0.2.28 - - [29/Nov/2014:15:57:12 -0500] "GET /icons/poweredby.png HTTP/1.1" 200 3956 "http://atria.stars.example/" "Mozilla/5.0 (X11; U; Linux i686; en-US; rv:1.9.0.5) Gecko/2008121911 CentOS/3.0.5-1.el5.centos Firefox/3.0.5"
10.0.2.28 - - [29/Nov/2014:15:57:12 -0500] "GET /favicon.ico HTTP/1.1" 404 294 "-" "Mozilla/5.0 (X11; U; Linux i686; en-US; rv:1.9.0.5) Gecko/2008121911 CentOS/3.0.5-1.el5.centos Firefox/3.0.5"
spica.stars.example - - [29/Nov/2014:18:42:26 -0500] "GET /server-status HTTP/1.1" 200 2718 "-" "Mozilla/5.0 (X11; U; Linux i686; en-US; rv:1.9.0.5) Gecko/2008121911 CentOS/3.0.5-1.el5.centos Firefox/3.0.5"
The plain text format of Apache access logs makes them amenable to automated analysis via scripting languages. As a simple example, consider the following Python script.
This opens an Apache access log in combined format (from the CentOS default location /var/log/httpd/access_log) and reads through it one line at a time. Each line is split at a breakpoint from the format string, either a space, a quotation mark, or the opening bracket in the time stamp. The data at that point in the format string is retained and the remainder passed on for additional parsing. The result is stored in an array of Python dictionaries that can then be used in subsequent analysis.
Virtual Hosts
Apache can run multiple web sites on the same server through the use of virtual hosts. Some common Apache configuration options include the following:
- Single IP address, single hostname, single web site
- Single IP address, single hostname, multiple ports, multiple web sites
- Single IP address, multiple hostnames, multiple web sites
- Multiple IP addresses, multiple hostnames, multiple web sites
To enable these more complex behaviors, Apache uses the VirtualHost directive.
To demonstrate how virtual hosts work, suppose that the administrator on an Ubuntu or Mint system wishes to run a second web site on TCP/8080. It is intended that this web site is completely separate from the first site running on TCP/80, including different documents and separate logging.
The first step is to configure Apache to listen on both TCP/80 and TCP/8080. On Ubuntu this is controlled by the Listen directive in the file /etc/apache2/ports.conf. The Listen directive has the form
Listen IP:port protocol
This determines the IP address, port, and protocol on which Apache should listen. If no address is specified, Apache listens on all assigned IP addresses, and if no protocol (http or https) is specified, then the https protocol is assumed if the port is TCP/443, and http is assumed otherwise. To ensure that Apache listens on both TCP/80 and TCP/8080, update the /etc/apache2/ports.conf to include the lines
Listen 80
Listen 8080
Each virtual host on Apache 2.2 has an associated name, specified by the directive NameVirtualHost. Ubuntu and Mint use a virtual host for the primary web site on the system, so a NameVirtualHost directive already exists. Add a second to /etc/apache2/ports.conf so that the result is
NameVirtualHost *:80
NameVirtualHost *:8080
This specifies that there are two virtual hosts: one listening to all IP addresses on TCP/80 and the second listening to all IP addresses on TCP/8080.
The VirtualHost directive specifies the properties of a virtual host. Virtual hosts can specify a number of properties, including the location of DocumentRoot, the location of CGI scripts, and the location of logs. Ubuntu and Mint include a template that can be used as a basis for a virtual host definition in /etc/apache2/sites-available. Create the file in /etc/apache2/sites-enabled/001-Port-8080.conf3 with the following content
The name in the VirtualHost directive exactly matches the name in the NameVirtualHost directive; this is required. This virtual host sets DocumentRoot to the directory /var/www2 then provides basic configuration for the directory. Errors of level warn or higher are sent to the log file /var/log/apache2/error2.log, while the access log uses the combined format and stores the result in /var/log/apache2/access2.log; both of these log files are different than those for the main site on TCP/80.
Create the directory /var/www2. If the directory is owned by root:root (a reasonable choice), then permissions on the directory must allow the web server user (www-data) access to the directory. The default permissions on a newly created directory (644) are sufficient. Add content to the new root directory for this web site, say a simple /var/www2/index.html file.
Restart the web server and verify that it serves pages on both TCP/80 and TCP/8080. Check that the new log files /var/log/apache2/access2.log and /var/log/apache2/error2.log are created.
Ubuntu 13.10 and Mint 16 run Apache 2.4 instead of Apache 2.2; this changes the process slightly. Apache 2.4 does not use the NameVirtualHost directive and it is unnecessary. Apache 2.4 also does not use the Order, Allow and Deny directives; to allow Apache access to the directory /var/www2 use the directives
<Directory /var/www2/>
        Options Indexes FollowSymLinks MultiViews
        AllowOverride None
        Require all granted
</Directory>
Another difference is the way in which CGI scripts are handled. Ubuntu 13.10 and Mint 16 configure CGI scripts in /etc/apache2/conf-enabled/serve-cgi-bin.conf outside any VirtualHost directive, while other versions of Mint and Ubuntu locate the ScriptAlias directive in the VirtualHost directive within /etc/apache2/sites-enabled/000-default. In this first case, the cgi-bin/ directory is available for all virtual hosts, while in the second case it is only available for the specified virtual host(s).
To configure an OpenSuSE system to use virtual hosts to run a second web site on TCP/8080, start by updating /etc/apache2/listen.conf to include the needed Listen and NameVirtualHost directives:
NameVirtualHost *:8080
Listen 80
Listen 8080
Unlike Ubuntu, OpenSuSE does not use a VirtualHost for its main web site on TCP/80, so only one NameVirtualHost directive is required.
The configuration of the virtual host can be done in a file located in the directory /etc/apache2/vhosts.d, say the file /etc/apache2/vhosts.d/vhost-8080.conf with the content
The main configuration file /etc/apache2/httpd.conf is configured to include .conf files from /etc/vhosts.d/. The directory /etc/vhosts.d also contains a more complex template for a virtual host configuration in /etc/vhosts.d/vhost.template.
Use YaST to update the firewall to allow inbound traffic to TCP/8080. Create the directory /srv/www2/htdocs with the proper permissions and add content. Once the Apache server restarts, it will serve documents from this directory to users on TCP/8080.
OpenSuSE 13.1 uses Apache 2.4. It is configured similarly, though the NameVirtualHost directive is not required. This is despite the fact that commented out NameVirtualHost directives exist in /etc/apache2/listen.conf/; using them results in the warning
mirach:~ # apache2ctl -t
AH00548: NameVirtualHost has no effect and will be removed in the next release /etc/apache2/listen.conf:38
On CentOS systems, the Apache configuration changes can all take place in /etc/httpd/conf/httpd.conf. Update the Listen directive to include TCP/8080 so it becomes
Listen 80
Listen 8080
The end of the main configuration file includes a commented out section to set up a virtual host. Add the NameVirtualHost directive and specify the properties of that virtual host with
NameVirtualHost *:8080
<VirtualHost *:8080>
        DocumentRoot /var/www2/html
        <Directory /var/www2/html>
                Options Indexes FollowSymLinks MultiViews
                AllowOverride None
                Order allow,deny
                allow from all
        </Directory>

        ErrorLog /var/log/httpd/error2_log
        LogLevel warn
        CustomLog /var/log/httpd/access2_log combined
</VirtualHost>
Like OpenSuSE, CentOS does not use a virtual host for the main host on TCP/80, so only the one NameVirtualHost directive is required. Ensure that the proper port is open in the firewall and restart Apache to enable clients to connect.
SELinux on CentOS in enforcing mode can block access to a web site hosted in /var/www2, leaving only a “Permission denied” entry in the log files.
If a server has more than one IP address and DNS name, Apache can be configured to serve different web sites depending on which IP address receives the request. Configure Apache with virtual host directives in the form
NameVirtualHost 10.0.2.73:80
<VirtualHost 10.0.2.73:80>
Each virtual host should contain its own DocumentRoot, ServerName, and logging directives as appropriate.
Care must be taken when using virtual hosts. If a server has a default site or virtual hosts with wildcards, then careless administrators may be surprised by traffic falling back to these defaults.
Apache can use virtual hosts to enable web sites that use SSL/TLS to protect the connection; however the configuration process differs between distributions.
Apache includes support for SSL/TLS in a separate module, ssl_module. On OpenSuSE systems this module is loaded by default, however, OpenSuSE uses a flag passed to Apache on startup to determine if SSL/TLS support is to be used, and by default it is disabled. To enable SSL/TLS, add "SSL" to the variable APACHE_SERVER_FLAGS in /etc/sysconfig/apache2 then restart the server.
OpenSuSE uses /etc/apache2/ssl-global.conf to store global settings that affect all SSL/TLS protected web sites; the values here can be kept in their default state.
The file /etc/apache2/vhosts.d/vhost-ssl.template is a template for a virtual host that uses SSL/TLS protection. Rather than begin with that (complex) file, consider a file /etc/apache2/vhosts.d/vhost-ssl.conf with the following content
In this approach, a separate directory /srv/www-ssl/htdocs is used to store the SSL/TLS protected web site. The configuration file begins with a Directory directive to specify the properties of this directory. The next directive, SSLRequireSSL ensures that SSL/TLS is used whenever this directory is accessed, and the subsequent SSLOptions +StrictRequire prevents it from being overridden. The remainder of the Directory directive sets properties for the directory and allows it to be served by Apache.
The configuration file continues with a virtual host directive. It begins by specifying DocumentRoot for the SSL/TLS protected web site, then sets up logging. One new log is included; the file /var/log/apache2/ssl-request-log, which uses two new fields, %{SSL_PROTOCOL}x that specifies the SSL/TLS protocol used in the connection; and %{SSL_CIPHER}x that specifies the precise cipher used.
Three directives specify the properties of SSL/TLS that are to be used. The first, SSLProtocol selects the available protocols, and disallows use of the older SSLv2 and SSLv3 protocols. Apache supports a large number of ciphers, and the given SSLCipherSuite directive allows some of them. The last directive, SSLHonorCipherOrder tells Apache to select the cipher preferred by the server rather than select the cipher preferred by the client (which is the default).
The problem of determining which cipher(s) to support is complex. It depends not only on the cryptographic strength of the different ciphers but also on which browsers support a particular cipher. Fortunately, the Mozilla Wiki at https://wiki.mozilla.org/Security/Server_Side_TLS keeps an updated list of recommended configurations. The list of ciphers included in the example is taken from that site to match their intermediate compatibility level, which includes Firefox 1, Chrome 1, and Internet Explorer 7. Mozilla includes an SSL configuration generator at https://mozilla.github.io/server-side-tls/ssl-config-generator/ that provides the result in a format that can be pasted directly into an Apache configuration file (as I have done).
The next directives enable SSL/TLS for the virtual host and specifies the location of the server’s private key and the server’s certificate. To generate a 2048-bit RSA private key and store the result in the file /etc/apache2/ssl.key/kooshe.key, use the command
kooshe:~ # openssl genrsa -out /etc/apache2/ssl.key/kooshe.key 2048
Generating RSA private key, 2048 bit long modulus
.....................................................+++
...+++
e is 65537 (0x10001)
As was noted in Chapter 9, the National Institute of Science and Technology concludes that a 2048-bit RSA key provides 112 bits of security and is acceptable through 2030 for sensitive but unclassified data (http://csrc.nist.gov/publications/nistpubs/800-57/sp800-57_part1_rev3_general.pdf).
Properties of the private key can be found with the command
kooshe:~ # openssl rsa -text -noout -in /etc/apache2/ssl.key/kooshe.key
Private-Key: (2048 bit)
modulus:
    00:ce:40:39:4c:a2:6a:51:4f:ef:e6:69:e5:03:9d:
    bc:b3:cc:d9:6d:38:f7:86:f2:e8:55:0c:42:18:e1:

... Output Deleted ...
The simplest method to enable an SSL/TLS protected web site is to use a self-signed certificate. In this case, the certificate is not signed by a trusted certificate authority (CA), so users see a browser warning when they first connect to the web site. To generate a self-signed certificate, run the command
kooshe:~ # openssl req -new -x509 -days 365 -key /etc/apache2/ssl.key/kooshe.key -out /etc/apache2/ssl.crt/kooshe.crt
You are about to be asked to enter information that will be incorporated
into your certificate request.
What you are about to enter is what is called a Distinguished Name or a DN.
There are quite a few fields but you can leave some blank
For some fields there will be a default value,
If you enter '.', the field will be left blank.
-----
Country Name (2 letter code) [AU]:US
State or Province Name (full name) [Some-State]:MD
Locality Name (eg, city) []:Towson
Organization Name (eg, company) [Internet Widgits Pty Ltd]:Towson University
Organizational Unit Name (eg, section) []:
Common Name (eg, YOUR name) []:kooshe.stars.example
Email Address []:[email protected]
The key element of the certificate is the common name; this must match the DNS name of the web server as it is checked by the browser. The properties of the certificate can be inspected with the command
kooshe:~ # openssl x509 -text -noout -in /etc/apache2/ssl.crt/kooshe.crt
Certificate:
    Data:
        Version: 3 (0x2)
        Serial Number:
            c0:61:69:be:ce:c8:1a:44
        Signature Algorithm: sha1WithRSAEncryption
        Issuer: C=US, ST=MD, L=Towson, O=Towson University, CN=kooshe.stars.example/[email protected]
        Validity
            Not Before: Dec  7 17:47:17 2014 GMT
            Not After : Dec  7 17:47:17 2015 GMT
        Subject: C=US, ST=MD, L=Towson, O=Towson University, CN=kooshe.stars.example/[email protected]
        Subject Public Key Info:
            Public Key Algorithm: rsaEncryption
            RSA Public Key: (2048 bit)
                Modulus (2048 bit):
                    00:ce:40:39:4c:a2:6a:51:4f:ef:e6:69:e 5:03:9d:
                    bc:b3:cc:d9:6d:38:f7:86:f2:e8:55:0c:42:18:e1:
... Output Deleted ...
Since the key and the self-signed certificate were stored in the locations specified in the configuration file /etc/apache2/vhosts.d/vhost-ssl.conf (File 11-3), this completes the specification for the server. Restart the server, and visit the SSL/TLS protected web site.
On OpenSuSE 13.1, the default configuration file /etc/apache2/ssl-global.conf includes the directive
SSLSessionCache shmcb:/var/lib/apache2/ssl_scache(512000)
This directive prevents the server from starting because the required module socache_shmcb is not loaded by default. Update the file /etc/sysconfig/apache2 and include socache_shmcb in the list of loaded modules before starting the server.
Before using SSL/TLS on Mint or Ubuntu systems, the required module mod_ssl must be loaded. To do so, create links from the directory of enabled modules to the directory of available modules.
enoether@tarantula:~$ sudo ln -s /etc/apache2/mods-available/ssl.load /etc/apache2/mods-enabled/
enoether@tarantula:~$ sudo ln -s /etc/apache2/mods-available/ssl.conf /etc/apache2/mods-enabled/
The file /etc/apache2/ports.conf contains the Listen directives; provided mod_ssl is loaded, then Ubuntu and Mint are already set to listen on TCP/443. Update the contents of the file /etc/apache2/mods-enabled/ssl.conf to set the values for SSLProtocol, SSLCipherSuite and SSLHonorCipherOrder; these values are then set globally for all SSL/TLS sites.
To enable an SSL/TLS protected site on Mint or Ubuntu, one approach is to start with the template in /etc/apache2/sites-available/default-ssl. It is also possible to directly construct a configuration file /etc/apache2/sites-enabled/ssl.conf with the contents
This is similar to the corresponding file for OpenSuSE. Because the values for SSLProtocol, SSLCipherSuite, and SSLHonorCipherOrder are specified globally, they are omitted here. The location of DocumentRoot is now /var/www-ssl/htdocs while the logs are in the usual directory on an Ubuntu system, /var/log/apache2. The location for the server key is /etc/ssl/private while the directory /etc/ssl/certs is used to store the server certificate; these are taken from the template. In the example, the keys take the name of the host. Restart the server and verify that it is correctly serving SSL/TLS protected pages.
On Ubuntu 13.10 or Mint 16 running Apache 2.4, the Order, Allow, and Deny directives must be replaced by appropriate Require directives. Further, the default SSL/TLS configuration in /etc/apache2/mods-enabled/ssl.conf contains the line
SSLSessionCache shmcb:${APACHE_RUN_DIR}/ssl_scache(512000)
This requires the module mod_socache_shmcb, which is not enabled by default. Correct this by enabling the module with the command
leuler@Eagle:~$ sudo ln -s /etc/apache2/mods-available/socache_shmcb.load /etc/apache2/mods-enabled/
Once done, Apache can be started.
The configuration of SSL/TLS on CentOS differs from OpenSuSE, Mint, and Ubuntu because the necessary module for SSL/TLS is not even installed as part of the default Apache installation and must be added separately. It can be installed with the command
[root@regulus ~]# yum install mod_ssl
The module installation adds the new configuration file /etc/httpd/conf.d/ssl.conf to the Apache configuration on CentOS. That configuration file can be used as the starting point to configure SSL/TLS; it is also possible to replace it with the following.
This begins by loading the required module and configuring Apache to listen on TCP/443. The global context variables have values taken from the CentOS default configuration file. The remaining directives follow the approach taken for other distributions. The logs are located in the usual location for CentOS, and the location of the server key and certificate are the same as in the default configuration file. Restart the server and verify that it is correctly serving SSL/TLS protected pages.
Signing Certificates
Instead of relying on self-signed certificates for each server, an organization may choose to have their certificates signed, either by an externally recognized certificate authority or by a trusted internal server. An organization that uses a trusted internal signing server can configure their clients to trust the signing server instead of each individual web server.
Earlier, a self-signed certificate was created for the OpenSuSE web server named Kooshe (kooshe.crt). If the administrator instead wanted to generate a signed certificate, the first step is to use OpenSSL to create a certificate signing request (.csr) on the web server.
kooshe:~ # openssl req -new -key /etc/apache2/ssl.key/kooshe.key -out /etc/apache2/ssl.csr/kooshe.csr
You are about to be asked to enter information that will be incorporated
into your certificate request.
What you are about to enter is what is called a Distinguished Name or a DN.
There are quite a few fields but you can leave some blank
For some fields there will be a default value,
If you enter '.', the field will be left blank.
-----
Country Name (2 letter code) [AU]:US
State or Province Name (full name) [Some-State]:MD
Locality Name (eg, city) []:Towson
Organization Name (eg, company) [Internet Widgits Pty Ltd]:Towson University
Organizational Unit Name (eg, section) []:
Common Name (eg, YOUR name) []:kooshe.stars.example
Email Address []:[email protected]

Please enter the following 'extra' attributes
to be sent with your certificate request
A challenge password []:
An optional company name []:
The contents of the request can be viewed.
kooshe:~ # openssl req -noout -text -in /etc/apache2/ssl.csr/kooshe.csr
Certificate Request:
    Data:
        Version: 0 (0x0)
        Subject: C=US, ST=MD, L=Towson, O=Towson University, CN=kooshe.stars.example/[email protected]
        Subject Public Key Info:
            Public Key Algorithm: rsaEncryption
            RSA Public Key: (2048 bit)
                Modulus (2048 bit):
                    00:ce:40:39:4c:a2:6a:51:4f:ef:e6:69:e5:03:9d:
                    bc:b3:cc:d9:6d:38:f7:86:f2:e8:55:0c:42:18:e1:
... Output Deleted ...
This certificate signing request could be sent to a commercial certificate authority for signature; however, suppose that this particular organization wants to create and use an internal server to sign all of its certificates.
A signing server (or even a complete CA) can be built using CentOS, Mint, OpenSuSE or Ubuntu. The first step to building a signing server is to generate the key that is to be used to sign all of the certificates. On a CentOS 6.1 signing server (named dubhe in this example), this is done with the command
[root@dubhe ~]# openssl genrsa -aes128 -out /etc/pki/CA/private/ca.key 2048
Generating RSA private key, 2048 bit long modulus
...+++
.............+++
e is 65537 (0x10001)
Enter pass phrase for /etc/pki/CA/private/ca.key:
Verifying - Enter pass phrase for /etc/pki/CA/private/ca.key:
This is essentially the same command used to generate a private key for a web server; here the result is stored in a different directory and the key is protected by a password with AES-128 encryption. The default location for the private key is already set with strong permissions
[root@dubhe ~]# ls -l /etc/pki/CA/
total 16
drwxr-xr-x. 2 root root 4096 Jul 19  2011 certs
drwxr-xr-x. 2 root root 4096 Jul 19  2011 crl
drwxr-xr-x. 2 root root 4096 Jul 19  2011 newcerts
drwx------. 2 root root 4096 Jan  6 21:50 private
With the key created, the next step is to create a certificate for the signing server.
[root@dubhe ~]# openssl req -new -x509 -days 365 -key /etc/pki/CA/private/ca.key -out /etc/pki/CA/certs/ca.crt
Enter pass phrase for /etc/pki/CA/private/ca.key:
You are about to be asked to enter information that will be incorporated
into your certificate request.
What you are about to enter is what is called a Distinguished Name or a DN.
There are quite a few fields but you can leave some blank
For some fields there will be a default value,
If you enter '.', the field will be left blank.
-----
Country Name (2 letter code) [XX]:US
State or Province Name (full name) []:Maryland
Locality Name (eg, city) [Default City]:Towson
Organization Name (eg, company) [Default Company Ltd]:Towson University
Organizational Unit Name (eg, section) []:
Common Name (eg, your name or your server’s hostname) []:dubhe.stars.example
Email Address []:
Finally, a serial number file needs to be created in the proper directory and initialized. The serial number file has the same name as the certificate, but a different extension (.srl). The serial number file contains a hexadecimal serial number with an even number of digits, and is updated each time a certificate is signed.
[root@dubhe ~]# echo "01" > /etc/pki/CA/certs/ca.srl
With the signing server prepared, copy the certificate signing request from the web server to the signing server, then sign it with the command
[root@dubhe ~]# openssl x509 -req -days 365 -in /etc/pki/CA/kooshe.csr -CA /etc/pki/CA/certs/ca.crt -CAkey /etc/pki/CA/private/ca.key -out /etc/pki/CA/newcerts/kooshe.crt
Signature ok
subject=/C=US/ST=MD/L=Towson/O=Towson University/CN=kooshe.stars.example/[email protected]
Getting CA Private Key
Enter pass phrase for /etc/pki/CA/private/ca.key:
Copy the newly signed certificate, (/etc/pki/CA/newcerts/kooshe.crt in this example) back to the web server and install it in the same fashion as the self-signed certificate. A check of the signed certificate shows that that the issuer is the signing server, and the subject is the web server.
[root@dubhe ~]# openssl x509 -text -noout -in /etc/pki/CA/newcerts/kooshe.crt
Certificate:
    Data:
        Version: 1 (0x0)
        Serial Number: 2 (0x2)
        Signature Algorithm: sha1WithRSAEncryption
        Issuer: C=US, ST=Maryland, L=Towson, O=Towson University, CN=dubhe.stars.example
        Validity
            Not Before: Jan  8 00:04:43 2015 GMT
            Not After : Jan  8 00:04:43 2016 GMT
        Subject: C=US, ST=MD, L=Towson, O=Towson University, CN=kooshe.stars.example/[email protected]
        Subject Public Key Info:
            Public Key Algorithm: rsaEncryption
                Public-Key: (2048 bit)
                Modulus:
                    00:ce:40:39:4c:a2:6a:51:4f:ef:e6:69:e5:03:9d:
                    bc:b3:cc:d9:6d:38:f7:86:f2:e8:55:0c:42:18:e1:
... Output Deleted ...
A client that connects to the protected site without having already trusted the signing server is told that the connection is untrusted. To prevent these warnings, the client must trust the signing server. Copy the certificate for the signing server (ca.crt) to the client and import it into the browser. On Firefox for example, this is done by navigating Preferences ![]() Advanced
Advanced ![]() Encryption. Press the View Certificates button, and in the resulting dialog box select Authorities, then Import. Select the certificate, and select the appropriate trust level (web sites, e-mail users, and/or software developers). On Internet Explorer, navigate Tools
Encryption. Press the View Certificates button, and in the resulting dialog box select Authorities, then Import. Select the certificate, and select the appropriate trust level (web sites, e-mail users, and/or software developers). On Internet Explorer, navigate Tools ![]() Internet Options
Internet Options ![]() Content
Content ![]() Certificates. Import the certificate and store the result in Trusted Root Certification Authorities.
Certificates. Import the certificate and store the result in Trusted Root Certification Authorities.
The process of using other distributions as a signing server is similar. On CentOS 5 systems, the directory /etc/pki/CA/private exists, but the other directories /etc/pki/CA/certs and /etc/pki/CA/newcerts need to be created. Mint, OpenSuSE and Ubuntu store OpenSSL configuration data in the directory /etc/ssl instead of /etc/pki.
Redirection
Apache can be configured to automatically redirect requests from one web page to another page. One common use of redirection is for SSL/TLS protected web sites. Consider a server kooshe.stars.example running an SSL/TLS protected web site exclusively. A user intending to visit that site may simply enter kooshe.stars.example in the address bar of their browser. The browser does not know that the user wants to visit https://kooshe.stars.example, and so instead sends the user to http://kooshe.stars.example. Since the server is serving SSL/TLS exclusively, the request fails. Rather than force the user to include the scheme (https) in any request, the administrator can instead redirect any traffic sent to http://kooshe.stars.example to the corresponding SSL/TLS protected page. One approach is to create a virtual host on port 80 with the configuration
NameVirtualHost *:80
<VirtualHost *:80>
    Redirect / https://kooshe.stars.example/
</VirtualHost>
This instructs Apache to redirect any page to the corresponding page on the SSL/TLS protected server. A client who makes a request for http://kooshe.stars.example/bob.html receives a 302 response informing the browser that the page has been moved to https://kooshe.stars.example/bob.html. The browser then loads the correct SSL/TLS protected page transparently to the client.
Basic Authentication
One approach to controlling access to a web site is through the use of Basic Authentication. A user that connects to a web site protected by basic authentication is asked to provide a username and a password to proceed (Figure 11-2). If the client is able to authenticate, then the requested resource is returned.

Figure 11-2. An Example of a Basic Authentication Request by Firefox 3.0.5 on CentOS 5.3
To configure Apache to protect a portion of a web site, a list of authorized users and credentials must first be created; this is done with the tool htpasswd. On OpenSuSE systems this tool is named htpasswd2.
[root@atria ~]# htpasswd --help
Usage:
        htpasswd [-cmdpsD] passwordfile username
        htpasswd -b[cmdpsD] passwordfile username password

        htpasswd -n[mdps] username
        htpasswd -nb[mdps] username password
 -c  Create a new file.
 -n  Don’t update file; display results on stdout.
 -m  Force MD5 encryption of the password.
 -d  Force CRYPT encryption of the password (default).
 -p  Do not encrypt the password (plaintext).
 -s  Force SHA encryption of the password.
 -b  Use the password from the command line rather than prompting for it.
 -D  Delete the specified user.
On Windows, NetWare and TPF systems the '-m' flag is used by default.
On all other systems, the '-p' flag will probably not work.
For example, to create the new authentication file /var/www/passwd containing the user cgauss using MD5 encryption run the command:
[root@atria ~]# htpasswd -c -m /var/www/passwd cgauss
New password:
Re-type new password:
Adding password for user cgauss
Additional users can then be added
[root@atria ~]# htpasswd  -m /var/www/passwd gmonge
New password:
Re-type new password:
Adding password for user gmonge
[root@atria ~]# htpasswd  -m /var/www/passwd sgermain
New password:
Re-type new password:
Adding password for user sgermain
The contents of the password authentication file should not be included within a server’s DocumentRoot and should not be provided to clients. An attacker on Kali able to download the saved password hashes can use tools such as John the Ripper to try to crack the passwords.
root@kali:~/Apache# john --wordlist=/usr/share/wordlists/rockyou.txt ./hashes
Loaded 3 password hashes with 3 different salts (FreeBSD MD5 [128/128 SSE2 intrinsics 12x])
password         (gmonge)
Password         (sgermain)
password1!       (cgauss)
guesses: 3  time: 0:00:00:03 DONE (Mon Dec  8 17:16:52 2014)  c/s: 34857  trying: pedro23 - parsons1
Use the "--show" option to display all of the cracked passwords reliably
Notice that even though the password hash file used salted MD5 hashes, John attempted nearly 35,000 cracks per second.
The htpasswd tool is not included by default on Ubuntu 13.10 or Mint 16; it can be installed with
leuler@Eagle:~$ sudo apt-get install apache2-utils
To require basic authentication before allowing clients access to a portion of a web site, a Directory directive can be used. For example, to require basic authentication before users can access files in the directory /var/www/html/safe, the following configuration can be used.
<Directory "/var/www/html/safe">
  AuthType Basic
  AuthName "Atria Safe Files"
  AuthUserFile /var/www/passwd
  Require valid-user
</Directory>
These directives can be included in the configuration file(s) for the web server; they can also be added to .htaccess files in the proper subdirectory, provided AllowOverride has been appropriately set.
The AuthType directive specifies that the directory is protected by basic authentication. The AuthName directive provides the name of the security boundary; it is passed on to the client and appears in the dialog box requesting authentication. The AuthUserFile specifies the name of the file containing the password hashes. The last directive, Require valid-user tells the server to allow access to any valid user in the authenticated users file. It is possible to restrict access to a single user or group of users with the AuthGroupFile directive.
When a resource is protected by basic authentication, requests for that resource are met with an HTTP 401 Authorization Required response. A typical browser request and response has the form
GET /safe/index.html HTTP/1.1
Host: atria.stars.example
User-Agent: Mozilla/5.0 (X11; U; Linux i686; en-US; rv:1.9.0.5) Gecko/2008121911 CentOS/3.0.5-1.el5.centos Firefox/3.0.5
Accept: text/html,application/xhtml+xml,application/xml;q=0.9,*/*;q=0.8
Accept-Language: en-us,en;q=0.5
Accept-Encoding: gzip,deflate
Accept-Charset: ISO-8859-1,utf-8;q=0.7,*;q=0.7
Keep-Alive: 300
Connection: keep-alive
Referer: http://atria.stars.example/
If-Modified-Since: Mon, 08 Dec 2014 20:41:48 GMT
If-None-Match: "26539-33-509ba749bd3e8"
HTTP/1.1 401 Authorization Required
Date: Mon, 08 Dec 2014 20:52:29 GMT
Server: Apache/2.2.15 (CentOS)
WWW-Authenticate: Basic realm="Atria Safe HTTP Files"
Content-Length: 486
Connection: close
Content-Type: text/html; charset=iso-8859-1
... Output Deleted ...
After the user provides their credentials, a new request is made of the server
GET /safe/index.html HTTP/1.1
Host: atria.stars.example
User-Agent: Mozilla/5.0 (X11; U; Linux i686; en-US; rv:1.9.0.5) Gecko/2008121911 CentOS/3.0.5-1.el5.centos Firefox/3.0.5
Accept: text/html,application/xhtml+xml,application/xml;q=0.9,*/*;q=0.8
Accept-Language: en-us,en;q=0.5
Accept-Encoding: gzip,deflate
Accept-Charset: ISO-8859-1,utf-8;q=0.7,*;q=0.7
Keep-Alive: 300
Connection: keep-alive
Referer: http://atria.stars.example/
If-Modified-Since: Mon, 08 Dec 2014 20:41:48 GMT
If-None-Match: "26539-33-509ba749bd3e8"
Authorization: Basic Y2dhdXNzOnBhc3N3b3JkMSE=
The HTTP header of the subsequent request contains the authorization information used by the server. Note that this is simply the Base64 encoding of the client’s username and password, and can be trivially decoded.
[root@atria ~]# echo Y2dhdXNzOnBhc3N3b3JkMSE= | base64 --decode
cgauss:password1!
Any directory protected by basic authentication must also be protected by SSL/TLS.
ModSecurity
ModSecurity is a web application firewall that is used to protect web servers and their clients from attack. It is a rule-based system that checks requests and responses against a flexible set of rules. These rules can be used to log or block traffic to and from the server. The OWASP project4 provides an open source set of rules, called the ModSecurity Common Rule Set (CRS). Rules in the CRS check for misconfigured or malformed HTTP traffic, common web application attack techniques, sensitive data leaving the server, and a host of other checks.
Installing ModSecurity
The source code for ModSecurity is available from the web site https://www.modsecurity.org/, however most of the Linux distributions under consideration include a version of ModSecurity in either their primary or an associated software repository. In Chapter 1, systems were configured to use software repositories as they existed when the distribution was first released. To install ModSecurity, some of those settings need to be tweaked.
On CentOS, ModSecurity is included in the Extra Packages for Enterprise Linux (EPEL) repository. To include it, update the list of repositories in /etc/yum.repos.d/. For example, to configure a 32-bit CentOS 5.4 system to use EPEL, either to an existing congfiguration file or a new file with the extension “.repo,” add the lines
[epel]
name=EPEL
baseurl=http://archive.fedoraproject.org/pub/epel/5/i386/
gpgcheck=1
gpgkey=http://archive.fedoraproject.org/pub/epel/RPM-GPG-KEY-EPEL-5
Validate the settings by running yum update then yum repolist.
The various available EPEL repositories are at http://archive.fedoraproject.org/pub/epel/; there are separate repositories for 32- and 64-bit systems, and separate repositories based on the major version number (CentOS 5 versus CentOS 6). It may be preferable to use one of the many mirrors for EPEL; a list of the available mirrors is available at https://admin.fedoraproject.org/mirrormanager/mirrors/EPEL.
Install ModSecurity on CentOS by running
[root@canopus ~]# yum install mod_security
If this is the first time the EPEL repositories are used, the installation process will ask before importing the GPG package verification key
Importing GPG key 0x217521F6 "Fedora EPEL <[email protected]>" from http://archive.fedoraproject.org/pub/epel/RPM-GPG-KEY-EPEL-5
Is this ok [y/N]:y
ModSecurity is included in the primary software repository for OpenSuSE systems other than OpenSuSE 11.0. It has the name apache2-mod_security2 and can be installed via zypper.
alphard:~ # zypper install apache2-mod_security2
On Ubuntu 9.04 systems or later, and on Mint 7 systems or later, ModSecurity is available in the Universe repository. For example, on an Ubuntu 9.04 system, update the list of sources /etc/apt/sources.list to include Universe by editing the line
deb http://old-releases.ubuntu.com/ubuntu/ jaunty main restricted universe
Once the new repository is added, update the system and install
enoether@soul:~$ sudo apt-get update
... Output Deleted ...
enoether@soul:~$ sudo apt-get install libapache-mod-security
Starting ModSecurity
ModSecurity is complex and powerful, and its base configuration varies between different distributions. The primary configuration file for ModSecurity on CentOS systems is /etc/httpd/conf.d/mod_security.conf. The file starts by loading two required modules: security2_module, which is ModSecurity itself; and unique_id_module, which is a support module required by ModSecurity.
The CentOS configuration continues
Include modsecurity.d/*.conf
Include modsecurity.d/activated_rules/*.conf
These files will contain additional configuration information for ModSecurity as well as the rules that govern its function. Note that the location is relative to the Apache server root (Table 11-1) so on CentOS these are located in /etc/httpd/modsecurity.d/.
The configuration file on CentOS 5 continues with the lines
SecRuleEngine On
SecRequestBodyAccess On
SecResponseBodyAccess Off
The first of these sets the state of the rule engine. If SecRuleEngine is set to On, then rules are processed, while if SecRuleEngine is set to Off then they are not. It can also be set to the value DetectionOnly; in this mode the rules are processed, but no modifications to the traffic are made; in particular traffic that matches a drop, block, or deny rule is merely logged. The next two directives give ModSecurity access to the request and response bodies; these are needed if ModSecurity is to block requests or responses.
The CentOS 5 configuration continues with the directives
SecDebugLog /var/log/httpd/modsec_debug.log
SecDebugLogLevel 0
These set the location of the ModSecurity debugging log and its level. The level can take values between 0 (no logging) and 9 (log everything). Log levels 1, 2, and 3 correspond to errors, warnings, and notices, and are copied to the Apache error log regardless of the ModSecurity log level. In general, no change is needed to this value. Log levels above 3 can slow the system down, and are recommended only when debugging ModSecurity itself.
In addition to debug logging, ModSecurity also provides request logging. On CentOS 5 this is configured by the directives
SecAuditEngine RelevantOnly
SecAuditLogRelevantStatus ^5
SecAuditLogType Serial
SecAuditLogParts ABIFHZ
SecAuditLog /var/log/httpd/modsec_audit.log
The directive SecAuditEngine can take the values On, Off, or RelevantOnly. In the last case, the audit log includes all transactions that have either triggered a rule or those whose status code is considered relevant. The collection of relevant status codes is specified by the regular expression from SecAuditRelevantStatus. In CentOS 5, this includes any status code 5xx. CentOS 6 contains the same CentOS 5 directives (in a different order) with two changes; it uses the directive
SecAuditLogRelevantStatus "^(?:5|4(?!04))"
This logs status codes 4xx or 5xx with the exception of 404. A complete list of HTTP return codes is in the Notes and References section; HTTP 4xx codes indicate a client error where 404 is used when the requested resource is not found. HTTP 5xx codes indicate a server error.
The directive SecAuditType can be configured as Serial or Concurrent. In the former case, all audit log entries are sent to the same file, while in the latter case a separate file is created for each transaction. The value of SecAuditLogParts specifies the elements that are to be recorded. The corresponding entry for CentOS 6 is
SecAuditLogParts ABIJDEFHZ
This records (A) the audit log header, (B) the request header, (I) the request body, including form data, (J) information about uploaded files (if any), (E) the response body, (F) the response headers, (H) the audit log trailer, and (Z) the required end-of-entry; the code (D) has not yet been implemented. A more detailed discussion of these components is available at the ModSecurity Reference Manual https://github.com/SpiderLabs/ModSecurity/wiki/Reference-Manual.
ModSecurity stores data in a pair of files determined by the directives
SecTmpDir /var/lib/mod_security
SecDataDir /var/lib/mod_security
The first is used for temporary data and the second for data such as session data. Both directories must exist and be writeable by the web server.
To use ModSecurity, rules are required. As an example, add the following testing rule to the end of /etc/httpd/conf.d/mod_security.conf
SecRule ARGS, "zzz" phase:1,log,deny,status:503,id:1
This rule tells ModSecurity that if the request has an argument containing the text “zzz,” then the request should be logged and the request denied with a 503 Service Unavailable error.
Restart Apache, with both ModSecurity installed and the new testing rule. A check of the Apache Error logs /var/log/httpd/error_log shows that ModSecurity is installed and running
[Sat Dec 13 16:29:35 2014] [notice] ModSecurity for Apache/2.6.8 (http://www.modsecurity.org/) configured.
[Sat Dec 13 16:29:35 2014] [notice] ModSecurity: APR compiled version="1.2.7"; loaded version="1.2.7"
[Sat Dec 13 16:29:35 2014] [notice] ModSecurity: PCRE compiled version="6.6 "; loaded version="6.6 06-Feb-2006"
[Sat Dec 13 16:29:35 2014] [notice] ModSecurity: LUA compiled version="Lua 5.1"
[Sat Dec 13 16:29:35 2014] [notice] ModSecurity: LIBXML compiled version="2.6.26"
[Sat Dec 13 16:29:35 2014] [notice] Digest: generating secret for digest authentication ...
[Sat Dec 13 16:29:35 2014] [notice] Digest: done
[Sat Dec 13 16:29:36 2014] [notice] Apache/2.2.3 (CentOS) configured -- resuming normal operations
If a client makes a request for a web page, say the page http://canopus.stars.example/index.html, then Apache and ModSecurity correctly serve the page. On the other hand, if the parameter “zzz” is passed with the request, for example, as a GET parameter for the variable a in a request like http://canopus.stars.example/index.html?a=zzz, then the server returns a 503 error to the client, and the error log /var/log/httpd/error_log contains the line
[Sat Dec 13 16:33:42 2014] [error] [client 10.0.2.28] ModSecurity: Access denied with code 503 (phase 1). Pattern match "zzz" at ARGS:a. [file "/etc/httpd/conf.d/mod_security.conf"] [line "95"] [id "1"] [hostname "canopus.stars.example"] [uri "/"] [unique_id "w2y@OX8AAAEAACP5FrIAAAAD"]
The ModSecurity audit log /var/log/httpd/modsec_audit.log contains more detail.
--79e9a520-A--
[13/Dec/2014:16:33:42 --0500] w2y@OX8AAAEAACP5FrIAAAAD 10.0.2.28 56225 10.0.2.11 80
--79e9a520-B--
GET /?a=zzz HTTP/1.1
Host: canopus.stars.example
User-Agent: Mozilla/5.0 (X11; U; Linux i686; en-US; rv:1.9.0.5) Gecko/2008121911 CentOS/3.0.5-1.el5.centos Firefox/3.0.5
Accept: text/html,application/xhtml+xml,application/xml;q=0.9,*/*;q=0.8
Accept-Language: en-us,en;q=0.5
Accept-Encoding: gzip,deflate
Accept-Charset: ISO-8859-1,utf-8;q=0.7,*;q=0.7
Keep-Alive: 300
Connection: keep-alive

--79e9a520-F--
HTTP/1.1 503 Service Temporarily Unavailable
Content-Length: 409
Connection: close
Content-Type: text/html; charset=iso-8859-1

--79e9a520-H--
Message: Access denied with code 503 (phase 1). Pattern match "zzz" at ARGS:a. [file "/etc/httpd/conf.d/mod_security.conf"] [line "95"] [id "1"]
Action: Intercepted (phase 1)
Stopwatch: 1418506422500921 490 (- - -)
Stopwatch2: 1418506422500921 490; combined=19, p1=19, p2=0, p3=0, p4=0, p5=0, sr=0, sw=0, l=0, gc=0
Producer: ModSecurity for Apache/2.6.8 (http://www.modsecurity.org/).
Server: Apache/2.2.3 (CentOS)

--79e9a520-Z--
The contents are split by a transaction ID number along with the part as defined by SecAuditLogParts. The request itself is shown in part B (GET /?a=zzz HTTP/1.1) and the response in Part F (HTTP/1.1 503 Service Temporarily Unavailable).
OpenSuSE behaves similarly to CentOS. To ensure that the required modules security2 and unique_id are loaded, the file /etc/sysconfig/apache2 needs to be modified and Apache restarted. The default configuration file for ModSecurity is /etc/apache2/conf.d/mod_security2.conf which has essentially the same structure as on CentOS. The audit log is stored in /var/log/apache2/modsec_autid.log. The default configuration file does not include directives for SecDataDir and SecTempDir; manually add them:
SecTmpDir /tmp
SecDataDir /tmp
Be sure the destination exists and is writeable by the web server (including the needed permissions on any parent directories).
The situation for Ubuntu and Mint depends on the precise distribution. The oldest versions (Ubuntu 8.04, 8.10; Mint 5, 6) do not include ModSecurity in their repositories. Subsequent versions (Ubuntu 9.04-11.04; Mint 7-11) include ModSecurity, but do not include a configuration file. Instead, they include a sample configuration file in /usr/share/doc/mod-security-common/examples/modsecurity.conf-minimal. To start ModSecurity, copy that file to /etc/apache2/mods-enabled/modsecurity.conf then edit that file to update the locations of the debug log and the audit log; natural places include /var/log/apache2/modsec_debug.log and /var/log/apache2/modsec_audit.log. Update the configuration file to include values for SecTmpDir and SecDataDir.
On later systems (Ubuntu 11.10 and later, Mint 12 and later), the ModSecurity installation process creates the configuration file /etc/apache2/mods-enabled/mod-security.conf; this file includes the contents of the directory /etc/modsecuity/*.conf. Copy /etc/modsecurity/modsecurity.conf-recommended to /etc/modsecurity/modsecurity.conf to ensure that it is included in the configuration and update the default setting for SecRuleEngine from DetectionOnly to On. The audit file is in the natural location /var/log/apache2/modsec_audit.log, the debug log is disabled, and SecDataDir is set to /var/cache/modsecurity.
Some 64-bit Mint and Ubuntu systems suffer from a known bug;5 the file /etc/apache2/mods-enabled/mod-security.load loads an XML library with the line
LoadFile /usr/lib/libxml2.so.2
The issue is that on 64-bit systems, that file is in a different location. Correct the line to:
LoadFile /usr/lib/x86_64-linux-gnu/libxml2.so.2
ModSecurity Rules
The OWASP ModSecurity Core Rule Set (CRS) is included in the EPEL repository for CentOS systems, and can be installed with the command
[root@regulus httpd]# yum install mod_security_crs
The primary configuration file for the rules is /etc/httpd/modsecurity.d/modsecurity_crs_10_config.conf, while the rules themselves are stored in /etc/httpd/modsecurity.d/activated_rules as symlinks to /usr/lib/modsecurity.d/base_rules/.
As an example of a typical rule, consider the next to last rule in /etc/httpd/modsecurity.d/activated_rules/modsecurity_crs_20_protocol_violations.conf, which has the content
SecRule ARGS|ARGS_NAMES|REQUEST_HEADERS|!REQUEST_HEADERS:Referer "@validateByteRange 1-255"
        "phase:2,rev:'2.2.5',block,msg:'Invalid character in request',id:'960901',tag:'PROTOCOL_VIOLATION/EVASION',tag:'WASCTC/WASC-28',tag:'OWASP_TOP_10/A1',tag:'OWASP_AppSensor/RE8',tag:'PCI/6.5.2',severity:'4',t:none,t:urlDecodeUni,setvar:'tx.msg=%{rule.msg}',tag:'http://i-technica.com/whitestuff/asciichart.html',setvar:tx.anomaly_score=+%{tx.notice_anomaly_score},setvar:tx.protocol_violation_score=+%{tx.notice_anomaly_score},setvar:tx.%{rule.id}-PROTOCOL_VIOLATION/EVASION-%{matched_var_name}=%{matched_var}"
This rule looks for content in the request’s arguments, argument names, or request headers other than referer, and checks that each character is not null. If the character is null, it blocks the request and writes a log message indicating that there is an ‘Invalid character in request’. Null characters should not appear in reasonable requests, but null characters are occasionally used in attacks to null terminate a string.
ModSecurity has two detection modes: traditional and anomaly based. In the traditional method, which is the default for CentOS, if a rule fires, then its defined action is taken. When anomaly based detection is used, each violated rule adds to anomaly score; if the score exceeds a threshold then ModSecurity takes action. In traditional detection, when ModSecurity determines that a request is to be blocked, it checks the value of SecDefaultAction. On CentOS 5, this is set in /etc/httpd/modsecurity.d/modsecurity_crs_10_config.conf with the value
SecDefaultAction "phase:2,deny,log"
On CentOS 6 it has the value
SecDefaultAction "phase:1,deny,log"
In either case a blocked request is denied, a 403 error code is returned to the client, and the result saved in the audit log. A different error code can be returned by modifying the default actions; for example, consider the directive
SecDefaultAction "phase:2,log,deny,status:503"
This instructs ModSecurity to respond with a 503 Service Unavailable message when a request is blocked.
Once the rule set is installed, check that ModSecurity functions correctly by visiting a web page and including a null character in the request; this can be done with a request such as http://regulus.stars.example/index.html?x=aaa%00, which provides the GET parameter x with the value ‘aaa’ followed by a null byte. The client receives a 403 Access Forbidden error, and the following entry appears in the Apache error log (/var/log/httpd/error_log on CentOS)
[Sun Dec 14 12:55:37 2014] [error] [client 10.0.2.28] ModSecurity: Access denied with code 403 (phase 2). Found 1 byte(s) in ARGS:x outside range: 1-255. [file "/etc/httpd/modsecurity.d/activated_rules/modsecurity_crs_20_protocol_violations.conf"] [line "353"] [id "960901"] [rev "2.2.5"][msg "Invalid character in request"] [severity "WARNING"] [tag "PROTOCOL_VIOLATION/EVASION"][tag "WASCTC/WASC-28"] [tag "OWASP_TOP_10/A1"] [tag "OWASP_AppSensor/RE8"] [tag "PCI/6.5.2"] [tag"http://i-technica.com/whitestuff/asciichart.html"] [hostname "regulus.stars.example"] [uri "/index.html"] [unique_id "1U9nGn8AAAEAABtEHtEAAAAE"]
Note that the log message provides the file name and line number for the rule that was violated.
The process to install the rule set for OpenSuSE systems depends on the distribution. ModSecurity is not included in the repository for OpenSuSE 11.0. For OpenSuSE 11.1-11.4 or 12.1-12.2, though ModSecurity is in the repository, the rule set is not. The rules themselves can be downloaded from the OWASP ModSecurity CRS GitHub page at https://github.com/SpiderLabs/owasp-modsecurity-crs/releases. OpenSuSE 11.1 uses ModSecurity 2.5.6, while OpenSuSE 11.2-11.4 and 12.1-12.2 use ModSecurity 2.5.9. The current version of the rule set includes features that are not supported by these older versions of ModSecurity. However, version 2.2.5 of the rules, released in September 2012 and available at https://github.com/SpiderLabs/owasp-modsecurity-crs/archive/v2.2.5.tar.gz is compatible enough with ModSecurity 2.5.9 for testing.6 These rules are not compatible with ModSecurity 2.5.6.
For OpenSuSE 11.2-11.4 or 12.1-12.2, download version 2.2.5 of the OWASP ModSecurity CRS, and uncompress the result in a convenient directory, say /etc/apache2/modsecurity/. This results in the following directory structure
alphard:/etc/apache2/modsecurity # ls -F
CHANGELOG  README.md         experimental_rules/                    optional_rules/
INSTALL    activated_rules/  lua/                                   slr_rules/
LICENSE    base_rules/       modsecurity_crs_10_setup.conf.example  util/
The primary rule set configuration file is modsecurity_crs_10_setup.conf.example; this is similar in structure to the corresponding CentOS configuration file and can be used in its current form. Copy that file to modsecurity_crs_10_setup.conf in the same directory. Update the primary ModSecurity configuration file /etc/apache2/conf.d/mod_security2.conf to include it and the rules in the activated_rules subdirectory by adding the lines
Include /etc/apache2/modsecurity/*.conf
Include /etc/apache2/modsecurity/activated_rules/*.conf
The full OWASP ModSecurity CRS comes with four collections of rules. The base rules are essentially the same rules seen in CentOS; in fact the next to last rule in /etc/apache2/modsecurity/base_rules/modsecurity_crs_20_protocol_violations.conf is the same check for null bytes seen in the CentOS file of the same name. Also included in the CRS are sets of optional rules, experimental rules, and Trustwave SpiderLabs (slr) rules. To include the base rules in the activated rules directory, symlinks can be created for the entire directory via the bash command
alphard:/etc/apache2/modsecurity # for f in `ls /etc/apache2/modsecurity/base_rules/`; do ln -s /etc/apache2/modsecurity/base_rules/$f /etc/apache2/modsecurity/activated_rules/$f; done
Before Apache can be restarted, a change needs to be made to the contents of /etc/apache2/modsecurity/base_rules/modsecurity_crs_20_protocol_violations.conf. That file defines the rule REQBODY_ERROR, however these versions of ModSecurity expect the rule to have the name REQBODY_PROCESSOR_ERROR. Change the name:
SecRule REQBODY_PROCESSOR_ERROR "!@eq 0"
        "phase:2,t:none,block,msg:'Failed to parse request body.',id:'960912',logdata:'%{reqbody
_error_msg}',severity:2,setvar:'tx.msg=%{rule.msg}',setvar:'tx.id=%{rule.id}',tag:'RULE_MATURITY/7',tag:'RULE_ACCURACY/8',tag:'https://www.owasp.org/index.php/ModSecurity_CRS_RuleID-%{tx.id}',
setvar:tx.anomaly_score=+%{tx.critical_anomaly_score},setvar:tx.protocol_violation_score=+%{tx.critical_anomaly_score},setvar:tx.%{rule.id}-PROTOCOL_VIOLATION/INVALID_REQ-%{matched_var_name}=%{matched_var}"
The file /etc/apache2/modsecurity/modsecurity_crs_10_setup.conf defines the variable max_num_args as 255 via a SecAction directive. Unfortunately, ModSecurity 2.5.12 is needed to use macros with numerical arguments.7 If this line is not commented out, the value is set to zero, and attempts to access web resources with one or more parameters are blocked with log messages like
[Sun Dec 14 19:23:05 2014] [error] [client 10.0.2.28] ModSecurity: Access denied with code 403 (phase 2). Operator GT matched 0 at ARGS. [file "/etc/apache2/modsecurity/activated_rules/modsecurity_crs_23_request_limits.conf"] [line "31"] [id "960335"] [rev "2.2.5"] [msg "Too many arguments in request"] [severity "WARNING"] [hostname "alphard.stars.example"] [uri "/index.html"] [unique_id "VI4p6X8AAAIAABgVFe8AAAAA"]
Once the changes are made, restart Apache and verify that the rules function by passing a null byte as a parameter in a GET request.
OpenSuSE 12.3 and 13.1 include the OWASP ModSecurity Common Rules in the repository; however both provide version 2.2.6 of the rules, which requires ModSecurity 2.7.8 The version of ModSecurity provided in the repository? ModSecurity 2.6. If the rules are installed, Apache will fail to start with errors in /var/log/messages reading
2014-12-14T21:54:50.327069-05:00 menkent start_apache2[3926]: Syntax error on line 15 of /usr/share/owasp-modsecurity-crs/base_rules/modsecurity_crs_41_xss_attacks.conf:
2014-12-14T21:54:50.327410-05:00 menkent start_apache2[3926]: Error parsing actions: Unknown action: ver
Instead of using the rules from the repository, use OWASP ModSecurity CRS 2.2.5 and install them in the same fashion as other versions of OpenSuSE. Fortunately, neither the REQBODY_ERROR fix nor themax_num_args fix are needed.
The rule set for Ubuntu and Mint is configured differently depending on the particular release. The oldest versions of Ubuntu and Mint that provide ModSecurity in their repository (Ubuntu 9.04, Mint 7) install ModSecurity 2.5.6; this suffers from the same compatibility problem with the OWASP ModSecurity CRS that OpenSuSE 11.1 has. Other older versions (Ubuntu 9.10-11.04; Mint 8-11) are handled in the same fashion as OpenSuSE systems. In particular, download the OWASP ModSecurity CRS 2.2.5 from https://github.com/SpiderLabs/owasp-modsecurity-crs/archive/v2.2.5.tar.gz and uncompress the result into /etc/apache2/modsecurity. Copy the CRS configuration file from /etc/apache2/modsecurity modsecurity_crs_10_setup.conf.example to /etc/apache2/modsecurity modsecurity_crs_10_setup.conf. Create the needed links in the activated_rules subdirectory by running
enoether@rosette:$ for f in `ls /etc/apache2/modsecurity/base_rules/`; do sudo ln -s /etc/apache2/modsecurity/base_rules/$f /etc/apache2/modsecurity/activated_rules/$f; done
Update the primary ModSecurity configuration file with the location of both primary CRS configuration file and the activated rules by updating /etc/apache2/mods-enabled/modsecurity.conf with the line
Include /etc/apache2/modsecurity/*.conf
Include /etc/apache2/modsecurity/activated_rules/*.conf
Make the REQBODY_ERROR fix and the max_num_args fix if necessary, then restart Apache and verify the rule set functions.
Later versions Ubuntu and Mint (Ubuntu 11.10 and later, Mint 12 and later) install the package modsecurity-crs when the primary ModSecurity package is installed. This package installs the OWASP ModSecurity CRS to /usr/share/modsecurity-crs. To use these rules, update the primary ModSecurity configuration file /etc/modsecurity/modsecurity.conf with the location of the activated rules and the main CRS configuration file with directives like
Include /usr/share/modsecurity-crs/modsecurity_crs_10_setup.conf
Include /usr/share/modsecurity-crs/activated_rules/*.conf
The name of the CRS configuration file varies between releases; on Ubuntu 13.10 it is named /usr/share/modsecurity-crs/modsecurity_crs_10_setup.conf while on Ubuntu 11.10 it is named /usr/share/modsecurity-crs/modsecurity_crs_10_config.conf.
Create the directory /usr/share/modsecurity-crs/activated_rules if necessary, and create the symlinks to the base rules
leuler@Eagle:~$ for f in `ls /usr/share/modsecurity-crs/base_rules/`; do sudo ln -s /usr/share/modsecurity-crs/base_rules/$f /usr/share/modsecurity-crs/activated_rules/$f; done
Restart Apache, and verify that the rules are being enforced.
EXERCISES
- What is wget? Use it to download a web page.
- What is curl? Use it to download a web page.
- Is the program web.cgi (Program 11-1) vulnerable to a cross-site scripting attack? If so, how?
- Connect to a web server via a telnet client. To connect, specify the name of the host and the port. The request contains one or more lines, and it is terminated with a blank line. For example, make a GET request for the page index.html via HTTP/1.1, specifying the host and user agent, and including the accept header by making a request like
root@kali:~# telnet regulus.stars.example 80
Trying 10.0.2.36...
Connected to regulus.stars.example.
Escape character is '^]'.
GET /index.html HTTP/1.1
Host: regulus.stars.example
User-Agent: Bob
Accept: text/html
What values are returned by the server? What happens if the host is not specified? If the user agent is not specified? If the accept header is not specified? Does it matter if the server is protected by ModSecurity?
- Connect to an SSL/TLS protected web server using openssl. Make a legitimate request of the server. For example, to connect to the HTTPS port on regulus.stars.example use the command
root@kali:~# openssl s_client -connect regulus.stars.example:443
CONNECTED(00000003)

... Output Deleted ...

---
GET /index.html HTTP/1.1
Host: regulus.stars.example
User-Agent: Bob
Accept: text/html
What information is returned about the server’s certificate? Can you remotely determine the size of the server’s private key? Does the GET request return the full web page?
- Change the values of the Apache directives ServerTokens and ServerSignature. What are the security implications?
- Use the ErrorDocument directive to change the page returned by the server for a 404 error.
- Capture the traffic to and from an Apache web server protected with SSL/TLS. Use Network Miner (c.f. Chapter 3) to extract and view the certificate contained in the traffic.
- Read the script /usr/sbin/a2enmod on Ubuntu. What does it do?
- What happens when a client makes a request of a server by IP address rather than name if the server is running ModSecurity with the OWASP CRS?
Notes and References
Each month, Netcraft releases the results of their web server survey; these results can be found at http://news.netcraft.com/archives/category/web-server-survey/.
The Apache web server is a complex tool. Fortunately it has excellent online documentation; visit http://httpd.apache.org/docs/2.2/ for information about the 2.2 series and http://httpd.apache.org/docs/2.4/ for information about the 2.4 series.
An excellent, though older book on securing Apache is
- Apache Security, Ivan Ristic´. O’Reilly Media, March 2005.
The wiki at https://wiki.apache.org/httpd/DistrosDefaultLayout has the default file layout for Apache on a range of distributions.
Table 11-2. Default included version of Apache and OpenSSL, by Linux distribution
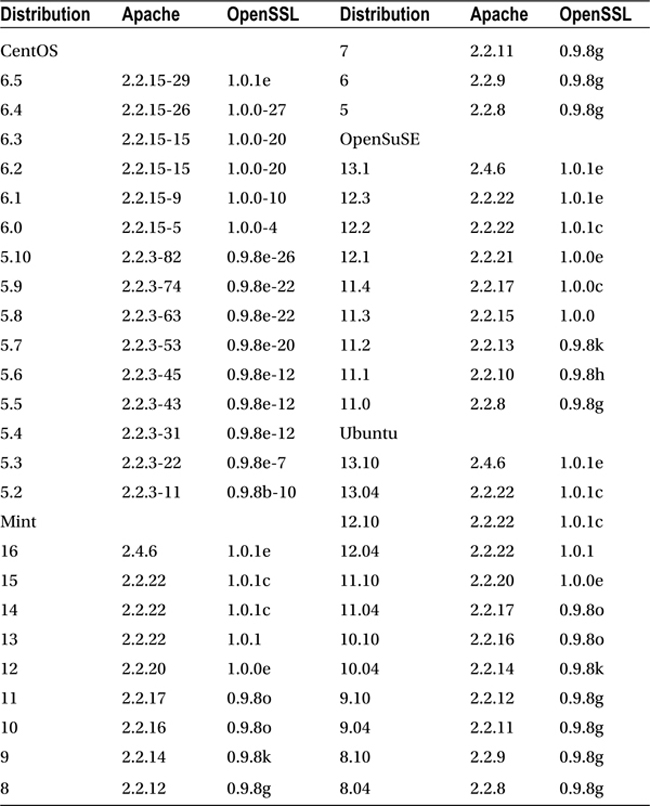
The HTTP status code registry at http://www.iana.org/assignments/http-status-codes/http-status-codes.xhtml lists the various HTTP status codes, including providing references to the defining RFC.
Table 11-3. HTTP Status Codes

A complete list of Apache Custom log format strings is provided by the Apache documentation at http://httpd.apache.org/docs/2.2/mod/mod_log_config.html#formats.
Rory McCann has developed and released a Python library, apache-log-parser, that reads Apache logs; it is available from https://pypi.python.org/pypi/apache-log-parser/. Jochen Voss has written a Python script to parse Apache access logs in combined format using regular expressions; it is available at http://www.seehuhn.de/blog/52.
A must-read book for more information about SSL and TLS is
- Bulletproof SSL and TLS, Ivan Ristic, August 2015.
An excellent tutorial on how to set up SSL/TLS security on Apache systems is also available at https://raymii.org/s/tutorials/Strong_SSL_Security_On_Apache2.html. The text used Mozilla’s cipher recommendation https://wiki.mozilla.org/Security/Server_Side_TLS and https://mozilla.github.io/server-side-tls/ssl-config-generator/; another recommendation is available from https://cipherli.st/.
For more detail on the process of Basic Authentication, check out RFC 2617 (https://tools.ietf.org/html/rfc2617) and its follow on RFC 7235 (https://tools.ietf.org/html/rfc7235).
The reference manual for ModSecurity is available online at https://github.com/SpiderLabs/ModSecurity/wiki/Reference-Manual. There are also two solid but older books:
- ModSecurity Handbook: The Complete Guide to the Popular Open Source Web Application, Ivan Ristic´. Feisty Duck Limited, March 2010. [Updated April 2012.]
- ModSecurity 2.5, Magnus Mischel. Packt Publishing, November 2009.
Apache includes a guide to securing web servers at http://httpd.apache.org/docs/current/misc/security_tips.html. The National Institute of Standards and Technology made broader recommendations in the older
- Guidelines on Securing Public Web Servers, Miles Tracy, Wayne Jansen, Karen Scarfone, and Theodore Winograd. NIST Special Publication 800-44, September 2007. Available online at http://csrc.nist.gov/publications/nistpubs/800-44-ver2/SP800-44v2.pdf.
Running netstat on a system running Apache can sometimes return confusing results. Consider, for example, an OpenSuSE 12.1 system in its default configuration. A check of netstat shows
nunki:~ # netstat -nlptv
Active Internet connections (only servers)
Proto Recv-Q Send-Q Local Address       Foreign Address      State       PID/Program name
tcp        0      0 0.0.0.0:22          0.0.0.0:*            LISTEN      1962/sshd
tcp        0      0 127.0.0.1:631       0.0.0.0:*            LISTEN      728/cupsd
tcp        0      0 :::80               :::*                 LISTEN      2755/httpd2-prefork
tcp        0      0 :::22               :::*                 LISTEN      1962/sshd
tcp        0      0 ::1:631             :::*                 LISTEN      728/cupsd
This listing appears to suggest that Apache is listening only on TCP/80 for IPv6, but not for IPv4. Indeed, checking for just IPv4 connections shows
nunki:~ # netstat -nlptv --inet
Active Internet connections (only servers)
Proto Recv-Q Send-Q Local Address          Foreign Address      State       PID/Program name
tcp        0      0 0.0.0.0:22             0.0.0.0:*            LISTEN      1962/sshd
tcp        0      0 127.0.0.1:631          0.0.0.0:*            LISTEN      728/cupsd
However, a check from an external host shows that the server is reachable via IPv4. The issue is that Apache can handle IPv4 connections using IPv4-mapped IPv6 addresses. This behavior can be changed when Apache is compiled, but is the default on non-BSD platforms. To prevent Apache from listening on both IPv4 and IPv6 addresses, the Listen directive can be modified; consider the directive
Listen 0.0.0.0:80
This tells Apache to listen on any IPv4 address, but not on any IPv6 address. See http://httpd.apache.org/docs/2.2/bind.html#ipv6 for details on Apache 2.2 and http://httpd.apache.org/docs/2.4/bind.html#ipv6 for details on Apache 2.4.
____________________
1If you think this approach is silly and that it would be simpler to add a LoadModule statement to httpd.conf, then consider the fact that /etc/sysconfig/apache2 states, “It might look silly to not simply edit httpd.conf for the LoadModule statements...”
2The word “referer” is, in fact, misspelled. It was misspelled in the original 1996 RFC for HTTP/1.0, RFC 1945, available at http://tools.ietf.org/html/rfc1945, and the new spelling has stuck. It is still in use in the June 2014 RFC 7231 (http://tools.ietf.org/html/rfc7231), which notes that referer has been misspelled.
3Do not include spaces in the name, as the Include directive from /etc/apache2/apache2.conf may not correctly include the result. In some versions (e.g., Ubuntu 13.10) only files that end in .conf are included.
4https://www.owasp.org/index.php/Category:OWASP_ModSecurity_Core_Rule_Set_Project
5https://bugs.debian.org/cgi-bin/bugreport.cgi?bug=670248.
6Be sure to use a current version of ModSecurity and a current rule set for any system in production!
7See http://lists.owasp.org/pipermail/owasp-modsecurity-core-rule-set/2012-February/001005.html
8See http://sourceforge.net/p/mod-security/mailman/mod-security-users/?viewmonth=201209.