
Application Resources
Resources are one of the most important components of an application. It is always good practice to externalize resources in order to maintain consistency and to prevent resource duplication, as resources can be referenced from multiple places within the application. Decoupling the code and the resources also has other advantages.
- Localization of the Application: The application can carry an alternative set of resources for various languages, and it can switch between them based on the user’s locale during runtime. This makes it possible to support multiple languages and locales with a single application binary.
- Device Specific Look and Feel: As the Android platform is highly fragmented, there is no magic user interface (UI) configuration that will look and feel the same on all Android devices. The screen layouts and also the images mostly need to be customized based on screen size and screen density. Externalization of resources enables the application to use the proper resource set based on the device’s specifications.
The Android framework provides a comprehensive set of application programming interfaces (APIs) and a structure to organize resources in order to seamlessly pick the proper resources on behalf of the application based on the characteristics of the runtime environment.
In the following section, I detail how to structure your resources, and how to access them from within your application through the APIs.
Structure of Resources
The Android Software Development Kit (SDK) requires the application resources to be placed in a specific subdirectory of the src/main/res directory. As shown in Listing 4-1, the example application has an image resource called icon.png, which is placed in the drawable subdirectory, a screen layout called main.xml in the layout subdirectory, and some string resources in the values subdirectory as a strings.xml file.
Listing 4-1. Structure of Application Resources
Hello Android
     |
     `- src
         `- main
             `- res
                 |- drawable
                 |     `- icon.png
                 |
                 |- layout
                 |     `- main.xml
                 |
                 `- values
                       `- strings.xml
The names of the resource subdirectories are important. The Android framework cannot find the resources if they are not properly placed.
Android Studio does not automatically create all possible resource subdirectories. You can create the missing ones as you need them at any time, by right-clicking the res directory and choosing New ![]() Android Resource Directory from the context menu to launch the New Resource Directory dialog as shown in Figure 4-1.
Android Resource Directory from the context menu to launch the New Resource Directory dialog as shown in Figure 4-1.
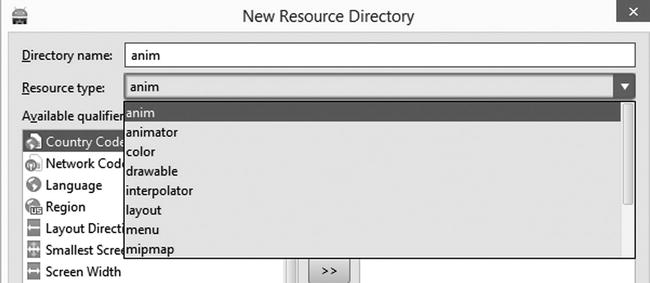
Figure 4-1. New resource directory dialog
Resource Groups
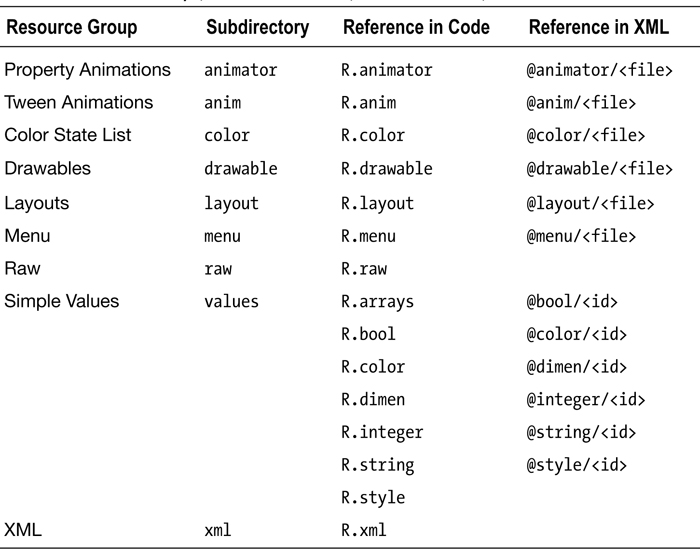
Android groups the resources under nine main categories based on their type. Each of these nine resources groups has its individual subdirectories within the src/res resource directory. Once you compile and build the application, the Android toolchain autogenerates a Java class file <application package name>.R (i.e., com.apress.R), to provide access to these resources from the application code. Table 4-1 lists these nine resource groups, their corresponding resource subdirectories, and their groups within the R constants class.
Table 4-1. Resource Groups, Their Subdirectories, Their R Constants, and XML Prefixes
Caution If you are unable to find your resources in the R class, please make sure that the correct R class is imported in your source file. Android framework resources are also provided through the android.R class, and this may have been unintentionally imported by the Android Studio IDE.
Property Animation Resources
The property animation1 resource describes the steps to animate any object on the screen by changing its properties at certain intervals during a defined time window. As shown in Listing 4-2, these resources are provided as XML files. Android expects them to be placed in the src/res/animator directory.
Listing 4-2. src/res/animator/example.xml Property Animation Resource File
<?xml version="1.0" encoding="utf-8"?>
<set xmlns:android=
    "http://schemas.android.com/apk/res/android">
    <objectAnimator android:propertyName="x"
        android:duration="1000"
        android:valueFrom="10"
        android:valueTo="100"
        android:valueType="intType" />
</set>
Once they are declared, the animation resources can be accessed through the R.animator.<resource file name>, as shown in Listing 4-3. The name of the resource file is used as the resource ID.
Listing 4-3. Using the Animation Resource from the Code
AnimatorSet animatorSet = (AnimatorSet) AnimatorInflater.loadAnimator(
        this, R.animator.example);
Tween Animation Resources
The tween animation2 resource describes the steps to animate an object on the screen by applying a series of simple transformations to its content. As shown in Listing 4-4, the src/res/anim directory also provides these resources as XML files. The name of the resource file is used as the resource ID.
Listing 4-4. src/res/anim/twin.xml Tween Animation Resource File
<?xml version="1.0" encoding="utf-8"?>
<set xmlns:android=
    "http://schemas.android.com/apk/res/android">
    <scale android:fromXScale="1.0"
        android:toXScale="2.0"
        android:duration="1000" />
    <rotate android:fromDegrees="0"
        android:toDegrees="180"
        android:duration="1000" />
</set>
The tween animation resource can later be accessed through the R.anim.<resource file name>, as shown in Listing 4-5.
Listing 4-5. Using the Tween Animation Resource from the Code
TextView textView = (TextView) findViewById(R.id.hello_world);
Animation animation = AnimationUtils.loadAnimation(
        this, R.anim.tween);
textView.startAnimation(animation);
Color State List Resources
The color state list3 resource describes the colors for different states of a view. For example, a different set of colors could be applied for each state of a button. As shown in Listing 4-6, the src/res/color directory provides these resources as XML files. The name of the resource file is used as the resource ID.
Listing 4-6. src/res/color/button.xml Color State List Resource File
<?xml version="1.0" encoding="utf-8"?>
<selector xmlns:android="http://schemas.android.com/apk/res/android">
    <item android:color="#ffff0000"
        android:state_pressed="true" />
    <item android:color="#ff00ff00"
        android:state_focused="true" />
    <item android:color="#ff0000ff" />
</selector>
The color state list resource can then be accessed within the code through the R.color.<resource file name> as shown in Listing 4-7. In the next chapter, I will show you how to reference to the color state list resource directly from the layouts.
Listing 4-7. Using the Color State List Resource from the Code
ColorStateList colorStateList =
        getResources().getColorStateList(R.color.button);
The drawable resources are graphics that can be drawn to the screen. You can reference the drawable resources from the application code using the Resources.getDrawable method and by providing their unique resource ID through the R.drawable.<resource name> constants.Android supports several types of drawables.
Bitmap File
A bitmap file is an image file in PNG, JPEG, or GIF format. You can obtain a drawable resource from these image files by simply placing them into the src/res/drawable directory. The name of the image file acts as the unique resource ID for the drawable resource.
XML Bitmap File
You can apply additional attributes to an existing bitmap file by using an XML bitmap file. It is an XML file that points to an existing bitmap file and declares the additional attributes such as anti-aliasing and dithering using the <bitmap>4 XML tag, as shown in Listing 4-8.
Listing 4-8. src/res/drawable/antialias.xml XML Bitmap File Drawable Resource File
<?xml version="1.0" encoding="utf-8"?>
<bitmap xmlns:android="http://schemas.android.com/apk/res/android"
    android:src="@drawable/ic_launcher"
    android:antialias="true" />
Nine-Patch File
The nine-patch file is a stretchable bitmap file that Android will automatically scale to accommodate the size of the view in which the drawable is placed as the background. Nine-patch files are also expected to be placed in the src/res/drawable directory. For Android to be able to distinguish between the ordinary bitmap files and the nine-patch files, the files are expected to have .9 extension between the file name and the extension, such as button.9.png.
Nine-patch files do not scale entirely as do the ordinary bitmap files. They carry additional information about the stretchable areas, as shown in Figure 4-2.
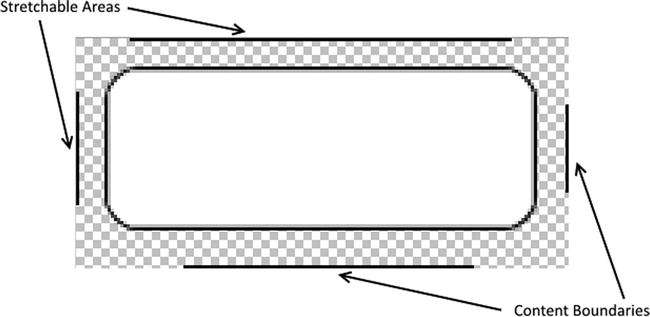
Figure 4-2. Border marks of a nine-patch file
- The left and top border lines define which pixels of the bitmap are allowed to stretch.
- The right and bottom border lines define the boundary of the area in which the contents are allowed to lie.
In order to make it easier to generate nine-patch files from the existing bitmap files, the Android SDK comes with a tool called Draw 9 Patch. It can be found in the <Android SDK>/tools directory as draw9patch.bat or draw9patch.sh, depending on the operating system.
XML Nine-Patch File
As does the XML bitmap file, the XML nine-patch file simply refers to an existing nine-patch and provides additional parameters, such as dithering, using the <nine-patch>5 XML tag as shown in Listing 4-9.
Listing 4-9. XML Nine-Patch File Applying Dithering to the Existing Nine-Patch
<?xml version="1.0" encoding="utf-8"?>
<nine-patch
    xmlns:android="http://schemas.android.com/apk/res/android"
    android:src="@drawable/button"
    android:dither="true" />
Shape Drawable
Shape drawable is a generic shape that is defined in XML format using the <shape>6 XML tag. The shape drawable supports all basic shapes—such as rectangle, oval, line, and ring. You can also apply corners, gradients, and colors to the shape objects through the XML resource file using the appropriate tags, as shown in Listing 4-10.
Listing 4-10. src/res/drawable/shape.xml Shape Resource File
<?xml version="1.0" encoding="utf-8"?>
<shape xmlns:android=
    "http://schemas.android.com/apk/res/android"
    android:shape="rectangle">

    <corners android:radius="4dp" />

    <gradient
        android:startColor="#FF00"
        android:endColor="#F0F0"
        android:angle="20"/>

    <padding android:left="4dp"
        android:top="4dp"
        android:right="4dp"
        android:bottom="4dp" />
</shape>
You can then reference and apply the shape object as any other ordinary drawable resource.
State List
The state list drawable is a group of several images that are mapped to different states of an object. Based on the current state of the object, Android uses the correct image from the provided list. For example, using the state list drawable, you can provide different images for each state of a button. You can define the state list drawable in XML format using the <selector> XML tag with nested <item> XML tags representing each image, as shown in Listing 4-11.
Listing 4-11. State List Drawable for Different States of a Button
<?xml version="1.0" encoding="utf-8"?>
<selector xmlns:android="http://schemas.android.com/apk/res/android">
    <item android:drawable="@drawable/button_pressed "
        android:state_pressed="true" />

    <item android:drawable="@drawable/button_focused "
        android:state_focused="true" />
</selector>
Layout Resources
The layout resource file defines the architecture of the UI. It consists of the list of view components and attributes defining how they should be placed on the screen. As shown in Listing 4-8, the src/res/layout directory also provides these resources as XML files. The name of the layout resource file is used as the resource ID.
Listing 4-12. src/res/layout/activity_my.xml Layout Resource File
<RelativeLayout xmlns:android="http://schemas.android.com/apk/res/android"
    xmlns:tools="http://schemas.android.com/tools"
    android:layout_width="match_parent"
    android:layout_height="match_parent">

    <TextView
        android:id="@+id/hello_world"
        android:text="@string/hello_world"
        android:layout_width="wrap_content"
        android:layout_height="wrap_content" />

    <Button
        android:id="@+id/button"
        android:text="@string/button_label"
        android:layout_width="wrap_content"
        android:layout_height="wrap_content" />

</RelativeLayout>
You can apply the layout resource to an activity as shown in Listing 4-13.
Listing 4-13. Applying the Layout Resource to Current Activity
setContentView(R.layout.activity_my);
Menu Resources
The Menu7 resources define the structure of application menus such as the options menu, context menu, or submenus. Listing 4-14 defines the menu resources in XML format.
Listing 4-14. src/res/menu/my.xml Menu Resource File
<menu xmlns:android=
    "http://schemas.android.com/apk/res/android"
    xmlns:tools="http://schemas.android.com/tools"
    tools:context=".MyActivity" >
    <item android:id="@+id/action_settings"
        android:title="@string/action_settings"
        android:orderInCategory="100"
        android:showAsAction="never" />
</menu>
Listing 4-15 demonstrates how to reference the menu resource through the R.menu.<resource file name>.
Listing 4-15. Using the Menu Resource in the Code
getMenuInflater().inflate(R.menu.my, menu);
Raw Resources
The raw resources are resources that do not belong to any of these resource groups. Android expects them to be in the src/res/raw directory. The raw resources do not have to be XML files like the other resource types; they can be in any format. You can reference them in the code as R.raw.<resource file name> without the file extension. As shown in Listing 4-16, you can use the Resources.openRawResource8 method to open a data stream for reading the raw resource, src/res/raw/attributions.txt, in the code.
Listing 4-16. Using the Raw Resource in the Code
InputStream inputStream =
        getResources().openRawResource(R.raw.attributions);
The value resources are simple values, such as strings, integers, Booleans, and colors. Android expects the value resource files to be placed in the src/res/values directory. Values resource files are provided in XML format. A single value resource file can contain multiple value resources.
As each resource is identified with its own ID, Android gives the developer the flexibility to organize the value in whatever way makes sense. For example, you can place all color resources in colors.xml, or you can have individual resource files per activity for clarity. An example resource file looks as shown in Listing 4-17.
Listing 4-17. src/res/values/strings.xml Value Resources File
<?xml version="1.0" encoding="utf-8"?>
<resources>
    <string name="app_name">Hello Android</string>

    <bool name="registered">false</bool>

    <color name="title_background">#ffff0000</color>

    <dimen name="activity_horizontal_margin">16dp</dimen>

    <integer name="count">10</integer>

    <integer-array name="numbers">
        <item>1</item>
        <item>2</item>
    </integer-array>
</resources>
String Resources
String resources are simple text strings. We define a simple string resource through the <string>9 XML tag, as shown in Listing 4-18.
Listing 4-18. Defining a String Resource
<string name="app_name">Hello Android</string>
You can then reference the string resource from the application code using the getString10 method and referencing to it through R.string.<resource name>, as shown in Listing 4-19.
Listing 4-19. Using the String Resource in the Code
String appName = getString(R.string.app_name);
Note For localization of string resources, please refer to the section “Default and Alternative Resources,” in this chapter.
String Arrays
You can also define string arrays in the value resources using the <string-array>11 XML tag, as shown in Listing 4-20.
Listing 4-20. Defining a String Array Resource in the Value Resources File
<string-array name="android_versions">
    <item>KitKat</item>
    <item>Lollipop</item>
</string-array>
After defining the string array resource in the resource file, you can use it in the code through the getStringArray12 method by providing its resource ID as R.array.<resource name>, as shown in Listing 4-21.
Listing 4-21. Using the String Array Resource in the Application Code
String[] androidVersions =
       getResources().getStringArray(R.array.android_versions);
Quantity Strings
Languages have different grammatical rules for plurals. Android provides a special resource type to define quantity strings in value resources. We define these resources using the <plurals> XML tag as shown in Listing 4-22.
Listing 4-22. Defining Plural Value Resources
<plurals name="books_found">
    <item quantity="zero">No books found.</item>
    <item quantity="one">One book found.</item>
    <item quantity="few">Few books found.</item>
    <item quantity="many">So many books found.</item>
    <item quantity="other">%d books found.</item>
</plurals>
The <plural> XML tag contains one or more <item> tags for plurals that require special treatment. The quantity attribute of the <item> tag indicates the plural case for which the string should be used. Table 4-2 provides a list of all plural cases that are supported.
Table 4-2. List of Plural Quantities That Can Have Special Treatment
|
Quantity |
Description |
|---|---|
|
zero |
Special treatment for number 0. |
|
one |
Special treatment for number 1. |
|
two |
Special treatment for number 2. |
|
few |
Special treatment for small numbers. |
|
many |
Special treatment for large numbers. |
|
other |
For any other given number. (The %d can be used number substitution). |
You can obtain the plural string resources through the getQuantityString method by providing their unique resource ID through the R.plurals.<resource name> as shown in Listing 4-23.
Listing 4-23. Using the Plural String Resources from the Application Code
String zeroBooksFound = getResources().getQuantityString(
        R.plurals.books_found, 0, 0);

String eightBooksFound = getResources().getQuantityString(
        R.plurals.books_found, 8, 8);
Note You need to pass the quantity twice if your plural strings include string formatting with a number, such as %d books found. The first parameter is used to select the proper string, and the second parameter is passed to the string formatter for %d substitution.
Boolean Resources
You can define Boolean value resources using the <bool>13 XML tag as shown in Listing 4-24.
Listing 4-24. Defining a Boolean Value Resource
<bool name="registered">false</bool>
The Booleans can then be referenced from the application code using the Resources.getBoolean14 method and by providing the unique resource ID through R.bool.<resource name> constant as shown in Listing 4-25.
Listing 4-25. Using the Boolean Value Resource from the Application Code
boolean registered = getResources().getBoolean(
        R.bool.registered);
Color Resources
You can define the color value resources using the <color>15 XML tag as shown in Listing 4-26.
Listing 4-26. Defining a Color Value Resource
<color name="title_background">#ffff0000</color>
The color values are specified using the RGB color model16 where the red, green, and blue (RGB) lights are added together to produce the color. In addition to the color components, you can also provide an Alpha value to specify the transparency. The RGB color components can be specified using any of the following formats as shown in Table 4-3 where the values are in hex.
Table 4-3. Formats That Can Be Used to Specify the Color Resource
|
Format |
Description |
Example |
|---|---|---|
|
#RGB |
Red-Green-Blue with single hex digit precision (0 to F). |
#F00 (red) |
|
#ARGB |
Alpha-Red-Green-Blue with single hex digit precision (0 to F). |
#60F0 (green with transparency) |
|
#RRGGBB |
Red-Green-Blue with double hex digit precision (0 to FF). |
#FF0000 (red) |
|
#AARRGGBB |
Alpha-Red-Green-Blue with double hex digit precision (0 to FF). |
#6200FF00 (green with transparency) |
You can reference the color resources in the application code using the Resources.getColor method and by providing the unique resource ID through the R.color.<resource name> constant as shown in Listing 4-27.
Listing 4-27. Using the Color Resource in the Application Code
int backgroundColor = getResources().getColor(
        R.color.title_background);
Dimension Resources
You can also specify the dimensions of UI components as part of the value resources using the <dimension>17 XML tag as shown in Listing 4-28.
Listing 4-28. Defining the Dimension Resource
<dimen name="activity_horizontal_margin">16dp</dimen>
We specify the dimension value with a quantity followed by a unit of measure such as pixels, inches, and so on. Android supports the following units of measurement when defining dimension resources:
- dp: Density independent pixels are relative to 160 dpi screens on which 1dp is roughly equal to 1px. Depending on the screen density of the device, these numbers get scaled accordingly.
- sp: Scale independent pixels are the same as density independent pixels, but they also get scaled based on the user’s font size preference. I recommend using this measurement unit when specifying the dimensions of text components.
- pt: Points are 1/72 of an inch based on the screen size.
- px: Pixels corresponds to the actual pixels on the screen.
- mm: Millimeters based on the physical size of the screen.
- in: Inches based on the physical size of the screen.
You can use the dimension resources in the application code with the Resources.getDimension18 method and by providing the unique resource ID through the R.dimen.<resource name> constants as shown in Listing 4-29.
Listing 4-29. Using the Dimension Resource in the Application Code
float activityHorizontalMargin = getResources().getDimension(
        R.dimen.activity_horizontal_margin);
The returned value, activityHorizontalMargin, is the resource dimension value multiplied with the appropriate metric. If you prefer the value in pixels, you can use the Resources.getDimensionPixelSize19 method instead.
Integer Resources
You can also define simple integer numbers in the value resources using the <integer>20 XML tag as shown in Listing 4-30.
Listing 4-30. Defining an Integer Value Resource
<integer name="count">10</integer>
We reference the integer resources in the application code using the Resources.getInteger21 method and providing their unique resource ID through the R.integer.<resource name> constant as shown in Listing 4-31.
Listing 4-31. Using the Integer Resource in the Application Code
int count = getResources().getInteger(R.integer.count);
Integer Arrays
Just like the string arrays, integer arrays are also supported as value resources. You can define integer arrays in the value resource file using the <integer-array>22 XML element as shown in Listing 4-32.
Listing 4-32. Defining an Integer Array Resource
<integer-array name="numbers">
    <item>1</item>
    <item>2</item>
</integer-array>
You can reference the integer array resource in the application code by using the Resources.getIntArray23 method and by providing the unique resource ID using the R.array.<resource name> constant as shown in Listing 4-33.
Listing 4-33. Using the Integer Array Resource in the Application Code
int[] numbers = getResources().getIntArray(R.array.numbers);
Typed Array Resources
The array support in resources is not limited by the string and integer arrays only. You can also define arrays of other resources (e.g., an array of drawables) as a typed array resource using the <array>24 XML tag, as shown in Listing 4-34.
Listing 4-34. Defining a Typed Array Resource
<array name="colors">
    <item>#FFF</item>
    <item>#000</item>
</array>
Note The typed arrays do not have to be homegeneous; Android also supports arrays of mixed resource types.
You can reference the types of array resources in the application code using the Resources.obtainTypedArray25 method and by providing the unique resource ID through R.array.<resource name> constant. You can then obtain the elements of the array through the appropriate method of content.res.TypeArray26 class for the underlying resource type, as shown in Listing 4-35.
Listing 4-35. Using the Typed Array Resource from the Application Code
TypedArray colors = getResources().obtainTypedArray(
        R.array.colors);

int background = colors.getColor(0, Color.BLACK);
int foreground = colors.getColor(1, Color.WHITE);
XML Resources
The XML resources are arbitrary XML formatted resource files. Compared to the raw resources, the Android toolchain does some pre-parsing of the XML resources at build time. This makes the XML resources much quicker to use during the runtime. Android expects them to be in the src/res/xml directory. You can access the XML resources by calling the Resources.getXml27 method and providing a reference to the resource through the R.xml.<resource file name> as shown in Listing 4-36.
Listing 4-36. Reading the XML Resource Using the XML Pull Parser
XmlResourceParser xmlResourceParser =
        getResources().getXml(R.xml.configuration);

try {
    for (int eventType = xmlResourceParser.getEventType();
         eventType != XmlPullParser.END_DOCUMENT;
         eventType = xmlResourceParser.next()) {

        switch (eventType) {
            case XmlPullParser.START_TAG:
                String tagName = xmlResourceParser.getName();
                break;

            case XmlPullParser.TEXT:
                String text = xmlResourceParser.getText();
                break;

            case XmlPullParser.END_TAG:
                String tagName = xmlResourceParser.getName();
                break;
        }
    }
} catch (XmlPullParserException e) {
    e.printStackTrace();
} catch (IOException e) {
    e.printStackTrace();
}
The getXml method returns a content.res.XmlResourceParser28 instance that can be used to parse the XML resource using an XML pull parser.
Default and Alternative Resources
Besides the default set of resources, Android applications can also contain alternative resources for different device configurations, such as alternative string resources to address different languages and alternative drawable resources to cover different screen densities. At runtime, Android picks the right set of resources based on the current device configuration.
Defining Alternative Resources
We place alternative resources in a separate resource directory which is named as <resource directory>-<configuration qualifier>, such as values-tr for value resources in the Turkish language.
Caution The alternative resource files should have the same name as the default resource files, as the names are used as the unique resource ID when referring to them in the application code.
Supported Configuration Qualifiers
You can also specify more than one configuration qualifier by simply adding them to the directory name separated by a dash, such as values-tr-car for value resources in the Turkish language when the device is displaying on a car dock. When you use multiple configuration qualifiers, they must be in the order in which they are listed in Table 4-4.
Table 4-4. Supported Configuration Qualifier Names
|
Configuration |
Description |
Example |
|---|---|---|
|
MCC/MNC |
Mobile Country Code (MCC)29 and Mobile Network Operator (MNC). |
mcc310 mcc310-mnc004 |
|
Language and Region |
Language is defined either by two-letter ISO 639-130 language code or by ISO 3166-1-alpha-231 region code. |
en tr-rTR |
|
Layout Direction |
Left-to-right (default) or right-to-left (i.e., Arabic language). |
ldltr (left to right) ldrtl (right to left) |
|
Smallest Width |
Shortest dimension of available screen size. This won’t change based on device’s orientation. |
sw480dp (handset) sw600dp (tablet) |
|
Available Width |
Available screen width in dp unit. This can change when the device orientation changes. |
w720dp |
|
Available Height |
Available screen height in dp unit. This can change when the device orientation changes. |
h720dp |
|
Screen Size |
Screen size similar to a low-density QVGA screen with minimum size of 320x426 dp is represented as small. Screen size similar to a medium-density HVGA screen with minimum size of 320x470 dp is represented as medium. Screen size similar to a medium-density VGA screen with minimum size of 480x640 dp is represented as large. Screen size similar to a medium-density HVGA with minimum size of 720x960 dp is represented as xlarge. |
small normal large xlarge |
|
Screen Aspect |
Based on the aspect ratio, a wide screen is represented as long, such as WQVGA, WVGA, and FWVGA. And as notlong such as QVGA, HVGA, and VGA. |
long notlong |
|
Screen Orientation |
The orientation of the screen, port for portrait, and land for landscape. This can change when the device orientation changes. |
port land |
|
UI Mode |
Device is in a car dock. Device is in a desk dock. Device is displaying on a television. Device is serving as an appliance. Device is worn as a watch. |
car desk television watch |
|
Night Mode |
Night time is night, and day time is notnight. |
night notnight |
|
Screen Density |
Low density is ldpi ~ 120 dpi Medium density is mdpi ~ 160 dpi High density is hdpi ~ 240 dpi Extra high density is xhdpi ~ 320 dpi Extra-extra high density is xxhdpi ~ 480 dpi Extra-extra-extra high density is xxxhdpi ~ 640 dpi The nodpi is used for resources that should not scale. Televisions are tvdpi ~ 213 dpi |
ldpi mdpi hdpi xhdpi xxhdpi xxxhdpi nodpi tvdpi |
|
Touchscreen |
Device with no touchscreen is represented as notouch; with touchscreen represented as finger. |
notouch finger |
|
Keyboard |
Keyboard is exposed is represented as keysexposed. The device has a hidden hardware keyboard and the software keyboard is disabled represented as keyshidden. Device with software keyboard available is represented as keyssoft. |
keysexposed keyshidden keyssoft |
|
Primary Input |
Device with no keys for input is represented as nokeys. Device with hardware qwerty keyboard is represented as qwerty. Device with a hardware 12-key keyboard is 12key. |
nokeys qwerty 12key |
|
Navigation Key |
Navigation keys available is represented as navexposed; otherwise navhidden. |
navexposed navhidden |
|
Primary Non-Touch Navigation Method |
Device with no navigation other than touchscreen is represented as nonav. Device with a directional pad is represented as dpad. Device with a trackball is represented as trackball. Device with directional wheel(s) is represented as wheel. |
nonav dpad trackball wheel |
|
Platform Version |
The API level supported by the device. |
v3 v4 |
Note To use a resource in more than one configuration, you can create an alias resource for the XML counterpart, such as XML bitmap for image resources.
Handling Runtime Changes
The Android framework restarts the activities when it detects a change in device configuration, such as a device orientation change or the user changing the device’s language. When the Android framework restarts the activity, the proper resources based on the new device configuration load seamlessly.
If the application prefers to handle the configuration change without the activity being restarted, it should declare the list of configuration changes that are handled by the application in the application manifest, as shown in Listing 4-37.
Listing 4-37. Configuration Changes That Are Handled by the Application
<activity
    android:name=".MyActivity"
    android:label="@string/app_name"
    android:configChanges="orientation">
Once the Android framework detects the device configuration change, instead of restarting the activity, it simply calls the Activity.onConfigurationChanged32 method of the activity. The application is expected to override this method to handle the device configuration change.
Assets
Another way of bundling artifacts with the applications is the assets. Android expects the assets to be present in the src/main/assets directory. Compared to the resources, the assets do not get processed by the Android toolchain and they maintain their original final names and their directory structure. There are no unique resource IDs for the artifacts in the assets directory, as they can be accessed through their original file names. The application can use the content of the assets directory through the methods of the content.res.AssetManager33 class. You can obtain an instance of AssetManager through the getAssets34 method of the current context, as shown in Listing 4-38.
Listing 4-38. Using the Artifacts in the Assets Directory in the Application Code
try {
    InputStream inputStream = getAssets().open("file.dat");
    try {

    } finally {
        inputStream.close();
    }
} catch (IOException e) {
    e.printStackTrace();
}
Using Assets in Web View
Assets become very handy when bundling web pages with the application, such as HTML, CSS, JS, and image files. You can place these files into the assets directory keeping their original names and structure. The Android android.webkit.WebView35 instance can then easily load them through a specific file URL (uniform resource locator), file:///android_asset/<file name>, as shown in Listing 4-39.
Listing 4-39. Web View Loading the Web Page from the Assets Directory
WebView webView = (WebView) findViewById(R.id.web_view);
webView.loadUrl("file:///android_assets/index.html");
APK Expansion Files
The Google Play application store currently requires the application packages not to exceed 50MB. Although this is lots of space for most applications, some applications, such as games, may require code and assets. In order to overcome this issue, Google Play allows attaching up to two APK expansion files,36 each up to 2GB, to the application package. We refer to the first one as the main expansion file, and the latter as the patch expansion file. As indicated by its name, the second one is assumed to be updating the main expansion file.
Note Although the second expansion file is for patching the main expansion file, if 2GB is not enough to bundle all required resources for the application, you can use the second expansion file as the additional resource file, which will make it possible to have 4GB of extra resources accompanying the application package.
These expansion files automatically download when you install the application on the device, and they are placed into the external storage under the <external storage>/Android/obb/<application package> directory. Google Play does not require any specific format for the expansion files.
Summary
In this section I described how to attach various resources to your Android application. Through the list of configuration qualifiers provided in this chapter, you can obtain an alternative set of resources within the same application to cover more device configurations. Android provides a comprehensive resource management framework that can automatically find the best resource for a device configuration and also update it in real time when it detects a device configuration change. In the next chapters, you will learn how to use the attached resources with the UI components.
____________________
1http://developer.android.com/guide/topics/graphics/prop-animation.html.
2http://developer.android.com/guide/topics/graphics/view-animation.html#tween-animation.
3http://developer.android.com/guide/topics/resources/color-list-resource.html.
4http://developer.android.com/guide/topics/resources/drawable-resource.html#bitmap-element.
5http://developer.android.com/guide/topics/resources/drawable-resource.html#ninepatch-element.
6http://developer.android.com/guide/topics/resources/drawable-resource.html#shape-element.
7http://developer.android.com/guide/topics/resources/menu-resource.html.
8http://developer.android.com/reference/android/content/res/Resources.
9http://developer.android.com/guide/topics/resources/string-resource.html#String.
10http://developer.android.com/reference/android/content/Context.html#getString(int).
11http://developer.android.com/guide/topics/resources/string-resource.html#StringArray.
12http://developer.android.com/reference/android/content/res/Resources.html#getStringArray(int).
13http://developer.android.com/guide/topics/resources/more-resources.html#Bool.
14http://developer.android.com/reference/android/content/res/Resources.html#getBoolean(int).
15http://developer.android.com/guide/topics/resources/more-resources.html#Color.
16http://en.wikipedia.org/wiki/RGB_color_model.
17http://developer.android.com/guide/topics/resources/more-resources.html#Dimension.
18http://developer.android.com/reference/android/content/res/Resources.html#getDimension(int).
19http://developer.android.com/reference/android/content/res/Resources.html#getDimensionPixelSize(int).
20http://developer.android.com/guide/topics/resources/more-resources.html#Integer.
21http://developer.android.com/reference/android/content/res/Resources.html#getInteger(int).
22http://developer.android.com/guide/topics/resources/more-resources.html#IntegerArray.
23http://developer.android.com/reference/android/content/res/Resources.html#getIntArray(int).
24http://developer.android.com/guide/topics/resources/more-resources.html#TypedArray.
25http://developer.android.com/reference/android/content/res/Resources.html#obtainTypedArray(int).
26http://developer.android.com/reference/android/content/res/TypedArray.html.
27http://developer.android.com/reference/android/content/res/Resources.html#getXml(int).
28http://developer.android.com/reference/android/content/res/XmlResourceParser.html.
29http://en.wikipedia.org/wiki/Mobile_country_code.
30http://www.loc.gov/standards/iso639-2/php/code_list.php.
31http://www.iso.org/iso/en/prods-services/iso3166ma/02iso-3166-code-lists/list-en1.html.
32http://developer.android.com/reference/android/app/Activity.html#onConfigurationChanged(android.content.res.Configuration).
33http://developer.android.com/reference/android/content/res/AssetManager.html.
34http://developer.android.com/reference/android/content/Context.html#getAssets().
35http://developer.android.com/reference/android/webkit/WebView.html.
36http://developer.android.com/google/play/expansion-files.html.