
![]()
Azure Identity and Access
Identity is one of those things that you cannot live without, whether virtually in the electronic world or physically in your daily life. Identity is what tells us who we are and helps us interact with others.
For years, Active Directory has been one of the most important and popular directory services for handling user and computer identities, and for managing authorized access to corporate resources such as servers, e-mail, printers, and so on.
Today, with both vendors and consumers adopting cloud computing, it is important to have an identity management component for workloads, applications, and services. Therefore, Microsoft brought Active Directory to the cloud as Azure Active Directory (AD), with entirely new features and capabilities to match the nature and requirements of the cloud.
This chapter discusses configuring and managing Azure Active Directory with PowerShell.
What’s Azure Active Directory?
Azure AD is an identity and access solution for both cloud and on-premises services. It integrates with Windows Server Active Directory to provide a single sign-on (SSO) for on-premises resources and applications, as well as Software as a Service (SaaS) apps.
Azure AD is the backbone for Microsoft Online Services like Office 365, Microsoft Intune, Azure RMS, and CRM Online. That’s why if you are using any of these services, you can still use your domain credentials without noticing any difference.
Single Sign-On (SSO) for SaaS Apps
Azure AD offers out-of-the-box integration with more than 2,480 SaaS apps (Microsoft and third parties). For instance, you can integrate Azure AD with apps like Salesforce, Google Apps, Oracle CRM, Facebook, Twitter, and so many more. It’s not only single sign-on but also account provisioning and de-provisioning.
Provisioning means that the next time that you create an account for a user, Azure AD automatically provisions a mailbox on Google Apps and an account on Salesforce. It is the same when you remove a user; Azure automatically de-provisions and removes the mailbox and Salesforce account.
A list of SaaS apps that Azure AD can integrate with is at http://azure.microsoft.com/en-us/marketplace/active-directory/all.
Group Management
Azure AD provides a Group Management feature in which you allow users to create their own AD security groups and Office 365 groups.
Also, you can enable group self-service to delegate the approval or rejection of membership requests. So, you can allow groups to manage their own user access without relying on the IT department.
Self-Service Password Reset (SSPR)
Another interesting component in Azure AD is self-service password reset (SSPR). Azure AD users can reset their passwords from a web portal that can be accessed from anywhere and at any time. It works very similarly to when you forget your Hotmail or Facebook password. You just log in to the web site and choose Forgot My Password, and then follow the procedure.
SSPR comes with password write-back capabilities that resets a password and syncs it back to the on-premises Active Directory.
Multi-Factor Authentication (MFA)
Multi-factor authentication (MFA) is a component that allows organizations to add a second security layer for people accessing sensitive business resources or data, such as accessing e-mail, connecting via a remote desktop session on a server, or even initiating a VPN session.
For a very long time, usernames and passwords have been used to protect information, accounts, computers, and so forth. Today, with a lot of security challenges and advanced security attacks, usernames and passwords are no longer enough. There are different reasons for this. For example, some people don’t seem to regard their passwords as confidential information. (I think that most of us have a friend who, perhaps due to forgetfulness, writes down his password on a sheet of paper or writes his PIN on the back of his credit card.) Another reason is when the service provider doesn’t maintain the right security standards; so if the service gets hacked, the users’ information is exposed (this has happened with big-name companies such as LinkedIn1). For these reasons, organizations and service providers started to apply and enforce multi-factor authentication (a.k.a. dual-factor authentication) to protect their employees and customers.
Typically in multi-factor authentication implementation, credential-based authentication with username and password is first used; if the user succeeds, a second authentication is required. This could be via a phone call (to the user’s number listed in the contact information stored in AD) asking for a personal PIN, or via an SMS containing a code, or via a randomly generated token, either a hard token or a soft-token app on the user’s smartphone, such as Azure Authenticator or Google Authenticator. Azure MFA SDK has a library to implement voiceprint authentication, so the next time my phone rings, the MFA server can analyze my voice to verify my identity.
Devices Registration
In Windows Server Active Directory, desktops and servers are joined to the domain so that you can manage and control them by applying the right security policies via Group Policy. The same concept applies to Azure AD; it allows Microsoft, as well as non-Microsoft operating systems, to be registered under your tenant so that you can force policies on devices via Microsoft Intune, the Mobile Device Management solution. It also lets you keep track of the devices’ activities (see Figure 10-1 and Figure 10-2).

Figure 10-1. User’s registered devices

Figure 10-2. Devices and applications from which the user has signed in
Devices Registration is also known as Workplace Join and Cloud Domain-Join (CDJ).
Application Proxy Service
Application Proxy Service (APS) allows secure publishing of internal web apps to remote and external users. The application proxy encrypts the traffic between Azure and the local web servers, defines a pre-authentication method (Azure AD or pass-through), applies multi-factor authentication, and also uses conditional access to identify which users are eligible to access which published applications from which IP addresses. You can consider APS as a reverse proxy as a service component; it is pretty much similar to Web Application Proxy (WAP), but on the cloud.
What I really like about APS is that all requests are sent to Microsoft datacenters. Microsoft then forwards this to your on-premises servers, which means that Microsoft is your first line of defense. Although there is never a 100% guarantee when it comes to security, you don’t have to worry about attacks in the same way as before. Simply, anyone trying to attack your web site is actually attacking a Microsoft datacenter.
You can read more about APS in the TechNet blog post at http://blogs.technet.com/b/applicationproxyblog/archive/2015/06/01/all-you-want-to-know-about-azure-ad-application-proxy-connectors.aspx.
Security Reports and Advanced Audit
With all of these capabilities in Azure AD, it’s very important to track and audit the services and applications. Azure AD provides a set of comprehensive and rich machine-learning-based security reports that allow you to audit every single access attempt to corporate resources. Table 10-1 describes these reports.
Table 10-1. Azure AD Security Reports
Report Name | Report Description |
|---|---|
Sign-ins from unknown sources | May indicate an attempt to sign in without being traced. |
Sign-ins after multiple failures | May indicate a successful brute-force attack. |
Sign-ins from multiple geographies | May indicate that multiple users are signing in with the same account. |
Sign-ins from IP addresses with suspicious activity | May indicate a successful sign-in after a sustained intrusion attempt. |
Sign-ins from possibly infected devices | May indicate an attempt to sign in from possibly infected devices. |
Irregular sign-in activity | May indicate events anomalous to users’ sign-in patterns. |
Users with anomalous sign-in activity | Indicates users whose accounts may have been compromised. |
Audit report | Audited events in your directory. |
Password reset activity | Provides a detailed view of password resets that occur in your organization. |
Password reset registration activity | Provides a detailed view of password reset registrations that occur in your organization. |
Self-service groups activity | Provides an activity log to all group self-service activity in your directory. |
Application usage | Provides a usage summary for all SaaS applications integrated with your directory. |
Account provisioning activity | Provides a history of attempts to provision accounts to external applications. |
Password rollover status | Provides a detailed overview of automatic password rollover status of SaaS applications. |
Account provisioning errors | Indicates an impact to users’ access to external applications. |
Azure AD has main three editions: Free, Basic, and Premium. Each edition has different capabilities and features. The list of available features per edition is available at https://msdn.microsoft.com/en-us/library/azure/dn532272.aspx.
Azure AD and PowerShell
Like most of the services of Azure, and even like Windows Server Active Directory, Azure AD can be managed by Windows PowerShell. Yet it’s not using the same Azure PowerShell module, but a separate module known as the Windows Azure AD module for PowerShell.
You can download the Azure AD module for PowerShell from http://go.microsoft.com/fwlink/p/?linkid=236297. This module requires the Microsoft Online Services Sign-In Assistant for IT Professionals RTW component, which you can download from http://go.microsoft.com/fwlink/?LinkID=286152.
The Azure AD module doesn’t cover all the features and capabilities of Azure AD, but it has powerful uses, especially when configuring users, groups, assigning licenses, and SSO configuration.
Once you download the module package and install it, you get a new module, MSOnline, added to your PowerShell modules store. You also get a desktop shortcut that you can use to launch it directly. Anyway, you don’t need that shortcut because PowerShell version 3.0 (and newer) has module autoloading capability.
Before managing your Azure AD tenant, the first step is to connect to this tenant using the Connect-MSOLService cmdlet along with the -Credential parameter. The credential you pass should be one of the tenant administrators.
#Connecting to Azure AD Tenant
Connect-MSOLService -Credential (Get-Credential admin@<YOUR_TENANT>.onmicrosoft.com)
Once you connect, you are able to run the rest of the cmdlets to manage the different Azure AD services.
Managing Azure AD Users
There are two ways to get users onto Azure AD. The first one is to synchronize the local Windows Server AD with Azure AD using the Azure Active Directory Connect (the new DirSync), or to manually create users.
For the first option, Directory Synchronization, you have to enable it on the Azure AD tenant using the Set-MsolDirSyncEnabled cmdlet along with the -EnableDirSync parameter (used to enable or disable it).
#Enable Directory Synchronization
Set-MsolDirSyncEnabled -EnableDirSync $true
Once you turn on DirSync features, follow the step-by-step article on how to set up and configure the Azure AD Connect tool at http://blogs.technet.com/b/ad/archive/2014/08/04/connecting-ad-and-azure-ad-only-4-clicks-with-azure-ad-connect.aspx.
For the second method, which is to create users manually, you use the New-MSOLUser cmdlet. This cmdlet has a set of parameters that reflect all the users’ information.
#New-MsolUser cmdlet Parameters
New-MsolUser -DisplayName  -UserPrincipalName  -AlternateEmailAddresses -BlockCredential  -City  -Country  -Department  -Fax  -FirstName  -ForceChangePassword  -ImmutableId  -LastName  -LicenseAssignment  -LicenseOptions  -MobilePhone  -Office  -Password  -PasswordNeverExpires -PhoneNumber  -PostalCode  -PreferredLanguage  -State  -StreetAddress  -StrongPasswordRequired <Boolean> -TenantId -Title  -UsageLocation
Although, there are a number of parameters, you still create an Azure AD user using only the -FirstName, -LastName, -DisplayName, and -UserPrincipalName parameters. Later on, you can update user accounts and add more information using the Set-MSOLUser cmdlet.
#create User Account with minimal parameters
New-MsolUser -FirstName ’Yahia’ -LastName ’Sherif’ -DisplayName "Yahia Sherif"-UserPrincipalName [email protected]

Password            UserPrincipalName               DisplayName         isLicensed
--------            -----------------               -----------         ----------
Zaxu3578            [email protected]     Yahia Sherif        False
In the previous example, you didn’t assign a password to the user, so the New-MSOLUser cmdlet generated a random password for that user account. You can reset the password later using the Set-MSOLUserPassword cmdlet.
#Reset Azure AD User Password
Set-MSOLUserPassword UserPrincipalName [email protected] -NewPassword Microsoft@123 -ForceChangePassword $true
If you want to remove a user account from Azure AD, use the Remove-MSOLUser cmdlet. By the way, this cmdlet is the only way to remove an Azure AD user synced using Azure AD connect; there is no GUI for it.
By default, the Remove-MSOLUser cmdlet sends removed user accounts to the Azure AD recycle bin; so you can restore any users that have been accidentally removed. A removed user account remains in the recycle bin for 30 days, after which it is automatically deleted. If you want to permanently remove a user in one shot, then use the -RemoveFromRecycleBin parameter.
#Remove Azure AD User
Remove-MSOLUser -UserPrincipalName [email protected] -RemoveFromRecycleBin
To retrieve a user from the recycle bin, use the Get-MSOLUser cmdlet with -ReturnDeletedUsers. Then, use the Restore-MSOLUser cmdlet to restore the account.
#Restore Azure AD Deleted User
Get-MSOLUser -ReturnDeletedUsers | Restore-MSOLUser
So far, you have created an Azure AD user account, reset its password, removed an account, and then restored it. The next step is to assign a subscription license to this user account.
Managing Azure AD Licenses and Subscriptions
Earlier in the chapter, I mentioned that Azure AD is the backbone directory service for Microsoft Online Services like Azure, Intune, Office 365, and CRM. Azure AD stores these services’ information, including services subscription, licenses, users, groups, devices, and so forth. And because you have this information, you can manage it.
You can get a list of all Microsoft Online Services subscriptions purchased by your company by using the Get-MSOLSubscription cmdlet. It tells you which subscriptions you have, as well as the purchase dates, the expiry/renewal dates, and the number of licenses.
Also, you use the Get-MSOLAccountSku cmdlet to get the license SKU (you need this information when assigning a license to a user), active licenses, consumed licenses, and warning licenses (mostly expired licenses).
The following code gets the available SKUs for Company123 tenants.
#Retriving Account SKUs
Get-MsolAccountSku

AccountSkuId                         ActiveUnits     WarningUnits    ConsumedUnits
------------                         -----------     ------------    -------------
Company123:CRMSTANDARD               0               25              3
Company123:INTUNE_A                  25              0               2
Company123:AAD_PREMIUM               100             0               4
Company123:RIGHTSMANAGEMENT_ADHOC    1000            1
The results of the Get-MsolAccountSku cmdlet shows that Company123 has
- 2 assigned Intune licenses (out of 25)
- 25 expired CRM licenses
- 4 assigned Azure AD Premium (out of 100)
- 1 assigned Azure RMS (out of 100)
For license assignments, you use the Set-MSOLUserLicense cmdlet. You use the –AddLicenses parameter to assign licenses, and the -RemoveLicenses to remove them. In the following example, you assign Intune and Azure AD Premium licenses to a user and remove the expired CRM license.
#Assign License to User
Set-MsolUserLicense -UserPrincipalName [email protected] `
-AddLicenses @("Company123:INTUNE_A","Company123:AAD_PREMIUM") `
-RemoveLicenses "Company123:CRMSTANDARD"
License assignment for PowerShell sounds a like geek showing off his PowerShell skills, but trust me, this is not the case. License assignment from the portal is not a smooth process (or let’s say it’s not that smooth yet). For instance, if you have an Intune or an Office 365 subscription, you have to assign the Intune license from the Intune portal, and then jump to the Office 365 portal to assign the Office 365 license. PowerShell provides a single place to manage both licenses and users.
Managing Azure AD Groups Membership
Windows Server Active Directory and Azure AD have groups. Actually, this makes sense because you have users and you need to categorize and filter them based on specific criteria or common property.
To create a new Azure AD security group, you use the New-MSOLGroup cmdlet along with the -DisplayName, -Description, and -ManagedBy parameters.
#Getting ManagedBy User information
$User = Get-MSOLUser -UserPrincipalName [email protected]

#Create Azure AD Security Group
New-MSOLGroup -DisplayName ’Finance’ -Description ’Finance Department Employees’ -ManagedBy $User.ObjectID
To update the information of the group that you just created, or even another existing group, you use the Set-MSOLGroup cmdlet with the same parameter as the New-MSOLGroup cmdlet. And to remove it, you use the Remove-MSOLGroup cmdlet.
#Get Group Object
$Group = Get-MsolGroup | Where DisplayName -eq "Finance"

#Remove Azure AD Security Group
Remove-MsolGroup -ObjectID $Group.ObjectID -Force
Now, that you have the group, let’s add members to it. For the purpose of this task, you use the Add-MSOLGroupMember cmdlet along with the –GroupMemberObjectID parameter to specify the objectID of the member to add; the –GroupObjectID parameter to specify the objectID of the group to add members to; and the –GroupMemberType parameter to specify whether the member is User or Group. You can also add other security groups as members.
In the following example, you add user Yahia Sherif to the Finance group.
#Get Group Object
$Group = Get-MsolGroup | Where DisplayName -eq "Finance"

#Get Member Object
$Member = Get-MsolUser -UserPrincipalName [email protected]

#Add Member to Group
Add-MsolGroupMember -GroupObjectid $Group.ObjectId -GroupMemberObjectId $Member.ObjectId-GroupMemberType "User"
To remove a member from a group, you use the previous code as is, but you replace the Add-MsolGroupMember cmdlet with the Remove-MsolGroupMember cmdlet.
#Get Group Object
$Group = Get-MsolGroup | Where DisplayName -eq "Finance"

#Get Member Object
$Member = Get-MsolUser -UserPrincipalName [email protected]

#Remove Member from Group
Remove-MsolGroupMember -GroupObjectid $Group.ObjectId -GroupMemberObjectId $Member.ObjectId -GroupMemberType "User"
To get the list of members of a specific group, use the Get-MSOLGroupMember cmdlet.
#Get Group Object
$Group = Get-MsolGroup | Where DisplayName -eq "Finance"
Azure AD groups are similar to Azure AD users; they can be synchronized from the on-premises Windows Server Active Directory, or manually created from the portal or by using PowerShell. Also, like synced users, PowerShell is the only one you can use to remove synced groups.
Managing Azure AD Roles Membership
Azure AD has different user roles, including User, Global Administrator, Services Administrator, and so on. The more Microsoft Online Services that you have, the more roles you get. For example, in addition to the built-in roles, when you subscribe to Office 365, you get roles like Exchange Service Administrator, Lync Service Administrator, and SharePoint Service Administrator. With Intune, you get roles such as Devices Manager and Devices Administrators. And so on with other cloud services.
To get the list of available roles under your Azure AD tenant, use the Get-MSOLRole cmdlet (also see Figure 10-3).
#Get Azure AD Roles
Get-MsolRole | Select Name,Description | Out-GridView
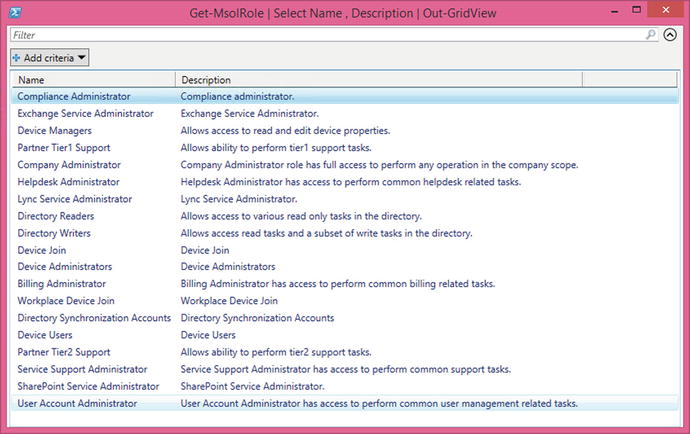
Figure 10-3. Azure AD available roles
You can retrieve the list of members of each role by using the Get-MSOLRoleMember cmdlet.
#Get all available roles
$Roles = Get-MsolRole

#Loop to Members of each Role
ForEach($Role in $Roles)
{
    Get-MsolRoleMember -RoleObjectId $Role.ObjectId
}
In order to add a user to a specific role, you use the Add-MsolRoleMember cmdlet along with the -RoleName parameter to specify the name of the role, and -RolememberEmailAddress to specify the e-mail address of the member to add to the role.
In the following example, you add Yahia Sherif to the Company Administrator, also known as Global Administrator if you are using the portal.
#Add User to Role
Add-MsolRoleMember -RoleName "Company Administrator" –RoleMemberEmailAddres [email protected]
To remove a user from a role, you use the Remove-MsolRoleMember cmdlet with the same parameters as the Add-MsolRoleMember cmdlet.
#Remove User from Role
Remove-MsolRoleMember -RoleName "Company Administrator" -RoleMemberEmailAddres [email protected]
Also, you can get the roles of specific users by using the Get-MsolUserRole cmdlet along with the -UserPrincipalName parameter.
#Get User Role
Get-MsolUserRole -UserPrincipalName [email protected]
PowerShell made it easy to change roles and put users in different roles at the same, which sometimes leads to giving users more rights than they need.
It’s actually the same problem you face with on-premises Active Directory when someone puts everyone in the IT department in the Domain Admins group. However, in the cloud, this is far more dangerous because you have everything available from the outside, so a little mistake could cost a lot.
That’s why I urge you to use Azure AD Privileged Identity Management, which allows you to manage and control privileged identities and to monitor access to Azure AD and other Microsoft Online Services. You can read more about it in the article at https://azure.microsoft.com/en-gb/documentation/articles/active-directory-privileged-identity-management-configure/.
Managing Azure AD Tenant Information
The Azure AD module for PowerShell has a set of cmdlets responsible for tenant information and its settings. Mainly, these cmdlets know which features and settings are enabled on your company’s subscription, including the company contact information. For instance, the Get-MsolCompanyInformation cmdlet returns company information, as described in Table 10-2.
Table 10-2. Output Information for Get-MsolCompanyInformation
Property | Description |
|---|---|
AuthorizedServiceInstances | A list of the company’s services |
City | The company’s city |
CompanyType | Type of company tenant (partner or regular tenant) |
Country | The company’s country |
CountryLetterCode | The two-letter code for the company’s country |
DirectorySynchronizationEnabled | When true, this company has directory synchronization turned on |
DisplayName | The display name of the company |
InitialDomain | The initial domain of the company (companyname.onmicrosoft.com) |
LastDirSyncTime | The last time that directory synchronization was run for the company |
LastPasswordSyncTime | The last time that that password synchronization was run for the company |
MarketingNotificationEmails | The e-mail address to send marketing notifications to |
ObjectId | The unique id for the company |
PasswordSynchronizationEnabled | When true, the company has password synchronization enabled |
PostalCode | The company’s postal location |
PreferredLanguage | The default language for the company |
SelfServePasswordResetEnabled | When true, the company has self-service password reset enabled |
State | The company’s state |
Street | The company’s street address |
TechnicalNotificationEmails | The e-mail address to send important notifications to |
TelephoneNumber | The company’s telephone number |
UsersPermissionToCreateGroupsEnabled | When true, users in the company are allowed to create groups |
UsersPermissionToCreateLOBAppsEnabled | When true, users in the company are allowed to create new applications |
UsersPermissionToReadOtherUsersEnabled | When true, users in the company are allowed to view the profile information of other users in the company |
UsersPermissionToUserConsentToAppEnabled | When true, users in the company are allowed to consent to applications that require access to their cloud data |
So, the information you just retrieved can be modified using a few set-* cmdlets. You already used the first cmdlet at the beginning of this chapter— Set-MsolDirSyncEnabled to turn DirSync on or off.
The second cmdlet is the Set-MsolCompanyContactInformation cmdlet that allows you to set the contact preferences for technical and marketing content. Thus, you use the -MarketingNotificationEmails and -TechnicalNotificationEmails parameters.
#Setting Company Contact Information
Set-MsolCompanyContactInformation -TechnicalNotificationEmails [email protected] -MarketingNotificationEmails [email protected]
The third cmdlet is the Set-MsolCompanySecurityComplianceContactInformation cmdlet that allows you to set the contact preferences for security and compliance content. For this cmdlet, you use the -SecurityComplianceNotificationEmails and -SecurityComplianceNotificationPhones parameters.
#Setting Security and Compliance Contact Information
Set-MsolCompanySecurityComplianceContactInformation –SecurityComplianceNotificationEmails [email protected] -SecurityComplianceNotificationPhones "0123456789"
The fourth cmdlet is the Set-MsolCompanySettings cmdlet, which allows modification of the following settings:
- -SelfServicePasswordResetEnabled: Specifies whether to enable or disable the user self-service password reset.
- -UsersPermissionToCreateGroupsEnabled: Specifies whether to allow users to create groups or not.
- -AllowAdHocSubscriptions: Specifies to sign up for e-mail-based subscriptions as individuals, such as signing up RMS for individuals.
- -DefaultUsageLocation: Specifies the default usage location for company users instead of assigning it manually for each user.
- -UsersPermissionToReadOtherUsersEnabled: Specifies whether to allow users to read other users’ information or not.
- -AllowEmailVerifiedUsers: Specifies whether the users with a verified domain can join the tenant or not.
All the previous parameters are used to enable or disable a setting, so they accept a Boolean value of either true or false. For example, if you want to enable self-service passwords along with allowing users to read others’ information but not to create groups, then the code would look like the following.
#Modifying Company Settings
Set-MsolCompanySettings -SelfServePasswordResetEnabled $true -UsersPermissionToReadOtherUsersEnabled $true -UsersPermissionToCreateGroupsEnabled $false
The company-wide settings are not something to change every day or even every week; however, it’s important to keep aware of this information, especially user-related settings like group creation and self-service passwords.
Managing Azure AD Domains
If you have experience with any of the Microsoft Online Services, then you’ve noticed that first-time activation requires the creation of a tenant in the form of a company.onmicrosoft.com domain. Actually, because the Microsoft Online Services relies on Azure AD, it creates an Azure AD tenant for your organization.
This company.onmicrosoft.com UPN suffix is good, as long as you are using it for administration and configuration. However, it doesn’t look good to use it for user accounts, especially e-mail (e.g., User@Company.onmicrosoft.com). So, Azure AD allows you to add your own custom domain and use it as a UPN suffix for users’ accounts, which means that Company.com is somehow mapped to Company.onmicrosoft.com.
To add a domain to Azure AD tenant, you use the New-MsolDomain cmdlet along with the -Name parameter to specify the domain name, and the -Authentication parameter to specify whether this domain is managed or federated. If you didn’t specify the -Authentication parameter, then the default value for domain authentication is managed.
The federate domains are those configured for single sign-on with on-premises Windows Server Active Directory via Active Directory Federation Services (ADFS), whereas managed domains are simply those stand-alone Azure AD tenants. You can change the domain later to federate or manage using the Convert-MsolDomainToFederated cmdlet and the Convert-MsolDomainToStandard cmdlet.
#Add New MSOL Domain
New-MsolDomain -Name CompanyDomain.com

Name                       Status          Authentication
----                       ------          --------------
CompanyDomain.com          Unverified      Managed
The domain has been successfully added; however, its status is showing that it’s unverified. This is because adding a domain doesn’t mean that you are the domain’s owner, or even that your company owns it. So, to validate your ownership, Azure AD asks to create a unique DNS record on your domain’s public DNS.
A DNS record could be a TXT or an MX record. To retrieve the information of the record to create, use the Get-MsolDomainVerificationDns cmdlet with the -DomainName parameter to specify the domain name, and the -Mode parameter to specify the type of record, whether DnsTXTRecord or DnsMXRecord.
#Get Domain Verification DNS
Get-MsolDomainVerificationDns -DomainName Company123.com -Mode DnsTXTRecord
Label : Company123.com
Text  : MS=ms89288253
Ttl   : 3600
Once you create the DNS record, use the Confirm-MsolDomain cmdlet to verify the domain. Keep in mind that there may be a delay in reflecting the new DNS record; it might take between 15 and 60 minutes.
#Verify Domain
Confirm-MsolDomain -DomainName Company123.com

#Validate Domain Verification
(Get-MsolDomain -DomainName Company123.com).Status
If you have more than one domain and you want to make a specific domain the default domain, then use the Set-MsolDomain cmdlet with the -IsDefault parameter.
#Set Default Domain
Set-MsolDomain -Name Company123.com -IsDefault $true
Once you add the domain and verify it, you can now assign it to the current users and change their UPN from company.onmicrosoft.com to company.com using the Set-MsolUserPrincipalName cmdlet.
#Change User UPN
Set-MsolUserPrincipalName -UserPrincipalName [email protected] -NewUserPrincipalName [email protected]
You can also manage the password policy for the entire tenant or specific domain. The password policy has two settings: the validity period to specify the number of days in which the password remains valid before asking the user to change it, and the notification days, which is when to start prompting a user to change his password.
To get the password policy settings for the company, use the Get-MsolPasswordPolicy cmdlet.
#Getting Password Policy
Get-MsolPasswordPolicy -DomainName Company123.com

ExtensionData                        NotificationDays            ValidityPeriod
-------------                        ----------------            --------------
System.Runtime.Serializ...                         14                       730
And you can set the password policy settings using the Set-MsolPasswordPolicy cmdlet along with the –NotificationDays and -ValidityPeriod parameters.
#Setting Password Policy for Domain
Set-MsolPasswordPolicy -DomainName Company123.com -NotificationDays 10 -ValidityPeriod 72
You can read more about Azure password policies and requirements in the article at https://msdn.microsoft.com/en-us/library/azure/jj943764.aspx.
Summary
This chapter discussed an entirely new area in Azure: identity and access management. You learned about Azure Active Directory and its features, as well as the Azure AD module for PowerShell and how to get it.
Then, you moved on to managing Azure AD users, groups, memberships, security roles, and company information settings, as well as domain management.
The next chapter doesn’t move far away from Azure Active Directory, but covers another service that relies on it. You will learn about information and content protection components in Azure, which is known as Azure Right Management Services (RMS). You will learn how to manage keys, how to configure users and templates, and how to analyze the logs.
________________________
1http://www.pcworld.com/article/257045/6_5m_linkedin_passwords_posted_online_after_apparent_hack.html.