![]()
Manual Duplication Techniques
This chapter will walk you through manual methods for cloning databases and tablespaces. If you’re already familiar with these techniques, then feel free to move on to the next chapters in this book, which illustrate how to employ the RMAN duplication process. Otherwise, there are several manual replication scenarios covered in this chapter:
- Cold backup
- RMAN backup
- Data Pump across network link
- Data Pump and transportable tablespaces
- RMAN and transportable tablespaces
- External tables
Knowledge of these methods will help you understand when it’s appropriate to use a technique and its advantages and disadvantages. This information will help you better understand the other chapters in this book that contrast these techniques with the RMAN DUPLICATE functionality (covered in Chapters 3, 4, and 5). First up is cloning a database using a cold backup.
Cloning from Cold Backup
If you worked with Oracle twenty or so years ago, you probably used a cold backup to move a database from one server to another. Even though this is an old technique, I still find myself occasionally using this method for cloning a database. For example, recently my supervisor asked me to copy a database (about 20 gig in size) from one server to another. In this scenario, the destination server directory structure was different from the source server directory structure, and the destination database needed to have a different name that the source database. In this situation I used a cold backup to move the database for the following reasons:
- Source database wasn’t in archive log mode
- There weren’t any RMAN backups of the source database
- Source database was fairly small, and it wouldn’t take long to copy the data files
- The requirement was to replicate the entire database
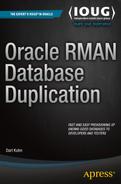
For this example to work you need the same version of Oracle installed on both the source and destination servers. The scenario is depicted in Figure 2-1.
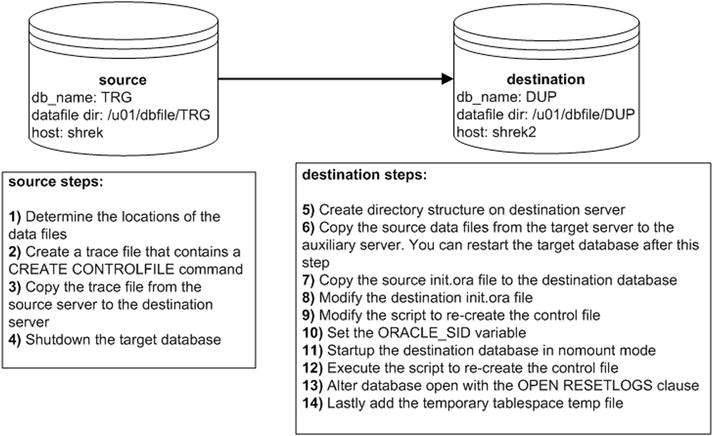
Figure 2-1. Cloning with a cold backup
Next are the detailed descriptions of each of the steps shown in Figure 2-1.
- On the source database, determine the locations of the data files:
SQL> select name from v$datafile;Here’s some output for the database used in this example:
NAME
--------------------------------
/u01/dbfile/TRG/repdata.dbf
/u01/dbfile/TRG/repidx.dbf
/u01/dbfile/TRG/sysaux01.dbf
/u01/dbfile/TRG/system01.dbf
/u01/dbfile/TRG/undotbs01.dbf
/u01/dbfile/TRG/users01.dbf - On the source database create a trace file that contains a CREATE CONTROLFILE command in it:
SQL> alter database backup controlfile to trace as '/tmp/dk.sql' resetlogs; - Copy the trace file from the source server to the destination server. This example uses the Linux/UNIX scp command (initiated from the source server):
$ scp /tmp/dk.sql oracle@shrek2:/tmp - Shut down the source database using immediate (and not abort):
$ sqlplus / as sysdba
SQL> shutdown immediate; - Create directory structures on destination server:
$ mkdir /u01/dbfile/DUP
$ mkdir /u01/oraredo/DUP - While the source database is shut down, copy the source data files from the source server to the destination server. This example uses the Linux/UNIX scp command (initiated from the destination server):
$ scp oracle@shrek:/u01/dbfile/TRG/*.dbf /u01/dbfile/DUPNotice there’s no need to copy the control files or the online redo logs in this scenario. Since the destination directory structure and destination database name will be different from the source name, the control files and online redo logs will need to be recreated. If the directory structure and the database name were the same on both the source and the destination, the procedure would be as simple as shutting down the source database, copying all control files, data files, online redo logs, and initialization file to the destination server, and then starting the database.
 Note After the copy is complete you can restart the source database.
 - Copy the source init.ora file to the destination server. If your source database uses an SPFILE, then you can create a text-based init.ora file from SQL*Plus, as follows:
SQL> create pfile from spfile;This command will place a text-based initialization file with the name of init<SID>.ora in the ORACLE_HOME/dbs directory. If you don’t want the text-based file to be placed in that directory you can override the default behavior as follows:
SQL> create pfile='/tmp/initTRG.ora' from spfile;This example uses the Linux/UNIX scp command (initiated from the destination server). Modify this appropriately for your environment. Assuming the file is in the default location of ORACLE_HOME/dbs:
$ scp oracle@shrek:$ORACLE_HOME/dbs/initTRG.ora $ORACLE_HOME/dbs/initDUP.ora - Modify the destination init.ora file, change the DB_NAME parameter to reflect the new name of the database, and also modify any directories to reflect the directory structure of the destination environment:
$ vi $ORACLE_HOME/dbs/initDUP.oraHere is the content of the initDUP.ora file after the modifications:
db_name='DUP'
control_files='/u01/dbfile/DUP/control01.ctl','/u01/dbfile/DUP/control02.ctl'
db_block_size=8192
fast_start_mttr_target=500
job_queue_processes=10
memory_max_target=500M
memory_target=500M
open_cursors=100
os_authent_prefix=''
processes=100
remote_login_passwordfile='EXCLUSIVE'
resource_limit=true
undo_management='AUTO'
undo_tablespace='UNDOTBS1'
workarea_size_policy='AUTO' - Modify the script to recreate the destination database control file:
$ vi /tmp/dk.sqlChange the first line to include the SET keyword and change the database name and directory structures to reflect the destination environment. Here are the contents of dk.sql after the modifications:
CREATE CONTROLFILE REUSE SET DATABASE "DUP" RESETLOGS ARCHIVELOG
    MAXLOGFILES 16
    MAXLOGMEMBERS 4
    MAXDATAFILES 1024
    MAXINSTANCES 1
    MAXLOGHISTORY 876
LOGFILE
  GROUP 1 '/u01/oraredo/DUP/redo01a.rdo'  SIZE 50M BLOCKSIZE 512,
  GROUP 2 '/u01/oraredo/DUP/redo02a.rdo'  SIZE 50M BLOCKSIZE 512
DATAFILE
  '/u01/dbfile/DUP/system01.dbf',
  '/u01/dbfile/DUP/sysaux01.dbf',
  '/u01/dbfile/DUP/undotbs01.dbf',
  '/u01/dbfile/DUP/users01.dbf',
  '/u01/dbfile/DUP/repdata.dbf',
  '/u01/dbfile/DUP/repidx.dbf'
CHARACTER SET AL32UTF8; - Set the ORACLE_SID variable to reflect the destination database name:
$ export ORACLE_SID=DUP
- Start up the destination database in nomount mode:
$ sqlplus / as sysdba
SQL> startup nomount; - Execute the script to recreate the control file:
SQL> @/tmp/dk.sqlYou should see this message if successful:
Control file created.At this point you have new control files and the database is in mount mode.
- Alter the destination database open with the OPEN RESETLOGS clause:
SQL> alter database open resetlogs;
Database altered. - Lastly, add the temporary tablespace temp file:
SQL> ALTER TABLESPACE TEMP ADD TEMPFILE '/u01/dbfile/DUP/temp01.dbf'
     SIZE 524288000 REUSE AUTOEXTEND OFF;
Also keep in mind that other steps may be required for your environment depending on your standards. For example, you might want to ensure the database SID is listed in the oratab file, or you might require the use of an SPFILE, enabling a password file, changing passwords, enabling archiving, taking a backup, adding entries into Oracle Net files, and so on.
The advantages of the cold backup approach to cloning a database are:
- It’s fairly simple and not much can go wrong (which simplifies troubleshooting any issues). There aren’t many moving parts to this technique.
- It uses a combination of SQL and operating system commands, so you don’t need to be familiar with any other tools to accomplish this task. A savvy manager, system administrator, or developer could easily use this approach to replicate a database.
The downside to this approach is that it requires you to shut down the source database while it is being copied. Thus, if you work in an environment that can’t afford any downtime with the source database, then this approach isn’t appropriate.
Copying from an RMAN Backup
When you think about architecting your backup strategy, as part of the process you must also consider how you’re going to restore and recover. Your backups are only as good as the last time you tested a restore and recovery. A backup can be rendered worthless without a good restore and recovery strategy. The last thing you want to happen is to experience a media failure, go to restore your database, and then find out you’re missing a file, you don’t have enough space to restore, something is corrupt, and so on.
One of the best ways to test an RMAN backup is to restore and recover it to a different database server. This will exercise all your backup, restore, and recovery DBA skills. If you can restore and recover an RMAN backup on a different server, it will give you confidence when a real disaster hits. Moving a database from one server to another using an RMAN backup requires an expert-level understanding of the Oracle architecture and how backup and recovery works. The next example will do just that; it uses an RMAN backup to restore and recover a database on a different server. This scenario is depicted in Figure 2-2.
Figure 2-2. Manually cloning a database using an RMAN backup
Notice in Figure 2-2 that only step 1 occurs on the source database server. All remaining steps are performed on the destination server. For this example the source database is named TRG, and the destination database is named DUP. Also notice that the originating source server and destination server have different directory names. You’ll have to adjust these directory names to reflect the directory structures on your database servers. Let’s get started with step 1:
- Create an RMAN backup on the source (target) database. When backing up a database, make sure you have the autobackup control file feature turned on:
$ rman target /
RMAN> configure controlfile autobackup on;
Also include the archive redo logs as part of the backup, as shown:
RMAN> backup database plus archivelog;Verify that a backup of the control file exists:
RMAN> list backup of controlfile;Here’s some sample output:
Piece Name: /u01/rman/TRG/TRGctl_c-1251088236-20141228-00.bkYou’ll need to reference the prior backup piece file when you restore the control file on the destination server (step 8). Also notice for this example that the backup pieces on the source server are in the /u01/rman/TRG directory.
- On the destination server, create any required directories for data files, control files, and so on. For this example the destination server directories created are:
$ mkdir -p /u01/rman/DUP
$ mkdir -p /u01/dbfile/DUP
$ mkdir -p /u01/oraredo/DUP
$ mkdir -p /u01/arch/DUP - Copy the RMAN backup to the destination server. This exampl.nux/UNIX scp command to copy the backup pieces (initiated from the destination server):
$ scp oracle@shrek:/u01/rman/TRG/*.* /u01/rman/DUP Note If the RMAN backups are on tape instead of on disk, then the same media manager software must be installed/configured on the destination server. Also, that server must have direct access to the RMAN backups on tape. - On the destination server, ensure you have the same version of the Oracle binaries installed as you do on the originating database.
- On the destination server establish the OS variables, such as ORACLE_SID, ORACLE_HOME, and PATH. The ORACLE_SID variable is initially set to match what it was on the source database (TRG in this example). The destination database name will be changed as part of the last step in this list, to DUP. Here are the settings for ORACLE_SID and ORACLE_HOME on the destination server:
$ export ORACLE_SID=TRG
$ echo $ORACLE_SID
TRG
$ echo $ORACLE_HOME
/orahome/app/oracle/product/12.1.0.2/db_1 - Copy the init.ora file from the source server to the destination server, placing it in the ORACLE_HOME/dbs directory. Modify the init.ora file so that it matches the destination box in terms of any directory paths. Ensure that you change the parameters, such as the CONTROL_FILES, to reflect the new path directories on the destination server (/u01/dbfile/DUP, in this example). Initially, the name of the init.ora file on the destination server is initTRG.ora, and the name of the database is TRG. Both will be renamed in a later step. Here are the contents of the initTRG.ora file:
db_name='TRG'
control_files='/u01/dbfile/DUP/control01.ctl','/u01/dbfile/DUP/control02.ctl'
log_archive_dest_1='LOCATION=/u01/arch/DUP'
log_archive_format='DUP%t_%s_%r.arc'
db_block_size=8192
fast_start_mttr_target=500
job_queue_processes=10
memory_max_target=800M
memory_target=800M
open_cursors=100
processes=100
remote_login_passwordfile='EXCLUSIVE'
resource_limit=true
standby_file_management='auto'
undo_management='AUTO'
undo_tablespace='UNDOTBS1'
workarea_size_policy='AUTO' - You should now be able to start up the destination database in nomount mode:
$ rman target /
RMAN> startup nomount; - Next, restore the control file from the backup that was previously copied from the source database; for example:
RMAN> restore controlfile from
'/u01/rman/DUP/TRGctl_c-1251088236-20141228-00.bk';
The control file will be restored to all locations specified by the CONTROL_FILES initialization parameter in the destination init.ora file. Here is some sample output from the restore operation:
channel ORA_DISK_1: restoring control file
channel ORA_DISK_1: restore complete, elapsed time: 00:00:07
output file name=/u01/dbfile/DUP/control01.ctl
output file name=/u01/dbfile/DUP/control02.ctl
You may see an error like this:
RMAN-06172: no AUTOBACKUP found or specified handle ...In this situation, ensure that the path and backup piece names are correctly specified.
- You should now be able to start up your database in mount mode:
RMAN> alter database mount;At this point, your control files exist and have been opened, but none of the data files or online redo logs exist yet.
- Make sure the control file is aware of the location of the RMAN backups. First, use the CROSSCHECK command to let the control file know that none of the backups or archive redo logs are in the same location that they were in on the original server:
RMAN> crosscheck backup; # Crosscheck backups
RMAN> crosscheck copy;    Crosscheck image copies and archive logs
You’ll probably see output indicating that RMAN can’t validate that archive redo logs exist:
archived log file name=/u01/arch/TRG/TRG1_16_869840124.arc
RECID=765 STAMP=869842623
That’s the expected behavior because those archive redo logs do not exist on the destination server.
Next use the CATALOG command to make the control file aware of the location and names of the backup pieces that were copied to the destination server.
Note Don’t confuse the CATALOG command with the recovery catalog schema. The CATALOG command adds RMAN metadata to the control file, whereas the recovery catalog schema is a user, generally created in a separate database, which can be used to store RMAN metadata.In this example, any RMAN files that are in the /u01/rman/DUP directory will be cataloged in the control file:
RMAN> catalog start with '/u01/rman/DUP';Here is some sample output:
List of Files Unknown to the Database
=====================================
File Name: /u01/rman/DUP/TRGctl_c-1251088236-20141228-00.bk
File Name: /u01/rman/DUP/TRGrman1_b7pr9m9q_1_1.bk
File Name: /u01/rman/DUP/TRGrman2_b6pr9m82_1_1.bk
File Name: /u01/rman/DUP/TRGrman2_b4pr9m6k_1_1.bk
File Name: /u01/rman/DUP/TRGrman1_b2pr9m4c_1_1.bk
File Name: /u01/rman/DUP/TRGrman2_b3pr9m4c_1_1.bk
File Name: /u01/rman/DUP/TRGrman1_b5pr9m82_1_1.bk
Do you really want to catalog the above files (enter YES or NO)?
Now, type YES (if everything looks okay). You should then be able to use the RMAN LIST BACKUP command to view the newly cataloged backup pieces:
RMAN> list backup;You should see output indicating that RMAN is aware of the backups that were copied to the destination server. Here’s a small snippet of the output:
BP Key: 280   Status: AVAILABLE  Compressed: NO  Tag:
TAG20150108T203552
Piece Name: /u01/rman/DUP/TRGrman2_jkps7th9_1_1.bk - Rename and restore the data files to reflect new directory locations. If your destination server has the exact same directory structure as the original server directories, you can issue the RESTORE command directly:
RMAN> restore database;However, when restoring data files to locations that are different from the original directories, you’ll have to use the SET NEWNAME command. Create a file that uses an RMAN run{} block that contains the appropriate SET NEWNAME and RESTORE commands. I like to use a SQL script that generates SQL to give me a starting point. Here is a sample script:
set head off feed off verify off echo off pages 0 trimspool on
set lines 132 pagesize 0
spo newname.sql
--
select 'run{' from dual;
--
select
'set newname for datafile ' || file# || ' to ' || '''' || name || '''' || ';'
from v$datafile;
--
select
'restore database;' || chr(10) ||
'switch datafile all;' || chr(10) ||
'}'
from dual;
--
spo off;
Run the prior script from SQL*Plus as SYS. In this example, the prior code is placed in a file named gen.sql and executed as follows:
SQL> @gen.sqlAfter running the script, these are the contents of the newname.sql script that was generated:
run{
set newname for datafile 1 to '/u01/dbfile/TRG/system01.dbf';
set newname for datafile 2 to '/u01/dbfile/TRG/sysaux01.dbf';
set newname for datafile 3 to '/u01/dbfile/TRG/undotbs01.dbf';
set newname for datafile 4 to '/u01/dbfile/TRG/users01.dbf';
set newname for datafile 5 to '/u01/dbfile/TRG/repdata.dbf';
set newname for datafile 6 to '/u01/dbfile/TRG/repidx.dbf';
restore database;
switch datafile all;
}
Then, modify the contents of the newname.sql script to reflect the directories on the destination database server. Here is what the final newname.sql script looks like for this example:
run{
set newname for datafile 1 to '/u01/dbfile/DUP/system01.dbf';
set newname for datafile 2 to '/u01/dbfile/DUP/sysaux01.dbf';
set newname for datafile 3 to '/u01/dbfile/DUP/undotbs01.dbf';
set newname for datafile 4 to '/u01/dbfile/DUP/users01.dbf';
set newname for datafile 5 to '/u01/dbfile/DUP/repdata.dbf';
set newname for datafile 6 to '/u01/dbfile/DUP/repidx.dbf';
restore database;
switch datafile all;
}
Now, connect to RMAN and run the prior script to restore the data files to the new locations:
$ rman target /
RMAN> @newname.sql
Here’s a small sample of the output from the prior script:
executing command: SET NEWNAME
executing command: SET NEWNAME
...
channel ORA_DISK_1: restoring datafile 00001 to /u01/dbfile/DUP/system01.dbf
channel ORA_DISK_1: restoring datafile 00004 to /u01/dbfile/DUP/users01.dbf
...
input datafile copy RECID=16 STAMP=869854446 file
name=/u01/dbfile/DUP/repidx.dbf
RMAN> **end-of-file**
All the data files have been restored to the new database server. You can use the RMAN REPORT SCHEMA command to verify that the files have been restored and are in the correct locations:
RMAN> report schema;Here is some sample output:
RMAN-06139: WARNING: control file is not current for REPORT SCHEMA
Report of database schema for database with db_unique_name TRG
List of Permanent Datafiles
===========================
File Size(MB) Tablespace           RB segs Datafile Name
---- -------- -------------------- ------- ------------------------
1    500      SYSTEM               ***     /u01/dbfile/DUP/system01.dbf
2    500      SYSAUX               ***     /u01/dbfile/DUP/sysaux01.dbf
3    200      UNDOTBS1             ***     /u01/dbfile/DUP/undotbs01.dbf
4    10       USERS                ***     /u01/dbfile/DUP/users01.dbf
5    10       REPDATA              ***     /u01/dbfile/DUP/repdata.dbf
6    10       REPIDX               ***     /u01/dbfile/DUP/repidx.dbf
List of Temporary Files
=======================
File Size(MB) Tablespace           Maxsize(MB) Tempfile Name
---- -------- -------------------- ----------- --------------------
1    500      TEMP                 500         /u01/dbfile/TRG/temp01.dbf
From the prior output you can see that the database name and temporary tablespace data file still don’t reflect the destination database (DUP). These will be modified in subsequent steps.
- Next you need to apply any archive redo files that were generated during the backup. These should be included in the backup because the ARCHIVELOG ALL clause was used to create the backup. Initiate the application of redo files via the RECOVER DATABASE command:
RMAN> recover database;RMAN will restore and apply as many archive redo logs as it has in the backup pieces; it may throw an error when it reaches an archive redo log that doesn’t exist. For example:
RMAN-06054: media recovery requesting unknown archived log for...That error message is fine. The recovery process will restore and recover archive redo logs contained in the backups, which should be sufficient to open the database. The recovery process doesn’t know when to stop applying archive redo logs and therefore will continue to attempt to do so until it can’t find the next log. Having said that, now is a good time to verify that your data files are online and not in a fuzzy state:
SQL> select file#, status, fuzzy, error, checkpoint_change#,
to_char(checkpoint_time,'dd-mon-rrrr hh24:mi:ss') as checkpoint_time
from v$datafile_header;
Here is a small sample of the output:
     FILE# STATUS  FUZ ERROR      CHECKPOINT_CHANGE# CHECKPOINT_TIME
---------- ------- --- ---------- ------------------ ---------------------
         1 ONLINE  NO                     1.3790E+13 23-jan-2015 15:23:37
         2 ONLINE  NO                     1.3790E+13 23-jan-2015 15:23:37
...
If you do have a file with a fuzzy status of YES, this indicates more redo logs need to be applied to the data file (normally this should not happen in this scenario).
- Set the new location for the online redo logs. If your source and destination servers have the exact same directory structures, then you don’t need to set a new location for the online redo logs (so you can skip this step). However, if the directory structures are different, then you’ll need to update the control file to reflect the new directory for the online redo logs. I sometimes use an SQL script that generates SQL to assist with this step:
set head off feed off verify off echo off pages 0 trimspool on
set lines 132 pagesize 0
spo renlog.sql
select
'alter database rename file ' || chr(10)
|| '''' || member || '''' || ' to ' || chr(10) || '''' || member || '''' ||';'
from v$logfile;
spo off;
set feed on verify on echo on
For this example, assume the prior code was placed in a file named genredo.sql and run it as follows:
SQL> @genredo.sqlHere is a snippet of the renlog.sql file that was generated:
alter database rename file
'/u01/oraredo/TRG/redo01a.rdo' to
'/u01/oraredo/TRG/redo01a.rdo';

alter database rename file
'/u01/oraredo/TRG/redo02a.rdo' to
'/u01/oraredo/TRG/redo02a.rdo';
The contents of renlog.sql need to be modified to reflect the directory structure on the destination server. Here is what renlog.sql looks like after being edited:
alter database rename file
'/u01/oraredo/TRG/redo01a.rdo' to
'/u01/oraredo/DUP/redo01a.rdo';

alter database rename file
'/u01/oraredo/TRG/redo02a.rdo' to
'/u01/oraredo/DUP/redo02a.rdo';
Update the control file by running the renlog.sql script:
SQL> @renlog.sqlYou can select from V$LOGFILE to verify that the online redo log names are correct:
SQL> select member from v$logfile;Here is the output for this example:
/u01/oraredo/DUP/redo01a.rdo
/u01/oraredo/DUP/redo02a.rdo - You must open the database with the OPEN RESETLOGS clause (because there are no online redo logs, and they must be recreated at this point):
SQL> alter database open resetlogs;If successful, you should see this message:
Statement processed Note Keep in mind that all the passwords from the newly restored copy are as they were in the source database. You may want to change the passwords in a replicated database, especially if it was copied from production. - Add the temporary tablespace temp file. When you start your database, Oracle will automatically try to add any missing temp files to the database. Oracle won’t be able to do this if the directory structure on the destination server is different from that of the source server. In this scenario, you will have to add any missing temp files manually. To do this, first take offline the temporary tablespace temp file. The file definition from the originating database is taken offline like so:
SQL> alter database tempfile '/u01/dbfile/TRG/temp01.dbf' offline;
SQL> alter database tempfile '/u01/dbfile/TRG/temp01.dbf' drop;
Next, add a temporary tablespace file to the TEMP tablespace that matches the directory structure of the destination database server:
SQL> alter tablespace temp add tempfile '/u01/dbfile/DUP/temp01.dbf'
     size 100m;
You can run the REPORT SCHEMA command to verify that all files are in the correct locations.
- Rename the database (optional). If you need to rename the database to reflect the name for a development or test database, create a trace file that contains the CREATE CONTROLFILE statement and use it to rename your database. For details on how to rename a database, see the next section “Renaming a Database.”
![]() Tip If you don’t rename the database, be careful about connect and resync operations to the same recovery catalog used by the original/source database. This causes confusion in the recovery catalog as to which is the real source database, which may jeopardize your ability to recover and restore the real source database.
Tip If you don’t rename the database, be careful about connect and resync operations to the same recovery catalog used by the original/source database. This causes confusion in the recovery catalog as to which is the real source database, which may jeopardize your ability to recover and restore the real source database.
Also keep in mind that other steps may be required for your environment depending on your standards. For example, you might want to ensure the database SID is listed in the oratab file, or you might require the use of an SPFILE, enabling a password file, changing passwords, taking a backup, adding entries into Oracle Net files, and so on.
This section shows you how to rename a database. If you’re working with a critical database, make sure you have a good backup of the data files, control files, and any relevant archive redo logs before you change the name.
Two different ways of renaming your database are described next. The first renaming method walks you through the manual steps. The second technique describes renaming a database with the Oracle NID utility. If you need to assign a new DBID to the renamed database, then you should use the NID utility.
Manual
In this example, the database is renamed from TRG to DUP. The steps for manually renaming your database are as follows:
- Generate a trace file that contains the SQL command to recreate the control files:
SQL> alter database backup controlfile to trace as '/tmp/cf.sql' resetlogs; - Shut down the database:
SQL> shutdown immediate; - Modify the /tmp/cf.sql trace file; be sure to specify SET DATABASE "<NEW DATABASE NAME>" in the top line of the output:
CREATE CONTROLFILE REUSE SET DATABASE "DUP" RESETLOGS ARCHIVELOG
    MAXLOGFILES 16
    MAXLOGMEMBERS 4
    MAXDATAFILES 1024
    MAXINSTANCES 1
    MAXLOGHISTORY 876
LOGFILE
  GROUP 1 '/u01/oraredo/DUP/redo01a.rdo' SIZE 50M BLOCKSIZE 512,
  GROUP 2 '/u01/oraredo/DUP/redo02a.rdo' SIZE 50M BLOCKSIZE 512
DATAFILE
  '/u01/dbfile/DUP/system01.dbf',
  '/u01/dbfile/DUP/sysaux01.dbf',
  '/u01/dbfile/DUP/undotbs01.dbf',
  '/u01/dbfile/DUP/users01.dbf',
  '/u01/dbfile/DUP/repdata.dbf',
  '/u01/dbfile/DUP/repidx.dbf'
CHARACTER SET AL32UTF8;
If you don’t specify SET DATABASE in the top line of this script, when you run the script (as shown later in this example) you’ll receive an error such as this:
ORA-01161: database name ... in file header does not match... - Create an init.ora file that matches the new database name:
$ cd $ORACLE_HOME/dbs
$ cp init<old_sid>.ora init<new_sid>.ora
In this example, the prior line of code looks like this:
$ cp initTRG.ora initDUP.ora - Modify the DB_NAME variable within the new initDUP.ora file (in this example, it’s set to DUP):
db_name='DUP' - If the instance with the old SID is still running, then shut it down (TRG in this example):
SQL> shutdown immediate; - Set the ORACLE_SID OS variable to reflect the new SID name (in this example, it’s set to DUP):
$ export ORACLE_SID=DUP
$ echo $ORACLE_SID
DUP - Start up the instance in nomount mode:
$ sqlplus / as sysdba
SQL> startup nomount; - Run the trace file to recreate the control file:
SQL> @/tmp/cf.sqlIf successful you should see:
Control file created. Note In this example, the control files already exist in the location specified by the CONTROL_FILES initialization parameter; therefore, the REUSE parameter is used in the CREATE CONTROL FILE statement. - Open the database with OPEN RESETLOGS:
SQL> alter database open resetlogs;If successful you should see:
Database altered. - As a last step, ensure that your temporary tablespace exists:
SQL> ALTER TABLESPACE TEMP ADD TEMPFILE '/u01/dbfile/DUP/temp01.dbf'
     SIZE 104857600  REUSE AUTOEXTEND OFF;
You now have a database that is a copy of the original database. All the data files, control files, archive redo logs, and online redo logs are in the new locations, and the database has a new name. Now would be a good time to take a backup of the newly renamed database, recreate the password file (if using), and modify service name values in Oracle Net files.
If you need to assign the database a new DBID, then you can use a utility such as NID to accomplish this.
NID
This section describes using the NID utility to rename a database. This procedure will rename the database and assign it a new DBID.
- First start the database in mount mode:
$ sqlplus / as sysdba
SQL> startup mount; - Now, from the operating system command line run the NID utility. This renames the database from DUP to DUP_NEW. You have to modify this as appropriate for the database names and passwords in your environment:
$ nid target=sys/foo dbname=DUP_NEWIn the output you should see a line similar to this:
Change database ID and database name DUP to DUP_NEW? (Y/[N]) =>Respond with Y if you wish to proceed. Here’s a sample of the output for this example:
Proceeding with operation
Changing database ID from 1251088236 to 1191846239
Changing database name from DUP to DUP_NEW
    Control File /u01/dbfile/DUP/control01.ctl - modified
    Control File /u01/dbfile/DUP/control02.ctl - modified
    Datafile /u01/dbfile/DUP/system01.db - dbid changed, wrote new name
...
All previous backups and archived redo logs for this database are unusable.
Database has been shut down, open database with RESETLOGS option.
Successfully changed database name and ID.
DBNEWID - Completed successfully.
Next create an initialization file that corresponds to the new database name:
$ cd $ORACLE_HOME/dbs
$ cp initDUP.ora initDUP_NEW.ora - Modify the DB_NAME parameter in the initDUP_NEW.ora to reflect the new database name:
db_name=DUP_NEW - Set ORACLE_SID to reflect the new database name:
$ export ORACLE_SID=DUP_NEW - Mount the database:
$ sqlplus / as sysdba
SQL> startup mount; - Open the database with the OPEN RESETLOGS clause:
SQL> alter database open resetlogs;
You can verify that the database has the new DBID assigned to it using the following:
SQL> select dbid from v$database;

      DBID
----------
1191846239
Now would be a good time to take a backup of the newly renamed database, recreate the password file (if using), and modify service name values in Oracle Net files.
![]() Tip See MOS note 863800.1 for more details regarding NID. You can leverage NID to only change the DBID (and not the database name), or you can use NID to change only change the database name (and not the DBID).
Tip See MOS note 863800.1 for more details regarding NID. You can leverage NID to only change the DBID (and not the database name), or you can use NID to change only change the database name (and not the DBID).
Replicating with Data Pump Across a Network Link
Data Pump is a powerful and flexible tool for moving data from one environment to another. This utility has significant advantages over other data replication methods, especially in the following situations:
- You need the ability to replicate at the table, tablespace, schema, or database level of granularity. For example, with Data Pump it’s simple to copy a schema and all its objects, with or without the data, from one database to another. Furthermore, you can also filter and transform the data during the replication.
- You need cross-platform replication. Any combination of cross-platform replication is possible. For instance, you can move data seamlessly between any two operating systems (Linux, Solaris, Windows, and so on) where Oracle is installed.
- You need to export data and import it into a database with the same version, or to any higher version. Some shops use this as a database upgrade mechanism.
A real-world example will help illustrate the utility. Suppose you have two database environments—a production database running on a Solaris box and a test database running on a Linux server. Your manager comes to you with these instructions:
- Make a copy of the production database on the Solaris box and import the copy into the test database on the Linux server.
- Change the names of the schemas when importing to reflect naming standards in the test environment.
First consider the steps required to transfer data from one database to another when using the old exp/imp utilities. The steps would look something like this:
- Export the production database (which creates a dump file on the database server).
- Copy the dump file to the testing database server.
- Import the dump file into the testing database.
You can perform those same steps using Data Pump. However, Data Pump provides a much more efficient and transparent method for executing those steps. If you have direct network connectivity between the source and destination database servers, you can import directly into the destination database over the network without having to create and/or copy any dump files. Furthermore, you can rename schemas on the fly as you perform the import. Additionally, it doesn’t matter if the source database is running on a different operating system than that of the destination database. Figure 2-3 illustrates the environment and required steps.

Figure 2-3. Data Pump export and import across a network link
For this example, in the source database there’s a schema named STAR. You want to move this user into the destination database and rename it to STAR_JUL. Also assume that the tablespace names are the same in both the source and the destination databases.
Notice that all of the following steps are performed on the destination server. No steps are required on the source server.
- In the destination database, create a user to be imported into. Here is a sample script that creates the user:
define star_user=star_jul
define star_user_pwd=star_jul_pwd
--
create user &&star_user identified by &&star_user_pwd;
grant create session, create table, create procedure to &&star_user; - In the destination database, create a database link that points to the source database. The remote user (in the source database) referenced in the CREATE DATABASE LINK statement must have a privileged role granted to it in the source database (this minimally needs to be the DATAPUMP_EXP_FULL_DATABASE role). Log into SQL as the user that you’ll use later to import the data. You want to ensure that the database link is created with the same schema used when importing. In this example, AUXDBA is the user in the destination database:
$ sqlplus auxdba/auxfooHere is a sample CREATE DATABASE LINK script:
SQL> create database link trg
connect to trgdba identified by trgfoo
using 'shrek:1521/TRG'; - In the destination database, create a directory object that points to the location where you want your log file to go. You’ll have to modify this to match a directory in your environment:
SQL> create or replace directory dpdir as '/orahome/oracle/dpdir';With the prior directory object, if you’re not using a privileged user (e.g., a user that has been granted the DBA role) you may need to additionally grant READ and WRITE privileges on the directory to the user. For instance:
SQL> grant read, write on directory dpdir to auxdba; - Run the import command on the destination box. This command references the remote database via the NETWORK_LINK parameter. This command also instructs Data Pump to map the target database schema to the newly created user in the destination database:
$ impdp auxdba/auxfoo directory=dpdir network_link=trg
schemas='STAR' remap_schema=STAR:STAR_JUL
This technique allows you to move large amounts of data between disparate databases without having to create or copy any dump files or data files. You can also rename schemas on the fly via the REMAP_SCHEMA parameter. If the tablespace names weren’t the same on both the source and destination, you can use the REMAP_TABLESPACE parameter to have tables placed in different tablespaces in the destination database. This is a very powerful Data Pump feature that lets you efficiently transfer data between disparate databases.
![]() Tip For a complete description of Data Pump’s features, see Pro Oracle Database 12c Administration available from Apress.
Tip For a complete description of Data Pump’s features, see Pro Oracle Database 12c Administration available from Apress.
Replicating with Data Pump Transportable Tablespaces
Oracle provides a mechanism for copying data files from one database to another in conjunction with using Data Pump to transport the associated metadata. This is known as the transportable tablespace feature. The amount of time this task requires is directly proportional to the time it takes to copy the data files to the destination server. In this scenario both the source and destination servers have the same operating system platform. Figure 2-4 shows the systems and the steps required to transport tablespaces for this scenario.
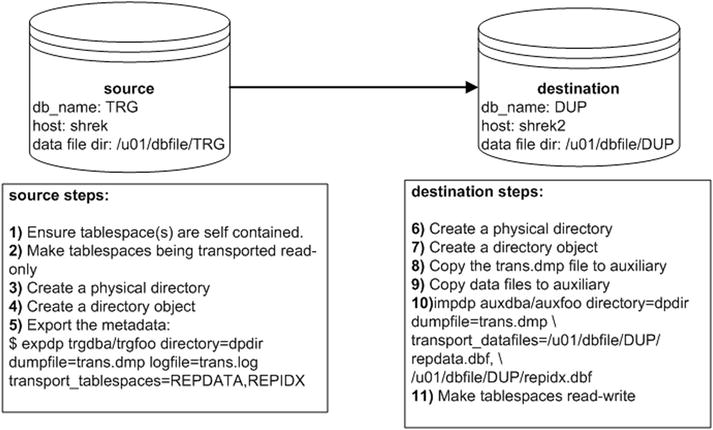
Figure 2-4. Using Data Pump with transportable tablespaces
The steps depicted in Figure 2-4 are described in detail next.
- First ensure that the tablespaces being transported are self-contained. These are some common violations of the self-contained rule:
- An index in one tablespace can’t point to a table in another tablespace that isn’t in the set of tablespaces being transported.
- A foreign-key constraint is defined on a table in a tablespace that references a primary-key constraint on a table in a tablespace that isn’t in the set of tablespaces being transported.
Run the following check on the source database to see if the set of tablespaces being transported violates any of the self-contained rules:
SQL> exec dbms_tts.transport_set_check('REPDATA,REPIDX', TRUE);Now, see if Oracle detected any violations:
SQL> select * from transport_set_violations;If you don’t have any violations, you should see this:
no rows selectedIf you do have violations, such as an index that is built on a table that exists in a tablespace not being transported, then you’ll have to rebuild the index in a tablespace that is being transported. Be aware that detecting and resolving violations can lead to other tablespaces being required to be added in the transportable set. This can turn into a much bigger task than one might initially anticipate.
- Make the tablespaces being transported read-only. In this example the tablespaces REPDATA and REPIDX are going to be transported:
SQL> alter tablespace repdata read only;
SQL> alter tablespace repidx read only; - Create a physical directory on disk:
$ mkdir /orahome/oracle/dpdir - Create a directory object that points to a directory that exists on disk:
SQL> create directory dpdir as '/orahome/oracle/dpdir'; - Use Data Pump export on the target server to extract the metadata for the tablespaces being transported (in this example, REPDATA and REPIDX). When exporting, use a user that has been assigned the DBA role:
$ expdp trgdba/trgfoo directory=dpdir
dumpfile=trans.dmp logfile=trans.log
transport_tablespaces=REPDATA,REPIDX - On the destination server, create a directory to hold the Data Pump export file (created in a previous step):
$ mkdir /orahome/oracle/dpdir - On the destination server, create a directory object that points to the physical exist directory.
SQL> create directory dpdir as '/orahome/oracle/dpdir'; - Copy the Data Pump export dump file from the source server to the destination server. The following line of code uses the Linux/UNIX scp command to copy the dump file. This is initiated from the destination server:
$ scp oracle@shrek:/orahome/oracle/dpdir/trans.dmp /orahome/oracle/dpdir - Copy the data file(s) from the source server to the destination server. Place the files in the directory where you want them on the destination database server. The following line of code uses the Linux/UNIX scp command to copy the data files. This is initiated from the destination server:
$ scp oracle@shrek:/u01/dbfile/TRG/rep*.dbf /u01/dbfile/DUP - On the destination server, import the metadata into the destination database. Use the following parameter file to import the metadata for the data files being transported. When importing, use a user that has been assigned the DBA role:
$ impdp auxdba/auxfoo directory=dpdir dumpfile=trans.dmp
transport_datafiles=/u01/dbfile/DUP/repdata.dbf,
/u01/dbfile/DUP/repidx.dbf
Additionally, ensure that the owner(s) of any tables or indexes within the tablespaces being transported exist(s) in the destination database. If the owning schema doesn’t exist in the destination database, you’ll receive this error:
ORA-29342: user ... does not exist in the databaseIf everything goes well, you should see some output indicating success:
job "AUXDBA"."SYS_IMPORT_TRANSPORTABLE_01" successfully completed ... - As a final step, you may want to change the tablespaces back to read-write. Depending on your requirements, you may want to perform this on both the destination and the source databases:
SQL> alter tablespace repdata read write;
SQL> alter tablespace repidx read write;
If the data files that are being transported have a block size different from that of the destination database, then you must modify your initialization file (or use an ALTER SYSTEM command) and add a buffer pool that contains the block size of the source database. For example, to add a 16KB buffer cache, place this in the initialization file:
db_16k_cache_size=200M
You can check a tablespace’s block size via this query:
SQL> select tablespace_name, block_size from dba_tablespaces;
The transportable tablespace mechanism allows you to quickly move data files between databases. It’s an appropriate method for moving data in data warehouse–type environments where you might have a staging database that periodically needs data transferred to a reporting database.
![]() Note To export transportable tablespaces, you must use Oracle Enterprise Edition. You can use other editions of Oracle to import transportable tablespaces.
Note To export transportable tablespaces, you must use Oracle Enterprise Edition. You can use other editions of Oracle to import transportable tablespaces.
RMAN Replication Using Transportable Tablespaces
You can use RMAN in conjunction with transportable tablespaces to copy data files from one database to a different database. In RMAN terminology the source database is referred to as the target and the destination database is referred to as the auxiliary. The target server can have the same operating system as the auxiliary server, or the target server can have a different operating system than the auxiliary server.
When the operating system is the same, you can issue the RMAN TRANSPORT TABLESPACE command to generate the tablespace metadata dump file. In this mode, the advantage to using RMAN is that you can keep the live data files online during the procedure (meaning you don’t have to place the tablespaces in read-only mode like Data Pump requires when transporting tablespaces).
When the operating systems are different (such as different endian formats), you’ll have to use the RMAN CONVERT command to create data files that can be used by a database running on a different operating system with a different endian format. In this mode, the tablespaces must be in read-only mode while the RMAN command is running.
Scenarios for transporting between two servers that have the same operating system and between two that have different operating systems are covered in the following sections.
Same Operating System
Using RMAN to transport tablespaces between servers that have the same operating system platform is fairly straightforward. As mentioned previously, in this configuration you can transport data files while the tablespaces are online. RMAN achieves this high availability by utilizing RMAN backups and archive logs while creating the transportable tablespace dump files. This means you must have a valid RMAN backup of the target database. If you don’t have a backup, when you attempt to run the TRANSPORT TABLESPACE command you’ll receive this error:
RMAN-06024: no backup or copy of the control file found to restore
The target database must be in archivelog mode also, if you attempt to run TRANSPORT TABLESPACE on a noarchivelog mode database you’ll receive the following error:
RMAN-05004: target database log mode is NOARCHIVELOG
Figure 2-5 illustrates the basic steps involved when using RMAN to transport tablespaces from one server and database to another when the servers are of the same operating system.
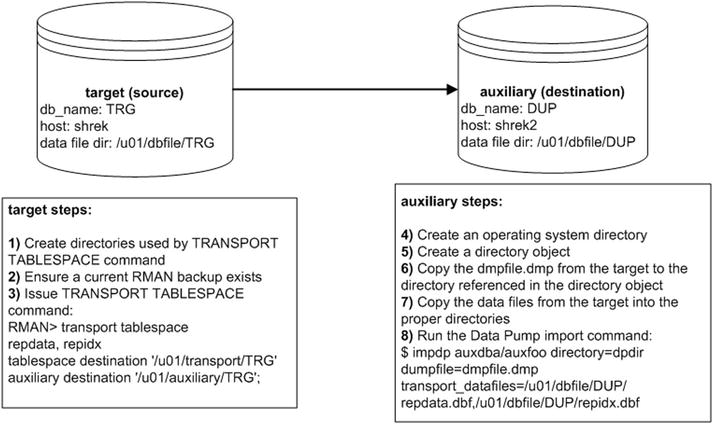
Figure 2-5. RMAN and transportable tablespaces (same platforms)
The steps shown in Figure 2-5 are described in detail next.
- On the target server, create two directories, one for the transport files that RMAN will generate and one for the auxiliary files that RMAN will generate (in a future step). You’ll have to modify this as appropriate for your environment:
$ mkdir -p /u01/transport/TRG
$ mkdir -p /u01/auxiliary/TRG - Ensure you have a current backup of the target database:
$ rman target /
RMAN> list backup; - While connected via RMAN to the target database, issue the TRANSPORT TABLESPACE command for the tablespaces you wish to transport (REPDATA and REPIDX in this example):
$ rman target /
RMAN> transport tablespace repdata, repidx
tablespace destination '/u01/transport/TRG'
auxiliary destination '/u01/auxiliary/TRG';
In the prior command, the tablespace destination is where RMAN will place files that can be used to transport the tablespaces. The auxiliary destination is used by RMAN to create files associated with a temporary auxiliary database that is used to generate the transportable tablespace files. This temporary auxiliary database will be dropped after the transportable tablespace files have been generated and placed in the transport directory. Don’t confuse this temporary auxiliary database with the auxiliary database that you’ll be transporting the tablespaces to.
- On the auxiliary server, from the operating system create an operating system directory:
$ mkdir /orahome/oracle/dpdirThis is the directory in which you’re going to place the dmpfile.dmp (from the target). If you’ve worked through examples in previous sections in this book, this directory may already exist, and that’s fine.
- On the auxiliary server, create a directory object that points to the physical operating system directory created in the prior set:
SQL> create directory dpdir as '/orahome/oracle/dpdir';If you’ve worked through previous examples in this book, then this directory object may already exist, and that’s fine. Just make sure the directory object DPDIR points to the /orahome/oracle/dpdir directory.
- Copy the dmpfile.dmp from the target server to the auxiliary server. This example uses the Linux/UNIX scp command initiated from the auxiliary server:
$ scp oracle@shrek:/u01/transport/TRG/dmpfile.dmp /orahome/oracle/dpdir
- Copy the database files from the target server to the auxiliary server. This example uses the Linux/UNIX scp command initiated from the auxiliary server:
$ scp oracle@shrek:/u01/transport/TRG/repdata.dbf  /u01/dbfile/DUP
$ scp oracle@shrek:/u01/transport/TRG/repidx.dbf /u01/dbfile/DUP - On the auxiliary server, run the Data Pump import command to import the metadata for the transported tablespaces:
$ impdp auxdba/auxfoo directory=dpdir dumpfile=dmpfile.dmp
transport_datafiles=/u01/dbfile/DUP/repdata.dbf,/u01/dbfile/DUP/repidx.dbf
When finished, you should have the tablespaces transported into the auxiliary (destination) database.
Cross-Platform Replication
In some scenarios you can use RMAN commands such as DUPLICATE, RESTORE, and RECOVER when the target server uses a different operating system than the auxiliary server. RMAN supports these operations only for the following operating system combinations that have the same endian format:
- To and from Solaris x86-64 and Linux x86-64
- To and from HP-PA and HP-IA
- To and from Windows 64-bit (IA or Itanium) and Windows 64-bit (AMD or x86-64)
- To and from Linux and Windows
Additionally, these types of operations are only supported when the Oracle version in use is the same on both the target and auxiliary databases. Also, the two environments must be at the same patch level.
![]() Tip See MOS note 1079563.1 for details on operations allowed when different platforms are in use for the target and auxiliary servers.
Tip See MOS note 1079563.1 for details on operations allowed when different platforms are in use for the target and auxiliary servers.
If an operating system combination is not listed in the prior bulleted list then you must use other supported migration procedures, such as transportable tablespace, transportable database, or Data Pump export/import. See the sections in this chapter “Different Operating System (Convert Tablespace)” and “Different Operating System (Convert Data File)” for examples of using RMAN to transport a tablespace (and associated data files) between operating systems with different endian formats.
Different Operating System (Convert Tablespace)
When transporting between different operating systems that have different endian formats, the CONVERT TABLESPACE command facilitates the converting of the data files from the source operating system platform to the destination platform. After the data files have been converted, they can be copied to a host of different operating systems with the different endian format.
I recently worked on a project moving a database from a Solaris SPARC 64-bit server to a Linux x-86 64-bit host. The steps involved in using CONVERT TABLESPACE to convert the data files are depicted in Figure 2-6.
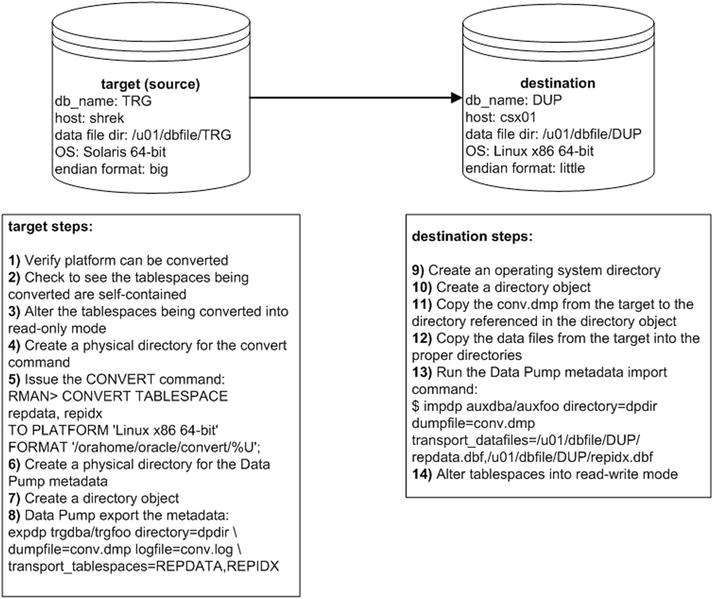
Figure 2-6. RMAN and transportable tablespaces (different platforms)
Details of the steps shown in Figure 2-6 follow next.
- On the target database, confirm the platforms that tablespaces can be converted to via the following SQL:
SQL> SELECT platform_id, platform_name, endian_format
FROM V$TRANSPORTABLE_PLATFORM
WHERE UPPER(platform_name) LIKE 'LINUX%';
Here is some sample output:
PLATFORM_ID PLATFORM_NAME                  ENDIAN_FORMAT
----------- ------------------------------ --------------------
         10 Linux IA (32-bit)              Little
         11 Linux IA (64-bit)              Little
         13 Linux x86 64-bit               Little
In this case, the target server can convert data files to be used on the destination Linux x86 64-bit box with the little endian format.
- On the target database, run the following check to see if the set of tablespaces being transported violates any of the self-contained rules:
SQL> exec dbms_tts.transport_set_check('REPDATA,REPIDX', TRUE);Now, see if Oracle detected any violations:
SQL> select * from transport_set_violations;If you don’t have any violations, you should see this:
no rows selectedIf you do have violations, such as an index that is built on a table that exists in a tablespace not being transported, then you’ll have to rebuild the index in a tablespace that is being transported. If you need more details on the DBMS_TTS.TRANSPORT_SET_CHECK procedure, refer to the Oracle Database PL/SQL Package and Types Reference guide available on Oracle’s technology network website.
- Place the target tablespaces in read-only mode:
SQL> alter tablespace repdata read only;
SQL> alter tablespace repidx read only; - Create a directory on the target server to hold the data files that will be converted. You’ll have to modify this as appropriate for your environment:
$ mkdir /orahome/oracle/convert - Connect to the target database and run the CONVERT TABLESPACE command:
$ rman target /
RMAN> CONVERT TABLESPACE repdata, repidx
TO PLATFORM 'Linux x86 64-bit'
FORMAT '/orahome/oracle/convert/%U';
You should now have the converted data files in the specified directory:
$ ls /orahome/oracle/convertHere is some sample output:
data_D-TRG_I-1251088236_TS-REPDATA_FNO-5_brprfa57
data_D-TRG_I-1251088236_TS-REPIDX_FNO-6_bsprfa57 - On the target server, create a physical directory on disk:
$ mkdir /orahome/oracle/dpdir - On the target database create a directory object that points to a directory that exists on disk:
SQL> create directory dpdir as '/orahome/oracle/dpdir'; - Use Data Pump export on the target server to export the metadata for the tablespaces being transported:
$ expdp trgdba/trgfoo directory=dpdir
dumpfile=conv.dmp logfile=conv.log
transport_tablespaces=REPDATA,REPIDX - Now, on the destination server create a directory to contain files that will be copied to it:
$ mkdir /orahome/oracle/dpdir - Create a directory object to point to the physical directory created in the prior step:
SQL> create directory dpdir as '/orahome/oracle/dpdir'; - Copy the Data Pump export dump file from the target server to the destination server. The following line of code uses the Linux/UNIX scp command to copy the dump file. This is initiated from the destination server:
$ scp oracle@shrek:/orahome/oracle/dpdir/conv.dmp /orahome/oracle/dpdir - Copy the data file(s) from the target server to the destination server. Place the files in the directory where you want them in the destination database server. The following line of code uses the Linux/UNIX scp command to copy the data files. This is initiated from the destination server:
$ scp oracle@shrek:/orahome/oracle/convert/data_D-TRG_I-1251088236_TS-REPDATA_FNO-5_brprfa57 /u01/dbfile/DUP/repdata.dbf

$ scp oracle@shrek:/orahome/oracle/convert/data_D-TRG_I-1251088236_TS-REPIDX_FNO-6_bsprfa57 /u01/dbfile/DUP/repidx.dbf - On the destination server, import the metadata into the destination database:
$ impdp auxdba/auxfoo directory=dpdir dumpfile=conv.dmp
transport_datafiles=/u01/dbfile/DUP/repdata.dbf,/u01/dbfile/DUP/repidx.dbf
You should now have the converted tablespaces (and associated data files) in the destination database.
- As a final step, you may want to change the tablespaces back to read-write:
SQL> alter tablespace repdata read write;
SQL> alter tablespace repidx read write;
Different Operating System (Convert DataFile)
You can also transport data across platforms with different endian formats using the RMAN CONVERT DATAFILE command. This example performs a conversion between Solaris 64-bit with big endian format to a Linux server with little endian format, with the conversion taking place on the destination server. The environment used and steps required are shown in Figure 2-7.
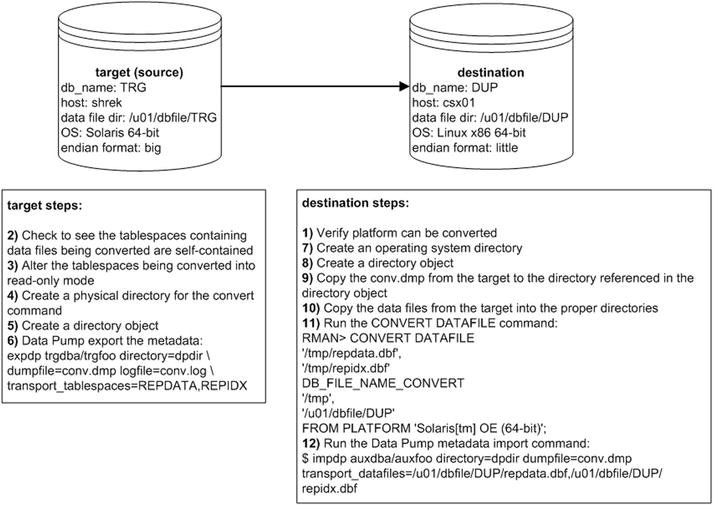
Figure 2-7. Converting data files between operating systems with different endian formats
Details of the steps shown in Figure 2-7 follow next.
- On the destination database (on the Linux server, in this example), confirm the platform can be converted from via the following SQL:
SQL> SELECT platform_id, platform_name, endian_format
FROM V$TRANSPORTABLE_PLATFORM
WHERE UPPER(platform_name) LIKE 'SOLARIS%';
Here is some sample output:
PLATFORM_ID PLATFORM_NAME                            ENDIAN_FORMAT
----------- ---------------------------------------- --------------
          1 Solaris[tm] OE (32-bit)                  Big
          2 Solaris[tm] OE (64-bit)                  Big
         17 Solaris Operating System (x86)           Little
         20 Solaris Operating System (x86-64)        Little
In this case, the destination (Linux) server is capable of converting data files from a Solaris box with the big endian format.
- On the source database (Solaris, in this example), run the following check to see if the set of tablespaces being transported violates any of the self-contained rules:
SQL> exec dbms_tts.transport_set_check('REPDATA,REPIDX', TRUE);Now, see if Oracle detected any violations:
SQL> select * from transport_set_violations;If you don’t have any violations, you should see this:
no rows selectedIf you do have violations, such as an index that is built on a table that exists in a tablespace not being transported, then you’ll have to rebuild the index in a tablespace that is being transported.
- Place the source tablespaces in read-only mode:
SQL> alter tablespace repdata read only;
SQL> alter tablespace repidx read only; - On the source server, create a physical directory on disk:
$ mkdir /orahome/oracle/dpdir - On the source database, create a directory object that points to a directory that exists on disk:
SQL> create directory dpdir as '/orahome/oracle/dpdir'; - Use Data Pump on the target server to export the metadata for the tablespaces being transported:
$ expdp trgdba/trgfoo directory=dpdir
dumpfile=conv.dmp logfile=conv.log
transport_tablespaces=REPDATA,REPIDX - On the destination Linux server, create a directory to place the dump file in:
$ mkdir /orahome/oracle/dpdir - On the destination Linux server, create a directory object that points to the directory holding the Data Pump metadata:
SQL> create directory dpdir as '/orahome/oracle/dpdir'; - Copy the conv.dmp from the target server to the destination server. This example uses the Linux/UNIX scp command initiated from the destination server:
$ scp oracle@shrek:/orahome/oracle/dpdir/conv.dmp /orahome/oracle/dpdir - Copy the database files from the source server to the destination server. This example uses the Linux/UNIX scp command initiated from the destination server:
$ scp oracle@shrek:/u01/dbfile/TRG/repdata.dbf /tmp
$ scp oracle@shrek:/u01/dbfile/TRG/repidx.dbf /tmp - On the destination Linux server, connect to RMAN and run the CONVERT DATAFILE command:
$ rman target /
RMAN> CONVERT DATAFILE
'/tmp/repdata.dbf',
'/tmp/repidx.dbf'
DB_FILE_NAME_CONVERT
'/tmp',
'/u01/dbfile/DUP'
FROM PLATFORM 'Solaris[tm] OE (64-bit)'; - Next, run Data Pump import so as to import the metadata associated with the data files being transported:
$ impdp auxdba/auxfoo directory=dpdir dumpfile=conv.dmp
transport_datafiles=/u01/dbfile/DUP/repdata.dbf,
/u01/dbfile/DUP/repidx.dbf
This imports into the destination database the metadata for the tablespaces (and associated data files) being converted. You can verify the data files exist in the data dictionary via:
SQL> select name from v$datafile where name like '%rep%';

NAME
----------------------------------------------------
/u01/dbfile/DUP/repdata.dbf
/u01/dbfile/DUP/repidx.dbf
You may want to place the newly converted tablespaces into read-write mode at this point:
SQL> alter tablespace repdata read write;
SQL> alter tablespace repidx read write;
Moving Data with External Tables
External tables are primary used to load data from csv files into the database. External tables can also be used to select data from a regular database table and create a binary dump file. The dump file is platform independent and can be used to move large amounts of data between servers of different platforms and different endian formats.
You can also encrypt or compress data, or both, when creating the dump file. Doing so provides you with an efficient and secure way of transporting data between database servers.
Figure 2-8 illustrates the components involved in using an external table to unload and load data. On the target (source) database, create a dump file using an external table that selects data from a table named INV. After it’s created, copy the dump file to the auxiliary (destination) server and subsequently load the file into the database using an external table.
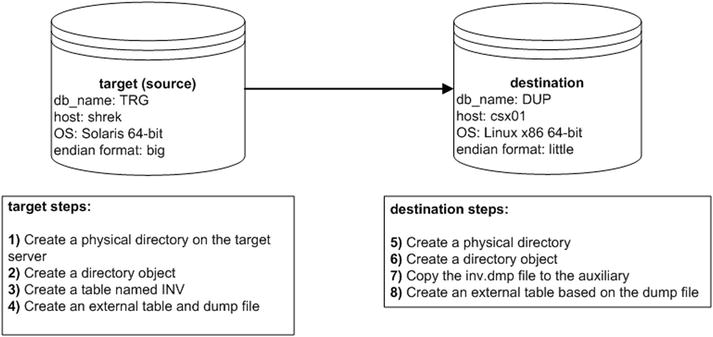
Figure 2-8. Using external tables to unload and load data
A small example illustrates the technique of using an external table to unload data. Here are the steps required:
- Create a physical directory on the target server:
$ mkdir /orahome/oracle/dpdir - Create a directory object that points to the physical directory:
SQL> create directory dpdir as '/orahome/oracle/dpdir'; - Create a table named INV and insert some data:
SQL> CREATE TABLE inv
(inv_id NUMBER,
 inv_desc VARCHAR2(30));
SQL> insert into inv values (1, 'test data'),
SQL> commit; - Use the CREATE TABLE...ORGANIZATION EXTERNAL...AS SELECT statement to unload data from the database into the dump file. Use the ORACLE_DATAPUMP access driver of the CREATE TABLE...ORGANIZATION EXTERNAL statement. This example unloads the INV table’s contents into the inv.dmp file:
CREATE TABLE inv_et
ORGANIZATION EXTERNAL (
  TYPE ORACLE_DATAPUMP
  DEFAULT DIRECTORY dpdir
  LOCATION ('inv.dmp')
)
AS SELECT * FROM inv;
The previous command creates two things:
- An external table named INV_ET based on the structure and data within the INV table
- A platform-independent dump file named inv.dmp
- Now, on the destination server create a physical directory:
$ mkdir /orahome/oracle/dpdir - On the destination database, create a directory object that references the physical directory:
SQL> create directory dpdir as '/orahome/oracle/dpdir'; - Now, you can copy the inv.dmp file to a separate database server and base an external table on this dump file. The following example uses the Linux/UNIX scp command to copy the file. This command is initiated from the destination server:
$ scp oracle@shrek:/orahome/oracle/dpdir/inv.dmp /orahome/oracle/dpdir
The remote server (to which you copy the dump file) can be a platform different from that of the server on which you created the file. For example, you can create a dump file on a Windows box, copy to a Linux/UNIX server, and select from the dump file via an external table.
- On the destination database, create an external table that points at the dump file. In this example the external table is named INV_DW:
SQL> CREATE TABLE inv_dw
(inv_id number
,inv_desc varchar2(30))
ORGANIZATION EXTERNAL (
  TYPE ORACLE_DATAPUMP
  DEFAULT DIRECTORY dpdir
  LOCATION ('inv.dmp'));
After it’s created, you can access the external table data from SQL*Plus:
SQL> select * from inv_dw;
    INV_ID INV_DESC
---------- ------------------------------
         1 test data
You can also create and load data into regular tables using the dump file:
SQL> create table inv as select * from inv_dw;
This provides a simple and efficient mechanism for transporting data from one platform to another.
![]() Tip For complete details on external tables, see Expert Oracle Database Architecture, available from Apress.
Tip For complete details on external tables, see Expert Oracle Database Architecture, available from Apress.
Enabling Parallelism
To maximize the unload performance when you create a dump file via an external table, use the PARALLEL clause. This example creates two dump files in parallel:
CREATE TABLE inv_et
ORGANIZATION EXTERNAL (
  TYPE ORACLE_DATAPUMP
  DEFAULT DIRECTORY dpdir
  LOCATION ('inv1.dmp','inv2.dmp')
)
PARALLEL 2
AS SELECT * FROM inv;
To access the data in the dump files, create a different external table that references the two dump files:
CREATE TABLE inv_dw
(inv_id number
,inv_desc varchar2(30))
ORGANIZATION EXTERNAL (
  TYPE ORACLE_DATAPUMP
  DEFAULT DIRECTORY dpdir
  LOCATION ('inv1.dmp','inv2.dmp'));
You can now use this external table to select data from the dump files:
SQL> select * from inv_dw;
Enabling Compression
You can create a compressed dump file via an external table. For example, use the COMPRESS option of the ACCESS PARAMETERS clause:
CREATE TABLE inv_et
ORGANIZATION EXTERNAL (
  TYPE ORACLE_DATAPUMP
  DEFAULT DIRECTORY dpdir
  ACCESS PARAMETERS (COMPRESSION ENABLED BASIC)
  LOCATION ('inv.dmp')
)
AS SELECT * FROM inv;
In Oracle 12c there are four levels of compression: BASIC, LOW, MEDIUM, and HIGH. Before using compression, ensure that the COMPATIBLE initialization parameter is set to 12.0.0 or higher. The LOW, MEDIUM, and HIGH levels of compression require Oracle Enterprise Edition, along with the Advanced Compression option.
![]() Tip You can also enable encryption when transporting data via external tables. See the Oracle Advanced Security Administrator’s Guide, which can be freely downloaded from the Technology Network area of the Oracle web site (http://otn.oracle.com), for full details on implementing encryption.
Tip You can also enable encryption when transporting data via external tables. See the Oracle Advanced Security Administrator’s Guide, which can be freely downloaded from the Technology Network area of the Oracle web site (http://otn.oracle.com), for full details on implementing encryption.
Summary
This chapter lays the foundation for understanding how you can move data from one database environment to another. This chapter discussed several different manual techniques for moving data:
- Cloning from a cold backup
- Restoring from an RMAN backup
- Replicating with Data Pump across a network link
- Replicating with Data Pump transportable tablespaces
- Replicating with RMAN transportable tablespaces between the same operating system platform and between different operating system platforms
- Moving data with external tables
Understanding these manual methods lays the foundation for intelligently using RMAN’s duplicate database functionality. You’ll now better understand the advantages and disadvantages of each feature. You will be in a better position to architect replication solutions. The RMAN duplicate database feature is next discussed in detail in the Chapters 3, 4, and 5 in this book.