![]()
Advanced Topics
Chapters 3 and 4 discussed duplicating a database from RMAN backups and from active databases, respectively. This chapter focuses on advanced topics such as:
- Partially duplicating a subset of tablespaces
- Duplicating in parallel
- Creating Data Guard standby databases with the DUPLICATE command
- Duplicating container and pluggable databases
- Duplicating databases between RAC and ASM to non-RAC and non-ASM (and vice versa)
The RMAN DUPLICATE command helps automate what would otherwise be quite complex tasks. First up is the topic of partial database duplication.
There are a couple of different techniques for duplicating a subset of tablespaces from the target (source) to the auxiliary (destination). You can either exclude certain tablespaces or just include specific tablespaces. Examples of each technique are shown in the following sections.
Excluding Tablespaces
When excluding tablespaces from a duplication operation, you can specify tablespaces to be skipped or skip read-only tablespaces. Examples of each will be shown in this section. Skipping specific tablespaces is enabled via the SKIP TABLESPACE clause. The following example duplicates while skipping the USERS tablespace. The steps required to do this are detailed next:
- Since this example uses targetless duplication it assumes there is a backup of the target database available to the auxiliary database (see Chapter 3 for complete details regarding targetless duplication). On the target database, create backups and copy them to the auxiliary server (or to network storage that is readable by the auxiliary server):
$ rman target/
RMAN> backup database plus archivelog;
RMAN> exit;
You can verify the location of the backups via the LIST BACKUP command; here’s a small snippet of the output:
Piece Name: /u01/rman/TRG/TRGrman1_rrpth9n6_1_1.bkIn my environment, the RMAN backups on the target host are in the /u01/rman/TRG directory. Next, I copy the backup files from the target to the auxiliary using the Linux/UNIX scp command. You need to ensure the destination directory exists before initiating the scp command. This command is initiated from the auxiliary server:
$ scp oracle@shrek:/u01/rman/TRG/*.* /u01/rman/TRG - Now copy the initialization file from the target to the auxiliary. You can use either an SPFILE or a text-based init.ora file. Here’s an example of using the Linux/UNIX scp command for my environment. This command is initiated from the auxiliary server:
$ cd $ORACLE_HOME/dbs
$ scp oracle@shrek:$ORACLE_HOME/dbs/initTRG.ora. - Start up the auxiliary database in nomount mode:
$ sqlplus / as sysdba
SQL> startup nomount;
SQL> exit; - Next, connect to the auxiliary database via RMAN:
$ rman auxiliary / - This example uses an RMAN backup for the source of the control file and data files, and therefore no connection to the target database is necessary. Once connected to the auxiliary, issue the DUPLICATE command, as follows:
RMAN> duplicate database to TRG
backup location '/u01/rman/TRG'
skip tablespace users
nofilenamecheck;
Once complete, a quick SQL query verifies that the USERS tablespace was not duplicated:
RMAN> select tablespace_name from dba_tablespaces
      where tablespace_name='USERS';

no rows selected
![]() Tip See MOS note 1355120.1 for further details regarding skipping tablespaces during duplication.
Tip See MOS note 1355120.1 for further details regarding skipping tablespaces during duplication.
It’s also possible to skip read-only tablespaces during the duplication process. The following command performs active duplication while skipping any tablespaces that have been placed in read-only mode:
RMAN> DUPLICATE TARGET DATABASE TO TRG
FROM ACTIVE DATABASE
SKIP READONLY
NOFILENAMECHECK;
When you exclude read-only tablespaces during the duplication command, you can expect to see output that indicates that the read-only tablespaces have been skipped:
datafile 5 not processed because file is read-only
datafile 6 not processed because file is read-only
To wrap up this section, excluding tablespaces is a good method for performing partial database duplication when you have specific tablespaces that you know aren’t required in the copied database.
Including Tablespaces
Another way to skip tablespaces is to instruct RMAN which tablespaces to include in the DUPLICATE command. In this manner, any tablespaces not included will be excluded. This example instructs RMAN to include the REPDATA and REPIDX tablespaces. The steps required to do this are detailed next:
- Copy the initialization file from the target to the auxiliary. You can use either an SPFILE or a text-based init.ora file. Here’s an example of using the Linux/UNIX scp command for my environment. This command is initiated from the auxiliary server:
$ cd $ORACLE_HOME/dbs
$ scp oracle@shrek:$ORACLE_HOME/dbs/initTRG.ora. - Start up the auxiliary database in nomount mode:
$ sqlplus / as sysdba
SQL> startup nomount;
SQL> exit; - Next, connect to the auxiliary database via RMAN:
$ rman auxiliary / - This example uses an RMAN backup for the source of the control file and data files, and therefore no connection to the target database is necessary. Thus, you need to ensure a valid backup of the target database is available to the auxiliary database (see Chapter 3 for complete details on targetless duplication). Once connected to the auxiliary, issue the DUPLICATE command, as follows:
RMAN> duplicate database to TRG
backup location '/u01/rman/TRG'
tablespace repdata, repidx
nofilenamecheck;
In this situation, RMAN duplicates all essential tablespaces (SYSTEM, SYSAUX, UNDO, and TEMP) and then only the tablespaces included in the TABLESPACE clause. A quick SQL query verifies this:
RMAN> select tablespace_name from dba_tablespaces;

TABLESPACE_NAME
------------------------------
SYSTEM
SYSAUX
UNDOTBS1
TEMP
REPDATA
REPIDX
Including specific tablespaces provides a quick method for creating a copy of a database that only contains the tablespaces required in the duplicated environment.
Parallelism can be used to greatly increase the performance of any RMAN backup, restore, or duplication operation. First I’ll cover general parallelism techniques as they apply to duplication and then I’ll review parallelism using the SECTION SIZE clause.
Configuring Parallelism
If you’re performing an active duplication (meaning you are connected to both the target and auxiliary and are using the live target database as the source for the duplication), then RMAN will automatically allocate the number of channels per the degree of parallelization configured in the target database. For example, if the degree of parallelism has been defined in the target database to be 4 (as follows):
RMAN> configure device type disk parallelism 4;
then when performing active replication, both the target and the auxiliary database will have 4 channels opened.
If performing targetless duplication (meaning you’re restoring from an RMAN backup), RMAN will open the number of channels configured for RMAN that were defined in the target at the time the backup was taken.
You can manually specify the channels to be opened via ALLOCATE within a run block. For example, first connect to the auxiliary:
$ rman auxiliary /
Then allocate channels and run the DUPLICATE command from within a run block:
RMAN> run{
allocate auxiliary channel dup1 type disk;
allocate auxiliary channel dup2 type disk;
allocate auxiliary channel dup3 type disk;
allocate auxiliary channel dup4 type disk;
#
duplicate database to TRG
backup location '/u01/rman/TRG'
nofilenamecheck;
}
You can verify the number of channels open. From another session, run this query:
SET LINES 132
COL username    FORM a10
COL kill_string FORM A12
COL os_id       FORM A6
COL client_info FORM A28
COL action      FORM A21
--
SELECT
 a.username
,a.sid || ',' || a.serial# AS kill_string
, b.spid AS OS_ID
,(CASE WHEN a.client_info IS NULL AND a.action IS NOT NULL
  THEN 'First Default'
       WHEN a.client_info IS NULL AND a.action IS NULL
  THEN 'Polling'
  ELSE a.client_info
  END) client_info
,a.action
FROM v$session a
    ,v$process b
WHERE a.program like '%rman%'
AND  a.paddr = b.addr;
Here is some sample output:
USERNAME   KILL_STRING  OS_ID  CLIENT_INFO               ACTION
---------- ------------ ------ ------------------------- -------------------
SYS        21,48425     12664  rman channel=dup1         0000023 STARTED40
SYS        23,60820     12665  rman channel=dup2         0000016 STARTED40
SYS        20,7160      12663  Polling
SYS        25,21933     12667  rman channel=dup4         0000008 FINISHED129
SYS        24,22053     12666  rman channel=dup3         0000008 FINISHED129
SYS        1,17710      12662  First Default             0000041 FINISHED64
Parallelism can greatly reduce the time required to duplicate a database. This is especially true for servers that have multiple CPUs and data files spread across multiple locations.
Using SECTION SIZE
By default RMAN uses at most one channel (process) to back up a data file. Starting with Oracle 11g, RMAN added the capability of using multiple processes to back up one data file. This is accomplished by specifying the SECTION SIZE clause. Using parallelism along with SECTION SIZE instructs RMAN to use multiple channels to back up a datafile. For example, say you had a 32-gig data file you wanted to back up. If you specify a SECTION SIZE of 8 gigs and a degree of parallelism of 4, then RMAN can use four parallel processes, each working on an 8-gig section of the data file. This feature is known as a multisection backup. The idea here is that you increase the performance of a backup by using multiple channels to back up one data file.
Starting with Oracle 12c, RMAN extended the multisection feature to active database duplication. This means you can specify the SECTION SIZE when replicating from an active database to parallelize the duplication of large data files. When you specify a SECTION SIZE and configure parallelism this instructs RMAN to use multiple channels to duplicate a single data file.
For example, say you have a database with 32 gigs of data files and you require RMAN to duplicate these data files in parallel. Further assume that the primary target database has never configured parallelism; therefore, you’ll need to manually allocate channels on the primary database as well as on the auxiliary database. The following specifies a SECTION SIZE of 8 gig and parallelism of four channels:
RMAN> run{
allocate channel prmy1 type disk connect 'sys/"foo"@TRG';
allocate channel prmy2 type disk connect 'sys/"foo"@TRG';
allocate channel prmy3 type disk connect 'sys/"foo"@TRG';
allocate channel prmy4 type disk connect 'sys/"foo"@TRG';
allocate auxiliary channel dup1 type disk;
allocate auxiliary channel dup2 type disk;
allocate auxiliary channel dup3 type disk;
allocate auxiliary channel dup4 type disk;
DUPLICATE TARGET DATABASE TO TRG
FROM ACTIVE DATABASE
SECTION SIZE 8G
NOFILENAMECHECK;
}
In this way you can increase the performance when duplicating databases containing large data files.
Creating Standby Databases
Data Guard is Oracle’s flagship disaster recovery tool. One main feature of this tool is the ability to implement a standby database. A standby database is a near real time copy of the primary (source) database. The standby database is typically created on a different server in a different data center from the primary database. The idea is that if a disaster struck (e.g., flood, earthquake, long-term power outage, and so on) you could quickly point applications at the standby database and be back in business literally within seconds or minutes, depending on how you’ve configured the Data Guard environment.
You can manually create a standby database or use the RMAN DUPLICATE command. A high-level description of how to manually implement a standby database is required to understand the utility of using DUPLICATE. Here’s an overview of the manual steps:
- Ensure Oracle Net connectivity exists between the primary server and standby server.
- Create standby redo logs on the primary database (optional, but recommended).
- Configure the initialization parameter files.
- Create a physical backup of the primary database (hot, cold, or RMAN backup).
- Create a standby control file.
- Copy the standby control file and backup to the standby server.
- Restore and recover the standby database.
- Start the Data Guard processes that keep the primary and standby database synchronized.
- Troubleshoot any issues.
These steps aren’t super difficult, but they do require solid DBA backup and recovery skills. Manually creating a standby can be a time-consuming process, especially the steps where you’re creating a backup of the primary and restoring and recovering that backup to the standby server. Enter the RMAN DUPLICATE command. In one command consisting of just a few lines of code, you can automate the creation of the standby database. You can create a standby by duplicating from an active target (primary) database, or you can create the standby from an RMAN backup of the primary database. Examples of each are described in the following sections.
Creating Standby from Active Target
Figure 5-1 illustrates the steps involved with using the RMAN DUPLICATE command to create a standby database. In this scenario it’s a single-instance primary database being duplicated to a single-instance standby database (no RAC or ASM involved). Pay particular attention to Step 17, which is running the DUPLICATE command. If you were manually creating the standby database you would have to replace that step with several steps, such as “create an RMAN backup, create a standby control file, copy files to standby server, and restore and recover the standby database.”
Figure 5-1. Creating a standby database with RMAN active duplication
A detailed description of using the DUPLICATE command to implement a standby database is next. As a prerequisite, ensure that the same version of Oracle that is installed on the primary database server is also installed on the standby database server. Also make sure all directories that contain the control files, data files, online redo logs, and archive redo logs exist on the standby server. Additionally, for active duplication there must be Oracle Net connectivity between the two hosts.
![]() Tip If you’re not familiar with Oracle Net, now would be a good time to review Chapter 6 in its entirety.
Tip If you’re not familiar with Oracle Net, now would be a good time to review Chapter 6 in its entirety.
- Ensure the primary target database is in force logging mode:
$ sqlplus / as sysdba
SQL> alter database force logging;
Verify that force logging has been set correctly, as follows:
SQL> select force_logging from v$database;

FORCE_LOGGING
---------------------------------------
YES - From the operating system, create a password file on the primary host. You’ll have to modify this to match the database name used in your environment. The primary database name is TRG in this example:
$ cd $ORACLE_HOME/dbs
$ orapwd file=orapwTRG password=foo - Copy the primary database password file to the standby server. This example uses the Linux/UNIX scp command and is initiated from the target server:
$ cd $ORACLE_HOME/dbs
$ scp orapwTRG oracle@shrek2:$ORACLE_HOME/dbs - On the primary target database, create standby redo logs. Make very sure that the size of the standby redo logs is the exact same size as the existing online redo logs:
$ sqlplus / as sysdbaHere I verify the size of the existing online redo log files:
SQL> select distinct bytes from v$log;
     BYTES
----------
  52428800
Now I add the standby redo logs:
SQL> alter database add standby logfile
     '/u01/oraredo/TRG/sb1.rdo' size 52428800;
SQL> alter database add standby logfile
     '/u01/oraredo/TRG/sb2.rdo' size 52428800;
SQL> alter database add standby logfile
     '/u01/oraredo/TRG/sb3.rdo' size 52428800;
SQL> alter database add standby logfile
     '/u01/oraredo/TRG/sb4.rdo' size 52428800;
Next, verify the standby redo logs were created:
SQL> SELECT GROUP#,THREAD#,SEQUENCE#,ARCHIVED,STATUS FROM V$STANDBY_LOG;Here is some sample output:
    GROUP#    THREAD#  SEQUENCE# ARC STATUS
---------- ---------- ---------- --- ----------
         3          0          0 YES UNASSIGNED
         4          0          0 YES UNASSIGNED
         5          0          0 YES UNASSIGNED
6 0 0 YES UNASSIGNED - Ensure the primary database is in archive log mode:
SQL> archive log list;
Database log mode              Archive Mode
Automatic archival             Enabled
Archive destination            /u01/arch/TRG
If the primary database is not in archive log mode, then enable it, as follows:
SQL> shutdown immediate;
SQL> startup mount;
SQL> alter database archivelog;
SQL> alter database open; - Configure the tnsnames.ora file on the primary host (usually located in the ORACLE_HOME/network/admin directory):
TRG1 =
  (DESCRIPTION =
    (ADDRESS = (PROTOCOL = TCP)(HOST = shrek)(PORT = 1522))
    (CONNECT_DATA = (SERVER = DEDICATED) (SERVICE_NAME = TRG1)))

TRG2 =
  (DESCRIPTION =
    (ADDRESS = (PROTOCOL = TCP)(HOST = shrek2)(PORT = 1522))
(CONNECT_DATA = (SERVER = DEDICATED) (SERVICE_NAME = TRG2))) - Configure the tnsnames.ora file on the standby host (usually located in the ORACLE_HOME/network/admin directory):
TRG1 =
  (DESCRIPTION =
    (ADDRESS = (PROTOCOL = TCP)(HOST = shrek)(PORT = 1522))
    (CONNECT_DATA = (SERVER = DEDICATED) (SERVICE_NAME = TRG1)))

TRG2 =
  (DESCRIPTION =
    (ADDRESS = (PROTOCOL = TCP)(HOST = shrek2)(PORT = 1522))
(CONNECT_DATA = (SERVER = DEDICATED) (SERVICE_NAME = TRG2))) - Configure the listener on the primary and place the following in the listener.ora file (usually located in the ORACLE_HOME/network/admin directory):
DGL1 =
  (DESCRIPTION_LIST =
    (DESCRIPTION =
      (ADDRESS = (PROTOCOL = TCP)(HOST = shrek)(PORT = 1522))))

SID_LIST_DGL1 =
  (SID_LIST =
    (SID_DESC =
      (GLOBAL_DBNAME = TRG1) # static registration of TRG1 service
      (ORACLE_HOME = /orahome/app/oracle/product/12.1.0.2/db_1)
      (SID_NAME = TRG)))
Start the listener on the primary:
$ lsnrctl start DGL1You should see this in the output:
Service "TRG1" has 1 instance(s).
  Instance "TRG", status UNKNOWN, has 1 handler(s) for this service...
The UNKNOWN status indicates the TRG1 service has been statically registered with the listener.
- Configure the listener on the standby server and place the following in the listener.ora file (usually located in the ORACLE_HOME/network/admin directory):
DGL2 =
  (DESCRIPTION_LIST =
    (DESCRIPTION =
      (ADDRESS = (PROTOCOL = TCP)(HOST = shrek2)(PORT = 1522))))

SID_LIST_DGL2 =
  (SID_LIST =
    (SID_DESC =
      (GLOBAL_DBNAME = TRG2) # static registration of TRG2 service
      (ORACLE_HOME = /orahome/app/oracle/product/12.1.0.2/db_1)
      (SID_NAME = TRG)))
Start the listener on the standby host:
$ lsnrctl start DGL2You should see this in the output:
Service "TRG2" has 1 instance(s).
  Instance "TRG", status UNKNOWN, has 1 handler(s) for this service...
This output indicates that the TRG2 service has been registered statically with the listener. We know that the service was registered statically because of the UNKNOWN status.
- Before modifying the primary database initialization file, first copy the primary database init.ora file to the standby database. This initiates the scp command from the primary database host:
$ scp $ORACLE_HOME/dbs/initTRG.ora oracle@shrek2:$ORACLE_HOME/dbs - Now add primary database–related initialization parameters in init.ora file (usually located in the ORACLE_HOME/dbs directory):
# Standby params
db_unique_name=TRG1
log_archive_config='DG_CONFIG=(TRG1,TRG2)'
log_archive_max_processes='6'
#
# Next two lines should be all on one line in initialization file:
log_archive_dest_1='LOCATION=/u01/arch/TRG valid_For=(all_logfiles,all_roles)
  db_unique_name=TRG1'
#
# Next two lines should be all on one line in initialization file:
log_archive_dest_2='SERVICE=TRG2 ASYNC
  valid_for=(online_logfiles,primary_role) db_unique_name=TRG2'
fal_server=TRG2
standby_file_management=auto
log_file_name_convert='/u01/oraredo/TRG','/u01/oraredo/TRG'
Stop and start the primary database to ensure the initialization parameters are instantiated:
SQL> startup force;If you’re not comfortable with running the prior command (which performs a SHUTDOWN ABORT and STARTUP), then stop and start the database as follows:
SQL> shutdown immediate;
SQL> startup; - Set the standby initialization parameters in the init.ora file (usually located in the ORACLE_HOME/dbs directory). In this example, the file is named initTRG.ora and has the following added to it:
# Standby params
db_unique_name=TRG2
log_archive_config='DG_CONFIG=(TRG1,TRG2)'
log_archive_max_processes='6'
#
# Next two lines should be all on one line in initialization file:
log_archive_dest_1='LOCATION=/u01/arch/TRG valid_For=(all_logfiles,all_roles)
  db_unique_name=TRG2'
#
# Next two lines should be all on one line in initialization file:
log_archive_dest_2='SERVICE=TRG1 ASYNC
  valid_for=(online_logfiles,primary_role) db_unique_name=TRG1'
fal_server=TRG1
standby_file_management=auto
log_file_name_convert='/u01/oraredo/TRG','/u01/oraredo/TRG' - Start up the standby in nomount mode:
$ sqlplus / as sysdba
SQL> startup nomount;
SQL> exit; - Ensure Oracle Net connectivity exists between the primary and standby servers. From the standby database server, ensure you can connect to the primary database over Oracle Net:
$ sqlplus sys/foo@TRG1 as sysdba
SQL> select host_name from v$instance;

HOST_NAME
---------------------------------------------------------
shrek - From the primary database server, ensure that you can connect to the standby database over Oracle Net:
$ sqlplus sys/foo@TRG2 as sysdba
SQL> select host_name from v$instance;

HOST_NAME
---------------------------------------------------------
shrek2 - Connect to RMAN with the target and auxiliary databases. In this example, the RMAN connection is initiated on the auxiliary standby server (but could just as easily be initiated from the target server or a remote RMAN client):
$ rman target sys/foo@TRG1 auxiliary sys/foo@TRG2In the prior line of code, you need to specify a net service name for the auxiliary database connection, otherwise you’ll receive an error similar to this:
RMAN-06217: not connected to auxiliary database with a net service name - Issue the DUPLCIATE command to create a standby database on the auxiliary host:
RMAN> DUPLICATE TARGET DATABASE
FOR STANDBY
FROM ACTIVE DATABASE
DORECOVER
NOFILENAMECHECK;
Here’s a small snippet of the lengthy output:
Starting Duplicate Db at
using target database control file instead of recovery catalog
allocated channel: ORA_AUX_DISK_1
channel ORA_AUX_DISK_1: SID=22 device type=DISK
contents of Memory Script:
...
Finished recover at
Finished Duplicate Db at - After the standby database is created you can start the Data Guard recovery process:
$ sqlplus / as sysdba
SQL> startup force;
SQL> ALTER DATABASE RECOVER MANAGED STANDBY DATABASE DISCONNECT;
In the prior code, if you’re not comfortable using STARTUP FORCE (which does a SHUTDOWN ABORT and STARTUP), then instead issue SHUTDOWN IMMEDATE and then STARTUP.
One caveat is that starting with Oracle 12c, the USING CURRENT LOGFILE clause is no longer required when starting the Data Guard managed recovery process. If you’re using Oracle 11g, the prior ALTER DATABASE command looks like this:
SQL> ALTER DATABASE RECOVER MANAGED STANDBY DATABASE
USING CURRENT LOGFILE DISCONNECT; - Lastly, verify that Data Guard is working. You can verify the standby is operational in a number of ways. One simple way is to insert a record into a table on the primary and then query the table from the standby to see if the transactions are being applied to the standby. This assumes that you’re using the Enterprise Edition of Oracle and Active Data Guard (this option requires a license from Oracle). If you’re using standby redo logs, such as in this example, then the transactions should be transmitted from the primary database to the standby in near real time (seconds or less). You can also run the following query on the standby database to verify that the standby is applying transactions properly:
SQL> SELECT client_process, process, thread#, sequence#, status
FROM v$managed_standby
WHERE client_process='LGWR' OR PROCESS='MRP0';
The output indicates that Data Guard is alive and applying a log:
CLIENT_P PROCESS      THREAD#  SEQUENCE# STATUS
-------- --------- ---------- ---------- ------------
LGWR     RFS                1        283 IDLE
N/A      MRP0               1        283 APPLYING_LOG
An additional sanity check would be to switch the log file on the primary database and then check the alert.log on the standby to see if those logs are applied to the standby database. If Data Guard is working correctly you should see messages similar to this in the alert.log:
Media Recovery Waiting for thread 1 sequence 14 (in transit)
Recovery of Online Redo Log: Thread 1 Group 3 Seq 14 Reading mem 0
  Mem# 0: /u01/oraredo/TRG/sb1.rdo
Creating Standby from RMAN Backup
Creating a standby database from an RMAN backup is similar in many ways to the steps covered in the previous section, “Creating a Standby from Active Target.” The main difference is that instead of duplicating from the active primary (target) database, you must instead first create an RMAN backup and copy it to the standby (auxiliary) server (or to storage that the standby database can access).
I won’t repeat all of the steps regarding setting up a standby. Make sure you complete Steps 1 through 16 from the previous section in this chapter before starting here. Next is a description of the additional tasks required when creating a standby database from an RMAN backup.
- First, create an RMAN backup on the primary database:
$ rman target /
RMAN> backup database plus archivelog;
RMAN> exit; - Next, copy the backup files to the standby server. For my environment the backup files are in the /u01/rman/TRG directory. This example uses the Linux/UNIX scp command and initiates the operation from the primary server:
$ scp /u01/rman/TRG/*.* oracle@shrek2:/u01/rman/TRG - On the standby server, start up the auxiliary database in nomount mode:
$ sqlplus / as sysdba
SQL> startup nomount;
SQL> exit; - On the standby server, connect to RMAN with both the target and auxiliary connections specified:
$ rman target sys/foo@TRG1 auxiliary sys/foo@TRG2 - Assuming there’s an RMAN backup available, issue the DUPLICATE command as follows:
RMAN> DUPLICATE TARGET DATABASE
FOR STANDBY
DORECOVER
NOFILENAMECHECK;
Notice that the prior DUPLICATE command in this scenario does not use the FROM ACTIVE DATABASE clause. It assumes there is an RMAN backup available. It knows where the RMAN backup is located based on the metadata in the target database control file, hence the need to connect to the target database (or a recovery catalog). If there is no RMAN backup available, you’ll receive this error:
RMAN-06024: no backup or copy of the control file found to restore
You may receive an error similar to this when RMAN completes the duplication procedure:
ORA-01152: file 1 was not restored from a sufficiently old backup
ORA-01110: data file 1: '/ora01/dbfile/TRG/system01.dbf'
ORA-1547 signalled during: alter database recover cancel...
These error messages aren’t as bad as they look. Perform these additional steps from SQL*Plus (on the auxiliary database). First, shutdown the database, start it in mount mode, and start the Data Guard processes, as follows:
$ sqlplus / as sysdba
SQL> shutdown immediate;
SQL> startup mount;
SQL> alter database recover managed standby database
disconnect from session;
That should apply the redo necessary to be able to open the database. You’ll need to inspect the alert.log file of the auxiliary database and verify that the required archive redo logs have been successfully applied. If you’re unsure of where the alert.log is located, run this query:
SQL> select value from v$diag_info where name='Diag Trace';
Here’s the output for my standby database:
VALUE
------------------------------------------------------------
/orahome/app/oracle/diag/rdbms/trg2/TRG/trace
You should messages like this in the alert.log:
Media Recovery Log /u01/arch/TRG/TRG1_18_869840124.arc
Media Recovery Log /u01/arch/TRG/TRG1_19_869840124.arc
Recovery of Online Redo Log: Thread 1 Group 4 Seq 21 Reading mem 0
Mem# 0: /u01/oraredo/TRG/sb2.rdo
After the required archive redo logs have been applied, shut down the database and restart the standby database and the Data Guard processes:
SQL> shutdown immediate;
SQL> startup;
SQL> alter database recover managed standby database
disconnect from session;
This command works in Oracle 12c; if you’re using Oracle 11g, you should run the following command instead to start the Data Guard processes:
SQL> alter database recover managed standby database
using current logfile disconnect;
![]() Tip See MOS note 469493.1 for additional details on how to manually create a standby database.
Tip See MOS note 469493.1 for additional details on how to manually create a standby database.
One last note: If you’re creating a standby database that is quite large in size (terabytes), you may want to encapsulate the DUPLICATE command within a shell script. Here’s a typical Bash shell script that contains such code:
#!/bin/bash
date
export ORACLE_SID=TRG
export NLS_DATE_FORMAT='dd-mon-rrrr hh24:mi:ss'
#
sqlplus -s /nolog <<EOF
connect / as sysdba;
startup nomount;
select host_name from v$instance;
exit;
EOF
#---------------------------------
rman <<EOF
connect target    sys/foo@TRG1
connect auxiliary sys/foo@TRG2
DUPLICATE TARGET DATABASE
FOR STANDBY
DORECOVER
NOFILENAMECHECK;
EOF
date
exit 0
Now, assuming the prior code is in a file named dup.bsh, you can make it executable, as follows:
$ chmod +x dup.bsh
When creating standby databases that are large in size, where it may take hours or even days to build the standby database, I’ll usually run the duplication shell script in the background as follows:
$ nohup dup.bsh &
Running a script in the background like this serves two purposes. First, it creates an operating system file (named nohup.out) that captures the output of any commands executing within the shell script. It also allows me to continuously tail the output the shell script is producing:
$ tail -f nohup.out
If you work on servers that have an automatic timeout for idle sessions, running a shell script in the background is highly desirable, as the shell script will continue to execute even if your terminal session is automatically logged off from a timeout setting on the server.
Container and Pluggable Databases
The Oracle Multitenant option is available in Oracle 12c and higher. This feature allows you to create and maintain many pluggable databases within an overarching multitenant container database. A multitenant container database is defined as a database capable of housing one or more pluggable databases. A container is defined as a collection of data files and metadata that exist within a container database. A pluggable database is a special type of container that can be easily provisioned by cloning another database. If need be, a pluggable database can also be transferred from one container database to another.
Every container database contains a master set of data files and metadata known as the root container. Each container database also contains a seed container, which is used as a template for creating other pluggable databases. Each container database consists of one master root container, one seed container, and zero or one or more pluggable databases.
When working with containers and pluggable databases, there are two types of duplication you may require:
- Duplicating the entire container database (and all of the associated pluggable databases)
- Duplicating a subset of pluggable databases
Examples of each are shown in the following sections.
Duplicating a Container Database
It’s fairly simple to duplicate an entire container database. Just like with a regular (non-container) database, you can either duplicate from an active target database or from RMAN backups. The main aspect to note about this scenario is that the initialization parameter file on the auxiliary must contain this line:
enable_pluggable_database=true
Also, you must ensure that you make a connection to the root container as SYS when performing the duplicate operation. Figure 5-2 illustrates the steps required to duplicate a container database. Notice that there must be a listener running on the target server (if you’re unsure of how to start a listener and register services, see Chapter 6 for details).
Figure 5-2. Duplicating a container database
These details of the duplication steps in this scenario are described next. This example assumes that a fully functioning container target database has already been created.
![]() Tip See Pro Oracle Database 12c Administration available from Apress for details on creating and managing container and pluggable databases.
Tip See Pro Oracle Database 12c Administration available from Apress for details on creating and managing container and pluggable databases.
In this example, the target container database name is CDB. Additionally, the auxiliary database name and directory structure are identical to the target database.
- Ensure the container target database is in archive log mode. Connect to the root container as a user with the SYSDBA privilege:
$ sqlplus / as sysdba
SQL> archive log list;
If it’s not in archivelog mode, enable it as follows:
SQL> shutdown immediate;
SQL> startup mount;
SQL> alter database archivelog;
SQL> alter database open; - On the target, create a text-based initialization file if one doesn’t already exist:
SQL> create pfile from spfile; - Copy the initCDB.ora file to the auxiliary server. This example uses the Linux/UNIX scp command and initiates the copy operation from the target database:
$ scp $ORACLE_HOME/dbs/initCDB.ora oracle@shrek2:$ORACLE_HOME/dbs - On the auxiliary server, ensure that all required directories exist to hold the data files, control files, and online redo logs. You can verify the directories in use by running this query on the target database:
SQL> select name from v$datafile
union
select name from v$tempfile
union
select name from v$controlfile
union
select member from v$logfile; - On the auxiliary server, create a password file for the CDB database:
$ cd $ORACLE_HOME/dbs
$ orapwd file=orapwCDB password=foo - On the auxiliary server, start up the CDB auxiliary database in nomount mode:
$ sqlplus / as sysdba
SQL> startup nomount;
At this point, it doesn’t hurt to verify the enable_pluggable_database parameter is set to TRUE:
SQL> show parameter enable_pluggable_database
Here is some sample output:
NAME                                 TYPE        VALUE
------------------------------------ ----------- -----------------
enable_pluggable_database boolean TRUE - On the auxiliary server, connect via RMAN to the target and auxiliary databases:
$ rman target sys/foo@shrek:1521/CDB auxiliary sys/fooYou’ll have to change the prior username, password, and connection information to match your environment.
- Now execute the DUPLICATE command:
RMAN> DUPLICATE TARGET DATABASE TO CDB
FROM ACTIVE DATABASE
NOFILENAMECHECK;
You should now see some rather verbose output; here’s a snippet:
executing Memory Script
...
database opened
Finished Duplicate Db at ...
When finished you should have an identical copy of the container database (and all of its associated pluggable databases). You can now connect to the root container and verify the container and pluggable databases exist via the following:
SQL> select con_id, name from v$containers;
Here’s some sample output:
    CON_ID NAME
---------- ------------------------------
         1 CDB$ROOT
         2 PDB$SEED
Duplicating Pluggable Databases
You can use RMAN to duplicate one or more pluggable databases to an auxiliary database. When you duplicate a pluggable database, RMAN duplicates the container database that houses the pluggable databases and then also duplicates the pluggable databases that you choose.
You can either specify which pluggable databases you want to include or state which pluggable databases you want to exclude. Examples of each operation are described in the following subsections.
Including Pluggable Databases
Suppose you have two pluggable databases named SALESPDB and HRPDB that you require to be duplicated to a different environment. To achieve this, first follow steps 1 through 7 from the prior section, “Duplicating a Container Database.” Make sure you create all of the required directories on the auxiliary server before you run the step containing the DUPLICATE operation. This means you must create all directories (on the auxiliary server) to house the pluggable database data files (as they existed on the target server).
Now, change the DUPLICATE command as follows to only include the pluggable databases of interest:
RMAN> DUPLICATE TARGET DATABASE TO CDB
PLUGGABLE DATABASE salespdb, hrpdb
FROM ACTIVE DATABASE
NOFILENAMECHECK;
You should see a great deal of output; here’s a small sample for this example:
Starting Duplicate Db at ...
using target database control file instead of recovery catalog
allocated channel: ORA_AUX_DISK_1
...
sql statement: alter pluggable database all open
Dropping offline and skipped tablespaces
...
When the operation is finished, you can verify the pluggable databases that were duplicated:
$ sqlplus / as sysdba
SQL> select con_id, name from v$containers;
Here’s some sample output confirming that only the pluggable databases of interest were duplicated:
    CON_ID NAME
---------- ------------------------------
         1 CDB$ROOT
         2 PDB$SEED
         3 SALESPDB
         4 HRPDB
Keep in mind that the duplicate operation in this section duplicates the entire container environment and additionally the pluggable databases specified in the DUPLICATE command. That’s why the CDB$ROOT and PDB$SEED containers were also duplicated, as these are part of any base container database.
![]() Note You can also instruct RMAN to only duplicate specific tablespaces within a PDB via the following syntax: TABLESPACE pdb:tablespace
Note You can also instruct RMAN to only duplicate specific tablespaces within a PDB via the following syntax: TABLESPACE pdb:tablespace
Excluding Pluggable Databases
The other technique to duplicate specific pluggable databases is by specifying which pluggable databases you do not want duplicated. To achieve this, first follow steps 1 through 7 from the section “Duplicating a Container Database.” Ensure you create all of the required directories on the auxiliary server before you run the step with the DUPLICATE operation. This means you must create all directories (on the auxiliary server) to house the pluggable database data files (as they existed on the target server).
For the last step, change the DUPLICATE command as follows to exclude pluggable databases that you don’t want replicated. This example excludes the HRPDB pluggable database:
RMAN> DUPLICATE TARGET DATABASE TO CDB
SKIP PLUGGABLE DATABASE hrpdb
FROM ACTIVE DATABASE
NOFILENAMECHECK;
When finished you can verify that the container database contains the pluggable databases of interest:
$ sqlplus / as sysdba
SQL> select con_id, name from v$containers;
Here is some sample output:
    CON_ID NAME
---------- ------------------------------
         1 CDB$ROOT
         2 PDB$SEED
         3 SALESPDB
![]() Note You can also instruct RMAN to only skip specific tablespaces within a PDB via the following syntax: SKIP TABLESPACE pdb:tablespace
Note You can also instruct RMAN to only skip specific tablespaces within a PDB via the following syntax: SKIP TABLESPACE pdb:tablespace
If you work in an environment that contains a mixture of RAC and non-RAC databases and find yourself with requirements to duplicate environments within this infrastructure, then you’ll find the DUPLICATE command seamlessly solves many technical issues. Because of the complexity of RAC environments, this section doesn’t document every detail involved with this operation, but it does give you a good high-level overview of a couple of common duplication scenarios involving RAC-enabled databases. Let’s first take the case of duplicating a non-RAC environment to a RAC environment.
Non-RAC/Non-ASM to RAC/ASM
I was recently asked by my manager to create a copy of a 10 TB database that was non-RAC and non-ASM and create an RAC database that uses ASM storage. One caveat was that on the auxiliary (destination RAC and ASM database) there was only about 10 TB of storage, so there was not enough space to copy an RMAN backup (even if it was compressed) to the auxiliary server and restore the database.
In this situation, I decided to use the RMAN DUPLICATE command to replicate from the live target database. RMAN nicely handles the conversion of taking data files on regular storage and restoring them on ASM disks. Figure 5-3 depicts this scenario. This example assumes that the RAC grid/cluster software and Oracle database software has been installed in the auxiliary environment. It’s beyond the scope of this book to document the steps to install this software, so here you’ll need to look at Oracle’s RAC and grid infrastructure software documentation, which is available freely on Oracle Technology Network website (otn.oracle.com).
Figure 5-3. Duplicating from non-RAC to RAC
The steps depicted in figure 5-3 are described in detail next.
- Prepare an init.ora file for one RAC instance on one RAC node. Ensure you initially set the cluster_database parameter to FALSE.
- Start up one node of the RAC cluster:
$ sqlplus / as sysdba
SQL> startup nomount; - Connect to the target and auxiliary instances:
$ rman target sys/foo@shrek:1521/TRG auxiliary sys/foo@RAC - Issue the DUPLICATE command:
RMAN> DUPLICATE TARGET DATABASE TO DUP
FROM ACTIVE DATABASE
  db_file_name_convert '/u01/dbfile/TRG', '+DATA/DUP/datafile'
logfile group 1
  ('+DATA/DUP/onlinelog/redot1g1m1.rdo',
   '+DATA/DUP/onlinelog/redot1g1m2.rdo') size 1073741824,
group 2
  ('+DATA/DUP/onlinelog/redot1g2m1.rdo',
   '+DATA/DUP/onlinelog/redot1g2m2.rdo') size 1073741824,
group 3
  ('+DATA/DUP/onlinelog/redot1g3m1.rdo',
   '+DATA/DUP/onlinelog/redot1g3m2.rdo') size 1073741824
NOFILENAMECHECK; - After the duplication procedure successfully completes, add any additional threads of REDO and UNDO to the other RAC nodes:
SQL> ALTER DATABASE ADD LOGFILE THREAD 2
  GROUP 10
   ('+DATA/DUP/onlinelog/redot2g10m1.rdo',
    '+DATA/DUP/onlinelog/redot2g10m2.rdo') SIZE 1073741824,
  GROUP 11
   ('+DATA/DUP/onlinelog/redot2g11m1.rdo',
    '+DATA/DUP/onlinelog/redot2g11m2.rdo') SIZE 1073741824,
  GROUP 12
   ('+DATA/DUP/onlinelog/redot2g12m1.rdo',
    '+DATA/DUP/onlinelog/redot2g12m2.rdo') SIZE 1073741824;
Enable the second thread of redo:
SQL> alter database enable public thread 2;
And now create the UNDO tablespace for the second node:
SQL> create undo tablespace undotbs2
datafile '+DATA/DUP/datafile/undotbs02_01.dbf' size 1g;
Also set cluster_database=TRUE in the initialization file, and you should now be able to start the second node.
RAC/ASM to Non-RAC/Non-ASM
Duplicating from a multinode RAC database using ASM storage to a single-instance database using the regular file system storage is fairly easy. The RMAN DUPLICATE command seamlessly handles the conversion from ASM-based storage to regular file system disks. This scenario is shown in Figure 5-4.
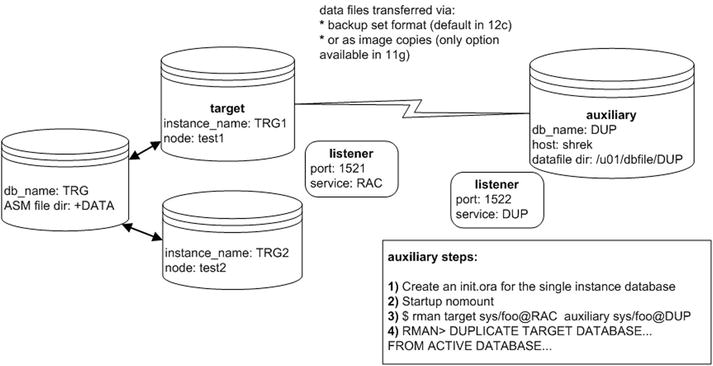
Figure 5-4. RAC to non-RAC duplication
The steps shown in Figure 5-4 are described next.
- Create an init.ora file for a single-instance database.
Here’s the initDUP.ora file I used for this example:
control_files='/u01/dbfile/DUP/control01.ctl'
db_block_size=8192
db_name='DUP'
fast_start_mttr_target=500
job_queue_processes=10
sga_max_size=400M
sga_target=400M
open_cursors=75
processes=100
remote_login_passwordfile='EXCLUSIVE'
resource_limit=true
standby_file_management='auto'
undo_management='AUTO'
undo_tablespace='UNDOTBS1'
workarea_size_policy='AUTO' - Start up the auxiliary database in nomount mode:
$ sqlplus / as sysdba
SQL> startup nomount; - Connect via RMAN to the target and auxiliary databases:
$ rman target sys/foo@RAC auxiliary sys/foo@DUP - Issue the RMAN DUPLICATE command:
RMAN> DUPLICATE TARGET DATABASE TO DUP
FROM ACTIVE DATABASE
DB_FILE_NAME_CONVERT '+DATA/rac/datafile','/u01/dbfile/DUP',
                     '+DATA/rac/tempfile','/u01/dbfile/DUP'
LOGFILE GROUP 1 ('/u01/oraredo/DUP/redo01.rdo') SIZE 50M,
        GROUP 2 ('/u01/oraredo/DUP/redo02.rdo') SIZE 50M;
In the previous command, I used the DB_FILE_NAME conversion to ensure that the data files were mapped properly from the ASM storage to the regular file system storage.
If you see an error such as this:
ORA-38856: cannot mark instance UNNAMED_INSTANCE_2...
then place this line in your init.ora file:
_no_recovery_through_resetlogs=true
You should now be able to:
SQL> shutdown immediate;
SQL> startup mount;
SQL> alter database open resetlogs;
Summary
This chapter covered many additional scenarios with RMAN duplication. First, we investigated examples of partial database duplication. Then we then discussed increasing the performance through parallelism. When working with large databases, increasing the degree of parallelism can greatly improve performance.
Next, we discussed how to create Data Guard standby databases using the RMAN DUPLICATE command. You can create a standby database from a live target primary database or from an RMAN backup of a target primary database.
Duplicating container and pluggable databases was also covered. Duplicating an entire container database is very similar to duplicating a non-container database. You also have the option of duplicating a subset of pluggable databases housed within the container database.
Lastly, we discussed how to duplicate RAC/ASM databases to non-RAC/non-ASM databases and vice versa. The RMAN DUPLICATE command greatly assists in duplicating in RAC environments.