
![]()
Performance Tuning
React was designed from the ground up with performance in mind. It uses several clever techniques to minimize the number of costly DOM operations required to update the UI, but it also provides tools and methods to fine-tune the performance when required.
In this chapter, you will learn how React’s reconciliation process works, how to identify performance bottlenecks with React Perf, and how to use the shouldComponentUpdate lifecycle method in your components to short-circuit the re-rendering process for performance improvements.
How the Reconciliation Process Works
Whenever you change the state of a React component, it triggers the reactive re-rendering process. React will construct a new virtual DOM representing your application’s state UI and perform a diff with the current virtual DOM to work out what DOM elements should be mutated, added, or removed. This process is called reconciliation.
In React, whenever you call setState on a component, instead of updating it immediately React will only mark it as “dirty” (Figure 7-1 illustrates this process). That is, changes to your component’s state won’t take effect immediately; React uses an event loop to render changes in batch.


An event loop is a JavaScript process that keeps on running indefinitely, constantly distributing data around, checking for all the event handlers and lifecycle methods that need to be invoked. By batching the reconciliation process, the DOM is updated only once per event loop, which is key to building a performant application.
When the event loop ends, React re-renders the dirty components as well as their children. All the nested components, even if they didn’t change, will have their render method called, as shown in Figure 7-2.

Figure 7-2. At the end of the event loop, dirty component trees are re-rendered to the virtual DOM
This may sound inefficient, but in practice it is actually very fast because React is not touching the actual DOM. All this happens in the in-memory virtual DOM, and JavaScript has become extremely fast in processing this kind of operation on modern browsers.
However, React provides a way to fine-tune this process and prevent sub-trees from re-rendering: the lifecycle method called shouldComponentUpdate. Before re-rendering a child component, React will always invoke its shouldComponentUpdate method. By default, shouldComponentUpdate always returns true, but if you reimplement it and return false, React will skip re-rendering for this component and its children.
Be aware that React is usually quite fast out of the box and this is only needed on occasional circumstances. Using shouldComponentUpdate needlessly is the definition of premature optimization, which is a bad practice that not only wastes time but adds code complexity and more surface area for bugs to appear, especially ones that are hard to debug. Instead of blindly applying shouldComponentUpdate to an application’s components, the best approach is to profile your application to detect if and where performance adjustments are necessary.
React Perf
ReactPerf is a profiling tool that gives an overview about an app’s overall performance and helps discover optimization opportunities where shouldComponentUpdate lifecycle hooks should be implemented. The Perf object is available as a React add-on and can be used with React in development mode only. You should not include this bundle when building your app for production.
The ReactPerf API is very simple. You invoke two methods: Perf.start() when you want to begin measuring the application and Perf.stop() to finish measuring. The ReactPerf module also provides three methods to display the relevant data in a nicely formatted table on the browser console after taking the measurements; see Table 7-1.
Table 7-1. React Perf Methods
Validator | Description |
|---|---|
Perf.start() and Perf.stop() | Start/stop the measurement. The React operations in between are recorded for analyses below. |
Perf.printInclusive() | Prints the overall time taken. |
Perf.printExclusive() | “Exclusive” times don’t include the time taken to mount the components: processing props, calling componentWillMount and componentDidMount, etc. |
Perf.printWasted() | “Wasted” time is spent on components that didn’t actually render anything; in other words, the render stayed the same, so the DOM wasn’t touched. |
![]() Tip While the React Perf add-on provides valuable insight, it still can’t detect every single optimization opportunity in your application. Use it along with the Browser’s developer tools besides testing and debugging the application yourself.
Tip While the React Perf add-on provides valuable insight, it still can’t detect every single optimization opportunity in your application. Use it along with the Browser’s developer tools besides testing and debugging the application yourself.
The Performance Test Application
To experiment with ReactPerf and later implement shouldComponentUpdate, you will create a simple React application that displays a clock. It will contain three components: the main App component, a Clock component, and a Digit component.
Starting bottom-up, the Digit component will receive a numeric value as a property, check if it is less than 10 (to add a trailing zero character) and render it. Listing 7-1 shows the complete code.
In sequence, let’s create the Clock component. It will receive three properties (hours, minutes, and seconds) and render three Digit components, one for each. Listing 7-2 shows the Clock.js code.
Finally, let’s work on the App component implementation. It will be a stateful component and have a getTime method that returns an object containing individual properties for hour, minutes, seconds, and milliseconds. This method will be used on both the constructor function (to initialize the component state) and on the componentDidMount lifecycle method (to set the application state to an updated value repeatedly). In the render function, you display a Clock component. Listing 7-3 shows the complete code.
When testing the application, you should see something like Figure 7-3.

Figure 7-3. The performance test application
Installing and Using ReactPerf
Now that your sample application is done, let’s install ReactPerf and profile it to look for performance optimization opportunities. The ReactPerf is provided as an add-on, so make sure to install it using npm install --save react-addons-perf before continuing.
Next, let’s import the Perf module into your App component. You will start measuring the performance just before the app render, and stop measuring right after it. Then you will invoke printInclusive (to present a list of all the rendered components instances and time taken) and printWasted (to present component instances that were rendered without any changes). The updated code is shown in Listing 7-4.
Testing the application on the browser now outputs the information shown in Figure 7-4 to the console.
In Figure 7-4, the lines marked with the number 1 denote the printInclusive output. It shows that your application has
- A single App instance
- A single Clock instance, nested inside the App component
- Three Digit instances, nested inside the Clock component

Figure 7-4. React Perf output
The console lines marked with the number 1 also shows the initialization and rendering time of each component in the tree index and the total application time.
The lines marked with the number 2 indicate the output from the printWasted method call. It contains an empty array because the method didn’t find any wasted time at all.
But there is a problem with the measurements you took: by stopping the profiling immediately after the first render, you didn’t analyze any state changes. You simply took a snapshot of the initial state of the application. To fix that, you will use a timer to measure the application for a little over a second before outputting any results. Listing 7-5 shows the updated code and Figure 7-5 shows the new output in the browser console.
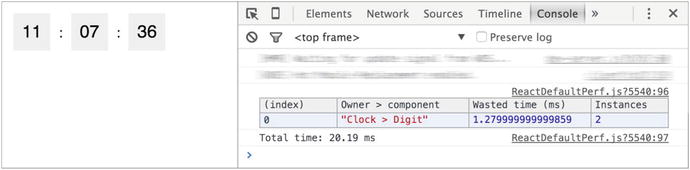
Figure 7-5. The output from printWasted after a little more than a second of measurement
Also, notice in the code above that you only kept the printWasted output.
Notice that now the ReactPerf detected two unnecessary renders of the Digit component. What happened here? To understand, let’s recap the steps that happened.
- You started the test when the clock was marking 11:07:35.
- During the profiling, the state changed and triggered a re-render of the clock component to display the value of the time as 11:07:36
- The Clock, in turn, rendered all three digits, even the ones that didn’t change.
The two instances that the ReactPerf detected were the re-render of the hour and the minute digits; because their value didn’t change, they were needlessly updated.
Notice, however, that these components were only updated in the virtual DOM. Due to React’s diffing process, they never mutating the real DOM. Furthermore, the amount of “wasted” time rendering the two digit components was less than two milliseconds, which can be considered negligible and has no performance impact. There is absolutely no reason to implement shouldComponentUpdate here.
Forcing an Impact on Performance
Let’s make a few changes in the app to purposely create a performance problem: you’re going to add a tenth of seconds field to your Clock component, update the App component every tenth of a second, and, to make sure it has an impact on performance, render 200 clocks on screen. Listing 7-6 shows the updated App component and Listing 7-7 shows the updated Clock component. The Digit component does not need any update.
Now, when running in the browser you will notice that the app performance is sluggish. That was purposeful, but if you are on a fast machine and are not observing any difference, feel free to increase the loop count. The ReactPerf measurements confirm it: there’s now a lot of time wasted by computing Digit components whose render didn’t change. As shown in Figure 7-6, you now have a very noticeable performance hit of more than 0.6 seconds. Just for reference, the FPS meter is also displayed; currently the application is running at 15 fps.

Figure 7-6. ReactPerf shows you’re now spending 609 ms computing unchanged Digit components
shouldComponentUpdate
React provides the shouldComponentUpdate lifecycle method, which is triggered before the rerendering process starts and provides the possibility of not computing a render tree entirely. The method receives nextProps and nextState as arguments, and you should return either true or false to tell React if the component needs to be re-rendered. It defaults to true, but if you return false, the component is considered clean, and therefore no diffing or rendering is performed.
In the Clock application, all you have to do when implementing shouldComponentUpdate on the Digit component is a straight comparison between the new and old values that come in as props, as shown in Listing 7-8.
As you can see in Figure 7-7, React Perf now outputs an empty array as wasted rendering instances. The performance impact is immediately perceivable in the browser (to prove this, the FPS meter is shown again; now the application runs twice as fast as before).

Figure 7-7. The Clock application after implementing shouldComponentUpdate on the Digit component
React will invoke the shouldComponentUpdate function pretty often, so keep in mind that the any tests and comparisons you may want to implement need to be really fast or it will defeat the purpose of improving the app performance.
Comparing single values (as you did in the earlier example) is really fast, so it works, but trying to compare values deeply nested inside objects is a very expensive operation, and it won’t work.
That’s when using immutable values pays of; it makes tracking changes and comparing entire objects cheap, fast, and reliable.
In Chapter 3, you studied React’s immutability helpers. They help to make mutations on JavaScript objects, but instead of changing the value inside an object directly, they always return an entirely new object with the mutated value. This means that a shallow compare between the old and the new objects is enough to determine if there’s a change, even if the changed value is deeply nested inside.
![]() Tip While React immutability helpers provide a nice mechanism to deal with default JavaScript data structures (that aren’t immutable) in immutable way, you might want to consider using a library that provides true immutable collections for JavaScript. Using immutable data structures not only leads to better performance optimizations in React, but also helps you achieve better data consistency and improved code quality.
Tip While React immutability helpers provide a nice mechanism to deal with default JavaScript data structures (that aren’t immutable) in immutable way, you might want to consider using a library that provides true immutable collections for JavaScript. Using immutable data structures not only leads to better performance optimizations in React, but also helps you achieve better data consistency and improved code quality.
There are many different libraries that provide Immutable collections for JavaScript, including Facebook’s own Immutable-js.
Immutable-js implements highly efficient immutable data structures such as Lists, Maps, Sets, and others. More information about Immutable-js is available on the library’s site at https://facebook.github.io/immutable-js/.
shallowCompare Add-on
React provides an add-on called shallowCompare to be used with shouldComponentUpdate. It shallow compares both the props and state of the object and returns if they have changed.
The shallowCompare add-on is not a silver bullet, but it does helps achieve a performance boost if your app fits these criteria:
- The component where you want to apply the shallow compare is “pure” (in other words, it renders the same result given the same props and state).
- You are using immutable values or React’s immutability helper to manipulate state.
Kanban App: Implementing shouldComponentUpdate with the shallowCompare Add-on
The Kanban application has a pretty good performance overall, but there’s a moment where it can get a little sluggish: when dragging cards around. That’s because every time you change a card’s position or list, all the cards get rerendered. To fix this, let’s implement the shouldComponentUpdate lifecycle method with the shallowCompare add-on on the Card component.
To get started, install react-addons-shallow-compare from npm:
npm install --save react-addons-shallow-compare
Next, edit the Card component to import shallowCompare and implement shouldComponentUpdate, as shown in Listing 7-9.
Summary
In this chapter, you got a better understanding of the assumptions that were made in order to make the React’s reconciliation algorithm fast. You saw that while it’s fast enough in the vast majority of use cases, it is possible to manually improve a component’s performance by implementing the shouldComponentUpdate lifecycle method to prevent it (and its entire UI sub-tree) from rerendering.