
Operating the Apple Watch
The Apple Watch is much more than just a timepiece, and the additional functionality that it has requires some learning by the wearer in order to unlock its full capability. The Apple Watch acts as a handy (wristy?) extension of the wearer’s iPhone and as such delivers a lot of computing power and functionality in a convenient package. The minimalist design of the Apple Watch gives the user a limited number of ways to interact with it. Despite this, it can do a surprising number of things.
Suppose, like me, you have decided to wear an Apple Watch to enhance your health and fitness as well as tell you the time of day. Apps on the Apple Watch, from both Apple and from third-party developers, can keep you focused on getting a healthy amount of exercise every day. They can also record your workouts so that you can track trends in your performance as well as your vital signs. The first step in improving your health with Apple Watch is to pair it with your iPhone.
Pairing the Apple Watch with Your iPhone
For the Apple Watch to use the processing power and other resources of its owner’s iPhone, it must be paired with the iPhone. Pairing sets up a two-way communication channel between the two devices. For the Apple Watch to deliver its full functionality, it must be within Bluetooth range of its paired iPhone. There are some things it can do when away from its paired iPhone, such as record the distance you have run or walked and the number of steps you have taken. However, it will not record your route, and its accuracy will be somewhat less than it would be if it had access to the GPS connection provided by your iPhone. After you pair the Apple Watch with your iPhone, you can enter inputs through the touchscreen, the digital crown, the button, and voice via Siri. The Apple Watch can send inputs to you via the screen, through the taptic engine, through audible tones, and also via Siri.
The Apple Watch works with the iPhone 5 and all newer models running iOS 8.2 and newer versions of that operating system. If you are still using an earlier iPhone, it is probably past time to upgrade anyway.
The pairing procedure is somewhat involved, consisting of a number of steps. Before you begin, you will need to make sure both your iPhone and your Apple Watch are ready to be paired and synced.
- On your iPhone, go to Settings
 Bluetooth and make sure Bluetooth is on.
 - Make sure your iPhone is connected to either Wi-Fi or a cellular network.
- Turn on your Apple Watch by pressing and holding the side button next to the digital crown until the Apple logo appears on the screen.
- Make sure both your iPhone and your Apple Watch are charged up.
- Keep the iPhone and Apple Watch close together during the pairing and syncing operation.
Now you can begin the pairing operation. Follow these steps:
- Launch the Apple Watch app on your iPhone. This will display a screen similar to Figure 3-1.
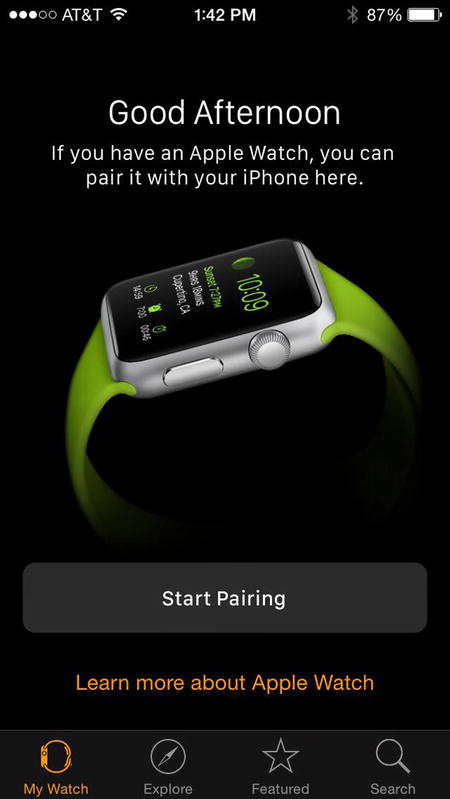
Figure 3-1. Apple Watch pairing screen
- On your Apple Watch, select the language you want the Apple Watch to use when communicating with you. A list can be scrolled through by rotating the digital crown or swiping the screen. Tap the desired language to make your selection.
- Tap Start Pairing on both your Apple Watch and iPhone. A pairing animation that looks like a swirling cloud of molecules will appear on the watch face.
- Hold your iPhone over the watch and center the pairing animation in the viewfinder on the iPhone screen. Keep the two devices aligned until you see a message saying “Your Apple Watch is Paired.” If for some reason this doesn’t work, you can pair the devices manually, following the instructions on your iPhone. Figure 3-2 shows your iPhone display after a successful pairing.

Figure 3-2. Your Apple Watch is now paired with your iPhone
- On your iPhone, tap the Set Up as New Apple Watch option and follow the steps to get the Wrist Preference screen. Pick a wrist by tapping Left or Right on the iPhone. (If you are re-pairing a watch that had previously been paired but then de-paired, select Restore from Backup rather than Set Up as New Apple Watch.)
- Read and agree to the terms and conditions.
- Sign in with your Apple ID password.
- Review settings for Usage and Diagnostics, Location Services, and Siri. They will be shared by the iPhone and Apple Watch. Figures 3-3 through 3-5 show these three steps in the process.

Figure 3-3. Allowing usage and diagnostic information to be sent to Apple
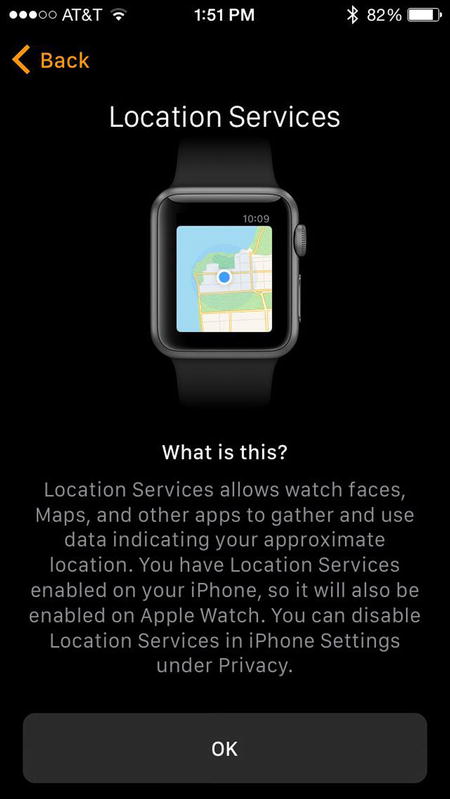
Figure 3-4. Enabling location information to appear on your watch

Figure 3-5. Enables Siri to hear your voice when you speak into your watch
- On your iPhone, choose whether you want to make a passcode for your Apple Watch. You will need this to use the ApplePay feature and possibly other things. Figure 3-6 shows the Create a Passcode screen.

Figure 3-6. Choose whether to protect your watch with a passcode
- As a convenience, you can elect to unlock your watch automatically whenever you unlock your iPhone. This will save some redundant typing and is still pretty safe. Figure 3-7 shows the relevant screen on your iPhone. You must approve this option on your watch.
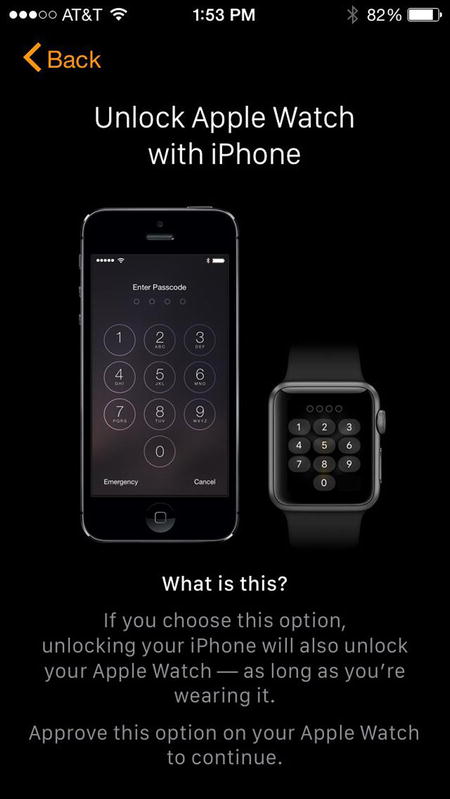
Figure 3-7. Choose whether to unlock your watch with your iPhone
- Sync iPhone apps that work with the Apple Watch by tapping Install All on your iPhone. If you are running a third-party fitness app, you will want to do this rather than selecting Choose Later.
- The setup is complete. Figure 3-8 shows the screen that informs you that your Apple Watch is now ready to use.

Figure 3-8. The Apple Watch is ready
Manipulating the Touchscreen
Since it is impractical to attach either a keyboard or a mouse to a watch, the Apple Watch relies primarily on a finger interacting with the touchscreen. There are three kinds of actions you can perform with a finger: swipes, taps, and presses.
Swipes are a quick sweep of a finger across the touchscreen. They can be performed either from the top down, from the bottom up, from left to right, or from right to left. Each of these could potentially cause a different action, depending on the app. For example, if the clock face is displayed, swiping down from the top will surface your most recent notification. Swiping up will display a screen enabling you to either select or deselect Airplane Mode, Do Not Disturb Mode, or Silent Mode. It will also enable you to ping your misplaced iPhone. When you do, your phone will emit a series of ping tones, enabling you to find where you left it. Figure 3-9 shows this screen.
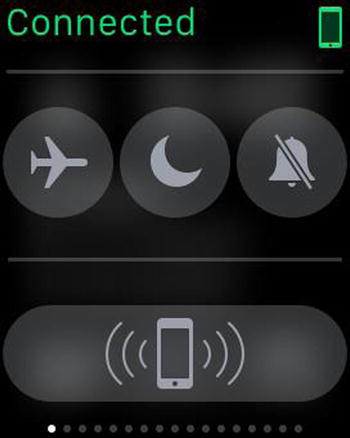
Figure 3-9. Handy control screen for frequently used functions
In the Activity app, with the three rings showing, swiping up from the bottom will display the calories you have burned so far today, the number of steps you have taken, and the distance you have run, walked, or cycled. Figure 3-10 shows my totals in the morning before doing much of anything. I had better get more active pronto.

Figure 3-10. Result of swiping up in the Activity app
In the Activity app, starting at the three rings screen, swiping from right to left displays the Move ring (Figure 3-11) along with the number of calories the watch has calculated that you have burned today.
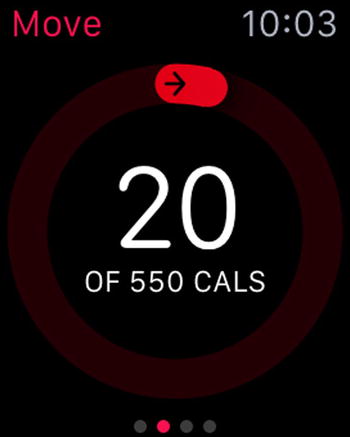
Figure 3-11. Current progress shown by the Move ring
Swiping from right to left again shows the Exercise ring (Figure 3-12), and swiping a third time shows the Stand ring (Figure 3-13).

Figure 3-12. Exercise ring before today’s first exercise session

Figure 3-13. Stand ring after watch has detected at least one minute of standing so far this morning
Swiping up from any of those ring screens shows a bar graph displaying when you did your moving, exercising, or standing, on an hour-by-hour basis throughout the day.
Taps are used to make selections. On the Home screen, which displays little circular icons for the apps you have installed, tapping an icon launches the associated app. Figure 3-14 shows the Home screen on my Apple Watch, showing some of the apps I use.

Figure 3-14. Apple Watch Home screen
Force Touch, which is putting a finger on the screen and pressing, acts as an additional control; the function depends on the app that is running and the page that is currently displayed on the screen.
Twirling the Digital Crown
The digital crown, which looks a lot like the crown that you wind on a mechanical watch, can be manipulated in two different ways, either twirling it or pressing in. When you twirl the crown, what it does depends on the context. In some cases, it acts much like the wheel that sits between the buttons on a two-button mouse. Twirl it in the upward direction to cause the display to scroll up or in the downward direction to cause the display to scroll down.
Figure 3-15 shows the Home screen displayed in Figure 3-14 after it has been scrolled up.
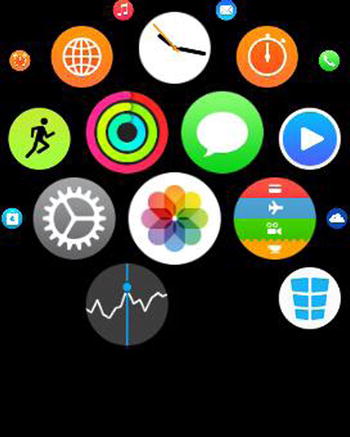
Figure 3-15. Home screen after a scroll-up swipe
This works, of course, only if the app you are running uses up and down scrolling. You can achieve the same result by swiping the display up or down with a finger. In a different context, the crown acts as a zoom control. Twirl it up to zoom in or down to zoom out. This is the behavior you get when you twirl the crown in the Photos app. Figure 3-16 shows some recent photos in the Photo app, and Figure 3-17 shows that same screen after scrolling up.

Figure 3-16. Some recent photos

Figure 3-17. Sognefjorden on a cloudy day
In the Activity app, you get the scrolling behavior when you twirl the crown rather than the zooming behavior.
Pressing the crown in takes you back to where you were before you entered the current app. For example, if you entered the Activity app by tapping the Activity icon on the clock face, pressing the crown in returns you to the clock face. If you entered the Activity app by tapping the Activity icon on the Home screen, you are returned to the Home screen.
Pressing the Button
The button located on the same side of your watch as the digital crown gives you instant access to the 12 people you call most often. Figure 3-18 shows what happens when I press this button.
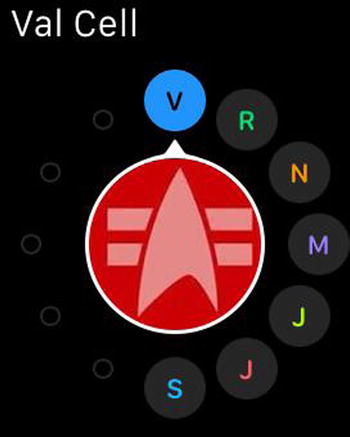
Figure 3-18. Apparently I call only seven people with any regularity
By pressing the button, you can call them right from your watch, Dick Tracy–style, rather than fishing your phone out of a pocket or purse. The Friends screen displays a small icon for each of the 12 people you have identified as friends on your phone’s Apple Watch app. By selecting one of them and pressing the phone handset icon, your watch will initiate a call to your friend.
If you press and hold down the button, it performs a different function, giving you the option of either powering off your watch or tapping into its power reserve. You may want to power off the watch if you don’t want to be interrupted for a period of time or if you want to conserve battery power. Tapping into the power reserve gives you a little more time before the watch shuts down.
Feeling Touched by the Taptic Engine
The Apple Watch is pioneering new ground here by applying haptic feedback to a mass-market product. Haptic feedback adds another of your senses to the ways that a watch can communicate with you. Traditional mechanical watches can communicate with you in only one way—you have to look at it. Some smartwatches add a second mode of communication: sound. They emit a tone or a synthesized voice. Apple Watch adds a third, a touch that you can feel as a tap on the back of your wrist. Apple has coined the clever word taptic to describe the technology, combining tap with haptic.
Inside the watch, a linear actuator will discreetly tap your wrist when you receive an alert or notification. You can choose to either deal with this incoming news or ignore it for now, avoiding the interruption that pulling out your phone or even glancing at your watch would cause.
You can even communicate with other Apple Watch wearers taptically by sending them a tap or two. Since your watch is constantly monitoring your pulse, you can even send your heartbeat to someone. This expands the ways you can contact people to an entirely new dimension: voice, text, emoji, tap, and now heartbeat too.
Summary
This chapter covered how to get your Apple Watch up and running in sync with your iPhone. It also described how to control your watch with the touchscreen, as well as with the digital crown and the button. In addition to the inputs you receive from the sights and sounds you receive from the screen and the watch’s speaker, the watch reaches out and touches you with its taptic engine. Apple has found ways to convey a lot of information to you through three channels in a compact package.