
What is an indexand why does it need to be rebuilt? An index is what SQL Server uses to retrieve rows from a table. The obvious similarity is to the index of a book; if you need to know about a certain topic, flip to the back and check the index. It tells you right where to find exactly what you’re looking for.
You can have a table without an index defined. In this case, it’s just a heap of data, so it’s termed a heap table. Storing data as a heap isn’t very efficient, as the entire table must be scanned in order to return the data you are requesting in a query. Instead, when you use indexes, the data is retrieved much quicker and more efficiently.
If you have a small database, is it worth it to create an index on a table? In short, yes. It is always worth it, because databases often tend to grow. When the administrative work is done at the beginning, it doesn’t need to be done later. And when you define indexes early on, and then set up a maintenance task to automatically rebuild those indexes, you are coming out way ahead of the game, because over time, the indexes start to “drift.” They may reference obsolete data, or large parts of the pages may be missing. Rebuilding the indexes makes sure that these things don’t happen, because they are all organized (which, if you ask my wife, is not my greatest strength).
For the first part of this chapter, I am going to go briefly into indexes in SQL Server. I say briefly because there isn’t enough room in this book to explain every single concept, so I’m going to assume that you have at least heard of indexes. Then in the second part of this chapter, we will actually get to the maintenance task to use to maintain your indexes.
Indexes Explained
Maybe you don’t really know or understand what indexes are or how they work. Believe it or not, that’s okay! Not long term, but the first step is realization, right? More than likely, if you’re not very familiar with indexes , then you’re either a new database administrator or a seasoned DBA that just hasn’t had the time or inclination to get into the weeds of how indexes work.
The best way that I can think of to describe indexes is to say that they are ways that SQL Server can access table data quickly by assuming certain things about how the data is accessed. You can have zero indexes on a table; that is completely acceptable. Not efficient at all, but acceptable. Think if you wanted to search for a certain word or phrase in this book, a standalone word like interface. I’ve said that word a lot, right? Can you imagine going through every page of this book just to find the locations where the word “interface” was used? That would take a long time! Imagine instead if you had an index that told you exactly where you could find these occurrences. That’s what indexes do for your database.
From this point on, there are two things about every single reader. Every one of you will fall into one of these two categories:
You already have indexes on your tables. You also need to manage them, either willingly or reluctantly.
You don’t currently have indexes, but recognize a need for them.
That’s it. Either you have them and want to manage them, or you don’t and want to implement them. For the rest of this section, I’m going to work from the assumption that you don’t currently have indexes. Skip ahead if you are solid in your understanding of indexes and how they work.
Beginning Indexes
Let’s start from the very beginning. How do you know if you even have an index ? Simple. Go to SQL Server Management Studio and expand your database. Then expand a table that needs an index. Look at that—a folder named Indexes. Click the little plus-sign there. If it expands, there are indexes and the type is shown to you. If it doesn’t expand, there are no indexes on that table.
At this point, you may be surprised to find that you had an index all along. If you inherited the database, then it may well be a custom index defined by the previous DBA. More than likely, it’s a primary key.
How to tell if it’s a primary key index ? Just right-click the table name and choose Design, and then look for the little key next to a column name. That’s your primary key.
If you had a primary key index , then let’s look at what you can do with it from here. Right-click the index and choose Properties. You should see something similar to Figure 7-1.
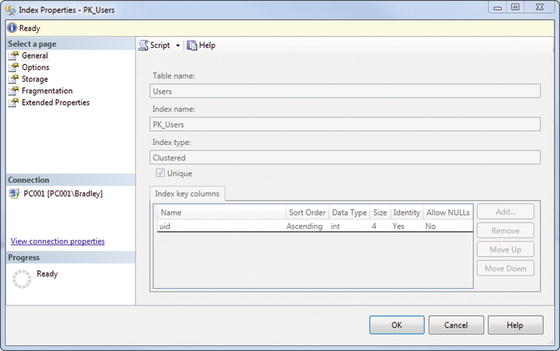
Figure 7-1. Index Properties
Look at that! You have a clustered index on that table. Look at the part that says “Index key columns” there. It says that the UID is sorted in ascending order as an integer, it is an identity field, and it does not allow NULL values. What that tells us is that, with this index in place, data is returned sorted by the UID field in ascending order—smallest to largest values.
Let’s say that you wanted the values to be returned in descending order, though. What can you do? You can’t edit the index from this screen. You could always add another index, but you can’t add another clustered index; it has to be nonclustered (more on the differences between those later), so that doesn’t make any sense. The last option is to delete this index and create a new one.
Go ahead and close the Index Properties screen, if it’s still open. Right-click the index in the Indexes folder and choose Delete. You’re going to get a screen that looks like Figure 7-2. When you do, just click OK.
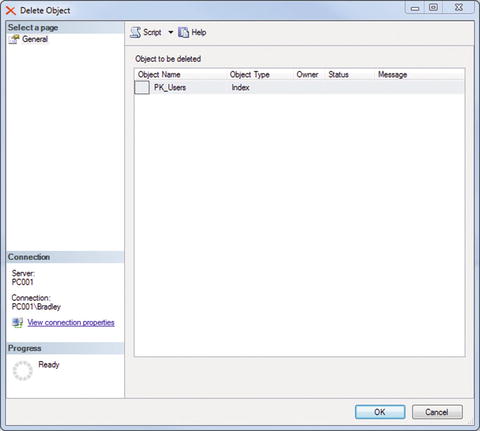
Figure 7-2. Delete Object
It is now deleted.
Again, right-click the Indexes folder and choose New Index ä Clustered Index. You will get an interface, as shown in Figure 7-3.
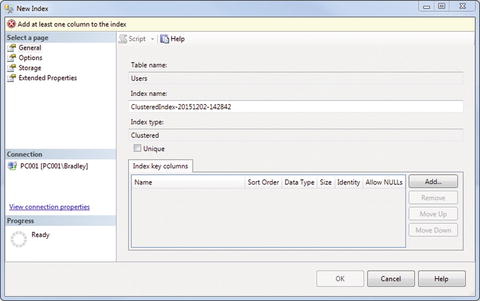
Figure 7-3. New Index
This lets you set up the index. When you choose a primary key, this is all done for you. This way gives you slightly more control, as you will see.
You can see that the table name is automatically added for you, but then a great big ugly Index name is defined. Go ahead and change that to IX_Users. Click the Unique check box as well. Next, click the Add button there on the right. You are shown a list of the columns in the table, so choose the column that you want to index and click OK. You should then see the screen shown in Figure 7-4.
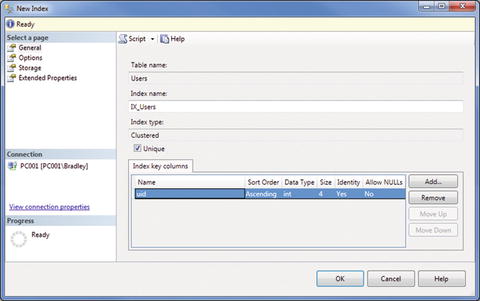
Figure 7-4. New Index (updated)
I said earlier that we wanted to show the values sorted in descending order. This is where we define that value. Pull down the menu under the Sort Order column shown in Figure 7-4 and select Descending. You should now see what is shown in Figure 7-5.
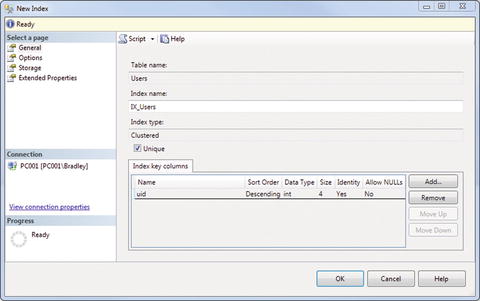
Figure 7-5. New Index (updated)
The only other thing we have to do is define where the index should live, so click the Storage option on the left. You should now see what is shown in Figure 7-6.
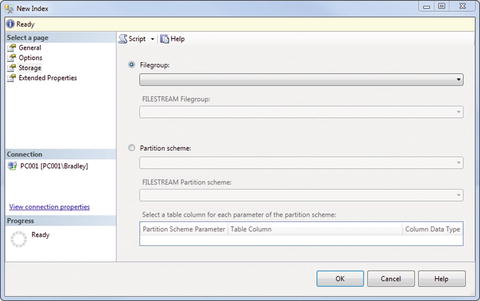
Figure 7-6. New Index, Storage option
Since we have to give the index a home, pull down the Filegroup menu and choose PRIMARY. This means that we are defining the index to be performed on the PRIMARY filegroup. It wouldn’t make much sense to define an index and then not define what to index. Defining the table wasn’t enough, in other words; we had to actually specify the filegroup. Why? Because you can have multiple filegroups for multiple databases. You can also choose to select a partition scheme here, but I didn’t want to get that far into it, and I’ve honestly never had to deal with this before. For 99% of installations out there, you won’t be using this option anyway.
Once you choose PRIMARY, click OK and your index is created. Now write a simple query against the table you just wrote the index for. Something easy, like the following, should suffice.
SELECT uid FROM [dbo].[Users];Did you notice anything about the UID values returned? They’re sorted in descending order, that’s correct. It is important to note that from now on, any query against this table is returned with descending UID values by default. Even if the index is deleted, it still returns the values in descending order until told to do otherwise by a new index. Interesting!
So what happens when you want to return the values sorted in ascending order again? I will leave that as an exercise for the student, but it entails deleting the current index and setting up another one. Review the previous steps to get going on that. You’re going to want this data sorted in ascending order, more than likely.
That’s a great start to indexes. You can see what it can do for you and your data, which is organize it for you and return it much quicker than using a heap. You can really see the performance improve when you get into much larger tables and joins.
So, are there different types of indexes ? You bet. We’ve only dealt with clustered indexes so far. There is another type called nonclusteredthat you can also use. It is just a slightly different way of returning query data quickly. I’m not going to get into the definitions for these in this book. If you are still unclear on the purpose of indexes at this, read on.
B-Tree Structures
You can’t really talk about clustered and nonclustered indexes without first bringing up the concept of B-Tree structures , which are used to return specific row data as expeditiously as possible.
Simply put, a B-Tree helps the index put the data together for return. Consider Figure 7-7, which shows the relationship between the different nodes of the structure. (I’m sure you’ve seen something like this a million times, if you’ve studied indexes before.) You can see from the illustration that the pages make up the traditional B-Tree structure. The top level, 1–200, stores all 200 rows of the table. The next level stores a subset of the original value, with each lower level storing the further subset until you actually get to the physical row of data.

Figure 7-7. B-Tree structure example
The B-Tree structure can be a great way to physically figure out how your database is returning the data it needs. It’s important to note that each page (or little box, as shown in Figure 7-7) references the lower pages until you get to the data. These pages are what become corrupted over time, so reorganizing and rebuilding the indexes is ideal for proper maintenance of your database.
You can use the B-Tree structure for both clustered and nonclustered indexes; both indexes work the same way. Yet there is another important thing to remember: you can’t have more than one clustered index on a table, but you can have (almost) as many nonclustered indexes as you want on a table.
Tip
Keep in mind that although you can, whether or not you should is ultimately the issue.
There will be performance hits with too many indexes on a table, a classic example of too much of a good thing. Yes, indexes will definitely boost your query performance, as long as they are used sparingly. Don’t index just for the sake of indexing, in other words.
I could have written about ten more pages on the different types and usages of indexes, but that’s really sort of outside of the scope of this book. If you are still unclear on indexes at this point, you should probably seek some supplemental reading on the topic. It is important for a good DBA to be absolutely clear on this subject of indexes.
Rebuilding vs. Reorganizing
For this chapter, we are focusing on rebuilding your indexes . You may have noticed that there was another task very similar to rebuilding that is named Reorganize Index . The major difference between rebuilding and reorganizing is quite simple: the Rebuild Index task drops and re-creates the indexes when the task is executed, while the Reorganize Index task simply shuffles the indexes to be better organized. They both return unused space to the operating system, they both will compress to an optimal size, and they both will leave the index functional during the operation (if selected).
Because they are so similar, Rebuild Index and Reorganize Index can be treated almost alike. More consideration should be given to the Rebuild task, though, because as I noted earlier, the index is dropped (destroyed) and re-created. This is probably optimal because it means that the index does not have a chance to become fragmented or have much “drift,” as opposed to an index that has only had the Reorganize task run against it. The Reorganize task is essentially the same as when insert, update, and delete statements are executed by the database engine. Essentially, the Reorganize task is an additional layer on this same functionality. While it certainly isn’t meaningless, it carries less weight in my book than the Rebuild task.
Setting Up the Maintenance Plan
Here we go again! Right-click Maintenance Plans under the Management folder in SSMS and choose Maintenance Plan Wizard. You then see what is shown in Figure 7-8.
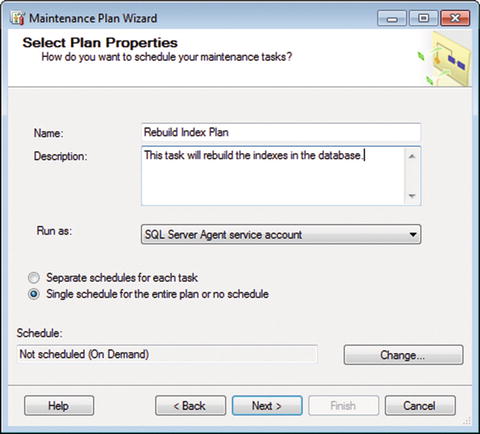
Figure 7-8. Select Plan Properties
Change the default values to what is shown in Figure 7-8. Click the Change… button to set the schedule, as shown in Figure 7-9.
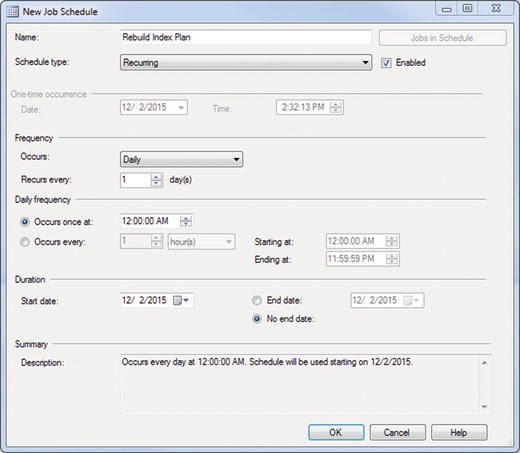
Figure 7-9. New Job Schedule
You only want it to run once a day, so change the Occurs drop-down menu to Daily and click OK. Your schedule is now set to run at 12:00AM every day. Click Next to continue.
You now see the screen shown in Figure 7-10, where you can choose the task you want to perform.
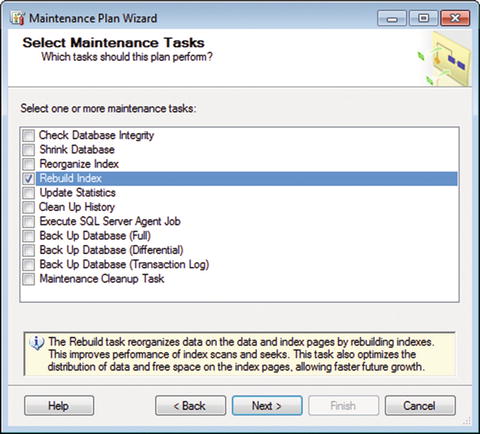
Figure 7-10. Select Maintenance Tasks
Choose the Rebuild Index check box and note the definition given: “The Rebuild task reorganizes data on the data and index pages by rebuilding indexes. This improves performance of index scans and seeks. This task also optimizes the distribution of data and free space on the index pages, allowing faster future growth.”
See how that relates to what we went over earlier in this chapter? Those indexes eventually drift; this task gets them back in line by rebuilding them from scratch. Does it take time? Yes. And it takes resources as well, so this is going to be an important one to keep an eye on. Luckily, we can do that.
Click Next when you’re ready to move on. You will now see the screen shown in Figure 7-11.
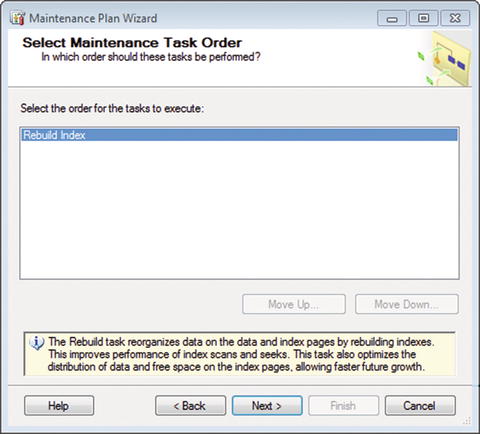
Figure 7-11. Select Maintenance Task Order
Since we just have the one task in here, don’t worry about it; click Next.
You are then shown the default screen to define the task. It should look like Figure 7-12.
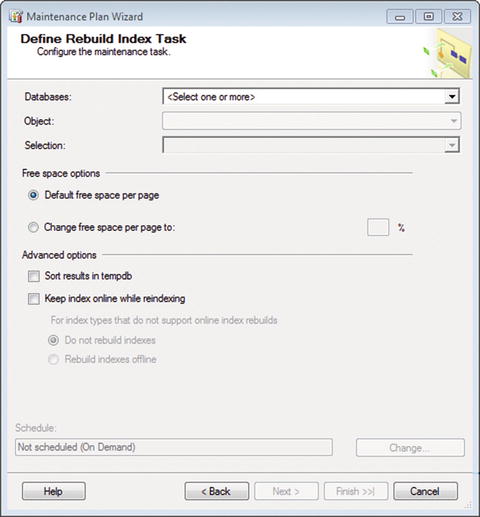
Figure 7-12. Define Rebuild Index Task
This should look familiar by now. You want to choose your database from the drop-down menu first. You are then shown the option for Object, which has the values Tables, Views, and Tables and Views. Choose the object that you want to set the task on, or leave the default of Tables and Views selected. This is absolutely everything that can be indexed: tables and views.
If you choose Tables, you have to manually define the tables you want to rebuild indexes on.
If you choose Views, you have to manually define the views you want to rebuild indexes on.
If you choose Tables and Views, all indexes are automatically rebuilt.
In the “Free space options” area, keep the “Default free space per page”. This is optimal for the database.
Under Advanced options, there are two selections: “Sort results in tempdb” and “Keep index online while reindexing”. What on earth…?
“Sort results in tempdb” gives you the option of keeping the indexes as they are built in tempdb, and then outputting the completed and rebuilt index to the specified filegroup. This doesn’t really give you anything beyond sorting and storing them directly in the filegroup. Selecting this option stores the sort results in tempdb and then the filegroup. Leaving it unselected runs the sort only against the filegroup. That’s about it.
The “Keep index online while reindexing” option is somewhat apparent. Do you want to keep it online while you’re rebuilding it? Chances are you want to enable this; otherwise, the index is not available when it is being rebuilt. Select the “Rebuild indexes offline” radio button also, in case there are indexes that cannot be rebuilt while online.
Your screen should look like Figure 7-13 when you are finished.
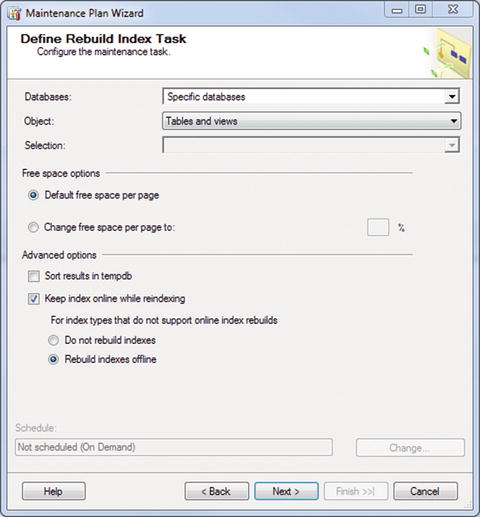
Figure 7-13. Define Rebuild Index Task (completed)
Click Next here. Now we get to define our reporting options. Go ahead and set your text file report location and the operator that we already set up. Your screen should now look like Figure 7-14.
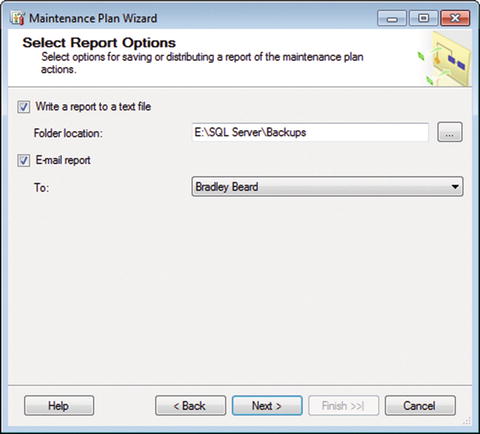
Figure 7-14. Select Report Options
Why did I choose E:SQL ServerBackups as the folder location? Remember back in Chapter 5 when we defined the maintenance cleanup task for text files? We had this folder location set as the location that we wanted to clean up because we were already writing to this area. So if we keep writing to this area, the maintenance cleanup task will clean up any mess we leave, which is ideal.
Click Next when you’re ready. You will see the summary screen, as shown in Figure 7-15.

Figure 7-15. Select Report Options
Fingers crossed. Hit Finish. Figure 7-16 should appear, complete with all those wonderful little green check boxes.
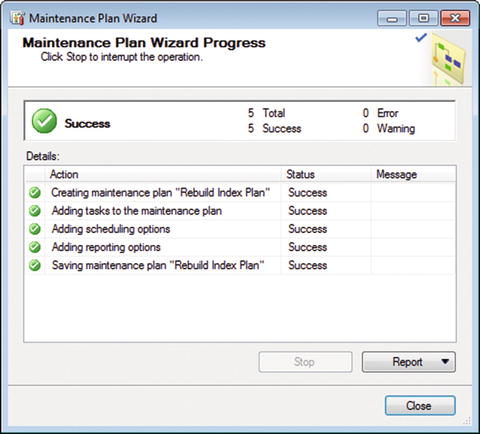
Figure 7-16. Maintenance Plan Wizard Progress
Beautiful.
Before we go on, make sure that you update the job as described before. I named mine Rebuild Index. Your Jobs folder should now look like Figure 7-17.
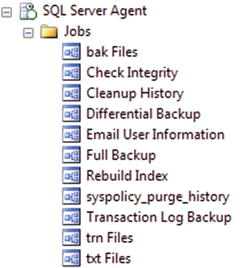
Figure 7-17. SQL Server Agent Jobs
Your Maintenance Plans should now look like Figure 7-18.
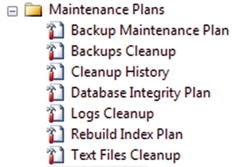
Figure 7-18. Maintenance Plans
Summary
Let’s quickly review this chapter.
We learned how to set up an index on a table and demonstrated the successful indexing by showing how data is returned in descending order based on the index values.
We briefly learned about indexes and B-Tree structures, and we now understand the importance of indexes as it relates to data retrieval.
Here is something else to remember, as an aside: if you have a high-volume database, then you should probably rebuild at least once a week. I know we set this as once a day in the task, and that’s fine too, as long as it fits your needs. I mentioned in an earlier chapter that “high volume” is a relative term, and I appreciate that it may not mean the same to all users. To alleviate that, I’m going to just say that once a week is enough for probably 99% of the readers of this book. Of course, you are free to do it as often as you like, but if you truly have a high-volume database, you will experience performance degradation if you rebuild too often.
That’s a pretty solid start for indexing. If you still are unclear, I highly recommend Mike McQuillan’s book Introducing SQL Server (Apress, 2015) as supplemental reading material on this topic.