
As you may recall, in Chapter 1, we installed Node.js on our local machine using the installer from http://nodejs.org . In Chapter 2, we rolled out servers and installed Node.js on Ubuntu servers. In Chapter 3, we installed modules and created our very own first Node.js module and published it to both npm and GitHub.
In this chapter, we will put it all together and utilize Node.js to create a service layer that can be used on any machine.
Note
A service layer, middle layer, or middle tier is the processing taking place between the front end and the database. It include business logic and processing data. The service layer allows for creating different presentations of the same data.
Express App
Our first step is to set up our server so that we can have an address that the client side can call and be able to receive a result from a service call.
Node.js and Express are built without a strict folder structure, but there are better practices out there. WebStorm includes a folder structure based on these best practices, but of course, what fits one project may not fit another. Regardless, it is recommended that we start by creating a new Node.js Express project.
We’ll create a Node.js Express server, examine best practices, and create services.
Note
Express is a flexible Node web application framework based on Node.js with a small footprint that provides a set of features for application development. Remember, the “E” in the MEAN Stack stands for Express, and using Express can help simplify and accelerate development over creating a separate server for front end. The same Node.js server can be used for the middle layer and presentation layer. Visit the Express website here: http://expressjs.com .
Installing Express
To start an Express skeleton project, open WebStorm, select “Create New Project,” then select “Node.js Express App,” and lastly, “Create” (Figure 7-1).
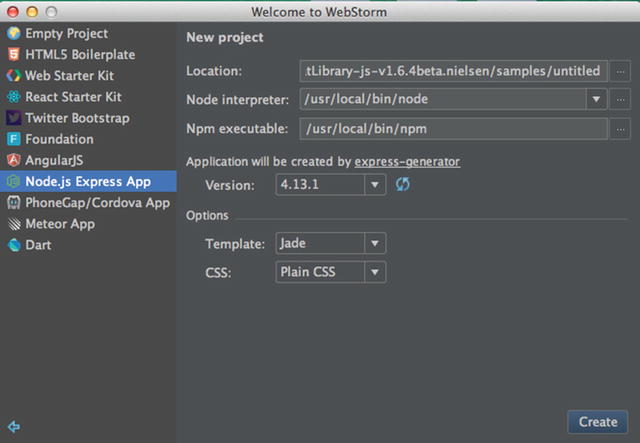
Figure 7-1. Creating a new Express project in WebStorm
Look at the directory list and you will see that we have a project with the following directories and files:
node_modules folder: the Node.js module dependencies being used by the project
public folder: where we will place our static files, such as images, JavaScript files, and stylesheet CSS files
routes folder: currently includes index.js and users.js JavaScript files (the services we will be using for our app)
views folder: holds Jade (now called Pug) templates rendered and served by the routes. Jade/Pug uses a concise, readable syntax to make authoring HTML pages easier.
app.js file: initializes and glues the app components together.
package.json file: stores references to the modules (installed in node_modules) and their versions that the app depends on
bin/www file: Node.js entry point that creates servers and loads required dependencies
If you look at the “package.json” file, notice that "express" "∼4.13.4" is the current stable version is 4 and Express 5 is in alpha state. Feel free to visit Express to see the list of changes in Version 5: http://expressjs.com/en/guide/migrating-5.html
Hello World Express
Now that we have a project set up in WebStorm, we’ll create a server locally and get a “Hello World.” In the upper right corner of WebStorm, click the green caret to run the “www” file. See Figure 7-2.

Figure 7-2. Run “www” Node.js Express app
You will see in the left button in the corner, the run window shows that the app is running successfully on port 3000. See Figure 7-3.

Figure 7-3. App running successfully on port 3000
Open http://localhost:3000/ and you will be able to see the app running (Figure 7-4).

Figure 7-4. Express app running on port 3000
Express Generator Tool
If you don’t want to use WebStorm to create your Express project, there is another way. In the section below, we’ll create the same project with a generator.
Express has a generator tool called “express-generator.” You can create the same seed project as the one built in to WebStorm with just two commands:
$ sudo npm install express-generator –g$ express untitled
The app the Express tool creates is the same as the one in WebStorm.
Pugjs, Previously Known as Jade
Jade’s name was changed to Pugjs , and it is one of the most popular template engines. You can take a look at the project here: https://github.com/pugjs/pug . It allows us to quickly write intuitive, easy-to-read code that will convert to HTML, saving development time and making the code readable. We have seen Pugjs in action in the previos example. In this section, we will cover Pugjs more, showing you how to integrate it into your app and utilize it.
Add the pug library to our project:
$ npm install pug --save-devNext, create the following file inside of the views folder views/index.pug, as shown in Listing 7-1.
Listing 7-1. Index.pug
doctype htmlhtml(lang="en")headtitle= pageTitlescript(type='text/javascript').if (foo) bar(1 + 5)bodyh1 Pug - node template engine#container.colif youAreUsingPugp You are amazingelsep Get on it!p.Pug is a simple templating language with astrong focus on performance and powerful features.
Listing 7-1 was taken straight from a Pug project; it illustrates how to write an easy-to-read HTML code in Pugjs. It creates an HTML document, sets the page title, performs some simple JavaScript calculation, and adds “h1” and “p” tags to the document.
Similarly, the code creates another file (“views/hello.pug”). The file will create an HTML document, add an “h1” tag and set “body” as the value (Listing 7-2).
Listing 7-2. hello.pug
htmlheadbodyh1=body
Now that we have two template documents , all we have to do is wire our app and set the view folder. Inside of “app.js,” after setting the app “app.set('view engine', 'jade')”, add the following code (see Listing 7-3):
Listing 7-3. Set app.js to map to the view folder
// set pugapp.set('view engine', 'pug');// pass variables to pugapp.get('/hello', function (req, res) {res.render('hello', { body: 'hello world pug'});});
Notice that we’re passing the value of “body” to the hello.pug template page.
To view the template (Figure 7-5), open the documents:

Figure 7-5. Index.pug template page
$ Open http://localhost:3000Now, open the hello.pug page (Figure 7-6):

Figure 7-6. Hello.pug template page
$ Open http://[computer name]:[port]/helloAs you can see, creating a template is a powerful tool to put in your bag of tricks when creating Express apps. It can be used for many different things, such as static pages, content, and HTML emails, as we will see later in this chapter.
Setting Up a Service Layer
Next, to set up a service layer, we can utilizie Express’s built-in functionality. Express handles service requests using “routing.”
Note
Routing in Express is the application end point (URI, or path) and an HTTP request method (GET, POST, HEAD, PUT, DELETE, etc) and how the end point responds to a client’s request.
Open the “routes” folder in your app and you will see that there are two files:
index.js
users.js
index.js is the default “home” page file, and app.js routes the “routes/index.js” file with the “views/index.jade” template file. When the client calls http://localhost:3000/, it sets the index as the route. In app.js (Listing 7-4), it also creates the app as Express, sets the views as a Jade template, and uses routes we define.
Listing 7-4. app.js sets routes
var routes = require('./routes/index');var users = require('./routes/users');var app = express();// view engine setupapp.set('views', path.join(__dirname, 'views'));app.set('view engine', 'jade');app.use('/', routes);app.use('/users', users);
Now, in index.js and users.js, we define how to handle the request. For “views/index.js,” the script sets the title as “Express,” which the Jade template will be using (Listing 7-5).
Listing 7-5. Content of index.js file
var express = require('express');var router = express.Router();/* GET home page. */router.get('/', function(req, res, next) {res.render('index', { title: 'Express' });});module.exports = router;
In the “views/index.jade” template file, the code defines the front-end representation (Listing 7-6).
Listing 7-6. Content of “index.jade” file
extends layoutblock contenth1= titlep Welcome to #{title}
The Jade template code is similar to HTML, but without the tags. h1 is the same as the HTML heading <h1> tag, and p is the same as the HTML <p> paragraph tag. More on Jade (Pugjs) later in this chapter.
For “routes/users.js,” the service responds with the message, “respond with a resource” (Listing 7-7). You can also open the URL to see the message: http://localhost:3000/users.
Listing 7-7. Content of users.js file
var express = require('express');var router = express.Router();/* GET users listing. */router.get('/', function(req, res, next) {res.send('respond with a resource');});module.exports = router;
The service is using the route “get” HTTP method router.get(). Additionally, Express supports all of the following methods: get, post, put, head, delete, options, trace, copy, lock, mkcol, move, purge, unlock, report, mkactivity, checkout, merge, m-search, notify, subscribe, unsubscribe, patch, search, and connect.
Express also supports “all()”, which will accept any type of HTTP method.
Setting Up a POST Service
In this section, we will be setting up a POST Service Layer and testing it. Change the code inside of “routes/users.js” to the following (Listing 7-8):
Listing 7-8. users.js POST HTTP method
var express = require('express');var router = express.Router();/* GET users listing. */router.get('/', function(req, res, next) {res.send('GET');});/* POST users listing. */router.post('/', function(req, res, next) {res.send('POST: ' + req.body.query);});module.exports = router;
We have added a “router.post” HTTP method, and when the client sends a POST request, it expects a query param in the body of the request. To see this service at work, create a new HTML file and name it “test.html” (Listing 7-9).
Listing 7-9. test.html form
<form action="http://localhost:3000/users" method="post"><input type="text" name="query" id="query"/><button id="btn">submit</button></form><script>var button = document.getElementById('btn');button.addEventListener(function() {document.getElementById('btn').submit();});</script>
Now open test.html in a browser. The content of the file is simple—use “vim test.html” or your personal favorite editor to create the code. In the Terminal, type “$ open test.html”, or just double click the file. See Figure 7-7.

Figure 7-7. Test.html form test page
Reload the server (or click the Rerun button in WebStorm) for the Express changed files to apply.
Next, type anything into the text input box and hit submit (Figure 7-8).

Figure 7-8. Users POST HTTP method return form data
As you can see, the service displays the results of the text input box. This data can be used to retrieve a user from a database or any other data source.
MongoDB Database Integration
In this section, we will be installing the MongoDB database, integrating the database using Express, and creating a service.
MongoDB consists of the following tools:
mongod: the actual database process
mongos: MongoDB Shard—like a controller routing service for MongoDB. It processes queries from the application layer and determines location of the data in the sharded cluster.
Mongo: the database shell (which uses interactive JavaScript)
and the following utilities:
Mongodump: a dump tool-for backups, snapshots, and other tasks
Mongorestore: allows dumping of a single collection
Mongoimport: allows the importing of data in JSON or CSV format
Mongofiles: allows placing and retrieving files from MongoDB GridFS mongostat and shows performance statistics
Install MongoDB
To install MongoDB
http://www.mongodb.org/downloads
Select “Community Server” tab, select “Current Stable Release,” and lastly, “Download (tgz),” as shown in Figure 7-9.

Figure 7-9. Downloading MongoDB
Next, navigate to the download folder and extract the gzip compressed tar file:
$ cd ∼/Downloads$ tar xzf mongodb-osx-ssl-x86_64-3.2.10.tgz
Note that the version at the time of writing is 3.2.10, but the version may have changed by the time you install. Next, move the file to a user local folder under MongoDB.
$ sudo mv mongodb-osx-x86_64-3.2.10 /usr/local/mongodbNow we can set a data folder for our MongoDB database:
$ sudo mkdir -p /data/db$ whoami$ [user name]$ sudo chown [user name] /data/db
Next, we will add the permission of MongoDB to a Bash profile.
$ cd ∼$ vim .bash_profile
Inside the Bash profile, insert the following:
export MONGO_PATH=/usr/local/mongodbexport PATH=$PATH:$MONGO_PATH/bin
To save and quit, click “ESCAPE” + “:wq” + “Enter.” Run the Bash profile for these changes to take effect:
$ . ∼/.bash_profileMongoDB is now installed. You can verify by running the following command:
$ mongo -versionMongoDB shell version: 3.2.7
As you can see, MongoDB replies with the version number. Similarly, for command line options, use the help flag:
$ mongod --helpStart MongoDB
To start MongoDB, open a new Terminal, type “command” + “t”, and run the mongod command.
$ mongodMongoDB shows all the output connection messages and ends with the following message:
[initandlisten] waiting for connections on port 27017>
A few troubleshooting tips:
To stop MongoDB on a mac in Terminal, open “$ top,” identify the process, and type “$ kill [pid]”, where pid should be the MongoDB process ID.
If you get a message such as “Failed to obtain address information for hostname [COMPUTER NAME]: nodename nor servname provided, or not known," you need to add the host of your computer: “$ vim /etc/hosts”. Then, add the host: “127.0.0.1 [COMPUTER NAME]”.
If you receive the message “Do you want the application mongod to accept incoming network connection,” select “Allow.”
Visit MongoDB docs regarding FAQ diagnostics: https://docs.mongodb.com/manual/faq/diagnostics/Next, open another Terminal tab instance while “waiting for connections on port 27017” mongod is still running.
$ mongoMongoDB shell version: [version]If you go back to the mongod Terminal tab, it will confirm that mongod is connected: “[initandlisten] connection accepted from 127.0.0.1:49360 #1 (1 connection now open).”
As you can see, it replies with a connection and we see “>,” and MongoDB is ready for a command.
> show dbslocal 0.000GB
We don’t have a database yet, so it returns with no data size.
Create a Database
Now that we have mongod running and we can interact and type commands, we can create our first MongoDB database. In the MongoDB command line, switch to the username (as you recall, we discover ouruser name by using “whoami”):
> use [username]The server will reply in the Terminal output:
switched to db [username]Next, we’ll create a user collection under our username and insert information about our user:
> db.usercollection.insert({ "username" : "someuser", "email" : "[email protected]" })The server replies in the Terminal output:
WriteResult({ "nInserted" : 1 })Now we can confirm that the information was inserted correctly:
> db.usercollection.find().pretty()The server replies in the Terminal output:
{"_id" : ObjectId("5771bc5a4c127a7131da18e2"),"username" : "someuser","email" : "[email protected]"}
Also, running “show dbs” will show us that the user has a collection; the size is still insignificant.
> show dbsThe server replies in the Terminal output:
[username] 0.000GBlocal 0.000GB
We have created our first MongoDB database, inserted a user collection under our username, and confirmed that the information was inserted correctly.
Read Results from MongoDB into our Express App
Next, we want to be able to interact with the MongoDB database we created and set our Node.js service layer to be able to execute CRUD (create, read, update, and delete) operations and interact with the express front layer.
MongoDB API
In this section, we’ll install an API that can create the connection between Node.js and MongoDB. Navigate back to the Express project we created in the previous section. We want to add the following two libraries:
MongoDB: the official Node.js driver for MongoDB. See: https://www.npmjs.com/package/mongodb
Monk: substantial usability improvements for MongoDB usage within Node.JS. See https://www.npmjs.com/package/monk
Install these two libraries locally and save them in the package.json file by typing:
$ npm install mongodb monk --save-devapp.js
Now that we have an API that can do the talking, we can go back to our “app.js” file and make our MongoDB database accessible to all of our routers. Place Listing 7-10’s code after “var app = express();”.
Listing 7-10. “app.js” connected to MongoDB
var mongo = require('mongodb');var monk = require('monk');var db = monk('localhost:27017/[USER NAME]’);// Make our db accessible to our routerapp.use(function(req,res,next){req.db = db;next();});
Notice that we set our database as our username. We got it by running “$ whoami” in the Terminal. Ensure you change the bracketed username (“[USERNAME]”) to your username.
users.js
Now in users.js, we can query the database and return the users (Listing 7- 11).
Listing 7-11. users.js get service
/* GET users listing. */router.get('/', function(req, res, next) {console.log('start get');var db = req.db;var collection = db.get('usercollection');collection.find({},{},function(e,docs){res.send(docs);});});Similarly, a post request will look like Listing 7-12.
Listing 7-12. users.js post service
/* POST users listing. */router.post('/', function(req, res, next) {var db = req.db;var collection = db.get('usercollection');collection.find({'username': req.body.query},{},function(e,docs){res.send(docs);});});You can just copy the complete code into routes/users.js as shown in Listing 7-13.
Listing 7-13. users.js complete code
var express = require('express');var router = express.Router();/* GET users listing. */router.get('/', function(req, res, next) {console.log('start get');var db = req.db;var collection = db.get('usercollection');collection.find({},{},function(e,docs){res.send(docs);});});/* POST users listing. */router.post('/', function(req, res, next) {var db = req.db;var collection = db.get('usercollection');collection.find({'username': req.body.query},{},function(e,docs){res.send(docs);});});module.exports = router;
Remember to ensure “mongod” is running by typing “mongod” in a Terminal instance.
Be sure to “run” the Node.js app by clicking the green return icon in WebStorm or by typing command + R while on the run window for the changes to take effect.
To test these changes, go to the user URL and you should be able to see the results of users:
http://localhost:3000/users
You will see the results in the browser:
[{"_id":"57f303a9ed4425e3f6a7724e","username":"someuser","email":"[email protected]"}]Now open “test.html” again, and this time give “someuser” as the user name and hit submit.
You’ll get the same results:
[{"_id":"57f303a9ed4425e3f6a7724e","username":"someuser","email":"[email protected]"}]Hit the back button in the browser and try a false username—you will get an empty result: “[]”.
We were able to create a MongoDB database connect to the MongoDB database through Node.js and create a Service Layer in Express to perform CRUD operations. In the following sections, we’ll add more interactions using Socket.IO.
Express and Socket.IO
In the section below, we will be covering creating a Service Layer that utilizes Web Socket to transfer data. Web Socket is often used to transfer real-time messages such as chats or streaming videos. Web Socket is a valuable feature that can be added that realism features to your application.
Install Socket.IO
Socket.IO allows us to easily create real-time event communications. This is a core feature and a good technology to keep in your bag of tricks for any type of app you will be building. Let’s start off by installing Socket.IO. Run the following command in the project root location:
$ npm install socket.io --save-devAdd Socket.IO to the App
To add Socket.IO, open app.js and create a server variable, then initialize Socket.IO. We also want to add Socket.IO to our response so it will be available (Listing 7-14). Place code after “var app = express();”.
Listing 7-14. Update app.js to set a Socket.IO server
// NOTE: add socket.iovar server = require('http').Server(app);var io = require('socket.io')(server);app.use(function(req, res, next){res.io = io;next();});
Lastly, we want to change our Express app signature to pass the app and server. bin/www need both app and server instead of just app. Be sure to add the following line at the bottom of the app.js file:
// NOTE: change from: module.exports = app;module.exports = {app: app, server: server};
Next, open the “bin/www” file and make changes so that the app variable will point to the app and server. This accomodates the changes we’ve made in app.js(Listing 7-15).
Listing 7-15. “bin/www” changes to changes of Express app
// NOTE: changed from: var app = require('../app');var app = require('../app').app;// NOTE: changed from: var server = http.createServer(app);var server = require('../app').server;
Update Users Service to Include Socket.IO
Now we can update our “routes/users.js” service file and send Socket.IO event notifications. Open “routes/users.js” and replace the service router.get with Listing 7-16.
Listing 7-16. users.js calling “helloSocketIO” and passing data
/* GET users listing. */router.get('/', function(req, res, next) {var db = req.db;var collection = db.get('usercollection');collection.find({},{},function(e,docs){// NOTE: EE: added socket IO callres.io.emit("helloSocketIO", docs);res.send(docs);});});
Note that once we have the results from the database, we are able to send these results as event notifications using Socket.IO, so that any subscriber to “helloSocketIO” can retrieve data.
You can return “bin/www” and refresh “http://localhost:3000/users,” which will produce the same results, since we are sending the data back “res.send(docs);”.
Retrieve a Socket.IO Event Using MongoDB Results
On the front end, our index can subscribe to the event notification and display an alert showing the data. In “views/index.jade,” change the code to that in Listing 7-17.
Listing 7-17. Update “index.jade” to include socket.io connection and results from database
extends layoutblock contenth1= titlep Welcome to #{title}script(src="/socket.io/socket.io.js")script.var socket = io('//localhost:3000');socket.on('helloSocketIO', function (data) {alert('Hello ' + data[0].username);});
Test Socket.IO App
To test our app, restart the app using the run command in WebStorm and open an instance of the app in your browser:
$ open http://localhost:3000Now, when we call the users service using a browser, it will display our user in an alert:
$ open http://localhost:3000/usersYou can also do it without user interaction using cURL:
$ curl http://localhost:3000/usersNote
cURL is a Linux tool that can be used without user interaction and is built to transfer data to or from a server using protocols such as FTP, HTTP, HTTPS, POP3, RTMP, and others. It’s available for Mac OS X out of the box in Terminal.
rooms.js
An easy way to integrate Engine.IO and Socket.IO, or any other transporters, with your app is to use an implementation layer that sits on top of these engines. There are many implementations out there, and we will review one as an example.
rooms.js is a JavaScript Node.js module for creating rooms and streaming data between the front end and back end. It uses Engine.IO or Socket.IO for sending messages and provides a way to send and receive messages and switch different transporters for creating rooms and streaming data between users, streaming data from a database and even streaming from a third-party CDN.
Take a look at Figure 7-10to better understand the flow. rooms.db connects to a database or a CDN, and through rooms.js, it uses Socket.IO to send messages through a controller to an app.

Figure 7-10. rooms.js high-level architecture
rooms.js, rooms.db and rooms.js-client together combine a light-weight back-end/front-end libraries built to stream live data and solve problems related to real-time communications.
To start a new project, open WebStorm and select “Create New Project,” then select “Node.js Express App.” Name the project “rooms”. Lastly, click the “Create” button.
Next, open the Terminal in WebStorm and run the following commands:
$ npm install roomsjs rooms.db http --save-devWe will be using Mongoose as the database connector:$ npm install mongoose --save-dev
If you didn’t install Bower in Chapter 1, you can run the following command prior to installing the rooms.js-client to install Bower:
$ npm install -g bowerNext, install the front-end client:$ bower install roomsjs-client
Next, we want to add app.js as an entry point, since we will be configuring the server and connection there instead of using “bin/www”:
Click “Run/Debug configurations” ➤ “Edit configurations…” (Figure 7-11).

Figure 7-11. Edit configurations in WebStorm
Next, click “Add new configuration” (plug symbol) and select “Node.js” (Figure 7-12).

Figure 7-12. Add new configuration in run/debug wizard
Name the configuration “app”
Set the working directory as [location of WebStorm Projects]/rooms
Set the “JavaScript file” field to “app.js” (Figure 7-13).

Figure 7-13. Run/Debug configrations window in WebStorm
Now copy the following into the “rooms/app.js” file (Listing 7-18):
Listing 7-18. app.js application entry point
'use strict';var os = require('os'),rooms = require('roomsjs'),roomdb = require('rooms.db'),port = (process.env.PORT || 8081);// create express server if neededvar express = require('express'),app = express().use(express.static(__dirname + '/client'));// engine.io, socket.iovar server = require('http').createServer(app).listen(port, function () {console.log('Listening on http://' + os.hostname() + ':' + port);});// servicesroomdb.setServices('services_sample/', app); // pass the app to get rest services or null// set roomsrooms = new rooms({isdebug : true,transporter : {type: 'engine.io', /* options: engine.io|socket.io|sockjs */server : server},roomdb : roomdb /* or null if db not needed */});We’ve created an Express server and set the services we will be using as well as passed reference of the server we will be using, decided on the Web Socket type and database.If you try to run the application at this point, you will received an error message, since we didn’t set any services yet but defined them here:roomdb.setServices('services_sample/', app);
Creating Static Service
In this section, we will create a service that can interact with the database and create a Web Socket connection for us to use. What we’ve done so far is create a server and pass the app, then have the app scan the services folder for any services.
For services, we’ll create a static data service that just returns names. First, create a folder in the project root and name it “services_sample.” Next, create a “services_sample/getnames.js” file in the “services_sample” directory.
Copy Listing 7-19.
Listing 7-19. getnames.js service with static data
'use strict';function getnames(data, dbconnectorCallBackToRooms) {var vo = ['Liam', 'Samuel', 'Noah'];dbconnectorCallBackToRooms(data, vo);}module.exports.getnames = getnames;
The code creates an array with names and passes it back to the database connector. The “dbconnectorCallBackToRooms” command returns the value object with the names “Liam,” “Samuel,” and “Noah.”
To test the code, run “app” in WebStorm. You should see the Terminal output:
/usr/local/bin/node app.jsadding service method: getnamescreated rest API: /getnamesListening on http://[computer name]:[port]
Navigate to a browser and give it a try:
http://localhost:8081/getnames
See Figure 7-14.

Figure 7-14. rooms.js getnames service
This example is simple in nature, but it shows you how to create a service and how the app can return the data from any data provider you want.
Creating MongoDB Service
In the next section, we can connect to an actual mongo database and insert and read data. To do so, all we need to do is define the data source we will be connecting to. In app.js, add the following line after we set the services:
roomdb.connectToDatabase('mongodb', 'mongodb://localhost/usercollection', {});Listing 7-20 provides the updated code for app.js.
Listing 7-20. app.js include connection to Mongo database
'use strict';var os = require('os'),rooms = require('roomsjs'),roomdb = require('rooms.db'),port = (process.env.PORT || 8081);// create express server if neededvar express = require('express'),app = express().use(express.static(__dirname + '/client'));// engine.io, socket.iovar server = require('http').createServer(app).listen(port, function () {console.log('Listening on http://' + os.hostname() + ':' + port);});// servicesroomdb.setServices('services_sample/', app); // pass the app to get rest services or nullroomdb.connectToDatabase('mongodb', 'mongodb://localhost/usercollection', {});// set roomsrooms = new rooms({isdebug : true,transporter : {type: 'engine.io', /* options: engine.io|socket.io|sockjs */server : server},roomdb : roomdb /* or null if db not needed */});
In services, create a service to insert data and name the file “services_sample/insertchatmessage.js”. (Listing 7-21). The service will be creating a connector to connect to the database and create the schema (if it does not exist already) then enter chat message and lastly, display the existing message.
Listing 7-21. insertchatmessage service
'use strict';function insertchatmessage(data, dbconnectorCallBackToRooms) {var connector = this.getConnector(),Chat;if (connector.isModelExists('Chat')) {Chat = connector.getModel('Chat');} else {var schema = connector.setSchema({chatMessage: 'string',roomId: 'Number',gravatar: 'string',email: 'string',userName: 'string'});Chat = connector.setModel('Chat', schema);}var chatMessage = new Chat({chatMessage: data.params.chatMessage,roomId: data.params.roomId,gravatar: data.params.gravatar,email: data.params.email,userName: data.params.userName});chatMessage.save(function (err) {if (err) {console.log('error' + err.message);} else {Chat.find(function (err, messages) {if (err) {console.log('error getting messages: ' + err.message);}dbconnectorCallBackToRooms(data, messages);});}});}module.exports.insertchatmessage = insertchatmessage;
To test the service, rerun the app.
When you rerun the app, you should see the new service we have added in the run output:
/usr/local/bin/node app.jsadding service method: getnamescreated rest API: /getnamesadding service method: insertchatmessagecreated rest API: /insertchatmessageListening on http://[computer name]:[port]
To see the code in action, call the service in the browser:
http://localhost:8081/insertchatmessage?chatMessage=test&roomId=1&[email protected]&userName=eli
Ensure MongoDB is still open. As you may recall, we ran mongod by typing “mongod” in the command line in Terminal.
$ mongodCreating a MongoDB GUI Client
In order to mange MongoDB more easily, it’s recommended to download a GUI tool such as mongoclient in order to view the data entered.
https://github.com/rsercano/mongoclient
The link to download the OSx software is at the bottom of the page:
https://github.com/rsercano/mongoclient/releases/download/1.2.2/osx-portable.zip
Move the software to the “Applications” folder or your favorite software location. To create a connection to the local database, click “connect” from the right top corner, select “Create New,” and fill in the following information:
Connections:
Connection Name: local
Hostname: localhost
Port: 27017 (default)
DB Name: usercollection
Select “Save changes,” as shown in Figure 7-15.

Figure 7-15. MongoClient connect wizard
Select “Connect Now.” Under the “Collections” item in the left-hand sidebar, you should be seeing “chats,” which is the data collection we just created using the “insertchatmessage” service. Click the “chats” collection and click the “execute” button, leaving all the default form settings in place.
Connect Front-End Application to Service
Now that we know how to create services, we can create front-end code to consume the data into our app. room.js comes with predefined examples for creating a front-end app for Angular, Engine.IO, Socket.IO, or SockJS. To get started:
Copy “bower_components/roomsjs-client/client” to the “rooms” root directory:
$ cp -rf bower_components/roomsjs-client/client ∼/WebstormProjects/roomsRerun “app.js.”
Open a few instances of the examples:
$ Open http://[computer name]:[port]/examples/engineio/
Look at the console and click “get results.” You will be able to see the data from the service being retrieved (Figure 7-16).
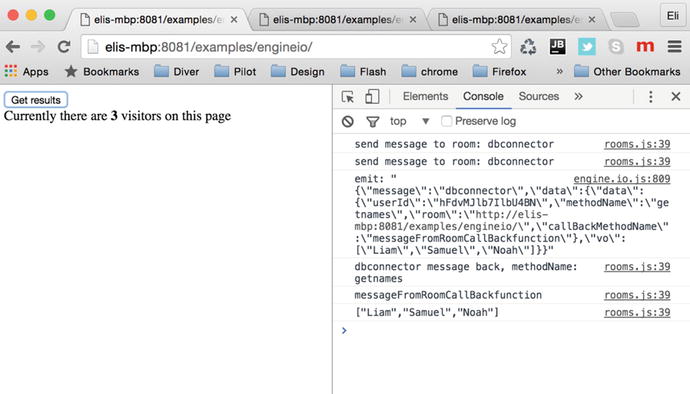
Figure 7-16. Engine.IO example connecting to service getnames
As we open more instances of our app, we can see how we are able to consume the data from Engine.IO to determine how many users are connected to our room. Once we click “get results,” we can connect to our room to retrieve the data from the service we created.
Open “client/examples/engineio/index.html” and take a look at the code (Listing 7-22).
Listing 7-22. Retrieved data
<html><head><script src="http://code.jquery.com/jquery-1.10.1.min.js"></script><script type="text/javascript" src="libs/engine.io.js"></script><script type="text/javascript" src="../../dist/libs/rooms.js"></script><script type="text/javascript" src="libs/autostartcontroller.js"></script><body><button id="getResultsButton">Get results</button><div id="visitors"/></body></html>
This example is adding the libraries we’re using—jQuery, Engine.IO.js, rooms.js, and autostartcontroller.js—and including a button and a div for displaying the visitor count.
Take a look at “client/examples/engineio/libs/autostartcontroller.js” (Listing 7-23). The code includes methods to “connectUser” and “listenToUserActions”. The code connects to a room, and once there are changes in the room, we listen to the change and update the front end.
Listing 7-23. autostartcontroller.js control rooms.js
'use strict';var isAutoConnect = false,rooms,userId,roomName;function listenToUserActions() {$("#getResultsButton").bind('click', function () {rooms.callDbConnector(userId, 'getitems', 'messageFromRoomCallBackfunction');rooms.callDbConnector(userId, 'getnames', 'messageFromRoomCallBackfunction');});}function connectToSocket() {var hostName = window.location.hostname,port,roomSetup,transporter,connectURL;userId = Rooms.makeid(16);roomName = window.location.href;port = (hostName !== '0.0.0.0' && hostName !== 'localhost') ? '80' : '8081';connectURL = 'http://' + hostName + ':' + port;roomSetup = {roomName : roomName,subscriptions : {RoomInfoVO : true}};rooms = new Rooms({roomSetup : roomSetup,userConnectedCallBackFunction : userConnectedCallBackFunction,userRegisteredCallBackFunction : userRegisteredCallBackFunction,numOfUsersInARoomCallBackFunction : numOfUsersInARoomCallBackFunction,stateChangeCallBackFunction : stateChangeCallBackFunction,debugMode : true});transporter = new eio.Socket('ws://localhost/');rooms.start({transporter : transporter,type : 'engine.io'});}function stateChangeCallBackFunction(data) {// impl}function userConnectedCallBackFunction() {if (isAutoConnect) {rooms.registerUser(userId);}}function userRegisteredCallBackFunction() {rooms.getNumberOfRegisteredUsersInRoom(userId);}function numOfUsersInARoomCallBackFunction(data) {var numofppl = data.size;document.getElementById('visitors').innerHTML = '<div style="font-size: 15px; top: 5px">Currently there are <b>'+numofppl+'</b> visitors on this page</div>';if (data.hasOwnProperty('register')) {sendMessageToLog('register userId: ' + data.register);} else if (data.hasOwnProperty('disconnect')) {sendMessageToLog('disconnect userId: ' + data.disconnect);}}function messageFromRoomCallBackfunction(data) {sendMessageToLog('messageFromRoomCallBackfunction');sendMessageToLog(JSON.stringify(data.vo));}function messageFromRoomCallBackfunction2(data) {sendMessageToLog('messageFromRoomCallBackfunction2');sendMessageToLog(JSON.stringify(data.vo));}function connectUser() {isAutoConnect = true;connectToSocket();}if (typeof jQuery !== 'undefined') {$(document).ready(function () {'use strict';connectUser();listenToUserActions();});} else {sendMessageToLog('jQuery not loaded');}
rooms.js with Angular
Similarly, we can create an Angular app that connects with rooms.js. Run this command a few times in order to open a few instances of the app:
$ open http://localhost:8081/examples/angular/Take a look at the console in the browser. You can see the interaction of users entering and leaving the room:
numberOfUsersInRoom message: 1
disconnect userId: 0r1sO64uyQGIl42m
The app entry point index.html is located here: “client/examples/angular/index.html” (Listing 7-24). This loads all the libraries we will be using: Engine.IO, Angular, rooms and angular-rooms.
Listing 7-24. rooms.js utilizing Angular index.html page
<!doctype html><html ng-app="myModule"><head></head><body><script type="text/javascript" src="../engineio/libs/engine.io.js"></script><script src="http://code.angularjs.org/1.0.6/angular.min.js"></script><script type="text/javascript" src="../../dist/libs/rooms.js"></script><script src="angular-rooms.js"></script><script src="scripts/app.js"></script></body></html>
In the angular app, we define the module we will be using and create a connection; see “client/examples/angular/scripts/app.js” (Listing 7-25).
Listing 7-25. Defining module and creating a connection
angular.module('myModule', ['rooms']).run(['roomsGateway', function (roomsGateway) {'use strict';roomsGateway.connectToGateway('ws://localhost:8081/', true);}]);
angular-rooms (see “client/examples/angular/angular-rooms.js”), is where the heavy lifting is happening. It’s similar to what we’ve done in autostartcontroller.js; we create a room, connect to it, and receive messages.
node-email-templates Library
Sending emails is a crucial and common task that is needed when creating a service, and there are many template libraries out there. One of the more popular ones is “node-email-templates.” Visit the project here: https://github.com/niftylettuce/node-email-templates
It allows us to integrate a template with popular template engines and services. To get started, install the following libraries into the project:
$ npm install email-templates async ejs node-sass -save-devTo create an example, we will be creating a service that loads an email template we can use to send emails. Create a new service here: “services_sample/newsletter.js” (Listing 7-26).
Listing 7-26. Newsletter service
'use strict';function newsletter(data, dbconnectorCallBackToRooms) {var EmailTemplate = require('email-templates').EmailTemplatevar path = require('path')var templateDir = path.join(__dirname, '../templates', 'newsletter')var newsletter = new EmailTemplate(templateDir)var user = {name: 'Joe', pasta: 'spaghetti'}newsletter.render(user, function (err, result) {// result.html// result.text})var async = require('async')var users = [{name: 'John', email: '[email protected]'},{name: 'Jane', email: '[email protected]'}]async.each(users, function (user, next) {newsletter.render(user, function (err, result) {if (err) return next(err)result.subject = user.name + ' newsletter email';console.log(result);// send an email via a service})}, function (err) {console.log('error');console.log(err);})dbconnectorCallBackToRooms(data, 'sending emails to users');}module.exports.newsletter = newsletter;
This service is based on the example “node-email-templates” provided on their GitHub landing page. It cycles through an array of users and creates a template HTML email using the data. Then, we can set the email. In a real life example, we can easily wire our MongoDB into this service, so we pull the data from the database instead of a static variable.
Next, add these three pages to the “templates/newsletter” folder: html.ejs, style.scss, and text.ejs:
“templates/newsletter/html.ejs” is the HTML template. Notice that it expects “name” to be passed.
<h1>Hi there <%= name %></h1>“templates/newsletter/style.scss” utilizes SASS (Syntactically Awesome Style Sheets). It uses “common.scss” and sets some properties:
@import '../common';body {background-color: #ddd;color: white;}h1 {text-align: center;}“templates/newsletter/text.ejs” is a text version of “html.ejs” stripted out of any HTML tags.
Hi there <%= name %>.
Lastly, we want to create a global “common” SASS-style “templates/_common.scss” that we can utilize with any template we will be using:
h1 {font-family: 'Avenir Next', sans-serif;}
That’s it! Rerun the app, and once we navigate to the new service we’ve created, we can see in the Node.js console that the email template is being generated.
$ open http://localhost:8081/newsletterHere’s the Node.js console output for our example:
{ html: '<h1 style="font-family: 'Avenir Next', sans-serif; text-align: center;">Hi there John</h1>',text: 'Hi there John.',subject: '[email protected] newsletter email' }{ html: '<h1 style="font-family: 'Avenir Next', sans-serif; text-align: center;">Hi there Jane</h1>',text: 'Hi there Jane.',subject: '[email protected] newsletter email' }
From here, we can wire it up to a mail service, such as “nodemailer” ( https://github.com/nodemailer/nodemailer ).
Summary
In this chapter, we covered the process of creating services utilizing Node.js and ExpressJS. We created a new project in WebStorm, installed Express, and created a Hello World Express application. We covered the Express Generator Tool and set up a simple Express GET / POST service, then we added MangoDB database integration to the mix, installed MongoDB, started the MongoDB server, and created a database. After that, we integrated and read the results from MongoDB into our Express app and viewed the database using the command line and a mongoclient GUI.
In this chapter, we also covered Socket.IO, Engine.IO, and the integration of Express and these transporters. We updated the users service to include Socket.IO and retrieved a Socket.IO event using MongoDB results. We also used rooms.js to easily create services that can consume data from any CDN. Lastly, we took a look at creating templates utilizing both PugJS and node-email templates. In the next chapter, we will be covering AngularJS SEO.