In this chapter I’ll show how you can automate the entire deployment process using Jenkins for both platforms, Kubernetes and ECS . Our final goal is to be able to update our application by pushing to some Git branch.
A typical continuous integration (CI) workflow when working with containers can be summarized as follows:
A change is pushed to the application repository on GitHub .
A service hook tells the CI server that a new version is available.
The CI server pulls the latest changes from GitHub .
The CI server builds a new Docker image with this new version.
The CI server pushes that image to your DockerHub account.
The CI server updates the necessary deployment files to use this new image version.
The CI server applies the changes by making calls to the framework’s API (application programming interface) .
Those steps are basically what we have been doing manually until now, so it shouldn’t be so hard to automate them. However, a big difference is that our current machine is completely configured to interact with all those different services. So the main difficulty with this pipeline will be to configure the CI server so it can connect to all the different services.
We’ll use Jenkins for our CI server, mainly because it is highly configurable and it has very good support to work with tools like Docker and GitHub.
For Kubernetes , we’ll have to install the kubectltool and configure the proper cluster credentials, so it can interact with our cluster. Since we already have a couple of scripts that automate our main tasks, it’ll be easy to build a new project to accomplish this.
For ECS we’ll only need to configure the AWS CLI (Command Line Interface ) with our credentials, the same way we did on our local machine. We also configured scripts that automate our tasks, so this is going to be very straightforward.
Let’s start by installing Jenkins on a new machine.
Installing Jenkins
For Jenkins , we are going to run a new AWS EC2 instance. We’ll be using the AWS CLI for creating all the different resources we need. You can use the AWS Dashboard, but I prefer this approach since you can document everything and reuse the commands afterward. It’s important to understand that Jenkins will be running on a regular EC2 Instance and not in a container. That’s because Jenkins will have to build Docker images, and doing that from another container can be kind of tricky. So let’s stay old school with our CI server and launch a regular server.
Creating a Key Pair
First let’s create a new key pair for accessing the server. We can create and save one by running the following:
$ aws ec2 create-key-pair --key-name Jenkins --query 'KeyMaterial' --output text > Jenkins.pemThen we need to add the permissions for that .pem:
$ chmod 400 Jenkins.pemSave this key in a safe folder. I like to keep my key pairs in ∼/.ssh/keys.
The instance we want to use has to be launched in a VPC (Virtual Private Cloud). We are going to use the same VPC where our cluster lives. If you don’t remember how to get the security group and a subnet ID for this VPC, you can go back to the section where we created a database for our application running with ECS . You’ll need your security group ID and one subnet ID.
Launching the Instance
You can use whatever image you prefer, but keep in mind that the Jenkins installation and general configuration may be different. I’ll go with the Amazon Linux AMI 2016.09.0 (HVM) whose ID is ami-c481fad3. Let’s use the following command for launching an instance with decent specs for a small Jenkins server in our existent VPC:
$ aws ec2 run-instances --image-id ami-c481fad3 --subnet-id subnet-3a09f717 --count 1 --instance-type t2.medium --key-name Jenkins --security-group-ids sg-bbe6b3c1 --block-device-mappings '[{ "DeviceName": "/dev/xvda", "Ebs": { "VolumeSize": 20 } }]' --associate-public-ip-addressYou’ll have a big output showing you all new instance information:
{"OwnerId": "586421825777","ReservationId": "r-445d77fa","Groups": [],"Instances": [{"Monitoring": {"State": "disabled"},"PublicDnsName": "","RootDeviceType": "ebs","State": {"Code": 0,"Name": "pending"},"EbsOptimized": false,"LaunchTime": "2016-09-29T19:16:17.000Z","PrivateIpAddress": "10.0.1.116","ProductCodes": [],"VpcId": "vpc-a0e9c0c7","StateTransitionReason ": "","InstanceId": "i-729ea343","ImageId": "ami-c481fad3","PrivateDnsName": "ip-10-0-1-116.ec2.internal","KeyName": "Jenkins","SecurityGroups": [{"GroupName": "amazon-ecs-cli-setup-ecs-cluster-EcsSecurityGroup-1QI8JT422T2EQ","GroupId": "sg-bbe6b3c1"}],"ClientToken": "","SubnetId": "subnet-3a09f717","InstanceType": "t2.medium","NetworkInterfaces": [{"Status": "in-use","MacAddress": "12:d7:fb:9b:28:3b","SourceDestCheck": true,"VpcId": "vpc-a0e9c0c7","Description": "","NetworkInterfaceId": "eni-bee16eac","PrivateIpAddresses": [{"Primary": true,"PrivateIpAddress": "10.0.1.116"}],"Attachment": {"Status": "attaching","DeviceIndex": 0,"DeleteOnTermination": true,"AttachmentId": "eni-attach-111a42ba", "AttachTime": "2016-09-29T19:16:17.000Z"},"Groups": [{"GroupName": "amazon-ecs-cli-setup-ecs-cluster-EcsSecurityGroup-1QI8JT422T2EQ","GroupId": "sg-bbe6b3c1"}],"SubnetId": "subnet-3a09f717","OwnerId": "586421825777","PrivateIpAddress": "10.0.1.116"}],"SourceDestCheck": true,"Placement": {"Tenancy": "default","GroupName": "","AvailabilityZone": "us-east-1c"},"Hypervisor": "xen","BlockDeviceMappings": [],"Architecture": "x86_64","StateReason ": {"Message": "pending","Code": "pending"},"RootDeviceName": "/dev/xvda","VirtualizationType": "hvm","AmiLaunchIndex": 0}]}
Now wait for a few minutes so the instance gets initialized. If you want, you can visit the AWS Console in order to check the instance status (or you can query the API if you prefer).
We can query the status using the instance ID from the previous output with
$ aws ec2 describe-instances --instance-ids i-729ea343 --query="Reservations[0].Instances[0].State"Output:
{"Code": 16,"Name": "running"}
Connecting to the Instance
First we’ll need the public DNS (Domain Name System) or IP (Internet Protocol) of this new server. Run
$ aws ec2 describe-instances --instance-ids i-729ea343 --query="Reservations[0].Instances[0].NetworkInterfaces[0].Association.PublicIp"Output:
"184.72.110.253"Now let’s connect to that IP address using ec2-user as the user, and passing the Jenkins .pem created previously:
$ ssh [email protected] -i Jenkins.pemMake sure you replace the IP with yours and that the path for the key is correct. You should see the following welcome message:
__| __|_ )_| ( / Amazon Linux AMI___|\___|___|https://aws.amazon.com/amazon-linux-ami/2016.09-release-notes/No packages needed for security; 3 packages availableRun "sudo yum update" to apply all updates.
Let’s install Jenkins and the other dependencies we need.
Installing Dependencies
Now that we are inside our server, let’s install some tools we’ll need. For that we’ll log in as the root user and use yum to install these dependencies.
# sudo su# yum update -y# yum install -y git nginx docker
Let’s also install Docker Compose with the instructions given in the releases page ( https://github.com/docker/compose/releases ).
# curl -L https://github.com/docker/compose/releases/download/1.8.1/docker-compose-`uname -s`-`uname -m` > /usr/bin/docker-compose# chmod +x /usr/bin/docker-compose
We’ll be using Docker Compose to run our test suite later. Now let’s add the Jenkins repository and install it.
# wget -O /etc/yum.repos.d/jenkins.repo http://pkg.jenkins-ci.org/redhat/jenkins.repo# rpm --import http://pkg.jenkins-ci.org/redhat/jenkins-ci.org.key# yum install -y jenkins
Before starting the services let’s add the Jenkins user to the Docker group.
# usermod -a -G docker jenkinsNow we can start the Jenkins and Docker services and add them to the system startup and run some commands so we can log in as the Jenkins user in case we need to.
# service jenkins start# service docker start# chkconfig jenkins on# chkconfig docker on# usermod -s /bin/bash jenkins# usermod -m /var/lib/jenkins jenkins
The last dependency we need is kubectl. Without kubectl we can’t talk to our cluster from Jenkins. We can install it with the following:
# curl -Lo kubectl http://storage.googleapis.com/kubernetes-release/release/v1.3.0/bin/linux/amd64/kubectl && chmod +x kubectl && sudo mv kubectl /usr/bin/That’s going to do the trick for Kubernetes . For ECS , we’ll also need the AWS CLI. Let’s install it with the following:
# curl "https://s3.amazonaws.com/aws-cli/awscli-bundle.zip" -o "awscli-bundle.zip"# unzip awscli-bundle.zip# ./awscli-bundle/install -i /usr/local/aws -b /usr/local/bin/aws
Before we restart the server, let’s configure the main tools we need, Docker, kubectlfor Kubernetes , and aws cli for ECS .
For Docker we only need to log in so this server can have access to DockerHub . We have to use the same credentials that allow access to the repository we have been working with.
# docker loginLogin with your Docker ID to push and pull images from Docker Hub. If you don't have a Docker ID, head over to https://hub.docker.com to create one.Username: pacunaPassword:Login Succeeded
For kubectlwe only need to add our cluster information and credentials so the Jenkins user can have access. All that information is kept in the ∼/.kube/config file of the user that’s using the client. Let’s switch to the Jenkins user and create that file.
# sudo su - jenkins# mkdir -p ∼/.kube# touch ∼/.kube/config
Now we can copy our local ∼/.kube/config file into the Jenkins server file. Remember that our local machine is already configured to interact with the cluster, so all of the necessary credentials live in that file. You should be careful with that information, since anyone who gets the file would have access to create and delete resources in your Kubernetes cluster. After you copy the file, you can remove the sections that belong to Minikube. For this server we only need access to our production cluster.
Your ∼/.kube/config in your Jenkins server should look something like the following:
apiVersion: v1clusters:- cluster:certificate-authority-data: VERYLONGSTRINGserver: https://52.32.34.173name: aws_kubernetescontexts:- context:cluster: aws_kubernetesuser: aws_kubernetesname: aws_kubernetescurrent-context: aws_kuberneteskind: Configpreferences: {}users:- name: aws_kubernetesuser:client-certificate-data: VERYLONGSTRINGclient-key-data: VERYLONGSTRINGtoken: 6YkrOgBXQXCgeATdTiAzc6diZk6VwMfR- name: aws_kubernetes-basic-authuser:password: XXXXXXXXXXXXXXXXusername: admin
Let’s see if kubectlis correctly configured by getting the nodes of the cluster.
# kubectl get nodesNAME STATUS AGEip-172-20-0-64.us-west-2.compute.internal Ready 2dip-172-20-0-65.us-west-2.compute.internal Ready 2d
Great! Now we have to configure the AWS CLI. This is going to be as simple as it was with kubectl. If you remember, the configuration for this tool lives in the files ∼/.aws/credentials and ∼/.aws/config. We also have to copy our local files that contain the access tokens for our account and our preferences to files in the home of the Jenkins user. Let’s create the folder and files in the server. Remember you have to be logged in as the Jenkins user.
# mkdir -p ∼/.aws# touch ∼/.aws/credentials# touch ∼/.aws/config
Now copy your local files to those remote files in the server. Let’s test the configuration by querying the API and getting the cluster information.
# aws ecs describe-clusters --cluster ecs-cluster{"clusters": [{"status": "ACTIVE","clusterName": "ecs-cluster","registeredContainerInstancesCount": 2,"pendingTasksCount": 0,"runningTasksCount": 2,"activeServicesCount": 1,"clusterArn": "arn:aws:ecs:us-east-1:586421825777:cluster/ecs-cluster "}],"failures": []}
You can see that the AWS CLI is correctly configured. Now we can reboot the server and start to work with Jenkins.
# reboot 1After the reboot, Jenkins should be running on port 8080, but currently our VPC security group doesn’t allow access through that port. Let’s add a new rule.
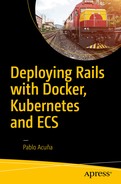
$ aws ec2 authorize-security-group-ingress --group-id sg-bbe6b3c1 --protocol tcp --port 8080 --cidr 0.0.0.0/0Now we can go to http://184.72.110.253:8080 and see the Jenkins installer (Figure 5-1).
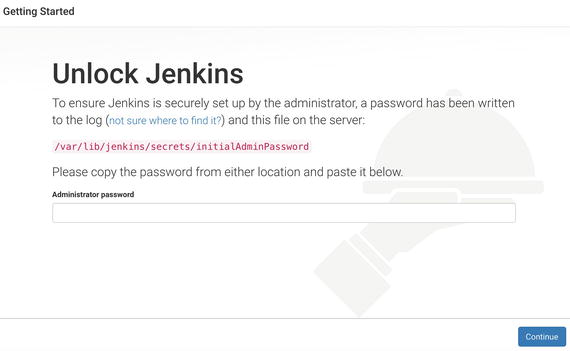
Figure 5-1. Jenkins install
Log in to the instance again and get that initial admin password.
$ ssh [email protected] -i Jenkins.pem# sudo su# cat /var/lib/jenkins/secrets/initialAdminPasswordXXXXXXXXXXXXXXXXXXXXXXXXXXXXXXXX
Use that password to continue with the following steps. In the following step select Install the suggested plug-ins. Next, choose a username for the admin user along with a password and the other requested information. Then click Save, Finish, and finally Start using Jenkins.
Then you should see the Jenkins home page (Figure 5-2).
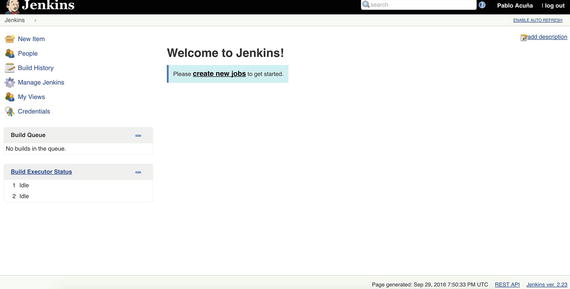
Figure 5-2. Jenkins home page
Now that we have our Jenkins server and our admin user configured, let’s install a plug-in that will help us with the interaction with our GitHub repository .
Go to Manage Jenkins ➤ Manage Plugins ➤ Available and search for the following plug-in (see Figure 5-3):
Figure 5-3. Jenkins plug-ins
GitHub Authentication pluginSelect the plug-in and click Install without restart.
Configuring a Job for Kubernetes
Right now we have our Docker Image, but we’ll also need a GitHub repository so we can trigger a build after every deploy. Go to GitHub and create a new repository and call it webapp. In my case the URL (uniform resource locator) for the repo will be https://github.com/pacuna/webapp .
Go to the Jenkins home page (see Figure 5-2) and click create new jobs. Use the name webapp-k8s, select Freestyle project, and then click OK (see Figure 5-4).
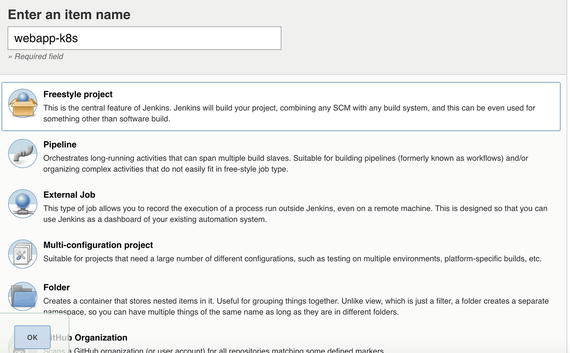
Figure 5-4. Jenkins plug-ins
In the General section (see Figure 5-5), check GitHub project and add the URL of your repository. For example, I’ll use https://github.com/pacuna/webapp .
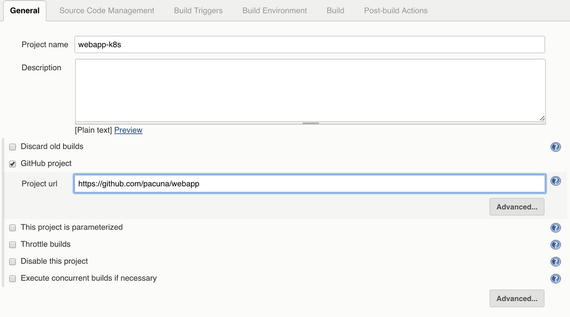
Figure 5-5. Job configuration
In the Source Code Management section (Figure 5-6) select Git and once again use your repository URL. Click the Add button in the credentials section to open the Jenkins credentials provider, use the Username with password kind, and add your username and password for GitHub . Make sure to select those credentials after, and that Jenkins doesn’t throw any field errors.
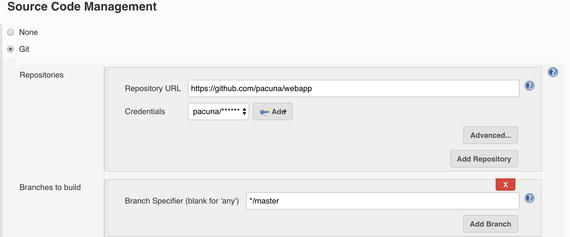
Figure 5-6. Job configuration
If you have problems with the GitHub authentication, you can also add your username and ssh private key to the Jenkins Credentials Provider and use the SSH URL of your repository.
In the Build Triggers section (see Figure 5-7), check Build when a change is pushed to GitHub.
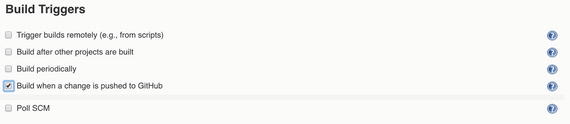
Figure 5-7. Job configuration
Finally, we get to the smart part of the pipeline. Click Add build step and select Execute shell (see Figure 5-8). This command will be executed after the latest code gets pulled from the GitHub repository. This script should be super simple. All the work is done by the two scripts we already have: deploy/push.sh and deploy/migrate.sh. So let’s add a call to those two files :
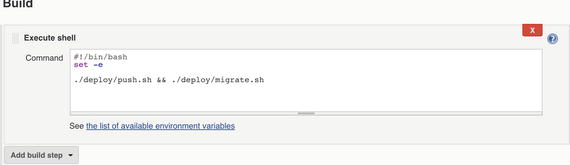
Figure 5-8. Job configuration
Click Apply and then Save.
Our deployment pipeline for Kubernetes should be ready. Let’s fix our database host in case you changed it while testing ECS .
production:<<: *default# host: webapp-postgres.caxygd3nh0bk.us-east-1.rds.amazonaws.comhost: postgresdatabase: webapp_productionusername: webapppassword: mysecretpassword
Let’s commit that change.
$ git add .$ git commit -m 'fix db host for kubernetes'$ git push origin master
Remember we haven’t added the hook to our GitHub repo. So right now a push to master will not trigger a deploy in Jenkins. We have to trigger a build by hand using the Build Now (see Figure 5-9) link on the sidebar of the project page in Jenkins . Click Build Now and you will see the job starting.
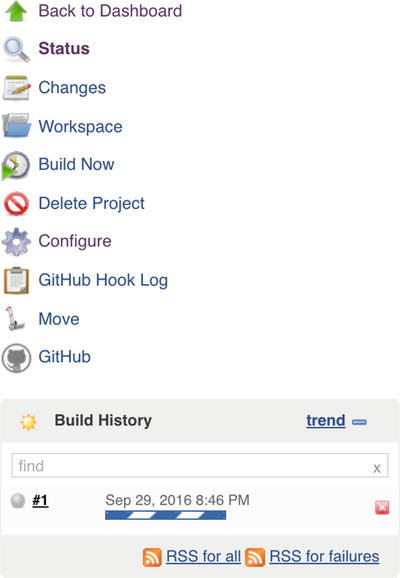
Figure 5-9. Job configuration
Click the job and then go to Console Output (Figure 5-10) to inspect the logs. There you should see all the output we used to inspect from our local machine but this time running on the Jenkins server.

Figure 5-10. Job configuration
When the job finishes, you can go to the bottom of the logs and see kubectlupdating our cluster (Figure 5-11).
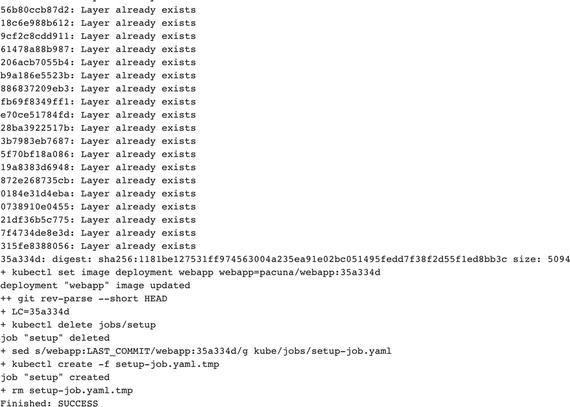
Figure 5-11. Job configuration
Let’s check if everything is OK with our webapp service. Remember you can get the load balancer DSN with kubectldescribe service webapp. If you hit your service end point for articles you should get the correspondent response:
[{"id":1,"title":"my first article","body":"Lorem ipsum dolor sit amet, consectetur adipiscing elit...","created_at":"2016-09-27T03:07:36.706Z","updated_at":"2016-09-27T03:07:36.706Z","slug":null},{"id":34,"title":"my second article","body":"Lorem ipsum dolor sit amet, consectetur adipiscing elit... ","created_at":"2016-09-28T03:20:37.427Z","updated_at":"2016-09-28T03:20:37.427Z","slug":"my-second- article"}]%
Cool! The only missing thing is to add a Webhook to our GitHub repository, so a push to master triggers a deploy.
Push to Deploy
Go to your GitHub repository, click Settings ➤ Integration & Services and then Add service. Look for the Jenkins (GitHub plug-in) and select. Then in the Jenkins hook url add the following (replace with your Jenkins IP address) (see Figure 5-12):
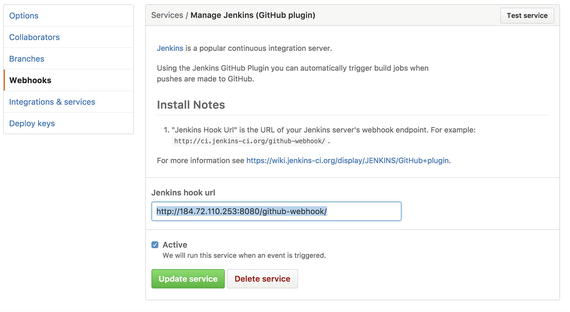
Figure 5-12. Hook configuration
http://184.72.110.253:8080/github-webhook/
Make sure you select Active and then click Save.
And that’s it! Now every time you push something to your master branch, a deploy will be triggered for the associated Job we just configure.
Running the Test Suite
A big part in CI is testing. With Jenkins we are able to run the tests before updating our application.
We’ll use Docker Compose to run our tests before we push the image to DockerHub . It doesn’t make much sense to push a broken image. So this workflow will be the following:
We push bad code to GitHub and trigger a new deploy.
Jenkins pulls these changes.
Jenkins runs Docker Compose using this new code and a custom entry point.
Jenkins waits for the status code of the test container.
If status is different than 0, the deployment stops.
First, let’s try to run our tests locally. We’ll have to create our test database in case it doesn’t exist and also run the migrations. On your local machine run
$ docker-compose run --rm webapp bin/rails db:create RAILS_ENV=test$ docker-compose run --rm webapp bin/rails db:migrate RAILS_ENV=test
And now let’s run the following tests:
$ docker-compose run --rm webapp bin/rake RAILS_ENV=testOutput:
.Finished in 1.267605s, 3.9444 runs/s, 5.5222 assertions/s.5 runs, 7 assertions, 0 failures, 0 errors, 0 skips
Great! We have our tests passing locally. This was just to be sure that we have a test suite ready.
Let’s create a Docker Compose file for the testing environment and a script for running a custom entry point (you can create these files in your root application folder).
$ touch docker-compose.test.yml$ touch setup.test.sh$ chmod +x setup.test.sh
First, for the docker-compose.test.yml file add the following:
version: '2'services:webapp_test:container_name: webapp_testbuild: .depends_on:- postgresenvironment:- PASSENGER_APP_ENV=testentrypoint: ./setup.test.shpostgres:image: postgres:9.5.3environment:- POSTGRES_PASSWORD=mysecretpassword- POSTGRES_USER=webapp- POSTGRES_DB=webapp_test
Pretty simple. We are running a container that builds our application from the latest code and is connected to a database container. We use the setup.test.sh as the new entry point, and we set the PASSENGER_APP_ENV to test so the commands in the entry point run on that environment.
Now, for the setup.test.sh file add the following:
#!/bin/shecho "Waiting PostgreSQL to start on 5432..."while ! nc -z postgres 5432; dosleep 0.1doneecho "PostgreSQL started"bin/rails db:create RAILS_ENV=testbin/rails db:migrate RAILS_ENV=testbin/rake RAILS_ENV=test
Just as with the setup container, we wait for the PostgreSQL container to be available. Then we create and migrate the test database and finally we run our tests with the rake command.
Now, just for testing purposes, let’s break one of our tests.
Open the test/controllers/articles_controller_test.rb file and modify the status code of this test from 201 to 301.
test "should create article" doassert_difference('Article.count') dopost articles_url, params: { article: { body: @article.body, title: @article.title } }, as: :jsonendassert_response 301end
We just want to test that Jenkins will actually stop the deployment when it sees that this test fails. Now push this code to your GitHub repository. There’s no need to build a new image since Jenkins is now doing that work for us with every build.
$ git add -A$ git commit -m 'Add testing stuff'$ git push origin master
Now let’s go to our webapp-k8s project’s configuration in Jenkins.
Add a new Build step selecting Execute Shell and then drag that step and put it before the one created previously. Remember we don’t want to create and push the new image until we’re sure the tests pass.
Add the following to that step:
#!/bin/sh# create test environmentdocker-compose -f docker-compose.test.yml builddocker-compose -f docker-compose.test.yml run --rm webapp_test# check the last status codeif [ $? -eq 0 ]thenecho "All tests passed! :)"elseecho "Tests failed! :("exit 1fi
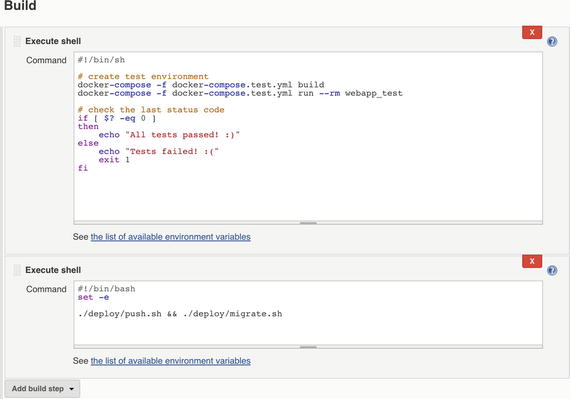
Figure 5-13. Test build step
This script will run Docker Compose and will use the docker-compose.test.yml file we created. It’ll build the image using the current workspace, which contains the latest code pulled from GitHub . If the tests failed, the exit code will be different than 0. In that case we stop the deployment using exit 1 and Jenkins won’t do anything else and will mark this build as failure. On the contrary, if the tests passes, the status code will be 0 and the deployment continues.
Click Apply and then Save. Now let’s test this pipeline by running Build Now on the sidebar. If you go to the console output after build the project, at the end you should see
Failure:ArticlesControllerTest#test_should_create_article [/home/app/webapp/test/controllers/articles_controller_test.rb:18]:Expected response to be a <301: Moved Permanently>, but was a <201: Created>. Expected: 301Actual: 201bin/rails test test/controllers/articles_controller_test.rb:13...(truncated)....Finished in 0.411073s, 12.1633 runs/s, 17.0286 assertions/s.5 runs, 7 assertions, 1 failures, 0 errors, 0 skipsTests failed! :(Build step 'Execute shell' marked build as failureFinished: FAILURE
That’s excellent! Remember we pushed a broken test to GitHub and that’s why this deploy is failing. Now let’s fix the test, push the code to GitHub, and see if this build passes. First fix the articles controller test so it checks for a 201 status code.
test "should create article" doassert_difference('Article.count') dopost articles_url, params: { article: { body: @article.body, title: @article.title } }, as: :jsonendassert_response 201end
Now push those changes to the repository.
$ git add .$ git commit -f 'Fix broken test'$ git push origin master
Now, go to your Jenkins projects to monitor the output of this build. At one point you should see your tests passing.
.Finished in 0.416967s, 11.9914 runs/s, 16.7879 assertions/s.5 runs, 7 assertions, 0 failures, 0 errors, 0 skipsAll tests passed! :)Then the image is built and pushed to DockeHub:...docker build -f Dockerfile -t pacuna/webapp:9c387bcSending build context to Docker daemon 236 kBStep 1 : FROM phusion/passenger-ruby23:0.9.19---> 6841e494987fStep 2 : ENV HOME /root---> Using cache---> 36d6c73cd6e5Step 3 : CMD /sbin/my_init---> Using cache---> d94279fdbbc8Step 4 : RUN apt-get update && apt-get install -y -o Dpkg::Options::="--force-confold" netcat---> Using cache---> e0d7432f73c6Step 5 : RUN rm -f /etc/service/nginx/down---> Using cache---> b8a8f4e592e5...
And finally the Kubernetes cluster is updated.
+ kubectl delete jobs/setupjob "setup" deleted+ sed s/webapp:LAST_COMMIT/webapp:9c387bc/g kube/jobs/setup-job.yaml+ kubectl create -f setup-job.yaml.tmpjob "setup" created+ rm setup-job.yaml.tmp
Awesome! Now you know how to add a build step that runs your test suite for avoiding deploys that may break your application.
You may want to version all of the scripts that you use in your Jenkins steps. It’s better to keep those scripts in your applications and only call the file instead of writing the bash code in Jenkins. But that’s up to you. I’m only giving you some ideas that can help you to write your customized scripts.
Configuring a Job for ECS
This configuration will also be pretty straightforward. The advantage we have is that we already have done all that we need. Similarly to what we did for the Kubernetes job, we are going to use the automation scripts we have and add the same step to run the test suite.
Now, chances are you are only going to use either Kubernetes or ECS , but not both. So while we build this ECS pipeline, we’ll have to change code that’s going to invalidate the Kubernetes pipeline. For example, the database host is not the same. For Kubernetes we were using an internal service with an alias of postgres, and for ECS we are using an RDS end point. Also, we cannot trigger two different hooks for our GitHub repo because we would be building a wrong image for one the platforms. With all of that said, let’s begin.
Go to the Jenkins home and create another job. This time give it the name webapp-ecs and choose Freestyle project. If you have doubts with the graphical interface for Jenkins, take a look at the Configuring a Job for Kubernetessection. There you can see a couple of screenshots of the steps. Click OK.
For the general section, select GitHubproject and add the project URL. In my case I’ll use https://github.com/pacuna/webapp/ .
In the Source Code Management section, select Git and add the same repository URL. If you haven’t configured your GitHub credentials, click add and fill out with your GitHub username and password. Then select those credentials for your repo. If the credentials aren’t working, you’ll see an error.
In the Build Triggers section, choose Build when a change is pushed to GitHub.
Now skip to the Build section and add a build step of type Execute Shell. Add the following script to the text area:
#!/bin/bashset -e./ecs/deploy/push.sh && ./ecs/deploy/migrate.sh
As you can see , we are calling our two scripts that will update the cluster with the latest code. Jenkins will pull the latest changes from GitHub and using those scripts will build a new Docker image, push it to DockerHub , and then update the task definition and service in our cluster.
And that’s it. Click Apply and then Save.
Now in your Project page, click Build Now in the sidebar. This will start a new build for the project. Click the new job that started and then click Console Output. You should see the entire deployment from the pull from GitHub to the update of the task definition and service, just as on our machine.
Running the Test Suite
Now let’s add another build step that’s going to run our tests. Go back to your project’s configuration page and add a new build step of the same type, Execute Shell, and put it on before the other build step. We want to run the test suite before creating the new image. Add the following in the text area:
#!/bin/sh# create test environmentdocker-compose -f docker-compose.test.yml builddocker-compose -f docker-compose.test.yml run --rm webapp_test# check the last status codeif [ $? -eq 0 ]thenecho "All tests passed! :)"elseecho "Tests failed! :("exit 1fi
Our docker-compose.test.yml should be
version: '2'services:webapp_test:container_name: webapp_testbuild: .depends_on:- postgresenvironment:- PASSENGER_APP_ENV=developmententrypoint: ./setup.test.shpostgres:image: postgres:9.5.3environment:- POSTGRES_PASSWORD=mysecretpassword- POSTGRES_USER=webapp- POSTGRES_DB=webapp_test
And the setup.test.sh should be
#!/bin/ shecho "Waiting PostgreSQL to start on 5432..."while ! nc -z postgres 5432; dosleep 0.1doneecho "PostgreSQL started"bin/rails db:create RAILS_ENV=testbin/rails db:migrate RAILS_ENV=testbin/rake RAILS_ENV=test
If you haven’t created the docker-compose.test.yml and the setup.test.sh files, go to the test suite part of the Kubernetes job’s section. That script will run our test suite and check for the status code of the process. If the tests fail, the deploy will be interrupted. If the tests pass, the deployment will continue and the new image will be deployed in the cluster.
The final part is to create a hook for triggering build when pushing to the GitHub repository. For that, please take a look at the Push to Deploy section for the Kubernetes job. The process is the same.
Summary
In this chapter we saw how a CI server can helps us to create a deployment pipeline to run our containerized architecture. You saw the power and flexibility of Jenkins as a CI server and the little amount of configuration that it required. We created all the needed resources with the AWS CLI so you could have a fast mechanism to launch them; also we used several bash scripts in our build steps so our Jenkins jobs were as simple as possible. This also allows us to replicate and create new jobs very easily.
A very important aspect of CI is to correctly understand the workflow and the life cycle of a deployment. We started by pulling the latest changes from our GitHub repository; we then generated a new image which is pushed to our DockerHub repository; finally, we updated the corresponding templates to apply the changes in the containers within the cluster.
We used Docker Compose to add a new build step where we ran our test suite. This prevented pushes that break tests by stopping deployments that return errors from this step.