
How to Secure Your Windows Box
The operating system (OS) is what all your applications run on. In fact, you cannot run any program except firmware (which contains hardware-specific information) on your PC without installing an operating system first. No matter what precautions you’ve taken to secure your PC, if your OS gets compromised, all the applications running on it will become vulnerable, and all the data stored on its hard drive will be exposed to unauthorized access.
Cyber-threats targeting the operating system can arrive from two sources.
Logical threats from malware: These generally come after installing or executing some malicious code, usually downloaded from the Web.
Physical threats: Here the attacker or the device (e.g., USB memory) gains direct access to your computer to perform a crafted, malicious action.
Configuring your operating system to be more secure should be your first step when protecting your digital privacy and security, before accessing the Internet or installing any security software. This chapter will give you recommendations and best practices for configuring your Windows machine to become more secure and resistant to external unknown and known threats. Please note the recommendations in this chapter are not exhaustive, as you can implement more than what is covered here; in addition, you can ignore some according to the threats you are currently facing.
We will begin by giving general hardening techniques for the Windows OS. Later in the chapter, we will cover privacy settings related to Windows 10 only.
Harden Your OS
Before we begin sharing our recommendations to secure Windows machines, it is necessary to discuss the best hardware to integrate with the security features available in modern Windows editions (Windows 10 and newer).
Windows 10 comes equipped with enhanced security features for encryption and authentication. This is in addition to its native support to stop sophisticated malware such as bootkits and rootkits from attacking the native system before Windows can boot. Windows 10 is the most secure version of Windows ever created, and it is highly recommended that you stop using the older versions (such as 8, 7, Vista, and XP). To use the modern security features in Windows 10, though, your hardware needs to support the following security features (or at least some of them):
Trusted Platform Module (TPM) version 2.0.
Unified Extensible Firmware Interface (UEFI) . This is the BIOS replacement.
Fingerprint scanner.
Integrated smart card reader.
Kensington lock slot to physically secure your PC in public places (i.e., chain your computer to a desk with a cable).
If the computer manufacturer offers the PC with Windows preinstalled on it, make sure that the Windows edition supports BitLocker drive encryption (Windows 10 supports BitLocker on Pro, Enterprise, and Education editions).
When installing Windows, it is highly recommended that you buy the latest version with an edition that supports BitLocker drive encryption. Currently, the newest version is 10.
A retinal scanner and 3D camera for facial recognition are highly recommended so you can activate the advanced biometric features of the Windows 10 Hello feature. However, their existence in modern computers is still limited.
Note
We have not described the intended benefits of each recommended security component mentioned in the previous list. In Chapter 5, we will discuss the benefit of the features in detail and how they can help you secure your Windows machine.
You can buy some advanced hardware security components separately and integrate them with your computer. For instance, you can buy a card reader and pair it with any computer via USB. Some motherboards support adding a TPM microchip. Consult your computer manufacturer’s manual or web site for such upgrade possibilities.
The previous features will make a computer cost more, so if your current computer satisfies your needs and you are not planning to replace it soon, the following measures (and all the recommendations in the book) will help you to secure your PC to a great extent despite the absence of the previous hardware components.
Note
It is always advisable to start with a clean install of your Windows OS without any extra programs before making security configurations. Many computer manufacturers add extra programs (sometimes named bloatware) when selling computers with Windows preinstalled. Make sure to uninstall these programs or reinstall Windows using your original CD/DVD.
Warning
Create a new system restore point before implementing the tweaks in this chapter so you can safely revert your changes in case something goes wrong.
Lock Your PC Using a USB Drive
In addition to using the regular Windows authenticator username and password when logging into Windows, it is recommended that you use USB authentication as a second authentication method for an older computer that cannot be protected using enhanced Windows 10 features. It works by storing a security key on a USB drive, which must be inserted into the computer whenever you want to unlock Windows.
USB Raptor allows you to lock your PC using a USB flash card. It is a free program with many advanced features. You can find it at https://sourceforge.net/projects/usbraptor/?source=typ_redirect .
Turn On Automatic Updates
The automatic updates feature for the Windows OS should always be turned on. In fact, the Windows 10 automatic updates feature is turned on by default and cannot be stopped easily.
Use a Less-Privileged User Account
Surfing the Internet, checking e-mails, using Microsoft Office, having Skype conversations, and doing other regular tasks do not require administrative privileges. It is always recommended that you use a limited user account for your daily tasks. This will effectively protect your computer from malware installed inadvertently; it will also limit hackers’ ability to invade your system as they will have the same restricted account you are currently using.
Warning
Disable the Windows guest account immediately. This account can be exploited by attackers to invade your system. To disable this account (in all Windows versions), go to Control Panel ➤ Administrative Tools ➤ Computer Management. In the left pane, click Local Users and Groups, double-click the Users folder in the right pane to open it, right-click the Guest account, select Properties, and select “Account is disabled.” You should also disable the built-in Administrator account and then create another account with another name and give it administrative permissions. Protect the new administrator account with a strong, complex password.
Configure Windows Backup
It is highly recommended that you back up your operating system on a regular basis. Partitions that contain your sensitive data should be backed up to three different locations. In Chapter 2 we mentioned some backup tools; however, Windows offers a free backup feature that can be accessed from Control Panel ➤ Backup and Restore (Windows 7). This utility will allow you to back up your Windows drive onto an external drive. The feature is available in Windows 7, 8, and 10. However, Windows versions 8 and 10 have another backup utility called File History, which can also be configured to back up your personal files to an external drive or network location.
Note
File History backup-specific folders relate to the current Windows user account by default (e.g., Desktop, Contacts, OneDrive, and so on). To configure it to back up other folders or drives, you should use the File History app. Go to Settings ➤ Update & Security ➤ Backup and then click “More options” in the “Back up using File History” panel to include more locations in your backup.
Disallow Remote Assistance
This feature allows you or another user to access your system remotely over the Internet or across local networks. Obviously, hackers can exploit this feature to gain unauthorized access to your machine. It is advisable to turn it off unless you are using it regularly.
To disable it in Windows 10, go to Control Panel ➤ System, select “Advanced system settings,” and go to the Remote tab. Then deselect the option “Allow Remote Assistance connections to this computer.” In the same dialog, make sure that the option “Don’t allow remote connection to this computer” is selected in the Remote Desktop section (in Windows 10).
Manage Restore Points
In Windows XP and all later versions, Microsoft offers the Volume Shadow Copy Service (VSS) , which is an application that coordinates the creation of a consistent snapshot of data at a specific point in time for each volume where it is activated. This helps Windows to recover if some of its files get corrupted and you need to restore the good version from one of its previous restore points.
Restore points can also hold files and folders created by the user. For example, if a user deletes a Microsoft Office document from his or her desktop, the user can still recover an old version of this document from a previous restore point.
Windows restore points can be beneficial to restore Windows to a previous stable state. With regard to your privacy, however, you should understand that they can also be used to recover older versions of your personal files/folders. Hence, the privacy danger comes from an adversary exploiting this feature to recover old, deleted files from your computer. Bear this fact in mind when activating the system restore feature for a specific volume.
There are some cases where it is beneficial to browse the old restore point contents without performing a full recovery. You may need to recover a specific file or folder or make sure that your deleted files are really gone forever without deleting the entire restore point.
ShadowExplorer ( www.shadowexplorer.com ) is a free utility that allows you to browse old restore points easily. You can view and extract individual files and folders with a simple point-and-click interface. All you need to do is to select the volume that you have a system restore activated for and then select the point that you want to browse. Right-click the file or folder you want to recover and select Export to save it in your desired location (see Figure 3-1).
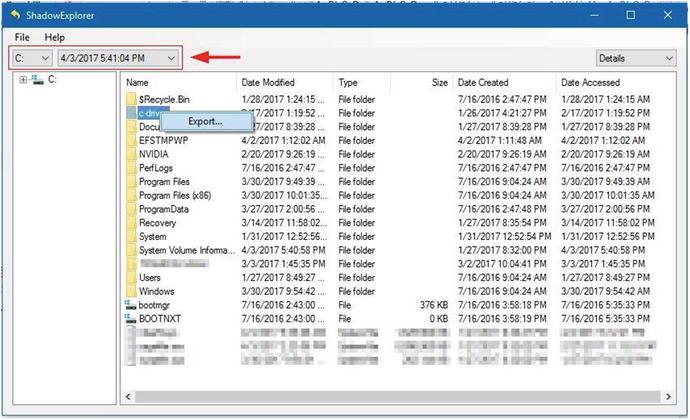
Figure 3-1. Using ShadowExplorer to browse old restore points
Make Hidden Files Visible
Windows hides some files and folders by default to prevent users from accidentally deleting them. From a privacy viewpoint, malicious programs come hidden in the same way to prevent a user from discovering them. Therefore, it is necessary to know how to reveal hidden files in Windows.
On Windows 10, go to Control Panel ➤ File Explorer Options. In Windows 7, select Control Panel ➤ Folder Options and go to the View tab. Select the option “Show hidden files, folders, and drives.” Another setting you need to change in the same window to view the hidden system files is “Hide protected operating system files (Recommended).” Remove the check mark and you are done.
File extensions also are hidden by default in the Windows OS. This can make it harder to recognize potentially malicious files, which can lead to users executing malware inadvertently. For example, an executable malware file could have the extension file.doc.exe and display a Microsoft Word icon; in this case, only the .doc extension would appear, making this file look legitimate. To view the file extension in Windows, from the same window as mentioned previously, deselect the option “Hide extensions for known file types.”
Set a Screen Saver Password
You should set a screen saver password so that Windows will lock your computer when you are not at it. To set a password for your Windows screen saver, go to Control Panel ➤ Personalization. At the bottom of the window, click Screen Saver. In the Screen Saver Settings dialog, select the box “On resume, display logon screen.”
Note
You can lock your Windows system immediately by pressing Windows Key+L.
Freeze the Hard Disk
Freezing software allows a Windows user to restore his or her operating system to a previous stable state within seconds each time the computer restarts. For example, if you are using a Windows PC with an administrative account and your computer gets infected with malware, all you need to do is to restart your machine and the malware will automatically be removed from your machine (regardless of whether you have already installed an antivirus program!). Enterprises can use such utilities to secure their computers and servers from malware threats and wrong configurations and restore them instantly to their original states.
RollBack Rx Home Edition (free for personal use) is a program for freezing Windows machines. You can find it at http://horizondatasys.com/rollback-rx-time-machine/rollback-rx-home/ .
Set a Password for BIOS/UEFI
Many cyber-attacks rely on booting the victim’s machine from a USB stick or CD/DVD drive to steal sensitive files or to bring damage to the victim’s computer by wiping clean the computer hard drive. By setting a password on your computer BIOS, you can stop many threats in addition to preventing others from changing BOIS settings. Each motherboard manufacturer has its own menu to set this password, usually in a Security section. You should first boot to BOIS/UEFI and then activate this option.
Disable Unnecessary Ports/Protocols
Each open port on your Windows OS is considered a threat that an attacker could exploit to invade your system. In Chapter 2, we recommend installing a firewall and setting it to “Interactive mode.” In this mode, any ingoing or outgoing connection will be suspended until the user allows or denies access.
Many tools are already available to monitor Windows ports and show which ones are open and what protocols they use. Such information is necessary to help you determine whether a specific port should remain open or you need to close it.
CurrPorts ( www.nirsoft.net/utils/cports.html ) is network-monitoring software that shows all open TCP/IP and UDP ports in addition to information about each port that includes the process/application that opened this port, the full path of the process, and other process-related information.
For advanced network protocol analyzing, especially for enterprises looking to get in-depth information about what is passing across their networks, Wireshark ( https://www.wireshark.org/download.html ) is highly recommended.
Disable Unnecessary Services
Like open ports, unused services should be disabled under Windows because they pose a potential security vulnerability in the computer system. You can stop Windows services by going to Control Panel ➤ Administrative Tools ➤ Component Services. Click Services on the left pane; all services available on your current computer should appear in the right pane. Each one’s startup type will also be displayed.
If you want to investigate the running services on your computer and see what files are running as part of each service, Sysinternals offers two utilities for this purpose.
Process Explorer ( https://technet.microsoft.com/en-us/sysinternals/bb896653.aspx ) shows detailed information about each running process on Windows in addition to all the associated DLL files and handles that each process opened. A new feature offered by this tool is its ability to query VirusTotal.com for each process or file running on the user PC. This will effectively help users to fight against malware not recognized by their antivirus solution.
Process Monitor ( https://technet.microsoft.com/en-us/sysinternals/bb896645.aspx ) shows the currently running files and applications on your computer and their associated registry keys and memory threads.
Data Destruction Techniques
In today’s digital age, data destruction is considered an integral part of any high-quality data management program. Most jurisdictions in developed countries require organizations and companies that handle private data to destroy it securely to protect individuals and businesses from the potential impact of a data breach or inadvertent disclosure. In Chapter 2 we talked briefly about the importance of wiping the hard drive before selling or disposing of your computing equipment. We suggested some techniques and tools for the safe removal of data. In this section, we continue the discussion of the safest methods to dispose of digital data securely.
Data destruction is an important step in covering your digital tracks . It is concerned with making your data (including remnant data) unreadable and impossible to recover from storage units. There are three types of hard drive destruction techniques: physical, degaussing, and logical destruction (sanitizing). Before describing each technique, let’s first talk about the different types of hard drives in use.
There are mainly two types of hard drives used in computers.
Hard disk drive (HDD) : This is the traditional (mechanical) hard disk drive. It uses a metal platter (or platters) made of glass or aluminum coated with magnetic material to store data.
Solid-state drive (SSD) : This is a more advanced version of a drive. It does not contain any moving parts and stores data on small microchip units, similar to USB flash drives. Data can be accessed on an SSD even though the electricity is not powered on. An SSD is faster than an HDD, but it is more expensive.
In terms of data recovery, recovering data from the HDD is relatively easy and can be achieved with free tools by a novice user. On the HDD, when Windows deletes a file, all it really does is mark the space on the hard drive that your deleted file occupied as free. In other words, it only deletes the pointer to this file. This operation helps to speed up the deletion process, saving valuable time. For example, deleting a 10GB file requires the same time as writing 10GB of data to your hard drive. By removing only the pointer to the deleted file, its space will be freed up immediately (theoretically, of course); however, data that belongs to the deleted file blocks will remain on the disk and will not be removed until Windows needs to write new data in that place.
The previous discussion is applicable to HDDs only. Recovering data from an SSD is more difficult than HDD and impossible in many cases. For instance, an SSD uses a different mechanism when handling deleted files. All modern SSDs utilize the TRIM command, when enabled. This command will remove deleted file data blocks instantly, allowing for another file to take up that space. This speeds up the writing process the next time the OS needs to write data onto the drive. There are many approaches to implementing TRIM on SSD devices, depending on the OS in use. Some operating systems will execute TRIM instantly after each file deletion, while others will execute TRIM at regular intervals.
Now that you have a fair understanding of the differences between HDDs and SSDs, we can talk about how to destroy data completely when using both drive types. The following techniques are used to achieve this:
Physical destruction: In this type, digital storage media (such as hard drives, memory sticks, magnetic tapes, CDs, DVDs and Blu-ray discs, and credit cards) is destroyed physically to avoid recovery. This technique is usually used by intelligence agencies such as the CIA in its Sensitive Compartmented Information Facility (SCIF) operational environments, and business organizations using this technique can assure the safe disposal of storage devices and avoid any possible recovery of classified and high-grade data assets. The equipment used to destroy these devices is a hard drive shredder or destroyer.
Degaussing: This technique works by exposing the HDD or any magnetic storage devices to the powerful magnetic field of a degausser to destroy stored data magnetically. A degausser works on magnetic storage devices only and will prove ineffective when used to destroy data on the SSD or USB flash memory because data in such devices is not stored in magnetic coating material like their HDD counterparts. SSD devices should be destroyed physically to assure the safe destruction of stored data. Obviously, devices exposed to degaussing cannot be reused to store data.
Logical destruction of data (sanitizing): This is the most commonly used technique by individuals and many organizations to assure the safe destruction of data. It works by using specialized software to cover the old data and remnants of data with random characters written by the wiping tool. There are many techniques already used to destroy data digitally in this way; some are more secure than others. However, what you should know when using such a technique to destroy data is that it cannot guarantee 100 percent removal of all data on your drive. Some advanced recovery techniques that are hardware based are still able to capture your old data, or at least parts of it (but doing so is costly and time-consuming). The main advantage of software wiping is that your storage device can be reused again to store data, unlike the previous two methods. Software wiping tools come with some disadvantages; for instance, they need time to finish because they must write random data multiple times (several passes) over all the available sectors on the hard drive. In addition, this technique assumes that your hard drive is working and writable in order to write the random data into it. Another challenge to wiping software comes when using it to wipe data stored using the RAID technology. This technology offers fault tolerance by mirroring data onto multiple disk drives in different physical locations. In such a situation, the wiping tool should track all mirrored data across all enterprise storage servers.
Different standards have been developed to wipe data (logical data destruction) on hard drives. Table 3-1 shows the most popular ones.
Table 3-1. Algorithms Used to Wipe Data on Hard Drives
Erasing Technique | Security Level | Overwriting Passes | Pattern Used | Requires Verification |
|---|---|---|---|---|
HMG Infosec Standard 5 | High | 3 | All 0s, then all 1s, and finally randomly generated 1s and 0 | Yes. |
DoD 5220.22-M | High | 3 | All 0s, then all 1s, and finally a random character (with verification after each write) | Yes. |
Bruce Schneier’s algorithm | High | 7 | All 0s, then all 0s, and finally random characters five times | Some implementations of this technique require at least one verification after the first or last pass. |
German standard BSI/VSITR | High | 7 | All 0s, then all 1s, then repeat that six times, and a final pass that writes random characters | No. |
Different programs exist to wipe your hard drives, and the majority support more than one wiping standard. Table 3-2 lists the most popular ones (free tools only).
Table 3-2. Tools Used to Securely Wipe Your Hard Drive Data
Program name | URL | Comments |
|---|---|---|
DBAN | The free version supports HDDs only. | |
Eraser | Open source; supports SSD. | |
CCleaner | Drive wiper and Windows trace cleaner. | |
SDelete | https://technet.microsoft.com/en-us/sysinternals/sdelete.aspx | Erases data according to DOD 5220.22-M . |
For SSD drives, the majority of SSD manufacturers offer utilities to erase data securely from their drives. You can check your SSD drive manufacturer’s web site for such utilities. Table 3-3 gives direct links to some of them.
Table 3-3. Specific Manufacturer Tools Used to Securely Wipe SSD Drives
Tool Name | URL |
|---|---|
Intel Solid State Drive Toolbox | |
Corsair SSD Toolbox | |
Samsung Magician | www.samsung.com/semiconductor/minisite/ssd/download/tools.html |
SanDisk SSD | https://kb.sandisk.com/app/answers/detail/a_id/16678/~/secure-erase-and-sanitize |
If you have a drive from a different manufacturer, search online for it using the phrase SSD secure erase tool X, replacing the X with the SSD maker.
Note! Windows Provides a Built-in Command-Line Utility to Overwrite Deleted Data to Avoid Future Recovery
All data that is not allocated to files or folders is overwritten using three passes. The first pass writes all 0s (0x00), the second pass writes 255 (0xFF), and the third pass writes a random number. To launch this tool, open a command prompt as the administrator, type cipher /w, and then specify the driver or folder that identifies the location of the deleted data that you want to overwrite (see Figure 3-2).
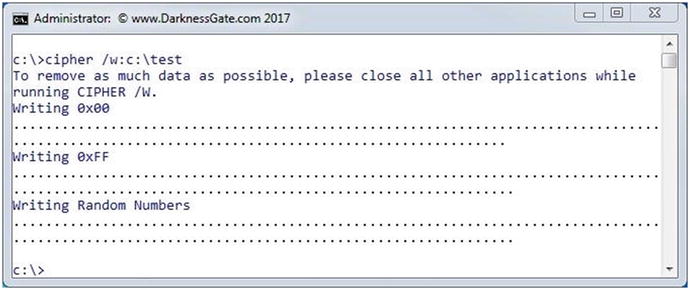
Figure 3-2. Using Cipher.exe on Windows to overwrite deleted data space on selected folder
Now, we will discuss how to configure Windows to stop recording your activities when using it. Windows records almost any task you do when using it, for instance, installing and uninstalling programs, launching a web browser to surf or to check e-mails, and conducting searches for a file or folder, as well as all errors generated from Windows and other software (e.g., memory dumps). These and more are all recorded somewhere on the hard drive. There are many privacy programs that can perform automatic checks of Windows digital traces in order to delete them; a good privacy tool for Windows is BleachBit ( https://www.bleachbit.org ). In addition to its main feature of deleting records of user actions in Windows, it has the ability to wipe clean your traces in thousands of applications (including all major web browsers).
Automated privacy tools are perfect for all users and offer an easy way to destroy your digital traces. However, to achieve the maximum privacy possible, it is recommended that you prevent Windows from recording some types of data about your computer usage. This way, you do not need to worry about data that does not exist in the first place!
Disable the Recycle Bin
When you delete a file, Windows will move it to the recycle bin. To force Windows to delete the file directly without sending it to recycle bin, right-click Recycle Bin (usually it resides on the Windows desktop), select Properties, and select the option “Don’t move files to the Recycle Bin. Remove files immediately when deleted.” Then click the OK button. Bear in mind that this technique does not guarantee the secure removal of deleted files. You still need to use one of the tools already mentioned to overwrite the deleted files sector area on the hard drive.
Disable UserAssist
Windows keep tracks of all programs launched on your PC since its installation date, including the number of launch times and other attributes. It also stores links you open frequently. To disable UserAssist, go to the registry and delete all entries under the following key:
HKEY_CURRENT_USERSoftwareMicrosoft WindowsCurrentVersionExplorerUserAssistNote
You can access the Windows registry editor by pressing Windows Key+R, then typing regedit in the Run dialog, and finally pressing Enter.
NirSoft has a good tool for viewing/deleting UserAssist keys; you can find it at www.nirsoft.net/utils/userassist_view.html .
Delete Previously Connected USB Devices
Windows keeps a history of all connected removable USB storage devices (thumb drives, iPods, digital cameras, external HDDs, SD cards, etc.) in different registry keys. Each key offers a different set of information for each connected USB device. If you want to view all this information in addition to many useful USB device manipulation functions in one location, use a free portable tool from NirSoft called USBDeview ( www.nirsoft.net/utils/usb_devices_view.html ).
Disable the Windows Prefetch Feature
This feature boosts Windows performance by predicting which application a user is likely to launch and then loads the necessary files to RAM to speed the launch time. A copy of each prefetched application will remain in the following folder: C:WindowsPrefetch. Access this folder and delete everything in it. You can also disable the prefetch feature as follows: press Windows Key+R, type services.msc in the Run dialog, and press Enter. Search for a service named Superfetch and double-click to access it. Change “Startup type” to Disabled. Then click the OK button .
Disable the Windows Thumbnail Cache
Windows stores thumbnail images of major graphics file types in a thumbnail cache file called thumbs.db within each folder that contains such files. This file can reveal information about previous files on your system even though you have deleted them. To disable this feature, go to Control Panel ➤ Folder Options (in Windows 10 it is called File Explorer Options), go to the View tab, and select the option “Always show icons, never thumbnails.” Click the OK button.
Note!
Thumbs.db files are hidden. You need to show hidden file/folders as you learned previously to see these files. Then you can delete each one manually if you want.
To delete all Thumbs.db files on a particular partition (for example, on the C: drive), right-click the drive on Windows File Explorer and then select Properties. Select the General tab and click the Disk Cleanup button. Select Thumbnail and then click the “Clean up system files” button (see Figure 3-3).

Figure 3-3. Deleting all thumbnail images under the Windows partition (C: drive)
Other Areas You Need to Consider
Other Windows features produce digital data that might include sensitive information about your computer usage, such as Windows restore points, the Windows hibernation file, the Windows paging file (virtual memory), and Windows error dump files. All these features can hold data that may violate your privacy or even crack your disk encryption if they fall into the wrong hands. Chapter 5 discusses the security threats imposed by these features and how you can mitigate them.
Windows 10 Security
Windows 10 comes equipped with sophisticated security capabilities to deter current and future cyber-attacks. As you already saw, being able to implement these modern Windows 10 security features depends on the hardware available in your computer. In this section, we will talk about the new Windows 10 security features and how you can harden Windows 10 to become more privacy friendly.
Windows Biometric Authentication
Windows Hello is a new feature/app introduced in Windows 10; it allows a user to log in to his or her Windows machine without entering a password; instead, he or she can use biometric characteristics such as a fingerprint, face, or iris. Microsoft claims that it will not store your biometric information on its servers; it will store the data only locally on each user’s machine.
As we already said, Windows Hello is not supported on all computers. To check whether your PC supports Windows Hello, go to Windows Settings (press Windows Key+I), select Accounts, and then click “Sign-in options.” If your PC does not support the Hello feature, you can simply buy an external fingerprint scanner or 3D camera for face recognition and attach it to your PC so that you can activate this feature.
Note
You can find more information about the Windows 10 Hello feature in addition to PC accessories such as third-party fingerprint scanners and 3D cameras to activate this feature on nonsupported devices at https://www.microsoft.com/en-us/windows/windows-hello .
Windows Hello integrates with many apps and online services, allowing you to synchronize your data across different Windows 10 devices, make purchases, and access your Dropbox and OneDrive accounts without entering any password.
Despite the enhanced security and ease of use that Windows Hello offers for Windows users, we still recommend using a local account to authenticate a user upon signing in. No one can guarantee the security of your personal data if an attacker succeeds in compromising this feature, but perhaps the situation will change when this technology becomes more mature.
Use Local Account
Always use a local account on your Windows PC. Local accounts are like all the old-school accounts that you have used in the past to secure your Windows machines. They do not require an Internet connection to work. Beginning from Windows 8, Microsoft offers the possibility for its users to log in to their PCs using Microsoft account login credentials (Hotmail, Outlook, Live, or another Microsoft e-mail to log in). This creates security risks for the following reasons:
You need to use your e-mail account to log in to your machine. If your password gets compromised, the attacker will have full access to your e-mail (and all Microsoft online services like OneDrive) in addition to all your computer’s local files.
Sending credentials across untrusted channels like the Internet should be minimized as much as possible because no one can guarantee what happens to your sensitive information when traveling online.
Your personal habits and PC usage will be sent to Microsoft servers on a regular basis, and everything will get linked to your e-mail account. That is a lot of information stored in one place!
The damage from a malware attack will double when using a Microsoft account; an attacker can reveal a great number of details about you if he or she successfully cracks your Microsoft account password.
For these reasons and more, it is highly advisable to use a local account when logging into Windows. Of course, there are some instances when you want to buy something from Windows Store or you want to install Windows apps. In those cases, you need to log in using your Microsoft account. However, make sure to return to your local account after finishing such tasks.
To switch from the local account to the Microsoft account or vice versa, press Windows Key+I to open Windows Settings. Click Accounts, then click the appropriate link near the top (“Sign in with a Microsoft account instead” or “Sign in with a Local account instead”), and finally follow the wizard to update your selection.
Windows Update
Windows 10 installs updates automatically without any user intervention. Keeping your system up-to-date is an excellent way to protect your data.
You can access Windows 10 updates and configure advanced settings by going to Settings ➤ Update & Security.
Windows Defender
Windows Defender offers basic antivirus capabilities for Windows 10. When you install a dedicated antivirus solution, Windows Defender will disable itself automatically. If you select to uninstall your current antivirus solution, Windows Defender will return and activate itself to protect your machine. Installing a dedicated antivirus solution, preferably with a built-in firewall, is important to protect your computer and data before going online.
Windows Backup
Windows offers a dedicated built-in utility to back up your data into an external drive, so there is no excuse for not backing up your data and system on regular basis. To access the backup utility under Windows 10, go to Settings ➤ Update & Security ➤ Backup. From here you can either use File History to back up your important folders, such as Desktop, Contacts, and Favorites (or any folder you select), or use the old Backup and Restore (Windows 7) to create a full system image of your Windows drive. This allows you to perform a full system restore from this image if your system becomes unstable.
Recovery
If a disaster happens and you want to recover your system or data, Windows 10 offers you these three options (you can access these options from Settings ➤ Update & Security ➤ Recovery):
Reset this PC: In this case you can reinstall Windows while keeping your personal files intact, or you can reinstall Windows and remove them entirely with a clean installation.
Advanced startup: This option allows you to restore Windows from a system image taken previously (stored on a network drive, USB flash drive, or CD/DVD). This helps you to restore Windows and all programs/configurations and personal data from a previous stable state (when the backup was taken).
Go back to an earlier build: This option will be available only if you upgrade Windows and the current upgraded build does not work for you. This will revert the upgrade.
Note
You can find more information about the recovery options at the Microsoft web site: https://support.microsoft.com/en-us/help/12415/windows-10-recovery-options .
Find My Device
This is a new feature introduced in Windows 10–capable devices that already have GPS or a similar sensor to know the device’s current location. It works by tracking your Windows computer, tablet, or smartphone periodically and stores the geolocation data in your Microsoft online account.
This feature allows Microsoft to record your location, so it is advisable to use full disk encryption (covered in Chapter 5) instead. If you lose your device, you can depend on the honesty of the person who finds it to hand it over to authorities or to you (provided you put your name or e-mail somewhere on the outside cover). If your device gets stolen, you can forget the device while being assured that your data will not get exposed because it is encrypted!
Privacy Settings
When Windows 10 was released to market, it fueled a heated discussion about the default privacy settings of Windows 10; many accused Microsoft of collecting information via the default Windows 10 Express installation settings to invade end users’ privacy. Many famous security experts and privacy advocates explained that Windows 10 could collect vast amounts of data about the usage habits and online browsing of each user in addition to the user’s calendar, location data, previous searches, and more. Windows sends this data to Microsoft for analysis to personalize the user experience and target him or her with customized advertisements.
Microsoft responded and assured people that the collected data would be used only to customize the user experience when using Windows, in addition to customizing certain services according to user location.
This book discusses the issue of privacy when going online, so we will not stop to discuss whether Microsoft is really respecting user privacy and to which extent. Users should always consider themselves working in a hostile environment when going online and must take all the precautionary measures mentioned in this book to safeguard their confidential data and personal information, without relying much on privacy promises offered by giant tech providers.
Warning
Security-conscious people working in extremely hostile environments who need to protect their confidential data shouldn’t use the Windows OS. The Tails OS is recommended; you’ll learn more about this in Chapter 4.
For now, let’s return to the security issue of Windows 10. A good start for any user who wants to use this OS is to read the following two agreements to understand what data Microsoft collects about them and for any purpose:
Microsoft software license terms: https://www.microsoft.com/en-us/Useterms/Retail/Windows/10/UseTerms_Retail_Windows_10_English.htm
Microsoft Privacy statement: https://privacy.microsoft.com/en-us/privacystatement
Reading the Microsoft Windows usage term agreement and privacy agreement is a good start. However, Windows 10 allows its users to browse and update major settings that affect their privacy. Privacy settings in Windows 10 are bundled together in one place to simplify privacy management. You can access the privacy dashboard from Settings ➤ Privacy (see Figure 3-4).

Figure 3-4. The privacy settings in Windows 10 are all bundled together in one location.
In the privacy dashboard, you can disable any setting that you think affects your privacy and customize other settings according to your privacy expectations. For example, if you are using Skype regularly to make Internet calls, you should allow the Skype app to use the camera and microphone in order to work, but if you are not making voice calls, you can prevent all apps from accessing your microphone by turning the microphone setting to Off for all apps. The majority of privacy settings can be disabled safely without affecting the Windows main functions.
Warning
Do not use automated privacy tools targeted to Windows 10 to adjust Windows privacy settings. These tools are not reliable and can cause different problems in both Windows functions and apps. Always use the normal Windows privacy dashboard to adjust your Windows 10 privacy settings.
Additional Security Measures
Here are additional measures to better secure your privacy when using the Windows OS.
Use a Virtual Keyboard
Keyloggers are malicious programs that monitor your computer silently (screen captures, browsing history keystrokes, and anything you do on your PC). They come in two major types: hardware keyloggers, which are physical devices attached to your computer and covered thoroughly in Chapter 5), and software keyloggers, which work like any other malicious software.
Installing antivirus and anti-malware solutions should be enough to stop the majority of software keyloggers. However, if you are using a public PC (e.g., an Internet café PC) and you need to enter your password to access your online account, it is highly advisable to use a virtual keyboard (this is a simulation for the physical keyboard) to avoid exposing your credentials—just in case the computer you are using has a software keylogger installed. A virtual keyboard offers a good protective measure, and it simply works by encrypting your keystroke so the keylogger cannot see anything in clear.
A virtual keylogger does not offer 100 percent protection against all types of software keyloggers. However, using it is better than nothing. Table 3-4 shows some free virtual keyboards.
Table 3-4. Free Virtual Keyboard to Protect Against Software Keylogger
Keyboard Name | URL |
|---|---|
Neo’s SafeKeys | |
Oxynger KeyShield | www.oxynger.com (offers more protection) |
Please note that many antivirus solutions offer an on-screen keyboard that you can use to protect your sensitive login information.
Automatic Program Updates
Installed applications must be updated regularly to avoid leaving any vulnerable application that can be exploited by attackers to invade your system. Different programs exist to remind you to update your currently installed programs to their latest version. However, using a software updater is a good option to help them secure all programs installed on your PC in one click without the hassle of manually updating them.
Table 3-5 lists some free tools to update Windows programs automatically.
Table 3-5. Windows Updater Tools
Program Name | URL |
|---|---|
Secunia Personal Software Inspector | http://learn.flexerasoftware.com/SVM-EVAL-Personal-Software-Inspector |
FileHippo App Manager | |
Patch My PC Updater |
Note
In this book, we recommend always using open source programs from a reputable source. The previously mentioned updater programs do not follow this criteria. Nevertheless, you can still check for new versions of each installed program and then download and update them manually. This is preferable to avoid using programs that aren’t open source. This warning is applicable to security-conscious people; the majority of end users can safely go with any updater program. (But always remember to read the end-user agreement and privacy policy of the tool before installing it to know what type of information it collects about you.)
Virtual Machines and Portable Apps
Use virtualization technology to enhance your privacy and protect your host machine from malware and other security threats. A virtual machine allows you to execute programs, open e-mail attachments, test programs, and visit dangerous web sites safely without being afraid of malware affecting your operating system, as the virtual machine will run in a sandbox isolated entirely from its host machine’s operating system. Popular virtual machines include VirtualBox ( https://www.virtualbox.org ) and VMware Workstation Player ( www.vmware.com/products/player/playerpro-evaluation.html ).
Virtual machines offer what is called a virtual hardware device that is independent of the host machine. However, there are some programs that offer virtualizing for separate programs running on your machine without creating a complete virtual device. Sandboxie ( https://www.sandboxie.com ) allows programs to run isolated from the host machine, thus preventing unwanted changes from affecting your operating system. This program is especially useful for the Firefox browser, which until now lacked the support of a full sandbox model compared to Google Chrome and Microsoft Internet Edge (and Edge).
Note
The majority of web browsers and some desktop applications already have the sandbox feature. The sandboxing concept means anything executed within the sandboxed application web browser, for example, will remain within it and will not affect the underlying operating system.
Use portable applications that can run without the need to install them into the system. This will effectively reduce your digital footprint online, although some traces will remain on the host machine after executing such tools (e.g., in the Windows Prefetch folder and maybe in the registry). Here are some popular portable app suites:
PortableApps.com: http://portableapps.com/suite
Liberkey, 295 Apps: www.liberkey.com/en
Pendriveapps: https://www.pendriveapps.com
Note
Use a bootable USB token or live CD/DVD when working on sensitive documents. Running the Tails OS ( https://tails.boum.org ) in offline mode is a great practice. There are many tools can help you to create a bootable USB/CD drive. The following are some of them:
Windows USB/DVD download tool: https://wudt.codeplex.com
Rufus: https://rufus.akeo.ie
WinBuilder: http://winbuilder.net
Windows To Go (Windows 10)
Windows To Go is a new feature available in Windows 10. It allows you to run the complete Windows 10 Live feature from a USB drive without needing to install it on your computer’s hard drive. This feature is available in both Enterprise and Education editions and can be accessed from Control Panel ➤ Windows To Go.
Note
Some third-party tools allow you to install and boot Windows 10 from any Windows 10 edition.
These are some tools to help you create a Windows To Go drive of Windows 10:
Rufus: https://rufus.akeo.ie
AOMEI Partition Assistant Standard: www.disk-partition.com/download-home.html
Do not forget to configure your computer’s BOIS or UEFI to boot from USB drives.
Please note that not all the usual Windows 10 features will be available when using the Windows To Go operating system. For instance, you cannot use TPM while encrypting using BitLocker. Hibernations and recovery options are also not available. For more information about Windows To Go features , go to the Microsoft web site ( https://docs.microsoft.com/en-us/windows/deployment/planning/windows-to-go-overview ).
Summary
Windows is an easy-to-use operating system. It also is still the most prevalent one across the globe. Despite all the rumors about default configurations set by Microsoft that may somehow invade your privacy, this operating system still is considered a secure and reliable one that can handle both personal and mission-critical tasks. Windows is not hardened by default to be an anonymous OS; it was not built for this role. Productivity and ease of use are what distinguish Windows from its rivals, not to mention its robust build and security features.
Windows, especially Windows 10, can be hardened to become more privacy friendly by updating its settings. Different security software is also available to install on this OS to make it more secure and anonymous, which is what we will cover in the rest of this book.