
How to Anonymize Everything You Do Online
You do not have to be a spy to care about your anonymity . Regular Internet users have many reasons to conceal their identity and digital tracks online. Nearly anything we do online is logged, analyzed, and used for different reasons without a user’s explicit consent. Internet users think that there is no way to stop this privacy invasion because they are not well educated about Internet security, and many of them find this topic hard to understand or scary. This is not always true; there are ways to anonymize what you do online. Although most Internet users are not specifically targeted by big intelligence agencies that have access to substantial resources and the ability to monitor communications using different online and offline methods, a percentage of these users may indeed be targeted by such mass surveillance programs utilized by nation-states and superpower intelligence agencies that work to harvest and acquire online traffic as intelligence. Giant companies also capture user activities online for various marketing purposes. This type of online monitoring constitutes the largest percentage of online monitoring and can be mitigated using simple protective steps.
As we already said, it is difficult to protect yourself if you are a target of a big intelligence agency like the National Security Agency (NSA) because it will find a way to capture your data. However, the guidance in this chapter, and in the rest of the book, will ensure that you understand how to defend against online risks and the potential of hacking attempts against your online profile.
Almost every week, the press announces various hacking attacks that have taken place against different companies. For example, on September 22, 2016, Yahoo announced that a security breach had resulted in exposing the personal details of 500 million user accounts in one of the largest cybersecurity breaches ever to have occurred. 1 The Yahoo case shows clearly that the Internet is a hostile environment and privacy violations are not limited to giant companies that record user activities to sell to various advertisement companies. Giant companies themselves are targets because they have confidential and sensitive data concerning end users.
In this chapter, you will learn how to conceal your identity online. As you already saw in Chapter 1, there are two types of data that prospective attackers are concerned with: personal identifying information and nonidentifying information. This chapter will teach you practically how to conceal both to mitigate or to reduce the potential of someone tracking your activities online.
Anonymous Networks
When working online (for example, surfing the Web, sending e-mails, conducting online banking, and posting data to blog), everything you do could be traced back to your machine. In Chapter 1 we described the concept of an Internet Protocol (IP) address, which is the main identifier of all online users. To anonymize your location online, you are mainly concerned with concealing your IP address. There are different techniques you can employ to conceal an IP address, some of which are more secure than others. In this section, we will cover anonymous networks , which offer the maximum protection and anonymity in today’s digital age. In addition to being used by casual users, anonymous networks are used by military personal, law enforcement, criminals, hacking groups, terrorists, pedophiles, whistle-blowers, journalists, and of course anyone else who wants to disappear when entering the online world.
Tor Network
Tor is the most popular anonymous network currently used online. The name is derived from an acronym for the original software project name, The Onion Router . Tor was originally developed by the U.S. Naval Research Laboratory to protect U.S. intelligence communications online. However, in December 2006, a nonprofit organization called the Tor Project took over Tor. 2
Currently, the number of users using Tor is about 1700,000, 3 but of course the number of users changes daily.
Tor is mainly composed of two parts.
The piece of software you run on your machine to access the Internet anonymously
The Tor network of volunteer computers that direct your online traffic
How Tor Works
To fully appreciate how Tor works, it is vital to appreciate how the superhighway of the Internet functions. In a nutshell, the Internet comprises 13 route servers that sustain its entire backbone and that support massive numbers of computers that store and process data. These computers are known as servers. The devices, such as PCs, laptops, smartphones, and tablets, that retrieve information from these servers are called clients. For example, when you want to read an article on the CNN web site, you use your client device (an iPad, for example) to connect to the CNN server that hosts the article. The connection between servers and clients is made in a variety of ways, such as through wireless signals, fiber-optic cables, or copper cables.
The online information travels in two directions. In the earlier example, you initiate the connection to the CNN server, and your client device will send your request in multiple packets. These packets contain information about your client device (such as the source IP address among other data) and the destination address. When the CNN server receives this data, it will act upon it and send the article you requested to your local machine through the established connection.
During this connection, you must remember that the traffic initiated between devices and servers can be monitored by various third-party bodies or even intruders. Government agencies, Internet service providers (ISPs), and giant companies are willing to sell your web browsing habits to advertisement companies. Hacker groups are another example of entities that might be interested in capturing and analyzing the traffic for various purposes. This applies when sending e-mails too. There is great danger in working online without the appropriate defenses in place.
Tor helps end users maintain a level of online anonymity by encrypting both the data and the destination IP addresses prior to sending them through a virtual circuit, which consists of many nodes (no fewer than three nodes in any given time). Each node then decrypts part of the data to reveal only the next node in the circuit to direct the remaining encrypted data to it. The next node performs the same function until the message reaches the final node, called the exit relay. The exit relay decrypts the data without revealing the source IP address, sending it on to its final destination (see Figure 4-1).

Figure 4-1. How the Tor network works
The term node is used to describe any server working as part of the Tor network of relays. Sometimes people use different terms for the node such as server, relay, or router. Bear in mind that all these names are interchangeable.
When using Tor to anonymize your location, it will use the exit relay IP address instead of your real IP address as the source IP address. This will effectively conceal your identity online.
The number of relays is increasing steadily. As of November 2016, there were about 7,166 relays available in the Tor network ; 958 of them work as exit relays. 4 As the number of relays increases, the Tor network becomes faster and more stable.
Any user can become a volunteer in the Tor network and operate a relay using his or her PC; however, it is necessary first to know about Tor relay types and how each one works.
Middle relays
Exit relays
Bridges
Tor assures that your Internet traffic will run through at least three relays before reaching its destination. The first two relays are the middle relays . They receive traffic and forward it to another relay. Middle relays show their presence to the rest of the Tor network so Tor users can connect to them. Individual volunteers usually run this kind of relay because they are not liable for any illegal activities that may pass through them because the traffic between middle relays is internal within the Tor network. Remember that the middle relay’s IP address will not show publicly outside of the Tor network.
Tor exit relays are the gateways where encrypted Tor traffic will hit the Internet. Individuals are encouraged not to run an exit relay at home or use a home Internet connection. The exit relay’s IP address will appear as the source IP address publicly.
Warning
If a malicious user conducts illegal activities and the traffic passed through an exit relay operated by you, law enforcement may consider you a criminal, and your PC can become part of the law enforcement investigation.
Bridges are the final type of Tor relay; these relays are not publicly listed as part of the Tor network. A bridge is used as a censorship circumvention in countries where the Tor’s public IP address is regularly blocked, such as China and in other places with fewer freedoms. A bridge is generally safe to run in your home, in conjunction with other services, or on a computer with your personal files. 5
As with all the techniques mentioned in this book, Tor is intended to be used by honest people seeking to maintain their privacy and to protect journalists and human rights activists living in countries controlled by oppressive regimes . However, it has been abused by criminals , black hat hackers, and terrorist organizations to conceal their incriminating communications. Tor is also used to access the underground Internet , also known as the dark web , as you will see later in this chapter.
Tor Browser
To use the Tor network to conceal your online identity, all you need to do is download the Tor Browser bundle, which works on all major operating systems. You can find it at https://www.torproject.org/projects/torbrowser.html.en . It is portable software, which means it requires no installation to work. You can safely run it from a USB drive.
The Tor Browser is a security-hardened Mozilla Firefox implementation and comes with Tor software associated with it. It helps a user access the Tor network transparently without making any complex configuration changes.
Download the Tor Browser and extract it to a specific folder on your drive; you can also extract it to a USB drive. Launch the Tor Browser by clicking the Start Tor Browser icon. Once Tor is ready, the Tor Browser will automatically open (see Figure 4-2).

Figure 4-2. Successful launch of Tor Browser
Please note only web sites visited through the Tor Browser are anonymous and directed through the Tor network; other browsers already installed on your machine such as Opera and Microsoft Edge are not affected, and their traffic will not pass through the Tor Browser.
When you’re done using the Tor Browser, make sure to close it properly by clicking the X in the top-right corner. Tor is preconfigured to forget and delete all your browsing history upon closing.
How to Hide Your Tor Usage from Your ISP
In some countries, Tor may be blocked because of censorship . In this case, you will not be able to launch the Tor Browser as described. In addition, in some countries using Tor could be prohibited by law, so using it could be considered suspicious or even dangerous and might land you in serious trouble with the local authorities.
ISPs can detect you are using the Tor network using a variety of ways, and hiding this fact is difficult and is still undergoing much research. However, you can still try to conceal your Tor usage to a great level using the following techniques.
Using a VPN
You can hide Tor from your ISP by using a virtual private network (VPN) service . A VPN allows you to mask your IP address and to establish a secure encrypted connection between your machine and the VPN service, which will act as your entry point to the Internet. Once the VPN is active, you can start the Tor Browser as described earlier, and the Tor usage will be hidden from your ISP to a large extent. (We will cover VPNs thoroughly later in this chapter.)
Using Tor Bridges
Bridge relays (or bridges for short) are Tor relays that aren’t listed in the main Tor directory. Bridges are considered entry points to the Tor network. Since there is no complete public list of them, even if your ISP is filtering connections to all the known Tor relays, it probably won’t be able to block all the bridges. 6
Please remember that this method may not fully guarantee that your ISP will not detect your Tor usage, but it will make discovering this fact difficult and will require sophisticated techniques to uncover. To use Tor bridges, follow these steps:
Go to https://bridges.torproject.org/bridges and enter the captcha to access the secure area, where you will find three bridges (see Figure 4-3).

Figure 4-3. Entering the captcha information to access the bridges
You can also request the bridges to arrive in your e-mail by sending an e-mail to [email protected] with the line “get bridges” by itself in the body of the mail. You’ll need to send this request from a Gmail, Riseup, or Yahoo account exclusively (see Figure 4-4).

Figure 4-4. Getting Tor bridges by sending e-mail to [email protected]
Warning Do not use your primary e-mail address to receive Tor bridges if you live in a country where Tor usage is illegal or prohibited. Automatic monitoring machines deployed by many nation-states can investigate e-mail contents and discover that you’re trying to connect to the Tor network using customized bridges.
To enter bridges into the Tor Browser, launch Tor Browser, and before the Tor Browser connects, click the Open Settings button (see Figure 4-5).

Figure 4-5. Accessing Tor network settings through the Tor Browser
A Tor Network Settings window appears; click the Configure button (see Figure 4-6).

Figure 4-6. Tor Network Settings window
Tor asks you whether your ISP is blocking or otherwise censoring connections to the Tor network; select Yes (see Figure 4-7) and click Next to continue.

Figure 4-7. Configuring Tor to use customized bridges
In the next wizard window, select the option “Enter custom bridges.” Copy the bridges you have from step 1 or step 2 and paste them in the box; click Next to continue (see Figure 4-8).

Figure 4-8. Entering custom bridges into Tor Browser
The next wizard asks you whether your computer sits behind a proxy server; in our case, we don’t need one (which is most comment). Select No and click the Connect button to continue (see Figure 4-9). If you are sitting behind a proxy server, select Yes, then enter your proxy settings, and finally click Connect.

Figure 4-9. Final wizard window
If everything works as expected, the Tor Browser will open using the customized bridges.
As we have already introduced, using customized Tor bridges may not fully mask your entry to the Tor network. Some countries use a deep packet inspection (DPI) technique to analyze Internet traffic flows by protocol to examine whether they contain Tor traffic. China, Uzbekistan, and Iran are examples of countries that have used this technique to try to block Tor traffic.
Using Pluggable Transports
To work around the DPI censorship technique, Tor has introduced the pluggable transport (PT). This will transform the Tor traffic flow between the client and the bridge into ordinary Internet traffic. This way, censors that monitor traffic between the client and the bridge will see innocent-looking transformed traffic instead of the actual Tor traffic . 7
To use a Tor pluggable transport, follow these steps:
Launch the Tor Browser and click the Open Settings button before Tor starts.
Click the Configure button, select the Yes option when asked whether your ISP blocks or censors connections to the Tor Network, and click Next to continue.
Select the option “Connect with provided bridges” and select a bridge from the Transport Type drop-down menu (see Figure 4-10).

Figure 4-10. Connecting to Tor network using a pluggable transport to conceal your Tor usage
Tor has many pluggable transports. Currently, the following are the most common ones:
obts4
meek-amazon
meek-azure
obfs3
scramblesuit
Select one from the drop-down menu and then click the Next button to continue.
Warning The pluggable transports currently deployed in the Tor Browser may change with future releases of the Tor Browser. You can always select a different one from the drop-down menu, but you should begin by selecting the “recommended” one, as we did in Figure 4-10.
The final wizard window will ask you whether this computer sits behind a proxy server. In our case, it does not, so we select the No option and click the Connect button. If you are sitting behind a proxy server, select Yes, enter your proxy settings, and click Connect button.
If everything goes well, the Tor Browser should now be able to load successfully, and the browser window should appear using the new bridges.
Precautionary Steps to Stay Anonymous When Using the Tor Browser
To stay anonymous when using the Tor Browser, you must consider the following warnings to avoid revealing your true IP address:
Do not install add-on s in your Tor Browser. Some extensions such as Flash Player and QuickTime tend to open connection outside your Tor network. This will reveal your true IP address. The Tor Browser is configured for anonymity, so you cannot use it as your regular browser.
Don’t open PDF files or view Flash video in your Tor Browser. As we already said, such an application may open its own connection outside the Tor network resulting in revealing your real identity.
A Tor exit relay can be abused to monitor your Tor traffic. As we already mentioned, the exit relay establishes the actual connection to the destination server and is not encrypted (Tor does not encrypt the link between the exit relay and the final destination), so if an intruder captures your traffic at this location, the intruder can read everything unless you have encrypted your data before sending to the Tor network.
Beware of a man-in-the-middle (MITM ) attack (see Figure 4-11). This attack is a kind of active cyber-attack where an intruder inserts his or her device in the middle of the connection between the two communicating parties (these parties can be humans or systems). By doing so, an attacker has the ability to intercept the entire conversation of the victims in addition to gaining full access to all the sensitive information they are currently exchanging. An attacker can also impersonate the communicating parties by relaying information between them as if legitimate. 8 The main protective steps against this type of attack are to use end-to-end encryption and to pay extra care when verifying the server authenticity. Checking server authenticity can be done automatically by using SSL certificates checked by your browser through a set of recognized certificate authorities. If you receive a security exception similar to the one in Figure 4-12, you may be a victim of an MITM attack. Do not bypass this warning unless you have another method to verify the authenticity of the server.

Figure 4-11. Man-in-the-middle attack

Figure 4-12. Error message when trying to access a web site with an unverified identity (insecure certificate)
This last warning is related to the human security aspect and people’s habits when using computers and surfing the Internet. For example, when you want to use a Tor Browser to conceal your online identity, you must not reveal your name or register with your real name and primary e-mail address on any web site that requires registration. In the same way, some users may use Tor while using Google to search. Such bad practices can ultimately reveal the user’s identity even though when using Tor. The Tor network is designed to help you conceal your IP address and can do nothing to protect you if you spread your personal details everywhere. In this book, we will cover best practices and suggestions to keep your personal information private when working online with or without using the Tor Browser.
In this section, we introduced the Tor network and how you can access it via the Tor Browser. Using the Tor Browser is more than enough for the casual Internet user seeking privacy online. However, users who live in extremely hostile environments who need a way to communicate privately must access the Tor network using a security-hardened operating system. The Tails operating system is a Linux security-hardened OS that uses Tor as its default networking application. Later in this chapter we will cover this sophisticated operating system and give warnings and tips when using it.
I2P Network
I2P is an alternative anonymity network to Tor, and it supports common Internet activities such as web browsing, e-mail web site hosting, file sharing, and real-time chat.
Unlike Tor, whose focus is to access web sites from the normal Internet, I2P is more directed toward accessing a closed, anonymous Internet, also known as a darknet, separated from the normal Internet. I2P protects communications from dragnet surveillance and monitoring by different third parties (governments, ISPs, etc.). Anyone running I2P can run an anonymous server through a so-called eepsite, which is accessible only within I2P network using the .i2p top-level domain (similar to .Onion for Tor hidden services, as you are going to see in the next section). 9
You can get I2P from its official web site ( https://geti2p.net/en/ ). However, you may find that the description of I2P on its official web site is somehow difficult to understand, so in this section we will introduce in simple detail how to set up your browser to use the I2P anonymous network.
Warning
I2P doesn’t go through Tor.
To run I2P on your PC (we are using Windows for this experiment), you must have Java already installed on your machine because I2P is written using the Java programming language. You can download Java from https://www.java.com/en/download/index.jsp .
Download I2P from https://geti2p.net/en/download and install it like you would any ordinary Windows program.
Start I2P by clicking the “Start I2P (restartable)” program icon, as shown in Figure 4-13).

Figure 4-13. Starting the I2P anonymous network
The I2P service console will appear. Wait some seconds for it to connect. A browser window will also open to announce a successful connection to the I2P network.
After I2P starts, you need to configure your browser to access the normal Internet. In our case, we will use Mozilla Firefox to configure it for I2P usage. Go to the Firefox menu, select Tools ➤ Options, go to the Advanced tab and then the Network tab, and click the Settings button. In the Connection Settings window, select the option “Manual proxy configuration” and enter 127.0.0.1 in the HTTP Proxy field and 4444 in the Port field. Make sure the “No Proxy for” text box contains “localhost, 127.0.0.1.” Finally, click the OK button to accept the new settings (see Figure 4-14).

Figure 4-14. Configuring Firefox to use the I2P anonymous network
Note
We prefer and encourage you to use the Firefox browser over other popular counterparts such as Chrome and Microsoft Edge. Later in this chapter we will discuss why we prefer using Firefox over other browsers.
Now your Firefox browser is ready to use the I2P network. To make sure the configuration is working, use Firefox to visit any web site that can show you your current IP address, such as https://www.iplocation.net (see Figure 4-15).

Figure 4-15. Making sure that I2P successfully masked your real IP address
The previous configuration of Firefox allows you to use the normal Internet anonymously. In the same way, you can access any web site hosted on the I2P anonymous network (such web sites have an .i2p extension instead of .com or .org). To access a web site within the I2P network, follow these steps:
Point your browser to the I2P web site you want to access; you will receive an error message stating “Website Not Found in Addressbook.” To solve this problem, you need to click one of the jump service links at the end of the page (see Figure 4-16).

Figure 4-16. Adding an I2P web site to the address book
Try to click each jump service link (boxed in red in Figure 4-16) until you find one that takes you to the page that allows you to add this web site to the I2P router address book (see Figure 4-17).

Figure 4-17. Adding your newly I2P web site to router address book
After clicking “Save X to router address book and continue to website,” the page shown in Figure 4-18 will redirect you to the intended web site (shadowlife.i2p in this example).

Figure 4-18. Redirecting you automatically to the requested web site
I2P is not suitable for casual Internet users. As we already said, it is for accessing web sites hosted on the darknet under the .i2p top-level domain name. Although it is a little daunting for beginners to use this network (and I2P is somewhat slow compared with Tor), we wanted to mention it in this book because we are going to talk about the darkne t later in this chapter, and I2P is considered one of the darknet’s major anonymous networks.
Freenet
This is another anonymous network. It is a fully distributed, peer-to-peer anonymous publishing network. We will not cover how to use this network like we did with the previous ones. However, you can check out http://freesocial.draketo.de for a complete tutorial on how to use this anonymous network.
Tor, I2P, and Freenet are the most popular anonymous networks currently available. Tor surpasses the other two in being more widely used and more mature. We recommend using the Tor network for all your work that requires online anonymity. Later in this chapter, we will introduce Tails, which is hardened specifically to stay anonymous and to protect users’ confidential and sensitive online communications.
Darknet
In the previous discussion of anonymity networks, we introduced the term darknet, also known as the deep web , deep net, or invisible web . All these terms are interchangeable and point to the hidden underground of an unindexed Internet. It is hidden because regular search engines like Google and Yahoo cannot index its contents and thus it remains hidden from the general public. The deep web refers to anything that cannot be indexed. For example, many government web sites have millions of documents in databases that cannot be retrieved using ordinary search engines; thus, such documents are considered part of the deep web.
When we discuss the darknet in this book, we are considering web sites that are hosted by anonymous networks, such as I2P or Tor. There are no rules or regulations that govern the web sites hosted on the darknet. This makes this subnetwork an ideal location for criminals and other miscreants and malicious individuals to conduct their illegal activities with more assured levels of invisibility. Buying and selling guns, drugs, and people; sharing child abuse images and extreme pornography; selling false government documents (such as national IDs and passports); and selling hacked bank account and credit card numbers are but a few areas of illicit interests that thrive on the darknet. This makes the darknet an attractive place to visit but also a dangerous place to make deals or to talk with people who are using its resource.
After reading this short introduction to the darknet, you may think that this hidden Internet is only intended for criminal organizations and other groups such as terrorist groups. However, this is not always true because there are many web sites that are hosted within this environment to prevent some nation-state authorities from knowing the associated operators. For example, many human rights activists and political opposition groups in developing countries use the darknet as a sort of resistance movement to promote their ideas or to exchange information away from their governments’ gaze.
Warning
Everything mentioned in this section is to educate regular Internet users about the darknet and its dangers. We strongly encourage you not to access the darknet or browse any of its contents. The only exception is for researchers, journalists, and human rights activists around the world who need to protect their active profile.
How to Access the Darknet
Web sites hosted on the darknet cannot be accessed from the regular Internet. To access these resources, you must use either the Tor or I2P network.
In previous sections, we briefly covered how to access the darknet using both Tor and I2P. All web sites hosted on the Tor network are accessible only through the Tor Browser, and all these web sites must end with the .onion top-level domain name. In the same way, all I2P web sites must be accessed from within the I2P network and have an .i2p extension.
A popular search engine to browse and search the darknet is Grams. It works on the Tor network only and can be found at http://grams7enufi7jmdl.onion (see Figure 4-19).

Figure 4-19. Grams search engine to search the darknet
These are other dark web search engines:
Onion.link ( http://onion.link )
Tor2Web ( https://hss3uro2hsxfogfq.onion.to )
SurfWax ( http://lookahead.surfwax.com )
Anonymous OS
Most ordinary computer users worldwide use the Windows OS for their daily tasks, but of course there are others who prefer the macOS, Google Desktop, or a Linux distribution.
Out of the box, most OS implementations are not configured to be robust, secure, or anonymous, although you can configure them it to be more secure. However, by design they are not built with consideration of users who seek anonymity and security by design.
In this section, we will cover how to use the Tails operating system from an end user’s perspective. Tails is considered the best anonymous OS currently available, and for the record, this is the OS that Edward Snowden used to help stay anonymous during the initial NSA spying leaks. You can use Tails to communicate privately with confidence in extremely hostile environments. At the end of this section, you will find a list of security procedures that should be considered when using the Tails OS to assure that your work is 100 percent secure. For now, let’s begin using this unique OS.
Tails
Tails stands for “the amnesic incognito live system.” It is a Linux -based operating system built to provide the maximum security and anonymity possible for its users. It is a portable live OS, meaning that it can be launched from within your USB stick drive without installation, and it is completely independent from the host machine’s current operating system.
Tails runs using the host machine’s RAM and does not copy any files to the resident host machine’s hard disk.
Tails achieves its anonymity by forcing all network connections to go through the Tor network. If an application tries to connect to the Internet directly, the connection is automatically blocked. Tails leaves no traces on the host machine’s hard disk. Upon shutdown, Tails will delete all user files, unless explicitly asked not to (persistent storage). Tails also come with several built-in applications preconfigured with security in mind: web browser, instant messaging client, e-mail client, office suite, and image and sound editors, in addition to a plethora of cryptographic tools such as LUKS for disk encryption (Linux only), HTTPS Everywhere, OpenPGP , and OTR for secure IM chat.
To run Tails from within your USB drive, follow these steps. However, before you begin, prepare a USB zip drive with at least 4GB capacity. All data on the target USB drive will be lost, so make a backup copy first.
Download the Tails ISO image from https://tails.boum.org/install/index.en.html .
Download the Universal USB Installer program from https://www.pendrivelinux.com/universal-usb-installer-easy-as-1-2-3/ . This is a portable tool used to burn Tails onto your USB drive.
Execute the Universal USB Installer, click “I agree” in the pop-up window, and supply the requested information, as shown in Figure 4-20. In step 1 in Figure 4-21, you can select Tails from the drop-down menu. In step 2 you select the location of the ISO image of the Tails OS. In step 3 you select the USB drive that will hold Tails. Remember to select the Format check box to format the drive before installing Tails.

Figure 4-20. Using the Universal USB Installer to install Tails on a USB disk drive

Figure 4-21. Tails welcome screen
Click the Create button to begin the process. A warning appears. Click Yes to start the installation. The installation takes a few minutes.
After the installation is finished, a pop-up window appears stating this. Click Close to close the wizard.
Now you have Tails ready on your USB disk drive. To boot from Tails, you need first to change the boot sequence of the host computer to start from the USB zip drive. You can apply this change to the boot sequence from within the BIOS settings. Each computer manufacturer has its own key to access the BIOS settings, the most common of which are F9 on HP; F10 on Sony; F11 on MSI; F12 on Lenovo, Dell, and Acer; and Esc on ASUS.
Note
Please note that Tails can also be installed on CD/DVD by burning the Tails ISO image onto a CD/DVD using any burning utility. CDBurnerXP offers such a facility and is free: https://cdburnerxp.se/en/home .
If Tails start successfully, the Tails boot menu appears. Select Live and press Enter. You need to wait for less than one minute for the Tails welcome screen to appear (see Figure 4-21).
Leave No selected and then click Login to continue. The Tails desktop will appear shortly.
Now you need to configure Tails to connect to the Internet. If you are using a wireless network connection, you need to configure Tails first to connect. From the top-right corner of the Tails screen, click the small arrow (near the battery indicator if you are using Tails on a laptop) and select Wi-Fi ➤ Select Network. A list of available wireless networks appears. Select one and click the Connect button. Enter a password for the selected Wi-Fi connection and click the Connect button.
To launch the Tor Browser, go to the upper-left corner of the Tails desktop; you will find a menu bar that contains two submenus. Click the Applications menu and select Internet ➤ Tor Browser.
Since you have started Tails and launched the Tor Browser successfully, you can begin your secure work online. When you’re done using Tails, go to the upper-right corner, click the drop-down menu, and click the power button symbol. Tails will shut down immediately and wipe the host PC’s RAM completely.
The previous configuration and installation of Tails is called intermediary Tails because you will not benefit from important features such as automatic security upgrades or the ability to store some of your documents and configurations in encrypted storage.
If you want to have Tails save user preferences, program configuration settings, and user data (persistent storage) when turned off, you need to install Tails as a final. Follow these steps to achieve this:
Launch Tails like you already did, prepare a USB drive with adequate storage capacity (we recommend at least 8GB), and plug it to your PC.
Go to the Application menu and select Tails ➤ Tails Installer to start the installer (see Figure 4-22).

Figure 4-22. Launching Tails installer
Click the “Select by cloning” button and choose the USB stick that will hold your Tails from the Target Device drop-down menu (of course, select the second USB stick, not the one already used to launch Tails).
Finally, click the Install Tails button. A warning message appears; click Yes to continue.
You are done! Now you can use Tails from your new USB stick (final Tails ), as you did the first time, but it will remember your preferences and program configuration on the next start.
Tip! Using Tails in Offline Mode
You can use Tails without an Internet connection if you want to read or create sensitive documents. To start Tails in offline mode, launch Tails. When you reach the welcome screen, in the Welcome to Tails window, click the Yes button. Then click the Forward button to enter advanced startup.
The advanced startup window appears. Go to the bottom of the window and click the “Disable all networking” button. Then click the Login button (see Figure 4-23).
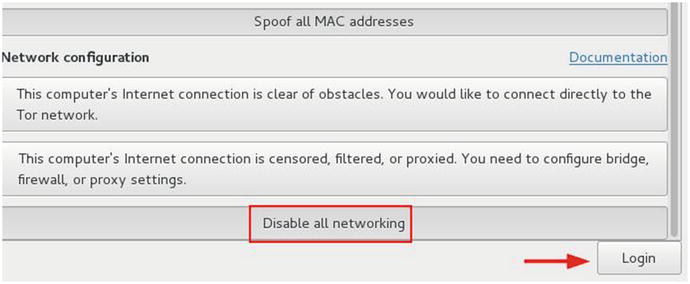
Figure 4-23. Launching Tails in offline mode
Warning
Before you create the live Tails DVD/USB/SD card, to check the integrity of the ISO image you have downloaded, you want to ensure your copy of the Tails file is genuine. Always download Tails from its official web site ( https://tails.boum.org/install/index.en.html ). Do not download the Tails ISO image from any other mirrored location.
Warning When Using the Tails OS
Tails is an excellent anonymous OS that uses the Tor anonymity network by default, but to stay completely anonymous when using this OS, you must be aware of some threats or attacks against the Tails OS that may result in your privacy being invaded while using it.
Tails is using Tor to anonymize Internet traffic, so all the earlier warnings for using Tor (in the section “Precautionary Steps to Stay Anonymous When Using the Tor Browser”) also apply to the Tails OS. Here are some other warnings for and possible attacks against Tails:
Tails does not protect you against hardware-based attacks: A hardware keylogger attached to a host machine can intercept your communications stealthily. In addition, some sophisticated attacks come from abusing BIOS or firmware to embed malicious software that can monitor all your Tails usage on the host machine. Tails cannot protect you against such attacks.
Encrypt everything before sending it through Tor: As we mentioned previously, Tor is an anonymous network and not for encryption. Tails is the same; it cannot encrypt your data by default, but it still offers ready tools for encrypting files before sending them through the Tor network. In the coming chapter, we will cover encryption in detail.
Tails does not clear a digital file’s metadata by default: When creating files using Tails or any operating system, the software used to create these files usually stores details about the computer user’s profile as well as technical details about the computer itself. Tails does not clear this metadata by default, so you must clear it yourself before sending such files online to avoid revealing your identity (deleting a digital file’s metadata has been covered thoroughly in Chapter 2).
If you are using Tails and live in an extremely hostile environment , you should take extra care when working online by separating your online identity into many identities: For example, use separate identities when you want to perform multiple actions online such as uploading a post to your blog, checking your e-mail, and replying to comments on a specific blog or web site. To remain anonymous in such cases, you should restart Tails after doing each task previously mentioned. This will effectively make tracking you by a global adversary with great resources almost impossible.
Tails and Tor are great projects for protecting user privacy online. However, keep in mind that both projects are works in progress. Computing technology is rapidly changing, and the attacks against user privacy are becoming much more complex and sophisticated. We advise you to always check the Tails official web site ( https://tails.boum.org ) and the Tor project official web site ( https://www.torproject.org ) for the latest news and updates. You can also check out http://www.DarknessGate.com where we will post information about all major updates to the tools contained in this book.
Secure File Sharing
Numerous providers offer file-sharing online services, many of which are free (although usually free accounts limit the file sizes you can upload). Almost all these providers store information about each online transaction that takes place through their servers. This is not the kind of service that security-conscious people should use. In this section, we will introduce two sharing providers that offer security and anonymity for their users.
OnionShare
OnionShare is a tool based on the Tor anonymous network dedicated to sharing files across the Internet in complete anonymity. OnionShare allows you to share files of any size anonymously using the Tor hidden network. It works by launching a temporary web site (similar to the Tor Onion service used in the dark web) that hosts your shared files. OnionShare will then produce an unguessable URL so the person you are corresponding with can access and download the shared files. What makes this program unique is that your shared files will not leave your computer and get uploaded to some location online; instead, they will remain on your local machine, and your correspondent will download them directly using the Tor Browser .
To share a file using OnionShare, follow these steps:
Download OnionShare from https://onionshare.org/ and install the application like you do with any Windows program.
Launch OnionShare and select the files you want to share by clicking Add Files (see Figure 4-24). You can also add entire folders by clicking the Add Folder button instead.
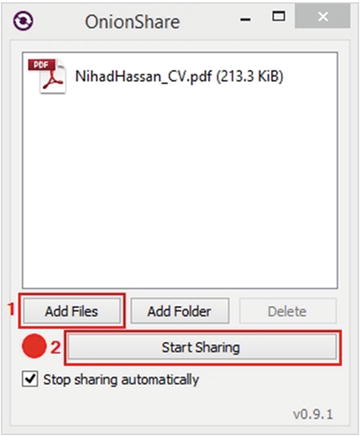
Figure 4-24. Adding files to OnionShare, in the same way you can add files by dragging and dropping them in the empty panel
Launch your Tor Browser. When your Tor Browser successfully connects to the Internet, click the Start Sharing button in the OnionShare program (see Figure 4-24).
When OnionShare successfully creates a hidden Tor service for your shared file (or files), also known as a temporary web site hosted on a Tor network, it will give you a URL to this file (see Figure 4-25). The shared file (or files) will remain on your PC.

Figure 4-25. OnionShare provides a URL for your shared files, sends it to the recipient, and keeps it private.
Finally, all you need to do is to give the recipient the URL to that web site so he or she can download your shared file.
Bear in mind that you must leave your Tor Browser and OnionShare programs open until the transaction ends. Your computer is playing the role of a hosting server for the shared file. When the recipient receives your file successfully, OnionShare will stop the sharing process automatically (to stop sharing automatically after recipient receives the file, you must enable the option “Stop sharing automatically” in the OnionShare program before sharing files).
OnionShare is not vulnerable to sniffing attacks (when an eavesdropper monitors traffic on a Tor exit node) because connections between Tor hidden services and the Tor Browser are end-to-end encrypted. No network attackers can eavesdrop on the shared files while the recipient is downloading them. Despite this, we advise you to encrypt files before sharing them using the OnionShare program for maximum security.
A shared file URL (and its password if you decide to encrypt the file before sharing it) must be sent using safe routes. In the next chapter, we will introduce many techniques to encrypt and secure online communications.
For security-conscious people who want to share sensitive files, we advise you to use the Tails OS when sharing files through the OnionShare program.
Note
It’s advisable to disable any third-party tools that you may use to download files from the Internet (for example, Internet Download Manager) because they may cause problems when downloading from the Tor Browser.
Some providers do not offer the same level of anonymity as OnionShare, but you can still trust them for your daily needs. As we already said, Tor is preferred over all other services when you need the maximum security and anonymity, but there are many cases where you just want to send a normal file in a secure and anonymous way without attracting attention by using a Tor-based service, and this what you are going to learn next.
FileTea
FileTea is a new sharing provider that offers an anonymous and volatile file-sharing service. According to its privacy policy, FileTea does not store any information about its users; it also does not cache the contents of files shared through its server, and it stores only limited information about each file (name, size, and MIME type) in the processing server’s volatile memory (RAM). The IP address of the user also is not recorded anywhere.
We’ve used this service many times and find it quite reliable; however, we advise you to encrypt any file you want to share through this service (Chapter 5 will cover encryption thoroughly). You can also encrypt the file name or simply change its name to anything that doesn’t reveal its contents. Again, security-conscious users can launch the Tor Browser and use it to access this web site and share files through it.
Sharing files is easy; all you need to do is go to the home page ( https://filetea.me ), click the “Add files” button, and select the file or files you want to share. FileTea will generate a link for each file (see Figure 4-26), copy it, and send it to the intended recipient. Bear in mind that your browser should remain open until the recipient receives the file (FileTea will only process your file for delivery; it will not upload it to its server).

Figure 4-26. Using FileTea service to share files anonymously. We used the Tor Browser in this experiment to achieve maximum security.
VPN
A VPN works to establish a secure tunnel between two or more devices. Using a VPN helps users to add an extra layer of security and privacy to private and public networks such as Wi-Fi connections and the Internet. Enterprises use VPN services regularly to secure their sensitive and business-related traffic. However, its use by ordinary end users has become more popular of late because of the huge increase in digital communications along with the increase of cyber-attacks, making more people aware of the security dangers when utilizing online services.
When using a VPN (see Figure 4-27), an organization can secure private network traffic over an unsecured network such as the Internet. Thus, users feel safe connecting their personal devices to the Internet, ensuring their banking details, credit card numbers, passwords, and any other sensitive data is not intercepted by an unauthorized party. The VPN also gives the user an anonymous IP address, making them appear as if in another location so they can avoid censorship, share files with other people anonymously, and more. In today’s digital world, using a VPN service is no longer considered as a security luxury.

Figure 4-27. How a VPN works (source. www.darknessgate.com )
Warning
We advise you not to access the Internet at all (either from home or using public Wi-Fi hotspots) without a reliable VPN connection.
Criteria to Select the Best VPN
There are numerous VPN service providers worldwide. Many of them are reliable and offer distinct features. The prices usually are in the range of $5 to $10 for a monthly subscription (you can expect to get a discount for yearly subscription). There are also many providers that offer free VPN services in exchange for showing advertisements during the browsing session. For most users, any paid VPN providers will provision an adequate service to protect their online communications. However, if you want to approach your online security correctly, then you need to select your VPN provider carefully because the provider could intercept all your online communications passing through its service if it so wanted.
Note
Read the VPN provider’s terms and conditions carefully.
In this section, we do not intend to describe how to use a specific VPN service provider to secure your connection, as each VPN provider may differ. Installing a VPN client is generally easy and requires a set of steps like when installing any other Windows software. We will focus on providing general advice to aid you when selecting a VPN provider.
Here are the criteria that must be met when selecting a VPN provider:
Do not subscribe to VPN service providers that are based in one of the following countries: the United States, United Kingdom, Australia, New Zealand, Canada, Denmark, France, Netherlands, Norway, Belgium, Germany, Italy, Spain, Israel, Sweden, and of course countries such as Russia, China, Iran, and all Arab states.
At the time of writing this book, the best secure providers are based in Swaziland and follow its jurisdiction.
The VPN provider must support the OpenVPN software; this is an open source program that can be audited by anyone to make sure it is clean and does not contain backdoors.
It is preferable that it have its own private DNS servers to avoid leaking users’ DNS requests (web browsing history); you’ll learn more about this in the next section).
It should have integrated DNS leak protection technology built into the client VPN software.
The VPN provider must separate Internet traffic according to the protocol used. For example, it should separate web browsing from file sharing, meaning that each one has a dedicated server.
The VPN client software must support the ability to disconnect the Internet from your computer if the VPN fails for any reason (to avoid leaking your current activities to your ISP).
It is better to support multiple devices at the same time, so you can protect your tablet and smartphone data in addition to your laptop or PC.
It should accept anonymous payments such as bitcoin, gift cards, debit cards, and cash, if possible without showing any IDs (more on anonymous payments in the next section).
It should not require many details to set up; a username and a password should be enough.
It should not store any information about its users. This policy is also known as a zero-knowledge policy.
Read the VPN provider’s privacy policy and terms of service well. These two documents contain company policies and state the amount of data they are going to be logging about you and for how long. The privacy policy also declares the circumstances under which your VPN provider may turn your data over to governments or law enforcement.
Do not use a free VPN service for mission-critical tasks online.
If your ultimate purpose is anonymity and plausible deniability, use the Tor Browser instead of a VPN.
Opera Browser’s Built-in VPN Service
The Opera browser has a built-in VPN function. This feature is completely free and unlimited (in terms of monthly bandwidth usage). 10
You can activate the built-in VPN in your Opera browser by going to the Opera menu and selecting Settings. Go to the Privacy & Security tab, find the VPN section, and select the Enable VPN check box (see Figure 4-28).

Figure 4-28. Enabling VPN in the Opera browser
After successfully enabling VPN in the Opera browser , you will see a blue VPN icon in the Opera address bar. You can further configure Opera VPN settings by clicking this icon (see Figure 4-29).

Figure 4-29. Customizing Opera VPN settings
Bear in mind that the Opera VPN is based on its dedicated VPN provider company named SurfEasy. This company is based in Canada and thus will follow its jurisdiction policies. You can use this VPN for your daily tasks to conceal your online tracks and unblock censored web sites. However, do not rely on it for mission-critical tasks, as we have already described.
Combine Tor with VPN
Using Tor with VPN will hide the fact that you are using Tor to surf online. As we already discussed, a VPN does not guarantee to mask your entry to the Tor network 100 percent. If your ISP or government uses advanced filtering techniques on Internet traffic, they can still discover indications that you are using the Tor Browser.
To use Tor with a VPN, first run your VPN client software. Once the VPN is turned on, you can start your Tor Browser. Please note that you cannot use a VPN when using the Tails OS.
Proxy Servers
A proxy or proxy server is basically another computer that serves as a hub through which Internet requests are processed. Your computer will connect to a proxy server requesting some services like a web page, a file, or other resources available from another server. The proxy server will fetch the required resources and send them to your computer. Today, most proxies are web proxies. Their major job is to facilitate access to content on the Internet and provide anonymity by changing the real IP address of the user’s computer into the IP address of the proxy server (see Figure 4-30). There are many types of proxy servers. In this book, we advise exercising care with web proxies that anonymize and encrypt Internet traffic used to secure any online activities. In our opinion, using a proxy server is not necessary and should be replaced by a VPN provider. In the previous section, we talked about how to select a secure, reliable VPN provider. The same criteria will apply to selecting a proxy server provider if you want to utilize such a service.

Figure 4-30. How a proxy server works (source: www.darknessgate.com )
Numerous free proxy servers are available online. However, we strongly recommend that such services are not used. A free proxy usually shows advertisements in your browser, which may introduce malicious software or other tracking scripts that could infect or compromise your machine if you click a malicious link. In addition, most free proxies are not secure enough to trust to process and communicate your critical data, such as credit card details and account passwords.
Connection Leak Testing
Sometimes even though you are protecting your connection using a VPN, a connection leak can occur and reveal the real IP address without you being aware. In this section, we will talk about how you can discover and handle this risk.
Check for DNS Leak
To understand what a DNS leak is, you must first understand the technical mechanism used to access web sites when you enter the web site URL in the browser address bar.
The Domain Name System (DNS) is one of the fundamental building blocks of the Internet and is utilized when you visit a web site, send an e-mail, have an IM conversation, or do anything else online. It can be considered the Internet’s equivalent of a phone book. The system maintains a directory of domain names and translates them to IP addresses. This is necessary because although domain names are easy for humans to remember, computers and machines access web sites based on numeric IP addresses. 11
For example, when you want to access the Google.com web site, you need to type its name in the address bar of your web browser. The request must then go to your ISP’s DNS server (or to any DNS server that your computer is configured to use) and translate Google.com into its equivalent IP address, which is 216.58.198.46. (This IP could be different according to your geographic location as Google has many IP addresses assigned to the same site.)
Tip
If your connection is not functioning normally and you suspect that your DNS server is down, you can type the IP address of the web site you want to visit directly in your browser address bar and it should open normally.
Most Internet users worldwide connect via the default DNS server assigned by their ISP, which means that these ISPs can monitor and record a user’s online activities whenever they send a request to the server. When using a VPN to encrypt your traffic, the VPN software should not use your default DNS server to resolve web site names to avoid revealing your web browsing history.
A DNS leak occurs anytime a DNS request is sent on your behalf to a DNS server other than the one you or your VPN provider intended. This happens most often when your DNS requests are routed outside of the encrypted VPN tunnel (because of the way operating systems handle DNS requests, especially in Windows OS). These unencrypted requests will then be forwarded to your ISP’s DNS servers, allowing them to potentially monitor and log the complete web browsing history, even though you’re using a VPN.
To ensure that your VPN provider is not vulnerable to this risk, you are strongly advised to test your connection directly after connecting to your VPN provider, as follows:
Go to https://www.dnsleaktest.com .
You will see two buttons along with your current IP address. The first button is labeled “Standard test,” and the second is “Extended test.” Click the second button for detailed results (see Figure 4-31).

Figure 4-31. Testing current VPN connection for DNS leak
The detailed test report (see Figure 4-32) will show you all the DNS servers (along with their locations) that are used to resolve your typed web site URLs into IP addresses. If any of these servers (or the location of these servers) are not related to your VPN provider company, this means your connection is leaking information about you, and you should contact your VPN provider to solve this issue before using it to browse the Internet.
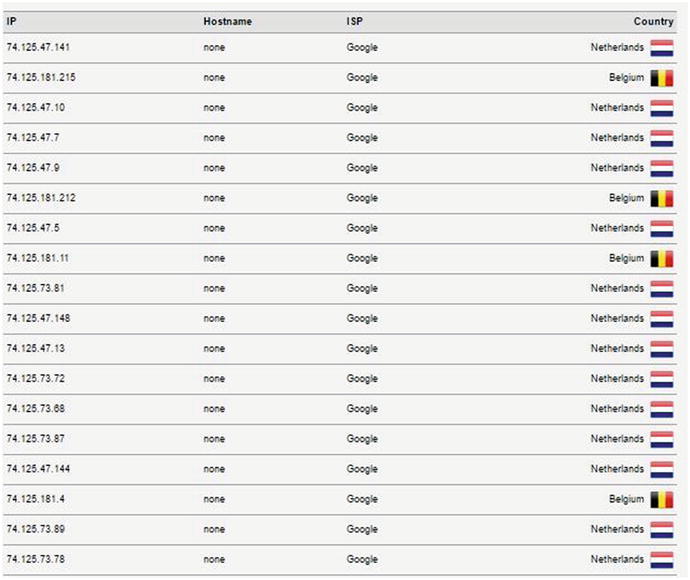
Figure 4-32. A partial report (extended test) generated by dnsleaktest.com showing DNS servers used by our current VPN connection
Fix DNS Leak
There are many ways to fix DNS leaks. The following recommendations should do the job.
Use a VPN with DNS Leak Protection
We will not endorse any VPN provider in this book. We already covered the security criteria that must be met by a VPN provider. Before procuring a VPN service, ensure it explicitly supports DNS leak prevention. This option should also exist within the VPN client software installed on your machine. To further secure yourself, make sure to do DNS leak testing, as explained, to assure that your DNS traffic is tunneled through your VPN-encrypted tunnel and not through your ISP.
Stop DNS Leak in Windows 8 and 10
Newer versions of Windows (8 and 10) attempt to optimize DNS queries to improve web performance by sending DNS requests in parallel to all the available network interfaces. Even if you are using a VPN connection, Windows 8 and 10 may still leak some of your DNS requests without your knowledge (sending some requests to your ISP DNS server). This problem is more dangerous on Windows 10 .
The Windows feature that causes a DNS leak connection is called smart multihomed name resolution. This feature is enabled by default; it must be disabled to avoid leaking your browsing history.
To disable this feature in Windows 8 and 10, follow these steps:
Open the Start menu and type gpedit.msc in the search bar. Click to open the Local Group Policy Editor (see Figure 4-33).

Figure 4-33. Accessing Local Group Policy Editor under Windows
Under Computer Configuration (see Figure 4-34), select Administrative Templates ➤ Network ➤ DNS Client and select “Turn off smart multi-homed name resolution.” Double-click to access the properties, select Enabled to turn off the service, and then click Apply (see Figure 4-35).

Figure 4-34. Configuring smart multihomed name resolution to stop DNS leaking

Figure 4-35. Disabling smart multihomed name resolution feature in Windows 8 and 10
Finally, reboot your computer and you are done.
Disable WebRTC
Web Real-Time Communication (WebRTC) is a standard that relies on JavaScript and provides browsers and mobile applications with real-time communication (RTC) capabilities via simple APIs.
A good real-world example of WebRTC was the HELLO client integrated into Mozilla Firefox. This tool enabled Firefox users to conduct audio and video chat with another user who is using Firefox, Chrome, or the Opera browser without installing any additional add-ons or making any specific configurations.
Firefox HELLO has been discontinued and was removed from Firefox starting with version 49. This happened automatically when you updated Firefox; no extra steps were needed. 12
There are many alternatives to the HELLO program that are using the WebRTC standard. Table 4-1 shows the most popular ones.
Table 4-1. Chat Clients That Support WebRTC Standard
Service Name | URL |
|---|---|
Talky | |
Cisco Spark | |
Appear.in | |
Jitsi Meet |
The problem with WebRTC is that it will reveal your true IP address when conducting a chat session with another user, regardless if you are using a VPN or not.
Any browser that supports the WebRTC standard will be vulnerable to this problem. For now, WebRTC is supported on Chrome, Firefox, Opera, Android, and iOS.
To avoid the risk, disable the WebRTC standard in your browser. We encourage users to use the Firefox browser (we discussed why in Chapter 2), so we will mention the ways to disable WebRTC using the Firefox browser only.
Method 1: Using an Extension
Use one of the following extensions:
Method 2: Disable WebRTC in Firefox
To disable Web RTC in Firefox, do the following:
Enter about:config in the Firefox address bar and press Enter. A warning message appears. Click “I accept the risk!” to continue (see Figure 4-36).

Figure 4-36. Accessing the Firefox config file to modify its internal settings
Search for media.peerconnection.enabled.
Double-click the entry to change its value; the column Value should now be false (see Figure 4-37).
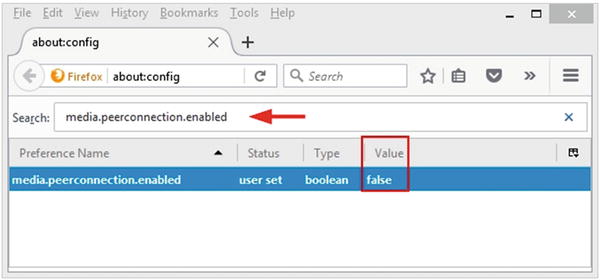
Figure 4-37. Changing the media.peerconnection.enabled setting to false
Fix IPv6 DNS Leak
IPv4 is the current Internet protocol; however, because the number of available IP addresses is dwindling, IPv6 will eventually become the standard protocol.
Some web sites have begun to use IPv6 to serve their users; however, the adoption of IPv6 is still at the beginnings because most web sites still use IPv4.
The problem with IPv6 in relation to using a VPN is that most VPN providers still do not support tunneling IPv6 requests through their encrypted tunnel. As a result, if a user connects to a web site that uses IPv6, the DNS request will go to his or her ISP DNS server, resulting in leaking the user’s web history visits.
VPN providers that support DNS leak protection handle this IPv6 issue by disabling the IPv6 protocol in the operating system, so there’s no need to worry about this issue.
If you want to disable IPv6 on your Windows PC manually, follow these steps:
Select Control Panel ➤ Network and Sharing Center. On the upper-left side select “Change adapter settings” (in Vista it is “Manage network connections”). Right-click the connection you want to disable IPv6 for and select Properties.
Uncheck the setting named Internet Protocol Version 6 (TCP/IPv6), as shown in Figure 4-38.

Figure 4-38. Deactivating TCP/IPv6 in your Windows box for the selected connection
By following the recommendations in this section, you can assure that no leak will happen while using a VPN connection. Nevertheless, periodically check your current connection at https://ipleak.net and http://dnsleaktest.com to make sure that everything is working well.
Secure Search Engine
Almost all Internet users have used a search engine in one way or another. Google is the largest search engine; it has a reputation for being easy to use and able to offer the best search results relevant to the user’s search criteria. However, Google is a privacy nightmare for its users because it records everything done online, with many of its subscribers being unaware of this fact. This means there is constant potential for compromising online activities.
With Google Voice Search (which allows users to search using their voice instead of typing a search keyword), Google records all your voice searches in your Google account (of course you need to be signed in to your Google account when using it). Google also records all your typed search keyword history; the same history is kept for YouTube.com searches. The search history can reveal a great number of details about any user, such as current health condition, sexual habits, buying habits, political opinions, geographic location, and more.
Most users now use GPS -capable devices for accessing the Internet, such as smartphones and tablets, and if a user “check ins” at some locations while signed in to a Google account, Google will record this also (this service is known as location reporting). A timeline of all places the user has used his or her mobile phone or tablet will be recorded and linked to the user account.
What enables Google to perform these tracking issues in a simple and automatic way is the popular free e-mail service Gmail (note that Google can track your online activity even though you are not logged into your Google account). Users usually sign in to check their e-mail accounts and then remain signed in and use the Internet as usual. This allows Google to record their activities while using its services and link it back to each user account. The same thing happens with smartphone devices running Android OS (developed by Google): a user may remain signed in to his or her Google Play account (which is used to download/update apps and needs a Google ID to work) and use the phone as usual to send e-mails or to conduct online searches, resulting in tracking and recording much of his or her online activities.
In addition to all the tracking issues conducted by major search engine providers, they tend to perform a kind of censorship of user-returned search results. Major search engines try to anticipate what sorts of results their users like and display them accordingly. This means users receive fewer or unexpected search results filtered to suit their saved browsing habits without their knowledge!
The advance of computing technology allows Google—and other giant IT providers—to track user activities online even when they are not logged in to their accounts. For example, when a user checks an e-mail address and then signs out from his or her account, if the user continues the Internet usage session and uses one of the Google services (that does not require the user to sign in), Google is still able to link the current activities to the original account through the IP address or browser fingerprinting.
This invasion of user privacy is not limited only to giant IT providers like Google but includes many other software companies. These companies develop browser extensions and offer related free services to simplify Internet browsing for end users but are also involved in recording user activities to sell the data to advertisement companies. A recent report that appeared on German national TV shows stated nearly 3 million German Internet users’ browsing history data has been collected by many companies that develop browser extensions for different popular browsers such as Firefox and Chrome. The report mentions only one popular add-on, which is Web of Trust (WoT) . The report said that Internet users’ data (nonanonymous data that includes user IP address, web history, and e-mail and Skype IDs) had already been sold to different third-party advertisement companies without users’ consent. 13
This clearly shows that despite all legislation that is promoted by different nation-states to protect user privacy, the Internet remains a hostile environment where users with limited IT skills (the majority) can become easy targets online.
In this section and the next, we will cover how you can stay anonymous online when conducting searches and how to harden your browser to avoid leaking private information about your online activities.
To stay anonymous online, it is vital to stop using regular search engines without proper defenses. In this section, we will introduce secure search engines in addition to showing how you can configure your Google account to prevent it from saving your online activities.
Configure Your Google Account to Stop Saving Your Activity
As mentioned, Google has the largest market share among all other search engine providers, so we will focus on it.
To configure Google to stop saving your private data (search history, location history, etc.) on any device you are using to access Google services, do the following:
Go to https://myaccount.google.com/activitycontrols (you must be signed into your Google account first).
Beginning at the top with the Web & App Activity section, move the slider to the left to turn off this feature (see Figure 4-39). A warning message will appear; click PAUSE to confirm your action (see Figure 4-40). Finally, the word Paused will appear next to the section title.
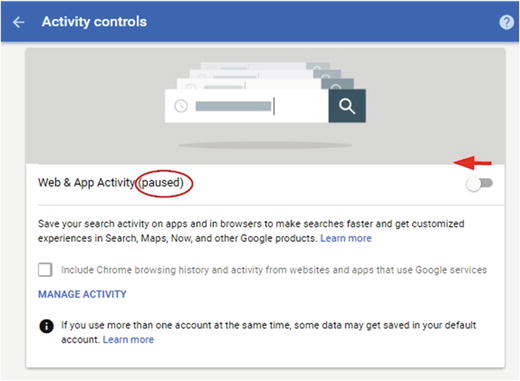
Figure 4-39. Turning off Web & App Activity in a Google account

Figure 4-40. Confirming you want to pause your Google account activity
Repeat the same process with the rest of the sections on the page. Currently, the following sections are included in the Google account activity page: Device Information, Video & Audio Activity, YouTube Search History, YouTube Watch History.
To delete all your previous Google account activities, follow these steps:
Go to http://myactivity.google.com (you must be signed into your Google account first).
On the My Activity banner, click More (click the vertical dots) and then “Delete activity by” (see Figure 4-41).

Figure 4-41. Deleting previous Google account activities
Below “Delete by date,” select the down arrow and then select the option “All time” (see Figure 4-42).

Figure 4-42. Deleting all previous account history (All time)
Finally, click DELETE and confirm your action.
After turning off all these features, you can somewhat assure that you have more privacy when using Google services. However, from a privacy perspective, we cannot guarantee that Google will really stop tracking you completely even after turning off all its tracking features. To assure the maximum privacy possible, we encourage users to use anonymous search engines that do not track their users.
Privacy at Microsoft
If you are a Microsoft fan (in other words, you prefer to use the online services offered by Microsoft), then you will be happy to know that Microsoft has launched a privacy dashboard for its users. All you need to do is log in to your Microsoft account ( https://account.microsoft.com/account/privacy?destrt=privacy-dashboard ) to manage all the data that Microsoft uses to personalize your experience online.
Microsoft collects vast amounts of data about its users’ online activities, covered next.
Web Browsing and Online Searches
You can choose whether your browsing history is collected for page prediction in your Microsoft browser settings by opening the Edge browser , clicking the dots in the top-right corner, and selecting Settings (see Figure 4-43). Go to the bottom of the window and click “View advanced settings. Disable the following options: “Show search and site suggestions as I type” and “Use page predication to speed up browsing, improve reading, and make my overall experience better.” It is also preferable to select the following option “Block only third party cookies.” from the drop down menu in the Cookies section.

Figure 4-43. Accessing the Microsoft Edge browser settings area
Location Information
You can turn on or off location services for your device in Settings ➤ Privacy ➤ Location; in Windows 10 you can disable location services by clicking the Windows 10 Start menu and selecting Settings ➤ Privacy ➤ Location. Change the setting “Location for this device” to Off. From here, you can also choose which Windows Store apps have access to your location, and you can manage the location history stored on your device.
Data That Helps Them Assist You, Personally
This includes collecting other personal data related to users to predict future actions, such as checking a user’s event calendar and user speech and handwriting patterns to predict what the user is aiming to do next and provide personalized recommendations. You can disable this online by going to https://account.microsoft.com/privacy/cortana .
Note
Cortana is the personal digital assistant for Windows 10 users. Its main task is to provide a personalized experience for Windows 10 users by offering suggestions when conducting searches in addition to remembering events, sending e-mails on the user’s behalf (when configured properly), and many more useful things.
Cortana works through cumulative learning. Hence, when the user communicates with it more (through the PC microphone or by typing), it will understand the user’s personal habits and attitude more, leading to more accurate results in future interactions.
To control Cortana’s collection and use of your data, check https://privacy.microsoft.com/en-us/windows-10-cortana-and-privacy , which contains instructions on how to disable it on different Windows devices.
Fitness and Health
Health data help users to live healthier by monitoring their current health indicators such as heart rate, calorie burn, diet quality, blood pressure, and sleep quality, among other indicators. This data can be stored in your HealthVault, allowing you to share it with your doctors or family. You can manage your HealthVault account online at https://account.healthvault.com and can manage the Microsoft health dashboard at https://dashboard.microsofthealth.com .
Other data settings include “Data to show more interesting ads for the user,” “Sign-in and payment data,” and “information from device sensors.” All these services can be disabled through the Microsoft privacy dashboard at https://account.microsoft.com/privacy .
Anonymous Search Engines
Anonymous search engines should have a number of criteria to be considered privacy friendly. Here are the main ones:
They should not record the IP addresses of users.
They should not record the browser fingerprint or plant cookies on the user’s computer.
They should use SSL to deliver data to users.
They should allow access via the Tor anonymous network.
They should have a zero-knowledge log policy about their users.
StartPage
StartPage ( http://startpage.com ) introduces itself as the world’s most private search engine. This search engine intelligently connects the user securely to its portal through SSL, allowing the user to search as if he or she is using Google. StartPage will take user queries, fetch the results from Google, and present them to the user. This process is transparent and fast. StartPage also integrates a proxy server so that you can open any link anonymously from the search result pages and yet keep your IP address hidden from the destination server.
DuckDuckGo
DuckDuckGo ( https://duckduckgo.com ) is an Internet search engine that emphasizes protecting searchers’ privacy and avoid personalizing search results according to each user’s previous Internet browsing history.
DuckDuckGo emphasizes getting information from the best sources rather than the most sources (from more than 400 sources), generating its search results from key crowdsourced sites such as Wikipedia and from partnerships with other search engines such as Yandex, Yahoo, Bing, and Yummly (note that it does not fetch results from Google). 14
DuckDuckGo does not record any information about its users (such as IP address) or log visits and does not plant cookies on your computer.
The following are other search engine providers that are worth mentioning for their privacy-enhanced techniques:
Disconnect ( https://search.disconnect.me ): This fetches its results from major search engine providers anonymously.
MetaGer ( https://metager.de/en ): This supports user privacy by not logging users’ data (like IP address, browser fingerprint, and cookies). It provides secure access through HTTPS to all its search results in addition to a proxy server to anonymize your access to these results. It also allows access via the anonymous Tor network.
These secure search engines have a proven record in protecting user privacy. Nevertheless, you should always check the privacy policy of any search engine you use regularly to make sure that no updates take place that affect your privacy.
Web Browser Privacy Configuration
There are many browsers in the market. The market share is dominated by five of them: Firefox, Chrome, Internet Explorer, Opera, and Apple Safari. 15
Of course, there are some lesser-known browsers such as UC Browser & SRWare Iron that have proven their presence in the market lately. However, these browsers are either an implementation of one of the major browsers already mentioned or were developed in countries where users’ privacy is not respected. For example, Iron is an implementation of the Chromium project. Both Google Chrome and Iron share much of code and features from the same project but with different licensing agreements. The UC browser was developed by a Chinese company.
Firefox is the first truly open source browser. Chrome , on the other hand, was developed by Google, which has a long record of logging users’ activities to target them with specific ads, so we do not encourage using it. Internet Explorer (and its successor Microsoft Edge) was developed by Windows and suffers from the same privacy concerns as Chrome. Opera was recently acquired by a Chinese company. 16 As a result, we discourage using it for mission-critical tasks.
Mozilla Firefox (or simply Firefox) is a free and open source web browser developed by the Mozilla Foundation. It has a great reputation for protecting users’ privacy since its launch. In fact, the Tor project uses Firefox as the preferred engine for its Tor Browser bundle.
Firefox for Android is also open source software, and its code is available to anyone who wants to audit it.
In this section, we will cover how you can harden Firefox to become more privacy friendly. Then we will cover some security add-ons that can enhance Firefox security. But first, let’s check what information current browsers are revealing about your identity!
Check the Browser Fingerprint
A browser fingerprint is any information that is used to identify your machine online. It can be used to fully or partially identify individual users or devices even when cookies are turned off. Browser fingerprinting is used to identify individual users online and is considered, relatively, a new technique for tracking and recording the online activities of users stealthily.
Browser fingerprinting can reveal a great amount of information about your computer. It works by loading a script (generally JavaScript or Flash) into your browser. Once it has loaded successfully, it will detect a wide array of technical information about your computer, such as screen resolution, OS type, supported fonts, browser type and version, add-ons installed, and even your PC hardware components. A hash is then made based on the information the script has collected. That hash can help identify and track your computer like an IP address would. A digital fingerprint can draw a comprehensive unique picture about each user, allowing different outside parties to easily profile people without using traditional tracking techniques like computer IP addresses and cookies.
Fingerprinting is currently considered the greatest risk that faces users when surfing online. Let’s begin by seeing what your current digital fingerprint shows to the public. The following are two web sites that offer such services for free.
Browserleaks
At BrowserLeaks.com you will find the gallery of web browser security testing tools that tell you what exactly personal identifiable data may be leaked without any permissions when you surf the Internet.
Go to https://www.browserleaks.com . On the bottom-left side of the screen you will find the set of tools that can be used to reveal your digital fingerprint divided into groups; click each one to see a detailed report (see Figure 4-44).

Figure 4-44. BrowserLeaks.com offers different security testing tools to access your web browser digital fingerprint
Panopticlick
Panopticlick ( https://panopticlick.eff.org/ ) is a research project created by the Electronic Frontier Foundation ( https://www.eff.org/ ). It will analyze how well your browser and add-ons protect you against online tracking techniques (see Figure 4-45).

Figure 4-45. Panopticlick home page
Hardening Firefox for Privacy
In this section, we will give technical advice on how to modify the Firefox settings to assure your online privacy and lower the amount of data leaking from your browser.
Let’s start with basic Firefox settings.
Access the Firefox options by clicking the menu in the upper-right corner of your browser and selecting Options (see Figure 4-46).

Figure 4-46. Accessing the Firefox Options menu
The Firefox Options page appears; let’s begin with the Search tab. You need to configure Firefox to use only secure and anonymous search engines. To do so, uncheck all currently used search engines and keep only DuckDuckGo and StartPage. Also, make the first one your default search engine (see Figure 4-47).

Figure 4-47. Keep only secure, privacy-enabled search engines to avoid using other public search engines accidentally.
Note!
To add StartPage.com to your list of supported search engines in Firefox, follow these steps:
Go to https://www.startpage.com/ (you must access this page using Firefox).
On the home page, click Add to Firefox.
There is another way that performs the same thing; it’s shown as Option 2 in Figure 4-48.

Figure 4-48. Adding StartPage to Firefox search engine list of providers
Move to the Privacy tab. You need to turn on the option Use Tracking Protection in Private Windows. When this option is enabled, each time you visit a web site, Firefox will send a signal that you do not want to be tracked. Of course, this is a voluntary action because some web sites may not obey your request. Still, it’s a good choice to enable it. Now go to the History section on the same page and select the option “Never remember history” so that Firefox will delete all your history every time you close it. Finally, go to the Location Bar section and disable all the suggestions in the search bar because the suggestion process can leak excessive data about you. Your Privacy tab should look like what appears in Figure 4-49.

Figure 4-49. Configuring the Privacy tab in Firefox browser for better privacy
Move to the Security tab. Please configure it like in Figure 4-50 to prevent loading dangerous web sites and to prevent web sites from installing add-ons. Also, you need to configure Firefox not to store user passwords.

Figure 4-50. Configuring the Security tab to stop phishing and dangerous web sites
Go to the Advanced tab. Here you will find multiple subtabs; select Data Choices. Disable the three available options named Enable Firefox Health Report, Share additional data (i.e., Telemetry), and Enable Crash Reporter (see Figure 4-51). Crash reports can contain valuable data about your computer status. If such data should fall into the wrong hands when traveling online from your PC to Firefox servers, this can reveal the type of vulnerability/error you are facing and enable an outside attacker to exploit your machine.
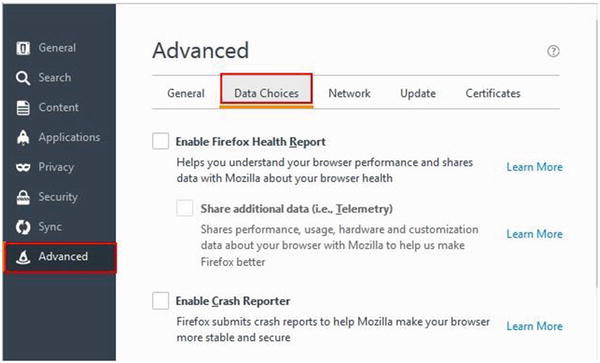
Figure 4-51. Configuring the Advanced tab via the Data Choices subtab
While you are still in the Advanced tab, go to the Network subtab, and make sure that the option “Tell me when a website asks to store data for offline use” is selected. This prevents web sites from planting a tracking code on your computer.
While you are still on the Advanced tab, go to the Certificates subtab and make sure that the options in this window are selected, as shown in Figure 4-52.

Figure 4-52. Configuring the Certificates subtab to protect your personal certificate that identifies you online
After configuring the basic settings of Firefox to become more privacy friendly, you need to access its advanced options menu to make it more robust against cyber-attacks and user profiling.
To access the Firefox advanced settings, type about:config in the URL address bar of your browser (see Figure 4-53). A warning message will appear; hit the button “I accept the risk!” to access the advanced settings panel.

Figure 4-53. Accessing Firefox advanced settings panel
To access a specific setting, you need to type its name in the Search box that appears at the top of the page. Let’s begin by searching for browser.formfill.enable to force Firefox to forget form information; double-click to change this setting to false (see Figure 4-54).

Figure 4-54. Disabling form history in Firefox
Firefox can cache data to disk. This is dangerous because some of your browsing history may reside on your disk even after you delete all your previous browsing history. To disable this feature, type browser.cache.disk.enable and double-click to change the setting to false (see Figure 4-55). You need to do the same with the setting browser.cache.disk_cache_ssl because Firefox has two setting for the content cache, one for normal web sites and the second for secure web sites (has SSL in its name).

Figure 4-55. Prevents Firefox from caching web content to the hard disk
You must also prevent Firefox from caching web contents for offline use by changing the setting browser.cache.offline.enable to false (see Figure 4-56).

Figure 4-56. Prevents Firefox from caching web contents for offline use
You can prevent Firefox from accessing your clipboard by changing the setting dom.event.clipboardevents.enabled to false. This feature has some privacy implications because it can allow web sites to manipulate clipboard events in your web browser.
Now you need to disable geolocation services. This prevents Firefox from sending information about your network and location to third parties (the default party is Google). Change geo.enabled to false (see Figure 4-57).

Figure 4-57. Disabling geolocation services in Firefox
It is a good idea to ask Firefox to throw away all cookies automatically every time you close your browser. To do this, change the setting network.cookie.lifetimePolicy to 2. To change its value, double-click and enter 2 at the prompt (see Figure 4-58).

Figure 4-58. Instructing Firefox to delete all stored cookies automatically upon closing
The most interesting setting that can reveal your list of installed plug-ins is plugin.scan.plid.all. It is essential to disable this setting so visited web sites will not be able to distinguish your browser from the add-on already installed (to minimize browser footprinting). In addition, some web sites may ask you to disable an ad blocker to view their web site because they can detect if you have an ad blocker already activated in your browser. Change this setting to false (see Figure 4-59).
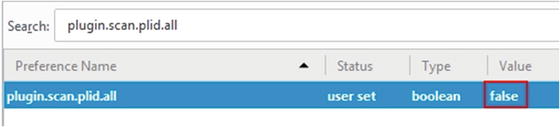
Figure 4-59. Prevents Firefox from revealing your installed add-ons
These advanced configurations will harden Firefox and make it more difficult for outside parties to track your activities. In the next section, we will cover privacy add-ons that can further secure Firefox and fight against online tracking and user profiling.
Browser Extensions for Privacy
In this section, we will cover Firefox browser add-ons that can further secure your browsing. To choose which add-ons to cover, we considered the developer behind the add-on, the estimated number of active users, and its overall reputation.
As we mentioned previously, some add-on providers may fool the user and collect personal identifying data about browsing habits and even personal information without his or her consent, so it is advisable to avoid installing any add-on except the ones mentioned in this section, and if a new reliable add-on appears later (maybe after publishing this book), ensure that it comes from a reputable trusted developer and install it from https://addons.mozilla.org exclusively.
HTTPS Everywhere
HTTPS Everywhere ( https://www.eff.org/HTTPS-EVERYWHERE ) is produced as a collaboration between the Tor Project and the Electronic Frontier Foundation. Many sites on the Web offer some limited support for encryption over HTTPS but make it difficult to use. For instance, they may default to unencrypted HTTP or fill encrypted pages with links that go back to the unencrypted site. The HTTPS Everywhere extension fixes these problems by using clever technology to rewrite requests to these sites to HTTPS.
Privacy Badger
Another great extension created by EFF is called Privacy Badger ( https://www.eff.org/privacybadger ). Privacy Badger is a browser add-on that stops advertisers and other third-party trackers from secretly tracking where you go and what pages you look at on the Web. If an advertiser seems to be tracking you across multiple web sites without your permission, Privacy Badger automatically blocks that advertiser from loading any more content in your browser. To the advertiser, it’s like you suddenly disappeared.
Disconnect
Disconnect ( https://addons.mozilla.org/en-US/firefox/addon/disconnect ) is an add-on that blocks web trackers from gathering your personal information. It claims it can load pages 44 percent faster in addition to stopping tracking that comes from more than 2,000 third-party sites. Disconnect receives Popular Science’s 26th annual Best of What’s New award honoring breakthrough products and technologies. 17
uBlock Origin
uBlock Origin ( https://addons.mozilla.org/en-US/firefox/addon/ublock-origin ) is a popular open source add-on with more than 2,000,000 downloads. It is efficient and easy on memory and CPU and yet can load and enforce thousands more filters than other popular blockers.
Random Agent Spoofer
Random Agent Spoofer ( https://addons.mozilla.org/nn-no/firefox/addon/random-agent-spoofer/ ) rotates complete browser profiles (from real browsers/devices) at a user-defined time interval. It includes many extra privacy-enhancing options.
Disable Flash Cookies and Java Plug-In
Most computer users have Flash Player already installed on their machines. You should adjust your Flash Player settings to disallow third-party web sites from installing Flash cookies on your computer. Modifying the Flash Player settings will influence all installed browsers on your computer (except the browsers that are Chromium based, including Google Chrome). To configure Flash Player for better security, go to the Control Panel and click Flash Player (see Figure 4-60) to access the Flash settings.

Figure 4-60. Accessing Flash Player in the Windows Control Panel to update its settings
On the Storage tab, make sure the option “Block all sites from storing information on this computer” is selected (see Figure 4-61).

Figure 4-61. Adjusting the Flash Player settings to disable third-party web sites from storing contents on your disk drive
Another plug-in that could be exploited to invade your privacy or install malware on your computer is the Java plug-in . Today, few web sites still use the Java plug-in in order to function, so the advice is to disable it completely from your browser. However, if you want to keep the Java plug-in, it is necessary to harden its security settings by going to the Control Panel and clicking Java to open the Java panel. Ensure that you select the option Very High, as shown in Figure 4-62. Also, go to the Update tab and make sure the option Check for Updates Automatically is selected.
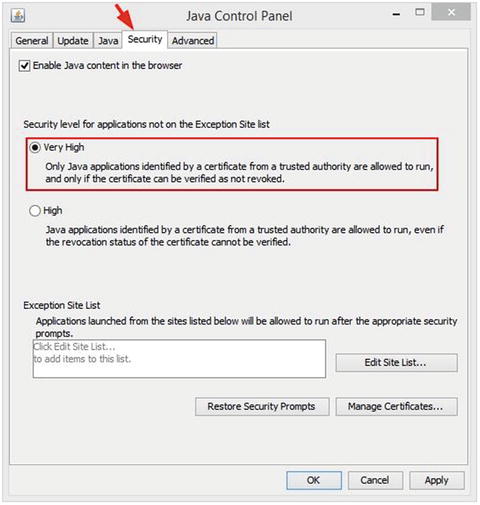
Figure 4-62. Adjusting the Java settings to increase security
Countermeasures for Browser Fingerprinting
Fighting against browser fingerprinting is difficult, and it doesn’t seem there is a 100 percent guaranteed technical solution. Even after configuring Firefox for better privacy and installing many add-ons, outside adversaries can still recognize your digital fingerprint to a large extent.
The best technical solution to fight against browser fingerprinting is to make your browser look like most browsers’ fingerprint! To achieve this, it is advisable to use a freshly installed copy of the Firefox browser configured manually with privacy-enhanced settings without installing any add-ons. This browser should run from a virtual machine that also freshly installed. By using this technique, your browser will look like most running browsers and thus effectively conceal your true digital footprint. Of course, you still need to use a VPN to encrypt your connection and conceal your IP address.
Anonymous Payment
To complete your endeavor to become completely anonymous online, you need to learn how to conduct online purchases without revealing your identity. Any time you make a purchase or send a payment, your name appears and may be stored along with other details about the transaction.
Anonymous payments are sometimes perceived by the public to be used by criminals and terrorist groups. However, in many instances, this is not the case as more and more ordinary users employ this to shield their identity and to prevent outside parties from knowing what they purchase. A user can have many reasons to conceal his or her purchase history. For example, some users may not feel safe to give their personal details to online merchants , others may not want to reveal what they buy (e.g., the purchase of sexual items could be embarrassing), and others want to hide their gambling, which may be against their religious beliefs. Security-conscious users who seek to maximize their online anonymity should use anonymous payment methods to conceal their identity when buying anonymity services online (e.g., paying for a VPN provider anonymously). This will effectively hide their usage to anonymity services. Other examples are journalists speaking against oppressive regimes, whistle-blowers, and free speech advocates.
In this section, we will introduce you to different anonymous payment methods that you can use to make anonymous purchase online.
Prepaid Gift Cards
Most credit card providers offer prepaid cards for their clients. This card can be used just like the ordinary one, and it does not require a client to have a credit check or bank account. In addition, most prepaid cards don’t require a PIN to use.
There are different types of prepaid cards. What we care about for this book is the anonymous type, which is the “nonreloadable” card. Prepaid cards (the nonreloadable type) are available almost everywhere, from drug stores to supermarkets. You can purchase them with cash (untraceable) without revealing any personal information; even your e-mail address is not required. Prepaid cards are also available online; however, buying online will of course require you to reveal your real identity to facilitate a purchase electronically (e.g., you must use a regular credit card/PayPal to purchase the prepaid one).
Here are the other types of prepaid cards:
Open-loop prepaid card: This belongs to a general credit card provider and carries its logo (e.g., Visa, Mastercard, American Express, Discover). You can use this card anywhere you can use the ordinary card type. However, this type is not anonymous because you need to supply your information to get one.
Closed-loop prepaid card: This card can be used to make purchases from a single company. It will carry the initiated company logo (not the credit card provider company like Visa or Mastercard) and cannot be used for general purchases. Examples of this card are from Starbucks, telephone, fuel, stores.
Reloadable prepaid card: This is a general-purpose card that consumers “load up” and spend almost anywhere. This type is usually issued by popular credit card providers like Visa, Mastercard, and American Express. Consumers can load it with cash using different methods like direct deposit and bank transfer. This type of cards is not anonymous as you need to supply your personal information to get one (almost the same procedure as an ordinary credit card).
Nonreloadable card: This card doesn’t require any personal information to have it. This type of card is widely available in major supermarkets and pharmacies, and you can buy it with cash to completely conceal your identity. Major credit card providers like Visa and Mastercard issue this type of card. This means you can use it anywhere you can use the ordinary card. However, unlike the reloadable card, when the balance of the card reaches zero, it will expire automatically and you cannot reuse or reload it with more funds. The maximum value that can be placed on this card is established by the card issuer (many issuers have a limit of $2,000).
Warning
Do not buy prepaid credit cards online. If you buy a prepaid credit card online, you need to pay for it using some form of nonanonymous payment like an ordinary credit card, a bank check, or PayPal. In addition, you need to supply your postal address to receive the card (if it is a physical plastic card). This will link the purchased credit card to your real identity.
Payroll card : This is usually issued by employers to their employees who do not have a bank account to receive their salary. Employees can use this card to purchase items online and pay bills. Obviously, this is not an anonymous card.
Government benefits card : This is issued by some government agencies to pay unemployment benefits, child support, and other government benefits.
Student prepaid cards: These cards are offered by universities for their students to pay for things on campus.
Here are some prepaid credit card providers:
Mastercard ( https://www.mastercard.us/en-us/consumers/find-card-products/prepaid-cards/gift-card.html )
American Express ( https://www.americanexpress.com/gift-cards/ )
Discover ( https://www.discover.com/gift-cards/ )
Warning
It is advisable to buy the “nonreloadable” prepaid cards from a location that doesn’t have security cameras to avoid revealing your identity.
Virtual Credit Card
This is an electronic card with no physical plastic presence. This type of card can be used for online transactions only. To get this type of card, you need to have a valid ordinary credit card or you can simply attach it directly to your charging bank account. The number on the virtual card will be randomly generated and will be associated with your actual credit card (if it is associated with an ordinary credit card). You can set the amount of money that this card will hold in addition to the expiration date and can deactivate it instantly if it is stolen. Whenever you buy something online, the actual bill will appear on your credit card account (or the charging bank account). However, the online merchant will see only your virtual card details, thus helping you secure your actual credit card number. Most of the largest credit card issuers offer virtual credit card services; other third-party companies also offer this service, including Entropay ( https://www.entropay.com ), which currently supports a Visa card only, and SpectroCard ( https://spectrocard.com ), which currently supports Mastercard only.
Virtual credit cards provide a type of anonymity to users (in terms of protecting the actual credit card details). However, we cannot consider this method of payment completely anonymous, as the virtual card is linked to either an actual credit card or an actual bank account. If you perform something illegal online, authorities can track your transaction back to you.
A virtual credit card allows people to buy products online while concealing their true identity against the merchant they deal with, in addition to protecting users from online fraud. This why we mention it here as a kind of anonymous payment method.
Cryptocurrency
This is a type of digital currency that is designed to work as a medium of exchange using cryptography to secure the transaction and to control the creation of additional units of currency. 18
Bitcoin was the first decentralized crypto-currency, appearing in 2009, and remains the dominant currency in terms of use and capitalization, so it will be our focus in this section.
Note
There are hundreds of crypto-currency types already in use. As we said, the most famous is still Bitcoin system. You can find a list of currently available crypto-currency at https://coinmarketcap.com .
Bitcoin
Bitcoin ( https://bitcoin.org ) is an innovative Internet protocol created by a software developer group called Satoshi Nakamoto. Bitcoin uses SHA-256 , which is a set of cryptographic hash functions designed by the U.S. National Security Agency. It is a decentralized peer-to-peer payment network (similar to the Torrent network) that is powered by its users with no central authority or middleman. Bitcoin is a digital system; it is not printed like ordinary currency (dollars and euros) and is created by people and companies using a specialized open source software program called a bitcoin wallet (the wallet can be an online service; hence, it is called an e-wallet). Bitcoin does not charge fees on transactions, and it is nonrefundable (once you send bitcoin to a recipient, it will be gone forever unless the recipient returns them to you).
We will not delve deeply into the technical side of the bitcoin digital currency because it is out of the book’s scope. What you should know about bitcoin is that you can make anonymous purchases using this currency. In the following sections, we will show you how to open a bitcoin account and fund it with cash to begin trading online.
Open Bitcoin Account
The following steps show you how to open a bitcoin account and how to fill it with bitcoin currency.
Step 1: Open Bitcoin Account
Like with a bank account, you first need to have a bitcoin account. In bitcoin naming, it called an address. A bitcoin address is a single-use token, which looks like this: 1MauqJEVKx7mohEAAaWYnn96RFvLEGnVjV.
Users can have as many addresses as they want (it is not limited); all these addresses are stored in a user’s bitcoin wallet.
To get your new bitcoin address, you need to register for a wallet. There are many web sites that offer bitcoin wallets. At blockchain ( https://blockchain.info/wallet/#/signup ), you can sign up for a new wallet by entering your e-mail and password (this password is to access your bitcoin wallet); then click the Continue button to create your new bitcoin wallet. To see your bitcoin address, log in to your wallet account and click the Receive button (see Figure 4-63).

Figure 4-63. Viewing your bitcoin address
Note
Here are some other bitcoin online wallet web sites:
Step 2: Buy Bitcoin
Bitcoin is a kind of currency, so to buy them, you need to pay real money to exchange for them. Here are some methods to fund your bitcoin wallet with cash.
If you followed along and created your wallet at Blockchain, you can get bitcoin currency by logging in to your bitcoin wallet and then going to Buy Bitcoin on the left side of the page. Blockchain works with exchange partners all around the world; select your country from the drop-down menu and click the Continue button.
Now you need to enter the amount of bitcoin you want to buy; in our case, we want 100 euro (see Figure 4-64); click the Buy Bitcoin button.

Figure 4-64. Entering the amount of bitcoin currency you want to buy using your selected country currency
The next screen will create an account for you on the bitcoin exchange partner that you select in the first step; just accept the terms of service and click Continue (see Figure 4-65).

Figure 4-65. Your current wallet account will be associated with the chosen bitcoin exchange partner
Now, you need to select your payment method. You have two options (see Figure 4-66).
Credit/debit card
Bank transfer

Figure 4-66. Selecting how you will buy your new bitcoin currency
Obviously, both payment methods will reveal your identity and link your purchased bitcoin with your real identity. In the next section, we will suggest other methods to buy bitcoin anonymously.
After selecting your payment method, click Continue to see the order details. If everything is OK, click the Confirm button to purchase the specified bitcoin amount (see Figure 4-67).
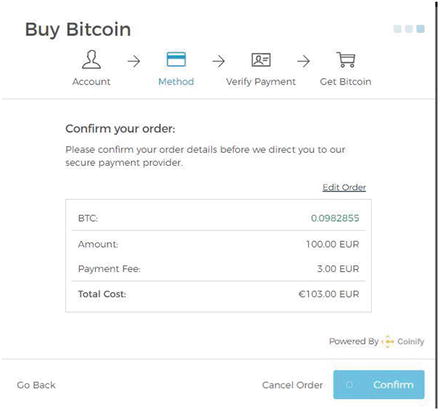
Figure 4-67. Confirming your order details to purchase bitcoin
Note
At the end of this section we will show you different ways, including anonymous methods, to buy bitcoin.
Step 3: Make Payments
After you have currency in your bitcoin address, you are ready to make online purchases. Go to the site where you want to purchase the item/service and find out the merchant bitcoin address you need to pay your money to and the amount of money needed.
A simple example of a bitcoin transaction is to send 2 bitcoins to the address 16TxBiZSfUdkWPtU6htKzxnkxHXcxzpnPi.
Go to the web site you used to get your address from (in our example https://blockchain.info ), find the location where you can input your recipient’s address (in https://blockchain.info it is the Send button) and the amount, and send the payment. It should be straightforward (see Figure 4-68).

Figure 4-68. Sending a payment to bitcoin Address
This is how you use bitcoin to make online payments; as we noted, it is straightforward and easy to use.
Bitcoin Client Software
In the previous example of bitcoin usage, we showed you how to use bitcoin to make purchases using an online service called an e-wallet. There is another way to use bitcoin without third-party online wallets; it works by using independent client software that manages the bitcoin address creation and purchases.
There are different bitcoin wallet programs; you can find a list at https://en.bitcoin.it/wiki/Clients . However, we prefer to use the standard one developed by bitcoin.org (also known as Bitcoin-QT) at https://bitcoin.org/en/download .
Bitcoin core initial synchronization will take time and download a lot of data. You should make sure that you have enough bandwidth and storage for the full block chain size (more than 100GB).
Once that is done, the client will control your wallet file. Be sure to protect it with a password and back it up regularly. It is stored in a file called wallet.dat in your bitcoin data directory. If you lose it or it gets stolen, you lose your money. 19
As we have mentioned, there are different ways to buy bitcoin currency; our focus in this book is to charge your bitcoin address with cash using anonymous methods. In the coming section, we will list anonymous ways to buy bitcoins.
Buying Bitcoin
There are different methods to buy bitcoin. However, most charging methods can be traced back to your real identity, which is what you do not want to happen.
For instance, the following buying methods are available: PayPal, credit cards, bank transfer, cash, personal checks, gift card (prepaid card), money order, MoneyGram, direct seller online, physical trading, and ATM (only the supported one). 20
These are the anonymous methods to buy bitcoin:
Cash: This is the best anonymous option. Find someone to sell your bitcoin to in person. You can find potential buyers by going to https://localbitcoins.com and see who is near your physical location. This service (called local bitcoin) requires you to register an account. To remain anonymous, do not use your primary e-mail address. Instead, create a new e-mail and use it for this purpose only (in the coming chapters we will cover anonymous secure e-mails). Also, be sure to take care to meet the person who will buy your bitcoin in a location where no security cameras exist.
ATM machines: You can buy bitcoin anonymously with cash using ATM machines; however, such machines are not available everywhere. Bitcoin ATM machines allow you to generate a new bitcoin address, if you do not supply one, and this new address will be printed on paper. Then you can take this paper and import the private keys on it to your e-wallet online service/client. To find ATM machines that support bitcoin, go to https://coinatmradar.com . From here you can select your country/city and see a list of ATMs along their physical locations; you can buy the bitcoin from these machines using cash .
Prepaid cards: This type of anonymous payment was already covered; you can use such cards to buy bitcoin online without submitting any personal details. Make sure to use Tor and a secure e-mail account to perform the buying transaction. https://www.coinmama.com accepts gift cards to buy bitcoin.
Note
Some services like https://bitpay.com allow people to accept bitcoin, store and spend bitcoin securely, or turn bitcoin into dollars with the BitPay Card.
Bitcoin payments are extremely anonymous; however, there is a bit of a learning curve for buying and exchanging bitcoin.
Registering for anonymity services, like a VPN, and even conducting some online purchases using an anonymous payment method may require users to supply their e-mail address as part of the transaction (e.g., you need to supply your e-mail address when buying a VPN service to receive the username and password). In this case, to stay anonymous, you should not supply your real e-mail; instead, use a temporary e-mail address. In the coming chapters, we will cover different secure, anonymous e-mail providers.
Warning
Encrypt your online connection before making an anonymous payment. When paying anonymously online, make sure to anonymize your connection using an anonymizing network like Tor or I2P. Paying anonymously without masking your IP address will expose your technical connection details to different parties, and this may lead to revealing your true identity.
Summary
In this chapter, you learned how you can conceal your identity online. As you already know, there are two types of information that can recognize you when surfing online. The first one includes your name, Social Security number, biometric records, or any other detail that uniquely belongs to you and is personally identifiable. The second type includes your digital footprint, which can include a variety of technical identifiers that cannot be related to your personality but can collectively distinguish you among millions of online users.
If anonymity is the goal, you must use the Tor Browser, which is the best one in the field. For people who live in extremely hostile environments, using the Tails OS is advisable.
We cannot guarantee a 100 percent technical solution to disappear completely online, but if you follow the instructions in this chapter along with other recommendations from the rest of this book, we can assure you that you can become invisible to an extent that is nearly impossible to discover. We say “nearly impossible” because in the computer security field, we cannot guarantee any technical solution to be completely perfect. For instance, if a big intelligence agency like the NSA targets you, it can use a set of elaborate and sophisticated online and offline techniques to break into your machine, whatever your defense.
Bibliography
Blockgeeks, “What is Cryptocurrency: Everything You Need to Know.” http://blockgeeks.com/guides/what-is-cryptocurrency/ .
Nihad Hassan and Rami Hijazi, Data Hiding Techniques in Windows OS: A Practical Approach to Investigation and Defense (Syngress, 2016).
Notes
Seth Fiegerman, “Yahoo says 500 million accounts stolen.” CNN, September 23, 2016. http://money.cnn.com/2016/09/22/technology/yahoo-data-breach/ .
The Tor Project, Inc. https://www.torproject.org/about/corepeople .
Tor Metrics. “Statistics about current status of Tor network,” https://metrics.torproject.org .
Tor Network Status. https://torstatus.blutmagie.de .
EFF web site, “What is Tor?” https://www.eff.org/torchallenge/what-is-tor.html .
The Tor project, “Tor: Bridges.” https://www.torproject.org/docs/bridges
The Tor project, “Tor: Pluggable Transports.” https://www.torproject.org/docs/pluggable-transports.html.en .
Tails, Warnings. https://tails.boum.org/doc/about/warning/index.en.html .
Tails, Using I2P. https://tails.boum.org/doc/anonymous_internet/i2p/index.en.html .
Free VPN integrated in Opera for better online privacy. http://www.opera.com/blogs/desktop/2016/04/free-vpn-integrated-opera-for-windows-mac/ .
Network solutions, “Managing Domain Name Servers.” http://www.networksolutions.com/support/what-is-a-domain-name-server-dns-and-how-does-it-work/ .
Mozilla Foundation, Support for Hello discontinued in Firefox 49, https://support.mozilla.org/en-US/kb/hello-status .
gHack, “Your browsing history may have been sold already.” http://www.ghacks.net/2016/11/01/browsing-history-sold/ .
DuckDuckGo search engine results source. https://duck.co/help/results/sources .
Desktop Browser Version Market Share. https://www.netmarketshare.com/browser-market-share.aspx?qprid=2&qpcustomd=0 .
Steve Dent, “Opera browser sold to a Chinese consortium for $600 million.” Engadget, July 18, 2016. https://www.engadget.com/2016/07/18/opera-browser-sold-to-a-chinese-consortium-for-600-million/ .
Highland Capital Partners, Disconnect’s Privacy and Security Software Named One of the Top 100 Innovations of 2013. http://www.hcp.com/disconnect-wins-popular-science-best-of-whats-new-award-2013 .
Andy Greenberg, “Crypto Currency.” Forbes, April 20, 2011. https://www.forbes.com/forbes/2011/0509/technology-psilocybin-bitcoins-gavin-andresen-crypto-currency.html .
Bitcoin.it, “First-time buyers guide.” https://en.bitcoin.it/wiki/First-time_buyers_guide .
Bitcoin.it, “Buying Bitcoins (the newbie version).” https://en.bitcoin.it/wiki/Buying_Bitcoins_(the_newbie_version ).