
Salesforce offers an array of data management tools. Lightning Salesforce offers a Data Import Wizard that allows you to update existing records or create new records (Figure 8-1). The Data Import Wizard allows imports, updates, and inserts to be performed using comma-separated value (CSV) files
, Outlook CSV, ACT! CSV, and Gmail CSV. Salesforce not only supplies an importing tool but also provides tools to help you export your data into CSV files
, mass transfer records from one owner to another based on the criteria of the record, and mass delete records based on the criteria of the record. Salesforce also provides data control tools
that help you control the type of data your users are adding to the system. You can create duplication rules to prevent users from adding duplicate records. Data management is hugely important for organizations; in fact, your Salesforce organization is only as good as the data you collect with it. If the data is “dirty,” your reports will be too. Having accurate and useful data will allow you to properly analyze your information. This in turn will allow you to better the user and client experience.
Figure 8-1
Importing can be easy!
Using the Data Import Wizard
The Data Import Wizard that Salesforce has provided allows you to import new records and update existing records. All you need is a CSV file
with column headers that match your existing Salesforce fields and your data in the rows of the spreadsheet (Figure 8-2).
Figure 8-2
CSV file ready for an import into the Salesforce organization
You can easily create a CSV file with an Excel spreadsheet. Once you save the file, you’ll see under the file name that you create a “save as” type. Select the drop-down and change it to “CSV (Comma delimited).” According to your Excel version, the verbiage may change. See Figure 8-3 for an example.
Figure 8-3
How to save an Excel file into a CSV file
format
Preparing Your Data for an Import
To prepare your data for a contact and account import, you must make sure that in your CSV file there is a column for all the required fields you may have set up or the ones that come standard with Salesforce. You can determine what fields are required by editing a record and looking for the fields with a red line next to them. You can include any field as a column in this CSV file that is found on the object you are importing to. Another important preparation step is to ensure that the data being imported matches the data type of the field. It is important to prepare your data because if it is incorrect, it will give you an error and not import that record. To prevent spending hours on import, follow these tips
:
- The date data type can be accepted only with this format: MM/DD/YYYY.
- The date and time data type can be accepted in the following format: MM/DD/YYYY hh:mm:ss. There are other formats accepted as well.
- The number and currency data type will take only numbers (no letters).
- The check box data type will accept TRUE and FALSE values (TRUE = selected, FALSE = deselected).
- The email data type fields require that an at (@) symbol be present and a dot (.) with an appropriate suffix be included (.com, .org, .gov, etc.). Salesforce doesn’t check for a specific suffix type, but if it sees no suffix after the dot, it will typically produce an error.
- Picklist data type fields must exactly match what is already included in the values for that picklist, or you can at the field level deselect the box “Restrict picklist to the values defined in the value set” so that any value will be included and imported.
- Multiselect picklist values must be separated by a semicolon (for example, blue; red; green).
- The URL data type field will need to include a dot with a suffix (.com, .org, .gov, etc.).
Note
In this import wizard, if the account name is the same as another in your CSV file, Salesforce will not create a duplicate. If the account name has one extra letter, Salesforce will see this as a new account and create a duplicate.
Additionally, if you label your column headers with the Salesforce field label, the Salesforce import wizard will automatically map your columns to the Salesforce fields (we’ll speak about this in step 9).
- Try to match all your column headers to the field names for your import. Most importing tools will “automap” your column headers to the appropriate fields.
Importing Accounts and Contacts with the Data Import Wizard
The Salesforce Data Import Wizard is a great, easy-to-use tool. It provides videos to help walk you through importing and has great a FAQ section. It even gives you a step-by-step process for setting up the import. It is important to keep your Salesforce data accurate and current. Whether you are importing accounts and contacts for the first time or adding new ones to the system, you’ll need to know how to do this for data integrity.
- 1.Prepare your data for import . Accounts in a standard Salesforce setup require the account name. Along with accounts, you can import contacts. Contacts in a standard Salesforce setup will require an account name and the last name. Because an account name is required for a contact, you can in your CSV file set the account and account details in one row and just use the account name for all the contacts related to that account for additional contacts. If you populate different account field details in the account fields to each contact, the last row of the import for that account will reflect in Salesforce. In Figure 8-4, Cloud Creations on row 5 would be the information seen in Salesforce after the import is performed.
 Figure 8-4Data ready for an import
 - 2.
- 3.In the Quick Find box, type Data import (don’t hit the Enter key; the option will populate as you type). Click Data Import Wizard, as shown in Figure 8-6.
 Figure 8-6Searching for Data Import Wizard
 - 4.Click the green Launch Wizard! button, as shown in Figure 8-7.
 Figure 8-7Accessing the Data Import Wizard
 - 5.Under the “What kind of data are you importing? question, click Accounts and Contacts on the “Standard objects” tab, as shown in Figure 8-8.
 Figure 8-8What kind of data are you importing?
 - 6.Under the “What do you want to do?” question, click “add new records” and the following information will appear:
- Match contact by: This allows you to match your CSV data to an existing contact, if it already exists in Salesforce, by the full name of the contact, email, or any field you have created and made a unique ID or external ID . This helps to prevent duplication when importing. You would want to choose which you think is the best match. Most commonly an email is used.
Note The unique ID or external ID is an ID or a unique identifier that relates only to that record. When transitioning data from another CRM to Salesforce, your other CRM will contain its own unique ID. You should create a field and mark it as an external ID and import this field to your Salesforce instance. This will allow you to make updates to it in the future should you forget to include something in your original import. Or, for business use integrations to other systems, an external ID is essential to relate the two organizations together and make sure that you have only one record being updated. Salesforce creates its own unique ID for every record created as well; it is a 15- to 18-character alphanumeric ID. You can find this ID for your records in reports; just search for the field ID, as shown in Figure 8-9, or find it in the URL of your browser, as shown in Figure 8-10. Figure 8-9How you can search for the ID for your record in reports
 Figure 8-10Where you can find your record ID in your browser URL
 - 7.Match Account by: This allows you to match your CSV data to an existing account, if it already exists in Salesforce, by the account name and site (a standard web site field on accounts) or any field you have created and made a unique ID or external ID, as shown in Figure 8-11.
 Figure 8-11What do you want to do?Note You can make any of the following data type fields a unique ID or external ID by creating or editing the field and selecting the unique or external ID check box: auto-number, email, number, or text.
 - 8.Salesforce allows for automated processes made with workflow rules or the Process Builder to be enabled or disabled. By checking the box, you are enabling them to be active during this import. This is important to consider if you have created actions that include email and tasks because this could bombard your clients or users. For example, you could have a workflow rule that can email a contact a welcome email every time a contact is created. If you keep this selected, all contacts imported will receive this email.
- 9.You can also assign all contacts imported to an existing campaign. If you select this option, you need to include a column in your import containing the campaign Salesforce ID.
- 10.Under the “Where is your data located?” question, you can drag and drop a CSV file into the “Drag CSV file here to upload” area, as shown in Figure 8-12. You can also click CSV, Outlook CSV, ACT! CSV, or Gmail CSV and then click Choose File. Locate the file on your machine and click Open.
 Figure 8-12Where is your data located?
 - 11.Once these steps are complete, click the Next button at the bottom-right corner of your screen, as shown in Figure 8-13.
 Figure 8-13Click the Next button on the screen
 - 12.In the Edit Mapping field , this is where you choose what column header is mapped to what Salesforce field on the accounts or contacts. If you set your column headers up correctly, you’ll see that Salesforce will match all your columns to the fields in Salesforce, as shown in Figure 8-14. In Figure 8-15, you’ll see that the headers didn’t match the names of the fields. Steps 13 and 14 are additional steps to follow should you not match the headers of your columns to the field names they are mapping too.
 Figure 8-14Field mapping when you matched your column headers to the field names in Salesforce correctly
 Figure 8-15Field mapping when you didn’t match your column headers to the field names in Salesforce
 - 13.If you see a triangle with an exclamation mark inside, this means that there is an error with your mapping, as shown in Figure 8-16. Hover over the icon to display the error message . In most cases, it is because you have mapped one column to multiple fields.
 Figure 8-16Shows the little triangle symbolNote If your import requires that two fields be updated with the same information, you’ll need to create two columns with the same data in each and map the columns to the respective fields. Importing tools can link to only one data point at a time.
 - 14.If you see a field in bold red like Figure 8-15, this means the field still needs to be mapped. To map a field or change a field already mapped, click the Map or Change hyperlink. You can either type in the field name or use the scroll bar to find the field. Select the appropriate field and click Map, as shown in Figure 8-17.
 Figure 8-17Mapping fields using the Data Import WizardNote If you don’t create a record owner field in your import, the records created will automatically be assigned to the user performing the import. This could impact your organization if you have security set up that eliminates users from seeing data. For example, if you have a role hierarchy set up that puts you at the top of the hierarchy and you are the importing user, users below you may not be able to see the records you’ve imported. This ultimately means they can’t do their jobs.
 - 15.Once you have reviewed that all the columns are mapped to the appropriate fields , click the Next button at the bottom-right corner, as shown in Figure 8-18.
 Figure 8-18Click the Next button to continue
 - 16.The Review & Start Import screen summarizes what objects you’re importing to, what type of import it is (insert, update, upset), what CSV you are using for your import, how many fields are mapped, and how many are unmapped, as shown in Figure 8-19.
 Figure 8-19A review of your import before you click Start Import
 - 17.Once you have reviewed this information and feel that it is correct, click the Start Import button, as shown in Figure 8-20.
 Figure 8-20Start Import button
 - 18.Click the OK button on the congratulations page to be taken to the bulk data load job request and status page, as shown in Figure 8-21.
 Figure 8-21OK button
 - 19.If the import is a large import (tens of thousands of rows), the job being processed can take up to several hours. If it is a small import, you may find that your job will be finished as soon as you click OK, as shown in Figure 8-22.
 Figure 8-22Import summary
 - 20.Salesforce will send you an email when your job is complete and will attach an error file to review any errors on your import. Some errors could include a data type not matching. Another could be that Salesforce is seeing a blank row, as shown in Figure 8-23.
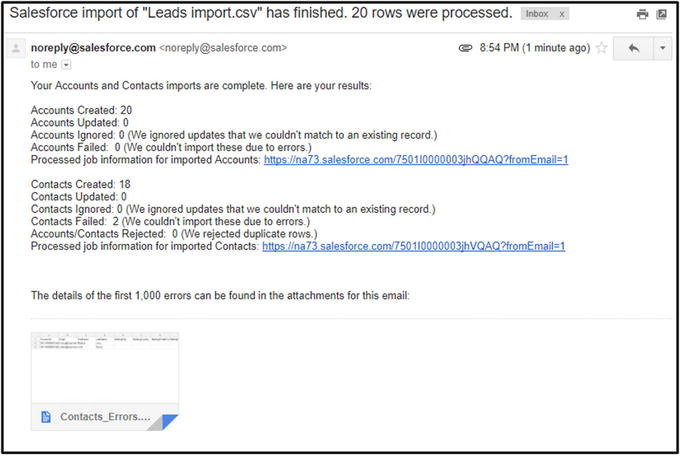 Figure 8-23Email that is received when the import is complete

Importing Leads
Ideally, you’ll find that you get to import new leads all the time! Whether you get new leads from a conference you attend or a purchased list, you’ll want to import them immediately to get your sales team working on them! The following steps will show you how to quickly make this happen:
- 1.Prepare your data for the import. Make sure that all the required fields are populated columns in your import. The standard Salesforce setup requires a last name, a company name, and a lead status.
- 2.Navigate to the Setup menu , as shown in Figure 8-24.
 Figure 8-24Navigating to the Setup area in Salesforce
 - 3.In the Quick Find area , type Data import (don’t hit the Enter key; the option will populate as you type). Click Data Import Wizard, as shown in Figure 8-25.
 Figure 8-25Searching for Data Import Wizard
 - 4.Click the green Launch Wizard! button , as shown in Figure 8-26.
 Figure 8-26Launching the Salesforce wizard
 - 5.Under the “What kind of data are you importing?” question, click Leads on the “Standard objects” tab, as shown in Figure 8-27.
 Figure 8-27What kind of data are you importing?
 - 6.Under the “What do you want to do?” question, click “Add new records,” and the following information will appear:
- Match Lead by: This allows you to match your CSV data to an existing lead contact if it already exists in Salesforce by the full name of the lead, email, or any field you have created and made a unique ID or external ID. This helps to prevent duplication from being imported. You would want to choose which you think is the best match. Most commonly email is used.
- Assign New Leads to this Source: This allows you to select what lead source all the leads should be assigned to. If you have an import that is not a mixture of lead sources, you can use this function. For example, if you just attended a conference and you want to show that all these leads came from that conference, you would globally assign all the imported leads from this list to that lead source. If you have a mixture of sources where your leads came from, you’ll want to ignore this.
- Assign all leads using Assignment rules: This allows you to utilize a lead assignment rule you’ve created to auto-assign the owner. The drop-down should include all your options that you created in lead assignments. If all the leads you are importing need to be assigned to specific users, you can ignore this feature. However, if you purchased a list and these leads are up for anyone, you may want to let your auto-assignment rules handle who gets what.
- Assign leads to campaigns: This allows you to add all the imported leads to a campaign . You’ll just need to make sure to include a column in your spreadsheet with that campaign ID. If you want to have all the imported leads related to a campaign for an event or a campaign for an email blast, you can do this with this function.
- 7.Salesforce allows for automated process made with workflow rules or the Process Builder to be enabled to disabled. By checking the box, you are enabling them to be active during this import. This is important to consider if you have created actions that include email and tasks as this could bombard your clients or users.
- 8.Under the “Where is your data located?” question, you can drag and drop a CSV file into the “Drag CSV file here to upload” area, as shown in Figures 8-28 and 8-29. You can also click CSV, Outlook CSV, ACT! CSV, or Gmail CSV. Then click Choose File, locate the file on your machine, and click Open.
 Figure 8-28What do you want to do?
 Figure 8-29Where is your data located?
 - 9.Once these steps are complete, click the Next button at the bottom-right corner of your screen, as shown in Figure 8-30.
 Figure 8-30Next button
 - 10.In the Edit Mapping field, this is where you choose what column header is mapped to what Salesforce field on the lead. If you set your column headers up correctly, you’ll see that Salesforce will match all your columns to the fields in Salesforce, as shown in Figure 8-31. In Figure 8-32, you’ll see that the headers didn’t match the names of the fields. Steps 11 and 12 are additional steps to follow if you did not match the headers of your columns to the field names they are mapping to.
 Figure 8-31Field mapping when you matched your column headers to the field names in Salesforce correctly
 Figure 8-32Field mapping when you didn’t match your column headers to the field names in Salesforce
 - 11.If you see a field in bold red , this means that the field still needs to be mapped, as shown in Figure 8-33. To map a field or change a field already mapped, click the Map or Change hyperlink. You can either type in the field name or use the scroll bar to find the field. Select the appropriate field and click Map, as shown in Figure 8-34.
 Figure 8-33Fields shown as unmapped
 Figure 8-34Selecting a fieldNote If you don’t create a record owner field and you don’t choose to use your lead assignment rules in the import, the records created will automatically be assigned to the user performing the import. This could impact your organization if you have security set up that eliminates users from seeing data. For example, if you have a role hierarchy set up that puts you at the top of the hierarchy and you are the importing user, users below you may not be able to see the records you’ve imported. This ultimately means they can’t do their jobs.
 - 12.Once you have reviewed that all the columns are mapped to the appropriate fields , click the Next button at the bottom-right corner, as shown in Figure 8-35.
 Figure 8-35Next button
 - 13.The Review & Start Import screen summarizes what objects you’re importing to, what type of import it is (insert, update, upsert), what CSV you are using for your import , how many fields are mapped, and how many are unmapped, as shown in Figure 8-36.
 Figure 8-36Import review
 - 14.Once you have reviewed this information and feel that it is correct, click the Start Import button, as shown in Figure 8-37.
 Figure 8-37Start Import button
 - 15.Click the OK button on the congratulations page to be taken to the bulk data load job request and status page, as shown in Figure 8-38.
 Figure 8-38OK button
 - 16.If the import is a large import (tens of thousands of rows), the job being processed can take up to several hours. If it is a small import, you may find that your job will be finished as soon as you clicked OK, as shown in Figure 8-39.
 Figure 8-39Bulk data load job review
 - 17.Salesforce will also send you an email when your job is complete and will attach an error file to review any errors on your import. Some errors could include data type not matching. Another could be that Salesforce is seeing a blank row, as shown in Figure 8-40.
 Figure 8-40Email confirmation
Scheduling a Data Export
Salesforce is a cloud-based CRM and development platform that can be accessed anywhere you have an Internet connection. If there is a drop in your Internet service or you need to work offline for the time being, Salesforce allows you to export your data into a CSV file. Or, if you’re like us and you like to keep a backup of your data, you can do so. You can schedule an export to run monthly (free of charge for all Salesforce editions), weekly, or daily (which may have a charge depending on the Salesforce edition), and you can have it emailed you. Or you can perform one-time exports.
- 1.
- 2.In the Quick Find area, type Data Export (don’t hit the Enter key; the option will populate as you type). Click Data Export, as shown in Figure 8-42.
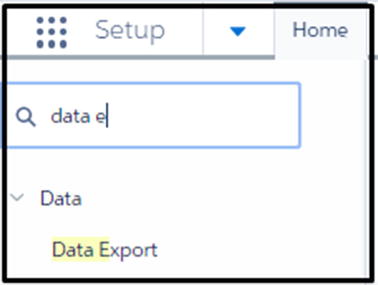 Figure 8-42Searching for Data Export
 - 3.To schedule an export, click the Schedule Export button, or to create a one-time export, click Export Now, as shown in Figure 8-43.
 Figure 8-43Monthly export service options
 - 4.To schedule the export, choose what frequency the export should be delivered at. For a monthly export, you can choose what day of the month it should be delivered on, or the first, second, third, fourth, or last specific day of the week. You can also choose when the schedule starts, ends, and what time it should start, as shown in Figure 8-44.
 Figure 8-44FrequencyNote The start time doesn’t ensure that it will be delivered at that time. Depending on the amount of data you have, it can take up to several hours to complete.
 - 5.You can choose to include images , documents, attachments, Salesforce files, and CRM content document versions with your export by selecting the boxes at the top of the page, as shown in Figure 8-45.
 Figure 8-45Choosing what to include
 - 6.You can also select specific objects to be exported only, or you can choose the option at the top-right corner to have all data included, as shown in Figure 8-46.
 Figure 8-46Objects to export
 - 7.Once the export is all set, click the Save button.
- 8.If you have scheduled your export, you should see a yellow box with the time your next scheduled export should run, as shown in Figure 8-47. If the export is scheduled for now, there will be a note for who scheduled, what time, and in what format the information will be received in, as shown in Figure 8-48.
 Figure 8-47Export now response
 Figure 8-48Export scheduled response
 - 9.Once the export is ready, Salesforce will email you with a link to the data export in the Setup menu, as shown in Figure 8-49.
 Figure 8-49Email sent from Salesforce that your email has been received
 - 10.Here the download hyperlink will need to be clicked to download the file that will then need to be stored on a machine, as shown in Figure 8-50.
 Figure 8-50In the email received, there will be a link that will direct you back in Salesforce to download your file
 - 11.It will be downloaded to a zip file that will need to be unzipped for your use. All objects will be broken out into individual CSV files, as shown in Figure 8-51.
 Figure 8-51Shows all objects broken out into individual CSV files

Duplicating Data Management
Another great feature in Salesforce is the ability to set up duplicate rules. Duplicate rules allow you to create criteria that will be checked against any new account, contact, or lead and prevent a user from creating a duplicate record. Salesforce comes out of the box with the following duplicate rules:
- Standard Account Duplicate Rule : Will verify if the new account being created matches any of the following combinations of account fields to an existing account:
- a.Account Name and Billing Street
- b.Account Name and City and State
- c.Account name and Zip code
- d.Account name and Phone
- e.Account Website and Phone
- f.Account Website and Billing Street
- a.
- Standard Contact Duplicate Rule : Will verify if the new contact being created matches any of the following combinations of contact fields to an existing contact:
- a.First Name and Last Name and Title and Account Name
- b.First Name and Last Name and Email
- c.First Name and Last Name and Phone and Company Name
- d.First Name and Last Name and Mailing Street and (City or Zip code or Phone)
- e.First Name and Last Name and Mailing Street and Title
- f.First Name and Last Name and Title and Email
- g.First Name and Last Name and Phone
- a.
- Standard Lead Duplicate Rule : Will verify if the new lead being created matches any of the following combinations of lead fields to an existing lead:
- a.First Name and Last Name and Title and Account Name
- b.First Name and Last Name and Email
- c.First Name and Last Name and Phone and Company Name
- d.First Name and Last Name and Mailing Street and (City or Zip code or Phone)
- e.First Name and Last Name and Mailing Street and Title
- f.First Name and Last Name and Title and Email
- g.First Name and Last Name and Phone
- a.
If the standard rules don’t work for your company, you can also create your own. For example, perhaps you have another combination of fields that would work better for account duplication rules. Maybe your business can match an account based on the account name and a custom field you are collecting. To create a new rule, follow these steps:
- 1.Go to your Setup menu and search for Duplicate Rules. Click Duplicate Rules , as shown in Figure 8-52.
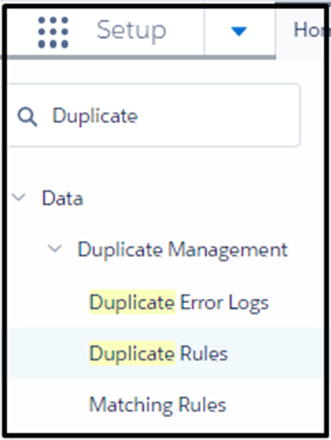 Figure 8-52Selecting Duplicate Rules
 - 2.From the New Rule drop-down, choose the object, in this example Account, as shown in Figure 8-53.
 Figure 8-53New account rule
 - 3.Name your duplicate rule .
- 4.Add a description.
- 5.Set the record-level security . This option only affects users who have sharing rules.
- a.“Enforce sharing rules” means that if your users have limited visibility with accounts they don’t own, they won’t be able to see the other account that is matching to this newly created account.
- b.“Bypass sharing rules” means that you are allowing the user to see the account they don’t own if the matching rule is activated.
- a.
- 6.In the Actions section , you can choose to allow the user to create or edit an account although the duplicate rule check was activated. The other option is Block, which will prevent the user from saving the record. You can also choose to alert them with a message from the alert box. The report option includes the duplicated account/contact/lead into a list view, as shown in Figure 8-54.
 Figure 8-54Duplicate rule, steps 3 to 6
 - 7.You can choose a preexisting matching rule you’ve created or you can pick from the drop-down Create New Matching Rule, as shown in Figure 8-55.
 Figure 8-55Creating a new matching rule
 - 8.Click Save Duplicate Rule, as shown in Figure 8-56.
 Figure 8-56Saving your duplicate rule
 - 9.Name your matching rule and hit the Tab key to have Salesforce create the unique name.
- 10.Add a description to your matching rule.
- 11.The matching criteria section is where you create the rule itself. From the column fields, choose the field that you’ll use as part of your matching rule. In this example, you have the account name. In Matching Method, you can have the option of Exact or for some fields Fuzzy. The method Fuzzy will strip the account name of Inc or Corporation and see if it can match two accounts without these in the name. The Fuzzy method changes per field; to see a full list of these methods, go to https://help.salesforce.com/ and search matching methods used with matching rules.
- 12.Select Match Blank Fields to allow your criteria to match the fields if they are blank. For example, if the account names are the same for the records and the custom field on both is blank and these were both checked, the criteria would match, and your user would be alerted. I suggest using exact values and also matching blank fields.
- 13.You can also choose if the filter logic should include all the previous fields with the word AND or if it should include some but not all with the word OR.
- 14.Click Save, as shown in Figure 8-57.
 Figure 8-57Creating the matching rule
 - 15.Make sure to activate your matching rule by clicking the Activate button, as shown in Figure 8-58.
 Figure 8-58Activating your matching rule
 - 16.Go back to the duplicate rules area (see step 1), click the name of the rule created, and activate the duplicate rule, as shown in Figure 8-59.
 Figure 8-59Activating your duplicate rule
Mass Deleting Records
Salesforce offers a Mass Delete Records
option for accounts, leads, activities, contacts, cases, solutions, products, and reports. This option is especially important because it allows you to clean up your database. If you allow or do not maintain your Salesforce CRM and leave records in it that mean nothing to you or your employees, you end up with “dirty data.” A CRM with dirty data is just about as useless as not having a CRM. Remember, your CRM
is only as good as the data you have in it. Hence, Salesforce gives you a tool to mass delete. For example, say you just went to a conference and captured all new leads, so you went ahead and imported them. However, after reviewing your import, you realized it was the wrong list and an old one at that. You need to delete these! The next couple steps will help you clean your database
:
- 1.Go to your Setup menu and search for Mass Delete Records. Click Mass Delete Records, as shown in Figure 8-60.
 Figure 8-60Finding Mass Delete Records
 - 2.Click the option for the objects you want to delete the records from. In the previous example, it was Leads, as shown in Figure 8-61.
 Figure 8-61Mass delete record choices
 - 3.Determine the criteria of the data that needs to be deleted. In this example, we know the created date was yesterday. Or perhaps the lead source was the specific conference. Almost any field on the object can be used as the criteria to find the records that need to be deleted.
- 4.In the first column, select the field.
- 5.In the second column, choose the method.
- 6.In the third column, enter your value.
- 7.Click Search, as shown in Figure 8-62.
 Figure 8-62Set up the criteria to find the records needing to be deleted
 - 8.Select the records you want to delete or select the box at the top to select all the records.
- 9.Select the box Permanently Delete if you are sure you never want to retrieve these again.Note Deleted records go to your recycle bin and will autodelete after 15 days, or if your recycle bin is full, the oldest record will be deleted.
- 10.Click the Delete button when you are ready to delete the records, as shown in Figure 8-63.Note You can only mass delete 250 records at a time.
 Figure 8-63Mass deleting your records
Mass Transferring Records
Salesforce offers a tool to help you transfer the ownership of accounts, leads, macros, or streaming channel records to another user. This allows you to transfer every record a user owns to another and can be based on the criteria of the record. This is an important tool if you have an employee who leaves your company or if one gets promoted! For example, if an employee is leaving your company and owns many accounts that now need to be managed by another employee, you can use this tool to transfer those accounts to new users.
- 1.Go to your Setup menu, search for Mass Transfer Records, and click the phrase, we shown in Figure 8-64.
 Figure 8-64Searching for Mass Transfer Records in the Setup menu
 - 2.In the example presented in the introduction of this section, you need to transfer accounts from one departing user to another user. To do this, click the Transfer Accounts link , as shown in Figure 8-65.
 Figure 8-65Transfer Account Records screen
 - 3.Using the magnifying glass icon , search for the user you want to transfer the ownership of the records from.
- 4.Using the magnifying glass icon, search for the user you want to transfer the ownership of the records to.
- 5.It is a general rule that you shouldn’t transfer records that are closed or completed from one user to another. We recommend that you keep the history of your business this way. Therefore, in Figure 8-66, you’ll see we only select “Transfer open opportunities” and “Transfer open cases.”
- 6.If you want all records that one user owns transferred to the other, you can leave this section blank. Otherwise, if you want to transfer only specific records based on the criteria of the record, you’ll need to use this section. Notice that you can only use the logic AND. This means that every set of criteria you build here will have been on the record it is a search for. For example, if you set the Type field to Customer – Channel and Billing State to California, this will require that the record has both of these values for it to be available to transfer.
- a.Find the field that you want to filter from. For example, if you use a Type field on the account and you only want to transfer specific types of accounts to the new user.
- b.Use the appropriate method: equals, contains, less than, greater than, and so on. In this example, we only want specific types of accounts, so we use “equals.”
- c.Enter the value that the criteria should be. In this example, it is the Type of accounts that equal Customer – Channel.
- a.
- 7.Once you have completed your criteria , click the Find button to find the records that match the criteria, as shown in Figure 8-66.
 Figure 8-66Setting up the mass transfer of records
 - 8.Use the check box found in the headers to select all the records to transfer or single select the users with the check box found next to the account name .
- 9.Once you have selected all the records , click the Transfer button, as shown in Figure 8-67.
 Figure 8-67Selecting the records to transfer
Once complete, you should get the record count of the transferred records
, as shown in Figure 8-68.
Figure 8-68
Record count of transferred records
Summary
Salesforce offers so many tools right at your fingertips. With all the data tools presented, you shouldn’t have any issues with dirty data. If you let dirty data get out of control, it can become a burden to you and your users. With the proper tools at hand, you’ll never have a reason to let it get this way.