
Salesforce is currently the number-one customer relationship management (CRM)
solution for business management. Delivering a robust platform and groundbreaking technology, Salesforce provides solutions for sales, service, and marketing departments. The Lightning Experience provides a new user interface that delivers a faster platform, dynamic capabilities, and enhanced aesthetics. Businesses have reported an increase in win rates, more collaboration, improved productivity, and faster reporting following the switch to Lightning (see Figure 1-1).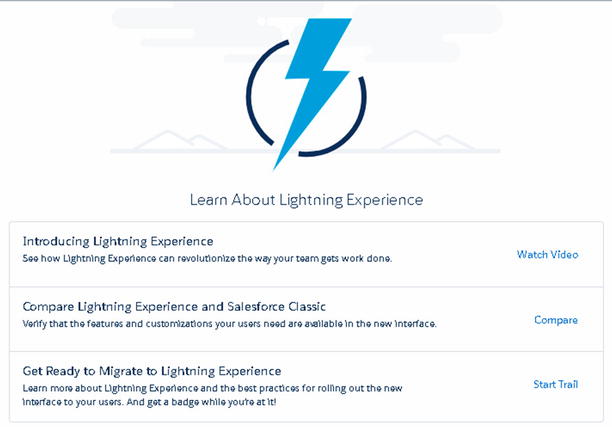
Figure 1-1
Salesforce Lightning Experience
Lightning Pages
The Lightning pages focus attention on what matters most. Important information is displayed “above the fold,” or positioned at the top half of the screen, so users can view key points quicker.


Migrate to Lightning Experience
Migrating to the Salesforce Lightning Experience is straightforward. The following steps describe how to access the Migration Assistant. The Migration Assistant will check your organization’s readiness for Lightning and walk you through a series of steps to enable Lightning for your organization. This is a great first step on your Lightning journey.
Note
These steps are not required but highly encouraged. Salesforce has spent considerable time thinking through potential migration pitfalls and has tried to address them within the Migration Assistant.
Migration Assistant
Follow these steps:
- 1.In Classic, select Setup (see Figure 1-4).
 Figure 1-4Setup area in Salesforce Classic
 - 2.From the Setup menu, click the Get Started button (see Figure 1-5).
 Figure 1-5Get Started button in Setup
 - 3.From here, you have three available resources to learn more about the Lightning Experience. You can select from the options in Figure 1-6.
 Figure 1-6Learning resources for Salesforce Lightning
 - 4.Click Next Step to get started.
Check Readiness
To get started, Salesforce will request access to your organization to analyze your current setup (Figure 1-7).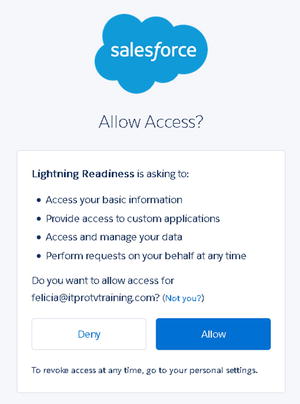
Figure 1-7
Allowing access to Lightning Readiness
Once you click Allow, shown in Figure 1-7, you must select which Salesforce product you want to access (see Figure 1-8).
Figure 1-8
Product selection to check for Lightning Readiness
Select the appropriate Salesforce product and click Check Readiness. Salesforce will analyze your current setup and email a readiness report (see Figure 1-9). New organizations can skip this step.
Figure 1-9
Lightning migration options
Preview
You can preview how your organization works in the Lightning environment. This is a great feature to test any issues that may have been brought up in your readiness report. If you encounter any issues in this switch, you can make changes on the spot. To test this, navigate to the Preview tab and click Preview, as shown in Figure 1-10.
Figure 1-10
Preview tab in the Migration Assistant
As you can see in Figure 1-11, you are instantly switched to Lightning in Preview mode.
Figure 1-11
Lightning Experience in Preview mode
Optimize with Features
For the complete experience of Lightning, take a look at some of the new features made available. This includes a new feature for news, options to enable activities and notes, and more. Navigate to this tab, and click Optimize with Features to enable/disable the Lightning features
found in Figure 1-12.
Figure 1-12
Lightning features to enable
You can enable the following options:
- Click Set Up My Domain to create a URL that is reflective of your company’s brand. This will add a subdomain to your Salesforce organization URL. Use this feature to increase the login and authentication process.
- Click Set Up Shared Activities to allow users to relate multiple contacts to an individual activity.
- Enable News to display relevant news article about your accounts and their industries. This information is pulled by accounts listed in your organization.
- Enable Social Accounts, Contacts, and Leads to allow users to connect better with your accounts by syncing social media accounts.
- Enable Notes to utilize the enhanced version of notes that includes automatic saving in edit mode, an option to add images, and share features.
Set Up Users
You can control who has access to the Lightning Experience. You can choose to roll this out to groups of users, individual users, or all users.
Note
tandard profile users have access to Lightning by default, while custom profile users do not. Click Learn How to change these settings.
Navigate to the Set up Users tab shown in Figure 1-13 to fine-tune this experience and select which users make the switch.
Figure 1-13
User setup
Follow these steps to switch users
:

- 1.Click Switch Users.
- 2.Select appropriate users by clicking the + next to their name (Figure 1-14).
- 3.Click Save.
Figure 1-14
Selecting users to migrate to Lightning
Rollout Approach
Execute a rollout strategy that works best for your company. For larger organizations, it is recommended that you have a phased rollout approach. This approach is advantageous when migrating large organizations and complex setups. There are a few benefits to this approach, including the following:
- This approach allows you to conduct user acceptance testing. Use this to identify any challenges or issues with the new experience. You can collect feedback from your users and fine-tune changes before executing to the entire organization.
- Make progress on your implementation by breaking this up into pieces. This ensures that progress is being made while staying on top of new features and changes.
The suggested rollout approach starts with new users, a pilot group of users, and lastly all users.
Turn It On
Hurray! The final step! Once your organization is ready to make the move to Lightning, select the Turn It On tab shown in Figure 1-15. Switch the tab to Enabled to finish.
Figure 1-15
Turning on Lightning to finish
Note
With the right permissions, users have the option to toggle between Classic and the Lightning Experience. From the Classic interface, select your username and click Switch to Lightning Experience, as shown in Figure 1-16. From the Lightning Experience, click Switch to Classic, as shown in Figure 1-17.

Figure 1-16
Switching from Classic to Lightning

Figure 1-17
Switching from Lightning Experience to Salesforce Classic
Lightning Home Page
The Lightning Experience home page is enhanced with new features. The home page can be tailored to give your users everything they need to manage their day in one centralized place. Without any configuration, Salesforce displays the following components: Quarterly Performance, Assistant, News, Today’s Tasks, Today’s Events, Recent Records, and Top Deals. See Figures 1-18 and 1-19.

Figure 1-18
Top half of the Lightning home page
Figure 1-19
Bottom half of the Lightning home page
Navigation Bar
The navigation bar
uses tabs to hold objects, as shown in Figure 1-20. In database terms, an object is a table. Objects hold groupings of information that may be related. This includes the records that live in them. Records are considered the rows that you find within a table. You will hear this terminology referenced throughout this book. For more information on objects, records, and fields, navigate to Chapter X.
In Lightning, each tab is actionable.
Figure 1-20
Navigation bar
In the navigation bar, objects are broken down into lists. These lists hold Salesforce records in relation to their object. One of the neat features of this is that records can be created directly from a tab. Each list can be used to see the object’s most recent items. This makes it easier for users to create new records on the fly.
Quarterly Performance
The Quarterly Performance
summary is a powerful reporting tool used to show sales users’ performance based on a pipeline (see Figure 1-21).
Figure 1-21
Quarterly Performance component located on the home page
Closed records display the user’s closed opportunities.
Open (>70%) displays the sum of all records with a probability greater than 70 percent.
If the user is part of a team, the team’s opportunity sums will be showcased on this report. Otherwise, the data represented will be the user’s owned opportunities.
Setting a Goal
To set a goal, follow these steps
:
- 1.Click the pencil icon and enter an amount, as shown in Figure 1-22.
 Figure 1-22Select the pencil icon to edit your quarterly goal
 - 2.Click Save.
The chart automatically calculates and updates the chart. Click  to refresh the data. Click
  to filter the data by week or day (Figure 1-23).
Now your sales users can start their day with a data visualization of their sales progress.
News
This new feature is a great way to display news articles related to your accounts and their industries. Once enabled, as discussed in the “Enhanced Features” section, news information can be displayed on your home page. When news is accessed from the home page, information is displayed based on recently viewed records and tasks and events for those records. See Figure 1-23.
Figure 1-23
News component found on the home page
Click See More News to navigate to the News tab, as shown in Figure 1-24.
Figure 1-24
Industry news found in the News object
This tab displays a list of news articles titled Industry News. Information populated here is related to your accounts and their industry.
Assistant
Lightning Assistant is helpful in prioritizing an end user’s daily tasks. Tasks that are overdue are showcased first on the top right of the page (see Figure 1-25). The following overdue tasks are tasks that are due today.
Figure 1-25
Lightning Assistant
Global Search
The Salesforce global search bar
appears at the top of every page. Use this area to search across any object in Salesforce. It’s best practice to search for a record before creating a new one to avoid duplicate data. Use wildcards and operators for greater search results.
Use an asterisk (*) to find records that match at the middle or end of your search, and use a question mark (?) to find records that match only one character at the middle or end of your search.
For example, a search for Ay* at the end will find and display results for a contact named Ayden. It will also find and display results for Andy Young (Figure 1-26).
Figure 1-26
Search results for Ay*
Favorites List
The Favorites icon
is a new tool in the Lightning platform. Favorites are customized shortcuts to records and items most frequently visited, such as favorite individual records, list views, dashboards, and more.
To make an item a favorite, click the star button in Figure 1-27. This powerful tool makes it easy to find your favorite records from different object locations, all in one place.
You can make your top deals, your most frequently visited reports, your top leads, and more your favorites!
Figure 1-27
Favorites icon
Click the arrow next to the star to select items in your Favorites list, as shown in Figure 1-28.
Figure 1-28
List of favorites
Lightning Actions
The + button shown in Figure 1-29 can be used to quickly create records in Salesforce. Use this quick-create feature to create a new activity, lead, contact, opportunity, case, or call directly from the home page.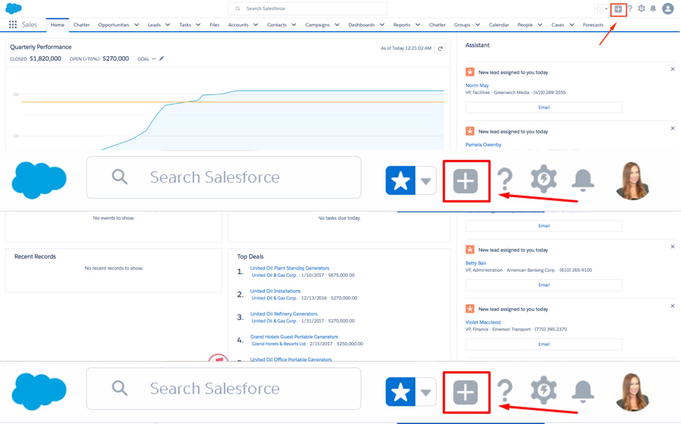
Figure 1-29
Lightning actions
Click any of the available options to instantly display a quick-create window at the bottom right of the screen.
In the Lightning Experience, multiple windows can be opened from the home page to enhance user productivity and speed. Up to three windows can be displayed at once (see Figure 1-30).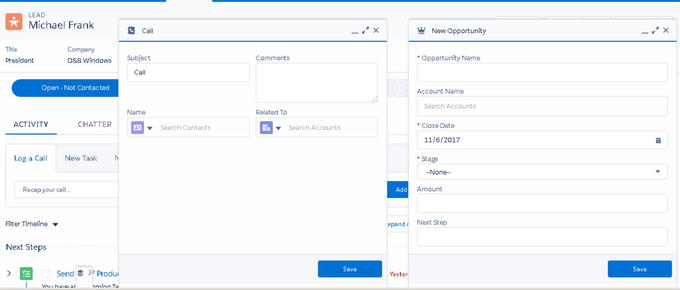
Figure 1-30
Utility bar
Help and Training
Salesforce has many great support resources including videos, walk-throughs, and an interactive learning tool called Trailhead. From the home page, click the question mark (shown in Figure 1-30) to access these resources. Each page has a help menu with links to helpful resources. Use this area to log a case and get support, give feedback, and view release notes.
Salesforce provides three seasonal releases a year: spring, summer, and winter. Each release offers more than 150 new features. The image displayed at the bottom right of this menu (shown in Figure 1-31) tells which release your organization is currently in.
Figure 1-31
Help and training
Setup
Setup
is an area used most frequently by Salesforce administrators. In Lightning, the Setup page has improved! The setup area has a more logical and easier-to-navigate layout. System administrators and users with the appropriate permission settings can access this area. Select Setup from the toolbar to navigate here (see Figure 1-32).
Figure 1-32
Lightning Setup home page
Setup has these categories: Administration, Platform Tools, and Settings. View the Most Recently Used Places in Setup to seamlessly continue any admin work. Use the Quick Find to easily find the admin tools necessary for custom work.
Click the Create button to quickly access the most common tools, including creating new objects, workflows, tabs, templates, and users (see Figure 1-33.)
Figure 1-33
Create button
Notifications
View all notifications
in one place, including approval requests and chatter mentions. Click the bell icon to see a list of notifications (see Figure 1-34).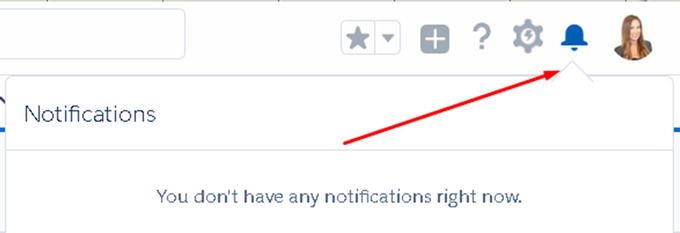
Figure 1-34
Notifications area
View Profile
Use this section to make changes to personal settings, log out, or switch to Salesforce Classic (see Figure 1-35).
Figure 1-35
Settings area
Users
In Lightning you can create Salesforce users just as easy as you can in Classic. Users are identified with a license, username and password, and profile. In Lightning you can create new users, deactivate users, edit user settings, and more.
Create a New User
To assign licenses and record ownership, you must first create a user. Each user must be assigned a license. To free up a license, you can deactivate a user and assign accordingly. In Quick Find, search for and select Users, which is located in the Administration section.
Navigate to the User home page (see Figure 1-36) to create an individual user, edit information about an existing user, add multiple users, and reset passwords.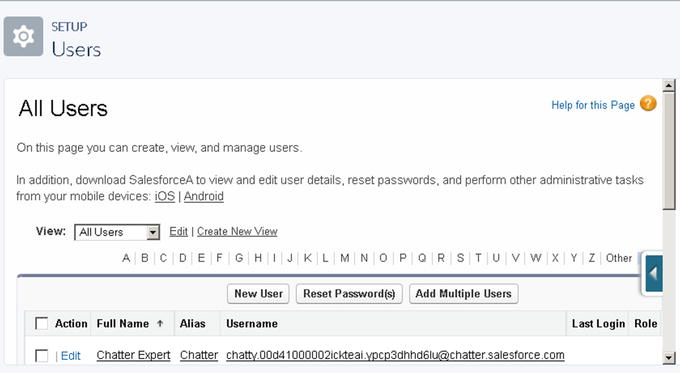
Figure 1-36
User setup home page
Create and Edit User Information
Follow these steps to create a new user:
- 1.Click New User.
- 2.Fill in all the required fields marked in red. This includes Last Name, Alias, Email, Username, and Nickname (see Figure 1-37).
 Figure 1-37Required fields to add a new userNote The email address must be in the form of a valid email address but can be used for multiple organizations. However, the username must be a unique username and in a correct email format.For example, [email protected] is a proper email format.
 - 3.Assign the appropriate license in the User License field.
- 4.Assign a profile using the Profile field.
- 5.Select Marketing User to give the assigned user access to your organization’s marketing tools.
- 6.Select Offline User to give the assigned user offline access.
- 7.Select Knowledge User to give permission to make changes to Knowledge Base articles.
- 8.Select Force.com Flow User to grant the ability for a Force.com licensed user to run flows.
- 9.Select Service Cloud User to grant access to Service Cloud.
- 10.Select Site.com Contributor User to allow access to Site.com.
- 11.Select Work.com user to assign a work.com user feature license.
- 12.Select Salesforce Classic User to enable access to Salesforce Mobile Classic.
- 13.Apply the appropriate locale settings such as time zone, locale, and language (Figure 1-30).
- 14.Click Save.
Salesforce sends a notification email
to the user immediately to generate a new password. To stop this, deselect “Generate new password” at the bottom of the screen.
Add Multiple Users
You can save time by adding multiple users at once. To add multiple users on the User home page, click Add Multiple Users, as shown in Figure 1-38.
Figure 1-38
Add Multiple Users button
The next page will break down the number of licenses available for each license type, as shown in Figure 1-39.
Figure 1-39
Breakdown of available licenses
Scroll to the bottom of the page and select the user license that you want to add for all users, as shown in Figure 1-40.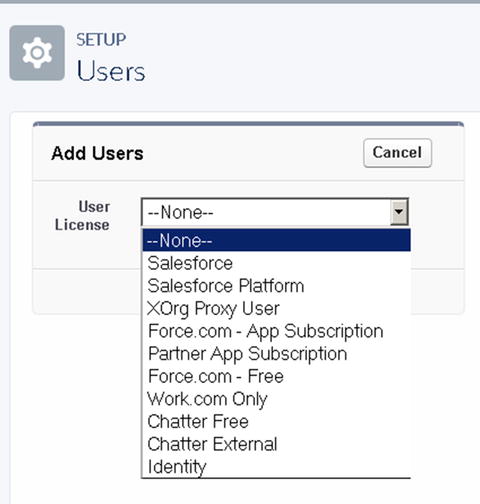
Figure 1-40
Selecting the user license for a mass group of users
Note
When adding multiple users, they must be users with the same license type.
Once you select the appropriate license type, fill in the details for the user and click Save, as shown in Figure 1-41. Not all user fields are available in this process.
Figure 1-41
Required fields for a new user
Deactivate a User
In Salesforce, you can’t delete a user, but you can deactivate a user to prevent them from logging in. Deactivating a user frees up a license that can be assigned to another user (see Figure 1-42). When you deactivate a user, the user is removed from all sharing privileges and groups.
Figure 1-42
Active check box on a user’s page
Records owned by this user can still be transferred to an active account. These are the deactivation
steps:
- 1.Navigate to the User section in Setup.
- 2.Select the name of the user that should be deactivated.
- 3.Click Edit from the user record page.
- 4.Deselect Active from the user profile.
- 5.Click Save.
Lightning Pages
Lightning allows you to create custom pages to display and arrange key information for specific groups of users. You can increase adoption and user acceptance by building out clear and easy-to-use pages. By creating apps, you can minimize the type of information that is exposed to make the Salesforce organization easier to adopt. The App Builder
is a new drag-and-drop tool to customize the interface without code (see Figure 1-43).
Follow these steps to make changes to the Lightning home page:
- 1.From the home page, click Edit Page (this feature can be found on most Lightning pages). See Figure 1-43.
 Figure 1-43Edit Page in the Setup drop-down
 - 2.Arrange which components you want accessible for your users to see. See Figure 1-44.
 Figure 1-44Lightning App Builder
 - 3.In the left panel, choose from the available Lightning components and drag and drop to the desired section on the home page. The right panel will request details specific to the component chosen.
Create a New Lightning App
From Setup, search and select App Manager to open up the Lightning Experience App Manager. Click New Lightning App to create a new app (see Figure 1-45).
Figure 1-45
Creating a new Lightning app
To create a new app, follow these steps:
- 1.Fill in the required fields (those marked with an asterisk).The app name is what will appear in the navigation bar.The developer name is the API name and must be unique across other apps in your organization.
- 2.For App Branding, upload an image such as a company logo to customize the page (see Figure 1-46).
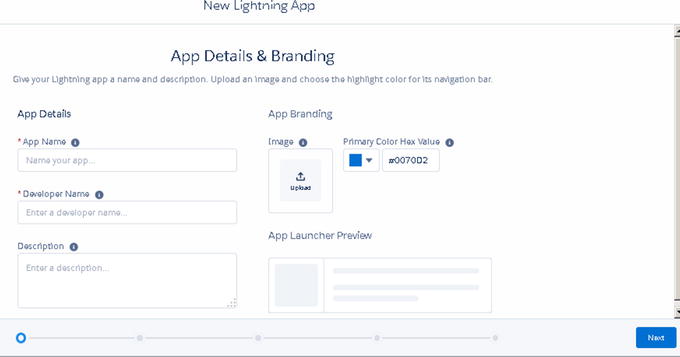 Figure 1-46App details
 - 3.Once you fill out the appropriate fields, click Next.
- 4.Select the navigation style. Choose Standard to display the navigation bar at the top or Console to open records in a new workspace tab (see Figure 1-47).
 Figure 1-47New Lightning app navigation options
 - 5.Click Next.
- 6.Click Add to add the utility bar (see Figure 1-48).
 Figure 1-48Steps to enable utility bar for an app
 - 7.Select the items that should be displayed in the new app. The order of your selected items will display at the top of the page from left to right (see Figure 1-49).Note It is best practice to create different apps for different groups of users. When creating these apps, it’s recommended that you display only the items that are relevant to those groups of users. It can be overwhelming and frustrating when there is too much unnecessary information for your users.For example, a sales app should show only sales-related items. Leads, accounts, contacts, and opportunities are examples. For your service agents, they most likely do not need to see opportunities. Create an app for your service agents to see only service-related items such as contacts and cases.
 Figure 1-49Adding tabs to new app
 - 8.Click Next.
- 9.Select the profiles that should have access to this app (see Figure 1-50).
 Figure 1-50Assigning users to an app
 - 10.Click Save and Finish Now. You can find the newly created app in the App Launcher.
Company Settings
Company settings are comprised of the settings that can be customized, such as fiscal year, business and holiday hours, language settings, and other important information.
Company Information
Search for and select Company Information in the Quick Find area. The Company Information section holds important information about the organization, license availability, and data usage.
Organization Detail
The organization detail
displays general information about the company. Edit the primary contact to establish the point of contact for any technical support requests. Make changes to the locale, currency, and newsletters settings here (see Figure 1-51).
Figure 1-51
Organization detail
Storage Usage
Each organization has storage limits. Storage is divided into two categories: data and file storage. To view your storage limits, storage usage, and percentage utilized, navigate to your company settings.
Click View next to Used Data Space or Used File Space to view your organization’s current storage use.
The storage usage is broken down and shows the percentage of utilization across the two. Information is also broken down by object, as shown in Figure 1-52. Use this breakdown to identify which records occupy the most space.
Figure 1-52
Storage Usage breakdown
User Licenses
This section displays the total number of licenses available, the total used, and the remaining number of licenses available for each license type. This includes the standard Salesforce license, which is the most commonly purchased and assigned (see Figure 1-53).
Figure 1-53
User licenses
Permission Set Licenses
Permission set licenses
entitle users to access features and various tools that are not included in their user license. This can include a Service Cloud console user, a CRM user, Analytics Cloud accessibility, and more.
Feature Set Licenses
Feature set licenses
include additional features on top of the standard user license. These can include Data.com, knowledge users, marketing users, and more.
Usage-Based Entitlements (BETA) Licenses
This feature is available for a limited amount of time for an organization. These tools can vary but are typically made available temporarily.
Fiscal Year
Set the fiscal year
in Salesforce with your existing quarterly and annual account periods in Salesforce. This information is important to have for reporting and forecasting purposes.
Modify Fiscal Year: Standard
To modify the standard fiscal year, navigate to the Fiscal Year section in Setup and follow these steps (see Figure 1-54):

- 1.If the Gregorian calendar year is followed by your company, choose Standard Custom Year. (Select Custom if the standard fiscal year is not followed.)
- 2.Select Fiscal Year Start Month.
- 3.Set whether the entered month is based on the ending or start of the month.
- 4.Click Save.
- 5.Choose Standard or Custom Fiscal Year.
Figure 1-54
Making changes to your organization’s fiscal year
Business Hours
Business hours define how the customer support team interacts with Salesforce. Specify the hours the support team is available to resolve cases. Salesforce will adjust the hours to sync with escalation rules, milestones, cases, and entitlement processes. Use the following steps to get started:
- 1.Select Business Hours in the Quick Find area.
- 2.Click New Business Hours to navigate to the edit page (see Figure 1-55).
 Figure 1-55Making changes to your organization’s business hours
 - 3.Give it a specific name.
- 4.Select the time zone.
- 5.Specify the business hours.
- 6.Click Active to activate these hours.
- 7.Click Save to use these business hours as the default.
Summary
This chapter served as an introduction to the new intelligence and sophistication of Salesforce Lightning. In this chapter, we covered how to migrate from Classic to Lightning and prepared your organization for success with getting set up. The next chapter will discuss how to get the most out of Sales Cloud in Lightning.