
The Sales Cloud gives sales and marketing professionals the ability to increase sales productivity and revenue at lightning speeds. You can see the complete customer journey from a prospective lead to an active customer by recording leads, accounts, contacts, opportunities, and campaigns. In Sales Cloud Lightning, leads are captured, nurtured, and seamlessly converted into active accounts or prospects. Sales leaders can then manage their sales pipeline with opportunity tracking to effectively close more deals (Figure 2-1).
Figure 2-1
New kanban feature on the Opportunities object in Sales Cloud
Lead Management
Across different business models, a lead in Salesforce can be an individual, organization, or entity. The Lead object can act as a holding bucket of all prospects stored in Salesforce. Leads come from a variety of sources. So, it’s a good idea to use the lead area to track important information about your leads, including contact information and notes.
Your leads may come from various entry points and may be a result of your marketing efforts. Use the Lead object to manage and nurture your leads as they are being worked through the qualification process. This can include leads that come from your web site via a Web to Lead, purchased lists, referrals, networking events, and others. Use this information to tell which channels your best leads come from.
For example, create a lead record for the prospect you met at your latest marketing event. Include important contact information about your lead, add notes, and create follow-up tasks to prevent leads from slipping through the cracks. Generate a report to see where most of your qualified leads come from. Use this information to put your marketing dollars in the most effective places.
Lead Conversion
Once you qualify your lead as a firm prospect, you can convert your lead into an account, contact, and opportunity. When you convert a lead in Salesforce, standard lead fields populate the new account, contact, and opportunity records.
Business leads create a business account, business contact, and opportunity. Individual customers, when converted
, create a persons account and opportunity.
Note
Not all business models use leads. However, lead tracking in Salesforce is a useful method for separating untouched leads from more promising prospects in the database. Identify your business process to determine the point of conversion.
Understand the Lead Page
In the Lightning Experience, the lead record contains important information about the lead including contact details, activity tracking, campaign history, chatter, and news.
Sales leaders can work through their most qualified leads faster with the help of Lead Workspace toolbar. This toolbar makes it easy for reps to take their leads through the lead conversion process.
Figure 2-2 shows a lead record in the Lightning Experience. This page layout consolidates key information with a highlights panel, an activity section, and the Lead Workspace toolbar.
Figure 2-2
A lead record page in the Lightning Experience
The highlights panel, shown in Figure 2-3, displays key information at the top of the page. By default, this includes lead salutation, first name, last name, title, company, all phone fields, and email. This feature makes it easier for your users to work through leads quickly.
Figure 2-3
Highlights panel on a lead record
The interactive toolbar shown in Figure 2-4 is called the Lead Workspace. This area helps users follow a series of configurable steps in the conversion process, referred to as sales path. Encourage users to update the lead status as they work to qualify leads.
Figure 2-4
Lead Workspace toolbar
Use the Activity tab, as shown in Figure 2-5, to log a call, create a new task or event, and send email. Create tasks to prevent your leads from slipping through the cracks. Any tasks that need to be completed will populate in the Next Steps area. Activities that have been completed are logged in the Past Activity section.
Figure 2-5
Activity section
on a lead record
Use the chatter feature on a lead record, shown in Figure 2-6, as a collaboration tool. Use this as your communication vehicle within Salesforce to collaborate with each other. Post updates, ask questions, and create polls.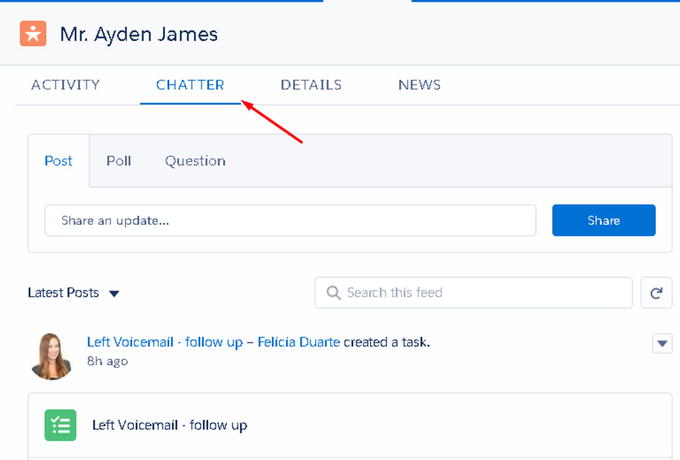
Figure 2-6
Chatter tab on a lead record
The Details tab shown in Figure 2-7 displays information related to the lead. This includes any standard and custom fields made visible to the user.
Figure 2-7
Details tab on a lead record
Use the News tab shown in Figure 2-8 to find news articles related to your lead. You can also sync your organization with Twitter to see up-to-date Twitter feeds and related connections.
Figure 2-8
News section on a lead record
To the far right of the page on a default lead layout, shown in Figure 2-9, you can identify potential duplicate records. If there are any duplicates found, that information will populate this section.
Figure 2-9
Duplicates area on a lead record
Note
The highlights panel can be rearranged to display the most important lead details at the top of the page. This makes it easy for end users to leverage key information.
Create a Lead
Follow these steps to learn how to create a new lead record from a list view
:
- 1.Click the
 button next to the Leads tab and click New Lead.Alternatively, you can click New from a Lead List view to create a new lead (Figure 2-10).
 Figure 2-10New button on a lead from a Lead list view
 - 2.Type the first name of the lead on the edit page , as shown in Figure 2-11.
 Figure 2-11Edit page of a lead record. Fill in the appropriate lead details here.
 - 3.Type the last name of the lead, which is required to save any lead record. Type the company name; this is the name of the business the lead is associated with.Note When converted, the first and last names will generate the contact’s first and last names. The company name is used to create an account record and maps to the Account Name field.Last Name and Company Name are required lead fields. If data is not filled in these fields, the record will not be saved. It’s ideal to fill out more data on a lead record. You should consider adding any additional important information about your lead.
- 4.Click Save to save the record. Click Save and New to save the current record and be directed to create a new lead.
- 5.When a lead is created successfully, a success message will display at the top of the page, as shown in Figure 2-12.
 Figure 2-12New lead record success message
If the record was not properly saved, an error message
will be displayed, as shown in Figure 2-13. An error message is displayed at the top of the page.
Figure 2-13
Error message received after trying to save a record without filling in all required fields marked in red
Note
Required fields are marked with a red asterisk, as shown in Figure 2-11. These fields must be populated with information in order for the record to be saved. If the field does not have an asterisk, it is not required and can be left blank, assuming there are no other validation rules in place.
How to Convert a Lead
Follow these steps to learn how to convert a lead
in Salesforce:
- 1.Open an existing lead record.
- 2.From the lead record page, click the Convert button shown in Figure 2-14.
 Figure 2-14The Convert button on a lead record
 - 3.Fill in the appropriate details located on the Convert Lead edit page, as shown in Figure 2-15.
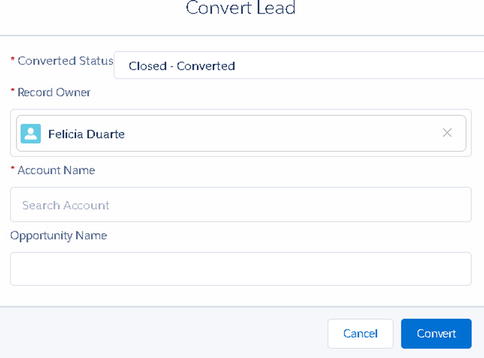 Figure 2-15Convert page includes converted status , record owner, account name, and opportunity name
 - 4.Enter the converted status. Closed - Converted is the default conversion status.Note The lead status field captures a value that corresponds to a converted or unconverted status. Select the appropriate lead status. By default, Converted is the default status.
- 5.Assign the record owner. This can be assigned to any Salesforce user.
- 6.Type in the account name. You can search for an existing account or create a new one. If the account does not exist, click New Account to create a new account record directly. If the lead is an individual, leave the Account Name field blank.
- 7.To create an opportunity record while converting, type the name of the opportunity. Leave this field blank if an opportunity does not exist.
- 8.Click Convert and view the conversion confirmation page, as shown in Figure 2-16.
 Figure 2-16Conversion confirmation page
Accounts and Contacts
An account in Salesforce can be an organization, company, or institution, while a contact can be an individual associated with a business.
For example, you may have an upcoming meeting with Michael Scott at Dunder Mifflin Paper Co. in regard to a potential opportunity about your product or services. Track information about Michael Scott and Dunder Mifflin Paper Co. in Salesforce. Create a new account and call it Dunder Mifflin Paper Co. Next, create a contact record for Michael Scott to relate the two.
Tip
It’s best practice to search for something before creating a new record to avoid duplication.
Accounts
You can sort your accounts
by type, status, or any other standard or custom field in Salesforce. Keep track of accounts that are active versus inactive, within a particular industry or territory, and much more.
From the Account list, you can identify key contacts, opportunities, cases, and related notes and attachments for an at-a-glance view.
Note
You can create roll-up summary fields at the account level to summarize specific metrics. For example, create a roll-up field to aggregate the total amount for all Closed Won opportunities. See the section “Field Types” in Chapter 1 for more information on roll-up fields.
Accounts and contacts have a master-detail relationship. This is a parent-child relationship in which the master object (Account) controls the detail object (Contact). See the section “Field Types” in Chapter 1 to learn more about master-detail relationships.
Create a New Account
Accounts can be created or imported directly into Salesforce, without having to be converted. Create an account
record to track information at the account level, such as employee count, account number, web site, etc.
- 1.From the toolbar, click
 next to the Account tab.
 - 2.Click New Account.
- 3.Fill in all required fields marked with an asterisk, including the account name (Figure 2-17).
 Figure 2-17Account record in edit mode
 - 4.Click Save to save an account record. A success message will appear when properly saved, shown in Figure 2-18.
 Figure 2-18Account success message
Contacts
Use the contact
record to capture individual information, including email addresses, phone numbers, birth dates, and more. Use this information to boost client relationships. Create encrypted fields to store secure information at the contact level, for example, Social Security numbers and credit card information.
As mentioned earlier, accounts and contacts have a master-detail relationship. To create a relationship between the two, make sure to enter the account name when creating a contact.
Tip
Create the contact from the account record to quickly relate the two.
Follow these steps to create a contact from an existing account:
- 1.From the account record, click the New Contact button shown in Figure 2-19.
 Figure 2-19New Contac t button on an account record
 - 2.Type the first name on the edit page, as shown in Figure 2-20.
 Figure 2-20Edit page for a new contact
 - 3.Type the last name (this is required to save any contact record).
- 4.The account name is prefilled with the name of the account record you started in. Fill in any additional information about the contact.
- 5.Click Save to save the record and relate Michael Scott with Dunder Mifflin. Once properly saved, a success message will appear, as shown in Figure 2-21.
 Figure 2-21New contact success message
Now, in the account record you can see the new contact record, as shown in Figure 2-22.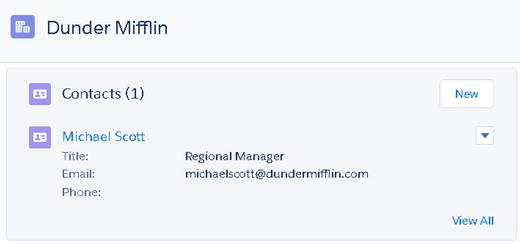
Figure 2-22
An account with its related contacts
. Click New to relate more contacts.
List Views
List views
make it easier to sort Salesforce data within each object. Leverage list views to call on specific groupings of records. For example, create a list view to only see active accounts, hot leads, and opportunities in the negotiation stage, and so on. Records are automatically displayed in any list view when the criteria are met. Take action on these lists with Salesforce’s importing and mass updating capabilities.
The new user interface (UI( in Lightning makes it easier to visualize data. Add charts to your views and use the new drag-and-drop feature to move records across different stages.
Create a List View
Follow these steps to create
a new list view:
- 1.To create a list view, select the tab of the object desired. For example, select the Accounts tab to create an Account List view.
- 2.Select the list view controller boxed in red, shown in Figure 2-23, and click New.
 Figure 2-23List view controller
 - 3.Give your list view a name. In this example, you’re creating a list view for your gold accounts (Figure 2-24).
 Figure 2-24New list view edit page
 - 4.Select the appropriate level of access. If this is a list view that should be visible only to you, select “Only I can see this list view.”
- 5.Click Save and view the new list in Figure 2-25.
 Figure 2-25List view after selecting Save
 - 6.Apply filters to your list views to segment Salesforce data, as shown in Figure 2-26.
 Figure 2-26The filter area in a list view
 - 7.Apply a filter to your Salesforce data using the filter section in Figure 2-27. Click Add Filter.
 Figure 2-27Use this section to create filter logic
 - 8.Set the Field, Operator, and Value options of the filter, as shown in Figure 2-14. (See the Reports area for more information on operators.)Example To create a list of only hot leads that I own, I created a filter. The values to this filter include “show only lead records where I am the owner” and Equal to Hot for the Rating field.
- 9.Click Done and Save.
Take Action on List Views
Records can be edited inline in a list view by clicking the pencil icon or double-clicking in the field. To save records that have been modified in a list view, click Save at the bottom of the page (Figure 2-28).
Figure 2-28
Charts within lists
Experience the enhanced update to list views in the Lightning Experience. Salesforce introduces a new UI to list views with its report charts and kanban functionality. Report charts can be displayed as bar graphs and donut charts.
Kanban Feature
Make lightning-fast changes in Salesforce with the new kanban feature
. Instantly update the status of multiple records within a list view by utilizing the new drag-and-drop feature shown in Figure 2-29. In the kanban view, each record is displayed as a widget that can be dragged and dropped across the lead status pipeline. This enhanced feature makes it easier to visualize and organize your data.
Figure 2-29
List view in the kanban
view
- 1.To change the default list view from a grid list to kanban, click the
 button.
 - 2.Click Kanban.
- 3.Drag and drop records to the appropriate column to instantly update the status.
Mass Change Status
To change
the status for a group of records at once, create a list view for that set of data.
- 1.Select the records that should be updated either individually or for all, as shown in Figure 2-18.
- 2.From the list view, click
 .
. - 3.Next, click Change Status. It’s important to know that only the first three actions are displayed. Any additional status values are grouped under the arrow.
- 4.From the Change Status pop-up, select the updated status shown in Figure 2-30. From here, you can change the status for a group of records with one click.
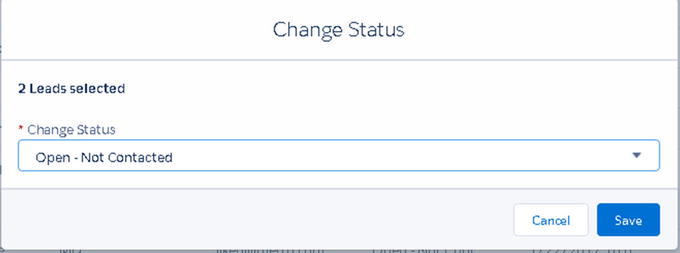 Figure 2-30Steps to change the status for a mass group of records
 - 5.Click Save and view updated changes to selected records.
Create an Email Template
Standardize company emails
in one central place with ease. Use merge fields to populate templates with custom values from a given record. Simply create and store on-the-spot email templates directly from an account, contact, or opportunity.
- 1.From a contact record, select Email, as shown in Figure 2-31.
 Figure 2-31How to create and save an email template
 - 2.Type the email of the recipient(s).
- 3.Type the subject of the email.
- 4.Compose the email in the body of the text.
- 5.Select
 to include merge fields.
 - 6.Click
 to save it as a new template.
Send an Email
From the Activity section in Salesforce, you select the Email tab to send
an email. Enter the email of the recipient and subject, as shown in Figure 2-31.
- 1.Click the Activity tab from any record.
- 2.Type the subject for the email.
- 3.Type the body text for the email.
- 4.To relate the email to another record in Salesforce, search and enter the record in the Related To section.
- 5.Click Send.
Note
To access stored templates, click  and select Insert Template. Choose from the list of available templates.
Opportunities
Opportunities
allow you to hold key information about any potential deal, order, or anything that may generate revenue (Figure 2-32). Deal tracking is an integral part to any business. Maximize and accelerate sales efforts effectively by keeping track of all open deals.
Use this powerful tool to prevent deals from slipping through the cracks.
Figure 2-32
Opportunity list view
Create a New Opportunity
Track key information
to help close open deals. Track samples that were sent, latest touch points, and next steps. Utilize or customize the Stage field to track where the deal is in the sales pipeline. Use the close date to forecast the expected close date of this deal.
- 1.Click the Opportunities menu.
- 2.Click New Opportunity and fill in the required fields found in Figure 2-33.
 Figure 2-33Edit page on an opportunity
 - 3.Type the opportunity name.
- 4.Type the expected close date and fill in any additional details about the opportunity. It’s recommended to fill in more details about the opportunity.
- 5.Select the stage of the opportunity record.
- 6.Click Save to save an opportunity record.
- 7.Salesforce relates the account and opportunity records once saved.
Tip
Not sure what to name the opportunity? Try to keep uniformity in your opportunity nomenclature and be specific. For example, Quantity + Product or Service of Interest.
Opportunity Stage History
Use the Stage History
area to keep track of changes to the stage. Any changes made to the stage, amount, probability, expected revenue, or close date are populated here. Select View all to see a list view of all the changes, as shown in Figure 2-34.
Figure 2-34
Stage History list on an opportunity
record
Products
Products
represent the product or service offered by your company. Store important product information in this object for sales reps to leverage during the sales process. The product description and pricing are powerful information for sales reps to leverage when out on the field or on a call.
Use products to associate with opportunities or quotes. Seamlessly update the opportunity amount to forecast potential incoming revenue. Use this information to report on best sellers, and so on.
Create a Product
Follow these steps to create
products in Salesforce:
- 1.Click the Products tab (shown in Figure 2-35).
 Figure 2-35Products tab
 - 2.Click New (Figure 2-36).
 Figure 2-36New button on the products list view
 - 3.Enter the product details. Type a descriptive name for the product and provide a description (Figure 2-37).
 Figure 2-37The Create Product edit page includes Product Name, Product Code, Description, Product Family, and Active status
 - 4.Click the Active check box to activate the product in Salesforce.
- 5.Click Save.
- 6.From the Related tab on the Product record, click Add Standard Price (shown in Figure 2-38).
 Figure 2-38Add Standard Price button
 - 7.Enter the list price of the product, as shown in Figure 2-39, and associate it with the standard price book if no other price books are being used.
 Figure 2-39Price book entry page
 - 8.Click Save. Salesforce creates the new pricebook entry record.
Note
How are products related with pricebooks? Products must be added to a pricebook in order to be available to an opportunity. Pricebooks can be used to record multiple pricing on a single product. Define prices for wholesalers, distributors, and other customers with Pricebooks.
Opportunity Products
Follow these steps to create opportunity
products in Salesforce:
- 1.From an opportunity record, click the arrow in the Products list shown in Figure 2-40.
 Figure 2-40Products list on an opportunity record
 - 2.Click Add Products.
- 3.Select the + button next to each product that should be attached. See Figure 2-41.
 Figure 2-41Product selection page
 - 4.Click Next.
- 5.Select the quantity for this particular opportunity and for each product, as shown in Figure 2-42.
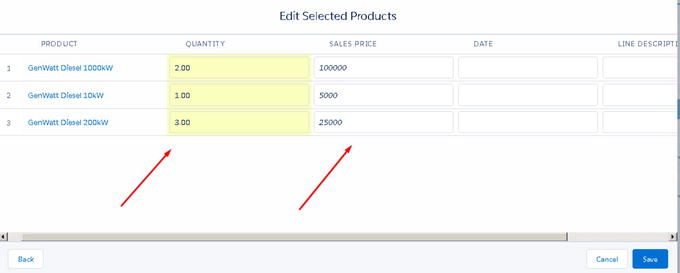 Figure 2-42Opportunity product selection
 - 6.Update the sales price for each product.
- 7.Enter a date or line description if desired.
- 8.Click Save.
- 9.View new opportunity product records successfully attached to this opportunity, as shown in Figure 2-43.
 Figure 2-43Opportunity home page with new products attached
Opportunity Record Page
The product panel to the right in Figure 2-43 displays the products associated to the opportunity. Click  next to any product record to edit or delete from the opportunity.
The Stage workspace at the top of the page in Figure 2-43 is an interactive tool, which can be used to help sales agents move along their sales process.
Activity Timeline
Prioritize your day-to-day tasks by setting reminders and assigning tasks in Salesforce. Use activities to create a task, create an event, or log a call. In the Lightning Experience, the Activity timeline
replaces the classic Activity History and Open Activities lists, as shown in Figure 2-44.
Figure 2-44
Activity section within lead
record
Use the comments section of the Log a Call tab to record important call details. Relate the contact to another account or opportunity.
Configuring Activity Feed
You can configure
your activity feed by creating new tasks and events.
Create New Task
Follow these steps to create a new task
, as shown in Figure 2-45:
Figure 2-45
Steps to create a new task
- 1.Type the subject of your task.
- 2.Enter the task due date. The due date will be used to notify when a task is upcoming or overdue.
- 3.Relate the task to another record in Salesforce in the Related To section. By default, whoever is creating the task is the Assigned To person. Simply change this by clicking the x and selecting the person the task should be assigned to.
- 4.Select a status. Not Started, In progress, Completed, Waiting on someone else, and Deferred are the standard status values.
- 5.Click Save. A successful task record will display a message, as shown in Figure 2-46.
 Figure 2-46Successful task message
 - 6.The task is saved and recorded in the Next Steps section. Tasks that have been completed are moved and displayed in the Past Activity area, as shown in Figure 2-47.
 Figure 2-47Next Steps section
Create a New Event
Keep track of any events
that are related to your leads or contacts. An event will have a start date and an end date.
Follow the next steps to create a new event for a lead record and refer to Figure 2-48.
Figure 2-48
Steps to create a new event
- 1.Select the New Event tab, as shown in Figure 2-46.
- 2.Type the subject of the event.
- 3.Every event in Salesforce must have a start date and end date. Enter these details here.
- 4.Select the box if this is an all-day event.
- 5.If the event has a location, enter the location details in Location. This is optional.
- 6.If the event is related to an account, search for the related account to associate the two, as shown in Figure 2-49.
 Figure 2-49Related To and Assigned To fields on the event page
 - 7.Tasks and events can be assigned to other Salesforce users. Choose who the task should be assigned to, as shown in Figure 2-49.
- 8.Click Save.
Create a Web-to-Lead Form
With a web-to-lead form
, leads can instantly be generated into Salesforce from your web site. For example, create a Contact Us form on your web site to create new lead records in Salesforce. Create custom fields to track specific information from your web site and into Salesforce.
Follow these steps to create a web-to-lead form:
- 1.Click Setup.
- 2.Search for web-to-lead in the Quick Find section.
- 3.Click Create Web-to-Lead Form.
- 4.Standard and Custom fields are displayed in the Available Fields multiselect picklist, as shown in Figure 2-50. Add the fields to the Selected Fields column to display on your web-to-lead form.Note Formula fields are not available to be selected.
- 5.After users submit a web-to-lead form, they are taken to a specified return URL. Type the return URL here. Note that this is typically a thank-you page.
- 6.Select this check box to enable reCaptcha to prevent spam. This is recommended.
- 7.To use this feature, go to the Google reCaptcha web site and click Get reCaptcha to register domain. Once this is attained, enter the API key pair here.
- 8.If the Google servers are down, select this box to allow all traffic and leads to be generated without reCaptcha.
Note
You can generate up to 500 leads within 24 hours. Any additional leads exceeding this amount are placed in a queue.

Figure 2-50
Web-to-Lead setup
page
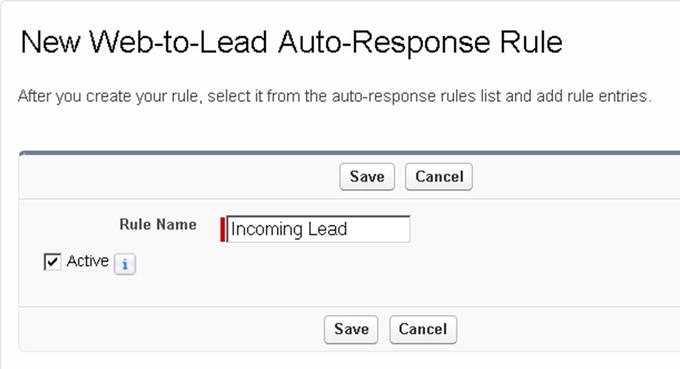
Create a Web-to-Lead Autoresponse Rule
Improve your client communication by sending out autoresponse messages to leads captured from your web site. As an example, create an autoresponse rule
notifying the client that you received their submission and will reach out within 24 hours.
- 1.Click the New button shown in Figure 2-51.
 Figure 2-51Create a new web-to-lead auto-response rule
 - 2.
- 3.Select Active to activate the rule.
- 4.Click Save.
- 5.Select the created rule.
- 6.Click New in the Rule Entries section.
- 7.Determine the sort order and set your desired criteria. In this example, I’m creating an auto-response rule for all leads coming from my web site, as shown in Figure 2-53.
 Figure 2-53Setting the criteria for auto-response rule
 - 8.Select the criteria for this rule to be triggered. This rule will be triggered when any lead has the source Web.
- 9.Type the name of the sender.
- 10.Type the email address of the sender.
- 11.Select the email template to be used.
- 12.Click Save. Now any lead that meets the criteria you set will automatically receive an email using the template you chose.
Create a Lead Assignment Rule
Automate your lead routing process by creating a lead assignment rule
New leads can automatically be assigned to a user or queue based on the condition that is set.
- 1.Click Setup.
- 2.Search for Lead Assignment Rules in Quick Find and select it.
- 3.Click the New button.
- 4.Give the rule a name and type it here.
- 5.Select Active to activate this rule; only one rule can be active at a time.
- 6.Click Save.
- 7.Select the rule name.
- 8.Click the New button in the Rule Entry section, as shown in Figure 2-54.
 Figure 2-54List of lead assignment rules
 - 9.Salesforce will evaluate each entry based on the sort order. Set the sort order for this rule.
- 10.Set the criteria for this rule by selecting the field, the appropriate operator, and the value. In this example, I am creating the rule for all leads coming from the state of California.
- 11.Determine whether leads that meet this criteria should be assigned to a user or queue. Type the name of the user or queue.
- 12.Click Save.
Create a Lead Queue
Manage your workload by controlling the way leads are assigned. Leads are bucketed into these queues
for group members to view and accept. Lead records remain in queue until a user accepts.
- 1.From Setup, go to Queues.
- 2.Click the New button shown in Figure 2-55.
 Figure 2-55Lead queue
 - 3.Type the name of the queue.
- 4.To notify group members that a lead has been added to a queue, enter the queue email and select Send Email to Members.
- 5.Select Lead and move to Selected Objects.
- 6.Choose the queue members as shown in Figure 2-56 and move them to Selected Members. You can define the selected members by users, roles, and groups.
 Figure 2-56Adding members to a queue
 - 7.Click Save. Now lead records will be placed in the queue if they meet the criteria. Queue members will have the ability to view those leads and pull from this queue.
Create a Campaign
Marketing professionals can use this powerful tool to track any marketing initiatives and efforts. Track the response and conversion rates to ultimately calculate return on investment (ROI). Use these metrics to confirm the effectiveness of your marketing efforts. Campaigns
can be an effective tool to improve future marketing efforts.
Follow these steps to create a campaign and add campaign members:
- 1.Select New Campaign from the Campaign tab, as shown in Figure 2-57.
 Figure 2-57Campaigns tab and list view
 - 2.Type the name of your campaign, as shown in Figure 2-58.
 Figure 2-58Campaign edit page
 - 3.Fill in the details about your campaign Include the type of campaign, the start date and end date of the campaign, and other important information.
- 4.Click the Active check box to make the campaign active and current.
- 5.Click Save.Once the campaign is active, you’ll want to add campaign members. This will tie everything together. Campaign members are the leads and contacts that you associate to any given campaign.Note that a lead and contact have a many-to-one relationship. This means that they can be associated to many campaigns. Click Add Leads to associate lead records or click Add Contacts to associate contact records (Figure 2-59). These leads and contacts are considered campaign members to your campaign.
 Figure 2-59Adding leads and contacts to your campaigns as campaign members
 - 6.Select the records that should be associated as campaign members and select Add to Campaign, as shown in Figure 2-60.
 Figure 2-60Adding campaign membersCampaign members provide reporting on the response rates of your campaign. Salesforce tracks these efforts by using these standard values: Sent and Responded.
 - 7.Enter the campaign that this record should be associated with.
- 8.Define the member status as existing or update the member status as Sent or Responded (see Figure 2-61).
 Figure 2-61Steps to associate the campaign and status that the selected campaign members should have
 - 9.Click Submit. Salesforce will generate a success message, as shown in Figure 2-62.
 Figure 2-62Campaign member success message
Summary
Sales Cloud provides effective tools to connect your sales and marketing teams. Sales Cloud sets the foundation for your CRM needs and provides insightful information into your opportunity pipeline.