
Salesforce offers many collaboration
tools. One valuable collaboration tool offered is called Chatter. This tool and its capabilities can be found on a significant number of standard objects and all custom objects in Salesforce. It allows your users to communicate with each other via internal messaging. You can even allow your users to share files such as Word and PowerPoint files with each other and your customers using content deliveries. Do you need to share your Salesforce records with another Salesforce organization? You can use Lightning Connect and sync data to the other Salesforce organization. You can enable topics, which allow your users to interact on specific topics with each other. We can’t forget about the Salesforce mobile app, Salesforce, that allows your users to be on-the-go for iPhone and Android users. Figure 6-1 shows the Chatter object
.
Figure 6-1
Chatter tool
Understanding Chatter
Salesforce Chatter
is an essential tool that can be used to help you collaborate internally with co-workers and externally with clients. You can use the Chatter feature post, which allows you to post messages to other users or post messages on a record itself about that record. Give your employees the ability to post a question that needs an answer to your management team. Or collect information from your employees via an anonymous poll. Chatter has a number of great built-in tools that can be used in various ways. Let’s look into some of these tools further.
Sidebar
The sidebar on the Chatter tab gives you quick access to Chatter features (Figure 6-2). Use the What I Follow link to quickly see all Chatter posts corresponding to all the records that users follow in Salesforce (more on this feature in a bit). Use the To Me link to see any post that a user directed at you using the @ symbol or any post that was left on your profile from another user. Use Bookmarked to see any post you have bookmarked. The Company Highlights quick-access link uses Einstein’s artificial intelligence (AI)
to bring you all the trending topics in your organization. The Streams quick-access link allows you to create quick-access links to records. Use this section to see all accounts, cases, contacts, and more that you follow. Recent Groups allows you to create and see the latest groups you have followed.
Figure 6-2
Chatter sidebar
Following in Chatter
Following is a powerful tool available in Salesforce. You can follow anything from people to groups to records. Following allows you to see all the relevant content and interactions that have happened to the record you choose to follow. Following in Chatter is comparable to following someone on Twitter. Want to see everything your training instructor is posting on Salesforce? Go to their profile and click the + Follow button. If you have a stream set up for that object, you can choose to add this record to the stream or to just use What I Follow. If you are viewing your Chatter feed, hover over the name of another user and use the Follow button here. Find the Follow button at the top of any record, as shown in Figure 6-3. Following brings the content and posts into your Chatter feed and allows you to interact right from your feed.
Figure 6-3
Following in Chatter
Bookmarking a Post
You can bookmark a post just like you would bookmark a web site. If you want to save this post for later use and have it appear in your Bookmarked quick-access list in Chatter, all you’ll need to do is click the down-facing arrow to the right of the post and click Bookmark (Figure 6-4). Notice that a yellow triangle with a star appears next to the arrow. Remove the bookmark the same way except choose Remove Bookmark in the drop-down.
Figure 6-4
Bookmarking
a post
Creating a Stream
Streams allow you to create groupings of specific records that you may want to follow (Figure 6-5). Streams in Chatter are best used when you want to create a custom feed that groups records from various objects into one feed. For example, if you have a new marketing campaign and you want to create a feed that follows records affected by the marketing campaign, you can create a stream that shows you all the Chatter posts on these various objects. To create a new stream, click the plus sign found in your Chatter sidebar next to Streams. First, you will need to name the stream. Next, choose what objects and records you want to include in this stream by first choosing the object and then using the search bar to search a specific record. Streams allow you to see records from the following standard objects, plus all custom objects: Accounts, Cases, Contacts, Files, Groups, Leads, Opportunities, People, and Topics. If you are viewing a record and want to include the individual record to a stream, use the + Follow button and select the stream.
Figure 6-5
Creating a new stream
Creating Groups
Chatter user groups in Salesforce provide a central location for users within that group to collaborate (Figure 6-6). Most organizations will create groups for their departments. You can make a group public, private, or unlisted. Public group feeds are seen by customers or Chatter-free users (more on this feature in a bit). Private groups are member-only groups and require a user to request to join and get approved prior to interacting with the group. Unlisted groups provide more privacy than private. Unlisted groups don’t allow users to request to join; it is by invitation only. Additionally, unlisted groups don’t show up in list views, feeds, profiles, or anywhere unless you are a member of that group or have the permission to modify unlisted groups (even users with Modify All Data can’t see these if they aren’t members). To create a group, click the plus sign next to Groups on the Chatter sidebar. Next, you’ll need to name the group. You can add a description for the group, add information about the group, choose who manages the group in the owner field, determine the access type (public, private, or unlisted), select if customers should be considered for joining the group, select Broadcast Only if you want the posts to only come from managers or owners of the group, and click the Save & Next button. On the next page, upload a group photo for your group.
Figure 6-6
Creating a Chatter group
Chatter Feed
Access your Chatter feed by navigating to the Chatter tab or by going to your profile found in the upper-right corner of the screen and clicking your name (Figure 6-7).
Figure 6-7
Navigating to Chatter
Your Chatter feed contains all the items you follow, posts directed at you using the @ symbol, or posts that you have created. In your Chatter feed, you can control what you see by using the sidebar.
Creating Posts on Your Feed
To create a post, make sure you are on the Post tab of Chatter (Figure 6-8). You can start typing in the box provided and use any of the stylings it provides, such as the bolding, italicizing, underlying, strikethrough to your text, and bullet points or numbering. You can also add images, tag other groups or users, and attach files. Once your post is complete, click Share. Make a mistake on your post? Not a problem, use the downward-facing arrow (the same as the one used to bookmark) and click Edit or Delete.
Figure 6-8
Creating a post on your feed
After you have shared your post, watch other users like, comment, and share your post (Figure 6-9).
Figure 6-9
Other users commenting and liking your post
Creating a Post on a Record’s Feed
First, you’ll have to search for or find the record you want to write your post on. Next, you’ll click the word Chatter that appears on the right when you are on the Related tab of that record. Once you have clicked Chatter, you can start typing in the box provided and use any of the stylings it provides, such as the bolding, italicizing, underlying, strikethrough to your text, or bullet point or numbering. You can also add images, tag other groups or users, and attach files, as shown in Figure 6-10. Once your post is complete, click Share. You can also use the Poll and Questions options (covered later in the chapter).
Figure 6-10
Creating a Chatter post on record
Creating Topics in Your Post
You can use hashtags just like on Twitter and Instagram to create trending topics in Salesforce. Just add the # symbol in front of any word (with no space) in comments or in posts. For example, use #learning (Figure 6-11).
Figure 6-11
Using hashtags to create topics
Creating Chatter Polls
Create Chatter polls on your feed or on a group feed with up to ten possible choices, as shown in Figure 6-12. Watch the other Chatter users vote on their choice. Salesforce will count the votes and display the results. The user voting will not see who voted for what choice and will not see the results of the Chatter poll until they submit their vote. Keeping reading to learn how to create a Chatter poll.
Figure 6-12
Chatter poll
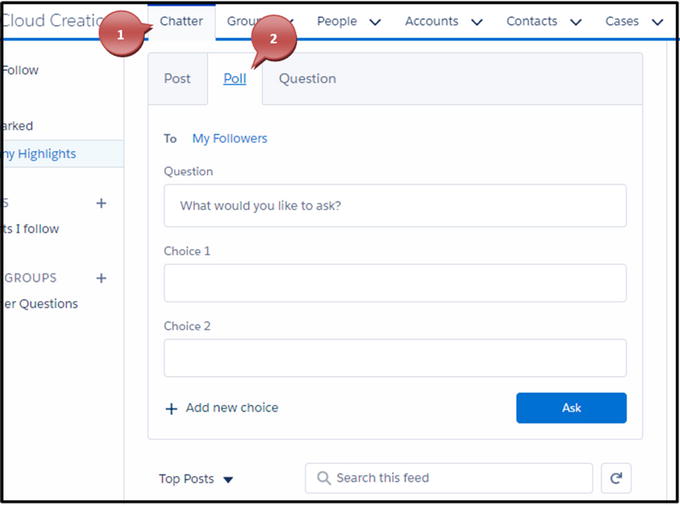
To create a Chatter poll, follow these steps:
- 1.Navigate to the Chatter object or create a poll from within a record by navigating to the Chatter tab.
- 2.
- 3.Enter the poll question you have in mind for your Chatter users.
- 4.Enter the choices your Chatter users have for the poll.
- 5.If you need more choices, click the “Add new choice” link.
- 6.Once finished with your choices, click Ask, as shown in Figure 6-15.
 Figure 6-15Creating a Chatter poll
 - 7.Once you have posted your poll, you can click the “View results” link to see your results, as shown in Figure 6-16.
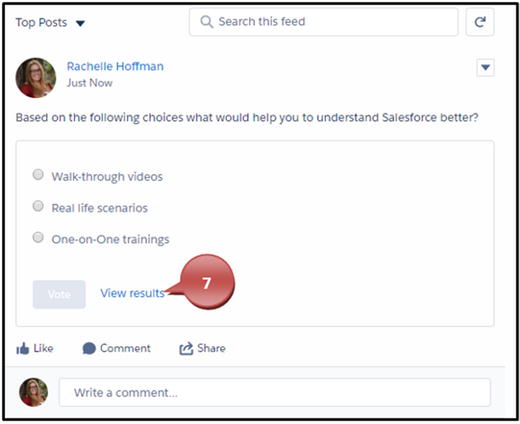 Figure 6-16Viewing the results of a Chatter poll

Creating Chatter Questions
You can use Chatter questions to ask questions that may be beneficial to other users or that other users may have the answer to, as shown in Figure 6-17. Make sure you are on the Question tab of your Chatter feed and post your question. Sit and wait for other users to answer your post. Once you have found the best answer, click the Select as Best link next to the Like link in the comment posted and watch it move to the top of your post under your question for other users to see.
Figure 6-17
Creating a Chatter question
Chatter Notifications
Chatter notifications can come in many forms. You can see immediately when someone directs a post at you by the bell icon in the upper-right corner of your browser, as shown in Figure 6-18. You can click the bell icon and see what the latest post to you is or what the comment left is. From here, you can click the “Mark all as read” link to clear your Notifications window
, or you can click the comment itself to be taken to the post in Chatter.
Figure 6-18
Receiving
Chatter notifications
You can also choose to receive daily, weekly, and instantaneous email notifications. If you are a Salesforce mobile (iPhone or Android) user, you can enable notifications to be delivered to your mobile phone, as shown in Figure 6-19.
Figure 6-19
Chatter notifications
Enabling Chatter Email Notifications
You can enable Chatter email notifications for all your users by following these steps:
- 1.Go to settings cog icon in the upper-right corner and choose Setup from the drop-down, as shown in Figure 6-20.
 Figure 6-20Navigating to the Setup menu
 - 2.In the Quick Find box, type Email Setting and click Email Settings found under Chatter, as shown in Figure 6-21.
 Figure 6-21Clicking Email Settings
 - 3.Select the email setting of your choice, as shown in Figure 6-22.
- Allow Emails turns on Chatter email notifications for users.
- Allow Email Replies turns on the ability for your users to reply from within their email to Chatter notifications.
- Allow Posts via Email allows your users to post to groups using their email.
- Allow Attachments via Email gives the ability for your users to use attachments in their replies and post from email.
- “Show Salesforce mobile app download badges” adds badges for downloading the Salesforce mobile app to all Chatter email notifications in your organization.
 Figure 6-22General email settingsNote Badges in Salesforce are an internal Chatter recognition technique that users can earn and give. This helps with user adoption by allowing users to give recognition with a Thanks badge. The Thanks badge shows up on the user’s profile for everyone to see.
 - 4.Click Save.
User’s Configuration for Chatter Notifications
The previous settings will allow your users to use Chatter. Now we’ll cover how your users can choose to receive the Chatter notifications.
- 1.Click your profile picture at the top-right corner of the web browser and click Settings, as shown in Figure 6-23.
 Figure 6-23Accessing your profile
 - 2.In the Quick Find area, type in Email Notifications and select Email Notifications under Chatter.
- 3.Select the options that best fit your needs.
- In the General section, you must select “Receive emails” to receive Chatter emails, as shown in Figure 6-24.
 Figure 6-24Turning “Receive emails” on
 - In the Personal section, for “Email me when Someone,” we recommend the following be selected because your users can become overwhelmed by too many email notices if all of them are selected:
- Posts on my profile: This option will keep you up-to-date on any post that is made on your profile.
- Comments on a post on my profile: This option will notify you on any comment that was left on your post.
- Comments on an item I bookmarked: This will keep you current with any bookmark post so you know the latest.
- Mentions me in a post: This will let you know any time a user uses the @ symbol and directs a post to you or mentions you in a post.
- Mentions me in a comment: This will let you know any time a user uses the @ symbol and directs a comment or mentions you in a comment.
 Figure 6-25Configuring what Chatter email you receive
 - 4.Select the frequency of your personal digest. Your personal digest is a summary of the recent activity in Chatter that appears on your own feed. You can choose to receive this daily, weekly, or never, as shown in Figure 6-26.
 Figure 6-26Selecting to receive emails daily, weekly, or never
 - 5.You can also set how often you receive group Chatter notifications. We suggest that you select Limited for new groups; you can change your setting for each individual group should you want more frequency, as shown in Figure 6-27.
 Figure 6-27Selecting what to receive from Chatter
 - 6.You can select how often you receive group customer questions as well, as shown in Figure 6-28. We suggest Limited as well here. If you choose another option, you may get more emails than you want, which can cause more of a distraction than being helpful.
 Figure 6-28Selecting what customer questions to be notified from
Feed Tracking
Salesforce feed tracking with Chatter
allows you to see changes made to records that are recorded in the Chatter feed. Enabling this option on an object allows a user to follow the changes made to that record in the Chatter feed. You can choose which object and what fields are tracked in the feed. You can track fields on the following objects: User, Group, custom and external standard objects, Account, Article Type, Asset, Campaign, Case, Contact, Contract, Dashboard, Event, Lead, Opportunity, Product, Report, Solution, and Task.
Note
Field-level security and sharing settings are used in the Chatter feed to determine what users can see in the feed as well.
Enabling and Customizing Feed Tracking
Follow these steps
:
- 1.Click the settings cog icon in the upper-right corner of the browser and select Setup, as shown in Figure 6-29.
 Figure 6-29Navigating to the Setup menu
 - 2.In the Quick Find area, type Feed Tracking and select Feed Tracking under Chatter, as shown in Figure 6-30.
 Figure 6-30Navigating to Feed Tracking
 - 3.On the left side, click an object you want to configure for feed tracking, as shown in Figure 6-31.
 Figure 6-31Setting up feed tracking
 - 4.At the top, make sure to select Enable Feed Tracking.
- 5.Select up to 20 fields to track per object. You don’t need to select any fields here if you don’t want to track changes to specific fields in Chatter. By selecting individual fields to track, this will capture the change that was made in Chatter. See Figure 6-32 for an example of feed tracking.
 Figure 6-32How feed tracking shows up in ChatterNote The more you select, the more cluttered your Chatter record feeds will become. Any field change on the field selection will add a new post to that record feed, pushing older posts lower.
 - 6.Once you have set up all the objects as desired, click the Save button.
Chatter Profiles
Salesforce Chatter profiles allow your users to customize their Salesforce profile that is seen by other Salesforce users and the Chatter-free users (usually customers). They can add a profile picture, write an About Me section, add contact information, and add a header photo. The profile is another way your users can see their Chatter feeds, what groups they are part of, what files they’ve uploaded in posts, who they are following, and who is following them. They can even add a new post and comment on existing ones from their profiles.
To access your profile, click your profile picture in the upper-right corner and click your name, as shown in Figure 6-33.
Figure 6-33
Navigating
to your profile
Other users can access your profile by clicking your hyperlinked name found on records, in Chatter posts, or anywhere else they see your name hyperlinked, as shown in Figure 6-34.
Figure 6-34
Accessing other users’ profiles
Uploading Your Profile Picture
To upload your profile picture, follow these steps:
- 1.Once you have reached your profile, you can click the camera symbol and click Update Photo, as shown in Figure 6-35.
 Figure 6-35Uploading your profile pictureNote Your photo must be stored on your computer. It has to be in JPEG, GIF, or PNG format, and the file size must be smaller than 16MB.
 - 2.Click the Upload Image button and choose the image from your computer location, as shown in Figure 6-36.
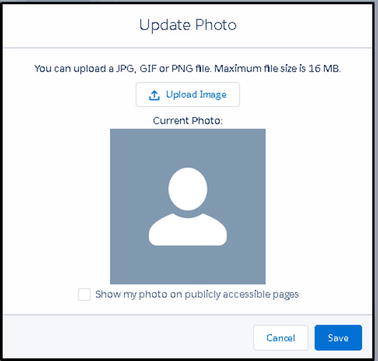 Figure 6-36Uploading your profile picture from your computer
 - 3.Use the slide bar to resize your photo. Select the check box “Show my photo on publicly accessible pages” if you want your photo disabled outside of Salesforce, as shown in Figure 6-37.
 Figure 6-37Modifying the size of your image
 - 4.Once complete, click Save.
Editing Your Profile
To edit your profile, follow these steps:
- 1.Go to your profile by clicking your profile picture found in the upper-right corner of your browser, as shown in Figure 6-38.
 Figure 6-38Editing your profile
 - 2.Click the word Edit found under your tabs on the right side of your browser, as shown in Figure 6-39.
 Figure 6-39Edit button
 - 3.You can edit any field here on the profile just like any field in Salesforce. Let others know who your manager is, add the title that you hold with your company, add a phone number and cell phone number, add your office location, and, of course, don’t forget to tell your other users a little bit about yourself in the About Me section, as shown in Figure 6-40.
 Figure 6-40Editing your profile
 - 4.Once complete, click Save.
Updating Your Header Photo
To update your header photo, follow these steps:
- 1.Click the camera image in the right corner above the Edit button, click the “Select an image” button, find your image on your computer, and click Open, as shown in Figure 6-41.
 Figure 6-41Uploading your bannerNote Your photo must be stored on your computer. It has to be in JPEG, GIF, or PNG format. For the best results, use a panoramic image that is at least 1280×300 pixels.
 - 2.Adjust your photo to fit the area provided. If you find that the photo won’t work, click “Choose a different photo” to upload a new one, as shown in Figure 6-42.
 Figure 6-42Modifying the size of your banner
 - 3.Click Save when complete.After your user completes their profile, it should like Figure 6-43.
 Figure 6-43Complete user profile
Salesforce Mobile App for iPhone and Android Users
Salesforce, the mobile app
for iPhone and Android users, is included in every Salesforce license and, for the most part, can be downloaded and used immediately, as shown in Figure 6-44. Users can download the app from the App Store or Google Play and start using it today! Salesforce can work out of the box because it uses metadata to see what you’ve built and configured in the desktop environment. However, with that said, not everything you may have customized will be easy to use on the mobile app. Some of the changes you may need to configure are “quick action” items such as creating a task, logging a call, and creating a new lead or contact. Or you may need to configure compact layouts, which allow your user to see the most important detail of a record instead of the whole-page layout of fields. Lastly, the mobile navigation allows you to place actions and objects in a user-friendly order. Making sure that the Salesforce app is configured and available for your users will help your users’ productivity. If you have users who are on the road or meeting with clients outside of the office, Salesforce app provides access to the records that they would be working with if they were in office or on the phone. Giving your users access to the mobile app will help them to capture necessary information when they are away from their desks. Also, if your user is out of the office and needs to find a client’s number quickly or an address, they can use the mobile app to do that.
Figure 6-44
Salesforce mobile app
Quick-Start Guide to Setting Up the Mobile App
Salesforce offers a quick-start guide
to setting up the mobile app.
- 1.Click the settings cog icon in the upper-right corner of the browser and click Setup.
- 2.In the Quick Find box, type in Salesforce Mobile and select the option Salesforce mobile Quick Start, as shown in Figure 6-45.
- 3.Click the button Launch Quick Start Wizard.
 Figure 6-45Launching the quick-start wizard for Salesforce mobile configuration
 - 4.Click the Let’s Get Started button, as shown in Figure 6-46.
 Figure 6-46Getting started with the quick start
 - 5.You can remove or reorder items found on this navigation menu by clicking it and using the arrows in the middle or by dragging and dropping them into a new place, as shown in Figure 6-47.
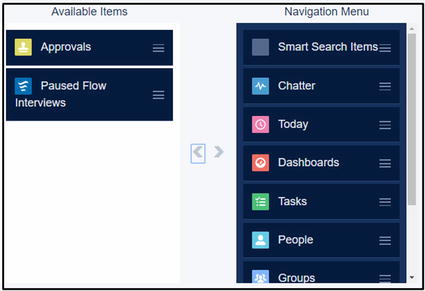 Figure 6-47Modifying the navigation menu
 - 6.Once you are done with your navigation menu, click Save & Next at the lower-right corner of your screen.
- 7.Click the Arrange Global Actions button, as shown in Figure 6-48.
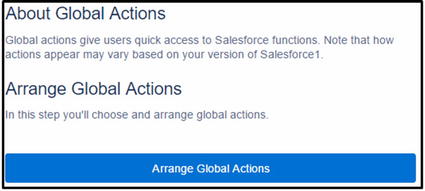 Figure 6-48Arranging the global actions
 - 8.Move actions that are necessary into the Selected Global Actions area and move ones that aren’t needed into the Available Items using the arrows provided between these two areas. Reorder what actions appear first by dragging and dropping them into place, as shown in Figure 6-49.
 Figure 6-49Modifying the order of your actions
 - 9.Click Save & Next when you are complete.
- 10.Click the Create Compact Layout button, as shown in Figure 6-50.
 Figure 6-50Configuring the contact compact layoutNote Through the quick start, you can only create a compact layout for contact records. We’ll go over how to make compact layouts for other objects on the next page.
 - 11.Move fields into the Compact Layout for Contacts area that you want displayed in your mobile app and move fields to the Available Fields section that you don’t want to include. Reorder the arrangement of the fields by dragging and dropping them into place, as shown in Figure 6-51.
 Figure 6-51Modifying the order of the fields for your contact compact layout
 - 12.Click Save & Next when you are complete.
- 13.In step 4 you can review what you have arranged in this quick start by clicking Navigation Menu, Global Actions, and Contact Compact Layout to see what you created. Do you see that a change needs to be made? Click the Edit button to be taken to that edit screen and make the change, as shown in Figure 6-52.
 Figure 6-52Reviewing what you’ve set up
 - 14.Click Next when you are complete.
- 15.If you are ready to invite your users, type in the names in the To field and customize your subject and message. Click Send, as shown in Figure 6-53.
 Figure 6-53Inviting users to download the Salesforce mobile app
 - 16.Click Next when complete and Finish.
Creating Compact Layouts
In step 10 previously, we mentioned that you can create compact layouts for other objects as well. Here’s how:
- 1.Click the settings cog icon in the upper-right corner of the browser and click Setup.
- 2.Select the Object Manager tab found at the top next to the home tab.
- 3.Select the object that you want to configure a compact layout for and click the hyperlink name of that object, as shown in Figure 6-54.
 Figure 6-54Navigating to the compact layout for an object
 - 4.On the left side, you’ll see various options and actions that can be made within this object. Select Compact Layouts, as shown in Figure 6-55.
 Figure 6-55Selecting compact layouts
 - 5.Create a new compact layout by clicking New, as shown in Figure 6-56.
 Figure 6-56Clicking the New button
 - 6.Create a label for your compact layout and hit your Tab key to automatically create the name. Move the field from the Available Fields area to the Selected Fields area using the arrows in between. Move the order in which a user sees the details up and down by using the arrows next to Selected Fields, as shown in Figure 6-57.
 Figure 6-57Creating a compact layout
 - 7.Once complete, click Save.
- 8.Click the Compact Layout Assignment button, as shown in Figure 6-58.
 Figure 6-58Complete compact layout
 - 9.Click the Edit Assignment button, as shown in Figure 6-59.
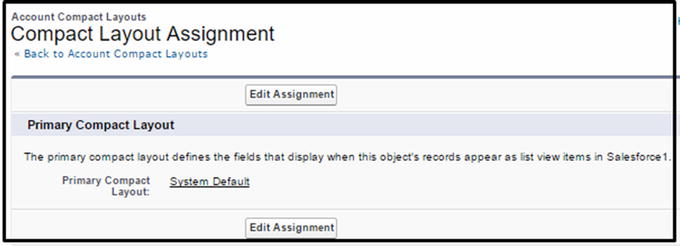 Figure 6-59Edit Assignment button
 - 10.Select from the drop-down the compact layout you created, as shown in Figure 6-60.
 Figure 6-60Selecting the compact layout
 - 11.Click Save.
Summary
As you can see, there are many ways for your users to interact with each other and with external customers in Salesforce. Collaboration in a business is key to getting sales closed and or projects/tasks moving forward. With the use of Chatter and Salesforce mobile app, your users have all the tools available to work throughout their day.