
Lightning Process Builder
is an extremely powerful business process automation tool that can solve a myriad of real-world business issues. Process Builder makes it easy to build logic in one place, with its enhanced point-and-click interface. With Process Builder, you can reduce or eliminate the need to build Apex code for simple processes. You can create automated logic to update related records, update fields, create a task, send an email, and much more. Click New to get started, as shown in Figure 7-1.
Figure 7-1
Process Builder home page
. Click New to get started.
Salesforce Workflow Rules vs. Process Builder
Salesforce has multiple solutions to automate your business process, including workflow rules and Process Builder.
Workflow rules are automated actions that take place when a record meets specified criteria and is saved. You can minimize the amount of manual data entry and processes by having a systematic process in place.
Process Builder is supported in Salesforce Lightning and does everything a workflow rule can do and more (with the exception of outbound messages). A Process Builder action can start when a record is changed or when invoked by another process. Both automation types support time-based actions.
If you have a simple single if/then statement, it is suggested that you use a workflow rule to automate your process. In other words, if you have criteria for automation that include simple logic, use a workflow rule. If there is a level of complexity to your automated requirement, Process Builder is best suited for this. Read the “Actions” section to learn more about what each action type does.
Table 7-1 identifies the differences between workflow rules and the Process Builder tool.
Table 7-1
Actions Available in Workflow Rules and Process Builder
Action | Workflow Rules | Process Builder |
|---|---|---|
Create a task | X | X |
Update a field | X | X |
Email an alert | X | X |
Send an outbound message | X | |
Create a record | X | |
Update a related record | X | |
Use a quick action | X | |
Send an email | X | |
Launch a flow | X | |
Post to the Chatter area | ||
Submit for approval | ||
Call an Apex method |
Process Builder: Action Types
Process Builder makes it easier to create automated actions because it is a visual designer, as shown in Figure 7-2.
The following are the actions that can be completed by a workflow rule or Process Builder:
- Call on an Apex class: Apex is a programming language used in Salesforce to develop complex processes. You can use Process Builder to call on an existing Apex class.
- Create a Record: Use this action to create a new record from any standard or custom object. Field values can be set to build the record appropriately.Tip Required fields are still active when a record is created via a process. Make sure all required fields are given a value in the Set Field Values section in order to successfully create a record.
- Email Alerts: Select an existing email alert to automatically send an email to designated recipients.
- Flows: Choose this action to launch an existing visual workflow.
- Post to Chatter: Create a message and choose to update a user, Chatter group, or new Chatter post to the related record.Note Merge fields can be used to generate the Chatter post.
- Processes: Use this action type to trigger another process.Note Only active processes can be started.
- Quick action: Use this action type to start a quick action. Select “Global actions” to create a record or log a call. Select Object to define an action for the selected object.
- Submit for Approval: Choose to activate the default approval process or specific approval process for the given record, as shown in Figure 7-2. Control who the submitter is by selecting the appropriate value: Current User, User Field from a Record, or Specific User. Submission comments can be entered.
 Figure 7-2Submit for Approval action type
 - Update records: Choose to update the existing record or a record related to the corresponding object (shown in Figure 7-3).
 Figure 7-3Selecting a record to update in Process Builder
Time-Dependent Actions
When a record meets the criteria, the action can be executed immediately or on a specified schedule.
To control when the action is executed, add a time lapse to the process, as shown in Figure 7-4. Actions can be triggered to run before or after a specified date.
Figure 7-4
Setting the time for a time-dependent action
Example
As an example, let’s create an automated action to send a “Happy Birthday” card to all active clients one day before birthdate. The Scheduled Actions option
is available only when the first node of the process starts the process with “only when a record is created” or “when a record is created or edited” is selected and the Yes check box is selected in the criteria node in the Advanced section, as shown in Figure 7-5.
Figure 7-5
Setting the criteria for an action group
Creating a Process Using Process Builder
Follow the steps in this section to create an automated business process
.
In this scenario, you will encounter a real-world business problem. Say sales users have to manually create a project record with the same details stored at the opportunity level. Rather than creating a new record and copying and pasting the details, it is beneficial for them to have the tool automatically create a new project record. At the same time, it’s beneficial to automatically pull the details stored in the opportunity record into the new project record.
Note
In this use case, project records are records stored in a custom object titled Projects.
For all opportunities that are set to Closed Won, you want to create a new project record and update the Project field Next Step to say Schedule Project Kickoff.
Note
This is a use case you can use while managing projects in Salesforce. These steps can also be tweaked to create the new policy records most commonly used with insurance companies. Those in the financial services industry also use this concept to create new financial accounts records when an opportunity closes. These are just a few examples. The opportunities to use automation in Salesforce are endless!
Follow these steps to create this process:
- 1.From Setup, select Process Automation in the Platform Tools section, as shown in Figure 7-6.
 Figure 7-6Process Automation in Setup
 - 2.Next, select Process Builder to access the Process Builder home page.All active and inactive processes are listed on this page, as shown in Figure 7-7, along with the description of the process, the related object, the process type, the last modified date, the status, and the actions.
 Figure 7-7Process Builder home page and list of processes
 - 3.Click the New button to start a new process.
- 4.Type the process name and press Tab to generate the API name, as shown in Figure 7-8.Note It is not required but recommended to enter a description for each process. For organizations with numerous automation processes, it can be challenging to find the right process when there are no descriptions.
 Figure 7-8Naming your process
 - 5.Determine when the process should start. Your options include when “A record changes” and when “It’s invoked by another process.”Note You can break down more complex processes into simpler processes. These processes can be reused and invoked by another process, as mentioned earlier.With the current scenario, you will start the process when “A record changes .” Click Save, as shown in Figure 7-9.
 Figure 7-9Starting a process when a record changes
 - 6.When you first start your process, you must select the object it starts from. Select Add Object, as highlighted in Figure 7-10.
 Figure 7-10Selecting an object in Process Builder
 - 7.Choose the object that the process should be evaluated from, as shown in Figure 7-11. In this example, you will select Opportunity.
 Figure 7-11Choosing when to start a process
 - 8.Select when the process should start, as shown in Figure 7-11.
- a.Select “only when a record is created” to only start the process for new records.
- b.Select “when a record is created or edited” to start the process for new records and existing record that are edited upon saving.
- a.
- 9.You can click Yes, as shown in Figure 7-12, to evaluate the record multiple times (up to five times) in one execution.
 Figure 7-12Click Yes to allow the process to evaluate a record multiple times in a single transaction
 - 10.Confirm your specification and click
 .
. - 11.Select the Add Criteria node shown in Figure 7-13 to set the criteria for this process.
 Figure 7-13Adding a criteria node to a process
 - 12.Set the criteria that the record should meet in order for the actions to be executed.
In this example, you want to set the criteria for the process to start only when opportunity records have a stage marked as Closed Won.
Setting the Criteria
Follow these steps to set the criteria for a process:
- 1.Name your criteria, as shown in Figure 7-14.
 Figure 7-14Steps to setting the criteria
 - 2.Find a field and choose the appropriate operator to set the criteria.
- 3.Select the criteria for executing the action (shown in Figure 7-15). You can choose to execute the actions only when the criteria are met, when a formula evaluates to be true, or with no criteria; just evaluate the action for that object. In this example, select “No Criteria–just execute the actions!” to execute the action for all opportunity records.
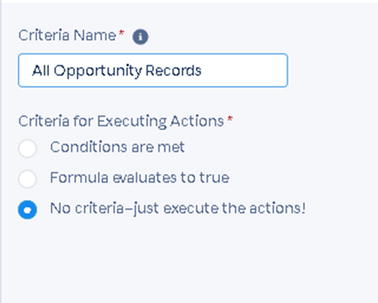 Figure 7-15Setting the criteria for executing an action
 - 4.Set the conditions. Use fields and operator values to set these conditions, as shown in Figure 7-16.
 Figure 7-16Setting the conditions to invoke a process
 - 5.Once the criteria are all set, click Save.
- 6.Choose what the action should be once this criterion is met. Click Add Action, as shown in Figure 7-17.
 Figure 7-17Adding an immediate action to a process
 - 7.Define the action type.
- 8.In this scenario, you want to create a new project record. Click Create a Record.
- 9.Name the action and choose what type of record should be created, as shown in Figure 7-18.
 Figure 7-18Naming the action and choosing the record type
 - 10.Set the field values for the new record, as shown in Figure 7-19, In our example, we set all the field values that we want to carry over into the new project record.Note All required fields must be entered when choosing this action. If a required field value is not entered, the record will not be created.
 Figure 7-19Setting the field values when creating a new record
 - 11.Once you confirm that the criteria and actions are correct, click Save
 .
. - 12.To make this process active . Click Activate, as shown in Figure 7-20.Note Only one version of the process can be active at a time.
 Figure 7-20Activating a process
 - 13.It is best practice to test the process. Create a test record to test this new automated process.
Summary
In this chapter, we reviewed the high-level details of what Process Builder can do. You can automate a lot more than you can with just workflow rules. It’s important to know that there are countless ways you can build automation into your existing setup. Use this chapter as a guide as to what the practical capabilities are with Process Builder.