In the previous chapter, we learned all about automating your code with for and while loops. We also looked at the break and continue statements and created a lot of colorful, mini projects.
In this theory-intensive chapter, let’s look at the various built-in data structures offered by Python. Let’s look at how to use these data structures to store more than one value at a time in a single variable, and let’s look at practical examples of using these data structures in real-world programs.
Store more than one value
So far, we’ve just been storing one value at a time. Of course, we can change the values, but we can’t store two values in the same place. Isn’t that a little inconvenient? Let’s say I want to store six different color values so I can use them in my code, one after the other.
Then I’d have to remember and refer each of those values every time I want them used in my code. Whoa…that’s a long-drawn-out process.

Multiple values in the same variable
This is called a data structure in Python. Look at how the data is structured (organized) and stored? Hence the name. There are four such pre-made data structures that can be used to store multiple values in the same location. You save a lot of lines of code, time, and your code is a lot more efficient too. You can store different types of data as well. The same data structure could have strings, numbers, and Booleans stored in them.
Accessing this data is easy too. You’d just have to follow a similar format to the one we use while accessing individual characters in a string. I’ll get to that in a bit.
Let me show you the four data structures first:

List: Python is indeed an easy-to-learn language, isn’t it? The keywords used in this language are very easy to remember. A list is just that. It’s a list of information, but it is ordered. The individual values in a list can be changed, and lists allow duplicate values inside of them.
Tuple: A tuple is similar to a list. The only difference is that the values cannot be changed once fixed. That means you can’t add or delete values either.
Set: A set, unlike a list of a tuple, is unordered, and there are no indices to access specific values from. It doesn’t allow for duplicate values as well, since the values are unordered.
Dictionary: As the name implies, a dictionary has the values stored in a word : description format. Dictionaries are unordered as well, but they can be changed and the “word”, which is called a “key” in Python, acts as an index through which you can access the values (descriptions).
You’re probably squinting at the pages of this book right now. Don’t worry at all. At a glance, these data structures look intimidating. They’re definitely not. I’ll explain them with fun and easy-to-understand examples from the next section, and you’ll understand everything in no time. ![]()
Lists
Let’s look at lists first. It’s quite easy to create them. Separate the multiple values you want stored in your list by commas and enclose everything inside of square brackets ([]) and you have yourself a list. Would you like to try?
The preceding example just has strings in them (hence the quotes), but you can create a list of just numbers, or just Booleans, or a combination of two or more of them. Just create what you want based on your need.
The preceding code is a list of heterogenous values (different data types).
Accessing values in a list
Okay, so we have a list of values. How do we access them? Would you like to take a guess? You know how already.
Yep, with indices, just like we did for our strings. The first value in the list has an index of 0, the second an index of 1, and so on.
Successfully accessed!
It works! Yippee! ![]()
Slice a list!
If negative indexing and accessing work, just like with your strings, then extracting a part of a list using ranges should work as well, right? Let’s test.
List manipulation on fire!
You have a lot of pre-defined methods that can be used to manipulate your list in multiple ways. Remember the methods we saw with your strings? You’ll find some of them repeated here as well. Are you ready to play with your list? Yes!
Yes! Our list’s length is 6. It works.
You have a complete list of methods for each of the data structures we’ll be looking at in this chapter. So, I’m just going to link you to the page in the Python docs where all those methods and their explanations are listed.
Here it is: https://docs.python.org/3/tutorial/datastructures.html.
That said, let’s just look at some of the most important methods in this chapter, alright?
Copy and append
Count and clear
We got the right answer! The number 1 appeared thrice in the list.
We have ourselves an empty list now!
Concatenation
As you can see in the preceding code, the elements of the list you want listed first come first, then a period (“.”), and then the “extend” method, and then inside the brackets, you can mention the name of the list you want joined to the first list.
Look at that! Perfectly joined, and in the order we wanted as well. ![]()
Search inside your list
Look at that! 3 exists thrice in the list, but we only got the index of the first 3. Sweet!
I’m asking my program to search for 3 from indices 3 to 5. You know how these things work right? The last value in the range won’t be included. So, if the last value is 5, then your program will only search until the fifth index.
Look at that! We got the index of the second instance of 3 in the list. Nice!
Add and remove elements
You know how to add elements to a list using your square brackets, and you can change elements using the same method as well. But what if I want to insert elements in the middle of the list so that the other values still exist, but just move one step further?
Yep, it worked! ![]()
The pop() method removes the last element in the list by default. If you give a position (index) though, it’ll remove the element at that position.
Look at that! The list originally had four elements, and we successfully removed the second element using the pop() method.
Alternatively, you can use the remove() method as well. The only difference is you can specify the exact element you want removed.
Yay! It worked!
It’s getting a bit too long, isn’t it? Don’t worry! We’re almost done. Then let’s distract us with a fun little project, deal? ![]()
Reverse and sort
Success!
Finally (yes, finally), there’s another method called the sort() method that sorts the elements by alphabetical order.
It’s like magic! :O
Hehe, it works.
When you give the argument as reverse=True, your program will sort your list in the descending order. The default is reverse=False, which sorts the list in the ascending order. When something happens by default, you don’t need to mention it as an argument.
Nice…my list is in the descending order now. Python lets us do pretty much anything, doesn’t it?
More fun with lists!
Look at that. It’s still a false because you haven’t searched with the correct term.
Now that you know how lists work, I want to get back to a previous topic. Remember “for” loops? And do remember my promise to revisit for loops when I teach you about lists? We’re here now!
Modify and run your code with the preceding line of code and you’ll notice that you get the same result.
The “clear” method just clears the list. But if you use the “del” keyword, you can delete the list in its entirety. Would you like to check?
Look at that! ‘list1’ was completely erased from our program.
The third value “True” no longer exists in list “a”.
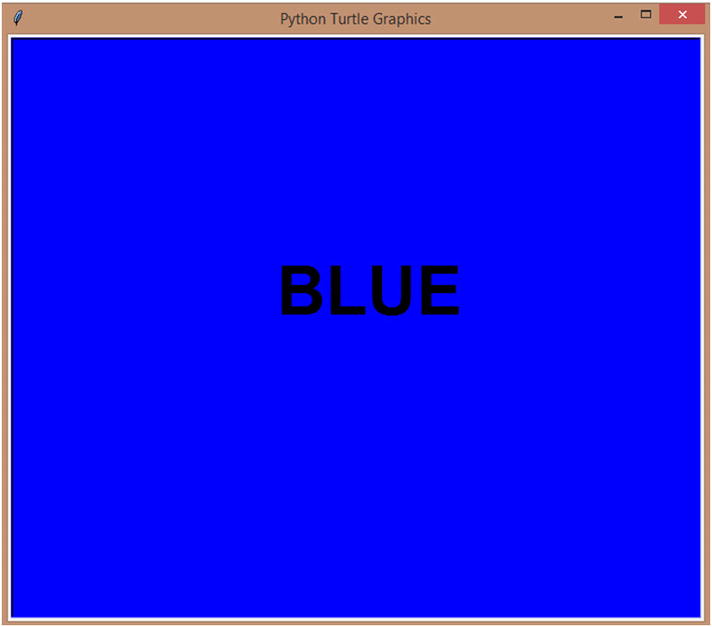
Mini project – multi-colored automated star
In this project, I’m going to draw a star with Python, but each side is going to have a different color. That’s where my list comes in. I’m going to create a list of five colors and run a for loop through it. For every iteration of the for loop, Turtle will draw a side of the star with a new color from the list.
- 1.
I’m going to start with the usual lines of code to set up Turtle:
- 2.
I’m going to set the pen size as 5 so my image looks good.
- 3.
Next, I’m going to create a variable called “colors” and assign a list of five colors, ‘Red, ‘Brown’, ‘Green’, ‘Blue’, and ‘Orange’ to it. I’ve already given you a link to a list of colors, so choose your preferred set of colors.

- 4.
Next, I’m going to create a temporary variable x that iterates, via the for loop, through the entire list:
- 5.
For every iteration of the loop, my pen color will change to the current color in the temporary variable “x”. I’ll ask my Turtle to move forward by 200 points and turn right by 144 points because a star’s outer angle is 144 degrees and I need to turn that much to get a proper star as my result.
- 6.
That ends my for loop and the indentation. Finally, I’m going to hide my turtle.

Multi-colored star
Yes! We got it! Why don’t you try the same with different colors or different shapes? Or maybe, you could try to randomly choose colors for every iteration? You know how to do that already (I’ve taught you how), so go ahead and try. ![]()
Tuples
Now that we’ve taken a detailed look at lists, you’ll find the remaining three data structures easy to understand, so I’ll quickly go through them, alright?
As I’ve mentioned before, a tuple is similar to a list. The only difference is that it’s ordered (just like a list, with index and all), but unchangeable (unlike a list). What does that mean for us? Well, it just means that you can’t add, delete, or change the elements in the list.
Now that’s a bummer! Does that mean a tuple is not as cool as a list? Well, I wouldn’t say that, exactly. You know, you might need to create a list that you don’t want anyone to manipulate later, am I right? Something like a “read-only” list? In those instances, a tuple is your best friend. Otherwise, go for a list, 100%. ![]()
Most of the things in a tuple follow the same format as that of a list, so I’m just going to list them, and I want you to try them out in your computer. It’ll be our little activity, okay?
Just like you do with your lists, you can access the elements in a tuple with square brackets.
t1[1] will return the second element, True. Tuples are indexed just like lists, where the first index is 0.
Just like lists, you can use negative indexing to access values in a tuple. So, t1[–1] will return the last element in the list.
You can slice a tuple using indices as well.
If you wanted to extract the second through the fourth value (last), then you can specify t1[1:4]) or just t1[1:], since we want everything from the first index anyway.
If you wanted to write the same with negative indices, you’ll do it like this: t1[–3:] because you want everything from –3 to the end of the tuple.
You can use the len(t1) method to get the length of the tuple and use the “in” keyword to check if something is inside a tuple, just like you do with your lists. Why don’t you try them out and see?
Why don’t you run the preceding code and check if looping works with tuples?
Ah well, so far, tuples look like lists written within parenthesis. What’s their use, anyway? Remember how I told that tuples are unchangeable? And we haven’t tried changing elements or adding elements to our tuple yet, have we? Let’s try.
Oops, we got an error! Tuples don’t support item assignment, meaning their elements cannot be changed.
Try adding a new element to the tuple. Access the fourth index (fifth element) and add something. When you do that, you’ll notice that you encounter the same error.
This is most important use of a tuple. You can create unchangeable lists that can be used to store sensitive information that shouldn’t be changed. What if you create a program to store the id numbers of your classmates? You wouldn’t want those changed, would you? Then store them in a tuple. Simple as that!
If you try to access t1 now, you’ll get an error.
Tuples have methods as well, but they only have few methods that can be used to access elements and none that can manipulate the elements or the tuple itself.
The “count” method returns the number of times a value repeated in a tuple. Remember, tuples can have duplicate values, just like lists.
Yes! 5.0 is in the third index (fourth position).
That’s it for tuple. It was quite simple, wasn’t it? Let’s look at the next data structure in the list next.
Sets
Do you remember what I told you about sets? They are unordered and they cannot have duplicate values. It’s a double whammy. But sets have their uses too. Would you like to take a look at it?
The preceding code is a set of the colors ‘Red’, ‘Orange’, and ‘Blue’.
Whoa, look at that! The order is changed. Can you run the program again and tell me what you get?
The order changed again, didn’t it? How cool is that? ![]()
But we do have a problem now. Sets are unordered. So how do we access the elements if we don’t know the indices? How do we add elements to the set? How do we insert elements in a particular position? Well, unfortunately, there are certain things you can’t do with a set, and anything that pertains to order comes under that.
Run the preceding code, and you’ll get True.
How interesting it that? We added ‘Green’ to the set, and it ended up in the second position. Run the program again, and you’ll find it somewhere else.
What if I want to add more than one color to my set? I can save space by using the “update()” method.
Look at where Green and Yellow ended up. :D
Just like with your lists, you can use the len() method to find the length of a list as well.
Now, let’s look at the rest of the methods for manipulating a set, shall we? I’ll just list the ones that are similar to the ones we saw with our lists.
In a list, the pop() method removes a random value and not the last one. You can use the remove() method to remove a particular value by mentioning it as an argument.
Alternatively, you can use the “discard()” method to remove a particular element as well. The only difference between discard and remove is that discard doesn’t raise an error if the mentioned element doesn’t exist. This is important in real-world programming. When running a program, you don’t want errors that stop the program execution because one line of code was wonky.
The clear() method clears the set, and the copy() method copies the list.
You can use the “del” keyword to delete the entire set, but you can’t use it to delete a particular element since you they don’t have fixed indices that you can access.
Let’s say we have two sets, colors and colors1 with their own values, and we want them merged into the colors set.
We’re done with sets as well. Yay! You’re becoming quite the pro Python programmer now. ![]()
Dictionaries
The last data structure in this list is the dictionaries . Let’s quickly finish it and go back to some more fun mini projects, so are you with me? Yes!

Dictionaries are created within flower brackets as well, but inside, you need to mention the values in key:value pairs. The “key” is the index here.
Since I want my dictionaries to model real-world objects, I’m going to create a dictionary that represents a person’s characteristics: their name, age, eye color, hair color, and so on.
I’ve created a dictionary, “person1”. Her name is Susan, she’s 9 years old, her pet’s name is Barky, and she has black hair and blue eyes. Looks great, doesn’t it?
Remember that you have to mention the keys within quotes everywhere.
Her name!
Nice!
It was added, yay!
Yes, “pet” is one of the keys of the dictionary.
Just like usual, you can find the length of the dictionary using the “len” method.
person1.clear() will empty the dictionary.
You can use the copy() method to copy the dictionary.
As usual, you can loop through a dictionary, but since our dictionary has a key and a value each, we can do the looping in different ways.
Yes!
We got just the values now. Whoo!
Nice! ![]()
Age is the only key left! ☹
Now, ‘name’ is the only key left!
That’s it for dictionary! ![]()
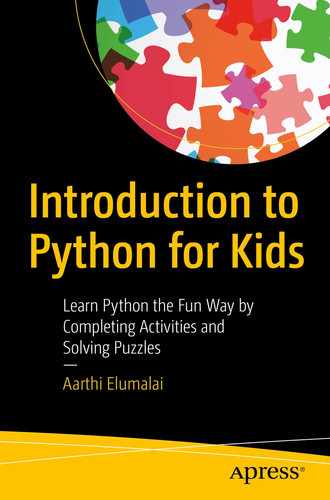
Mini project – never-ending colors
Another simple project with a twist! ![]() We are going to randomly change the background colors after an interval of 1 second while printing the current color on the turtle screen.
We are going to randomly change the background colors after an interval of 1 second while printing the current color on the turtle screen.
- 1.So, as I said, we need both the “time” and the “turtle” modules. Let’s import both.import timeimport turtle
- 2.Next, let’s set up turtle as usual.s = turtle.getscreen()t = turtle.Turtle()
- 3.Once set up, let’s move the pen we just created to the position from where we want it to write the colors. That’s going to be the point –80,0.t.penup()t.goto(-80,0)t.pendown()
- 4.Now, let’s create a dictionary of colors. I’m creating a dictionary and not a list this time, because I’m going to make the keys capitalized versions of their values (colors) so I can write them on the screen.colors = {'RED':'Red', 'BROWN':'Brown', 'GREEN':'Green', 'BLUE':'Blue', 'ORANGE':'Orange'}
- 5.Before we start drawing, let’s hide the turtles. You’ll see why when you run the program.
 t.hideturtle()turtle.hideturtle()
 - 6.
Now, here comes the fun part. We want this program to be never ending, remember? So, it’s obvious that we need a loop, but what kind of loop? How do we create a never-ending loop? Remember how I said “while” loops can literally run forever if we’re not careful? That is, if the condition doesn’t become false at one point.
- 7.
Simple! Next, let’s create for loop that’ll loop through the “colors” dictionary.
- 8.For every iteration, let’s change the background color of the turtle screen to the next color in the for loop (the value). Also, let’s write the key value (x) in Arial, 50 pt, bold text.turtle.bgcolor(colors[x])t.write(x,font=('Arial',50,'bold'))
- 9.
Now, after every color change, we need a 0.5-second delay, or gap, before the next color change (for loop iteration) happens. This is where the “time” package comes in. It has a built-in function called sleep() which will literally pause the loop for the number of seconds mentioned. In our case, it’s going to be 0.5.
- 10.
Okay, this should technically be it, but if we leave it at this, then you’ll notice that your turtle writes the next text on top of the old text, and things will continue to get messy. Why don’t you try and see?
Never-ending colors
You’ll notice that the program loops through the “colors” dictionary, infinitely. Sweet, huh? ![]()
Mini project – first and last name reversal
In this project, this is what I want happened: When I enter a name, for example, Susan Smith, I want my program to return the reversal of it, that is, Smith, Susan.
- 1.Let’s start the program by getting the name as the input. The condition is their first and last name needs to be separated by a single space. This is important. You’ll see why.name = input('Please Enter your first and last name, separated by a space: ')
- 2.
As I said, the format of the string input is important to make this program work. So, I’m going to count the number of single spaces in the string. If it’s none, or more than one, then the program stops with an error message.
Let’s create a variable count and assign it to 0 to start with.
- 3.Next, let’s create a for loop that loops through the string we just got. Whenever there’s a single space, let’s add 1 to count.for i in name:if i == ' ':count += 1
- 4.If count is just 1, then we’re good to go. Let’s convert the string to a list by using the split method, where the first and last names are separated into separate list items with the single space as the delimiter used.if count == 1:#Convert string to list, where the condition is the spacel = name.split(' ')
- 5.Next, let’s reverse the list.#Reverse listl.reverse()
- 6.Finally, let’s insert a comma with a space to the first position of the list, so when we join everything, we get the exact format we want.#Add a comma, with a space, in the first position of the listl.insert(1,', ')
- 7.Now let’s join the list into a string with an empty string as the join condition. This way, everything gets stuck together, and the only thing separating the last and first names is “, ”.#Join a list into a stringname = ''.join(l)
- 8.
Finally, print everything.
- 9.If the count isn’t 1, print an error message.else:print('Please Enter your name in the correct format')
Perfect! ![]()
Summary
In this chapter, we took a deep dive into the four pre-defined data structures offered by Python, namely, list, set, tuple, and dictionary. We looked at how to create them, delete them, manipulate them, and so much more. Finally, we looked at how to use them in programs and why they’re useful in real-world programming scenarios.
In the next chapter, let’s take a small break from all the learning and start creating! We’ll be creating a lot of mini projects. ![]()