Sometimes “good enough” really is.
—Tim Rayborn. The Scandinavian Guide to Happiness
I left Russia 30 years ago when the short period of democracy and liberalism just started, only to be effectively killed after several years by Putin’s autocratic, nationalist regime, which led to the nightmare we all witnessed in Ukraine. I was born and raised in St. Petersburg, the second-largest Russian metropolis, but during my childhood, the name of the city was Leningrad, and the name of the country was USSR. Under the communist regime, the Soviet Union, fenced off from the free world by an iron curtain, was significantly behind the West in computer technologies. Unfortunately, the same will happen now with Russia under its current postmodern fascist rule.
Nevertheless, despite all the “inconveniences” associated with the communist regime ruling during my childhood, I was lucky enough to have access to recent advancements in the computer industry, both Soviet and American. Thanks to my dad, who was a professor and an executive in one of the most prestigious universities, I had an opportunity to get student side jobs that allowed me to work on various big and small computers, both as part of my duties and during after-work hours, day and night. But many, perhaps most, Soviet people were not so lucky back then. Imagine the world before the Internet and without an affordable personal computer.
The invention of the Internet and the mass production of home computers changed everything. People from the countryside and big cities now have equal chances to become a programmer. Bitcoin created a similar revolution in the financial sector. People who previously could not afford a bank account or credit card can now become investors, traders, and account holders. Software developers can become entrepreneurs without the mediation of haughty angel investors and venture capitalists.
But this is just the beginning. The Bitcoin white paper was published only 13 years ago. Only a selected population of lucky plugged-ins could benefit from crypto in the first years after the blockchain revolution. But more and more people join the club, and now crypto does not belong only to geeks anymore. Everyone these days can create their own cryptocurrency, and you don’t even need to be a programmer.
Coins vs. Tokens
We already learned about the difference between coins and tokens, but let’s repeat it for clarity. Coins are the result of creating a whole new ecosystem, including a new blockchain and network of nodes. Some coins also become a platform for creating tokens. The most known example of a token platform is Ethereum, which has its coin Ether (ETH). But there are others, less known but sometimes more efficient and less expensive, such as Solana (SOL), Polygon (MATIC), and Klaytn (KLAY).
As a token platform, Ethereum carries many custom-created tokens that can be generated by recording a transaction containing a smart contract in a blockchain. Designing smart contracts requires programming skills outside this book’s scope. But fortunately, some tools allow nontechnical people to create smart contracts and their own tokens.
How to Create a Token Without Coding
Even though the token generation process requires writing a smart contract code, there are applications created by third-party developers that allow unsophisticated users to make their own tokens with no coding at all. ERC-20 is the most popular standard for custom fungible tokens, that is, tokens that can become a cryptocurrency.
As you probably realized already, there is almost nothing free in the crypto world, so if you want to create your own token, which can become your own money, you better get ready to pay some money for it up front. To simplify the task, we will refrain from creating a token directly on the mainnet and do it on the testnet instead. Using a testnet is the best practice for any software development activity, and a smart contract is nothing but a new code deployed on the distributed blockchain network. Therefore, creating a new token means new software development and deployment, so it’s better to be tested on the testnet before mainnet deployment.
Another reason for using a testnet first is financial, as you don’t want to spend real money on something you haven’t tested yet. Testnet tokens , which you need to pay for your token’s smart contract, can be obtained for free. Unlike real Ether, getting a testnet Ethereum coin is very simple. Let’s use the Ropsten testnet for our experiment. The Ropsten testnet has a functionality close to the Ethereum mainnet, so you can get a similar experience for free.
Setting Up the Wallet and Getting the Testnet Coins

A screenshot depicts the MetaMask wallet connected to the Ropsten Ethereum testnet. The following are present: Ropsten test network, not connected, personal account, 10.02 E T H, buy, send, swap, assets, and activity.
MetaMask wallet connected to the Ropsten Ethereum testnet

A screenshot depicts the Ropsten testnet faucet. The following are present: your Ropsten address, give me Ropsten E T H with an exclamation symbol, a checked box on successfully queued 10.0000 to, and please expect r E T H to your address within half an hour.
Ropsten testnet faucet
Generating ERC-20 Token
Now, when we get more than enough test coins to pay for Ethereum transactions, we can create a smart contract . To do that (without coding), you go to the Student Coin website.2 Despite its .org domain, which is typically supposed to mean that this is a noncommercial organization, Student Coin is actively promoting its own token called… Student Coin (STC) .3 I will not comment on it because the only thing we care about now is their ability to generate an ERC-20 smart contract without a single line of code, which they do well.
So, you just go to the Student Coin website and find Create your token button and click it. Welcome to the centralized, incorporated world of decentralized, free cryptocurrencies: you will be prompted to create a user account. Okay, we’ll get through this to make our lives easier. But in fairness, I must note that you can make a token without sacrificing your privacy; however, you will have to write the code.
Crypto Basics Token Parameters
Parameter Name | Parameter Value | Reason |
|---|---|---|
Token name | CryptoBasics | That’s the name of the book! You can choose any name but try to find the unique one that was not taken before |
Token symbol | CRBT | This is the abbreviation for Crypto Basics Token. You can select any capital letters; typically, it’s three to five letters. You can check if yours is the unique one by looking it up at the CoinMarketCap website. If you choose the token name or token symbol that is in use already, it will create a lot of confusion for you and the users |
Capping | Capped supply | This is typical for IXO tokens as investors don’t like uncertainty. The uncapped supply can lead to inflation and abuse. The max supply can be any number. Bitcoin has 21M so I simply set it to 21M |
Supply | Initial supply | This is the simplest and most straightforward one. You can choose vesting to appease your potential investors |
Initial supply amount | 21000000 | Can be any number between 0 and the max supply. But if you set a number less than the max supply, you will have to come up with a tricky way to issue the rest |
Sale | No sale | You can sell it later using Uniswap or other exchanges |
Supply adjustments | Unchecked | Using those options will make things too complicated. Keep it simple and transparent |
Transaction tax | Unchecked | It would be very tempting to get paid for every transaction with your token, but I don’t think it is suitable for most use cases, especially for IXO |
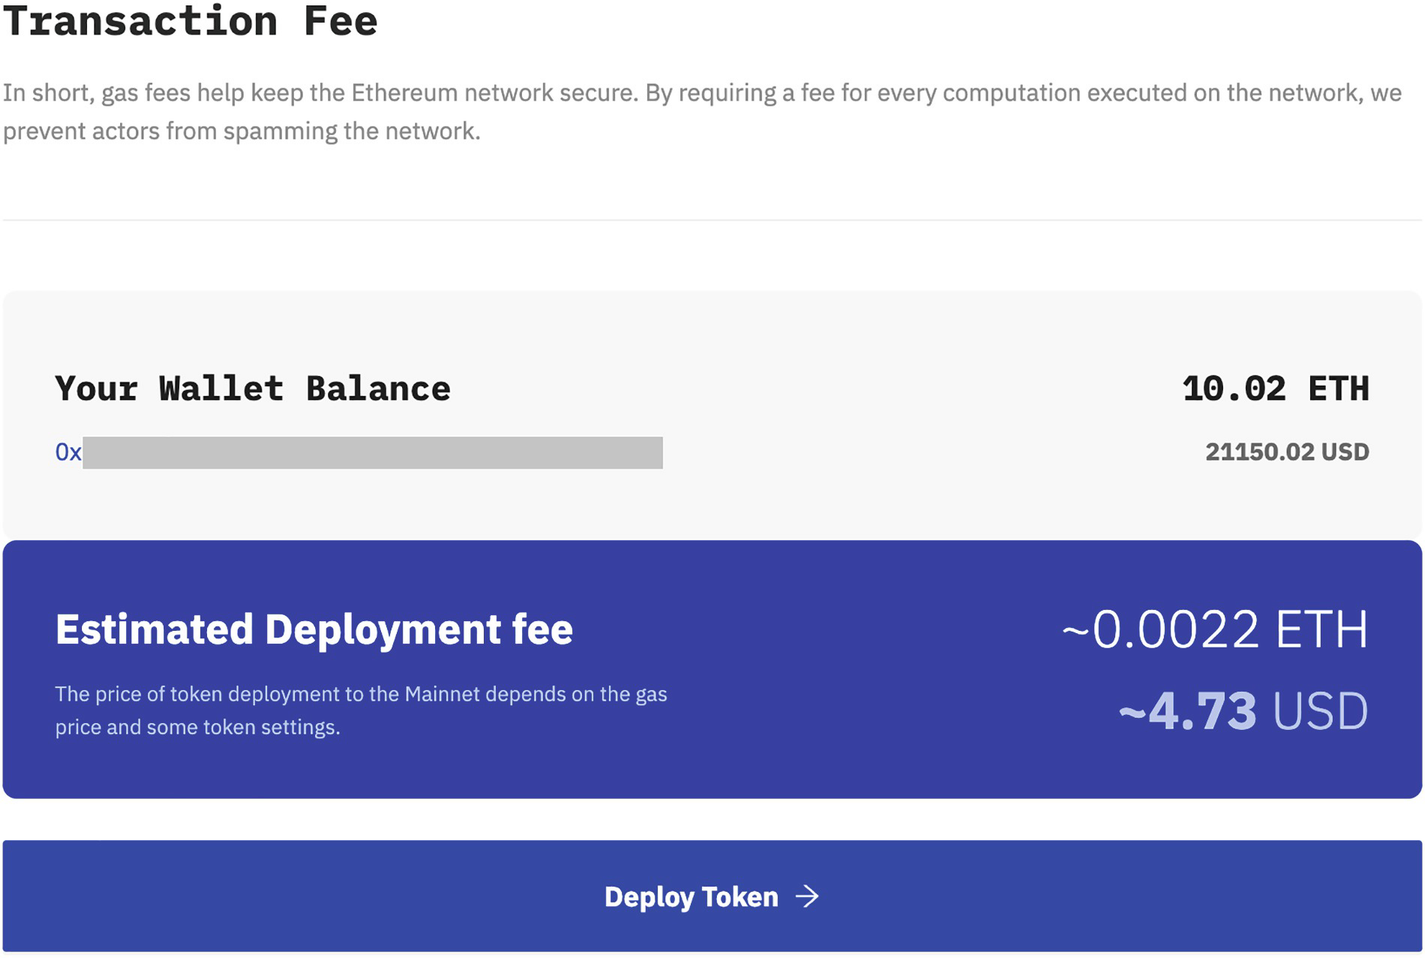
A screenshot depicts the transaction fee for token generation on the Ropsten testnet. The wallet balance and deployment fee are shown.
Transaction fee for token generation on the Ropsten testnet

A screenshot depicts the confirmed token generation transaction in the MetaMask wallet. The following are present: Ropsten test network; personal account; new contract; contract deployment and a web address given; details; data; estimated gas fee; total; reject; confirm.
Confirming token generation transaction in the MetaMask wallet
Viewing Your Token in Wallet and Block Explorer
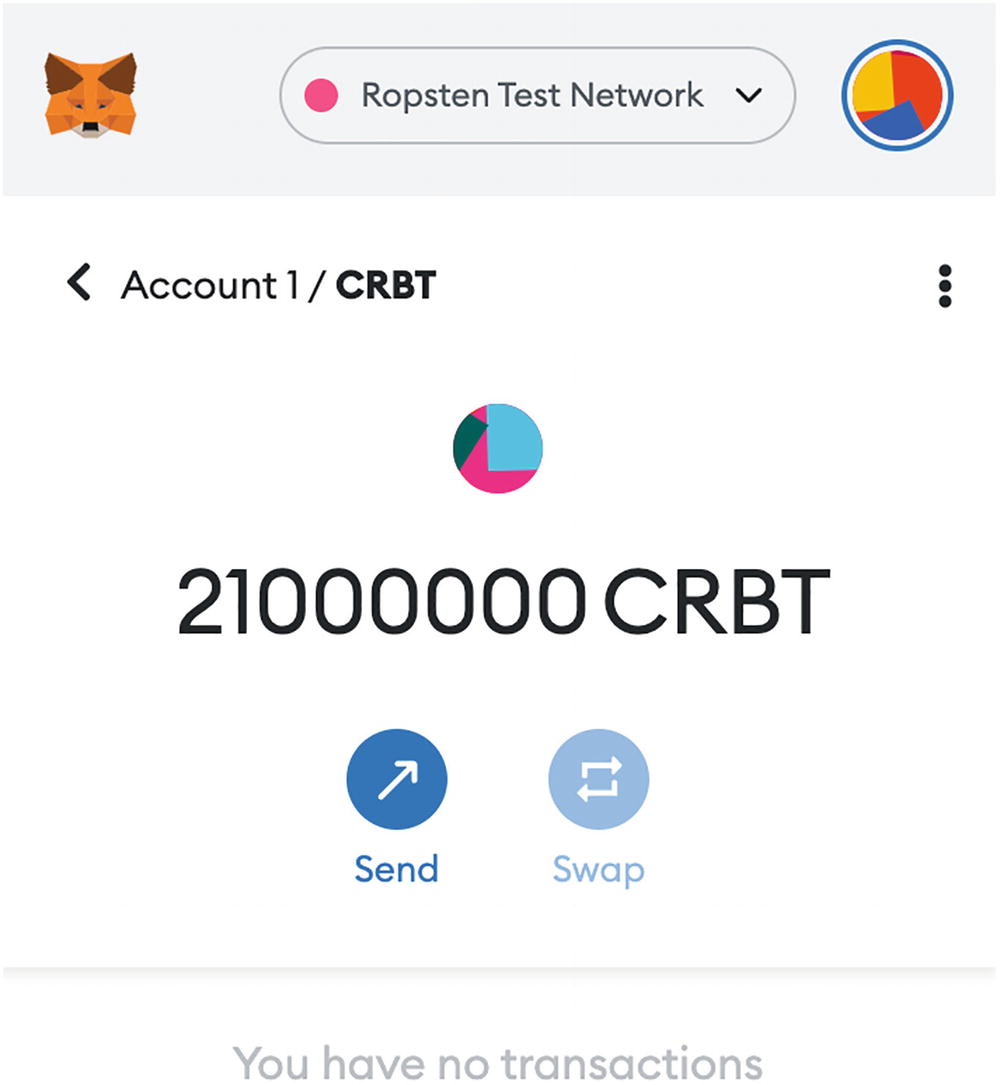
A screenshot depicts the CryptoBasics balance in the MetaMask wallet. Send and swap labels are visible in the screenshot.
CryptoBasics (CBRT) balance in the MetaMask wallet

A screenshot depicts the C R B T token smart contract view in the Etherscan block explorer. It is divided into three sections.
CRBT token smart contract view in the Etherscan block explorer
You still need to do a couple more things to make your token “alive,” like registering it with the CoinMarketCap and CoinGecko5 websites and listing it on exchanges. We will see how to do it in the next chapter because some preconditions should be satisfied before you can apply for those listings .
Token or Coin?
Before starting your own crypto project, you need to answer the central question of whether you should create a token or a coin. You just learned about one of the possible options to generate a token. As we discussed already, a new coin means creating a new blockchain, which sounds scary, but let’s see how difficult it actually is.
The fact is that there are two main ways to create a new blockchain. The first one is designing and writing the new code from scratch, which is the most challenging method, but it might give your project a better chance to become successful if it’s based on an original, brilliant idea. Most successful platforms are coded from scratch. Most top coins on CoinMarketCap are original designs such as Bitcoin (obviously), Ethereum, XRP, Cardano, Solana, etc. To code from scratch, however, you must have a good team of engineers with a deep understanding of blockchain tech, a unique vision, and original ideas. Note that core development (another fancy name for coding from scratch) also requires a lot of time and funding, so be prepared for serious fundraising.
The second way – forking – is also common and sometimes very successful. Forking has a dual meaning as some crypto projects fork the source code, enhance it, and start a new blockchain, while other projects fork the existing blockchain while starting from some point on the original chain. The main idea of forking is reusing the design and source code of the existing, often already successful cryptocurrency such as Bitcoin.
Some well-known examples of cryptos created by forking are Bitcoin Cash (BCH) and Ethereum Classic (ETC) . Forking can be as easy as just copying the code repository of the original project, renaming some functions, and adjusting some constants. For experienced programmers, it can be, if not a weekend project, at least something that can be done within a very reasonable time.
Comparing Different Ways to Create Your Own Cryptocurrency
ERC-20 Token | Forking Existing Crypto Project | Designing and Coding from Scratch | |
|---|---|---|---|
Does not require coding at all | Yes | ||
Short time to market | Yes | Yes | |
Does not require developers involved | Yes | ||
Small initial costs | Yes | Yes | |
Does not require maintaining infrastructure like seed nodes | Yes | ||
Can be placed on DEX immediately | Yes | ||
Easy (and less expensive) to list on exchanges | Yes | Yes | |
Possibility to attract supporters and investors from existing platforms | Yes | ||
Possibility to attract serious investors | Yes |
The comparison shows that probably the easiest way to create your crypto is the ERC-20 token, while designing it from scratch is the most difficult one, although it has some benefits that other methods lack. If you fork an existing project and plan to enhance it, such a move can attract supporters and investors from the original project if they like your ideas.
The bottom line is that if you decide to launch your own project, you should use the method that best fits your goals, capabilities, and circumstances. My mission is just to show that a variety of options are available.
Doing It the Hard Way
If you still decide to do it the hard way, that is, create your own coin by forking the existing crypto or writing a new code, you should be aware of several important things.
First, you will need to decide whether to go PoW or PoS. In previous chapters, we have reviewed the advantages and disadvantages of both consensus algorithms. If you are going to fork, the decision would be as simple as just selecting your project of preference based on other features. The consensus algorithm will be just one of those features, perhaps not even the most important one.
If you select to write your own code, however, I suggest going PoS or DPoS as they are more promising than the widely desecrated PoW. The PoS coin is also easier to manage as you don’t need to fight the continuous emission. Still, on the other hand, without mining, you will need to solve the problem of motivating the node operators. In PoS, the node operator can get rewards in the form of transaction fees.
Another essential factor you need to consider is node hosting expenses and maintenance effort. When you create a token, you piggyback on the existing network, such as Ethereum, which does all the hard work of managing the nodes for you. But if you start your own coin, you must establish a new distributed network of nodes.
Each new crypto network starts from the seed nodes that are the primary go-to sources of truth for new nodes which just joined the network. You will have to host and maintain those seed nodes for the entire period of the project. For redundancy, there should be at least three to four powerful servers as seed nodes. In case one or two nodes go down due to hardware failure, hacker attack, or overwhelming from the network traffic jam, you should still have some redundant backup nodes up and running.
For PoS and especially DPoS projects, you may need more than four nodes to ensure the initial quorum and network stability. In general, the more seed nodes you have, the better for network safety. When the project gets traction, you can rely on other node operators and gradually reduce the number of your nodes. But ensure that somebody still hosts the seed nodes whose addresses are typically hardcoded in the node initialization code.
The easiest way to host the nodes is using a public cloud such as AWS or Azure. You can get a free tier from either provider, but it will not be enough to host multiple nodes. AWS also provides significant credits to startups (up to $100,000). They used to give those credits directly, but now the only way to do it is to join their Activate program through third-party providers. You will need to apply for a membership with one of such providers.6
How to Create NFT with No Coding, for Free
A chapter called Creating a Token would not be complete without mentioning NFT, which has become a superhot thing nowadays. Although NFT is not directly related to creating a crypto project, why can’t we still see how to create NFT? Maybe building your own cryptocurrency, which must always be a fungible token or coin, is too heavy a lift for you. But you still want to join the army of clever people who benefit from crypto differently but also creatively by designing their own non-fungible tokens .
NFTs are different from coins and fungible tokens by their uniqueness. Each NFT instance has some unique properties, for example, a unique image associated with it. By the way, imagery NFT is the most popular and sellable category. Many artists today sell their artwork attached to NFT, and buyers are paying a lot of money – sometimes, millions and tens of millions in a dollar equivalent!7
Creating NFT is as easy as creating regular fungible tokens such as Ethereum’s ERC-20. And similar to ERC-20, NFT is a smart contract, which can also be generated without a single line of code using special tools provided by third-party developers. Let’s use OpenSea,8 a popular NFT marketplace, to develop our own NFT.
The NFT generation process is even easier than the ERC-20 one, and OpenSea developers managed to do it off-chain without paying a fee. They call it lazy minting, which means the token is only recorded in the blockchain when it is sold or transferred for the first time. This is an excellent feature because it allows you to create an unlimited number of NFTs without spending a dime. You only pay a one-time fee to initialize your account.9 To implement the lazy minting functionality, OpenSea developers used a special type of NFT token standard called ERC-1155.10
The NFT Artwork

An image depicts the N F T art with the book cover, the signature of Slava Gomzin, and a unique serial number.
The NFT art with book cover, signature, and unique serial number
Now, when my beautiful artwork is compiled and ready to be attached to the token, I will generate the NFT itself. By the way, they accept various image file formats like JPG, PNG, GIF, etc., but instead of an image, you can also use video or audio files or even a 3D model .
Linking a Wallet
Another remarkable and pleasant detail about OpenSea: Although they offer to register a user account, they don’t force you to do so. OpenSea is a peer-to-peer marketplace, meaning the tokens belong to their owners throughout token creation, listing, and selling. The process is still arranged by the centralized entity, but they use your crypto wallet address instead of your identity to link the tokens to you.

A screenshot depicts the linking of the OpenSea account to the MetaMask wallet address. At the bottom, the sign and cancel labels are visible.
Linking OpenSea account to your MetaMask wallet address
So, when you go to the OpenSea website and try to hit the Create button for the first time, it will prompt you to link your wallet and sign their terms of service (Figure 12-8). Unfortunately, unlike Student Token, OpenSea does not allow creating tokens on the testnet, so you will have to link a wallet connected to the Ethereum mainnet. But don’t get too upset about it – you can connect a wallet with zero balance because they don’t charge any fee up front and even allow you to create a token before paying the initiation fees. However, you will be prompted to pay when you try to list your NFT for sale .
Generating the NFT

A screenshot of the OpenSea site depicts the new N F T collection of books by Slava Gomzin.
My new NFT collection on OpenSea
So, after I clicked the Add Item button in the collection (the same as the Create button on the website’s front page), I got into the new token page. I uploaded the image I prepared and specified a few token parameters such as name, description, and properties like Author and Publisher (these are the custom properties you add by yourself, any number of them). I hit the Create button, and that’s it! I have got my NFT for free! Note that you can still edit some parameters, even the token’s name.
Listing the NFT for Sale

A screenshot of the OpenSea site depicts the N F T listed, Slava Gomzin’s Bitcoin for Nonmathematicians book cover, signed, 1st copy, which is on sale.
My NFT listed for sale on OpenSea
When you put NFT on sale, as I said, you will be prompted to pay the initiation fee (actually two fees, one after another), which can be in total anywhere from a few bucks to $30–$40, depending on how crazy Ethereum network traffic is. Once the transaction is completed, the NFT is listed, and anyone can purchase it (or bid if you selected the auction option). Note that now if you want to create more NFTs, as many as you want, as I said, you won’t need to pay anything . As promised, the NFT design and selling process is (almost) free and does not require coding!
What’s Next?
Designing your own crypto can be extraordinarily difficult or simple. Coin or token, new code or fork – there are many options. It depends on what level of technology your idea demands. The irony is that the financial success of cryptocurrencies does not necessarily have a direct link to technological complexity.
Creating a token can be easy. In this chapter, you have learned how a token can be generated without a single line of code. But developing a crypto project is a different story. Next, we will see how to start such a business.