Automation is a critical part of database administration because it reduces the total cost of ownership (TCO) of the enterprise by allowing repeatable tasks to be carried out with little or no human intervention. SQL Server provides a rich set of functionality for automating routine DBA activity, including a scheduling engine, decision-tree logic, and a comprehensive security model. In this chapter, we discuss how you can harness SQL Server Agent to reduce the maintenance burden on your time. We also look at how you can reduce effort by using multiserver jobs, which allow you to operate a consistent set of routines across the enterprise.
SQL Server Agent
SQL Server Agent is a service that provides the ability to create automated routines with decision-based logic and schedule them to run one time only, on a reoccurring basis, when the SQL Server Agent service starts or when a CPU idle condition occurs.
SQL Server Agent also controls alerts, which allow you to respond to a wide range of conditions, including errors, performance conditions, or WMI (Windows Management Instrumentation) events. Responses can include sending e-mails or running tasks.
After introducing you to the concepts surrounding SQL Server Agent, the following sections discuss the SQL Server Agent security model, how to create and manage jobs, and how to create alerts.
SQL Server Agent Concepts
SQL Server Agent is implemented using jobs, which orchestrate the tasks that are run; schedules, which define when the tasks run; alerts, which can respond to events that occur within SQL Server; and operators, which are users (usually DBAs) who are notified of occurrences, such as job status or alerts that have been triggered. The following sections introduce you to each of these concepts.
Schedules
One time: Allows you to specify a specific date and time.
Start automatically when SQL Server Agent starts: Useful if a set of tasks should run when the instance starts, assuming that the SQL Server Agent service is configured to start automatically.
Start when CPU becomes idle: Useful if you have resource-intensive jobs that you do not wish to impact user activity.
Recurring: Allows you to define a complex schedule, with start and end dates, that can reoccur daily, weekly, or monthly. If you schedule a job to run weekly, then you can also define multiple days on which it should run. If you define the schedule as daily, you can opt to have the trigger occur once daily, on an hourly basis, every minute, or even as frequently as every ten seconds. If the schedule is reoccurring based on second, minute, or hour, then it is possible to define start and stop times within a day. This means that you can schedule a job to run every minute, between 18:00 and 20:00, for example.
A recurring daily schedule is actually used to define a schedule that runs daily, hourly, every minute, or every second.
You can create individual schedules for each job, or you can choose to define a schedule and use this to trigger multiple jobs that you need to run at the same times—for example, when you have multiple maintenance jobs you want to run when the CPU is idle. In this case, you use the same schedule for all of these jobs. Another example is when you have multiple ETL runs against different databases. If you have a small ETL window, you may want all of these jobs to run at the same time. Here again, you can define a single schedule and use it for all of the ETL jobs. This approach can reduce administration; if, for example, the ETL window moves, you can change a single schedule rather than many schedules.
Operators
An operator is an individual or team that is configured to receive a notification of job status or when an alert is triggered. You can confine operators to be notified via e-mail, NET SEND, or the pager. It is worth noting, however, that the pager and NET SEND options are deprecated and you should avoid using them.
If you choose to configure operators so they are notified through e-mail, then you must also configure Database Mail, discussed later in this chapter, specifying the address and port of the SMTP Replay server that delivers the messages. If you configure operators to be notified via NET SEND, then the SQL Server Agent Windows service is dependent on the NET SEND service, as well as the SQL Server service, in order to start. If you configure operators to be notified by pager, then you must use Database Mail to relay the messages to the e-mail to pager service.
You increase your operational risk by introducing reliance on the NET SEND service.
When using pager alerts, you can configure each operator with days and times that they are on duty. You can configure this in 24/7 organizations that run support shifts or “follow the sun” support models for operational support, which see shifts being passed to support teams in different global regions. This functionality also allows you to configure each operator with different shift patterns on weekdays, Saturdays, and Sundays.
Jobs
SSIS packages
T-SQL commands
PowerShell scripts
Operating system commands
Replication Distributor tasks
Replication Merge Agent tasks
Replication Queue Reader Agent tasks
Replication Snapshot Agent tasks
Replication Transaction Log Reader tasks
Analysis Services commands
Analysis Services queries
You can configure each job step, with the exception of T-SQL commands, to run under the context of the service account running the SQL Server Agent service or to run under a proxy account, which is linked to a credential. You can also configure each step to retry a specific number of times, with an interval between each retry.
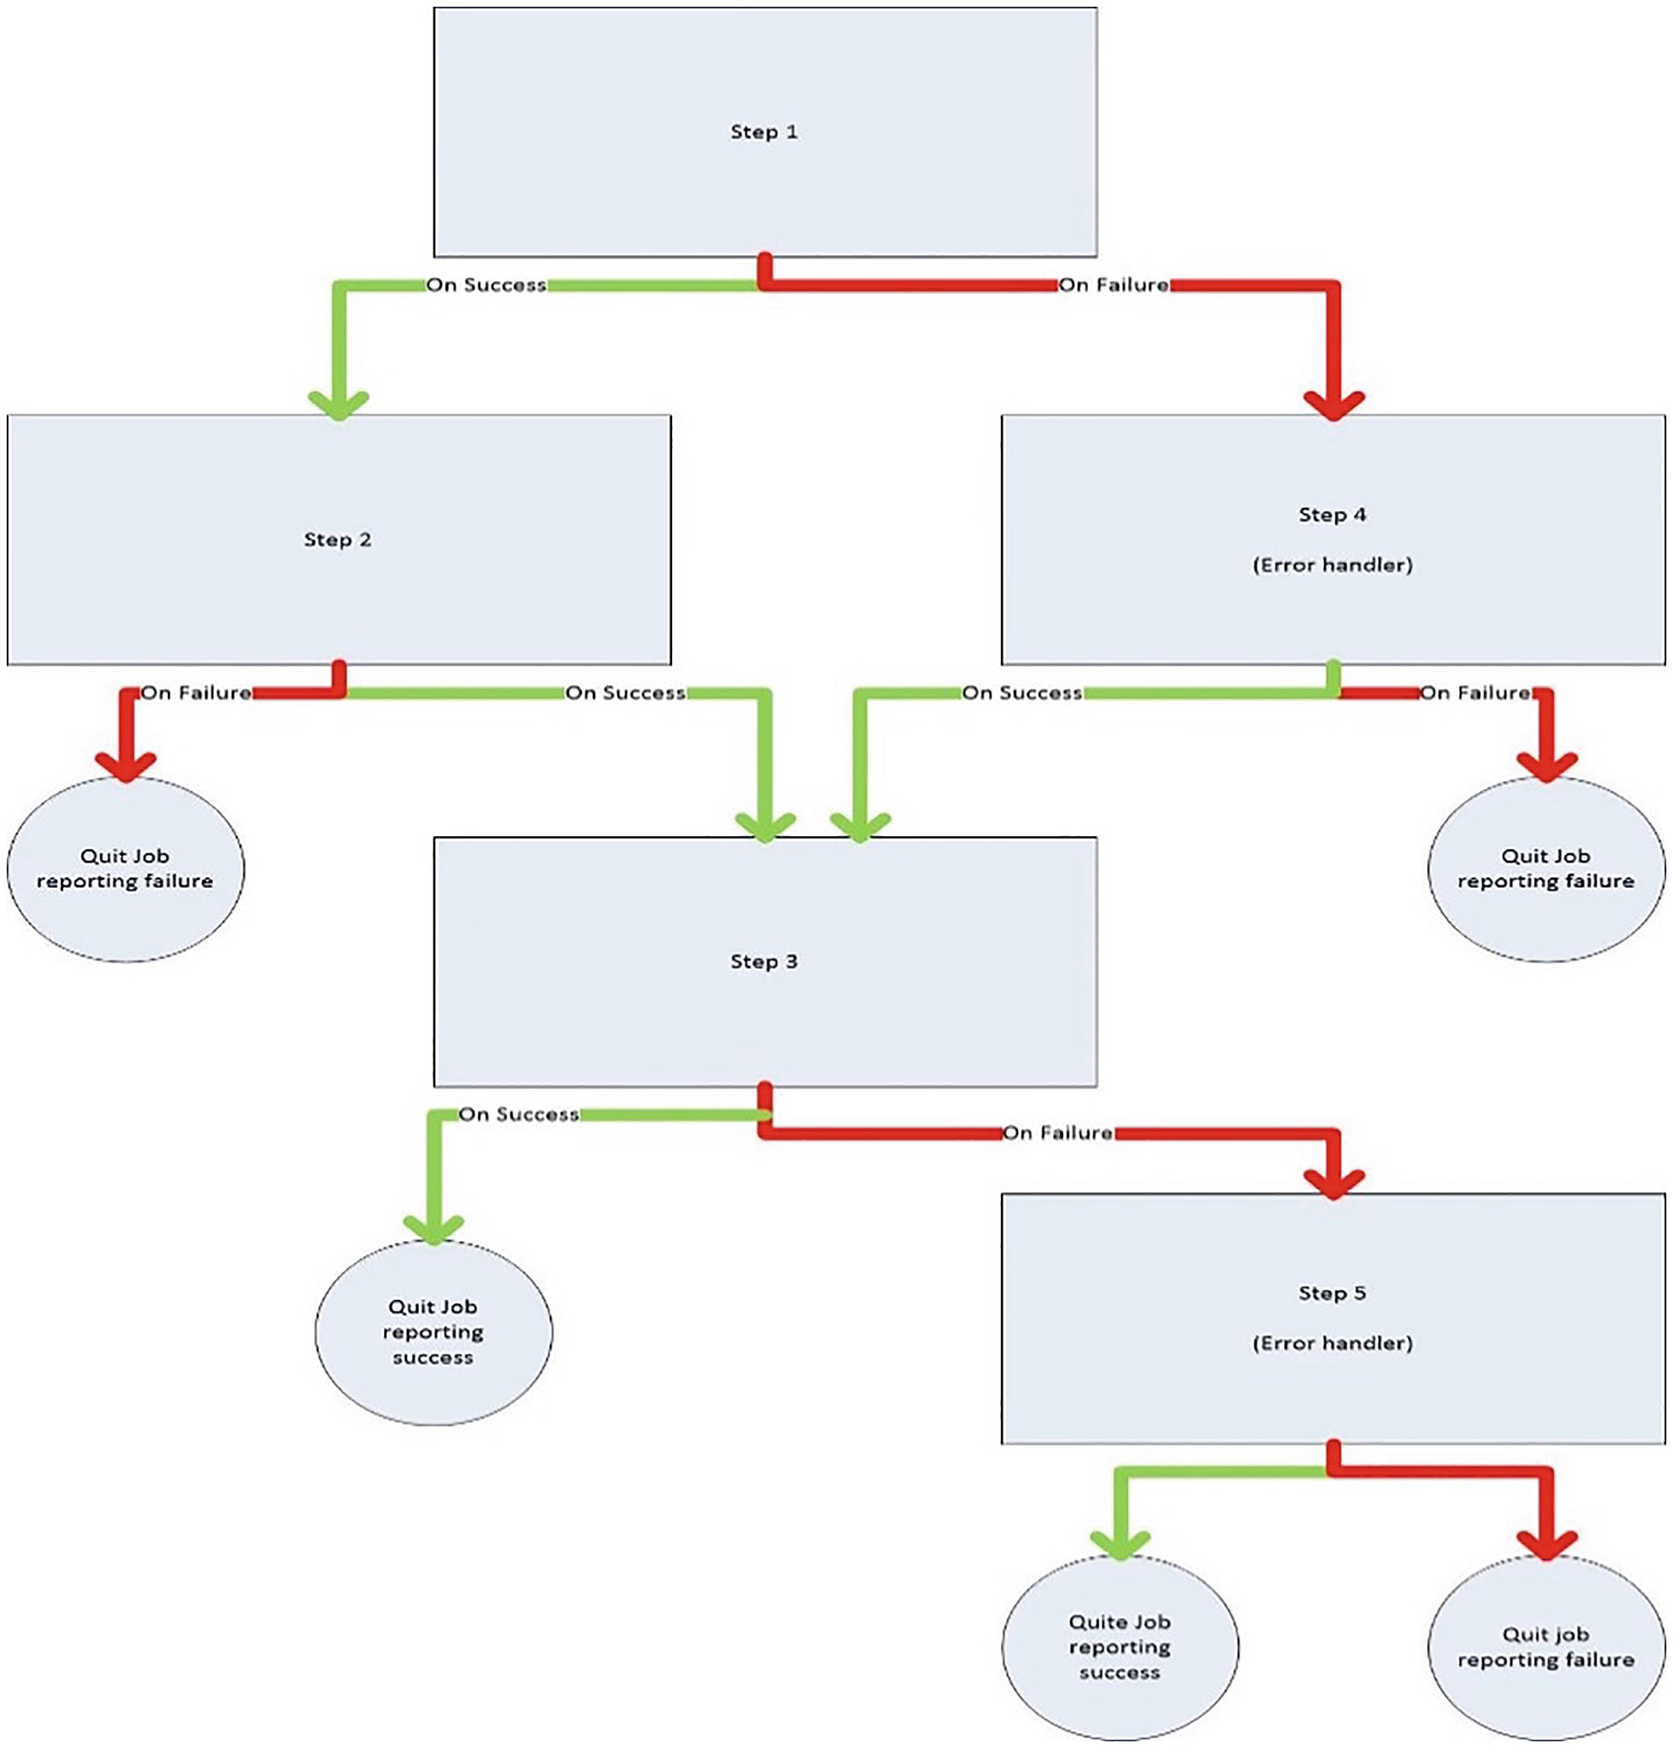
Decision-tree logic
You can run each job on a schedule that you can create specifically for the job that you are configuring, or share between multiple jobs, which should all run on the same schedule.
You can also configure notifications for each job. A notification alerts an operator to the success or failure of a job, but you can also configure it to write entries to the Windows application event log or even delete the job.
Alerts
SQL Server events
SQL Server performance conditions
WMI events
When you create an alert against a SQL Server events category, you can configure it to respond to a specific error message or to a specific error severity level that occurs. You can also filter alerts so that they only fire if the error or warning contains specific text. They can also be filtered by the specific database in which they occur.
Listing Performance Objects and Counters
SQL Server Agent Security
You control access to SQL Server Agent via database roles and you can run job steps under the context of the SQL Server Agent service account or by using separate proxy accounts that map to credentials. Both of these concepts are explored in the following sections.
SQL Server Agent Database Roles
SQLAgentUserRole
SQLAgentReaderRole
SQLAgentOperatorRole
SQL Server Agent Permissions Matrix
Permission | SQLAgentUserRole | SQLAgentReaderRole | SQLAgentOperatorRole |
|---|---|---|---|
CREATE/ALTER/DROP operator | No | No | No |
CREATE/ALTER/DROP local job | Yes (Owned only) | Yes (Owned only) | Yes (Owned only) |
CREATE/ALTER/DROP multiserver job | No | No | No |
CREATE/ALTER/DROP schedule | Yes (Owned only) | Yes (Owned only) | Yes (Owned only) |
CREATE/ALTER/DROP proxy | No | No | No |
CREATE/ALTER/DROP alerts | No | No | No |
View list of operators | Yes | Yes | Yes |
View list of local jobs | Yes (Owned only) | Yes | Yes |
View list of multiserver jobs | No | Yes | Yes |
View list of schedules | Yes (Owned only) | Yes | Yes |
View list of proxies | Yes | Yes | Yes |
View list of alerts | No | No | No |
Enable/disable operators | No | No | No |
Enable/disable local jobs | Yes (Owned only) | Yes (Owned only) | Yes |
Enable/disable multiserver jobs | No | No | No |
Enable/disable schedules | Yes (Owned only) | Yes (Owned only) | Yes |
Enable/disable alerts | No | No | No |
View operator properties | No | No | Yes |
View local job properties | Yes (Owned only) | Yes | Yes |
View multiserver job properties | No | Yes | Yes |
View schedule properties | Yes (Owned only) | Yes | Yes |
View proxy properties | No | No | Yes |
View alert properties | No | No | Yes |
Edit operator properties | No | No | No |
Edit local job properties | No | Yes (Owned only) | Yes (Owned only) |
Edit multiserver job properties | No | No | No |
Edit schedule properties | No | Yes (Owned only) | Yes (Owned only) |
Edit proxy properties | No | No | No |
Edit alert properties | No | No | No |
Start/stop local jobs | Yes (Owned only) | Yes (Owned only) | Yes |
Start/stop multiserver jobs | No | No | No |
View local job history | Yes (Owned only) | Yes | Yes |
View multiserver job history | No | Yes | Yes |
Delete local job history | No | No | Yes |
Delete multiserver job history | No | No | No |
Attach/detach schedules | Yes (Owned only) | Yes (Owned only) | Yes (Owned only) |
SQL Server Agent Proxy Accounts
By default, all job steps run under the context of the SQL Server Agent service account. Adopting this approach, however, can be a security risk, since you may need to grant the service account a large number of permissions to the instance and objects within the operating system. The amount of permissions you need to grant the service account is especially important for jobs that require cross-server access.
To mitigate this risk and follow the principle of least privilege, you should instead consider using proxy accounts. Proxies are mapped to credentials within the instance level and you can configure them to run only a subset of step types. For example, you can configure one proxy to be able to run operating system commands while configuring another to be able to run only PowerShell scripts. This means that you can reduce the permissions that each proxy requires.
For job steps with the Transact-SQL (T-SQL) script step type, it is not possible to select a proxy account. Instead, the Run As User option allows you to select a database user to use as the security context to run the script. This option uses the EXECUTE AS functionality in T-SQL to change the security context.
Creating SQL Server Agent Jobs
In the following sections, we create a simple SQL Server Agent job, which runs an operating system command to delete old backup files. We then create a more complex SQL Server Agent job, which backs up a database and runs a PowerShell script to ensure the SQL Server Browser service is running. Before creating the SQL Server Agent jobs, however, we first create the Chapter23 database, as well as security principles that we use in the following sections.
You can find the script to perform these tasks in Listing 23-2. The script uses PowerShell to create two domain users: SQLUser and WinUser. It then uses SQLCMD to create the Chapter23 database, before creating a login for SQLUser and mapping it to the Chapter23 database with backup permissions. You can run the script from the PowerShell ISE (Integrated Scripting Environment) or from the PowerShell command prompt. You should run the script on a Windows Server operating system; if you are running it on a different operating system, you need to prepare the environment manually.
Be sure to change the server name in the following script to match your own.
Preparing the Environment
Creating a Simple SQL Server Agent Job
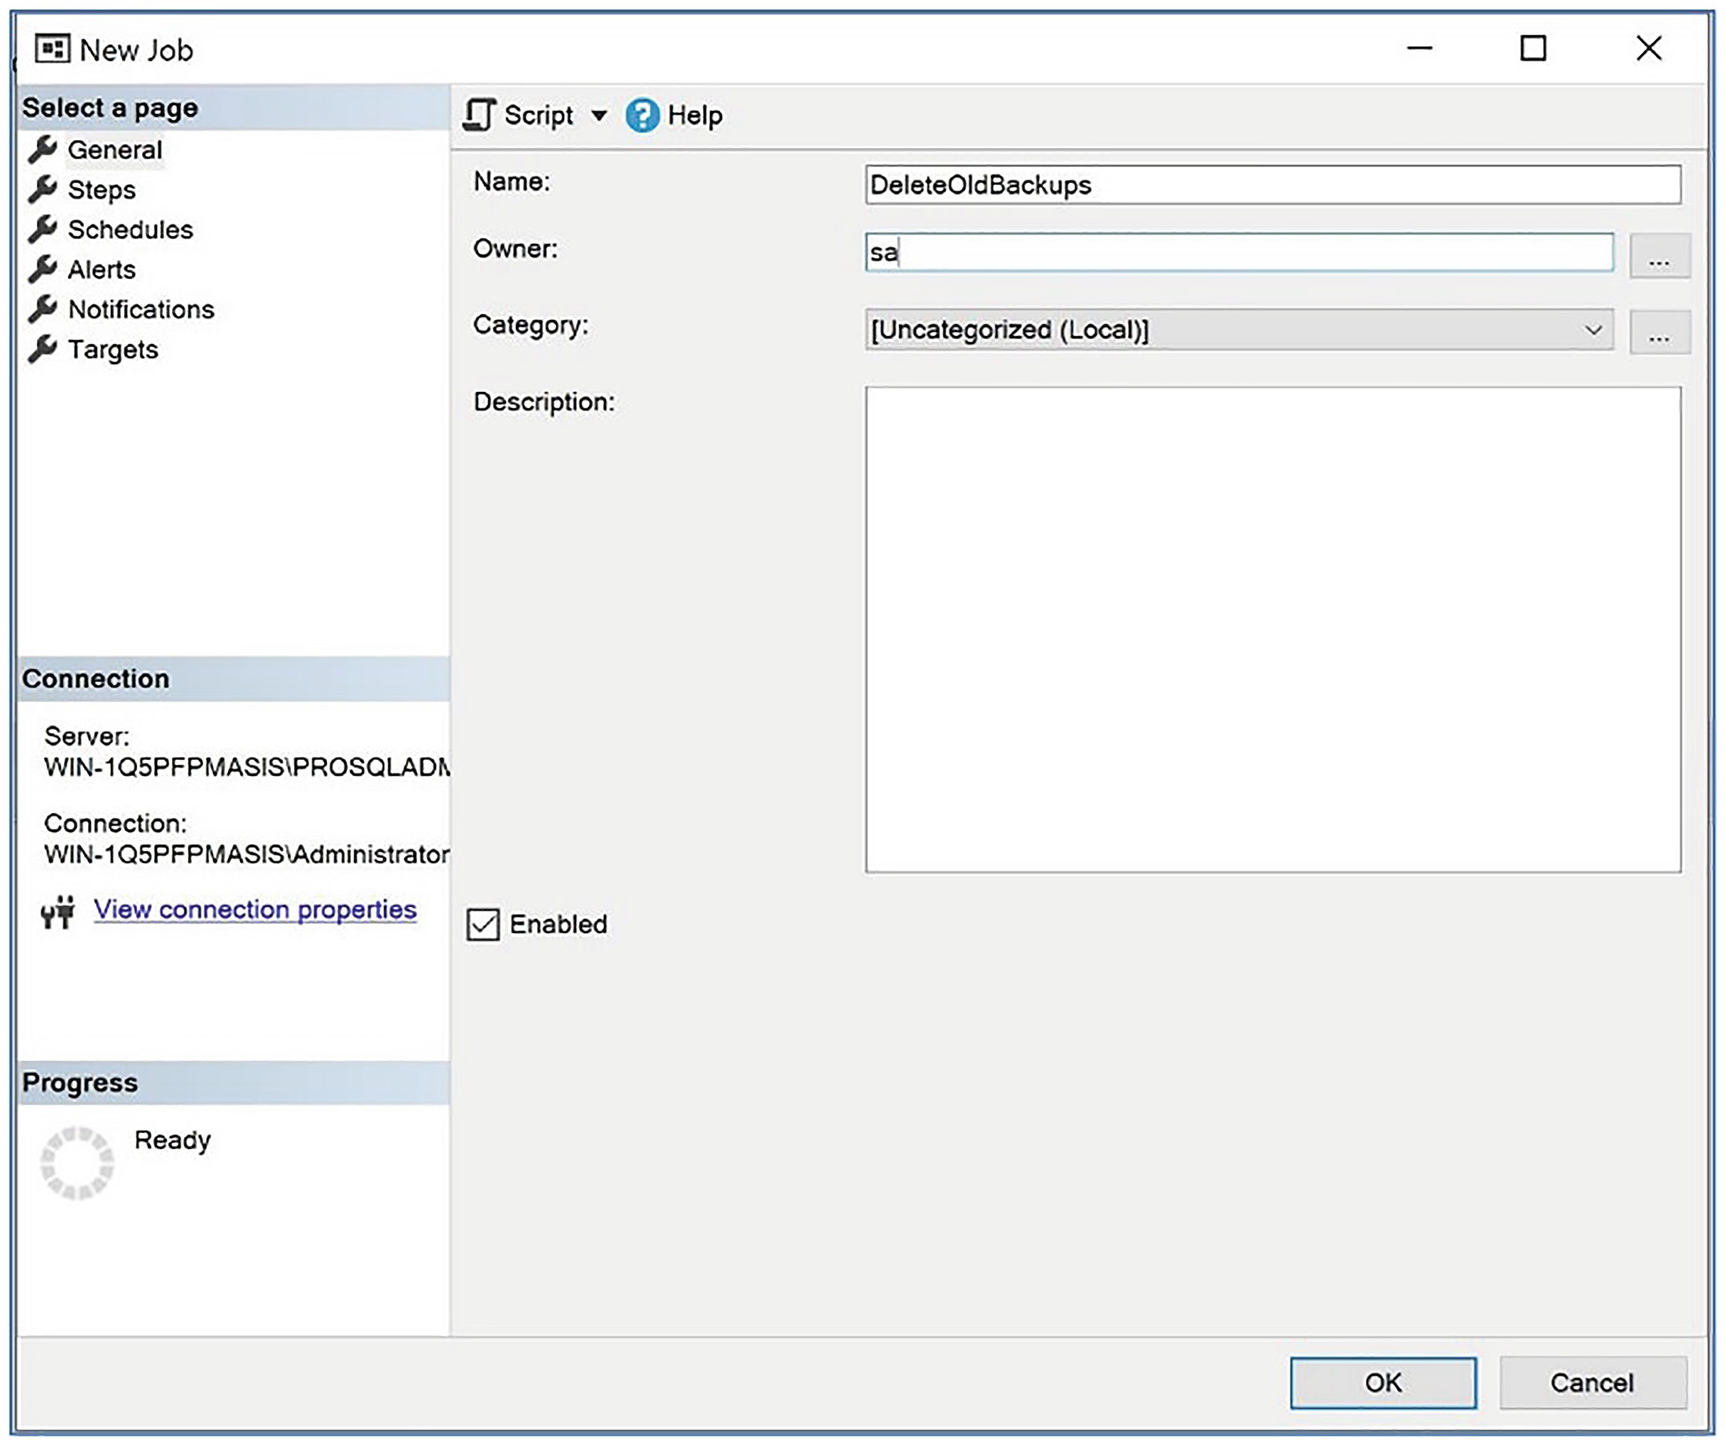
The General page
On this page, we name our job DeleteOldBackups and change the job owner to be the sa account. We can also optionally add a description for the job and choose a category.
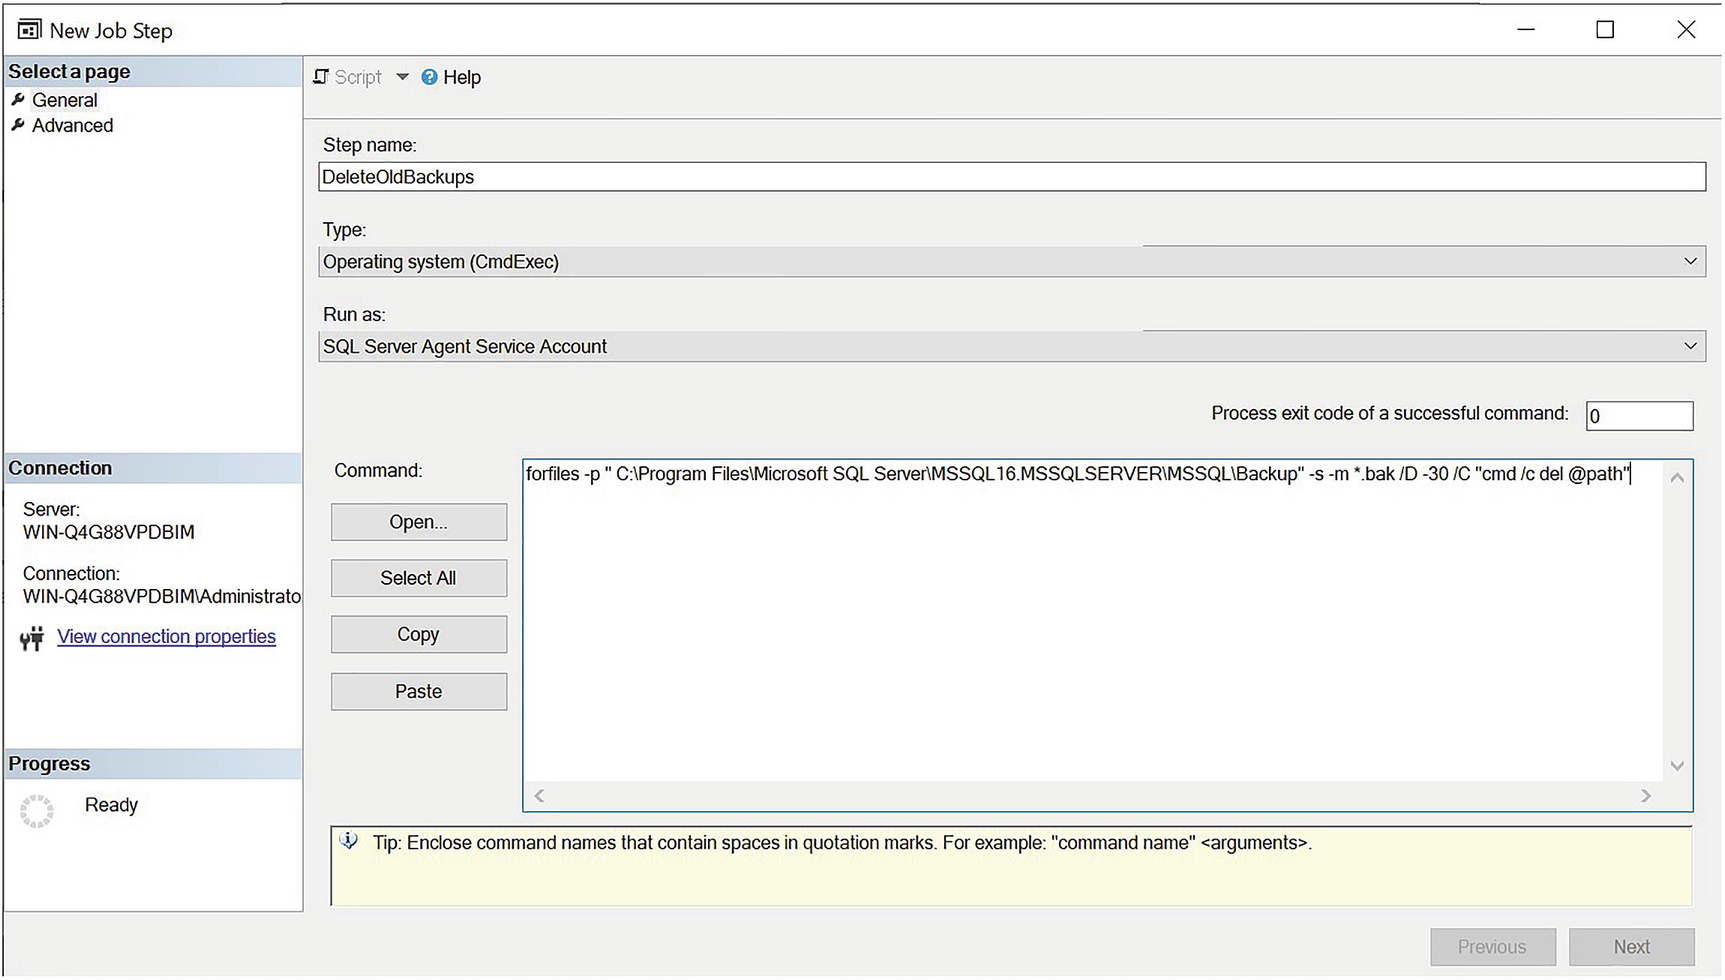
The General tab
Removing Old Backups
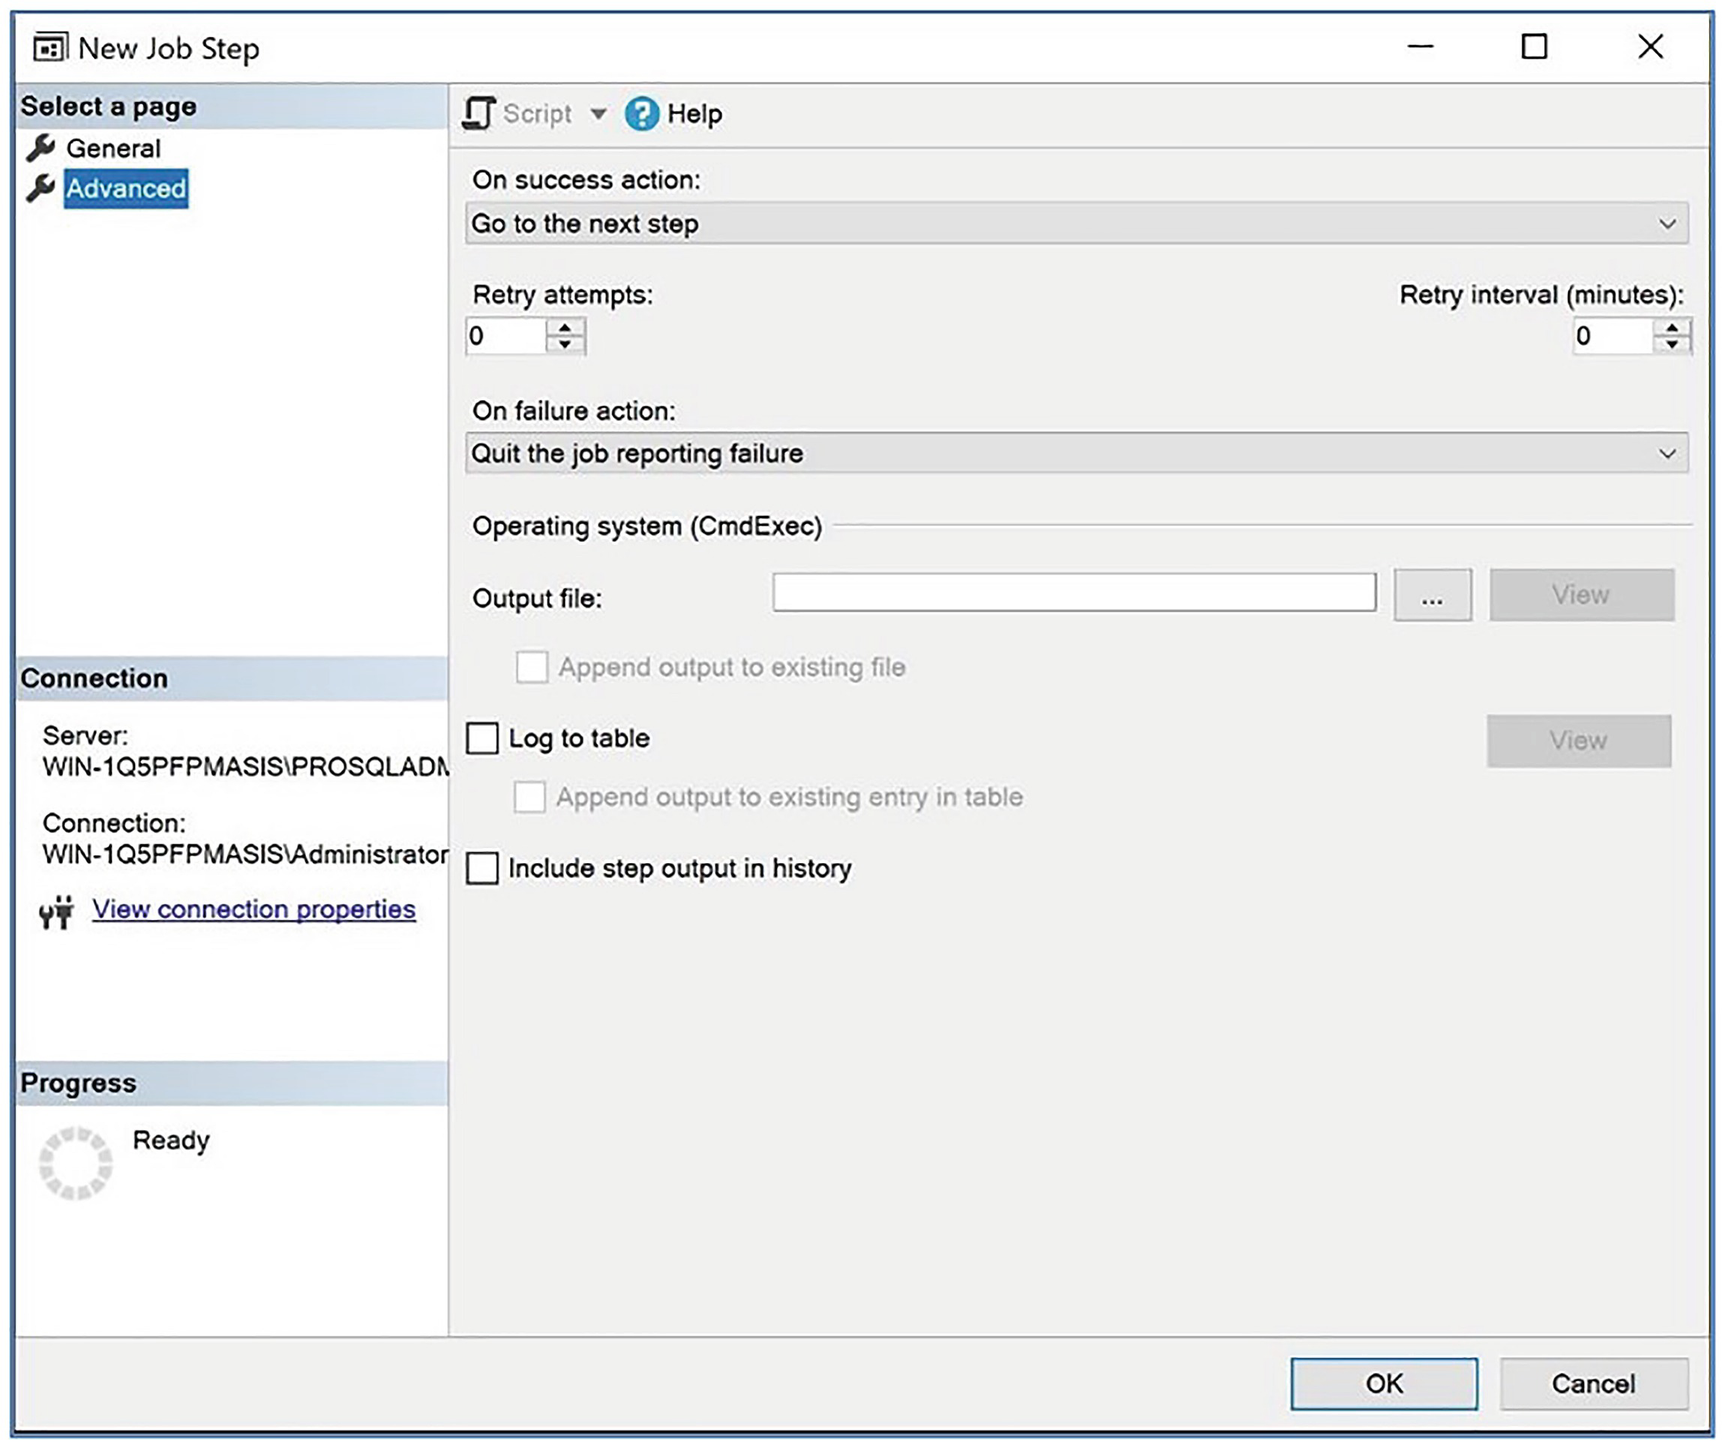
The Advanced page
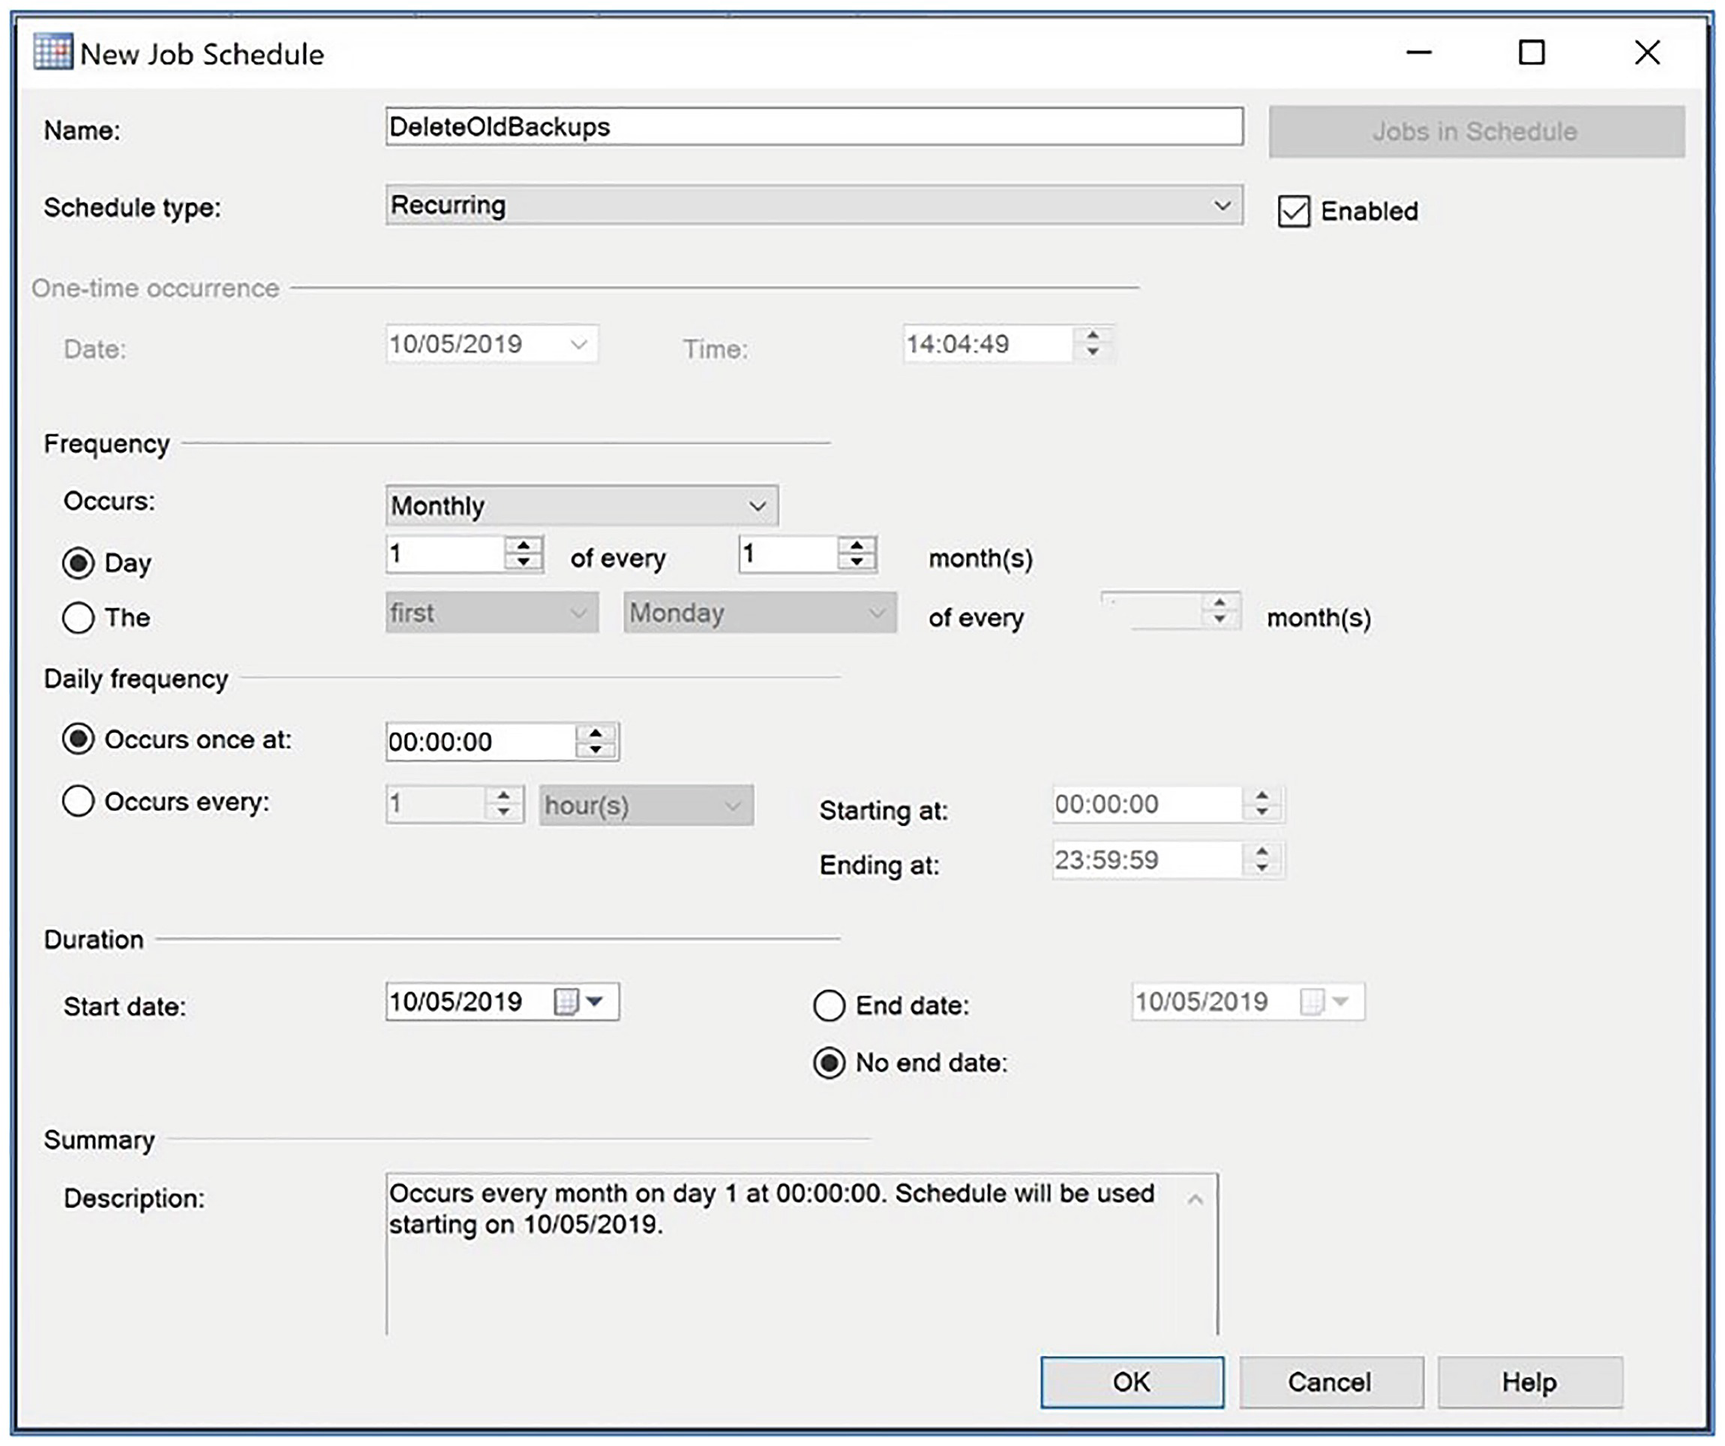
The New Job Schedule dialog box
In the New Job Schedule dialog box, we first enter a name for our schedule. The default schedule type is Recurring, but the screen changes dynamically if we choose other options. In the Frequency section of the screen, we select Monthly. Again, the screen changes dynamically if we select weekly or daily in this drop-down.
We can now configure the date and time that we would like the schedule to invoke job execution. In our scenario, we leave the default option of midnight, on the first day of each month.
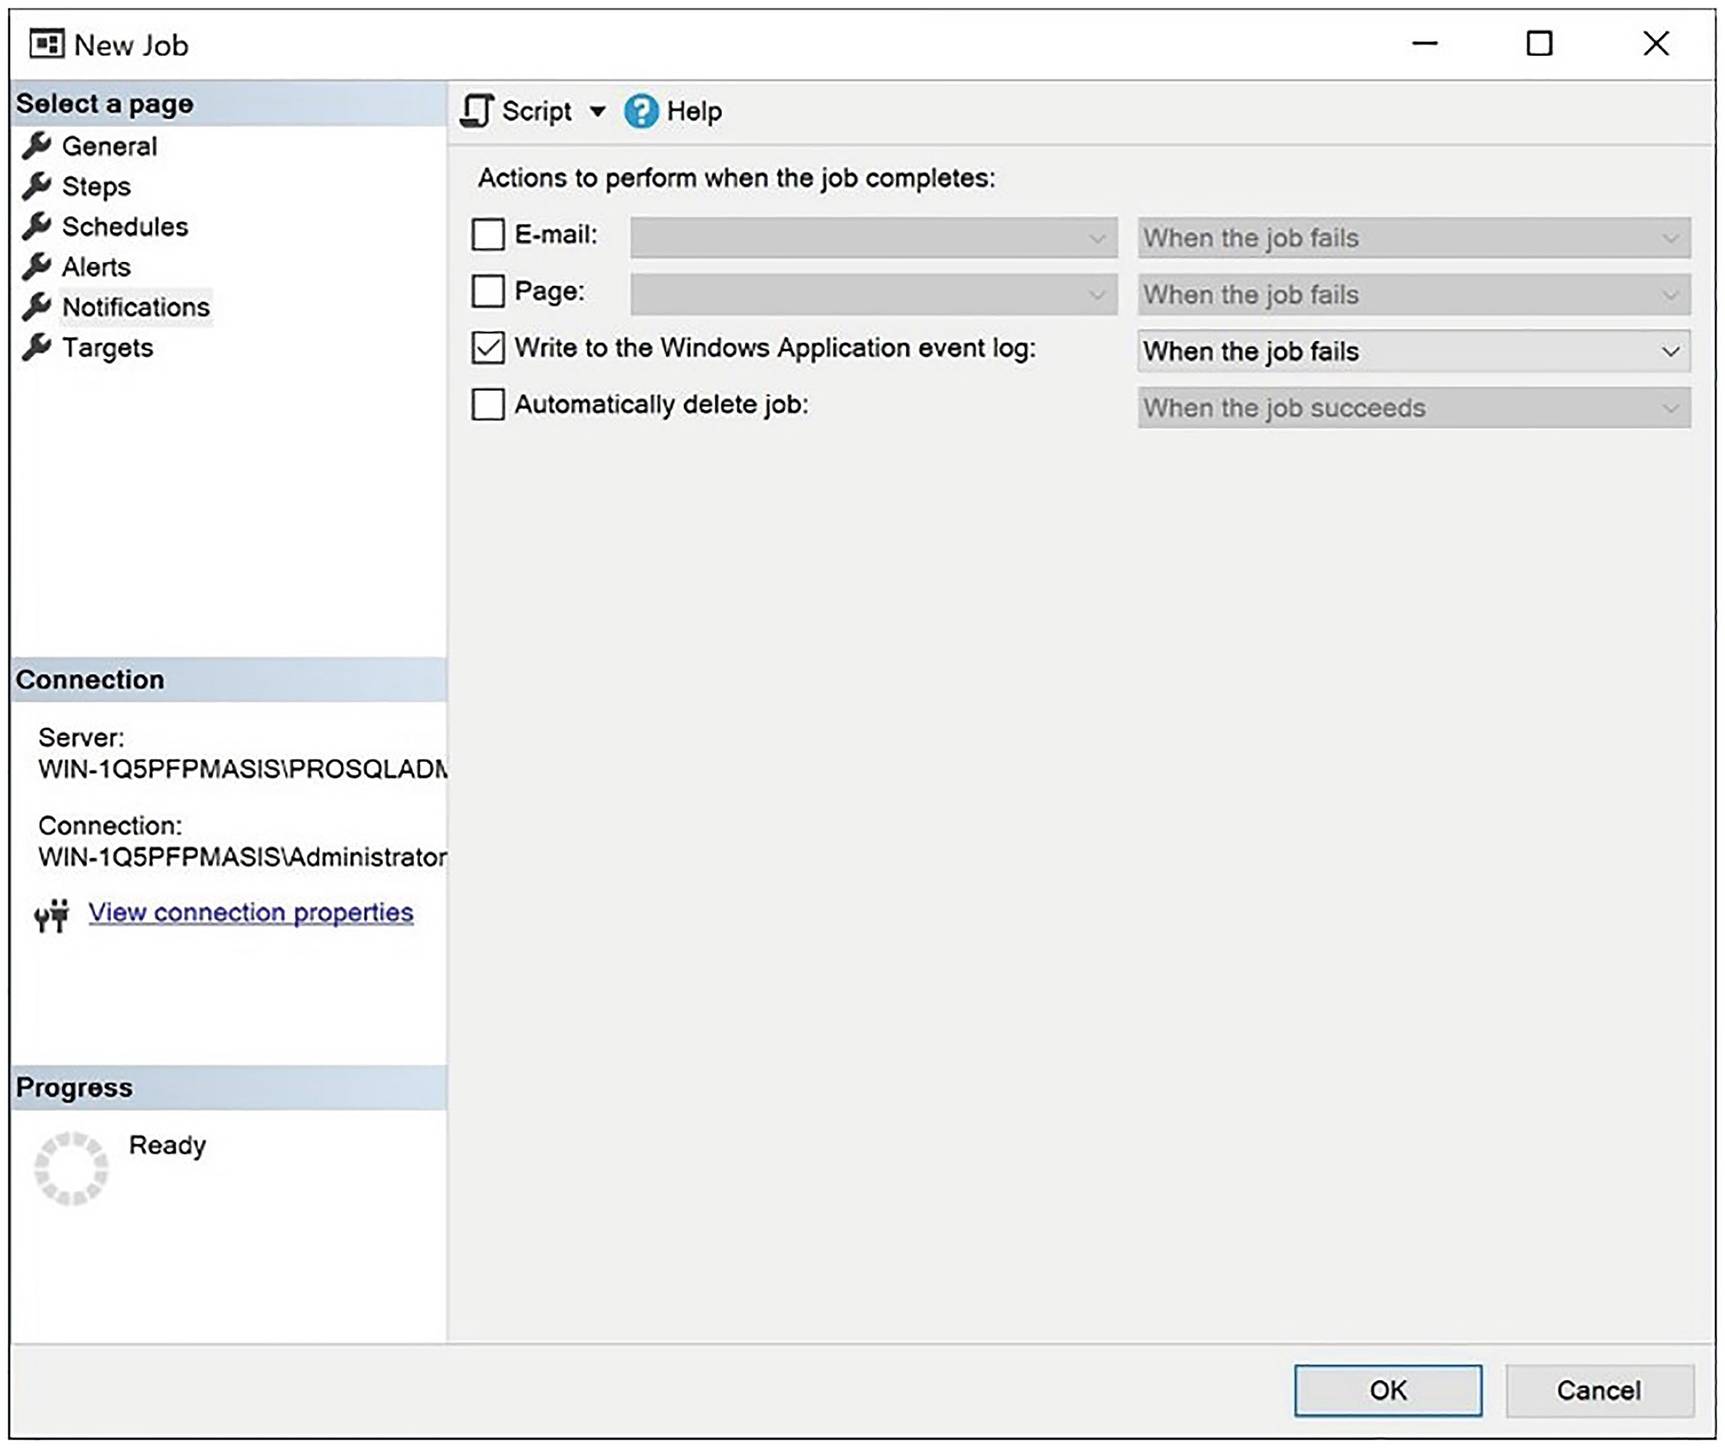
The Notifications page
Creating a Complex SQL Server Agent Job
In the following sections, we create a more complex SQL Server Agent job, which backs up the Chapter23 database. The job then checks that the SQL Server Browser service is running. We use Run As to set the context under which the T-SQL job step runs and a proxy to run the PowerShell job step. We also configure Database Mail so that an operator can be notified of the success or failure of the job and schedule the job to run periodically. You can also see how to create the SQL Server Agent artifacts using T-SQL, which may prove useful when you are working in Server Core environments.
Creating the Credential
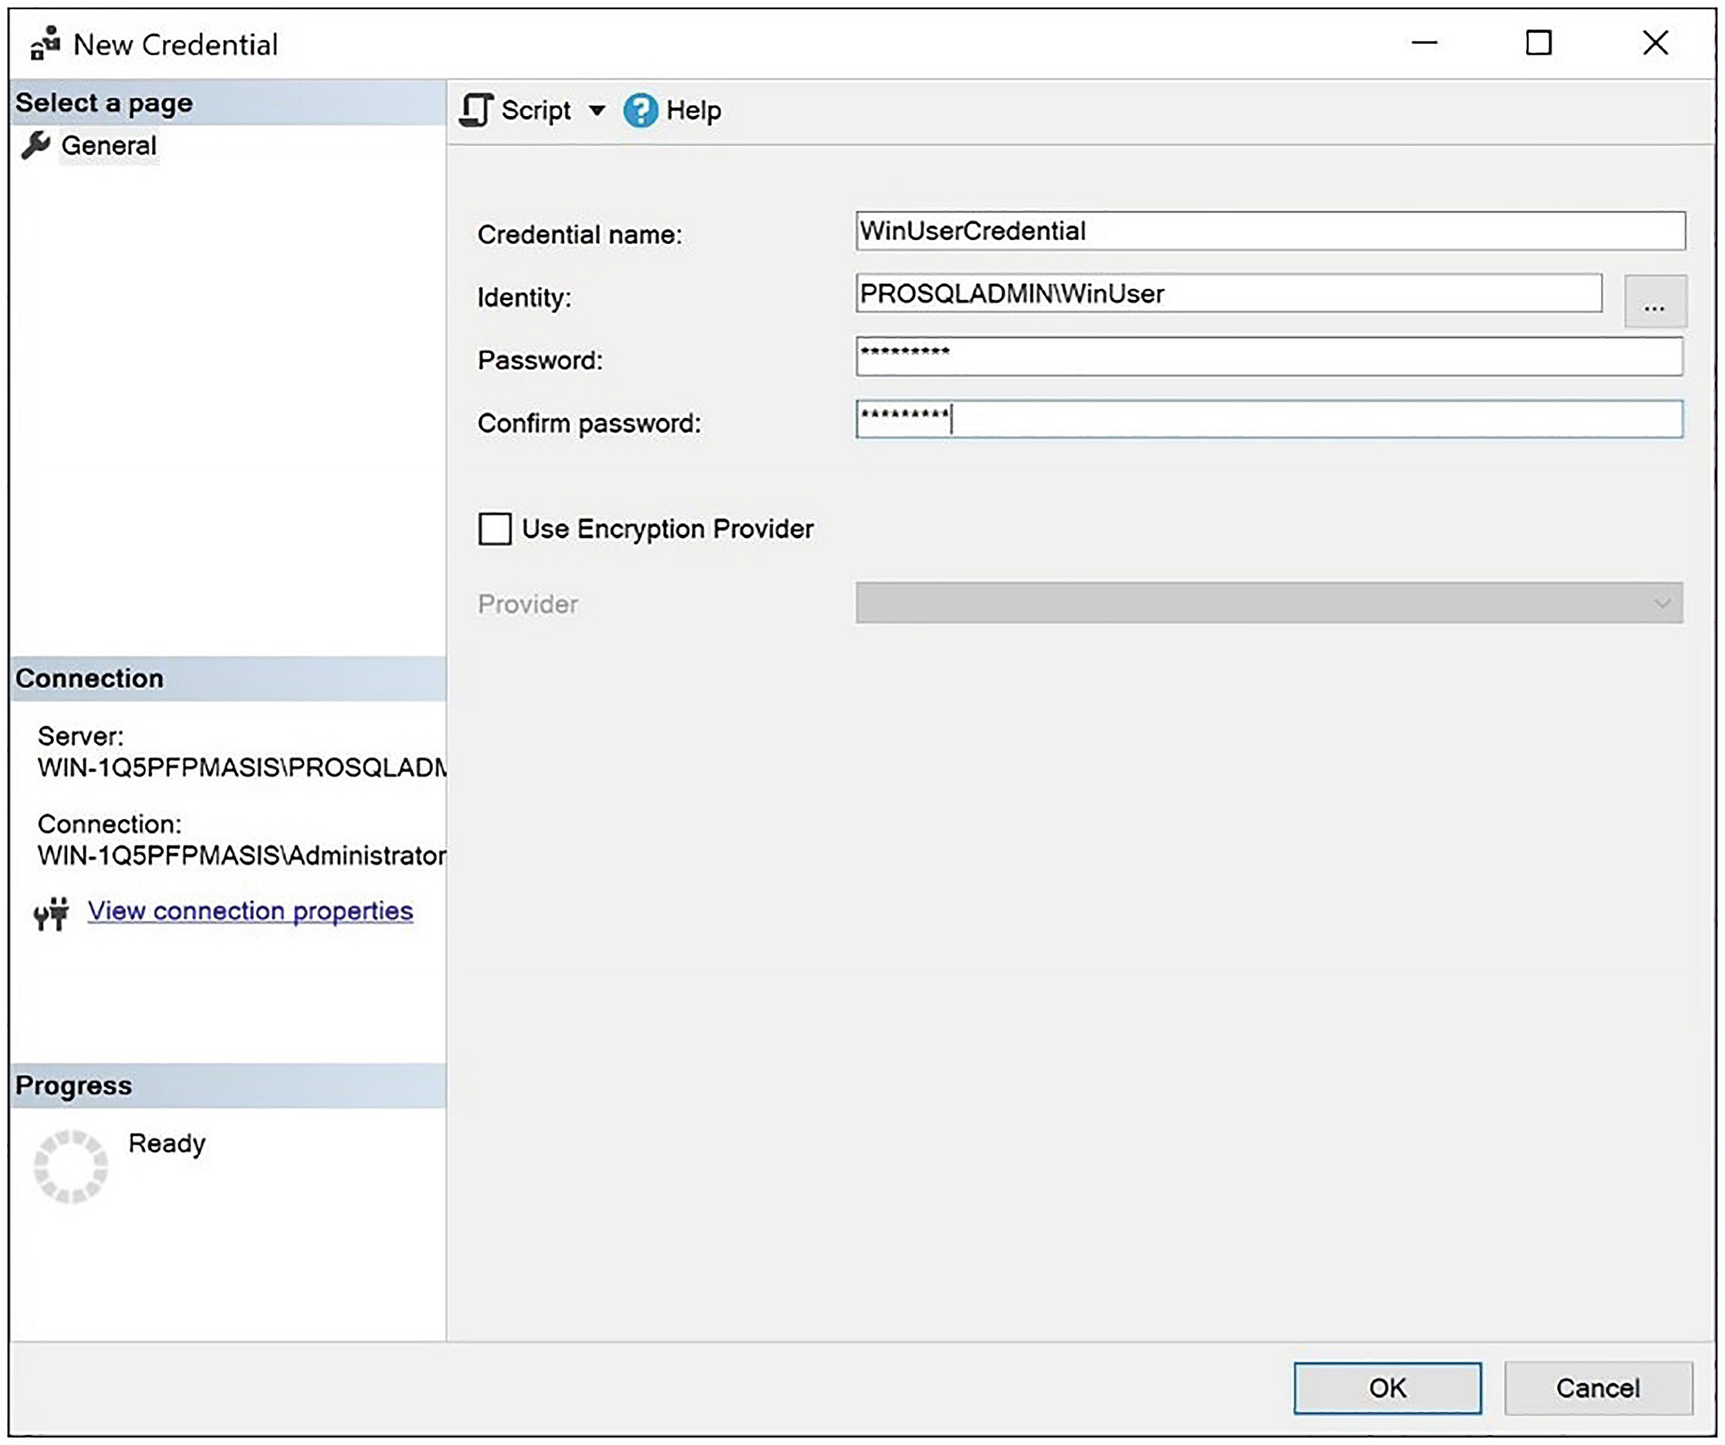
The New Credential dialog box
In this dialog box, use the Credential name field to specify a name for your new credential. In the Identity field, specify the name of the Windows security principle that you wish to use and then type the Windows password in the Password and Confirm password fields. You can also link the credential to an EKM provider. If you wish to do this, check Use Encryption Provider and select your provider from the drop-down list. EKM is discussed further in Chapter 12.
Creating the Proxy
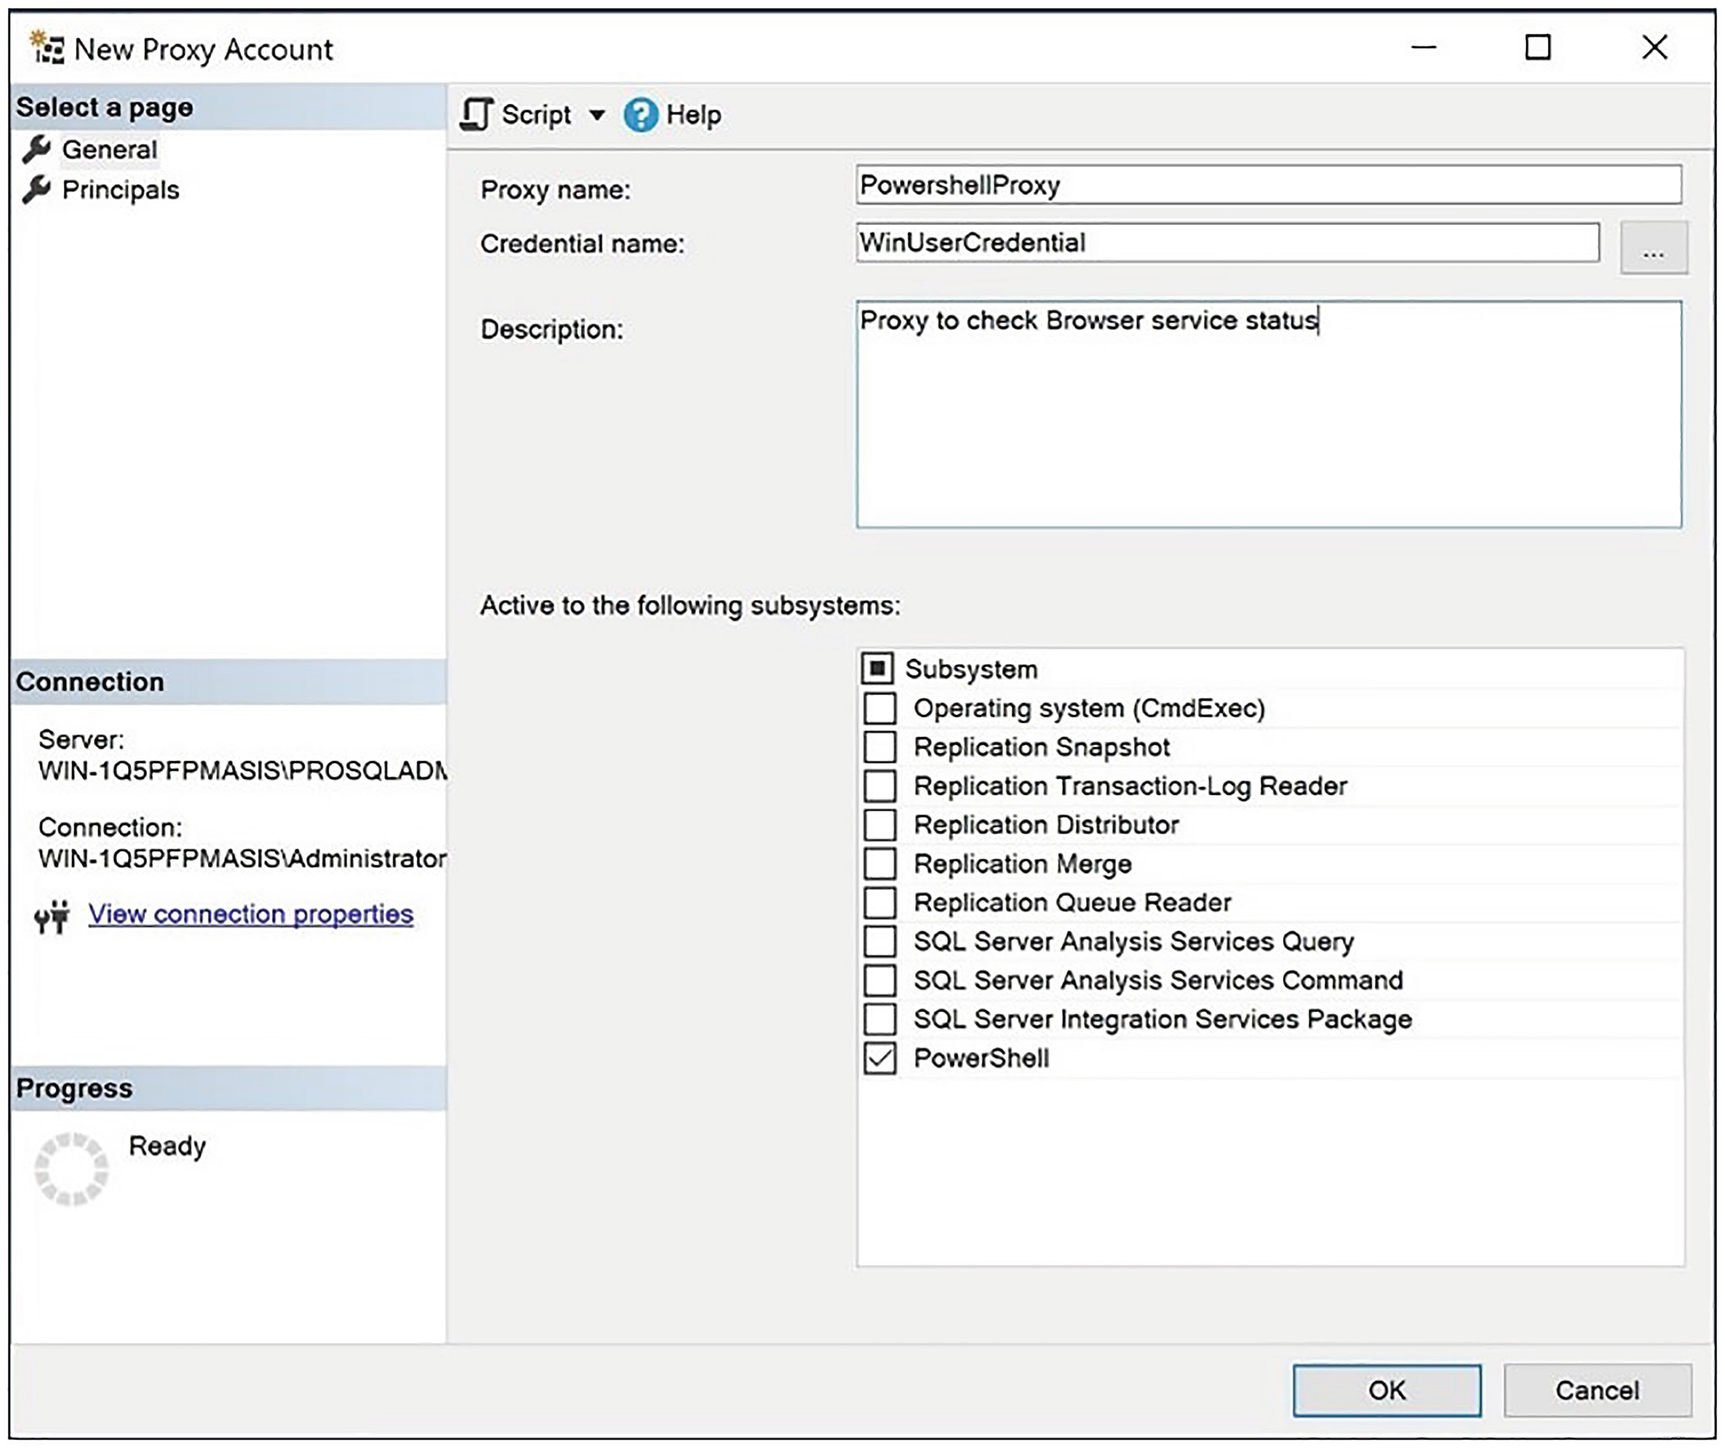
The New Proxy Account dialog box
On this page, we specify a name for our proxy account and give it a description. We use the Credential name field to select our WinUserCredential credential and then use the Active to the following subsystems section to authorize the proxy to run PowerShell job steps.
If you enter the new proxy account from the node of the relevant subsystem located under the Proxies node in Object Explorer, the relevant subsystem is automatically selected within the dialog box.
On the Principles page, we can add logins or server roles that have permissions to use the proxy. In our case, this is not required, because we are using SQL Server with an administrator account, and administrators automatically have permissions to proxy accounts.
Creating the Schedule
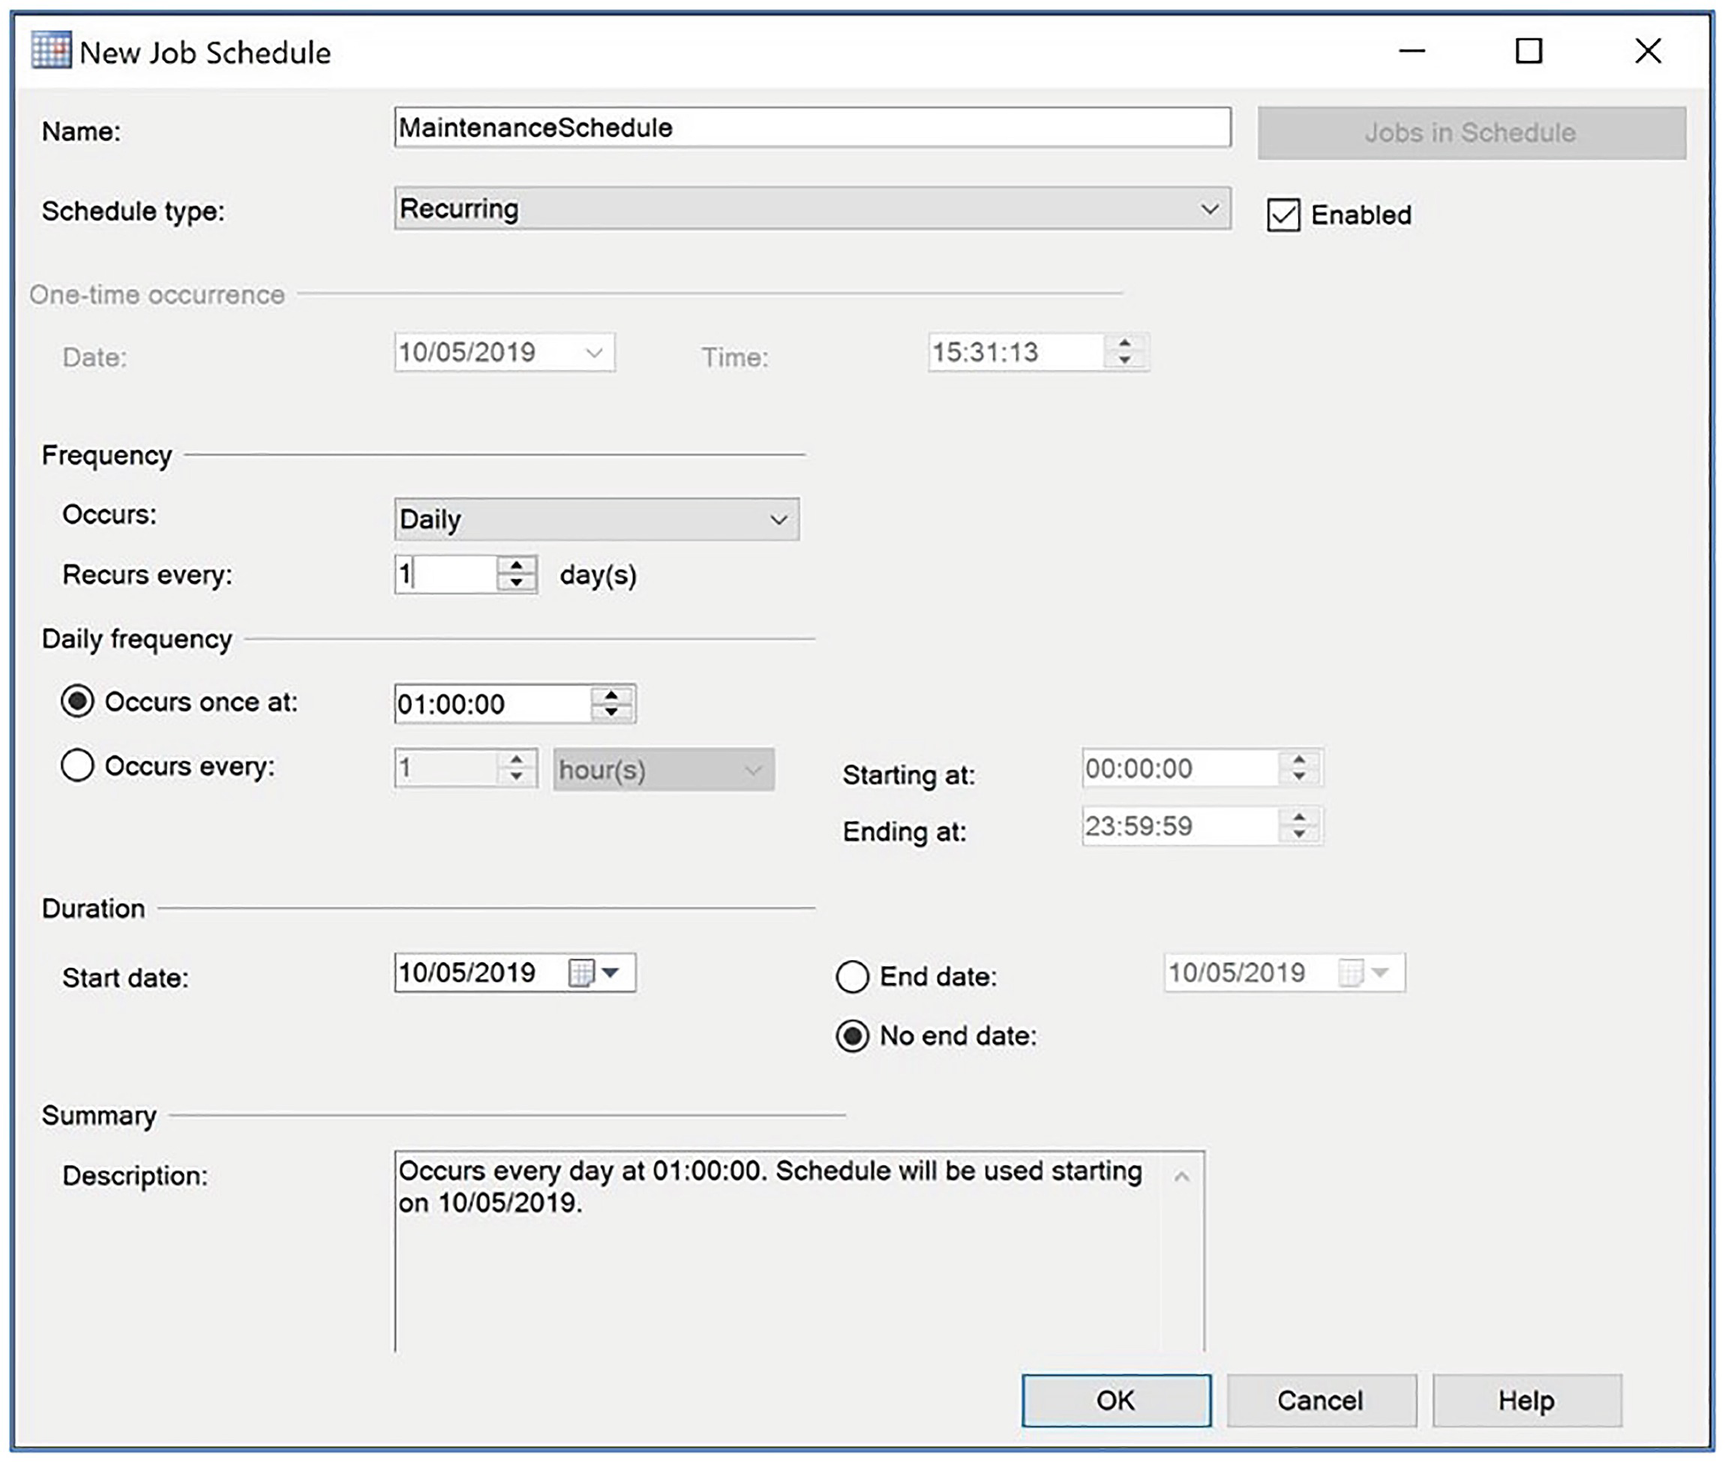
The New Job Schedule dialog box
In this dialog box, we specify a name for the schedule in the Name field and select the condition for the schedule in the Schedule type field. Selecting any condition other than Recurring causes the Frequency and Duration sections to become unavailable. Selecting any condition other than One Time causes the One-time occurrence section to become unavailable. We also ensure that the Enabled box is checked so that the schedule can be used.
In the Frequency section, we select Daily in the Occurs drop-down list. Our selection in this field causes the options within the Frequency and Daily frequency sections to be altered dynamically to suit our selection. Since we want our schedule to run daily at 1 AM, we ensure that 1 is specified in the Recurs every field and change the Occurs once at field to be 1 AM. Because we want our job to start running immediately and never expire, we do not need to edit the fields in the Duration section.
Configuring Database Mail
We would like our DBA’s distribution list to be notified if our job fails. Therefore, we need to create an operator. Before we do this, however, we need to configure the Database Mail on the instance so that the notifications can be delivered. Our first step is to enable the Database Mail extended stored procedures, which are disabled by default, to reduce the attack surface. We can activate these using sp_configure, as demonstrated in Listing 23-4.
If you do not have access to an SMTP Replay server, then the examples in this section will still work, but you will not receive an e-mail.
Enabling Database Mail XPs
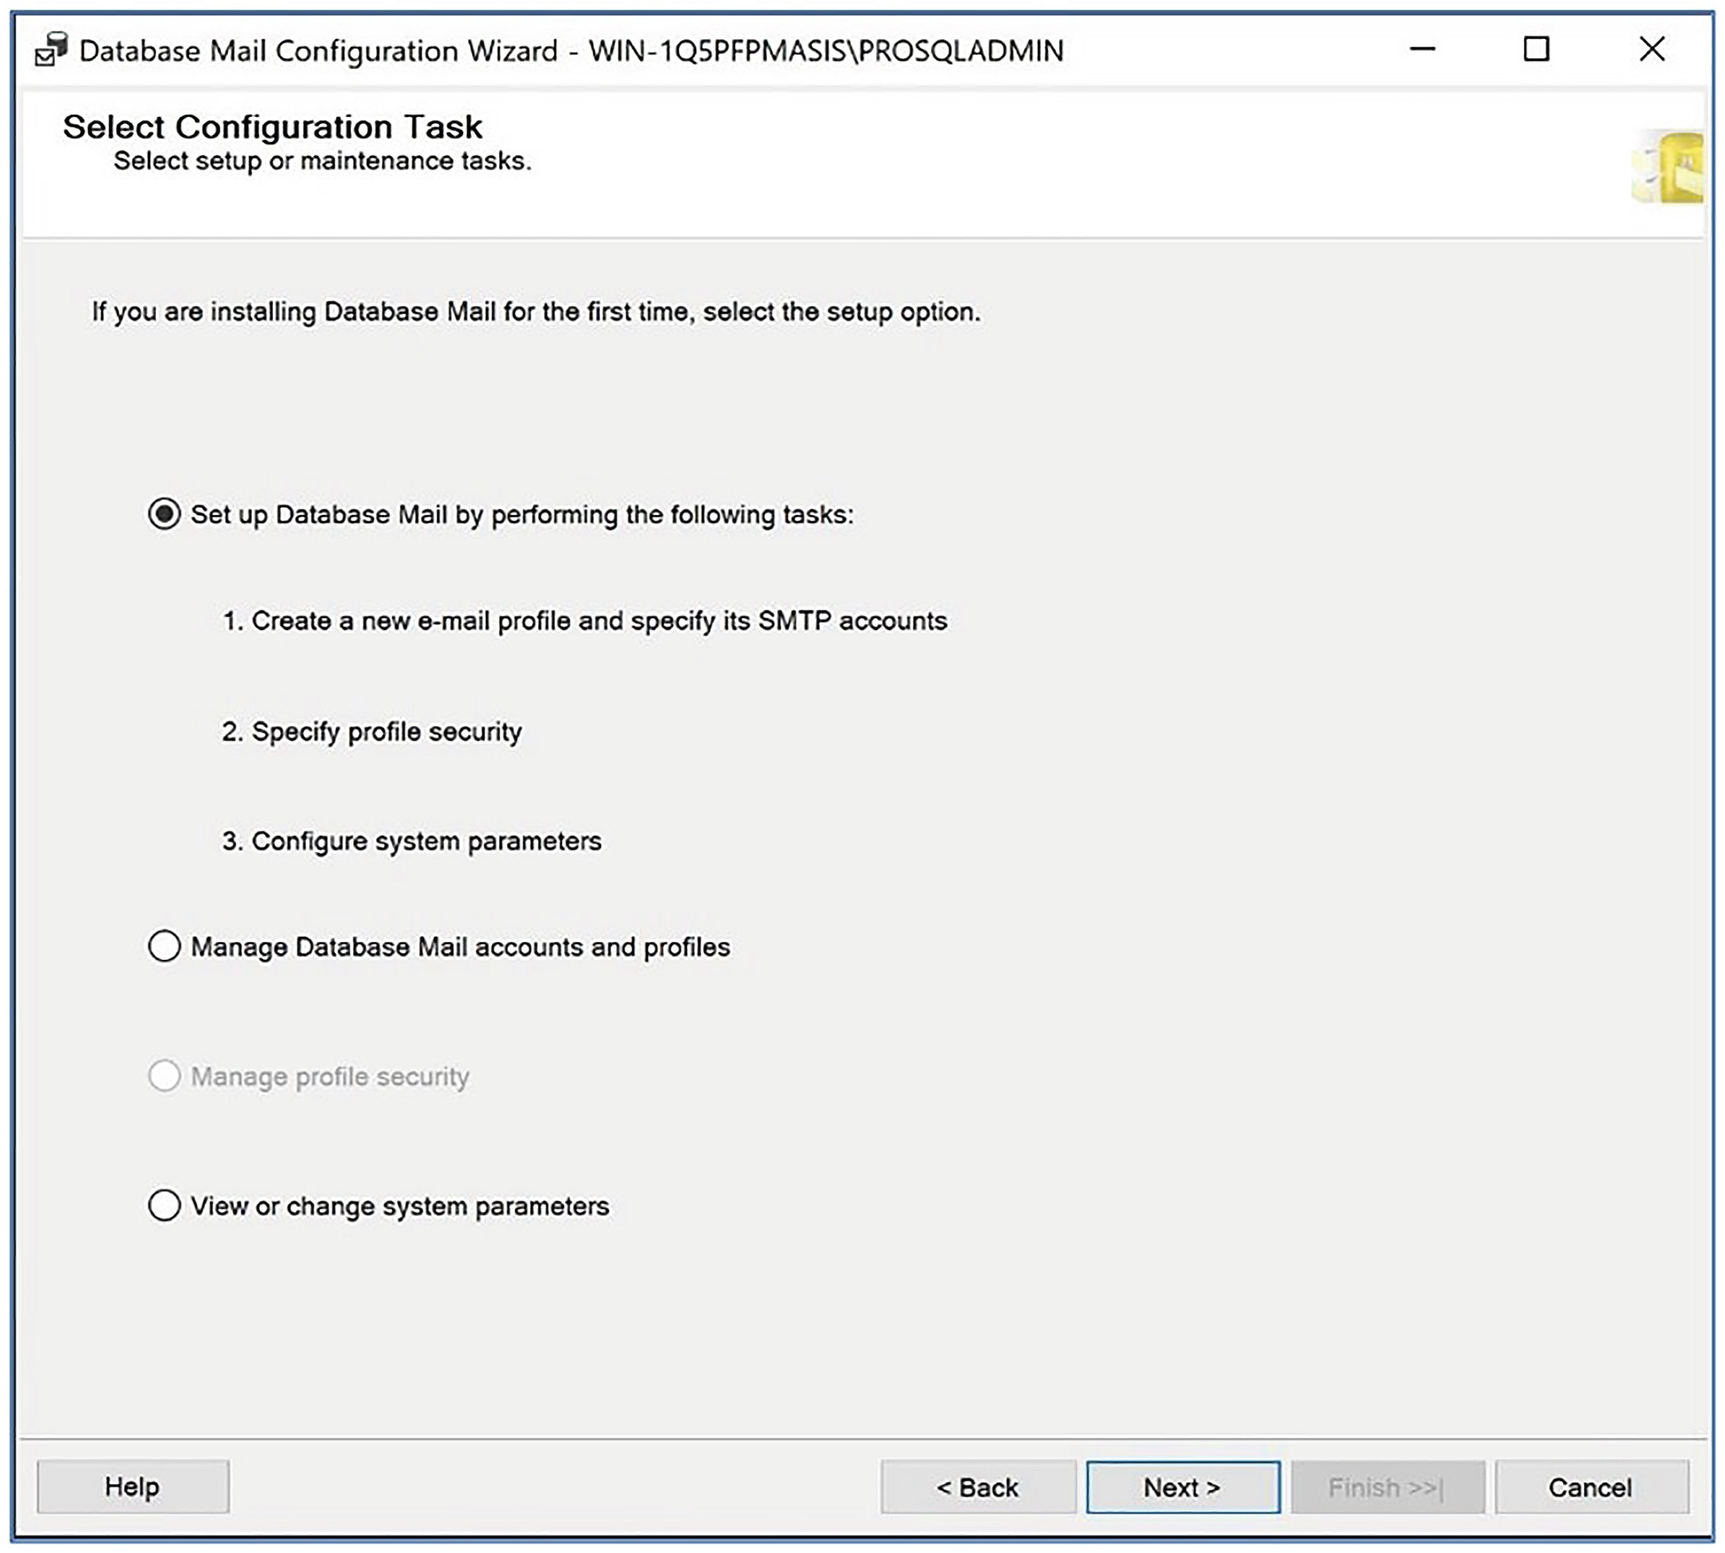
The Select Configuration Task page
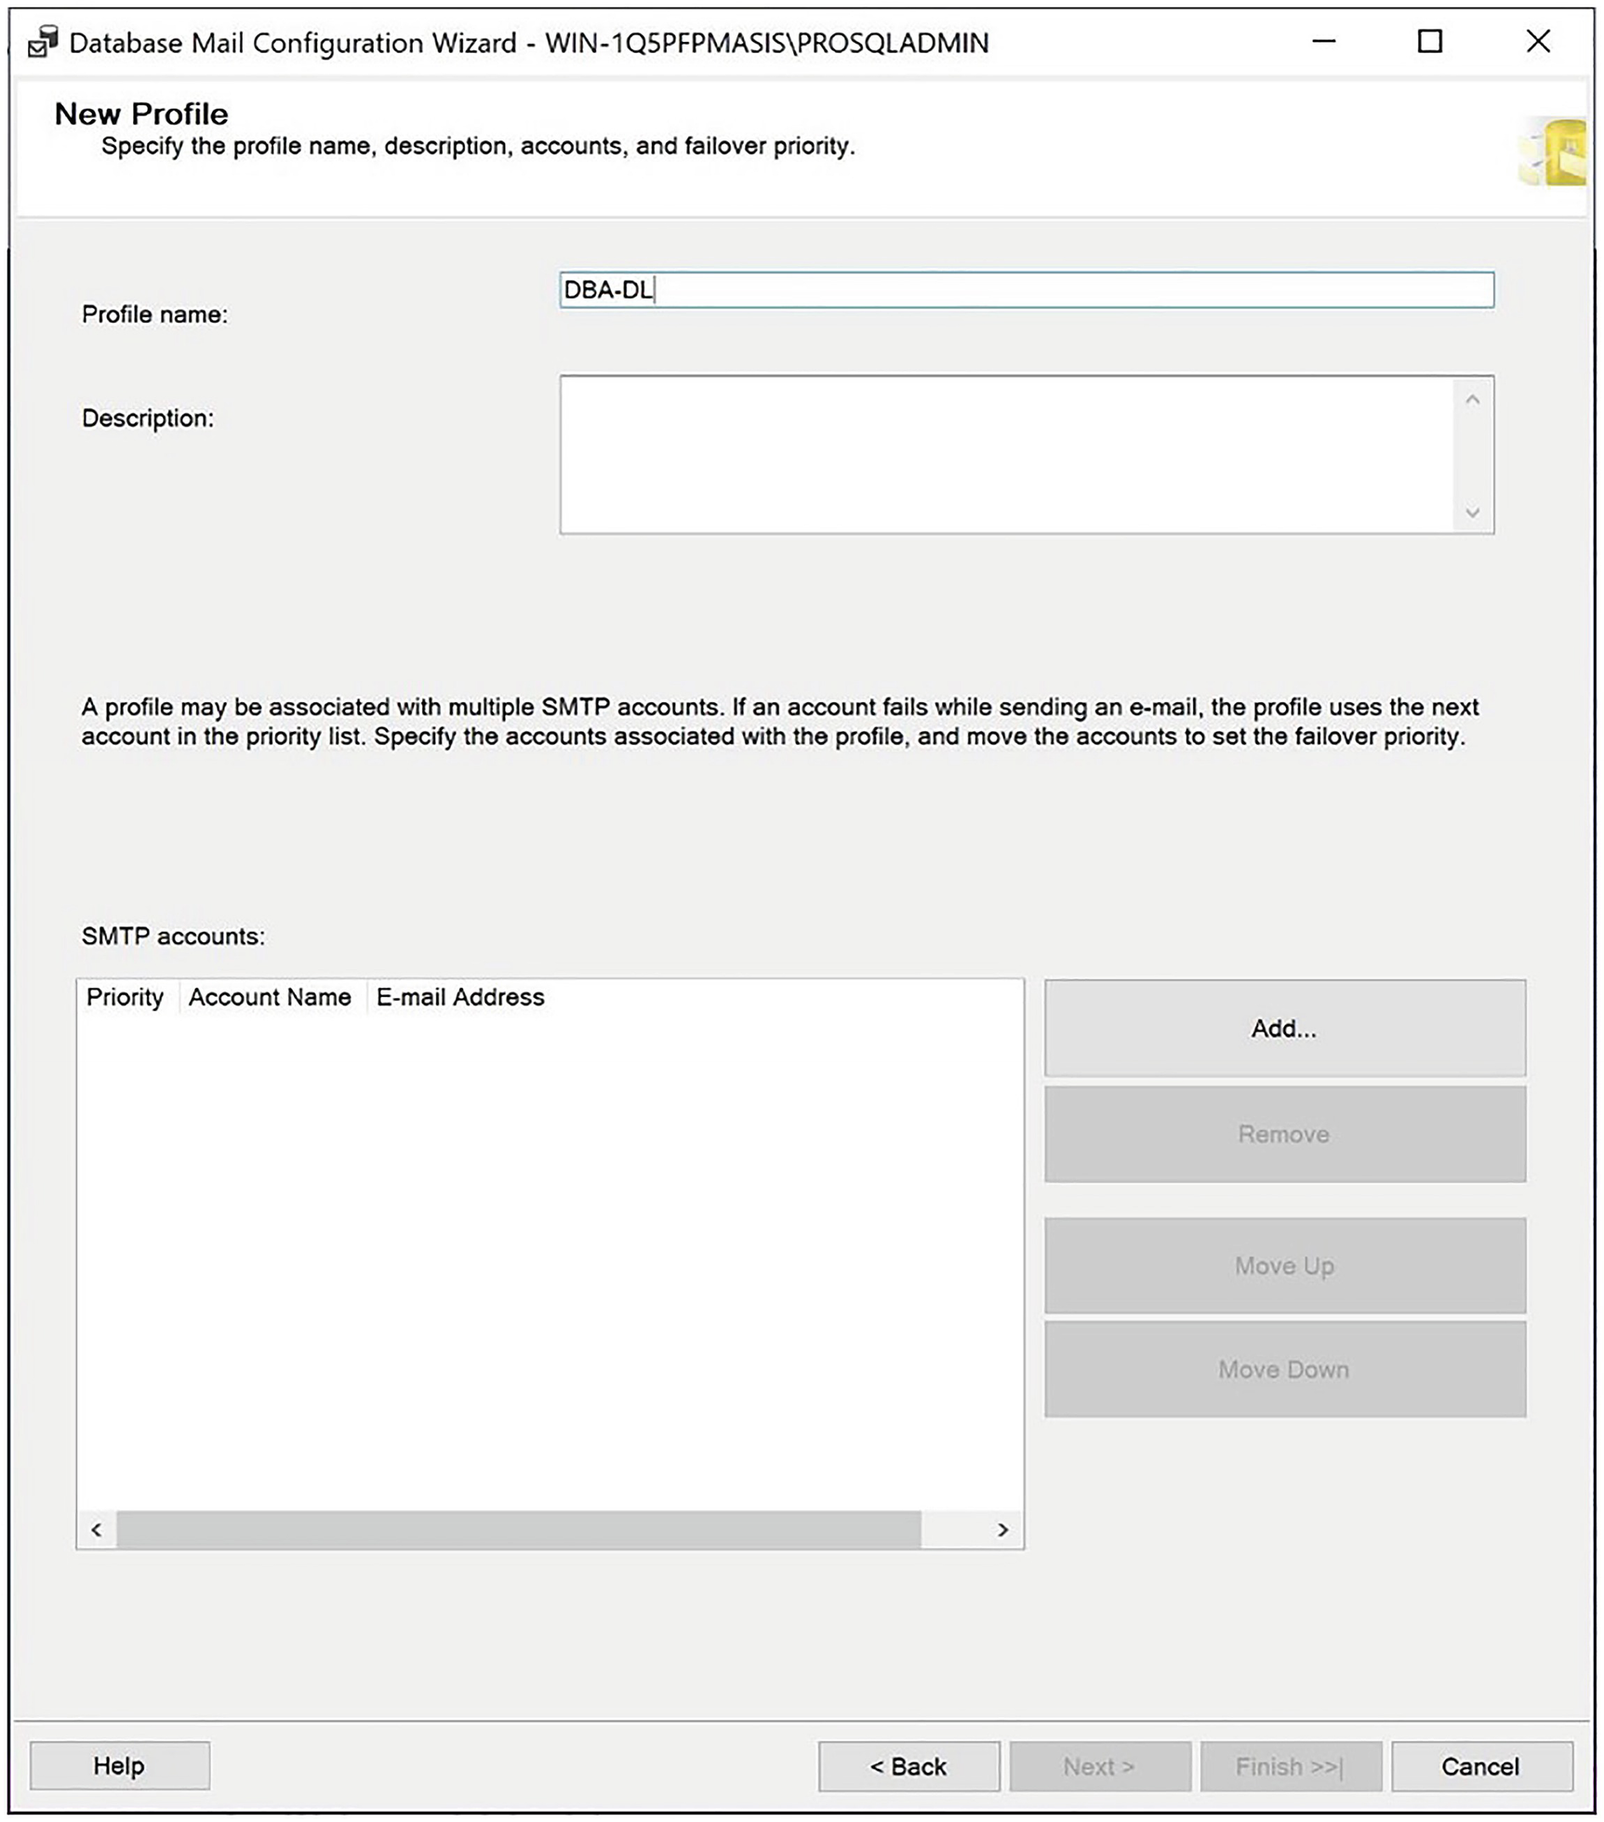
The New Profile page
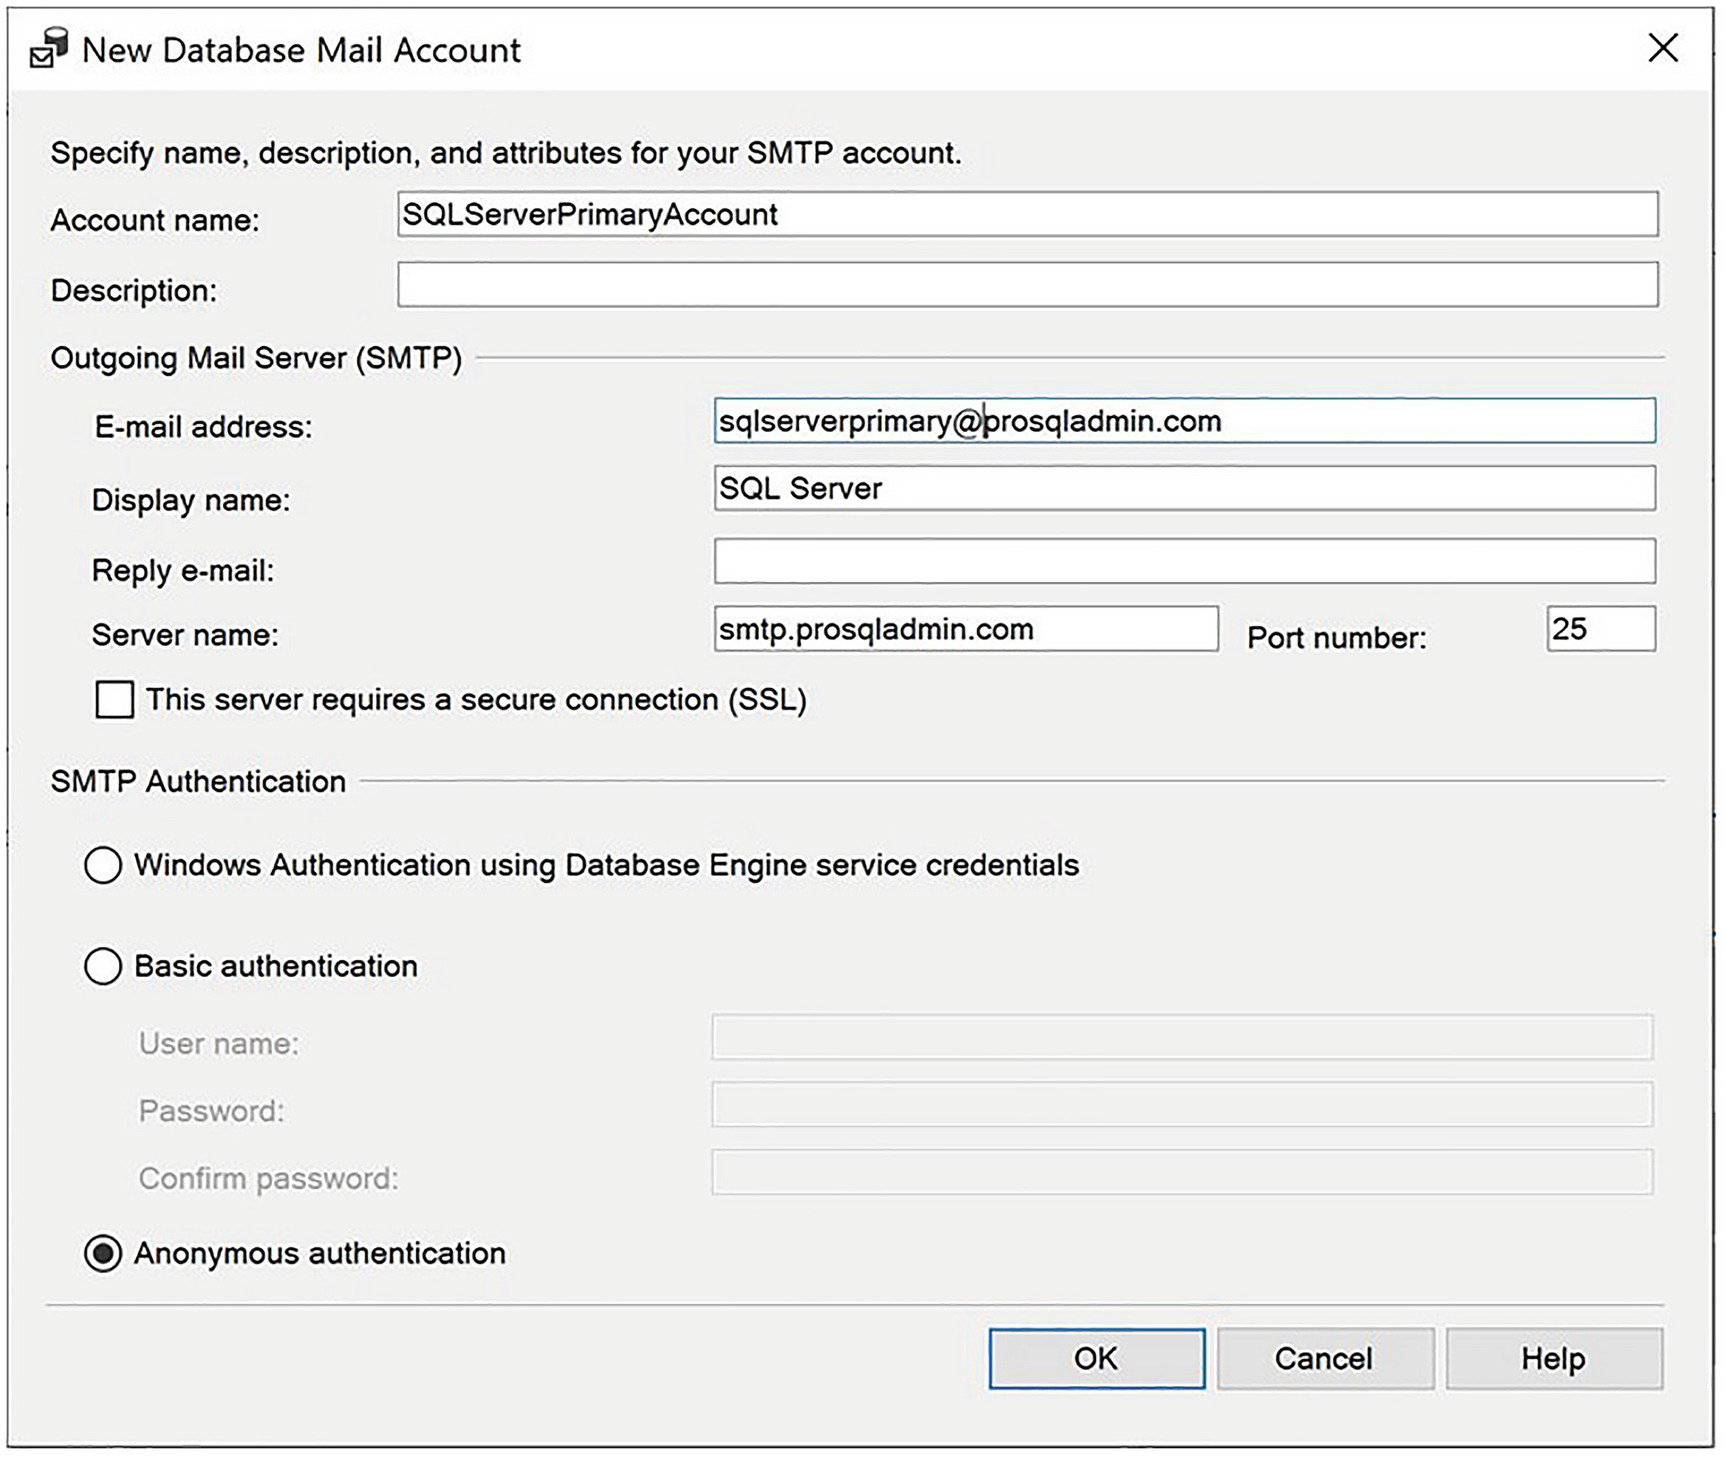
The New Database Mail Account dialog box
In this dialog box, we specify a name for the account and, optionally, a description. We then need to specify the e-mail address that we will use to send mails, along with the name and port of the SMTP server that will deliver the messages. You can also specify a display name for when the e-mails are received. For DBAs who receive the notification, it helps if the display name includes the server/instance from which the notification was generated. We have selected Anonymous authentication. This implies that access to the SMTP server is controlled with firewall rules, as opposed to authentication. This is a relatively common approach in enterprise environments.
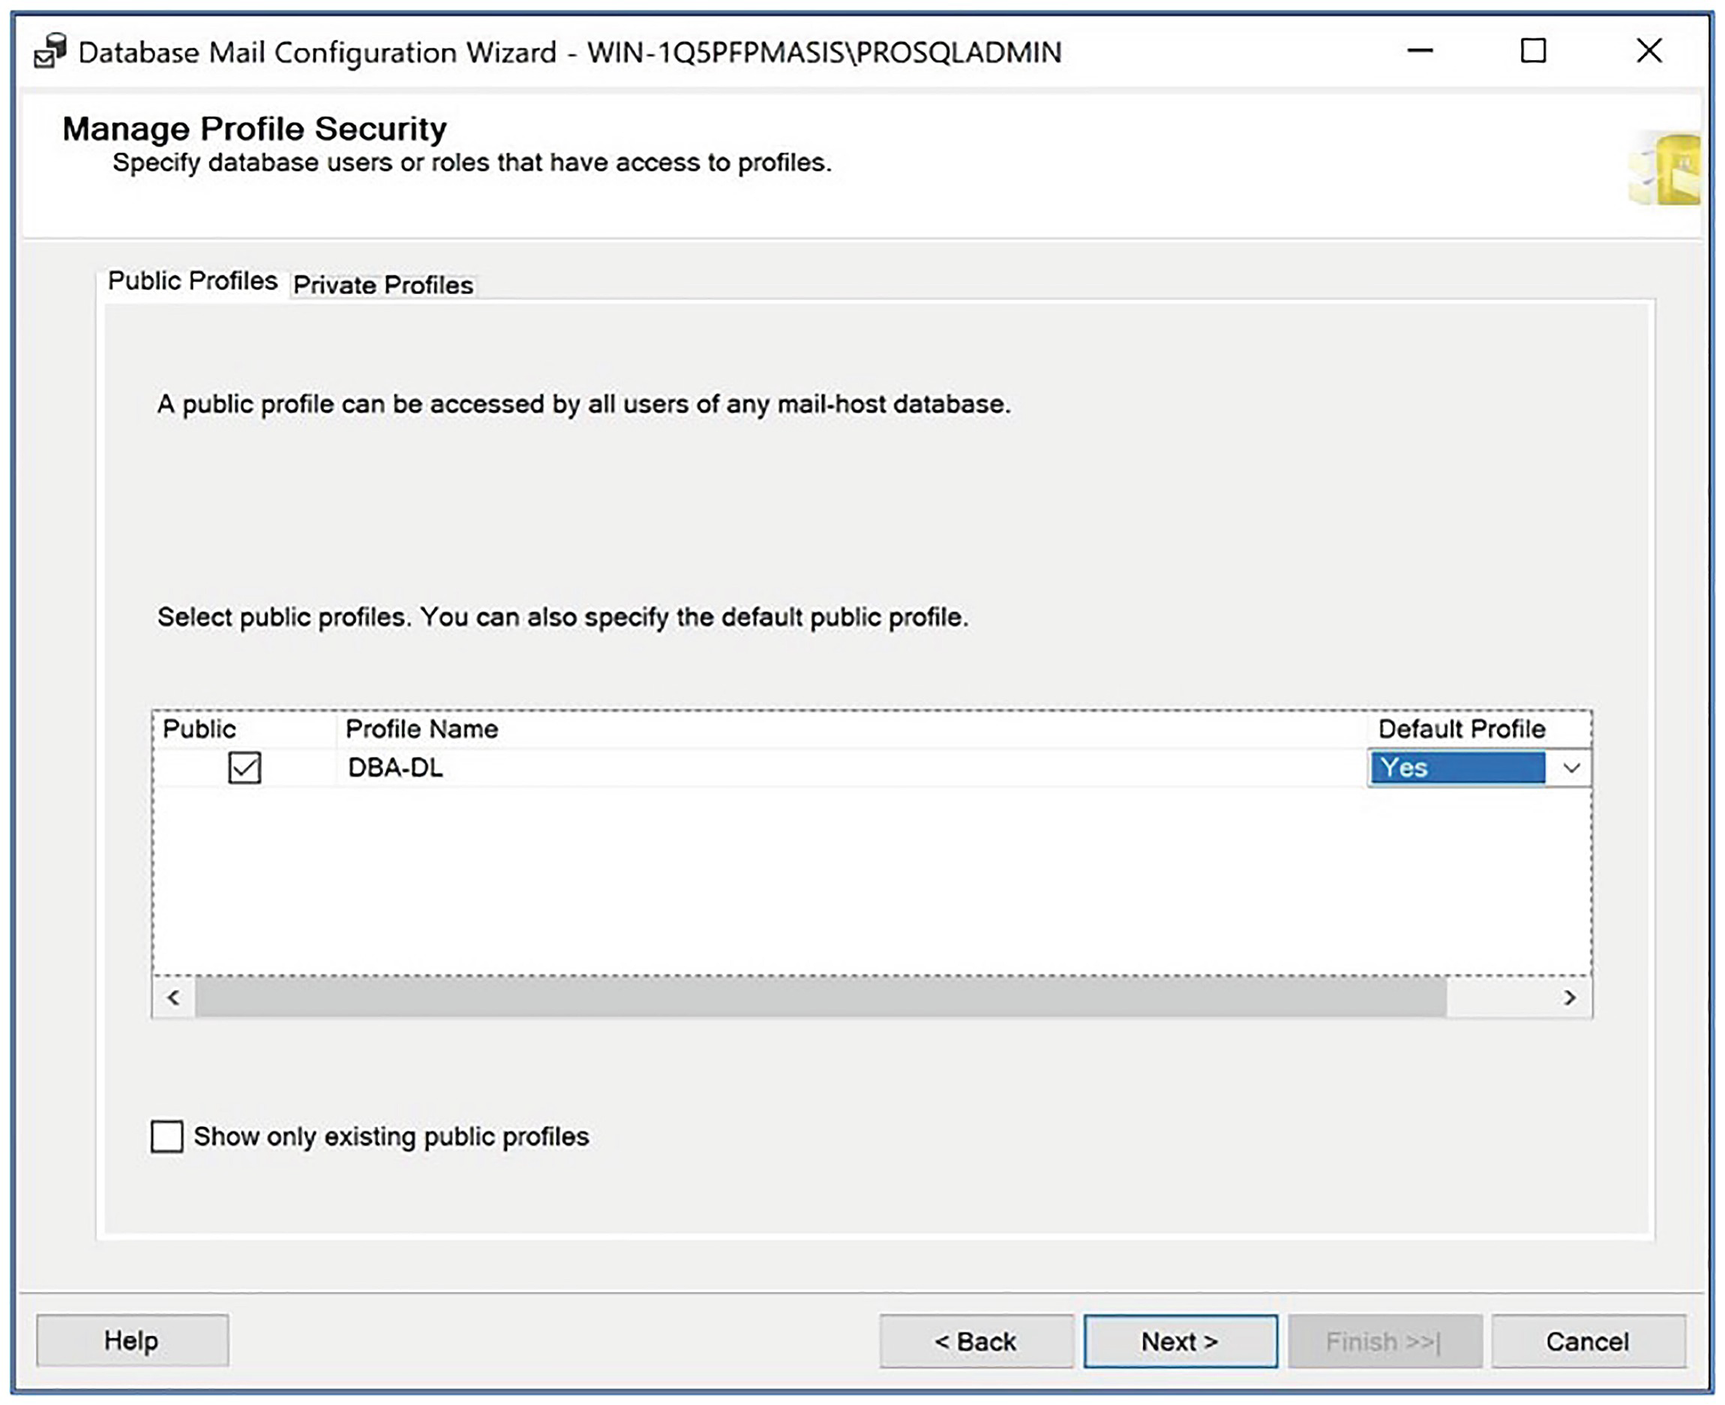
The Public Profiles tab
Normal: Logs errors
Extended: Logs errors, warnings, and informational messages
Verbose: Logs errors, warnings, informational messages, success messages, and internal messages
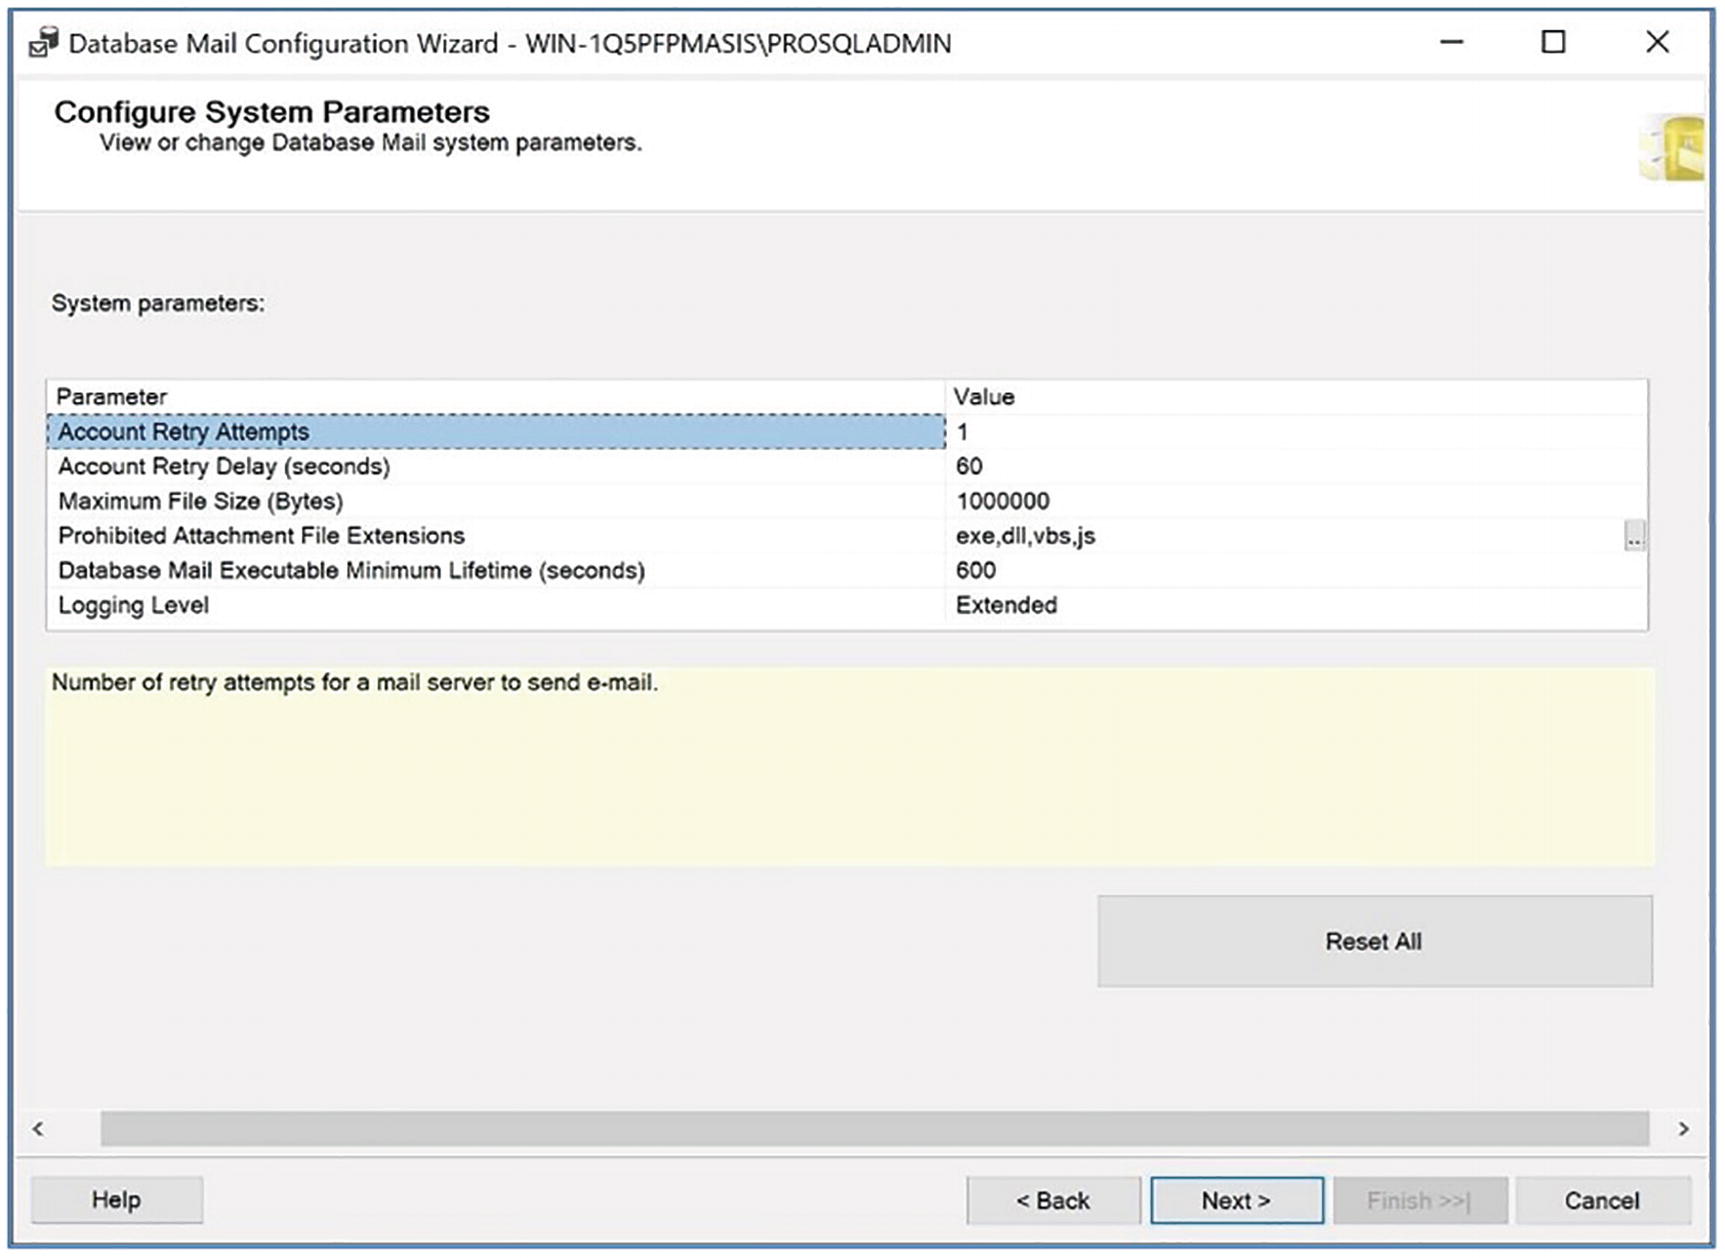
The Configure System Parameters page
Unfortunately, attachment exclusions are implemented as a blacklist, as opposed to a whitelist. This means that to achieve the best balance of security and operational support, you should give time and thought to the file types that should be excluded.
On the Complete the Wizard page, you are provided with a summary of the tasks that will be performed. In our scenario, this includes creating a new account, creating a new profile, adding the account to the profile, and configuring the profile’s security.
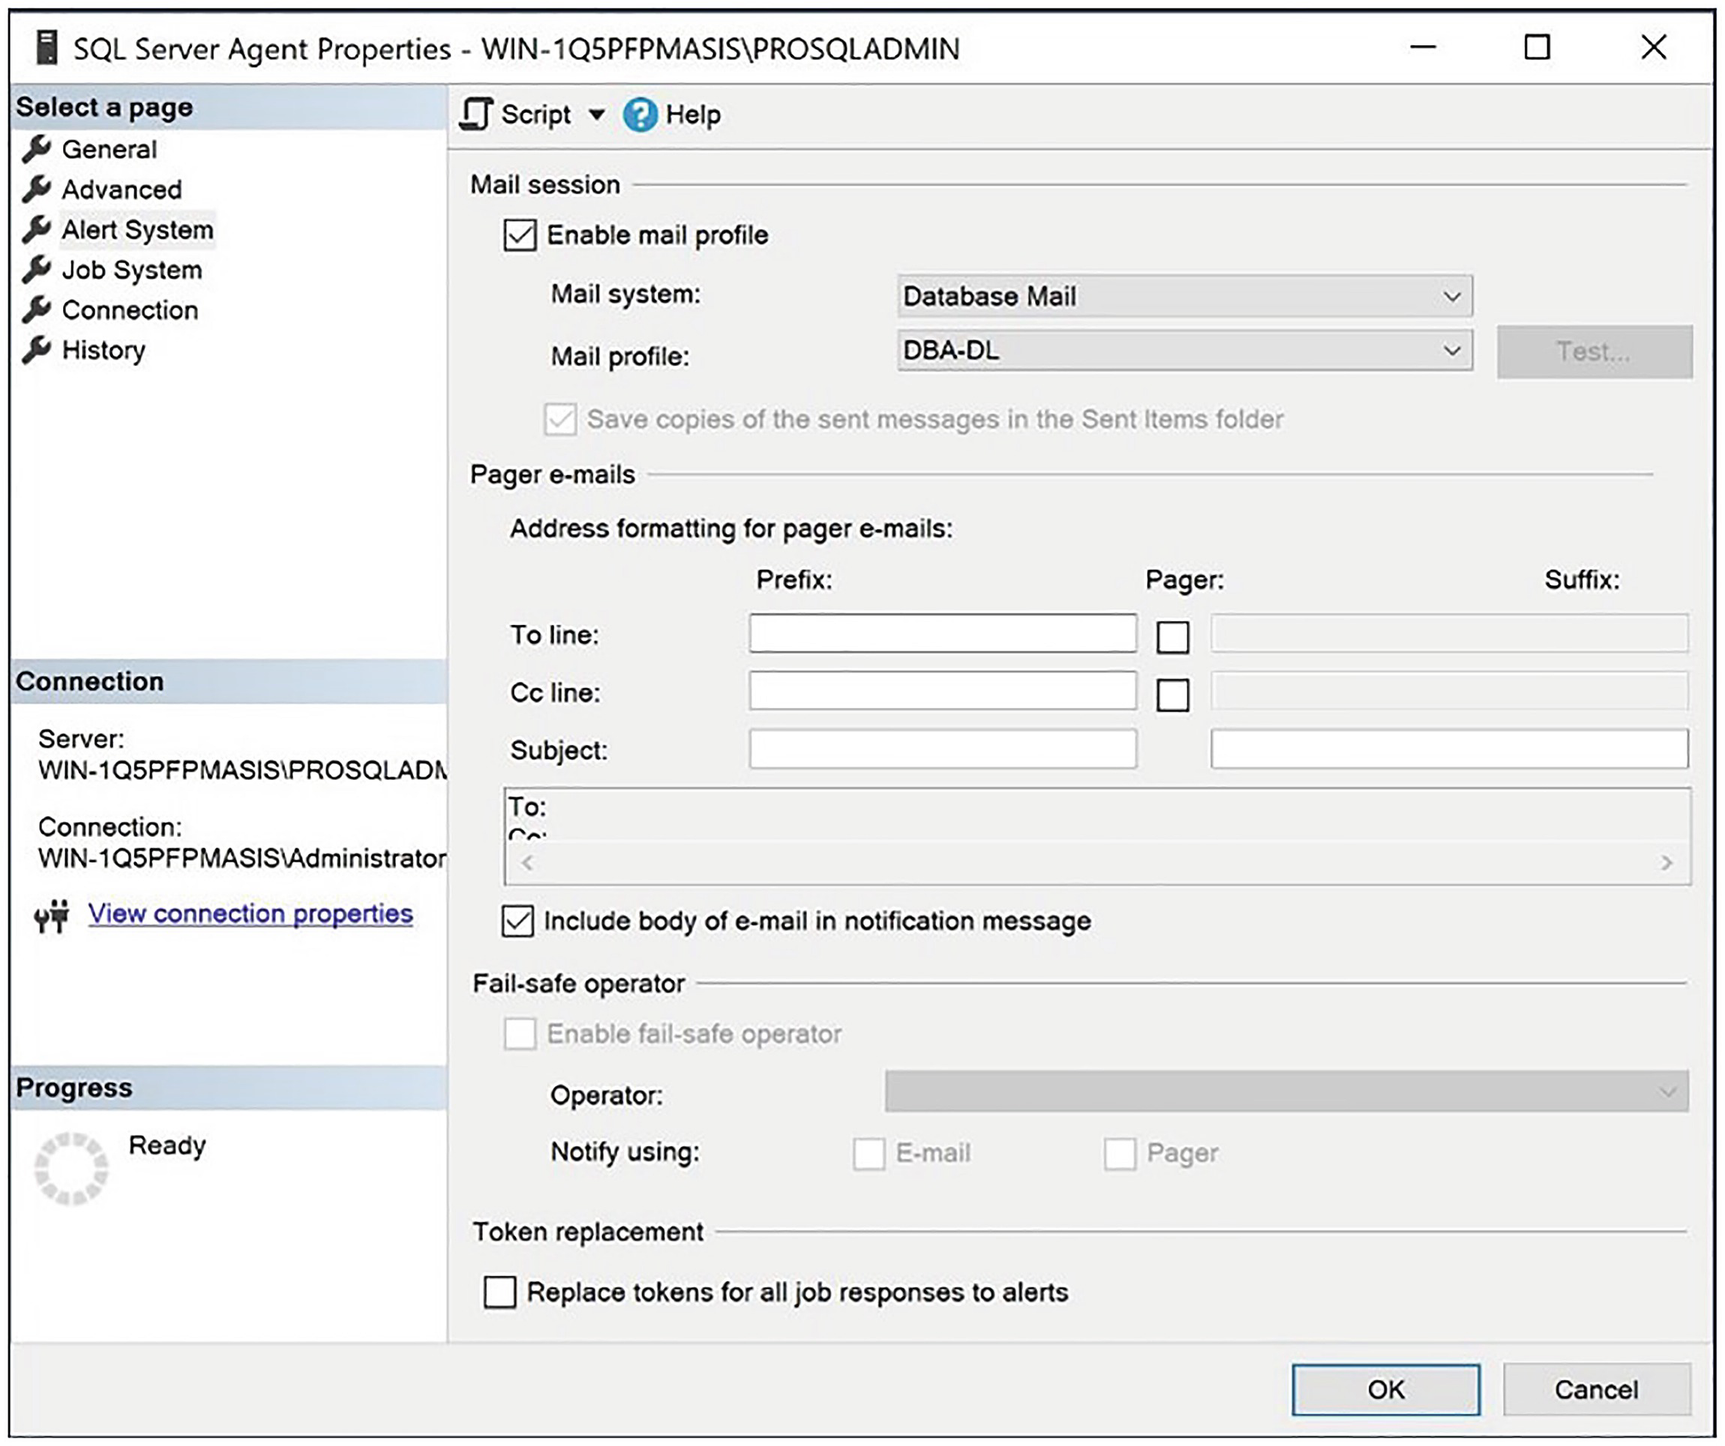
The Alert System page
On this page, we check the Enable mail profile check box before selecting the DBA-DL profile from the drop-down list. After we exit the dialog box, operators are able to use Database Mail.
Creating the Operator
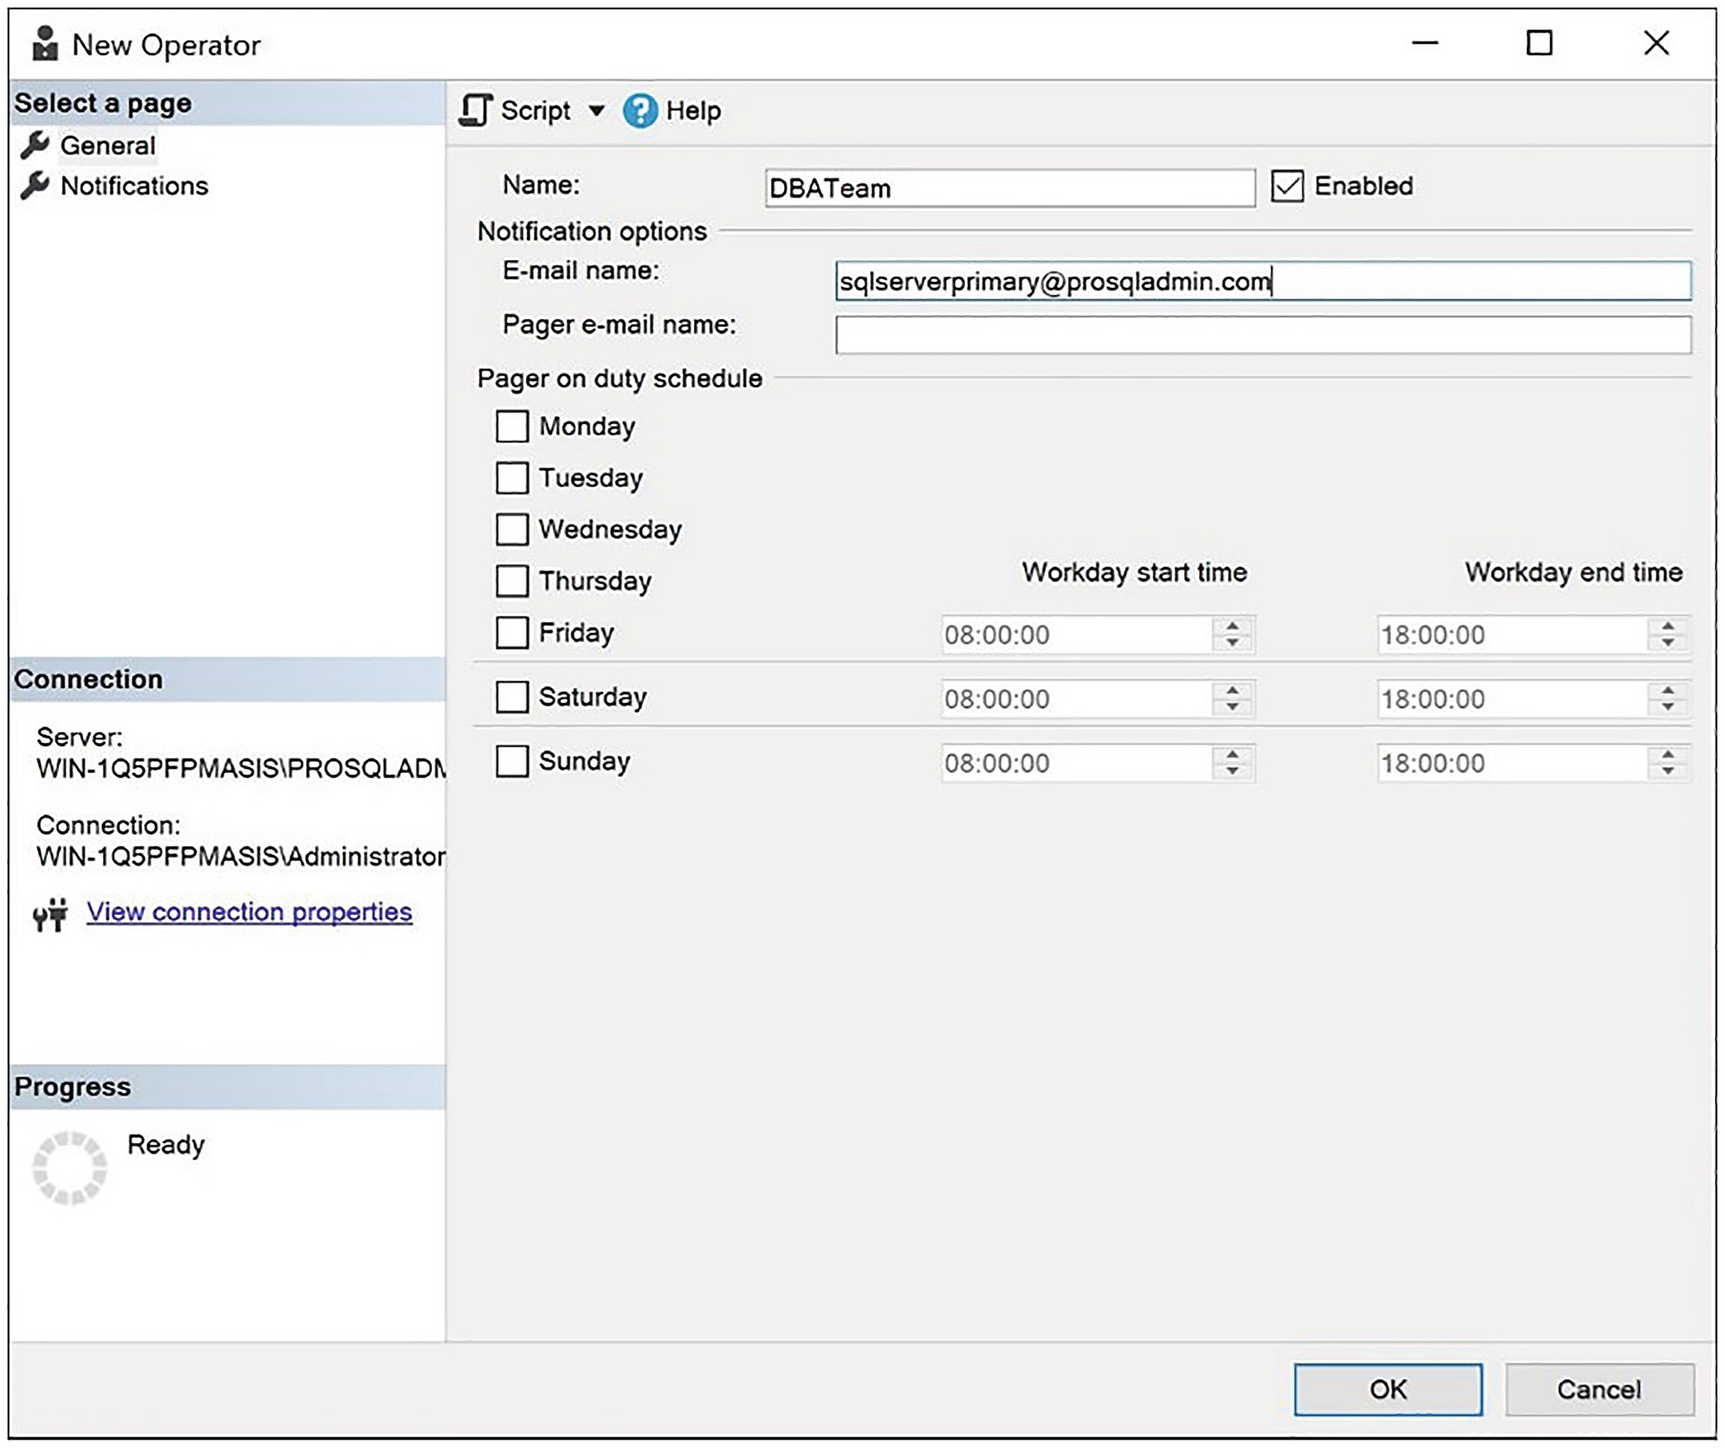
The General page
On this page, we specify a name for the operator and also add the e-mail address that the operator will be using. This must match the e-mail address that has been configured within Database Mail. The Notifications page displays details of the alerts and notifications that are already configured for the operator, so it is irrelevant to us at this point.
Creating the Job
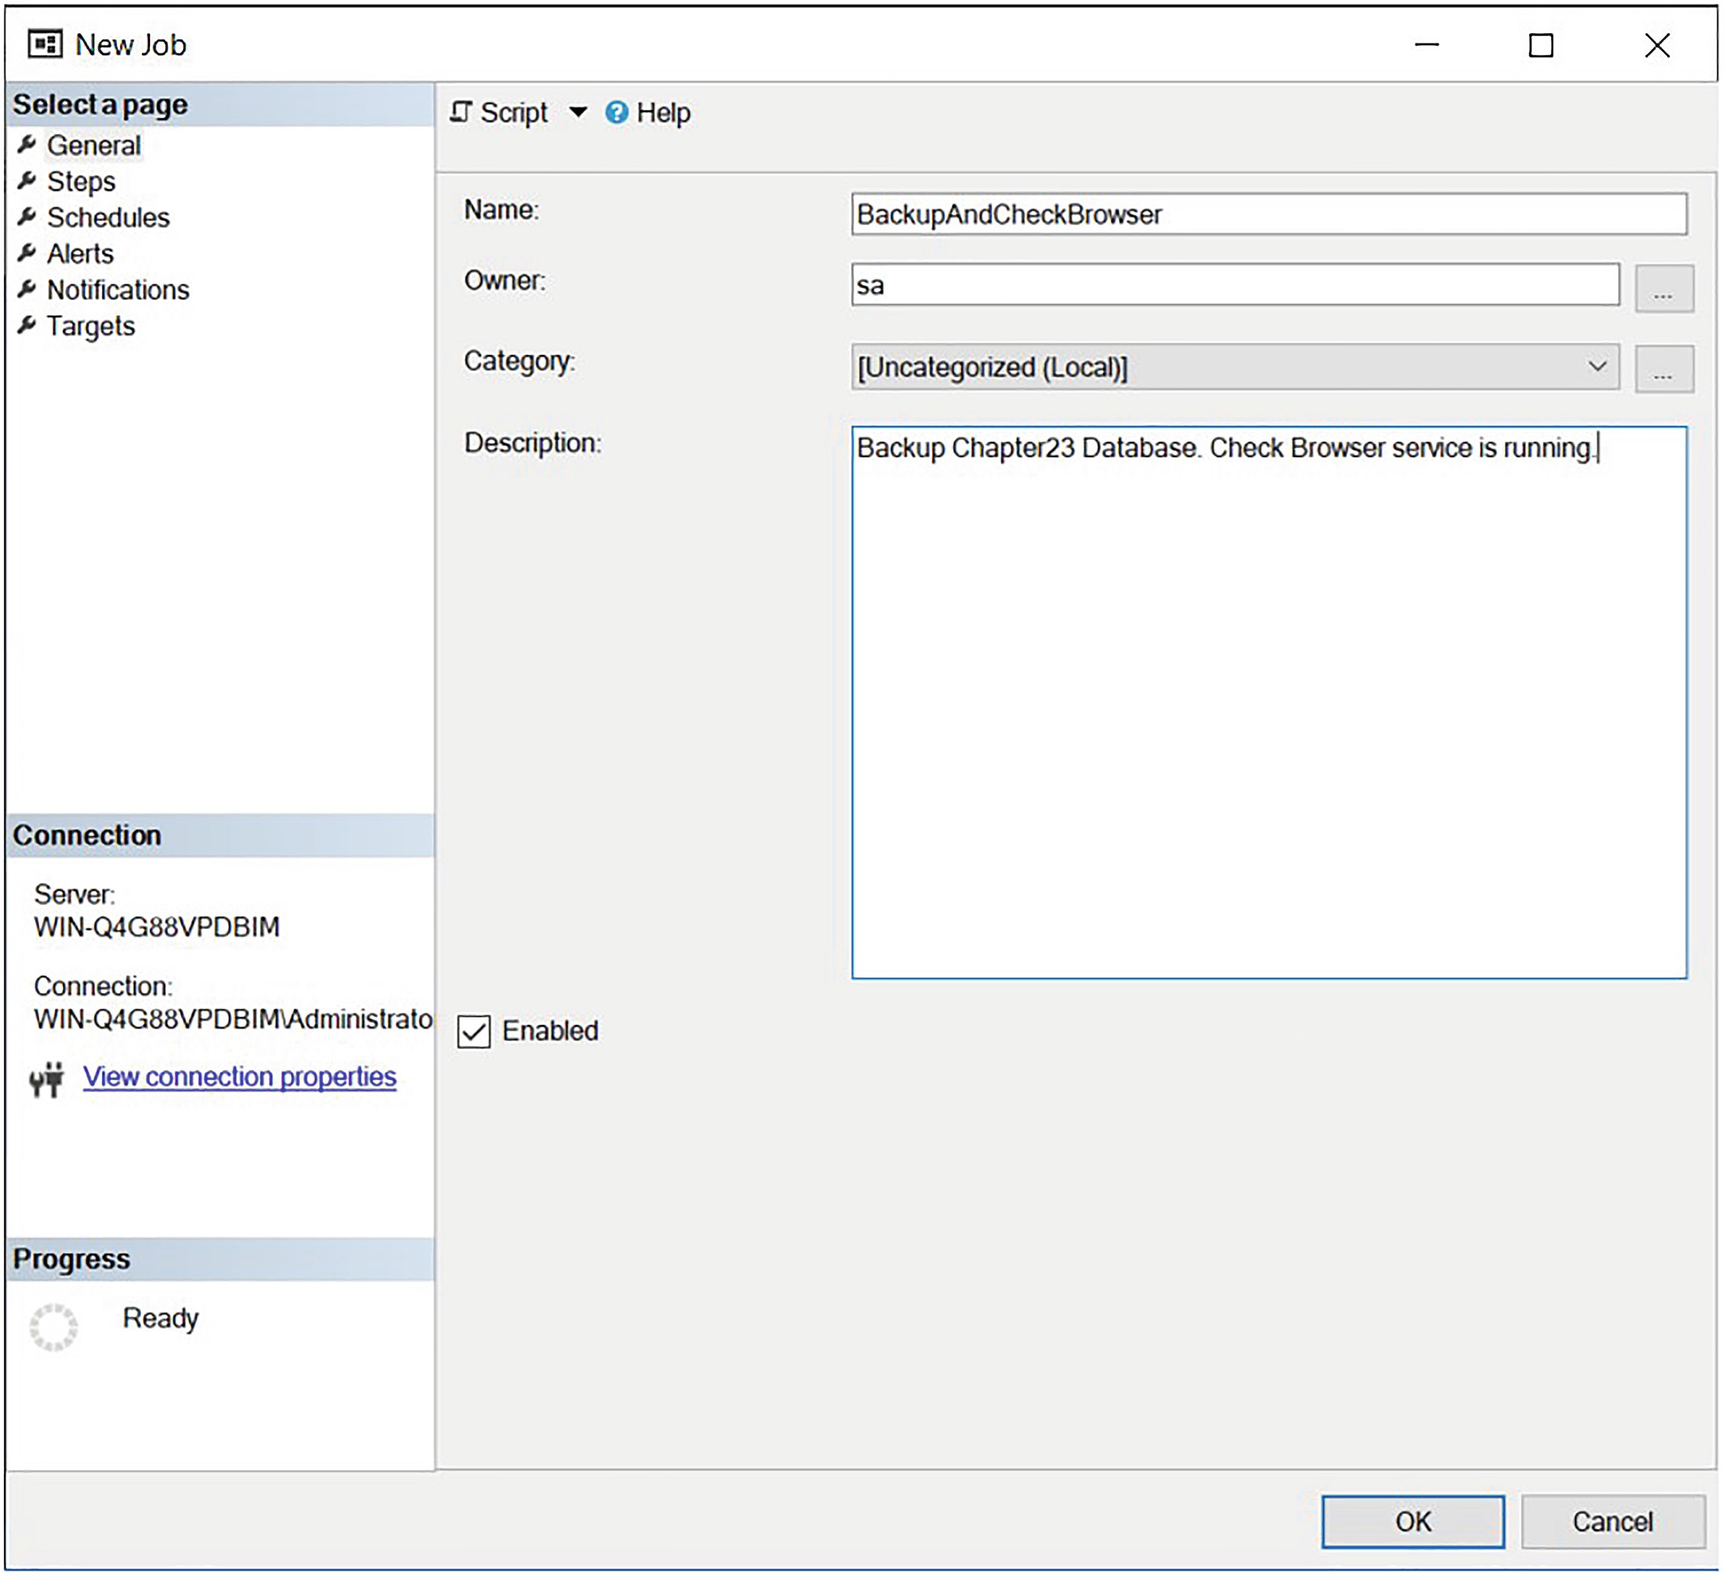
The General page
On this page, we use the Name field to specify a name for our job and, optionally, add a description in the Description field. It’s also optional to add the job to a category; in our instance, we have added the job to the Database Maintenance category by selecting it from the drop-down list. We also check the Enabled box so that the job will be active as soon as it is created.
We also specify that the job owner will be sa. This is a controversial topic, but I generally recommend this approach for the following reason: job ownership does not matter much. No matter who owns the job, it functions in the same way. If the owner’s account is dropped, however, then the job no longer functions. If you make sa the owner, then there is no chance of this situation occurring. If you are using the Windows authentication model as opposed to mixed-mode authentication, however, then it is reasonable to use the SQL Server Agent service account as an alternative. This is because, although it is possible that you will change the service account and drop the associated login, it is more unlikely than dropping other user’s logins, such as DBAs’ login, when they leaves the company.

The General page of the New Job Step dialog box
On this page, we enter Backup as the name of the job step and type the BACKUP DATABASE command in the Command field. The Type field allows us to select the subsystem to use, but it defaults to T-SQL, so we do not need to alter this. Listing 23-5 contains the backup script.
Make sure to always test scripts before you add them to your jobs.
Backup Script
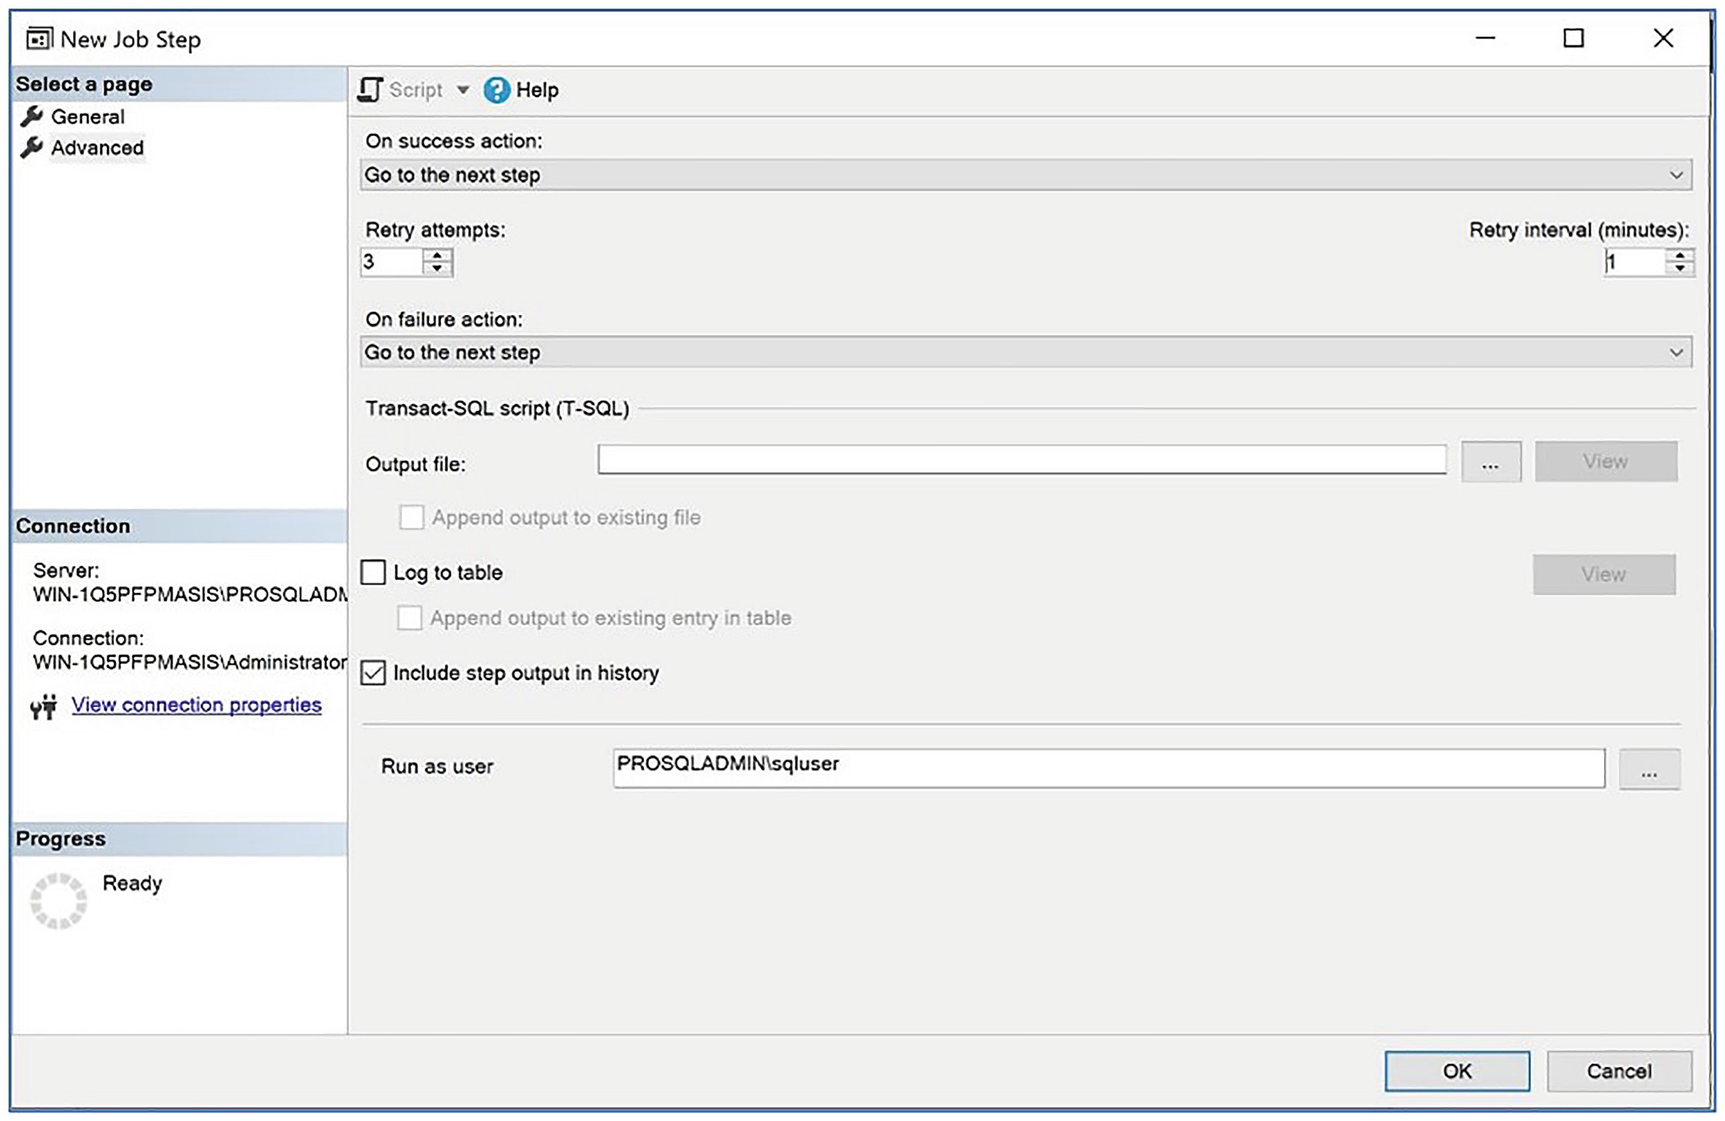
The Advanced page
We check the Include step output in history box so that the step output is included in the job history (doing so helps DBAs troubleshoot any issues) and configure the step to run as the SQLUser user. We configure the Run as user option because, as previously discussed, job steps of the T-SQL type use EXECUTE AS technology, instead of a proxy account to implement security.
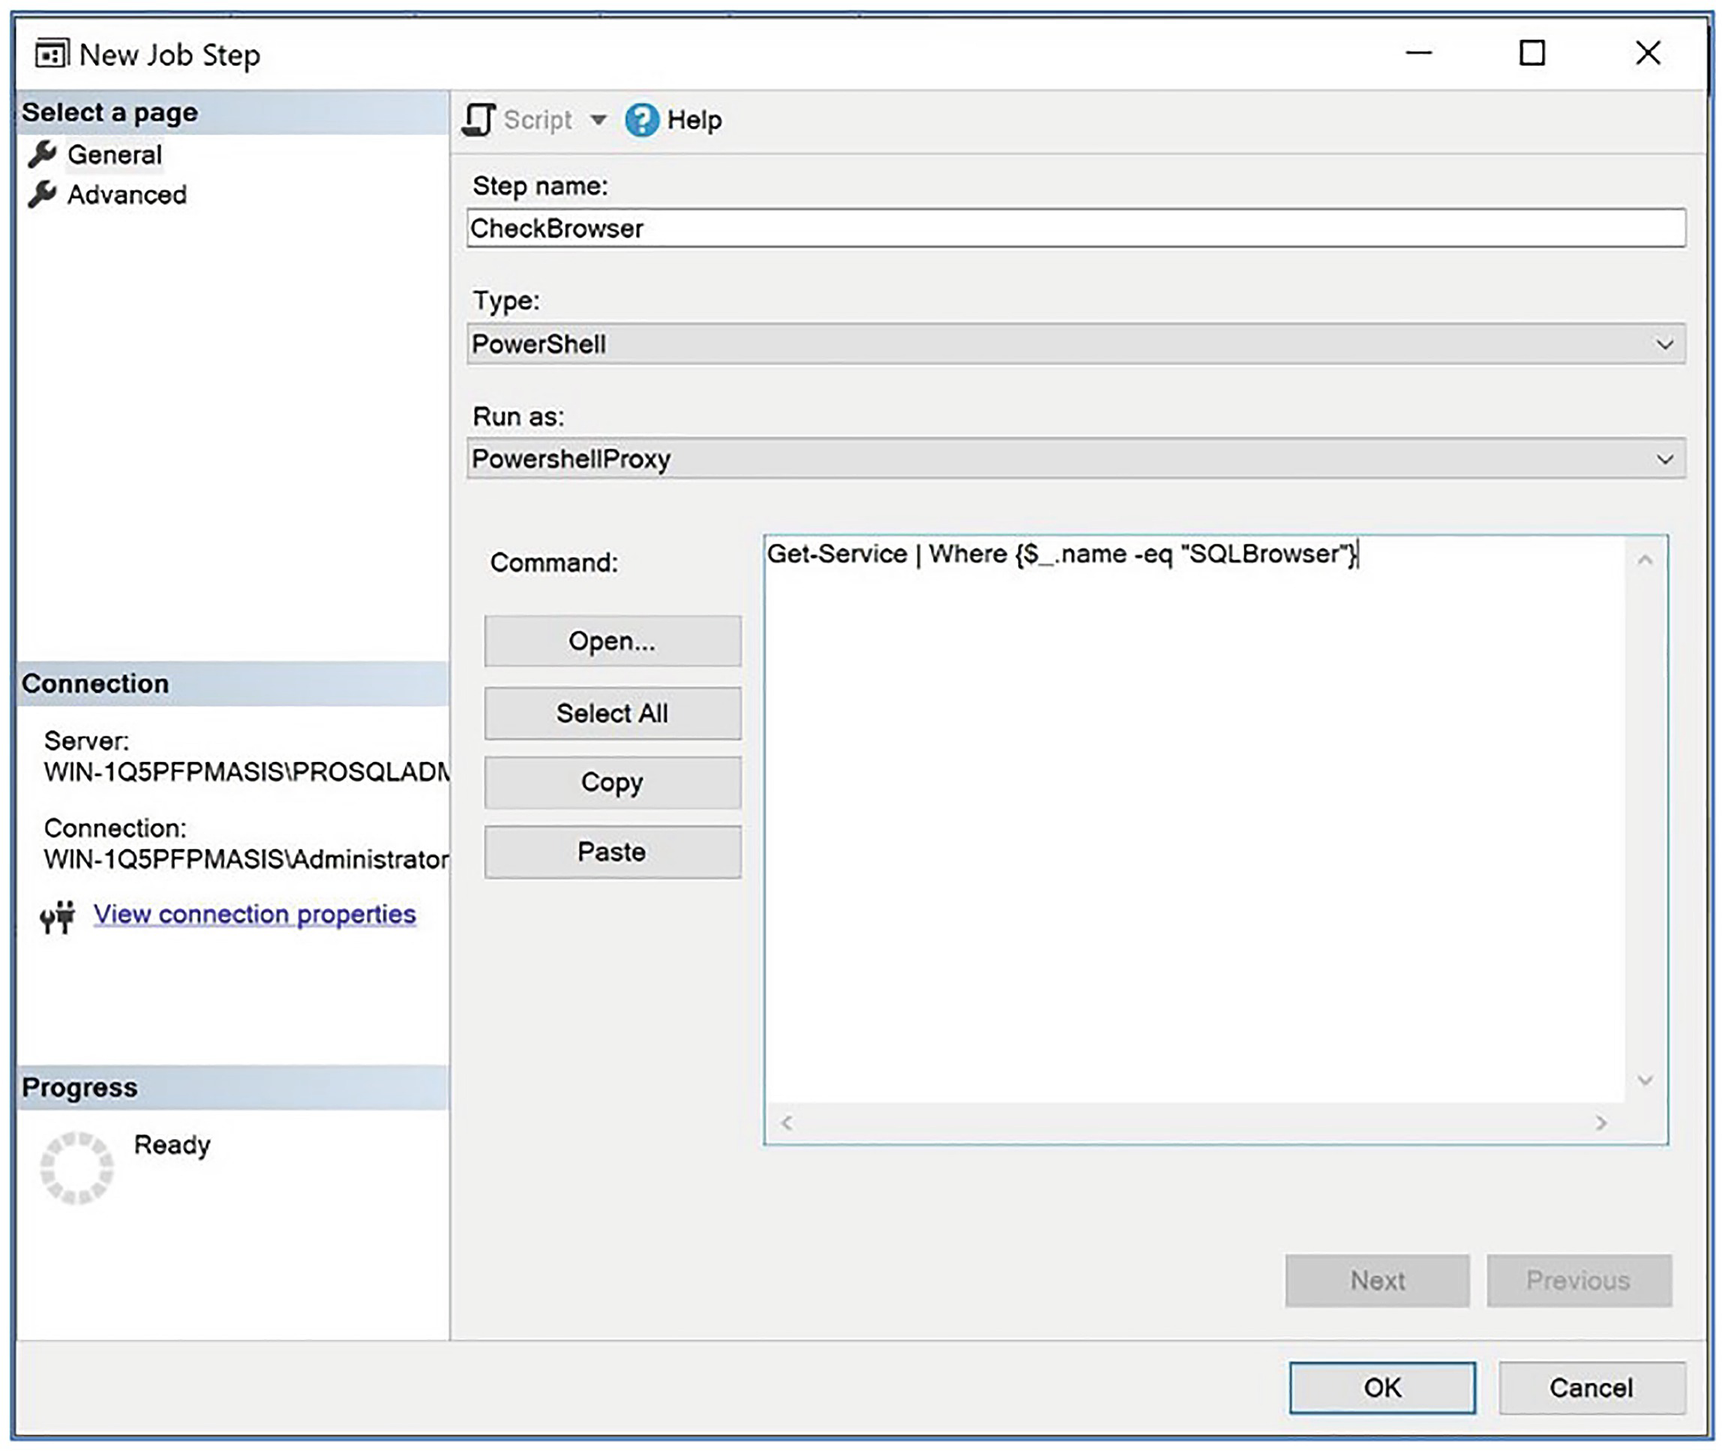
The General page
Checking Browser Service
On the Advanced page, we choose to include the step output in the job history. We can leave all other options with their default values.
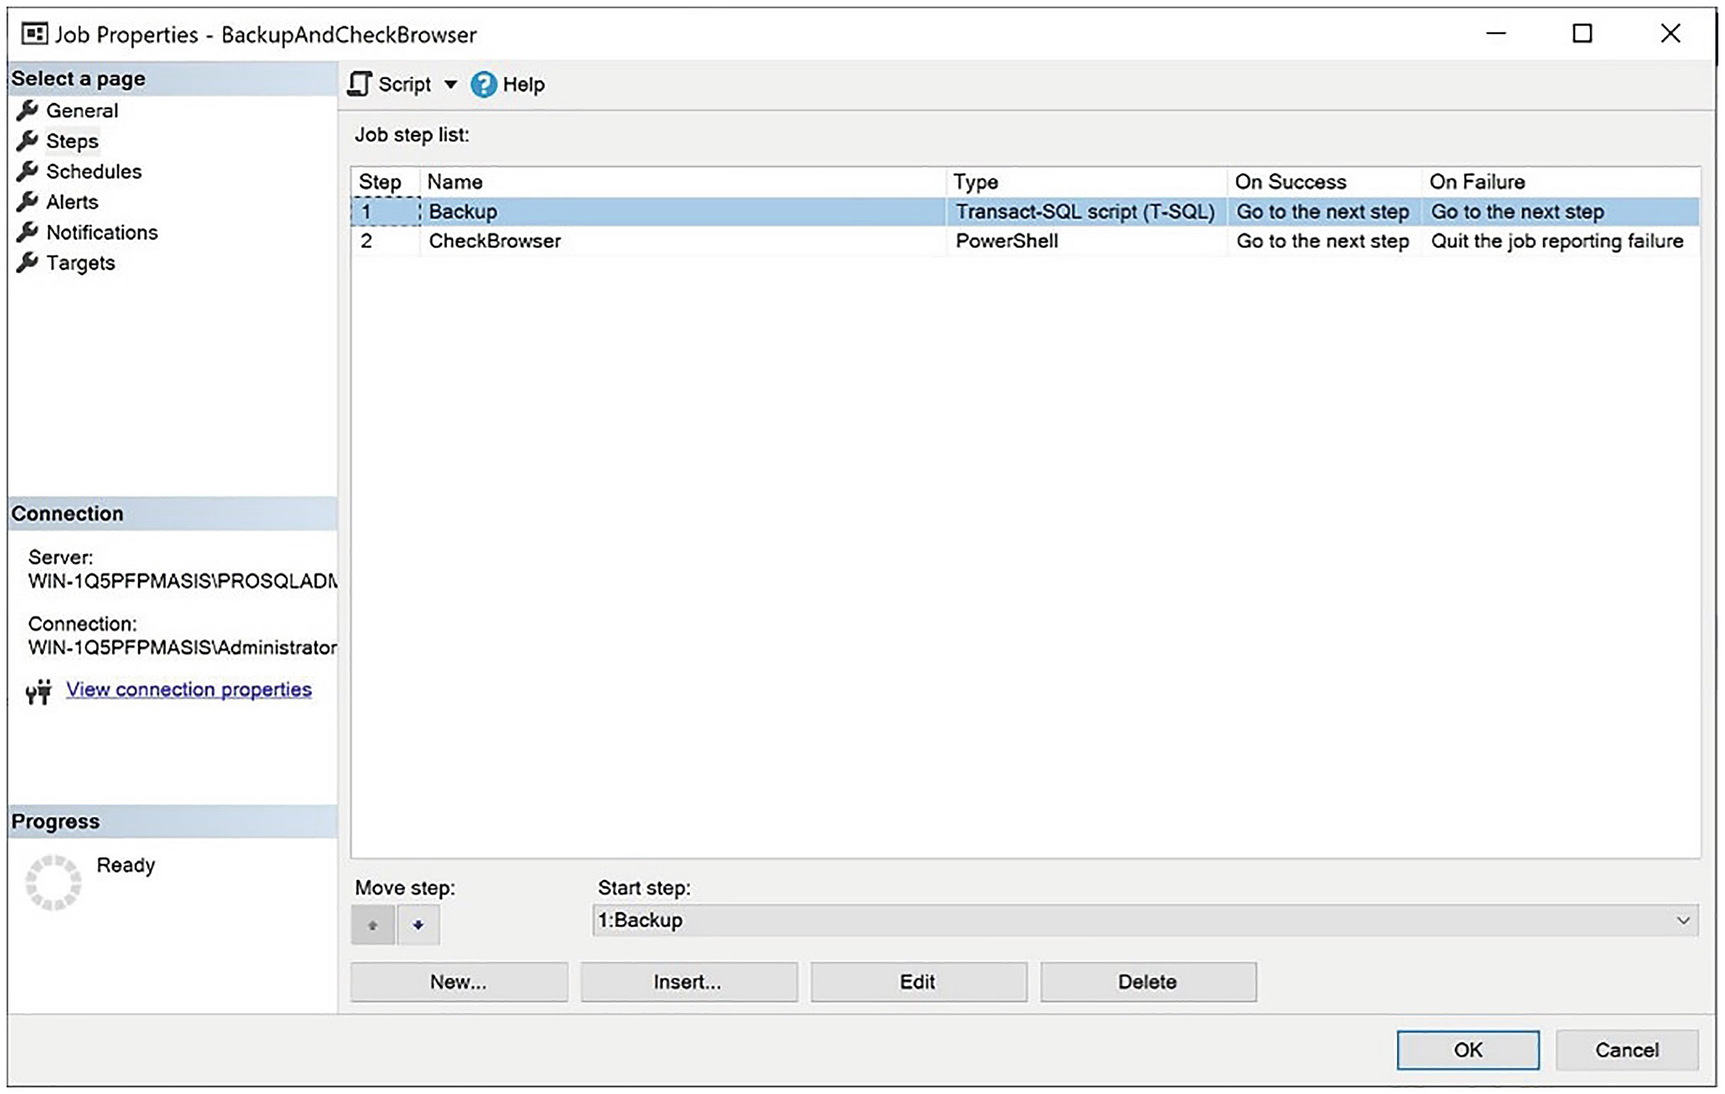
The Steps page
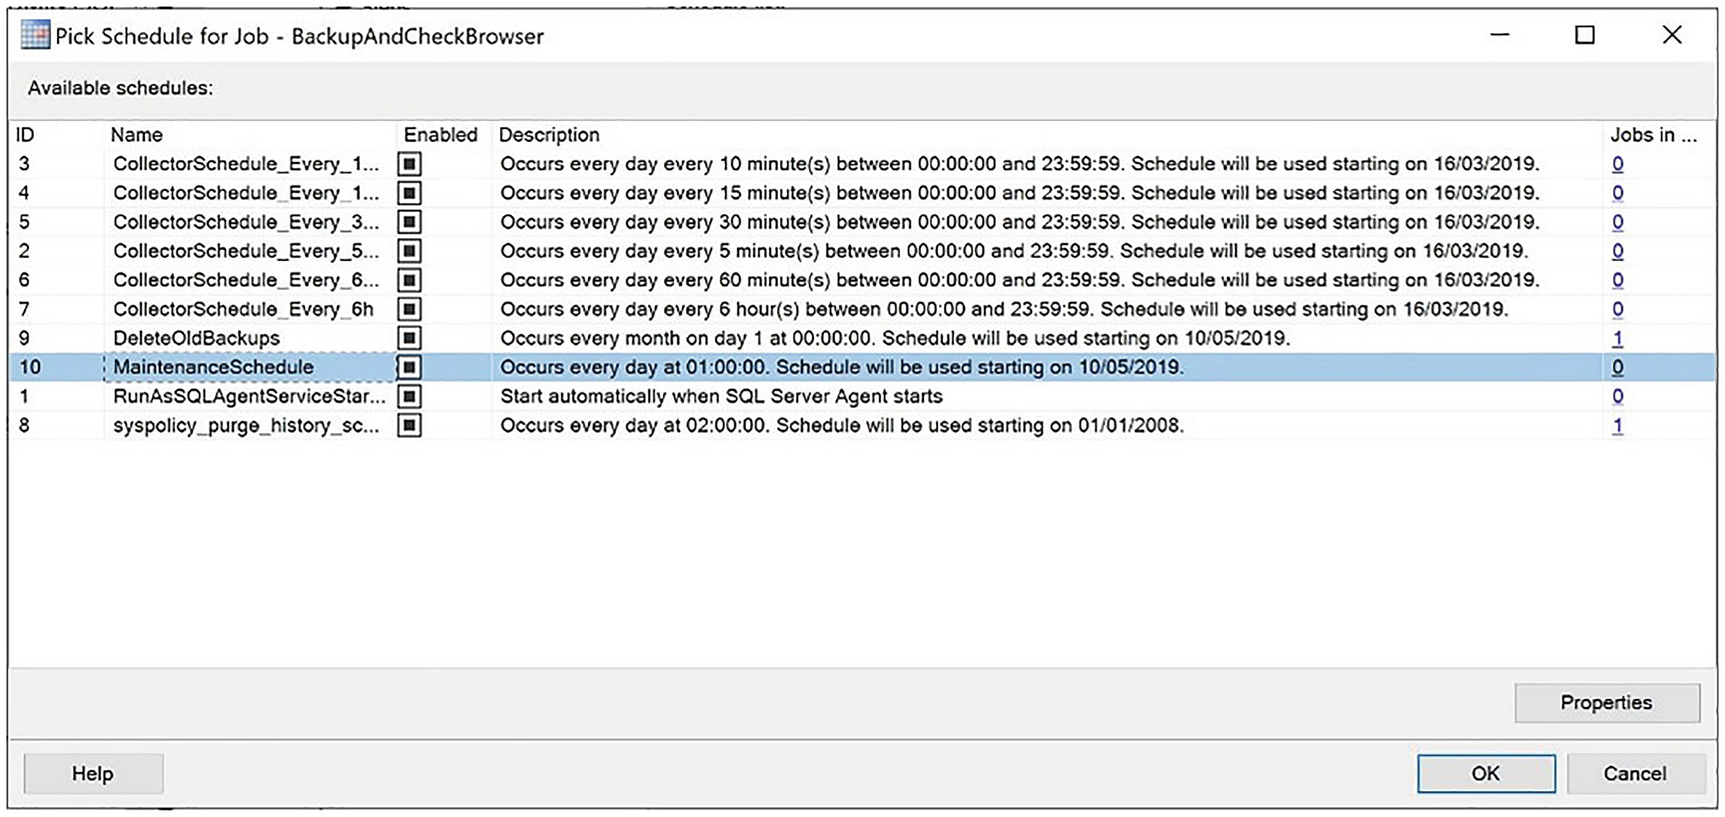
The Pick Schedule for Job dialog box
After we exit the dialog box, the Schedule displays on the Schedules page of the Job Properties dialog box.
You can use the Alerts page to organize alerts for the job. This is not relevant to our scenario right now, but alerts are discussed later in the chapter.
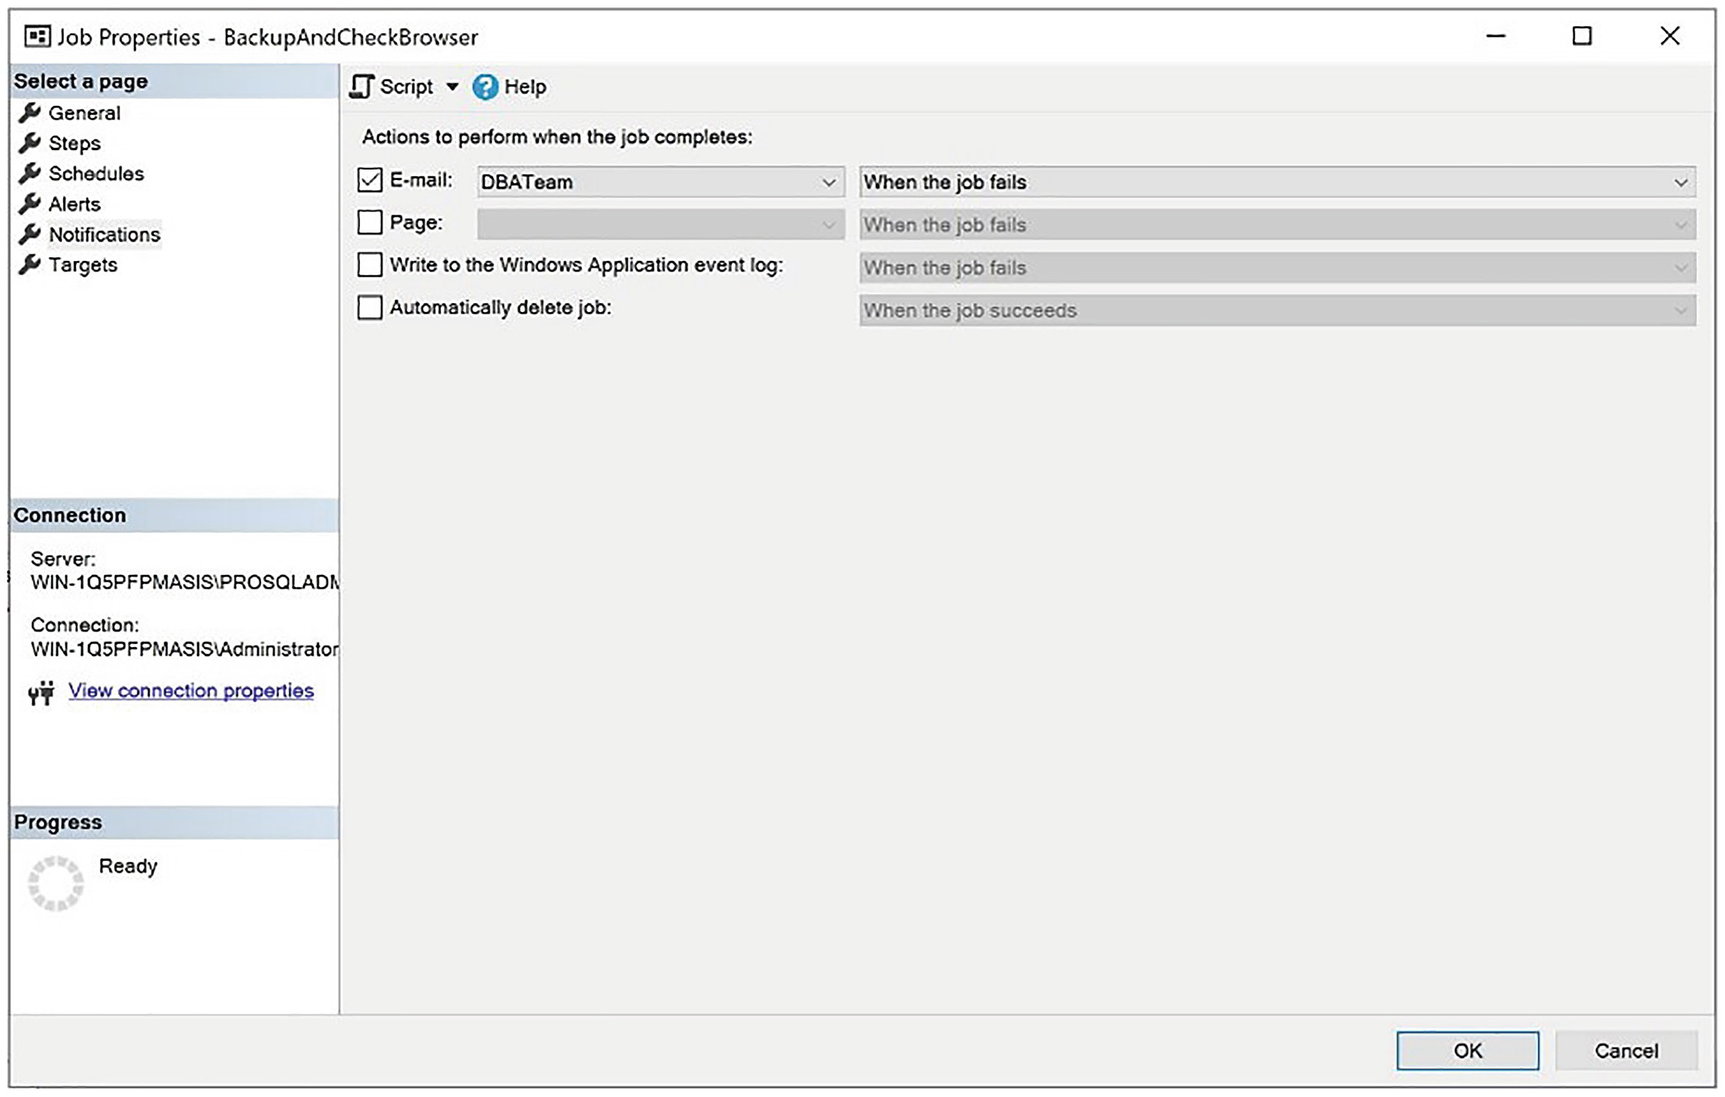
The Notifications page
You can use the Targets page to configure multiserver jobs, which are not relevant to our current scenario, but we do discuss them later in this chapter.
Monitoring and Managing Jobs
Although jobs are usually scheduled to run automatically, you still encounter monitoring and maintenance requirements, such as executing jobs manually and viewing job history. These tasks are discussed in the following sections.
Executing Jobs
Even if a job is scheduled to run automatically, at times you may wish to execute a job on an ad hoc basis. For example, if you have a job that is scheduled to run nightly to take full backups of the databases within your instance, you may wish to execute it manually just before a code release or software upgrade.
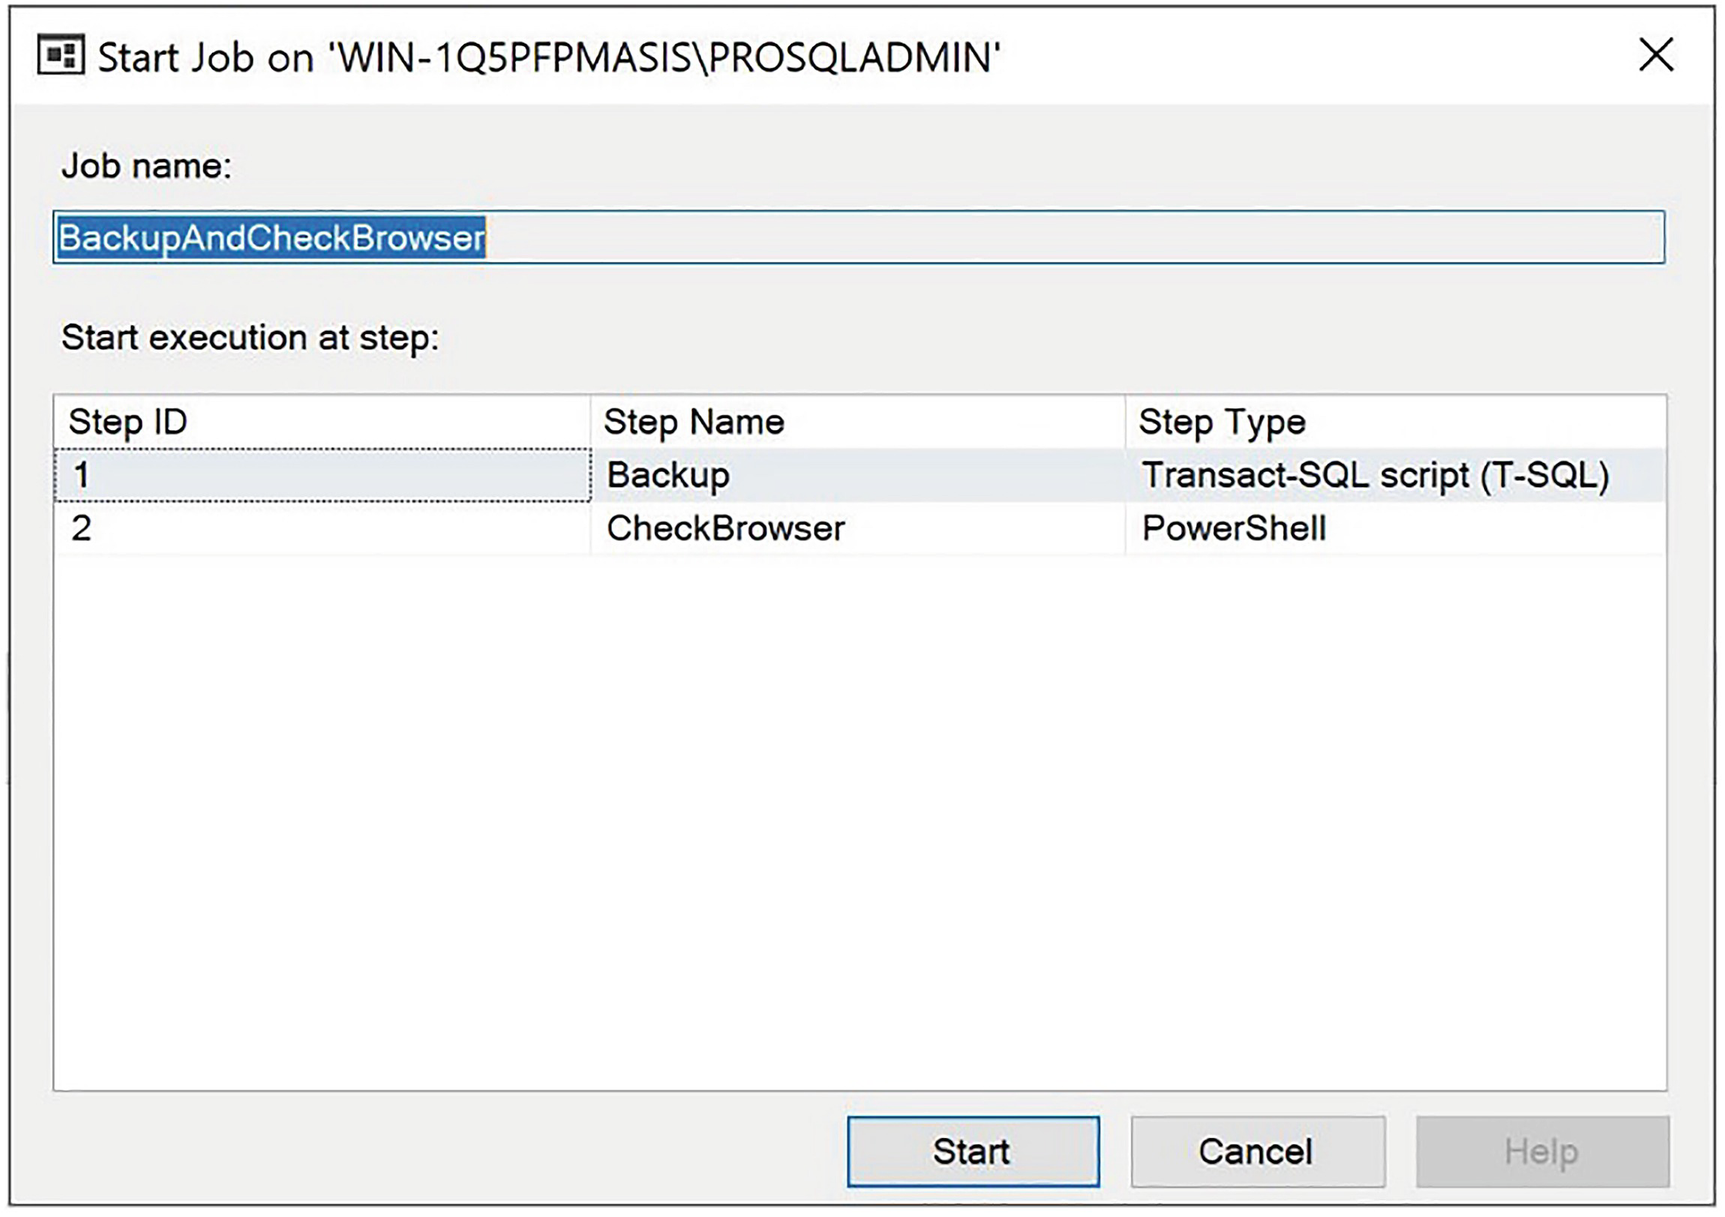
Start Job dialog box
sp_start_job Parameters
Parameter | Description |
|---|---|
@job_name | The name of the job to execute. If NULL, then the @job_name parameter must be specified. |
@job_id | The ID of the job to execute. If NULL, then the @job_name parameter must be specified. |
@server_name | Used for multiserver jobs. Specifies the target server on which to run the job. |
@step_name | The name of the job step where execution should begin. |
Executing a Job
Starting a Job from a Specific Step
Viewing Job History
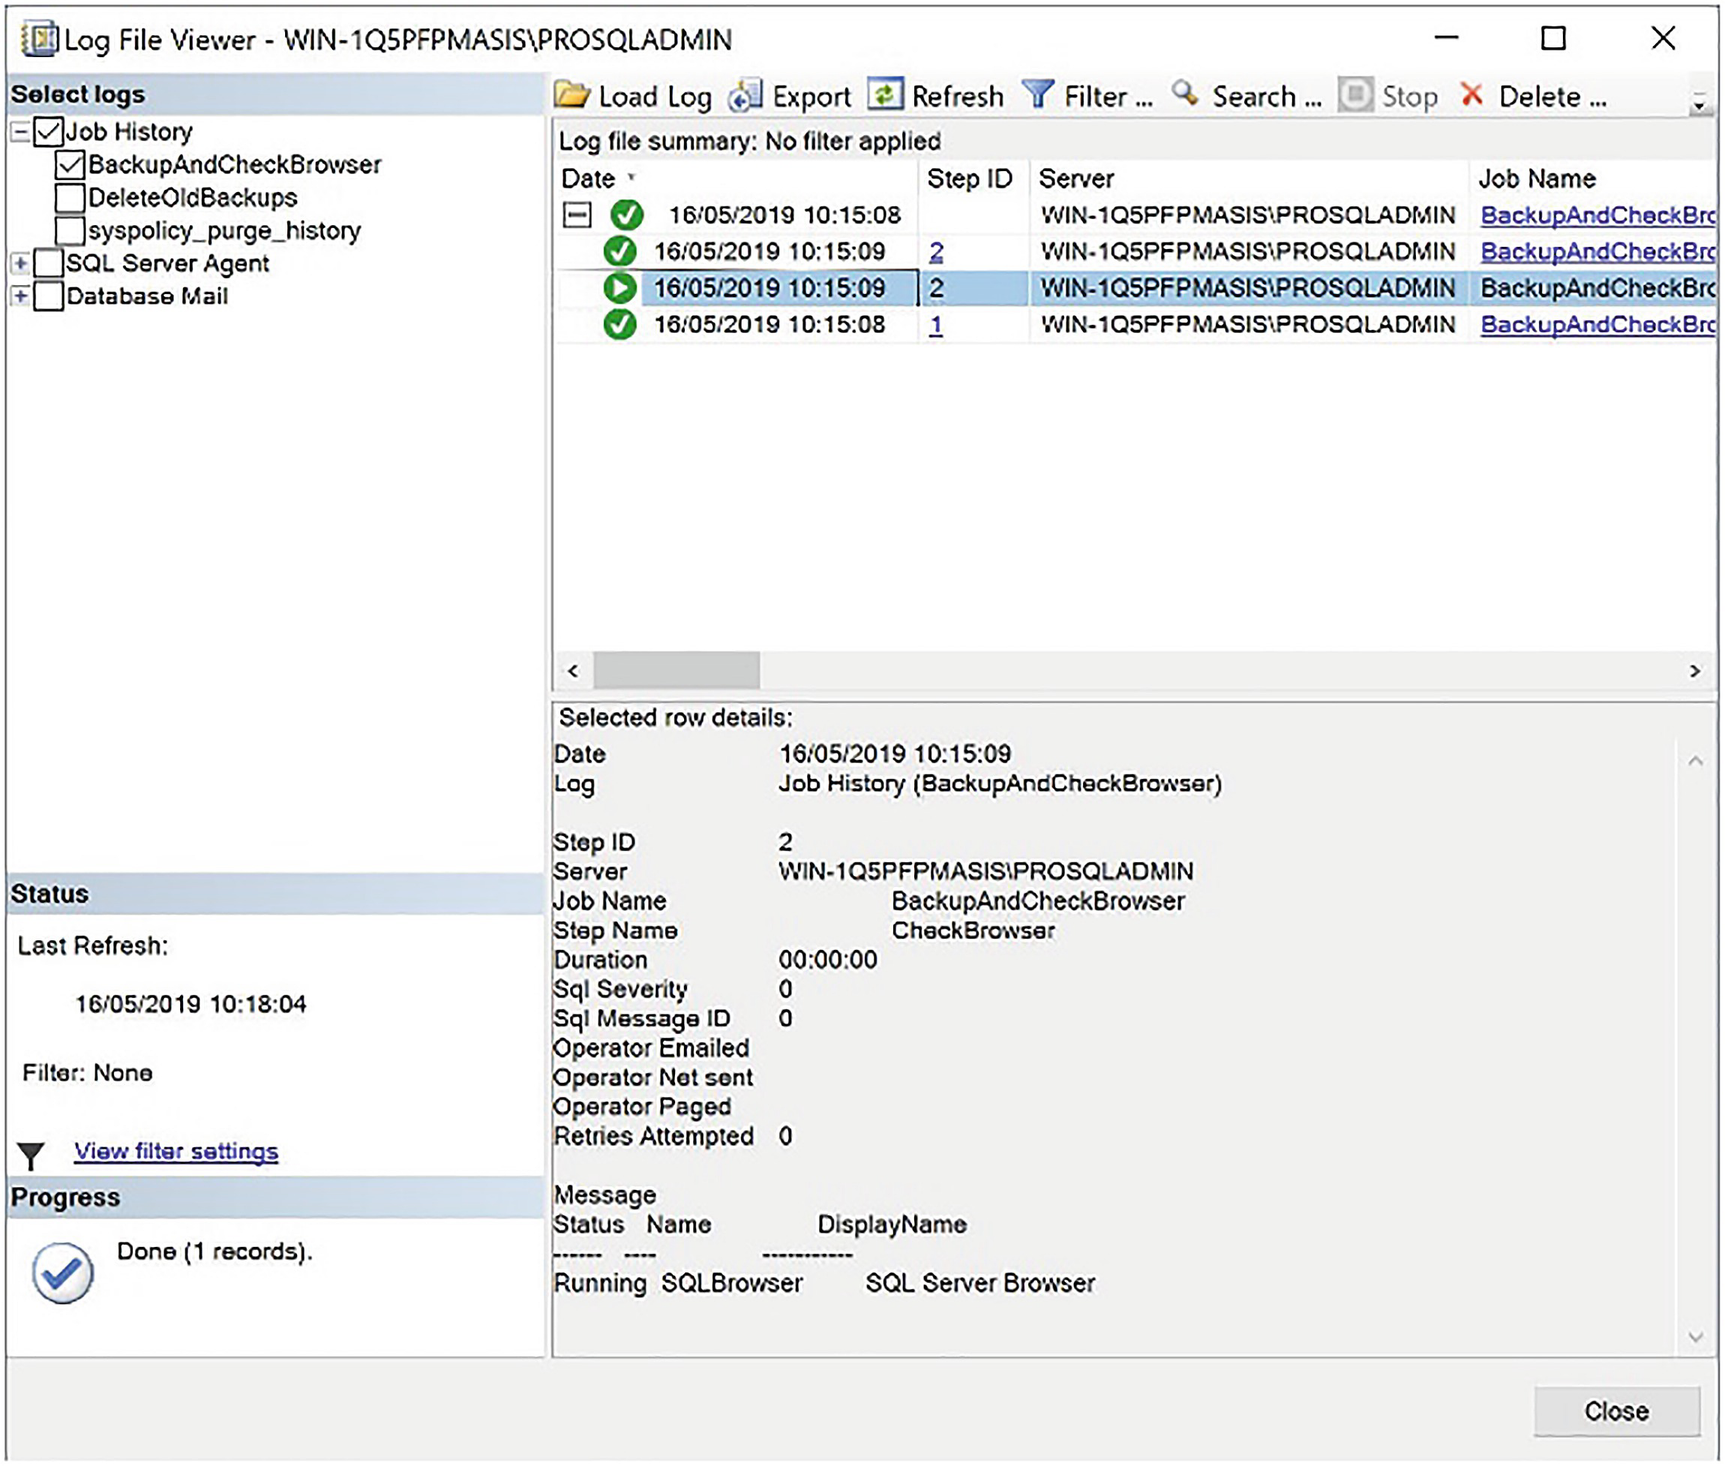
The job history
Here, you can see that we have drilled through Job History to see the history of each individual step. After highlighting the Step 2 progress entry, we can see that the results of the PowerShell script have been written to the step history and they show us that the SQL Server Browser service is running, as expected.
Creating Alerts
Creating an alert allows you to proactively respond to conditions that occur within your instance by either notifying an operator, running a job, or both. On our instance, we want to notify the DBATeam operator in the event that our Chapter23 log file becomes more than 75% full.
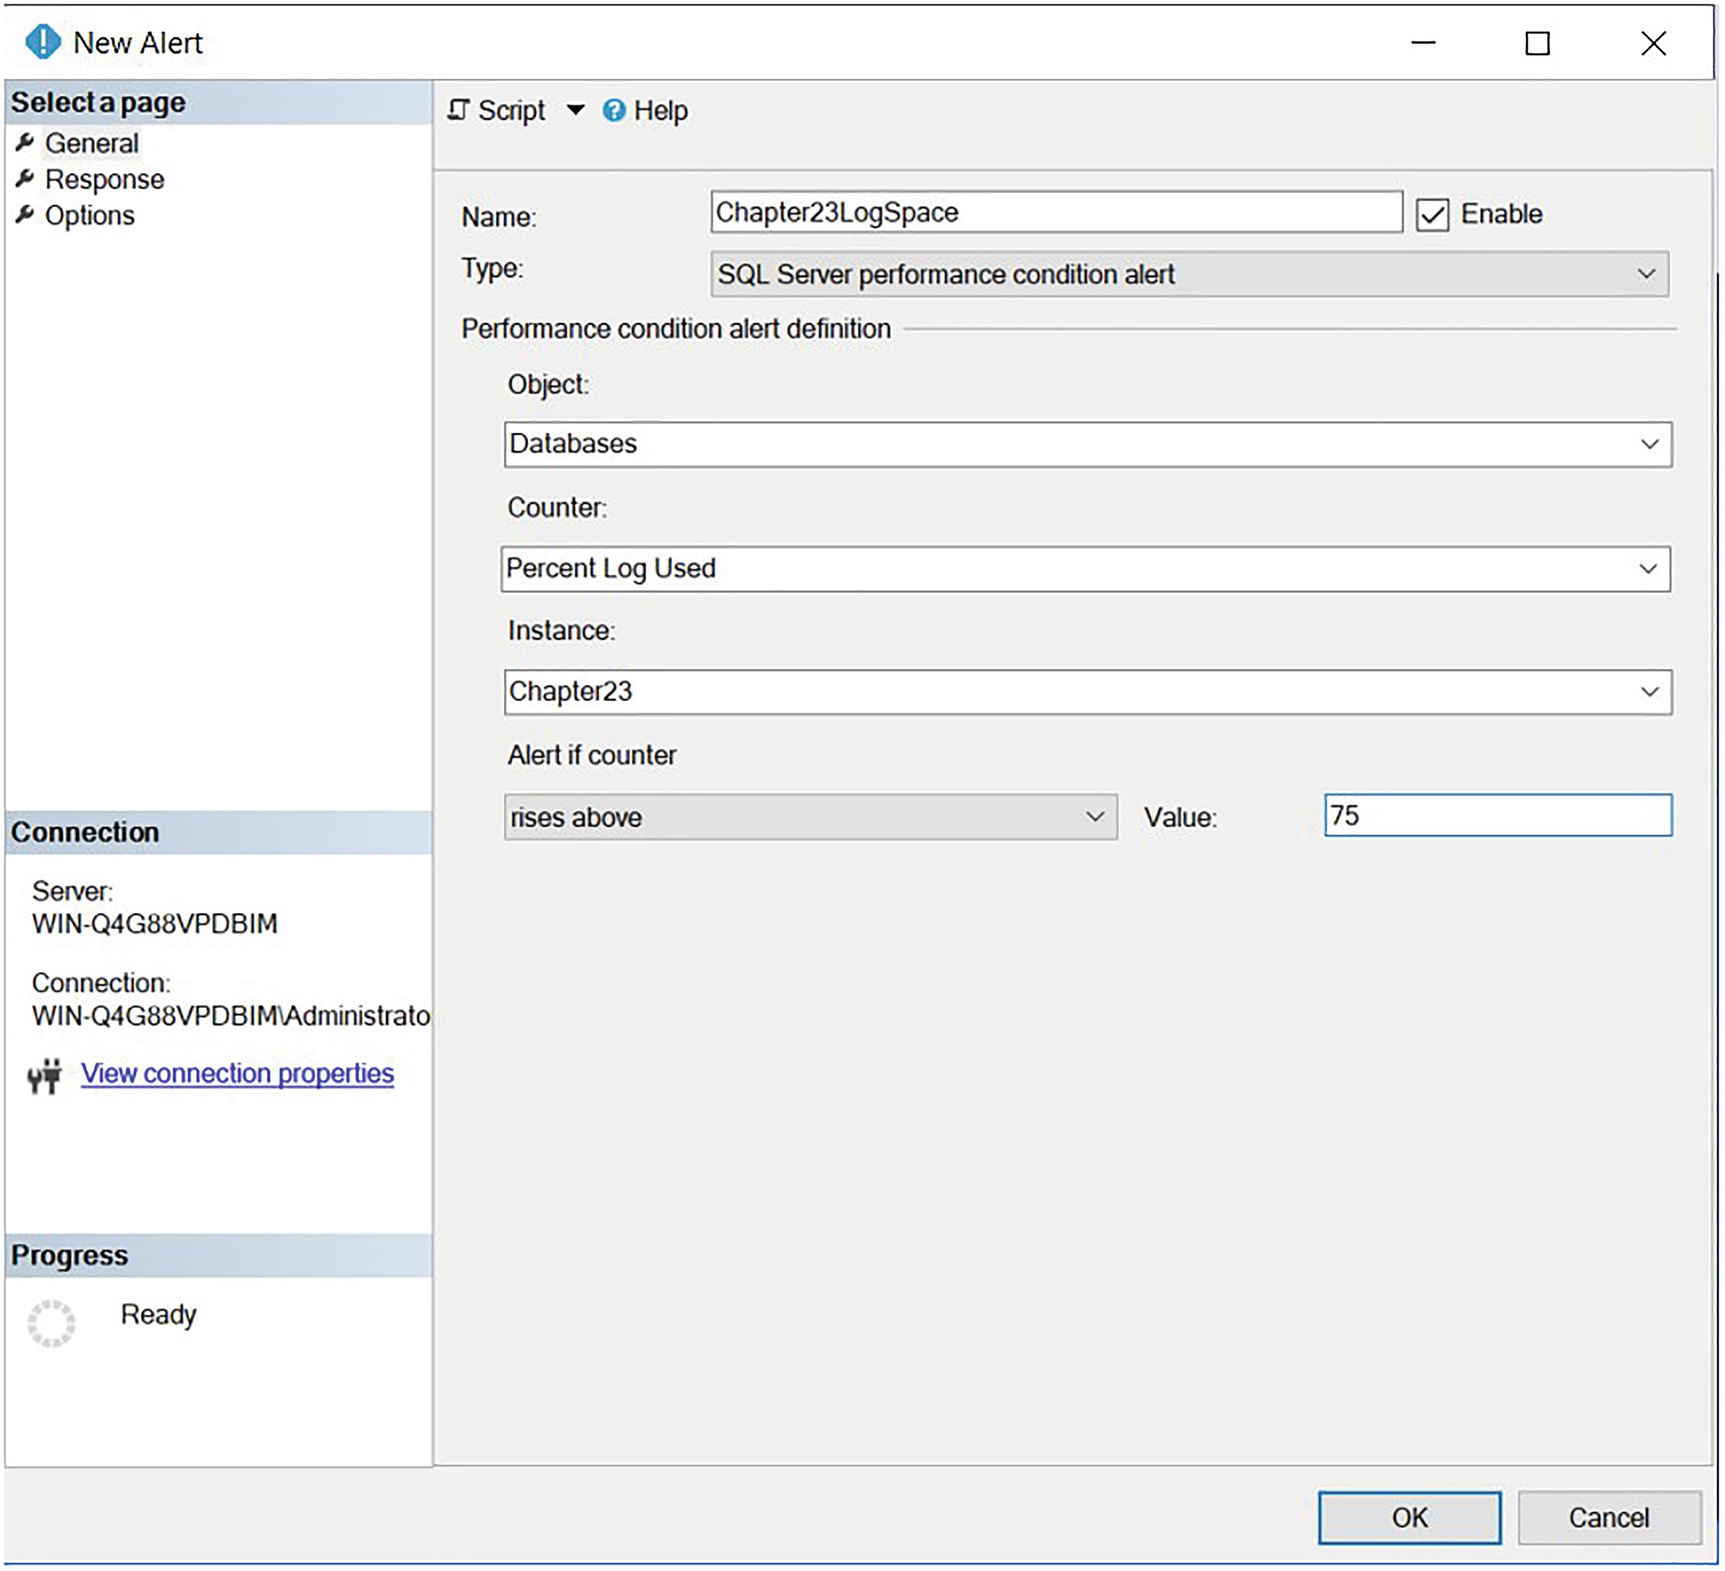
The General page
On this page of the dialog box, we use the Name field to specify a name for our alert and select SQL Server performance condition alert from the Type drop-down list. This causes the options within the page to dynamically update. We then select the Percent Log Used counter from the Databases object and specify that we are interested in the Chapter23 instance of our object. (There is an instance of this counter for each database that resides on the instance.) Finally, we specify that the alert should be triggered if the value of this counter rises above 75 within the Alert if counter section of the page.
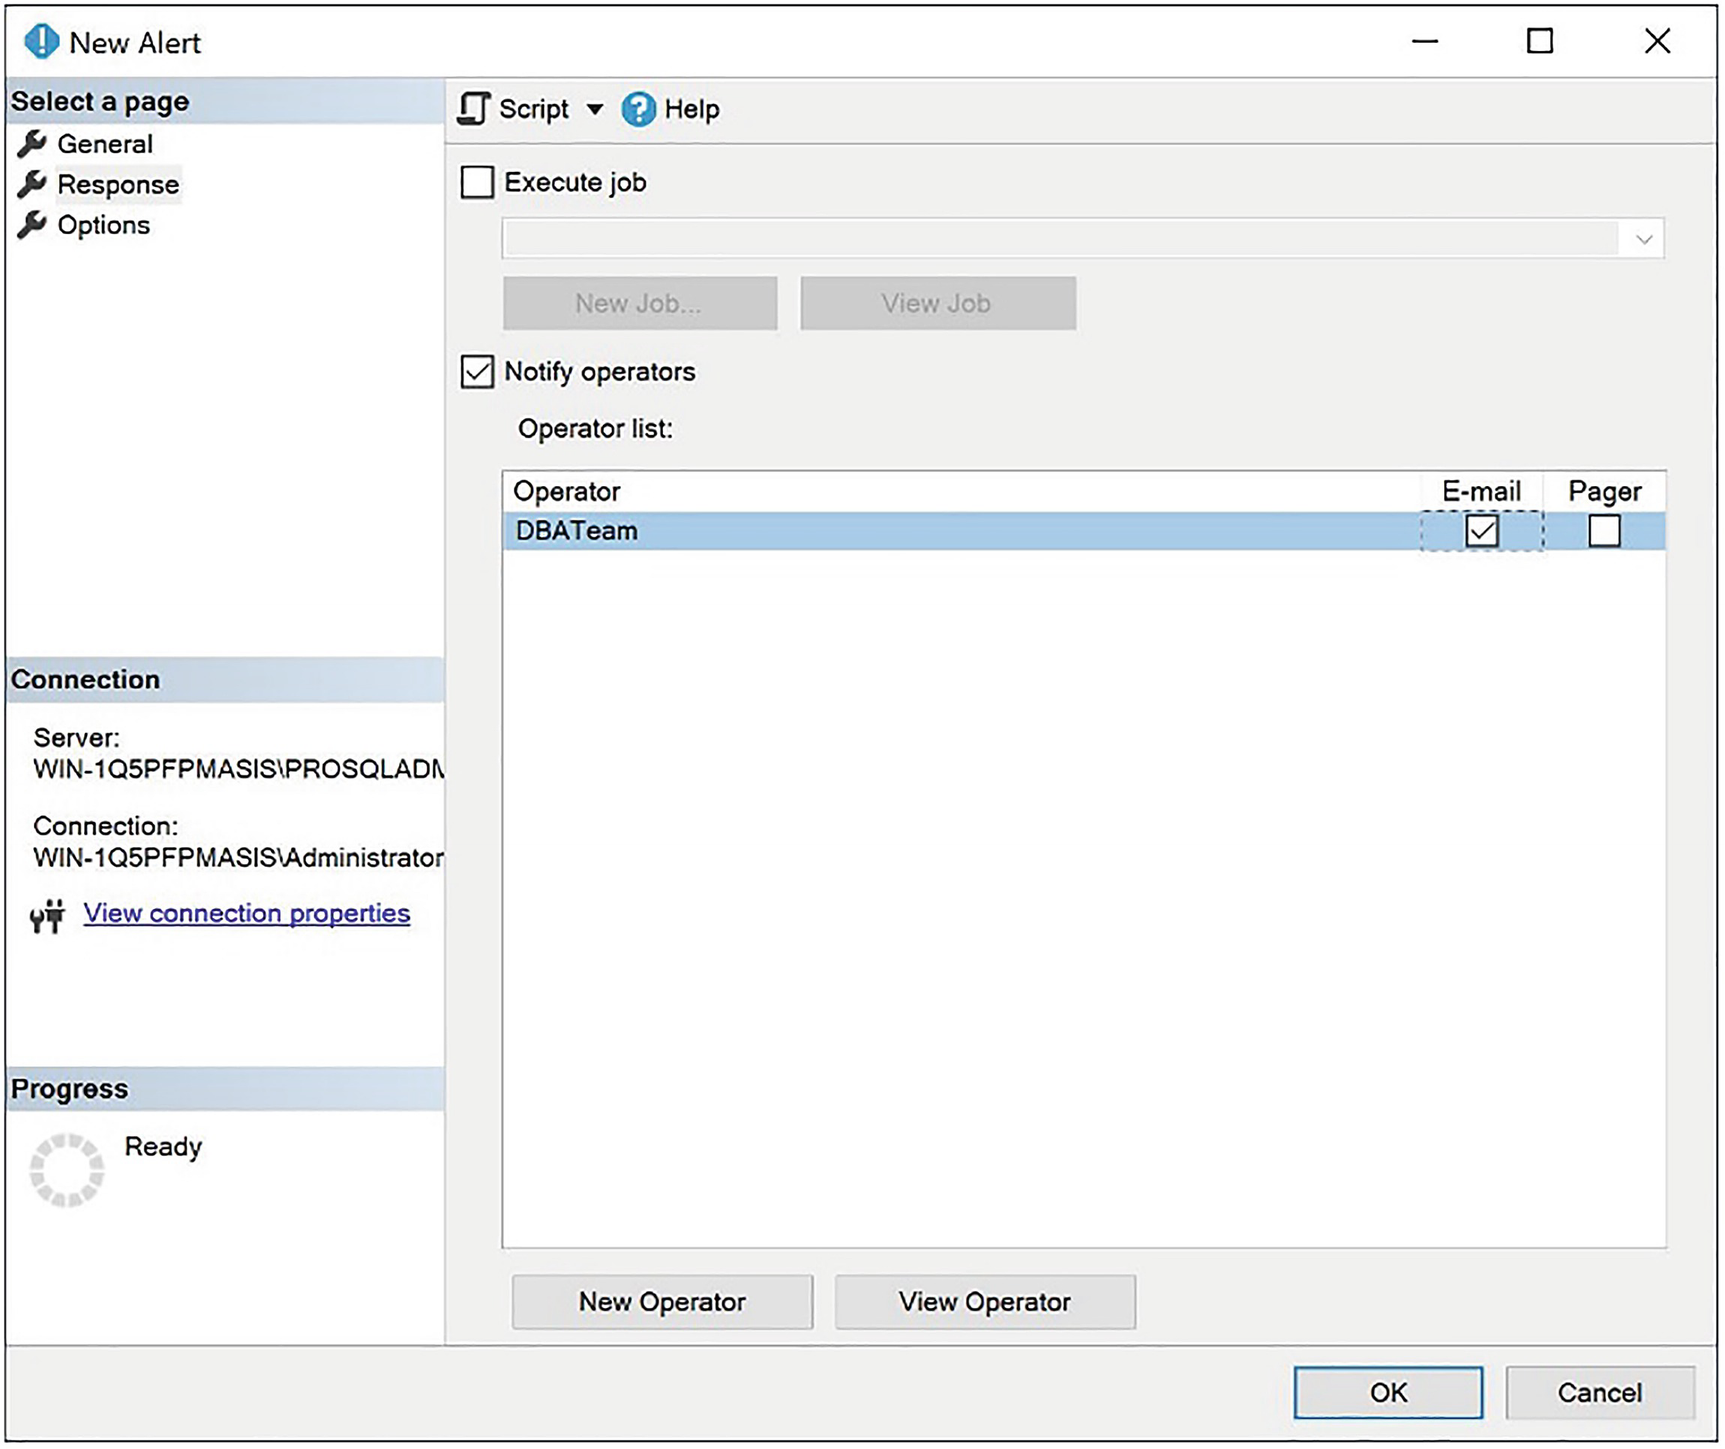
Response page
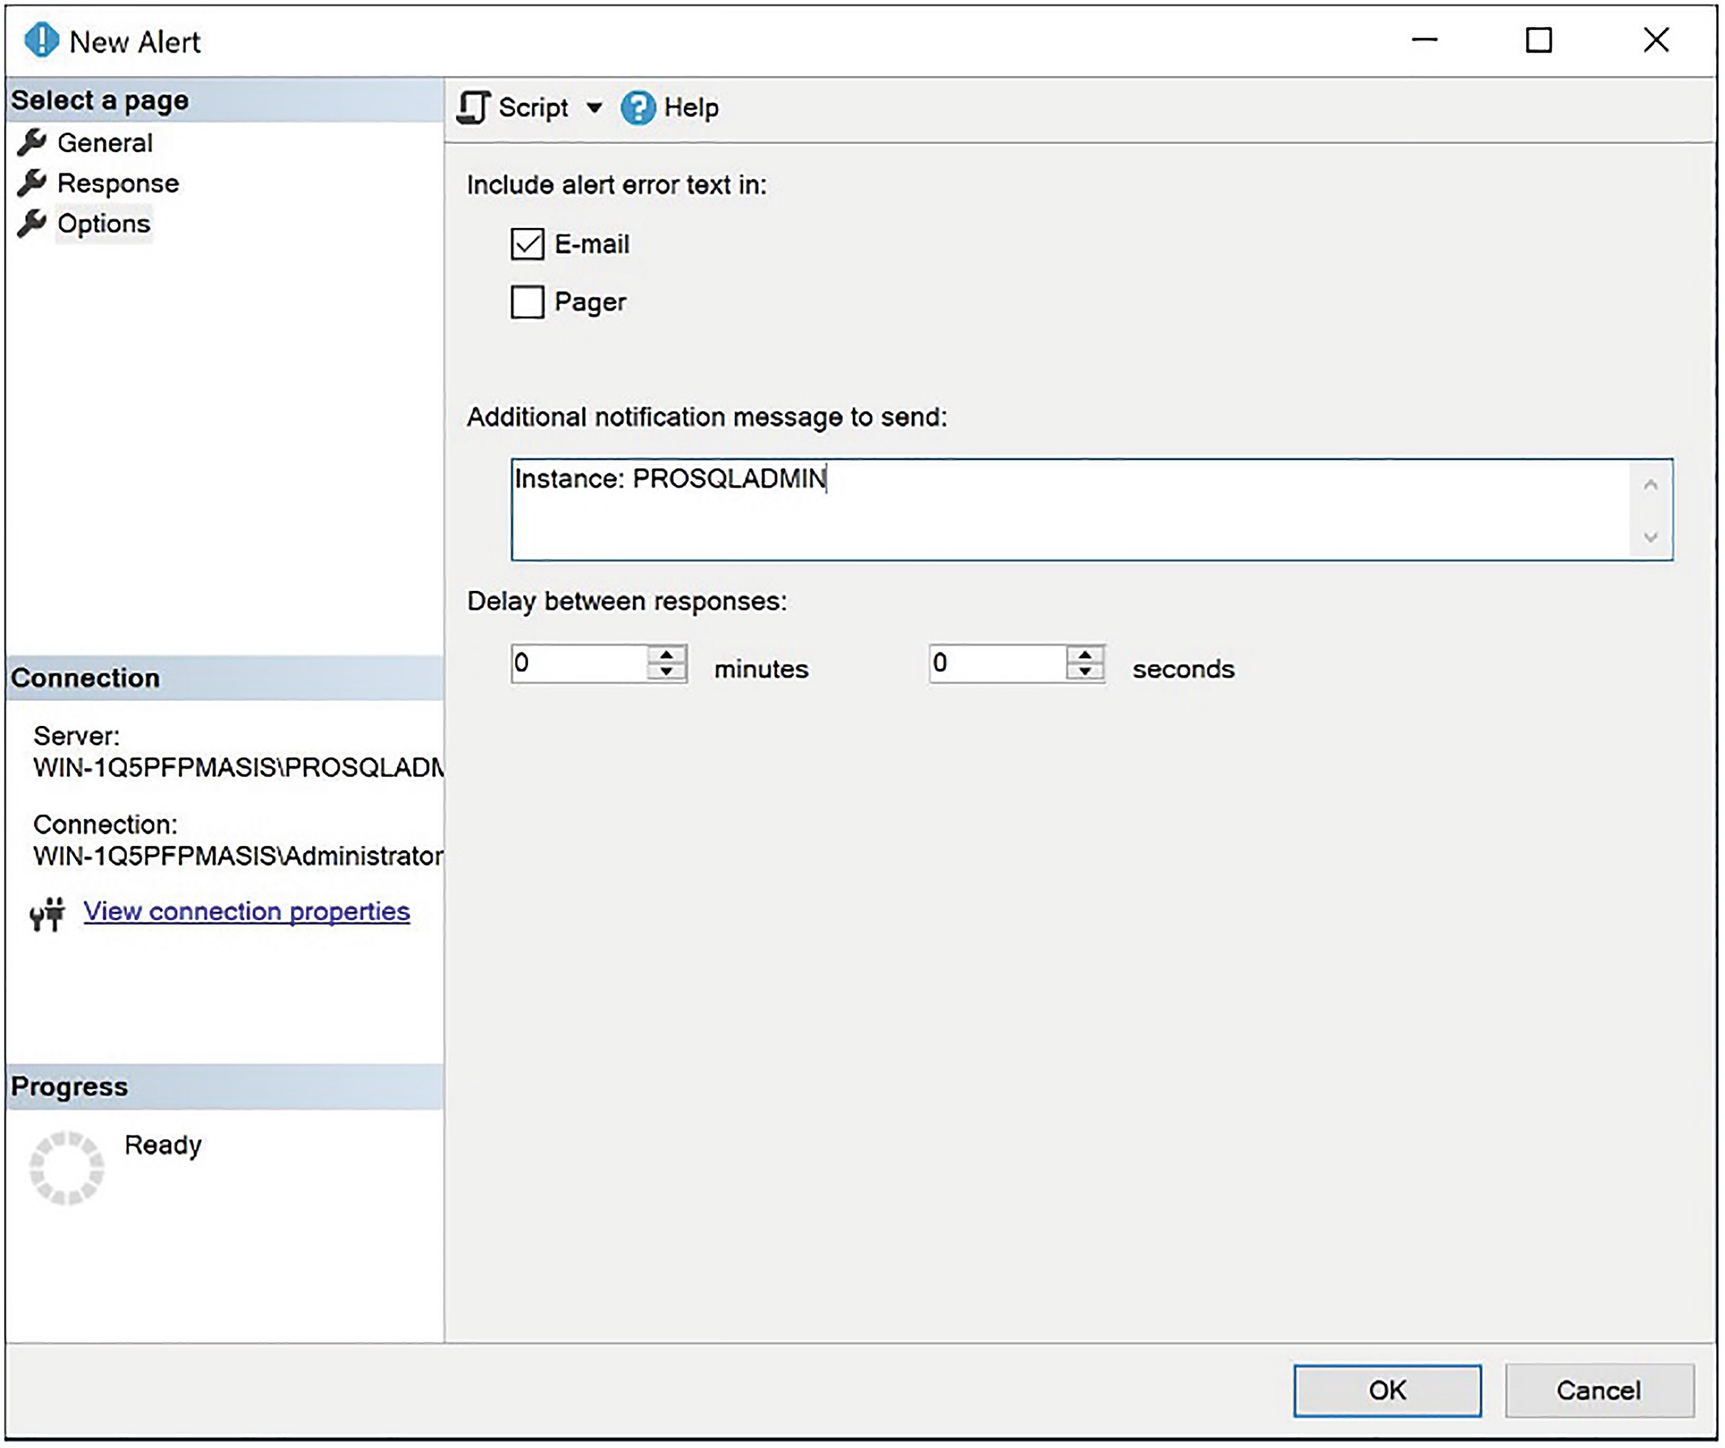
The Options page
Multiserver Jobs
Administration can be drastically simplified when you use multiserver administration. In a multiserver environment, you can configure one instance as a master server (MSX) and then other servers as target servers (TSX). You can then create a set of maintenance jobs on the MSX and configure them to run on the TSXs, or a subset of the TSXs.
Configuring the MSX and TSX Servers
Before creating multiserver jobs, you must first prepare the environment. The first step is to edit the Registry on the MSX and set the value of the AllowDownloadedJobsToMatchProxyName REG_DWORD to 1, which allows jobs to match the proxy name. You can find this value under the SQL Server Agent key, which is located under the SoftwareMicrosoftMicrosoft SQL Server[YOUR INSTANCE NAME] key in the Registry. You also need to ensure that the TSXs have a proxy account configured with the same name as the proxy account on the MSX that will be running the job.
We also need to configure how the TSXs encrypt the data when they communicate with the MSX. We achieve this using the MsxEncryptChannelOptions Registry key for the TSX. You can find this key in the SQL Server Agent key, which is located under the SoftwareMicrosoftMicrosoft SQL Server[YOUR INSTANCE NAME] key in the Registry. A value of 0 means that encryption is not used; 1 indicates that encryption is used, but the certificate is not validated; and an option of 2 indicates that full SSL encryption and certificate validation is used. In our environment, since all instances are on the same physical box, we disable encryption.
Therefore, to prepare our SQLSERVERMASTERSERVER instance to be an MSX, and to prepare our SQLSERVERTARGETSERVER1 and SQLSERVERTARGETSERVER2 instances to be TSXs, we run the script in Listing 23-9 to update the Registry.
The demonstrations in this section use three instances named SQLSERVERMASTERSERVER, which we configure as an MSX, and SQLSERVERTARGETSERVER1 and SQLSERVERTARGETSERVER2, both of which we configure as TSXs.
Updating the Registry
Because all of our instances reside on the same server, this script can be run from any of the three instances. If your instances are on different servers, then the first command will run on the MSX and the other two commands should run against their corresponding TSX. You should also note that the service account running the database engine will require permissions to the registry keys, for the script to succeed.
Creating a Proxy
We can now begin to configure our SQLSERVERMASTERSERVER instance as an MSX. To do this through SQL Server Management Studio, we invoke the Master Server Wizard by opening the SQL Server Agent context menu in Object Explorer and selecting Multi Server Administration ➤ Make This a Master.
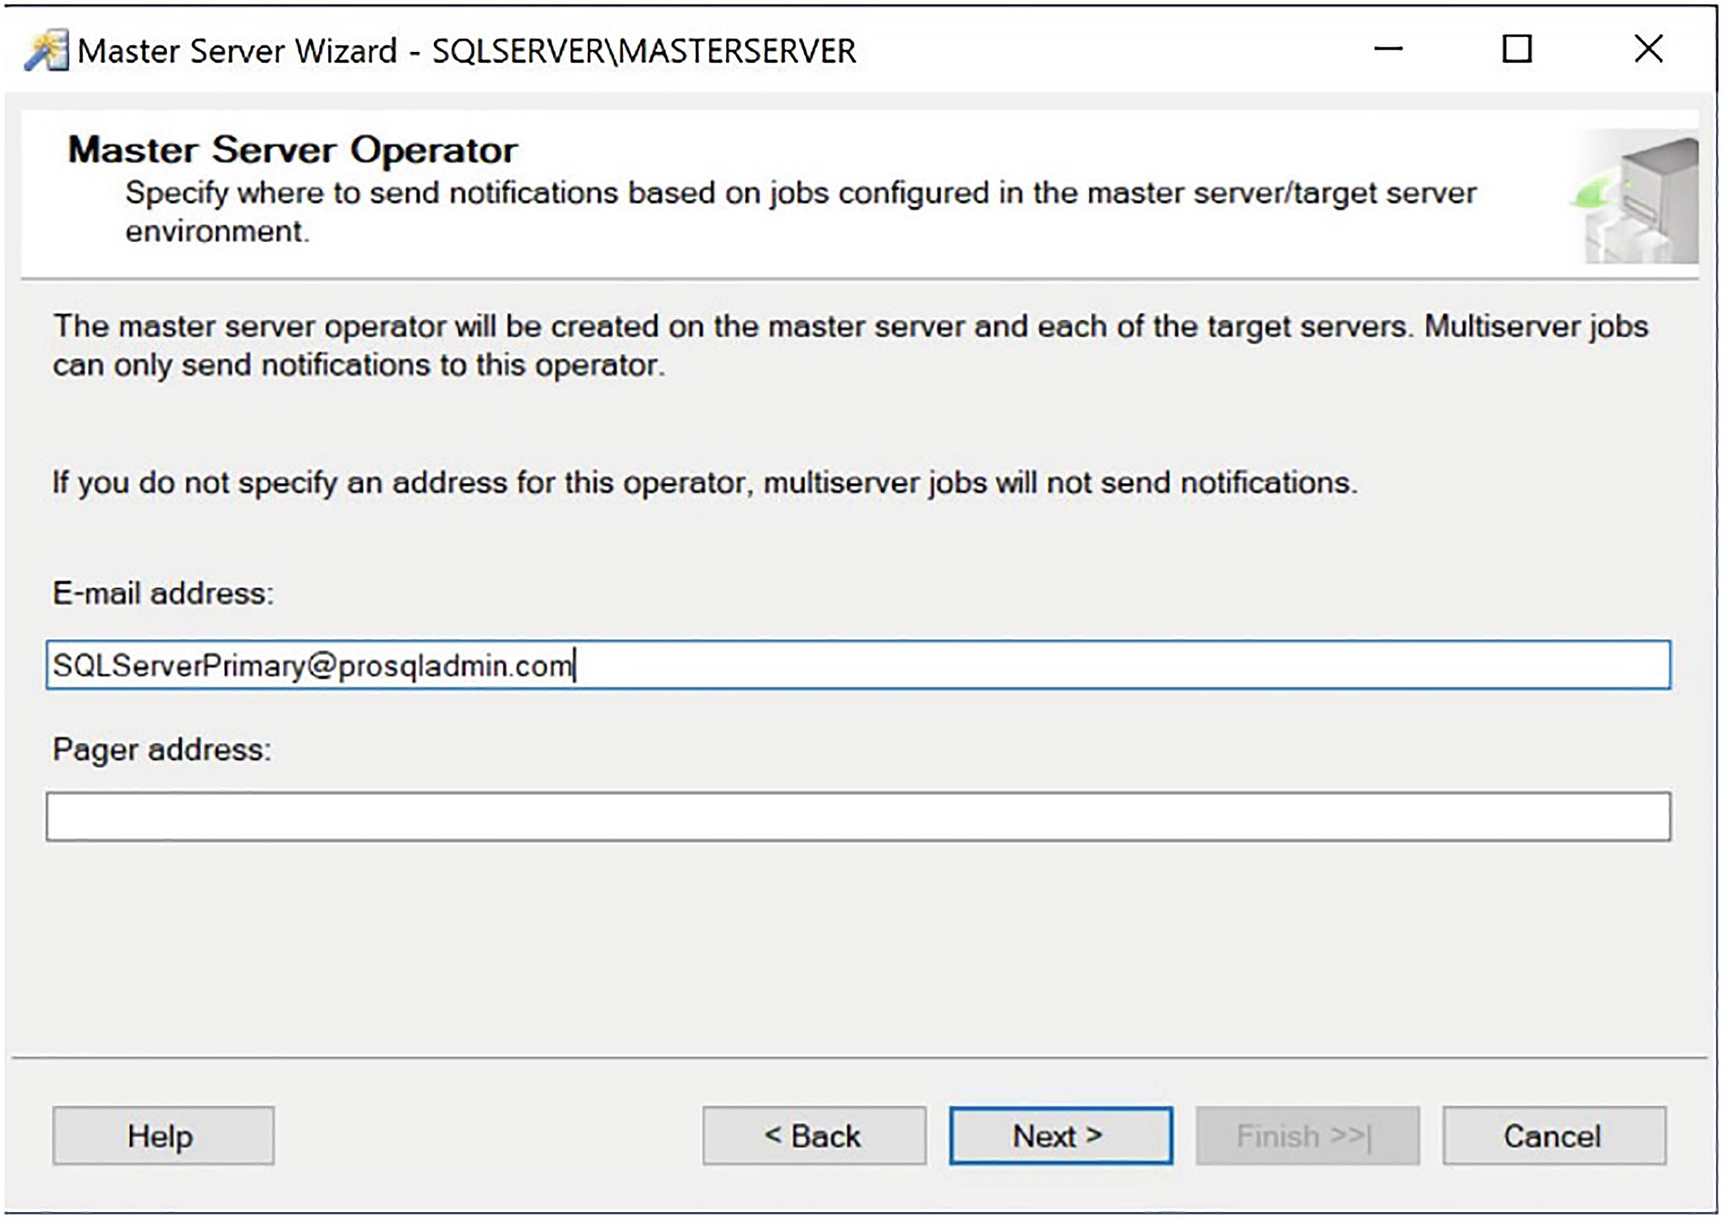
The Master Server Operator page
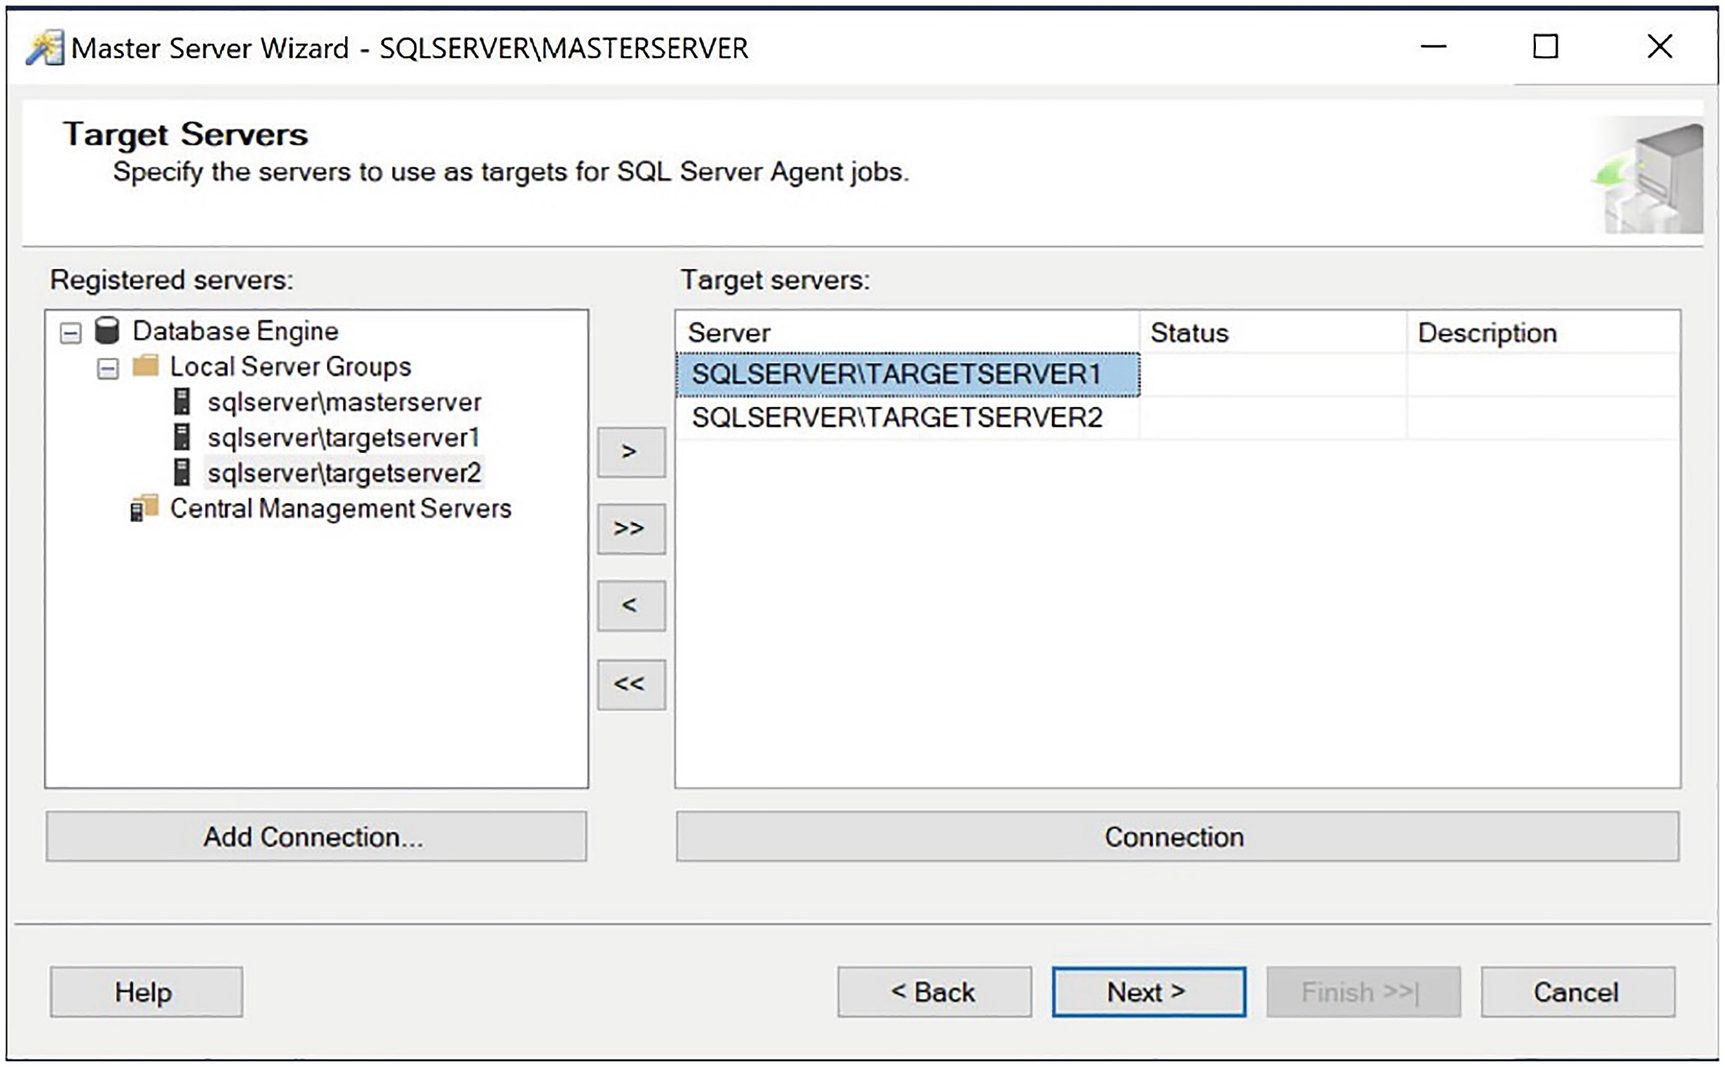
The Target Servers page
All of our instances appear in the Local Server Groups node of the Registered servers pane because they are all on the same server. If the instances that you wish to be target servers are not local, you can register servers by using the Registered servers window, which you can access from the View menu in SQL Server Management Studio.
On the Master Server Login Credentials page of the wizard, we are asked if a New Login should be created if required. This is the login that the TSXs use to connect to the MSX and download the jobs that they should run. If the instances of SQL Server Agent share the same service account as the MSX, then this is not required.
Now we see a summary of the actions that will be performed on the Completion page of the wizard before we are presented with a progress window, which informs us of the success or failure of each task.
Creating Master Jobs
Updating Job Step
Updating a Job
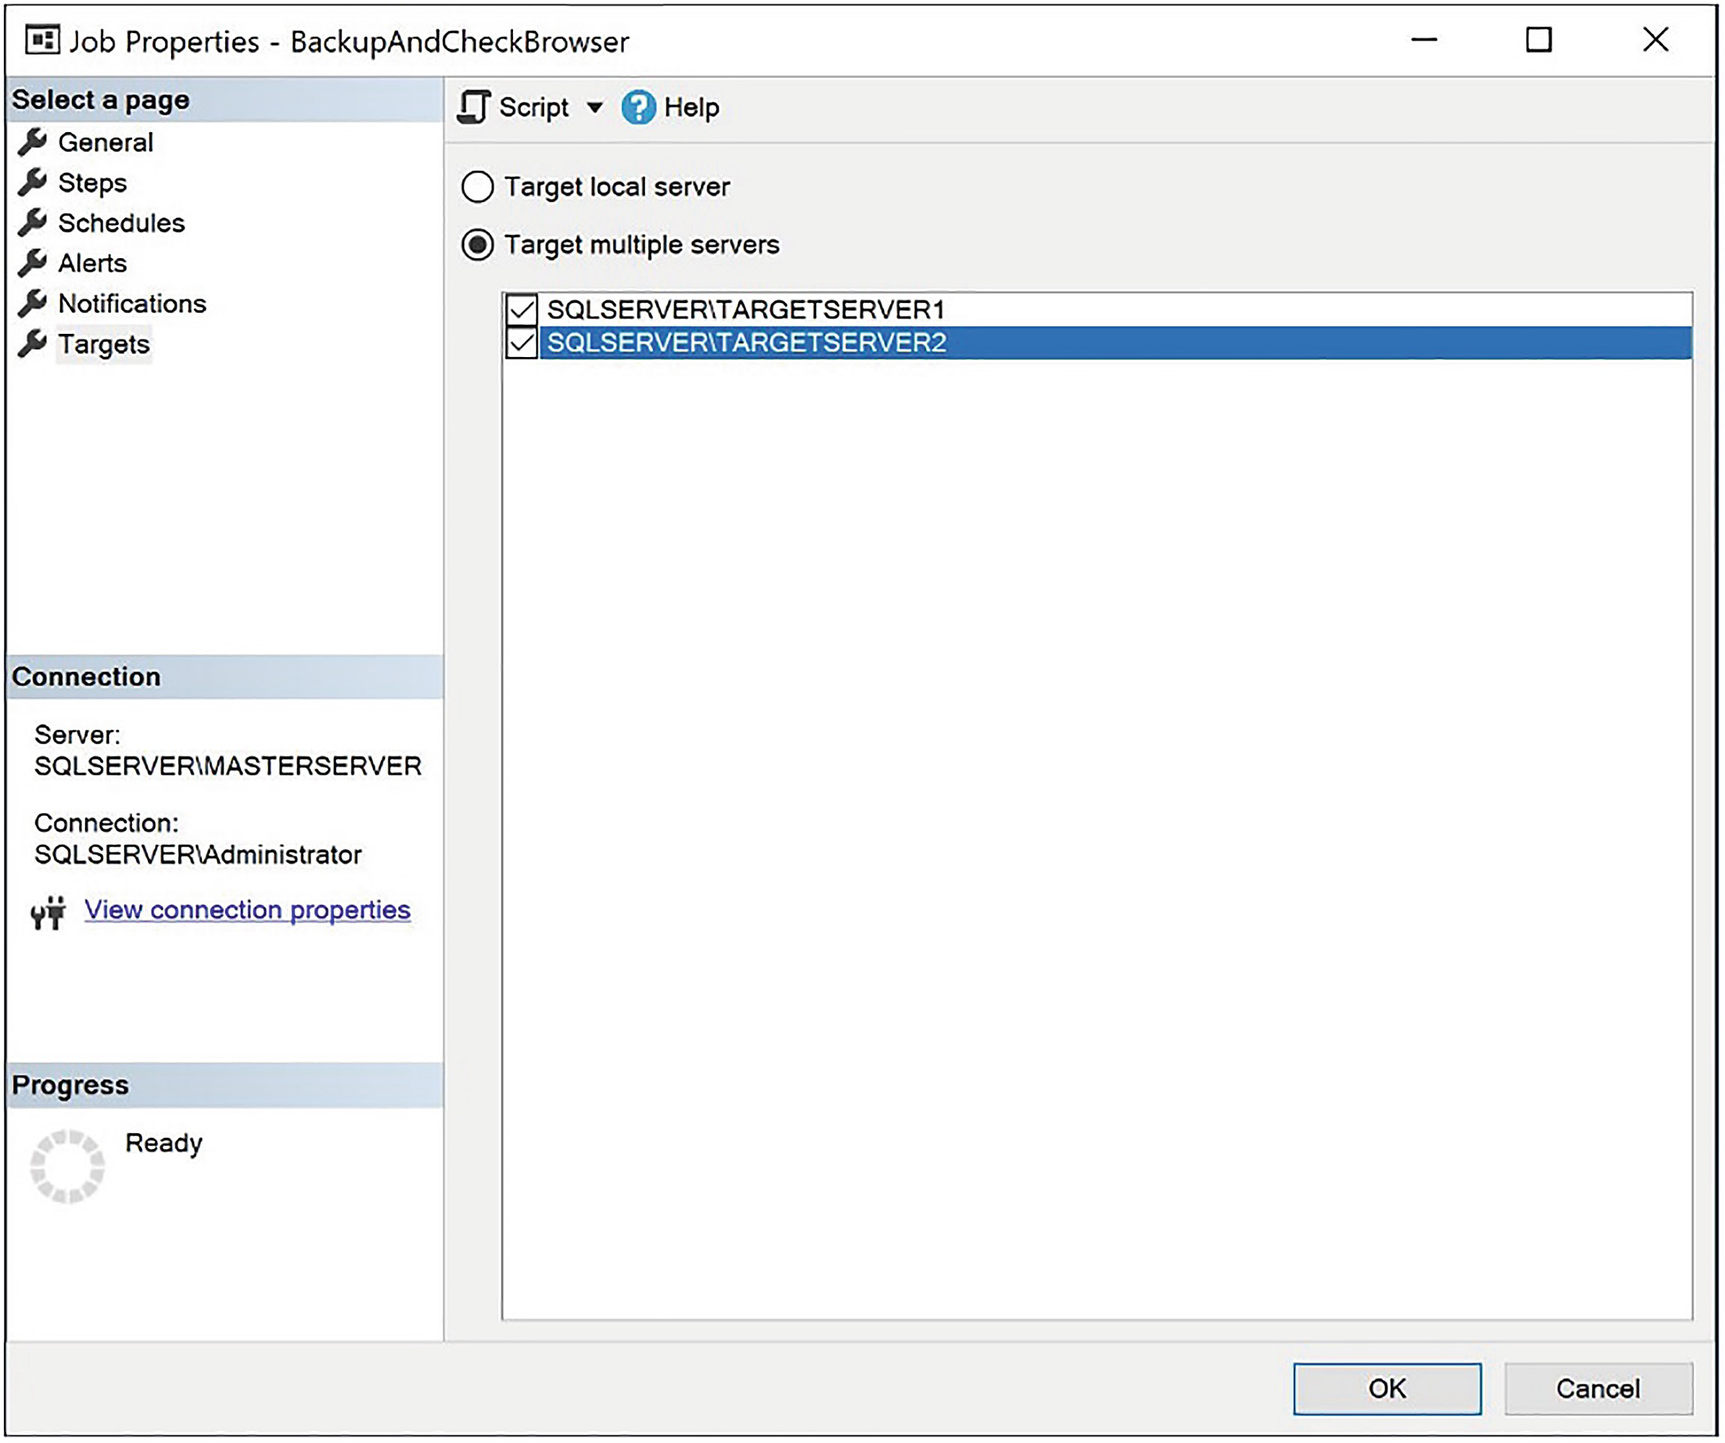
Convert to multiserver job
sp_delete_jobserver and sp_add_jobserver Parameters
Parameter | Description |
|---|---|
@job_id | The GUID of the job that you are converting to a multiserver job. If NULL, then the @job_name parameter must be specified. |
@job_name | The name of the job that you are converting to a multiserver job. If NULL, then the @job_id parameter must be specified. |
@server_name | The server/instance name that you want the job to run against. |
Converting to a Multiserver Job
Managing Target Servers
When you configure your MSX, make sure you consider various maintenance activities against the TSXs. These include polling the TSXs, synchronizing time across the servers, running ad hoc jobs, and defecting (delisting) TSXs.
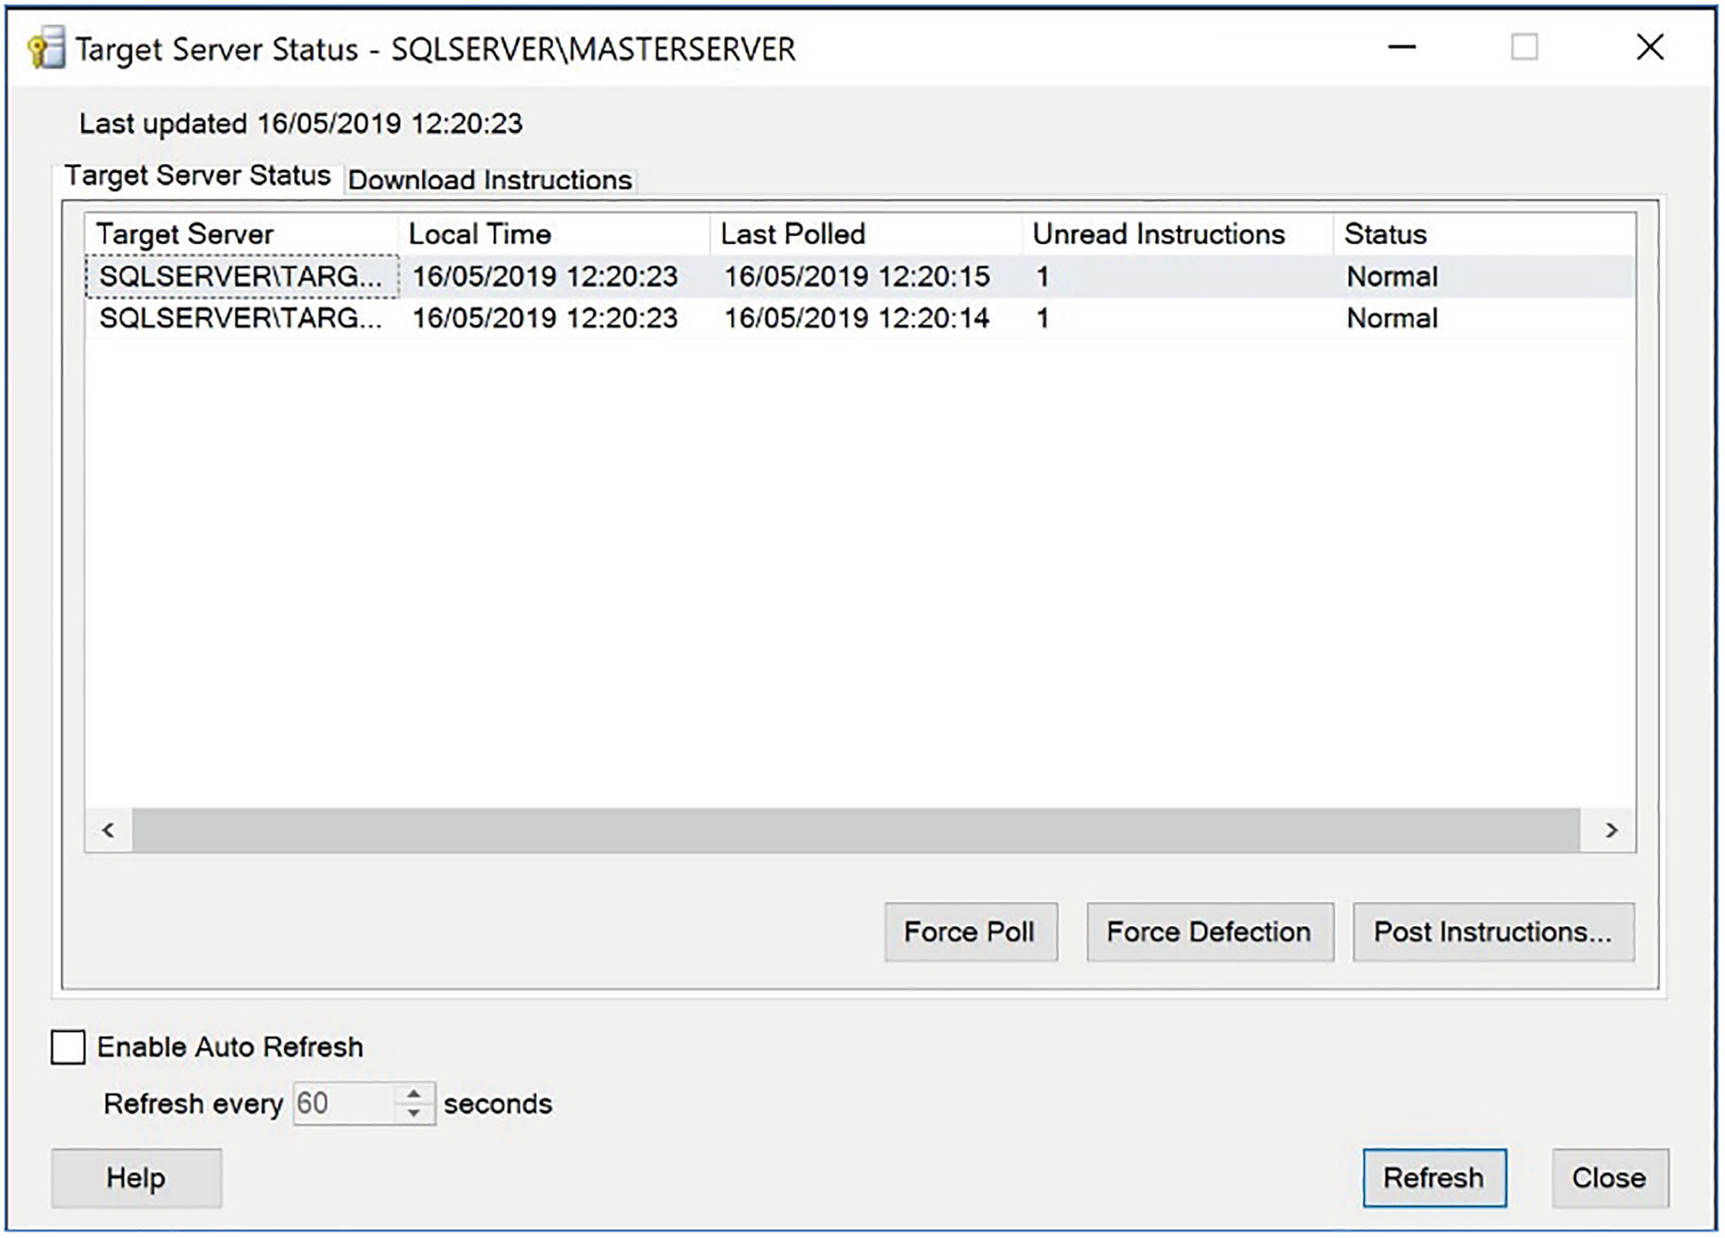
The Target Server Status tab
On this tab, we can use the Force Poll button to make the Target Servers poll the MSX. When a TSX polls the MSX, we are forcing it to download the latest copy of the jobs that it is configured to run. This is useful if you have updated the master job.
The Force Defection button causes the highlighted TSX to be delisted from the MSX. After it is delisted, the selected TSX no longer polls for or runs multiserver jobs.
Defect
Set Polling Interval
Synchronize Clocks
Start Job
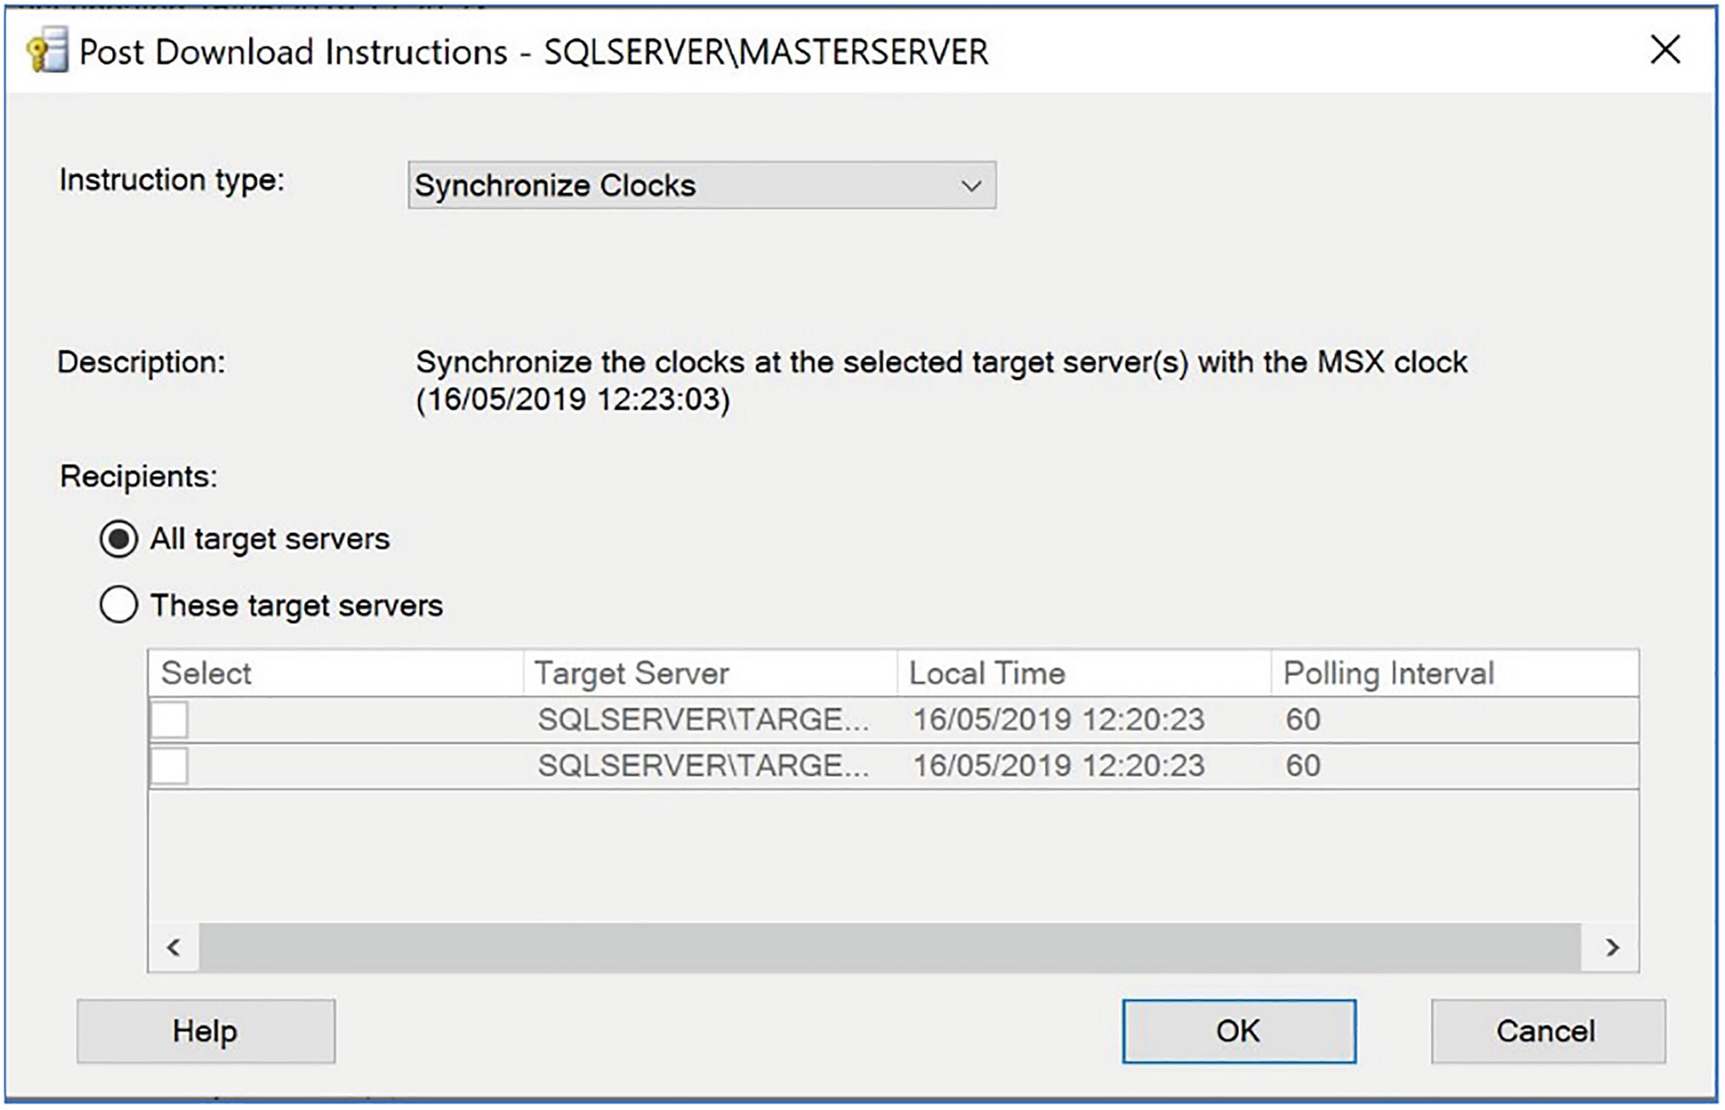
Synchronize Clocks
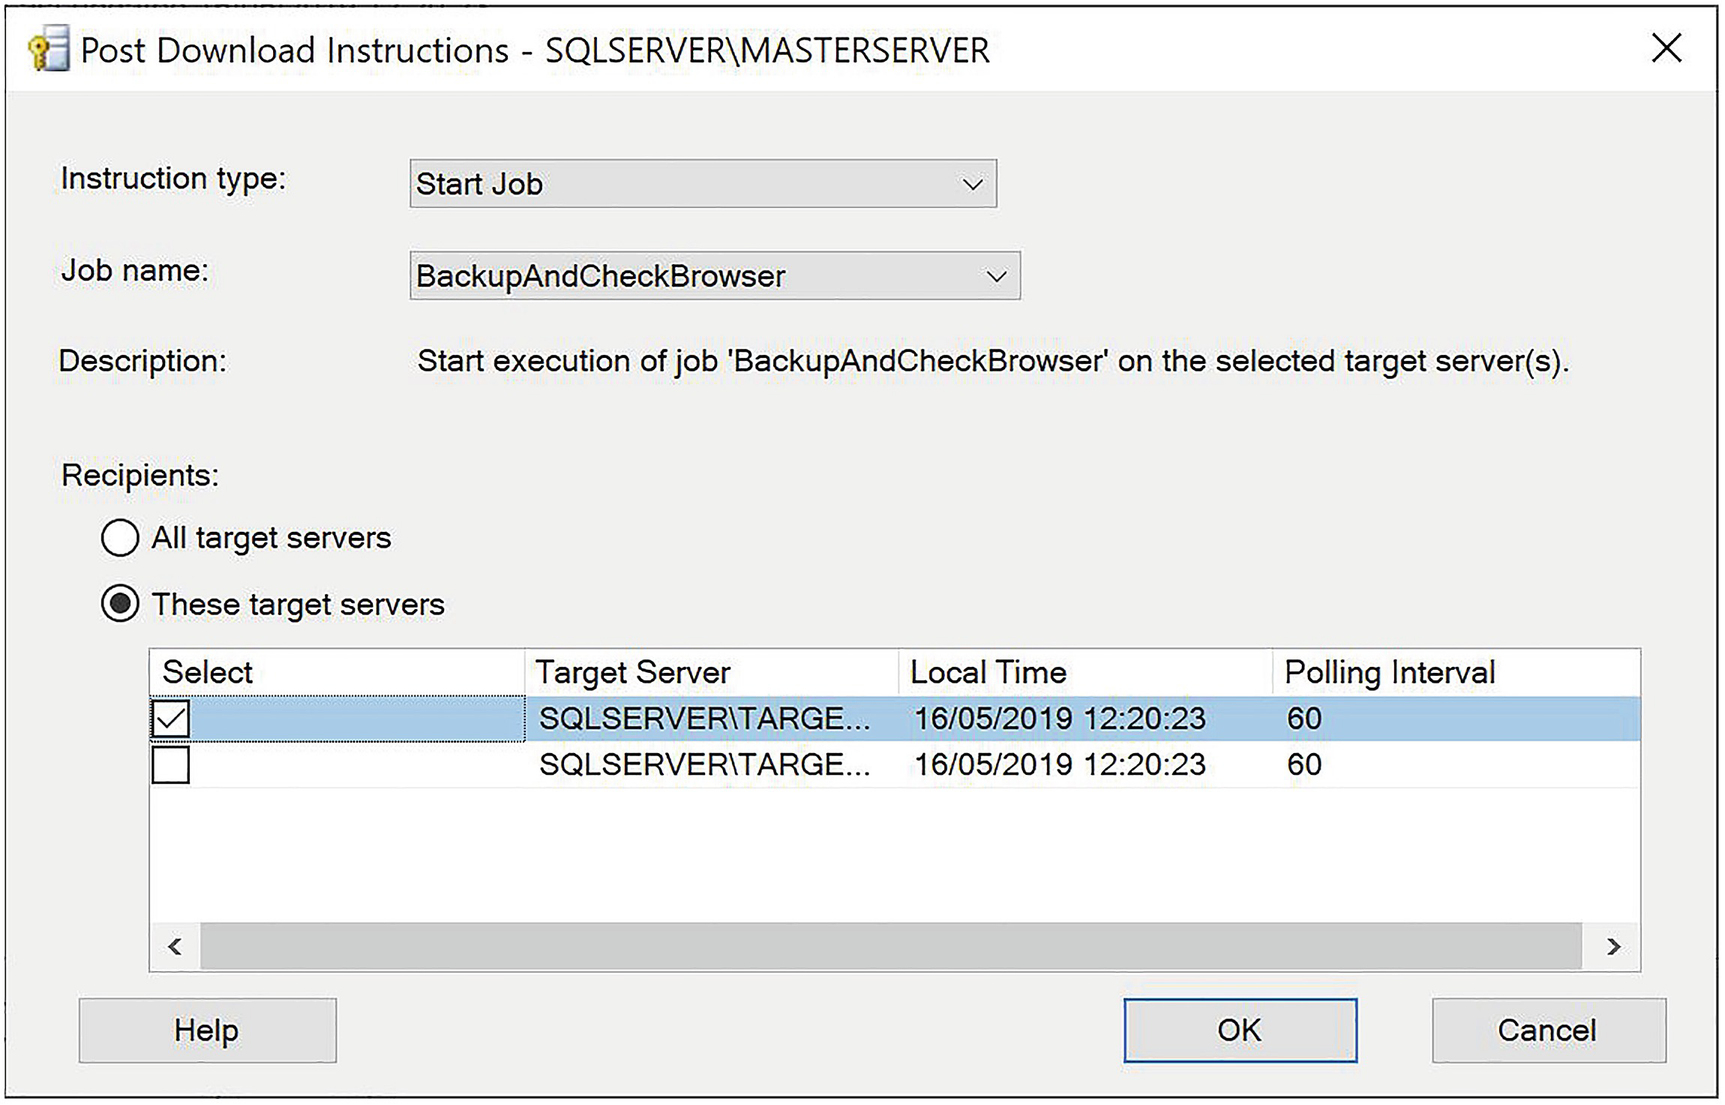
Start a job on TARGETSERVER1
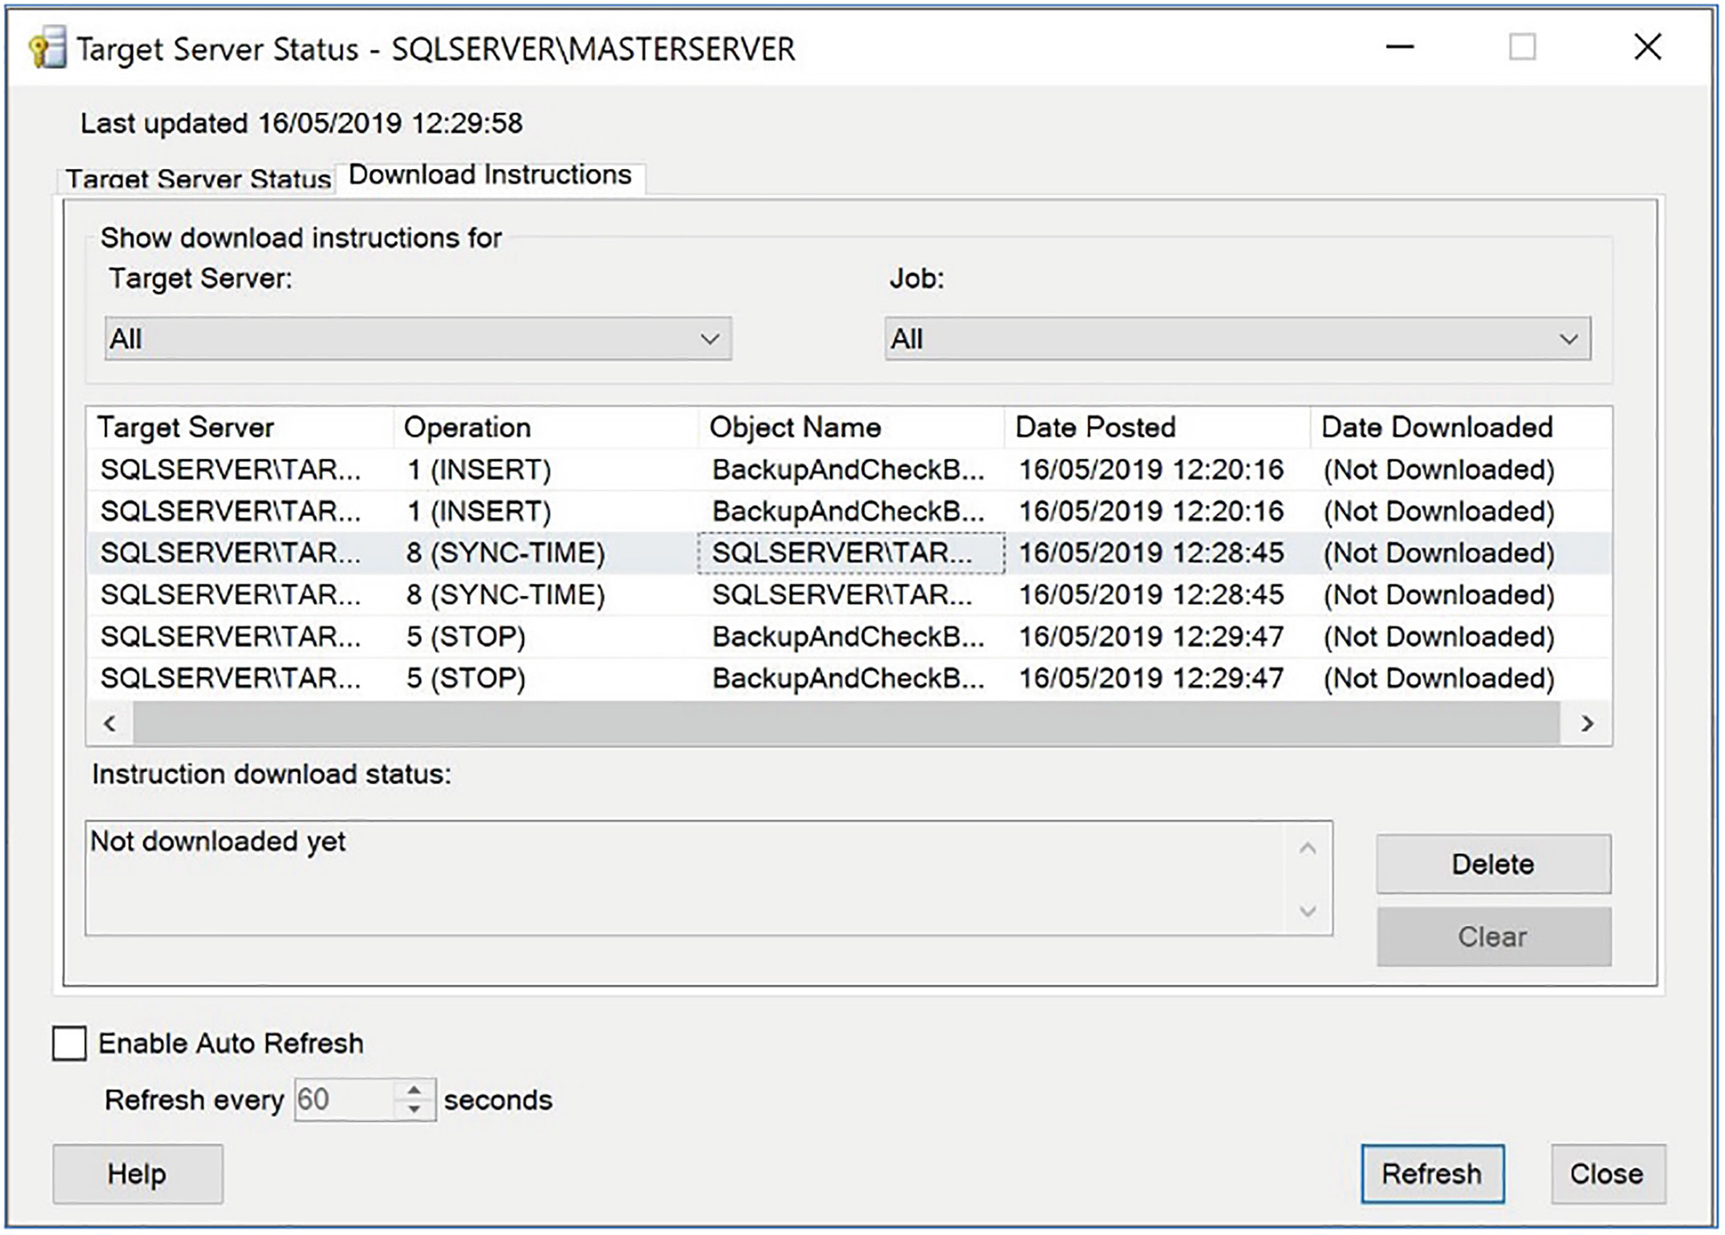
The Download Instructions tab
Summary
SQL Server Agent is a scheduling engine for SQL Server that allows you to create powerful maintenance jobs, with decision-based logic, on a variety of schedules. A job is the container for the tasks that should be performed, and each of these tasks is known as a step. Each job step can run under the context of a different account and can run tasks under different subsystems, or types, such as T-SQL, PowerShell, operating system command, or SSIS package.
A schedule is attached to a job and can be triggered at a specific date and time, when the CPU is idle, or on a reoccurring schedule, such as daily, weekly, or monthly. A schedule can also reoccur on an intraday basis, such as hourly, every minute, or even as frequently as every ten seconds.
An operator is an individual or team who is notified of the success or failure of jobs and if an alert fires. Operators can be notified of job status via e-mail, pager, or NET SEND; however, support for NET SEND and pager are deprecated. For an operator to be notified by e-mail, Database Mail must be configured so that e-mails can be sent via your SMTP Replay server.
By default, jobs run under the context of the SQL Server Agent service account. However, for good security practice, you should consider using proxy accounts to run the job steps. Proxy accounts map to credentials at the instance level, which in turn map to a Windows-level security principle. Proxies can be used for all subsystems, except T-SQL. T-SQL job steps use EXECUTE AS to execute the commands under the context of a database user. This is configured using the Run As property.
Alerts can be triggered when an error or warning is fired within the Database Engine, when a WMI event occurs, or in response to a performance condition being met. When an alert fires, responses include notifying an operator or running a job to resolve an issue.
Multiserver jobs allow DBAs to run jobs consistently across their enterprise. In a multiserver scenario, there is a master server (MSX), in which jobs are created and modified, and multiple target servers (TSXs). The TSXs periodically poll the MSX and retrieve a list of jobs that they should be running.