Appendix B. Proof of Concept and Performance Test Quick Reference
This appendix contains a convenient quick reference, drawn from earlier chapters, of the steps required at each stage of planning and carrying out a proof of concept (POC), performance test execution, and performance test analysis.
The Proof of Concept
A proof of concept is an important prerequisite because it does the following (see Chapter 3 for details):
-
Provides an opportunity for a technical evaluation of the performance testing tool against the target application
-
Identifies scripting test data requirements
-
Allows an assessment of scripting effort
-
Demonstrates the capabilities of the performance testing solution against the target application
POC Checklist
You should anticipate no more than a couple of days for completion, assuming that the environment and application are available from day one.
Prerequisites
The following should be in place before you set up the POC environment:
-
A written set of success or exit criteria that you and the customer have agreed on as determining the success or failure of the POC.
-
Access to a standard build workstation or client platform that meets the minimum hardware and software specification for your performance testing tool or solution; this machine must have the application client and any supporting software installed.
-
Permission to install any monitoring software that may be required into the POC test environment.
-
Ideally, sole access to the application for the duration of the POC.
-
Access to someone who is familiar with the application (i.e., a power user) and can answer your usability questions as they arise.
-
Access to an expert who is familiar with the application (i.e., a developer) in case you need an explanation of how the application architecture works at a middleware level.
-
A user account that will allow correct installation of the performance testing software onto the standard build workstation and access to the application client.
-
At least two sets of login credentials (if relevant) for the target application.
-
Two sample use cases to use as a basis for the POC: a simple read-only operation as well as a complex activity that updates the target data repository. These let you check that your script replay works correctly.
Process
Here are the steps involved in the POC process:
-
Record two instances of each sample use case and compare the differences between them using whatever method is most expedient. Identifying what has changed between recordings of the same activity will highlight any session data requirements that need to be addressed.
-
After identifying the input and session data requirements and any modifications needed to the scripts, ensure that each script will replay correctly in single-user and multiuser mode. Make sure that any database updates occur as expected and that there are no errors in the replay logs for your scripts. Make certain that any modifications you have made to the scripts are free from memory leaks and other undesirable behavior.
Deliverables
Following are some guidelines for the POC deliverables:
-
The output of a POC should be a go/no-go assessment of the technical suitability of your performance testing tool for successfully scripting and replaying application use cases.
-
You should have identified the input and session data requirements for the sample use cases and gained insight into the likely data requirements for the performance testing project.
-
You should identify any script modifications required to ensure accurate replay and assess the typical time required to script each use case.
Performance Test Execution Checklist
See Chapter 4 for an expanded version of this material.
Activity Duration Guidelines
The following are suggested duration guidelines for typical performance test activities:
- Project scoping
-
Time to complete nonfunctional requirements (NFR) capture and to produce a statement of work (SOW). Allow a day for each activity.
- Scripting use cases
-
For straightforward web applications, allow half a day per use case assuming an experienced technician. For anything else, increase this to a full day per use case.
- Creating and validating performance test sessions or scenarios
-
Typically allow one to two days’ work.
- Performance test execution
-
Allow a minimum of five days.
- Data collection (and software uninstall)
-
Allow half a day.
- Final analysis and reporting
-
Allow at least one day.
Step 1: Pre-Engagement NFR Capture
You need this information to successfully create a project plan or statement of work:
-
Deadlines available to complete performance testing, including the scheduled deployment date.
-
A decision on whether to use internal or external resources to perform the tests.
-
An agreed-upon test environment design. (An appropriate test environment will require longer to create than you estimate.)
-
A code freeze that applies to the test environment within each testing cycle.
-
A test environment that will not be affected by other user activity.
-
All performance targets identified and agreed to by business stakeholders.
-
The key application use cases identified, documented, and ready to script.
-
A determination of which parts of use cases should be monitored separately (i.e., checkpointed).
-
Identified input, target, and session data requirements for use cases that you select. Make sure you can create enough test data of the correct type within the timeframes of your testing project. Don’t forget about data security and confidentiality.
-
Performance test scenarios identified in terms of number, type, use-case content, and virtual user deployment. You should also have decided on the think time, pacing, and injection profile for each scripted use-case deployment.
-
Identified and documented application, server, and network KPIs.
-
Identified deliverables from the performance test in terms of a report on the test’s outcome versus the agreed-upon performance targets.
-
A defined procedure for submitting any performance defects discovered during testing cycles to development or the application vendor. If your plan is to carry out the performance testing in-house, then you will also need to address the following points related to the testing team:
-
Do you have a dedicated performance testing team? At a minimum you will need a project manager and enough testing personnel (rarely are more than two needed) to handle the scale of the project. See Figure B-1.
-
Does the team have the tools and resources it needs to performance test effectively?
-
Are all team members adequately trained in the testing tools to be used?
-
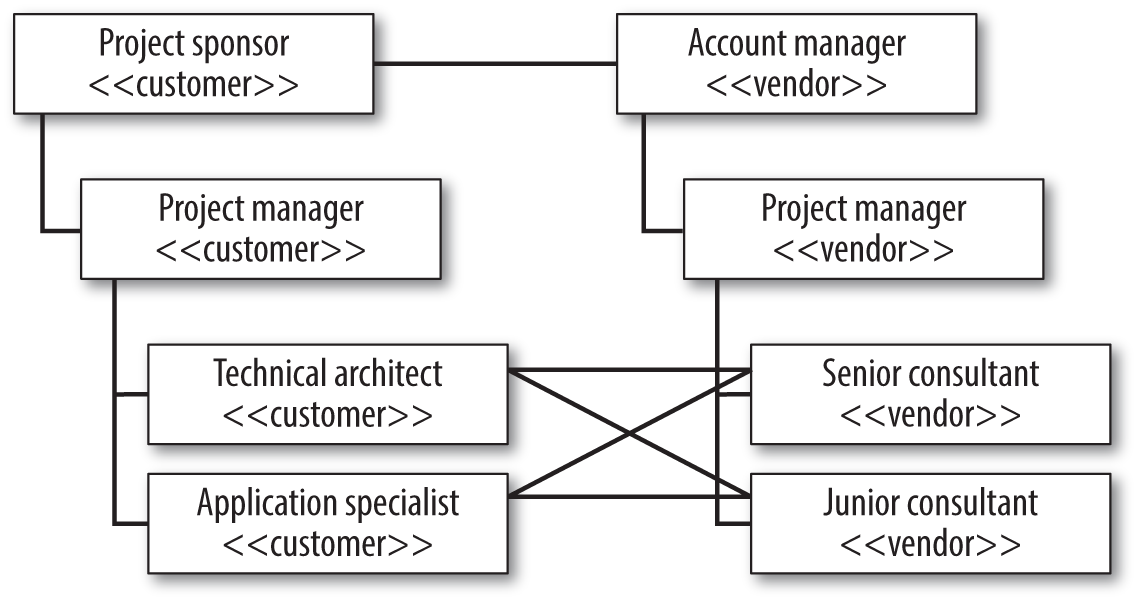
Figure B-1. Example performance testing team structure
Given this information, proceed as follows:
-
Develop a high-level plan that includes resources, timelines, and milestones based on these requirements.
-
Develop a detailed performance test plan that includes all dependencies and associated timelines, detailed scenarios and test cases, workloads, and environment information.
-
Include contingency for additional testing cycles and defect resolution if problems are found with the application during performance test execution.
-
Include a risk assessment of not meeting schedule or performance targets. With these actions under way, you can continue with each of the following steps. Not everything mentioned may be relevant to your particular testing requirements, but the order of events is important. (See Appendix E for an example MS Project–based performance testing project plan.)
Step 2: Test Environment Build
Strive to make your test environment a close approximation of the live environment. At a minimum it should reflect the server tier deployment of the live environment, and your target database should be populated realistically in terms of content and sizing. (This activity frequently takes much longer than expected.)
-
Allow enough time to source equipment and to configure and build the environment.
-
Take into account all deployment models (including LAN and WAN environments).
-
Take external links into account, since they are a prime location for performance bottlenecks. Either use real links or create a realistic simulation of external communication.
-
Provide enough load injection capacity for the scale of testing envisaged. Think about the locations where you will need to inject load from. If nonlocal load injector machines cannot be managed remotely, then local personnel must be on hand at each remote location. (Don’t forget to consider the cloud for load injection.)
-
Ensure that the application is correctly deployed into the test environment.
-
Provide sufficient software licenses for the application and supporting software (e.g., Citrix or SAP).
-
Ensure correct deployment and configuration of performance testing tools.
-
Ensure correct deployment and configuration of KPI monitoring tools.
Step 3: Scripting
Proceed as follows for each use case to be scripted:
-
Identify the use-case session data requirements. You may have some insight into this requirement as part of a proof of concept.
-
Confirm and apply use-case input data requirements (see Appendix A).
-
Determine the use-case checkpoints that you will monitor separately for response time.
-
Identify and apply any changes required for the scripted use case to replay correctly.
-
Ensure that the script replays correctly from both a single-user and a multiuser perspective before including it in a performance test. Make sure you can verify what happens on replay.
Step 4: Performance Test Build
Making use of the application load model created as part of NFR capture, for each performance test consider the following points:
-
Is it a pipe-clean, volume, stress, soak, or configuration test? A typical scenario is to have pipe-clean tests for each use case, first in isolation as a single user and then up to the target maximum currency or throughput. Run isolation tests to identify and deal with any problems that occur, followed by a load test combining all use cases up to target concurrency. (You should then run stress and soak tests for the final testing cycles, followed perhaps by non-performance–related tests.)
-
Decide on how you will represent think time and pacing for each use case based on the type of performance test scenario.
-
For each use case, decide on how many load injector deployments you will make and how many virtual users should be assigned to each injection point of presence.
-
Decide on the injection profile for each load injector deployment: Big Bang, ramp-up, ramp-up/ramp-down with step, or delayed start. Your performance test choice will likely involve a combination of Big Bang deployments to represent static load and one or more of the ramp variations to test for scalability (see Figure B-2).
-
Will the tests execute for a certain length of time or be halted by running out of data, reaching a certain number of use-case iterations, or user intervention?
-
Do you need to spoof IP addresses to correctly exercise application load balancing requirements? (If so, then you will need a list of valid IP addresses.)
-
Do you need to simulate different network conditions like baud rates or cellular network quality? If so, then confirm the different scenarios required. Any response-time prediction or capacity modeling carried out prior to performance testing should have already given you valuable insight into how the application reacts to bandwidth restrictions.
-
What runtime monitoring needs to be configured using the client, server, and network KPIs that have already been set up? The actual monitoring software should have been deployed as part of the test environment build phase, so you should already have a clear idea of exactly what you are going to monitor in the hosting infrastructure.
-
If this is a web-based performance test, what level of browser caching simulation do you need to provide? New user, active user, returning user? This will very much depend on the capabilities of your performance testing solution. See Chapter 9 for a discussion of caching simulation.
-
Consider any effects that the application technology will have on your performance test design. For example, SAP performance tests that make use of the SAPGUI client will have a higher resource requirement than, say, a simple terminal emulator and will require more load injector machines to generate a given number of virtual users. Chapter 9 discusses additional considerations for SAP and other application technologies.
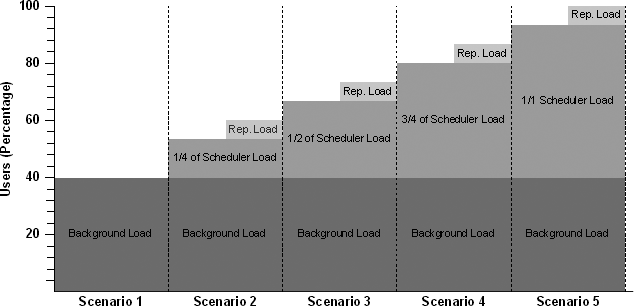
Figure B-2. Performance test plan using background (static) load and ramp-up injection profiles
Step 5: Performance Test Execution
Run and monitor your tests. Make sure that you carry out a dress rehearsal of each performance test as a final check that there are no problems accessing the application or with the test configuration. This phase should be the most straightforward part of any performance testing project. You’ve done the hard work: preparing the test environment, creating the scripts, addressing the data requirements, and building the performance tests. In an ideal world, performance test execution should be solely to validate your application performance targets. It should not become a bug-fixing exercise. The only unknown is how many test cycles will be required before you achieve your performance testing goals. I wish I could answer this question for you, but like many things in life this is in the lap of the gods. However, if you’ve followed the suggested performance testing checklists religiously to this point, you’re in pretty good shape to be granted a miracle!
Here is a summary of tips related to performance text execution:
-
Execute additional dress-rehearsal tests to verify you have sufficient load injection capacity for the target concurrency. Unless your concurrency targets are very modest, you should always check the upper limits of your load injectors.
-
Execute pipe-clean tests to establish ideal response-time performance. (This is typically a single user per script for a set period of time or a certain number of iterations.)
-
Execute volume tests, ideally resetting target database content between executions. This test normally includes all scripts prorated among the target number of virtual users.
-
Execute isolation tests to explore any problems revealed by load testing, and then supply results to the developers or application vendor.
-
Execute stress tests to generate data concerning future growth of transaction volume and application users.
-
Execute soak tests (if time allows) to reveal any memory leaks and problems related to high-volume transaction executions.
-
Execute any tests that are not performance related (e.g., different load-balancing configurations).
Step 6 (Post-Test Phase): Analyze Results, Report, Retest If Required
The following are pointers on what to do during the post-test phase:
-
Make sure that you capture and back up all data created as part of the performance testing project.
-
Compare test results to performance targets set as part of project requirements; this will determine the project’s success or failure.
-
Document the results of the project. Your report should include sections that address each of the performance targets.
-
Use the final results as baseline data for end-user experience (EUE) monitoring.
Analysis Checklist
The focus here is on analysis rather than execution. See Chapter 5 for more details.
Pre-Test Analysis Tasks
-
Make sure that you have configured the appropriate application, server, and network KPIs. Make sure there are no obstacles to installing and configuring agent software on the servers (unless you use remote monitoring).
-
Set any available automatic thresholds for performance targets as part of your performance test configuration.
-
If your performance testing tool provides the capability, configure autocorrelation between response time, concurrent virtual users, and server or network KPI metrics.
-
If you are using third-party tools to provide some or all of your KPI monitoring, make sure that they are correctly configured before you run any tests—ideally, include them in your dress rehearsal.
-
Be sure you can integrate third-party data with the output of your performance testing tool. Unless your tools do this automatically, this can be time-consuming.
Tasks During Test Execution
Here is a list of tasks to complete during test execution:
-
Periodically examine the performance of your load injectors to ensure that they are not becoming stressed.
-
Document every test that you execute. At a minimum, record the following:
-
The name of the performance test execution file and the date and time of execution
-
A brief description of what the test comprised
-
The name of the results file (if any) associated with the current test execution
-
Any input data files associated with the performance test and which use cases they relate to
-
A brief description of any problems that occurred during the test
-
If your performance testing tool allows you to annotate the performance test configuration with comments, use this facility to include whatever information will help you easily identify the test run. During execution, you should do the following:
-
Watch for the sudden appearance of errors. This frequently indicates that some limit has been reached within the test environment; it can also mean that you’ve run out of data or that the operating system’s default settings are interfering.
-
Watch for a sudden drop in throughput. This is a classic sign of trouble, particularly with web applications where the virtual users wait for a response from the web server. If your application is using links to external systems, check to ensure that none of these links is the cause of the problem.
-
Watch for an ongoing reduction in available server memory. Available memory should decrease as more and more virtual users become active, but if the decrease continues after all users are active, then you may have a memory leak.
Post-Test Tasks
Post-test tasks include the following:
-
Collect all relevant data for each test execution. If you’re relying on third-party tools to provide monitoring data, make sure that you preserve the files you need.
-
Back up, onto a separate archive, all testing resources (scripts, input data files, and test results).
-
Your report should map results to the performance targets that were set as part of the pre-test requirements capture phase.