
Chapter 10. Managing Your Library
Photos’ library concept is very tidy: Your entire Photos existence is bundled into a single file. It’s also quite versatile because you can maintain a single library or several. (You first met your Mac’s Photos library file back in Chapter 2; see Dealing With Duplicates for an overview of what it contains.)
Photos makes it easy to create new libraries and switch among them on your Mac, but there are consequences. For example, it may sound like a great idea to create a new library for your kid’s sporting events, your niece’s wedding, or your space walk outside the International Space Station (hey, astronauts might read this book). But is that a good idea? This chapter points out the many reasons why it’s not.
If, for whatever reason, you find yourself in Multiple Library Land, you can always merge them to simplify your Photos experience. Unfortunately, doing so is no easy task. Since Photos can’t merge its own libraries, you have to employ other methods that cost money. This chapter walks you through all your options.
Another important aspect of managing your library files is backing them up. Recent surveys report that the things people are most afraid of losing in a catastrophe—besides other people and pets, of course—are their digital photos and videos. Even if you’re using iCloud Photo Library (Meet the iCloud Photo Library) and you feel smug knowing that you maintain an offsite backup of your library on Apple’s iCloud servers, it’s safer to err on the side of caution and back up your files elsewhere, too. This chapter teaches you how to do that in a variety of ways, such as the strategy detailed in the box on A Super-Awesome Backup Strategy.
Burning files to a CD or DVD is also useful, even though it may feel old school to some. As Burning Movies onto CDs or DVDs explains, this is an easy way to send photos and exported slideshow movies to far-flung friends and family. This maneuver also lets you view pictures, videos, and exported slideshows on your TV, which is handy if you don’t have an Apple TV (the box on Viewing Slideshows on an Apple TV has more on using an Apple TV).
Tip
You can’t access your Photos library on an iOS device, so this chapter deals solely with Photos for Mac.
Using Multiple Libraries
If you’re an organized person, you may think that you can easily keep track of more than one Photos library. In reality, trying to do so is a nightmare. In a very short period of time, you’ll have no idea which content lives in which library.
The one situation where multiple libraries make sense is when you’ve got multiple people using the same Mac. (As Photos for Families explains, setting up different user accounts on a shared Mac creates separate Photos libraries for each user.) On the other hand, maintaining more than one library per Mac user account makes no sense. Let us count the reasons why doing so is a very bad idea:
You can’t search across multiple libraries. One of Photos’ superpowers is that it lets you find stuff in a million different ways—but only in one library.
Projects can only include pictures from the currently active library. That’s a deal-killer right there. Because of this limitation, the custom calendar you plan to give folks during the holidays won’t include anything from another library unless you switch to that library, find the photos you want, export them, switch back to the first library, import the photos—which duplicates them on your hard drive, devouring precious disk space—and then include them in your calendar project. Ditto for cards, books, and slideshows. It’s exhausting just thinking about it.
Merging libraries is painful. You may assume you can easily merge multiple libraries later on if you need to, but as Merging Libraries explains, the process is messy, time-consuming, and expensive.
iCloud can only share and sync content from one library at a time. You’ll learn more about iCloud later in this chapter, but in a nutshell, you can use it to share some of your content or you can pay a fee and sync all of your content across all of your devices. Either way, iCloud only works with one library at a time—specifically, your main Photos library, which Photos call the System Photo Library (What Gets Uploaded).
You have more libraries to back up. As you’ll learn later in this chapter, backing up your files is extremely important. The more libraries you have, the more files you have to worry about backing up. iCloud Photo Library (Meet the iCloud Photo Library) makes this less of an issue but it’s still best to have multiple backups of your digital mementos.
The takeaway here is that if you value your sanity and you’re honest about your abilities (and shortcomings), it’s best to keep all your digital memories in one library per user account on your Mac. (To learn more about managing Photos for families, flip back to Photos for Families.) After all, Photos is designed to handle massive libraries, so there’s really no benefit to splitting up your picture and video collection.
Assuming you’re convinced that one library is the best policy, you can skip straight to Merging Libraries with a Third-Party App to learn how to back it up. But if you’re the stubborn type, keep reading to learn about managing multiple libraries.
Creating a New Library
So, you’ve considered all the reasons in the previous section for not using multiple libraries, and yet you still feel compelled to create a new Photos library. Fine. It’s easy to do—if you know the secret handshake.
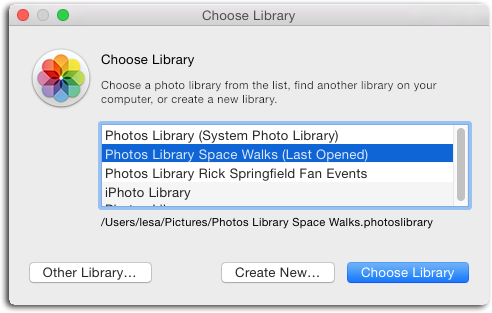
To create a new, empty Photos library, press ⌘-Q to quit the program, and then press and hold the Option key while launching it (just click the icon in your Dock). The dialog box shown in Figure 10-1 appears. Click Create New, enter a unique name for your fresh new library—say, Photos Library Space Walks—and then pick a location to store it.
Although Photos remembers where you saved your new library (so you can easily switch to it later), Apple recommends that you store all your Photos libraries in your Pictures folder—you’ll find your Photos life simpler if you do. Nonetheless, if your Photos library is so big that it gobbles up all your internal hard drive space, it’s perfectly legal to store it on an external drive instead. Just be sure to include that drive in your backup regimen, and bring it with you when you travel if you plan to do any Photos work during your trip.
Tip
If you want to have separate libraries for your kids or other loved ones who use your Mac, give them their own user accounts. That way, when they launch Photos for the first time, the program creates a new library for them and uses it whenever they’re logged into their accounts. To create a new user, go to the ![]() →System Preferences→Users & Groups and click the + sign under the list of users. See Family Sharing for the full scoop on using Photos in a family situation.
→System Preferences→Users & Groups and click the + sign under the list of users. See Family Sharing for the full scoop on using Photos in a family situation.
Switching Between Libraries
If you’ve completely ignored this book’s sage advice about using only one library per Mac user account and you’ve stubbornly created multiple libraries, sometimes you’ll need to switch between them. There are two ways to do this:
Double-click any Photos library file in the Finder. You can do this whether Photos is running or not. If the program is running, a pane appears offering to switch to another library. Click Switch, and Photos quits and relaunches using the library you double-clicked. If the program isn’t running, Photos springs into action and opens the new library.
Quit Photos and hold down the Option key on your keyboard while you relaunch it. You see the Choose Library dialog box shown back in Figure 10-1 that lists all the Photos libraries you’ve created, as well as any iPhoto or Aperture libraries on your Mac. Click a library to select it, and then click Choose Library.
Note
Hopefully you named your other libraries in a way that lets you distinguish between them; otherwise, it’s a guessing game as to which one you want. Fortunately, single-clicking each library displays where it lives on your hard drive, though if you keep all of them in your Pictures folder, that info won’t help you very much.
Keep in mind that switching from your System Photo Library (discussed next) to a different library disables iCloud sharing and syncing as well as iTunes syncing. This means any changes you make to the other library won’t be shared or synced to any of your other devices, and any content you add to the Photos library on your other devices won’t show up in this one.
Changing the System Photo Library
If you have multiple Photos libraries, only one can be anointed the System Photo Library at any time. (If you only have one library, it’s automatically the System Photo Library.) As you learned in Chapter 8, this is the library that gets used by iCloud Photo Library, iCloud Photo Sharing, and iCloud’s My Photo Stream. It’s also the library that iTunes pulls from to deliver photos and videos to your iOS devices and Apple TV (see the box on Viewing Slideshows on an Apple TV).
Just because you can open a different library and tell Photos to make it your System Photo Library doesn’t mean you should. Consider the following consequences of doing so:
iCloud doesn’t like it. When you switch your System Photo Library, Photos turns off iCloud Photo Library syncing. If you re-enable it using Photos’ preferences, the contents of the new System Photo Library are added to your iCloud Photo Library, along with the contents of your previous System Photo Library—and they’re all merged into your current library. (In fact, this is how you merge Photo Libraries, as the next section explains.)
Also, whatever albums you shared in the previous System Photo Library using iCloud Photo Sharing stop being shared, and any albums in the new System Photo Library that you previously shared using iCloud Photo Sharing begin sharing again. The iCloud Photo Stream also stops streaming to the previous System Photo Library and begins streaming to the new one.
iTunes doesn’t like it. Similarly, iTunes stops sending pictures and videos to your iOS devices and your Apple TV because the Photos library it used is suddenly gone (remember, it uses your System Photo Library to do all this). So if you open iTunes and try to adjust the Photos settings for an attached iOS device (or one on your local network), only the pictures, videos and albums in the new System Photo Library are listed. This can cause all manner of mayhem in your household.
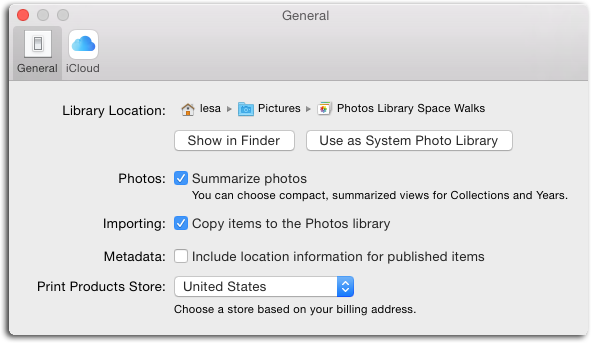
Now that you know what’s at stake, here’s how to designate your currently open Photos library as your new System Photo Library: Choose Photos→Preferences and you see the pane shown in Figure 10-2. Click the General tab, and then click “Use as System Photo Library.” May the Force be with you!
Merging Libraries
If you’ve got multiple Photos libraries, you may want to merge them at some point. Perhaps you created multiple libraries by mistake, you inherited a library from another person, or you merely came to the conclusion that you can’t juggle more than one. Whatever the reason, you can merge multiple Photos libraries into a single library, but the process is painfully slow, complex, irreversible, and it costs money. That’s because Photos can’t merge libraries on its own. Instead, you have to employ iCloud Photo Library (Meet the iCloud Photo Library) or third-party software to get it done, both of which aren’t free.
At this point, the frugal among you are tempted to try the following in order to avoid spending money on this venture:
Bad idea #1: Export pictures and videos from one library and import them into another. The problem with this method is that any edits you’ve made to the exported content become permanent. Plus, you lose any album organization you’ve done, meaning your stuff ends up in one gigantic, unorganized, lumbering library.
Bad idea #2: Burn the contents of one library onto a CD or DVD and then import it into another library. This method wastes both time and discs, plus you wind up in the same boat as bad idea #1.
Is it fair that Apple forces you to spend money to merge Photos libraries? No, but there’s nothing for it. Even Photos’ predecessor, iPhoto, couldn’t merge its own libraries, so this isn’t a news bulletin if you’ve been a Mac user for any length of time.
The good news is that both of the merging methods explained in this section have benefits, so the money you spend isn’t wasted. In fact, you stand to gain quite a bit.
Merging Libraries Using iCloud Photo Library
As you learned back in Chapter 1, iCloud Photo Library is an Apple service that syncs all the pictures and videos in your System Photos Library app onto all of your devices, and vice versa. It’s incredible, but it’s not free (unless you have a tiny library): If your library is over five gigabytes in size (and yours probably is), then you have to pay for this service.
Here’s how to use iCloud Photo Library to merge Photos libraries:
Open your System Photo Library in Photos.
As you learned on Meet the iCloud Photo Library, iCloud Photo Library works with your System Photo Library only, and that’s the one you need to open first. If you don’t know which library that is, press ⌘-Q to quit Photos, and then launch the program while holding down the Option key on your keyboard, to summon the dialog box shown in Figure 10-1. The library designated as your System Photo Library has a parenthetical beside its name that says so. Click its name in this list, and then click Choose Library.
If you haven’t already done so, turn on iCloud Photo Library.
Choose Photos→Preferences and, on the iCloud tab, turn on iCloud Photo Library. Photos calculates how much storage space it needs to add your library to your iCloud account and offers to upgrade you to the smallest size possible (see Meet the iCloud Photo Library for pricing). Once you upgrade, Photos starts uploading your library to Apple’s servers. Wait until the upload is complete—you can look at the iCloud tab in Photos’ Preferences to check progress. Depending on your library’s size, this can take minutes, hours—or days.
Open the next Photos library you want to merge, designate it as the new System Photo Library, and then turn on iCloud Photo Library for it.
Use the methods described on Switching Between Libraries to open another Photos library. Next, choose Photos→Preferences and, on the General pane, click “Use as System Photo Library.” As you learned earlier in this chapter, doing so disables iCloud Photo Library. To turn it back on, repeat step 2, and then wait until the new library is finished uploading.
Repeat step 3 until all your libraries have been uploaded to iCloud.
Tedious, isn’t it? Treat yourself to a beverage, snack, or nap—or all three. Hopefully you’ll only ever have to do this once. When the last upload is finished, the resulting library contains all the albums, projects, pictures, videos, and metadata from all the libraries you merge—miraculously without any duplicates.
The obvious drawback to this process is that you have to wait for all your pictures and videos to upload from all your libraries—and that can take hours or even days per library. If your Internet service provider limits the amount of data you can upload or download each day, you may encounter additional fees or severely limited Internet service for a while. And then there’s the cost of iCloud storage.
But the benefits are huge. Now all your files are accessible in the Photos app on all your devices, and you have an offsite backup of all your stuff.
Merging Libraries with a Third-Party App
In the olden days of iPhoto, you used to be able to use merging PowerPhotos (www.fatcatsoftware.com) to merge libraries. As of this writing, it still can’t merge Photos libraries. That said, it does show you which library is set as your System Photo Library (and whether it’s syncing to iCloud), lets you search across multiple libraries (which Photos can’t do), reveals individual pictures or videos in the Finder, and eliminates duplicate photos.
Backing Up Your Files
Your pictures and videos are priceless—and so is all the organizational toiling and project creating you’ve done in Photos. Unfortunately, your digital files aren’t bulletproof, and neither is your computer. Because files can get corrupted and hard drives routinely crash, you need to keep a copy of your Photos library in at least one other location. The good news is that your backup options are relatively inexpensive and painless to set up, as the box on A Super-Awesome Backup Strategy explains. And taking the time to implement a backup plan is far better than losing a lifetime’s worth of digital memories.
If you’re using iCloud Photo Library (see Meet the iCloud Photo Library), you already have one excellent backup of your Photos library—it’s offsite and available wherever you are, provided there’s an Internet connection. But honestly, it would take forever to download all your stuff in order to recover it, and your files disappear if you stop paying Apple’s monthly fee. For those reasons—and your peace of mind—it’s smart to stash another backup copy elsewhere.
Note
Mac professionals who rely on their files to make a living always keep at least one backup where their computer lives and at least one additional backup copy that they stash elsewhere. The second location could be someone else’s house, a safe deposit box, or a cloud-based (Internet) service such as CrashPlan. The box on A Super-Awesome Backup Strategy describes one strategy for creating such a backup system.
In this section, you’ll learn the smartest ways to back up your Photos library—or any group of files—to a hard drive or disc.
Backing Up to a Hard Drive
Some people make a copy of their most important files in a second location (folder) on their main hard drive. For example, say you store your Photos library in your Pictures folder (which is what Apple recommends), and a copy in a Backups folder on your desktop. This is handy if the original file gets corrupted—you can just switch to the backup copy and keep trucking. However, if the whole hard drive goes south, which is frighteningly common, both copies disappear. So, think of this kind of thing as a convenience copy, not a real backup. If you’ve got the hard drive space, you can make a convenience copy of your Photos library in the Finder, and then choose File→Duplicate and pick another spot on the same drive. The new file includes the word “copy” at the end of its name.
To create a true backup you need to copy the file onto a second hard drive, be it internal or external (one that’s plugged into your Mac with a cable). You can do this manually by dragging the Photos Library file from one drive onto another, but then you have to remember to repeat this process every so often. A far better solution is to use a third-party program to perform a backup for you each night. (OS X’s Time Machine is also a great solution, but quite different; you’ll learn about it on Using Time Machine.)
Note
When this book refers to a “hard drive,” that means either a traditional spinning-platter hard drive or a newfangled SSD (solid state drive) that has no moving parts but is much faster (and more expensive) per gigabyte of storage space. Another kind of drive you may hear about is called a fusion drive or hybrid drive, which combines a hard drive with solid-state memory to minimize cost and maximize capacity and speed. Any of these options works for backups.
Backing Up Manually
To create a manual backup of your Photos library (or any file), you just drag the file from one hard drive to another. Here’s how:
Open two Finder windows—one that houses your Photos library and another for the backup destination.
Unless you’ve moved it, your Photos Library file lives in the Pictures folder inside your Mac’s User folder. If you moved it but don’t remember where you put it, press ⌘-Q to quit Photos, and then relaunch it while holding down the Option key. In the dialog box that appears, click a library to see its location on your hard drive (Figure 10-1 shows an example). Either way, open a Finder window to wherever your Photos library lives.
Note
If you changed Photos’ preferences so your pictures and videos are not copied into Photos’ library file (Copied vs. Referenced photos), then you need to remember where you stashed them so you can back them up, too! Otherwise you’re merely backing up Photos’ organizational structure and not your pictures and videos.
Next, open another Finder window to where you want to store the backup copy. By opening two Finder windows, you can see the original file’s location as well as the location where the backup copy will go. That way, you won’t get confused when you attempt this nerve-wracking procedure. For example, if you regularly perform this kind of manual backup, there will already be an older copy of your Photos library in the destination. Keeping two Finder windows open helps you avoid accidentally replacing the newer file with the older one (a catastrophic mistake, indeed).
Drag your Photos Library file into the backup destination’s Finder window.
As you drag the file from one window to the other, you see a ghosted icon of the file follow your cursor. When your cursor is inside the destination folder on the second hard drive, release your mouse button, and the Finder displays a dialog box and status bar showing the progress of the copy operation. If your Photos library is big, this can take a while, but feel free to continue working on other tasks during the process. Working in Photos, however, is not a good idea, since your Mac is in the act of copying the very files you’re working on.
Note
If you migrated your old iPhoto or Aperture libraries to Photos and you haven’t yet deleted those libraries, you don’t have to back them up, too. Even though Photos links to the content of those libraries (as the box on Duplicate Library Magic explains), OS X is smart enough to include that original content whenever you copy your Photos library to a different location.
When it’s all finished, you have a safe backup of your Photos library. Now all you have to do is remember to repeat the process every so often so your backup remains current, which is a good excuse to add a repeating reminder in OS X’s Calendar app.
Backing Up Automatically
Although it requires some setup, an automated backup system provides far more peace of mind than the manual method described in the previous section. Fortunately, backup software is much easier to use than it used to be.
There are myriad apps to help with this. Heck, some external hard drives include software that backs up your Mac to the external drive whenever you plug it in (some let you do it on a schedule, too). Rather than buying a drive just to get the backup software it includes, consider using Carbon Copy Cloner ($40 at www.bombich.com) or SuperDuper ($28 at www.shirt-pocket.com) to create your own automated backup to any hard drive your Mac can see—including drives elsewhere on your network (say, a wireless multidrive backup system such as Drobo.com). Both options let you instruct the software to copy one drive to another on specific days and at specific times.
A big benefit of using these two apps is that your external backup drive becomes an exact duplicate of your internal drive—so if your internal drive crashes, you can restart your Mac from the external drive and keep working. (Starting up your Mac from an external drive can be really slow, so you only want to do this in an emergency.)
The first backup you run with either one of these apps takes a while, but subsequent backups zip along much faster. This is due to a trick called incremental backups, which means that only files that have been added or changed since the previous backup are included.
Using Time Machine
If you like the idea of automated backups and the ability to recover previously saved versions of your files (and who doesn’t?), Apple has a slick solution called Time Machine, which is built into OS X. It does what the automated backup programs mentioned in the previous section do, but with minimal setup required. One important thing to consider, though, is that unlike Carbon Copy Cloner or SuperDuper, you can’t restart your Mac from your Time Machine backup drive because it doesn’t backup your operating system. If your internal hard drive fails, you have to replace it, install OS X on it, and then restore your files from the Time Machine backup, which can be an overnight process best started before going to bed.
To use Time Machine, you need a storage device such as a second internal hard drive, an external USB, Thunderbolt, or FireWire hard drive, or an AirPort Time Capsule (www.apple.com/airport-time-capsule). The kicker is that the backup drive has to have more storage space than the drive you’re backing up. And bigger is better—the more space you have on the Time Machine drive, the farther back in time you can recover previous versions of your files. (A good rule of thumb is to make the backup drive at least twice as big as the drive you want to back up.)
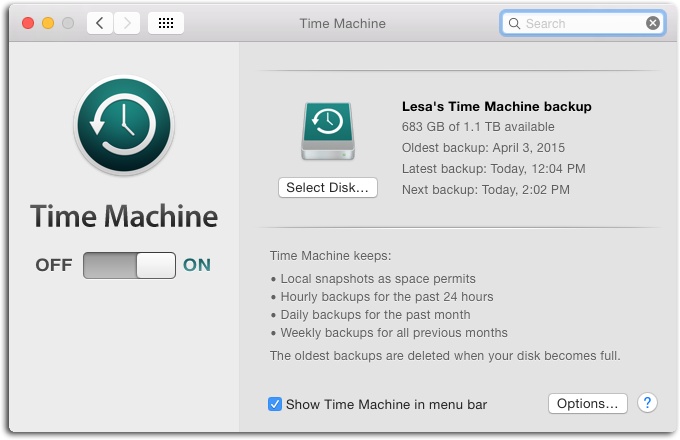
Turning on Time Machine is a piece of cake. The first time you attach an external drive to your Mac or install an additional internal drive, you see a message inviting you to use that drive as Time Machine’s backup drive. If you accept the invitation, the Time Machine preferences pane shown in Figure 10-3 appears.
Turn on Time Machine by clicking the enormous On/Off button, and it immediately sets about copying everything on your hard drive to the backup drive. You can stop or pause the process at any time by using that same On/Off button, and if you decide to use a different disk for your Time Machine backups, you can select it here. The checkbox at the bottom lets you add a Time Machine icon to your Mac’s menu bar, which is handy for quickly seeing the status of your latest backup and for telling Time Machine to start backing up right away rather than waiting for its next hourly cycle. You can also use this icon to recover a previous version of a file (say, if you made a change to it and then saved the file).
Backing Up to CDs and DVDs
Because CDs and DVDs can only hold so much, you’ll likely only want use them for archiving pictures and videos you export from your Photos library, instead of using them to back up your entire Photos library. A blank CD can store about 700 megabytes of data, while a single-layer DVD stores six times that much (4.3 gigabytes), and a dual-layer DVD stores a whopping 8.5 gigabytes. If your Photos Library file is smaller than 4.3 gigabytes, you can back it up onto a single-layer DVD. If it’s less than 8.5 gigabytes, you can back it up onto a dual-layer DVD. (It’s unlikely that your Photos Library will fit on a CD.) To see the file size of your Photos library, select it in the Finder and choose File→Get Info. In the window that appears, you see how hefty it is.
Tip
When you’re shopping for blank CDs or DVDs, Verbatim DataLifePlus is a good brand to look for, especially their archival quality DVDs and Blu-ray discs, which allegedly last for 100 years.
It’s important to note that your Mac can’t burn Blu-ray discs directly, but if you have an external Blu-ray burner, you can use an app named Toast to burn Blu-ray discs. A single-layer Blu-ray disc holds 25 gigabytes, and a dual-layer Blu-ray disc holds 50 gigabytes. Each disc costs about $1.50 or $4.00, respectively, when you buy them in packs of 50, and you can get an external Blu-ray burner (which also burns DVDs and CDs) for less than $100.
The process is the same whether you’re burning your entire Photos library onto a disc, or only your exported pictures, videos, or slideshow movies. Here’s how it works:
Prepare your files.
If you want to burn your whole library, locate it in the Finder. Unless you moved it, it lives inside your Pictures folder in your User folder. If you don’t remember where your library is, you can find it by opening the Choose Library window, as explained on Switching Between Libraries.
If you want to burn a collection of pictures and videos, you first have to export them from Photos (Exporting from Photos). And to burn a slideshow project, you need to export it into a video file (Exporting a Slideshow tells you how).
Insert a blank CD or DVD into your Mac’s optical disc drive and tell your Mac what to do with it.
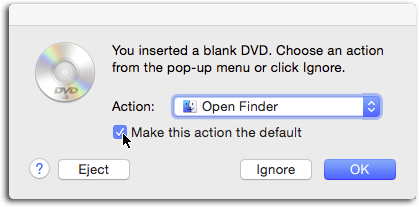
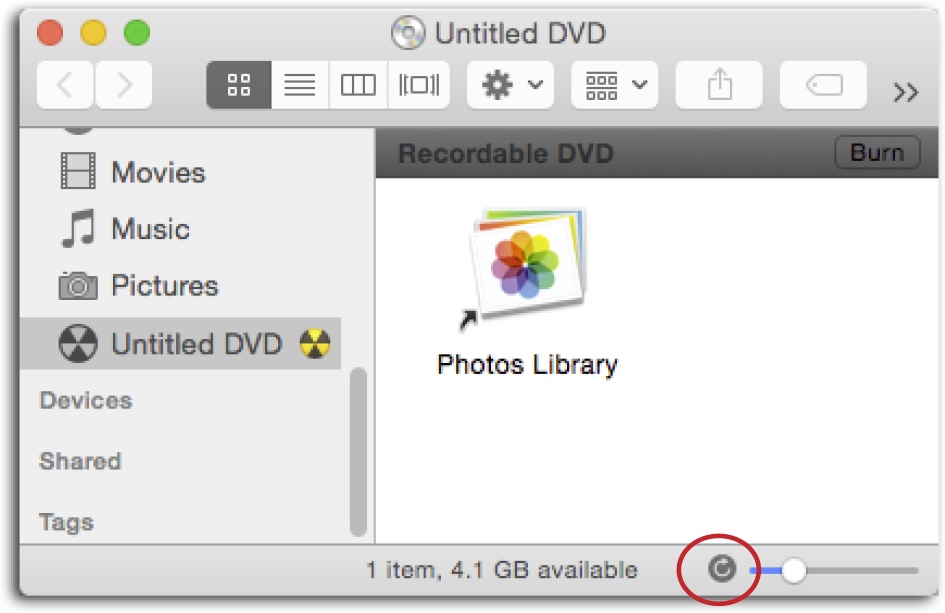
When you insert a blank disc, it takes your Mac a few seconds to figure out what kind of disc it is. Eventually, the dialog box shown in Figure 10-4 appears, asking you which app you’d like to handle the disc. In the Action drop-down menu, choose Open Finder, and then click OK. The disc appears on your desktop as an Untitled CD or Untitled DVD with a round disc-shaped icon. The disc also appears in the sidebar of any open Finder window with a tiny burn symbol on it (you can see this symbol in Figure 10-5).
Drag your file(s) onto the disc’s icon on your Mac’s desktop.
This disc behaves like any attached drive—just drag the file(s) you want to copy onto its icon. You can also double-click its icon to open a Finder window that shows its contents. You can create folders on the disc, drag files onto its open window as shown in Figure 10-5, rename the files you’re about to burn, rename the disc, and so on.
It’s important to understand that as you’re crafting the disc’s contents, you’re not moving files around on your hard drive, nor is your Mac burning any items to the disc quite yet. The files you drag onto the disc’s icon or into its Finder window are aliases—pointers to the original items on your hard drive. (Look closely at the files you’re going to burn and you see their icons include the tiny, curved arrow that indicates they’re an alias; it’s visible in Figure 10-5.)
This means if you change the contents of the soon-to-be-burned file before clicking Burn, the disc will include the altered contents. For example, if you edit a picture in your Photos library or delete a project from it and then click the Burn button, those changes appear on the burned disc, too.
Tell your Mac you’re finished editing the disc’s contents.
When you’ve dragged all the files you want onto the disc and are happy with how those files are arranged, let your Mac know you’re ready to burn it in by doing one of the following:
On your desktop, click the disc’s icon, and then choose File→Burn [disc name].
In the sidebar of a Finder window, click the Burn icon next to the disc’s name (it looks like a yellow and black radiation symbol).
In the upper-right corner of the disc’s Finder window, click Burn.
On your desktop, drag the disc’s icon toward the Trash icon in the Dock. As soon as you begin to drag, the Trash icon turns into a yellow Burn icon. Drop the disc’s icon onto it.
On your desktop, Control-click the disc’s icon and choose Burn [disc name].
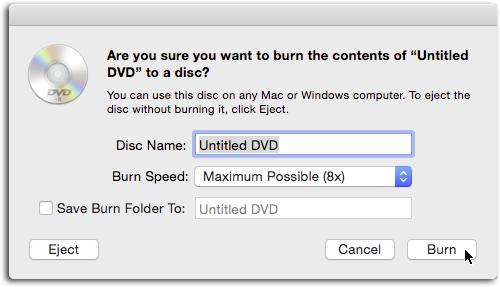
Whatever method you use, the confirmation dialog box shown in Figure 10-6 appears.
Enter a name for your disc, and then click Burn.
When you click Burn, your Mac begins physically recording your chosen files to the CD or DVD. When it’s done, double-click the disc’s icon to ensure the contents were indeed transferred, and then eject it by pressing ⌘-E.
Note
The discs that your Mac burns work on Macs and on Windows (or Linux) PCs, too. But if you plan to use the disc on a PC, it’s important to know that Windows doesn’t let you use certain characters in filenames, folder names, or disc names; specifically, these: / : * ? “ < > |. If you include those characters in file, folder, or disc names, you won’t be able to open them in Windows.
Using a Burn Folder
Another way to collect files for burning onto a disc is to create a burn folder. This technique lets you collect files at your leisure and then burn them when you’re ready. The only drawback to this method is that you won’t know how much disc space you’ve got on the CD or DVD. In other words, you may collect more files than you’ve got space for. Still, if you’re sure that the files you’re going to burn will fit onto the CD or DVD you plan to use, give it a shot. This method is handy if you’re out of discs; just make a burn folder, and then burn its contents to a disc when you get one.
To create a burn folder, go to the Finder, choose File→New Finder Window, and then click Desktop in the list on the left. Next choose File→New Burn Folder. A new folder named Burn Folder appears on your desktop and in the Finder window you opened. Name the folder anything you like, and then drag the files you want to burn onto its icon or, if you double-click to open the burn folder, right into its Finder window. When you’re ready, open the folder and click the Burn button in its upper right. Your Mac then asks for a blank CD or DVD and walks you through the process of burning it.
Note
When you make a new burn folder, it lands inside whatever folder you’re viewing in the frontmost open Finder window, which could be anywhere on your hard drive (say, in the Rotary Club Recipes folder that lives in your personal folder inside your Documents folder—whew!). By taking a moment to open a Finder window set to display the contents of your Mac’s desktop before you make the burn folder, you’ll make it easier to find because it’ll land on your desktop.