1
Hello, Kitchen!
Chapter Contents
Don’t Always Follow the Recipe
A Place for Everything and Everything in Its Place
WE GEEKS ARE FASCINATED BY HOW THINGS WORK, AND MOST OF US EAT, TOO.
Learning to cook can be one of the most rewarding endeavors of your life. Cooking—and eating—is a fascinating puzzle with many layers that, like those in an onion, peel away only to reveal another layer. No one is ever done learning to cook.
To the beginner, cooking has many hidden rules. Learning them is not so much about rote memorization as it is about curiosity, and that’s something geeks have plenty of. With time, the hidden rules of the kitchen reveal themselves to be a combination of art and science, giving you the keys to the kitchen kingdom. It is a worthwhile quest. With good food, you can take better care of yourself and your health. And with knowledge of the kitchen, you can cook and provide for others, building friendships and community.
This chapter is about the ground rules for the game of learning to cook—that tough outer layer of the onion, if you will. It covers how to approach the kitchen. What does it mean to think like a geek? What type of cook are you? Where do recipes come from and how do you interpret them successfully? What tools should you have in your kitchen? What else might be important in cooking? To answer these kinds of questions, you need to start thinking like a geek.

If you’re already comfortable in the kitchen, skim this chapter and dig right into the science of taste, smell, and flavor in Chapter 2.
How to Think Like a Geek
What does it mean to think like a geek in the kitchen?
In part, it’s technique and tools. Rolling pizza or pie dough to a uniform thickness can be hard, but slap a few rubber bands on each end of your rolling pin and you’ve got an instant autoleveling roller. Need to grill something, but don’t have a grill? Your oven’s broiler is extremely similar, but the heat comes from above, instead of from below. Spraying cooking oil onto a muffin tin? Open your dishwasher, set the tin on the opened door, and spray away—no messy counter to clean up, and the door will get cleaned on the next cycle.
Other times, thinking like a geek is about understanding why ingredients are being used. Following a recipe that uses white vinegar, but don’t have any? Lemon juice can work—if the recipe is using the ingredient as an acidifier and the taste won’t interfere. Making a dish that uses oregano for flavor, and you’re all out of it but do have thyme? The two herbs share common odor compounds and therefore are good substitutes for each other. Wondering if you can substitute baking soda for baking powder in a cake? Not without adding the right amount of an acidic ingredient to react with the baking soda.
Sometimes thinking like a geek means being inventive in how you solve a problem—coming up with a clever trick to get around something that’s broken or just seeing easier ways to do something. I know one person who tweeted, “My microwave has no 3 key, but I can enter 2:60.” Clever! Another friend uses a mug as a pastry bag holder—instead of trying to spoon stuff into a bag while holding it, she just drops it in a mug or pitcher and folds the top down around the edge. Learning to think like a geek is seeing the “why?” behind the technique or ingredient, and then answering that question in a useful way.
Here’s a thought experiment: imagine you’re given a candle, a book of matches, and a box of thumbtacks, and asked to mount the candle on a wall. Without burning down the house, how would you do it?
If you were stranded on a tropical island, how could you start a fire with a can of soda and a bar of chocolate? Think like a geek and see past the functional fixedness! Use the chocolate to polish the bottom of the can to a mirrorlike finish, then use the polished bottom as a parabolic reflector to focus sunlight onto a dry twig.
This experiment is called Duncker’s Candle Problem, after the German psychologist Karl Duncker, who studied the cognitive biases that we bring to problems. Things like the cardboard of the matchbook have a “fixed function” of protecting the matches. We don’t normally think of the matchbook cover as a piece of thick cardboard that’s been folded over; we just see it functioning to protect the matches. As a result, other uses of the cardboard become invisible to us.
We’re blinded by functional fixedness everywhere. Recognizing that an object is capable of serving other functions requires mental restructuring, whether it’s a rubber band on a rolling pin or lemon juice as an alternative acidifier. We see large wire mesh strainers as tools for straining pasta, but flipped upside down and placed on top of a frying pan, they work as splatter guards. Toaster ovens are perfectly serviceable for more than making toast: they heat air up to 350°F / 180°C, so why not poach fish in one if your oven is otherwise occupied?

Functional unfixedness: use a wire strainer as a splatter guard.
The obvious solutions to Duncker’s Candle Problem—pushing thumbtacks through the candle or melting the side of the candle so that it sticks to the wall—will either split the candle or set the wall on fire. The solution, at least the one Duncker was looking for, involves realizing that you have a box: the one that is holding the thumbtacks. Pin the box to the wall, stand the candle in the box, and light the candle.
You should banish functional fixedness in the kitchen. In learning to cook, you’ll learn the most by figuring out the why behind each step in a recipe and exploring different possible answers. Even if you guess wrong, you’ll learn what does and doesn’t work, and in the process slowly build up a new, “functionally unfixed” view of the kitchen.

Duncker’s Candle Problem:
how would you mount a candle to a wall, given a box of thumbtacks and a book of matches?
Know Your Cooking Style
Part of learning to think like a geek is understanding your temperament and style in the kitchen. Most of us think of there being two types of chefs: cooks and bakers. (Personally, I think there are two types of people: those who divide people into two kinds, and those who don’t.) Cooks have a reputation for an intuitive, “toss it into the pan” approach, pulling together whatever ingredients inspire them and correcting as they go. Bakers are typically described as precise, exact in their measurements, and methodically organized. Even culinary schools such as Le Cordon Bleu split their programs into cooking (“cuisine”) and baking (“patisserie”), due to the differences in technique and execution. Professional line cooking requires prep work and then an on-demand, “order in!” portion. Professional pastry baking is almost always done production-style with a different set of techniques and completed well in advance of when the order comes in. For most of us cooking isn’t a profession, though, so dividing culinary types into two isn’t useful.
The most helpful way of thinking about types of cooks that I’ve come across is the research done by Brian Wansink, the director of the Cornell University Food and Brand Lab and author of Mindless Eating (Bantam, 2006). Brian’s work is fascinating, finding all sorts of patterns in eating behaviors that can then be used to create healthier eating patterns.
Based on a survey of about a thousand home chefs from North America, Brian found five different types of cooks. With his permission, I’m reproducing his short quiz here. It’s fun to see that any food TV show or cooking magazine that I can think of falls neatly into one of these five categories. In his research, he found that most people were roughly equally split between the five types that describe about 80–85% of us. The other 15–20% end up being combinations of two or three types, so don’t sweat it if you take the quiz and don’t fall squarely into one category. What I’ve found in talking with some geekier audiences—full of scientists and software engineers—is a huge bias toward the innovative type of cook. There’s clearly a personality bent in these fields!
When cooking for others, keep in mind the possible combinations of different types of cooks and, by extension, eaters. Imagine you’re a health-driven eater being given food by someone who is a giving cook, who expresses affection with food. That plate of brownies is their way of saying, “I care about you!” So enjoy one, or at least a nibble, and say thanks. When I asked Brian about conflicts between the eating styles of people who live together, he suggested sharing the cooking responsibilities: take turns doing the cooking, giving the regular cook a night off at least once a week.
No one’s ever wrong on the Internet, so the average of a whole bunch of right things must be righter, right? The quantities here are based on the rounded average of eight different pancake recipes from an online search.
In a mixing bowl, measure out and whisk together:
1½ |
cups (210g) flour |
2 |
tablespoons (25g) sugar |
2 |
teaspoons (10g) baking powder |
½ |
teaspoon (3g) salt |
In a separate large, microwave-safe bowl, melt:
2 |
tablespoons (30g) butter |
Add to the butter and whisk to combine thoroughly:
1¼ |
cups (300 mL) milk |
2 |
small eggs or 1 jumbo egg (80g) (1 large egg will work just fine—but it’s not the Internet average!) |
Pour the dry ingredients into the liquid ingredients and mix them together with a whisk or spoon until just incorporated. Little pockets of flour are okay; you want to avoid overstirring the batter to minimize the amount of gluten formed by the flour (see page 246 for more about gluten in flour).
Place a nonstick frying pan on a burner set to medium-high. Wait until the pan is hot. The standard test is to toss a few drops of water into the pan and see if they sizzle; if you happen to have an infrared thermometer for checking surface temperatures, check that the pan is around 400°F / 200°C. Use a ladle, measuring cup, or ice cream scoop to pour about half a cup of batter into the pan. As the first side cooks, you’ll see bubbles forming on the top surface of the pancake. Flip the pancake after those bubbles have started to form but before they pop (about 2 minutes).
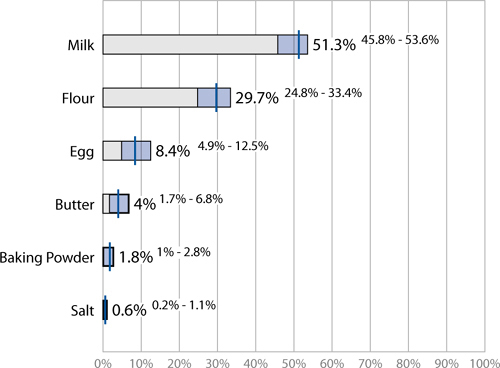
Average ratios for pancakes.
Notes
• The order of ingredients usually indicates the order in which you should add them into your bowl. It doesn’t always matter, but in this case you should add the milk before the eggs to prevent the eggs from cooking in the hot butter.
• If you use a nonstick frying pan, don’t butter the pan first. If you’re using a regular sauté pan, butter it and then wipe away the butter with a paper towel. Too much butter on the surface of the pan will cause uneven browning because parts of the pancake won’t cook as hot.

This is the first recipe my parents taught me. And yes, that says the pancakes “must be poured into this shape” with a drawing of a Mickey Mouse head.
How to Read a Recipe
It’s easy: start at the beginning and finish at the end. Ha! If only. Recipes are documentation of what works for their authors; suggestions from one chef to another. When looking at a recipe, realize that it’s not only a suggestion, but an abbreviated one. Give the same recipe to a dozen different chefs, and you’ll get a dozen different variations.
The first time I follow a recipe, I stick to it. I’ve learned many things this way—turns out, you can peel red bell peppers (the peel has an herbaceous, grassy, bitter taste). For a new cake recipe, I might think the batter looks too runny (needs more flour?) or too thick (add more oil?), but I go with it. After I’ve made it once, though, all bets are off. The next time I’ll tweak it based on notes and memories from the first time.
If you’re new to cooking, start with breakfast. It’s the meal that we’re most likely to eat at home, and the recipes are the easiest to learn. Plus, breakfast meals are quick to make and the ingredients are cheap. (One friend told me about learning to debone meat in culinary school. It basically amounted to “Do it 100 times, and by the time you’re done, you’ll know how to do it.” No wonder culinary school is so expensive!)
• Understand the “why?” behind each step in the recipe. I’ve watched chemists—experts trained at following instructions—skip right over the step that says “turn off heat” in a recipe that involves melting chocolate in simmering liquid. “Turn off heat? But melting things requires heat!” That recipe used the residual heat from the liquid to melt the chocolate to prevent it from being burnt.
• Practice mise en place—French for “put in place.” Start by prepping your ingredients before you begin the cooking process. Read through the entire recipe, and get out everything you need so you don’t have to go hunting in the cupboards or the fridge halfway through, only to discover you’re short of a critical ingredient. Making stir-fry? Slice the vegetables into a bowl and set it aside before you start cooking.
• Follow order of operations. “3 tablespoons bittersweet chocolate, chopped” is not the same thing as “3 tablespoons chopped bittersweet chocolate.” The former calls for 3 tablespoons of chocolate that is then chopped up (taking up more than 3 tablespoons), whereas the latter refers to a measure of chocolate that has already been chopped.
• When a recipe calls for something “to taste,” add a pinch, taste it, and continue adding until you think it is balanced. Ingredients vary, so balancing flavors depends on the specifics of the ingredients you have on hand. Also, what constitutes balanced is a matter of cultural background and personal preference, especially when you’re using seasoning ingredients such as salt, pepper, lemon juice, vinegar, and hot sauce.
Need to convert between standard and metric measurements for ingredients?
Check out Wolfram|Alpha (http://www.wolframalpha.com). Enter “1 tablespoon sugar” and it’ll tell you it weighs 13 grams; enter the ingredients for the pancake recipe using a “+” between them and it’ll tell you the combined ingredients have 38 grams of fat, 189 grams of carbs, and 46 grams of protein.
Always read through the entire recipe, top to bottom, before starting.
Steel-cut oats are the less processed version of the more familiar oats that most Americans know as quick-cooking oatmeal and Europeans call rolled oats. Rolled oats are oat groats—the kernels of the oat grass—that have been steamed, flattened between heavy rollers, and often toasted. Cooked briefly in hot water, rolled oats have a gloppy texture that’s a mere shadow of what’s possible. (They’re perfect for baking, though!)
Steel-cut oats, also called pinhead oats, are less processed and more interesting. They’re oat groats that have been cut with steel blades, hence their name. Cutting the kernel exposes its endosperm—the starchy interior of the grain—which speeds up cooking and allows for some of the starches to mix into the cooking water for a heartier meal. Even having been cut, steel-cut oats take time to cook. Their slightly nutty flavor and texture is worth the wait.
Cooking steel-cut oats the traditional way is simple: use 1 part oats to 3–4 parts water, simmer for 20–30 minutes, and then add a pinch or two of salt to taste. (The side of the tin in my kitchen says to cook for 5 minutes and let it rest overnight in the fridge, which is probably better, but I never think to do it the night before.) For variety, try swapping milk for part of the water, starting with a 1:1 ratio and adjusting based on how you like the taste.
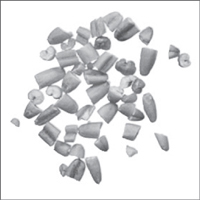
Steel-cut oats (uncooked)
Oat kernels cut into pinhead-sized pieces.

Jumbo rolled oats
Uncut oat groats that are steamed, rolled, and sometimes toasted.
Rolled oats
Cut oat groats, steamed and rolled. (Take some cooked steel-cut oats and smash them with the back of a spoon—they’ll suddenly look familiar!)
Traditionally served in Northern Europe with milk or cream on top, oatmeal or porridge is more commonly served in a cereal bowl and topped with flavor-packing foods: brown sugar, cinnamon, nuts, raisins, and milk, or fresh berries on top of yogurt and honey.
The word cereal derives from the name of the Roman goddess of agriculture, Ceres, and describes any edible grain. The idea of eating cereals as breakfast started out in the United States in the 19th century, in an era when most people ate fatty foods and leftovers for breakfast. Granula, the first manufactured cereal, was first sold in 1876 by Dr. James Jackson, a vegetarian who wanted to offer his idea of a healthy breakfast meal. A year later Dr. John Kellogg—yes, that Kellogg—came out with his own cereal, which took off due to his marketing that associated it with a health professional.
Sadly, their ambitions for health have failed. Most breakfast cereals sold today are glorified desserts! A 2011 analysis by the Environmental Working Group found a staggering two-thirds of children’s cereals failed to meet US federal sugar guidelines (at or below 26% sugar by weight).
A frittata is like an omelet but has ingredients whisked into the eggs. My version, based on one I had in health-conscious Southern California, uses just the egg whites to make a tasty, easy-to-cook weekend breakfast treat. (Don’t let that “health-conscious” bit lower your taste expectations—this is amazingly tasty.)
You’ll need a batch of steel-cut oatmeal, already cooked—see the previous page for how to prepare this if you’re not familiar. Each frittata serves one person, so plan accordingly.
Preheat the oven by setting it to broil mode. Adjust the top rack to be about 6 inches (15 cm) away from the broiler.
In a bowl, separate out 3 egg whites, saving the egg yolks for some other dish, such as crème brûlée (see page 372). If you’ve never separated eggs before, the “easy” method is to crack the eggs into the bowl and then, using all your fingers, carefully pick up the yolks. Don’t worry if you get a little egg yolk mixed into the whites, but try to keep them separate. Add 1 cup of cooked steel-cut oatmeal (150g) and a generous pinch of salt. Using a whisk, beat the mixture to a foamy, almost soft-peak stage.
Soft peaks will stick to your whisk but fold over.
See page 289 to learn more about egg whites.
Set a frying pan on medium heat. Add 1–2 tablespoons (15–30g) of either canola oil or butter. Heat the pan for 3–4 minutes, waiting until the oil or butter is hot.
Pour the egg white and oat mixture into the pan, spreading it out to an even thickness.
After 3 minutes, check to see if the underside is browning. Continue checking every minute or so until the bottom turns light golden brown.
Once the bottom is browned, place the pan under the broiler, taking care to position the handle so as to not cook it too. Cook until the top is golden brown.
If you don’t have a broiler, you can attempt to flip the frittata with a spatula or a careful flick of the pan. And if it breaks, don’t worry! Use a spoon to scramble the partly cooked frittata, and instead of serving frittata, call it “oat and egg white scramble” and serve it in a bowl.
To serve, slide the frittata onto a plate and top with:
¼ |
cup (40g) sliced strawberries (about 4 to 6 strawberries) |
¼ |
cup (60g) cottage cheese |
¼ |
cup (60g) applesauce |
Dust with ½ teaspoon (1g) cinnamon; optionally add a little maple syrup.
Have you ever noticed that breakfast dishes are either mostly protein—eggs, omelets, and so on—or heavy on the carbs? (I’m looking at you, delicious, delicious Internet Average pancakes.) This frittata is my answer to the “half carb, half protein” quest.
Fear in the Kitchen
The only real stumbling block is fear of failure. In cooking you’ve got to have a what-the-hell attitude.
—Julia Child
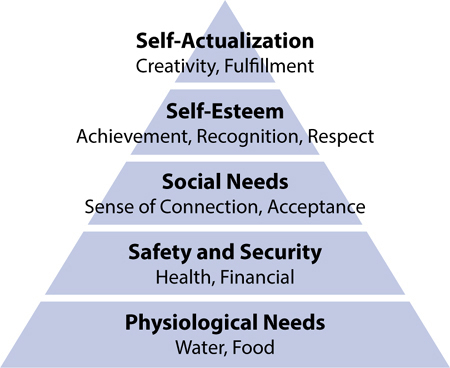
Maslow’s hierarchy of needs with areas related to food and cooking.
This is my pep talk for readers who are afraid of the kitchen. For some, the idea of stepping into the kitchen sets off panic attacks as the primitive parts of the brain take over. (If it helps, you can blame your brain’s locus coeruleus. It’s not your fault; take a few deep breaths to relax it.)
Fear in the kitchen can come from many sources but invariably boils down to fear of rejection and fear of failure. Why someone fears something depends on what needs are at stake. Abraham Maslow, an American psychologist, was looking at what motivates human behavior in 1943 when he created his hierarchy of needs, putting what he considered the more basic human needs at the bottom of a pyramid. While his ranking of the needs hasn’t held up to scrutiny, the needs themselves give a good framework for looking at kitchen fears. The most common fears I’ve seen about cooking involve social needs and self-esteem.
First up, social needs. Cooking for others is a powerful way of building friendships and community, and bringing people together over a good meal is immensely rewarding. But there is also trepidation: what happens if you utterly ruin the food that you’re cooking? To overcome this fear, start by redefining what happens when food is ruined. So what if you ruin the dinner? Sure, there are physiological needs (one solution: order delivery) and a financial impact. But if your fears are based on social needs, the food doesn’t actually matter. As long as you’re bringing people together and treating them well, you’ll be meeting your needs—and theirs. (Humor goes a long ways to getting over fear—“Remember that time we served cereal for dinner and laughed about it?”) People are far more likely to remember how you made them feel than the food you served. What’s important is who’s at the table, not what’s on the plates.
Then there’s self-esteem. Low self-esteem comes from comparing ourselves to others and caring too much about what others think. We’re bombarded with magazine covers promoting the perfect holiday meal (“so easy, so elegant!”) and online posts showing amazing culinary creations. Then when we go to try that “easy” recipe with the beautiful photograph, we expect the same outcome. These comparisons aren’t valid. Aspirational magazines—and, sadly, many scientific papers—publish their best results instead of their more obtainable average results. Can you picture a glossy cooking magazine with all the photographs of perfect meals replaced with ones capturing a home cook’s version?! For self-esteem challenges, instead of making impossible comparisons, accept yourself for who you are and accept whatever it is you’ve made. (Unless, of course, it’s utterly burned, in which case see the previous paragraph.)
Julia Child’s appeal lay in her almost-average abilities and her “nothing special” humble aura (plus buckets of tenacity). Like her, try things with a what-the-hell attitude. Expect to drop the chicken on the floor once in a while. Play around with various ingredients and techniques. Come up with projects you want to try. (Mmm, bacon and egg breakfast pizza.) So what if you drop the chicken or burn the dinner?! If you’re enjoying yourself, does it matter? As the famed psychologist Albert Ellis quipped: “Only you can make you feel guilty!”
How much better off would we be if we talked about “success in learning” instead of “failure in the kitchen”? There’s not much to learn when things work. When things fail, you have a chance to understand where the boundary conditions are and an opportunity to learn how to do something better next time. Philosopher Alain de Botton gave a fantastic speech on this definition of success at the 2009 TED Conference. See http://cookingforgeeks.com/book/botton/ to watch his talk, “A kinder, gentler philosophy of success.”
Give learning time. You might have days when you feel like you’ve learned nothing, but the cumulative result will lead to insights. If a recipe doesn’t work as well as you’d have liked, try to figure out why. The recipe might simply be too advanced or poorly written. If you’re not happy with the results, try a different source of recipes.
The way to get over the fear in cooking is to understand what needs you’re trying to meet and not allow anxieties around those needs to bubble over elsewhere. Treat cooking as an experiment and bring that smart geek curiosity to the kitchen. Approach it as a fun puzzle to solve, where you get to pick the pieces.
If you’re nervous about cooking for others—a romantic date?—practice cooking the meal you’ve chosen the day before for just yourself and a confidant. This will make the routine of cooking the meal more familiar, reducing fear. It’s entirely okay to screw up and toss it in the trash; it’s no different than a science experiment that didn’t pan out (pardon the bad pun).

PHOTO CC-BY-SA-3.0 PORKRIND ON EN.WIKIPEDIA.COM
Adam Savage is the cohost of MythBusters, a popular science program that examines rumors, myths, and conventional wisdom, “putting them to the test” with a scientific approach.
How do you go about testing a myth?
One of the earliest things we realized on the show is that you always have to have something to compare to. We would try to come up with an answer like: is this guy dead, is this car destroyed, is this an injury? And we would be trying to compare it to an absolute value, like X number of feet fallen equals dead. The problem is the world is very spongy and nonuniform, and trying to nail down a value like that can be really difficult. So we always end up doing relative tests. We end up doing a control under regular circumstances and then we test the myth under identical circumstances, and we compare the two things. In that comparison, we get to see our results.
We did one where we were testing whether or not you could tenderize steaks with explosives. We had to figure out what tenderness is. The problem is you can give two different people each a piece of steak from the same cut compared to a piece of steak from a different cut, and they might come up with two different assessments of which one is more tender. We actually did a whole day of testing that didn’t end up on film because we realized we were using the wrong parameters for assessing steak tenderness. The USDA [United States Department of Agriculture] actually has a machine for testing the tenderness of steak that measures the pounds of force it takes to punch a hole through a steak. We replicated that machine and to our great surprise, it worked exactly as it was supposed to. Coming up with something for $50 that equals the USDA testing equipment: that was thrilling!
How can testing a myth translate into learning more about cooking?
Changing one variable is probably the single hardest thing for people to understand. Change only one variable. It’s not like changing only a small number of variables; it’s really changing one variable at a time, because only then do you know what caused the change between your first test and your second test. You get so much clarity from the process that way.
I’m an avid cook. My wife and I both cook a lot of elaborate things, and we really do love playing around with single variables, changing things and learning how things work. We were reading Thomas Keller, and he talked about how salt is a flavor enhancer, and he mentioned that vinegar does a similar thing. It doesn’t add a new taste, but it often alters the taste that’s there. My wife was making a cauliflower soup, and it was kind of bland. I didn’t want to put any more salt in it, because I could tell it was about to go in the wrong direction. We tossed in a little bit of vinegar and the whole thing just woke up. It was thrilling! I love that.
Have you done other myths related to food?
We have—certainly a whole bunch of drinking myths. We did poppy seed bagels to see if eating a poppy seed bagel causes you to test positive for heroin, which is absolutely true. In fact, parolees are completely forbidden from eating poppy seed bagels. They’re told if you test positive for drugs, we are not going to wonder why. You are just going to go back to jail, so make it easy: don’t eat poppy seeds.
I had a whole episode written called “The Surreal Gourmet,” which ended with tenderizing steak with dynamite, but it had all those other things like poaching fish on your catalytic converter or cooking eggs in your dishwasher. [MythBusters cohost] Jamie loves the idea of tenderizing meat in the dryer. Also, the idea of is it safe to eat fresh roadkill? We think that would be just hilarious and gross.
The problem-solving aspect of the show is really fascinating. Do you have any advice on how to get to where you want to be when problems arise?
The first thing to realize is that you’re not going to end up where you think. The world is smarter than you are. A craftsman isn’t somebody who never screws up. A craftsman screws up just as much as you do. They can just see it coming, and can adjust; it’s an ongoing process. Everybody’s oven heats at a different rate. You open it up to check, the temperature drops. There are all sorts of variables. Maybe it’s humid, maybe it’s not. Humidity was affecting all sorts of my wife’s cookie recipes. People tend to overfocus on the final product, when you’ve got to be awake to the process. So problem solving doesn’t mean doing whatever it takes to get to the end result; it means following the path that you’re on. You’re going to probably end up changing your definition of what the result is before you’re done.
The better you get, the more that things start to turn out like you planned. When my wife started doing really serious baking, I couldn’t believe how much of a difference just having all your ingredients at room temperature made in terms of the emulsifying and chemical reactions—getting the doughs flaky, for instance. Just the simple thing of pulling all of your ingredients out of the refrigerator an hour before you start cooking has a massive effect on the final product. Or things like certain kinds of berries in certain kinds of pastries; the acidity of the berries means having to add more baking soda. I love that. You just have to learn as you go.
What do you enjoy cooking?
My favorite thing to cook of all is eggs. After years of practice, I’ve almost mastered the pan flip for an omelet without the spatula. I’ve actually held brunches for 15 people where the theme was “come and I’ll cook you eggs any way you want.” My kids are both really getting into it now. They wake up (they’re 10-year-old twins) and they both have their specific ways that they like cooking eggs. My son Addison prefers the hobo egg, in which you cut a hole out of a piece of bread and fry an egg in that hole, and my son Riley likes scrambled eggs. He likes them a little bit on the hard side, but I’m trying to teach him not to cook them too much.
That does seem to be a common affliction, overcooking eggs and getting dry scrambled eggs.
With enough sauce, they’d work, but when you start to cook them right, it turns out that there is this tiny band in which they’re unbelievably good. That’s why I like eggs. They’re kind of unforgiving in some ways and that’s really exciting.
One of the great things about cooking is that, unless you’re doing something really specifically unforgiving, most recipes are really quite impressively forgiving. That’s a part I really love. You can change all sorts of variables and it still comes out pretty darn good. It’s a great test platform.
How do you learn from the things that don’t succeed?
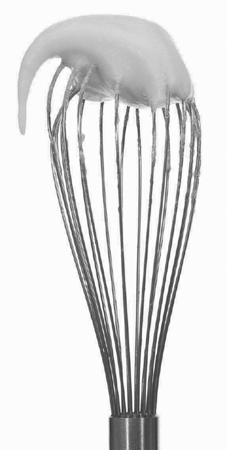
I hand-whipped my first whipped cream about six or seven years ago. I whipped it, and the very first thing I did once it was whipped was I whipped it too far on purpose. I thought, “I know this is perfect, but I want to know where the line is,” and I just kept on going until I had butter. It was surprisingly fast and taught me a really clear thing about exactly where you can go with whipping cream.
Whipped cream tastes great. Flavoring it and sweetening it is just trivial. If you’re good, you can do it almost as fast as it takes to get the mixers and the bowls out and do it all mechanically. It’s a lovely thing to sit there and talk to your guests while you’re hand-whipping cream.
See page 300 to read about whipping cream.
A Brief History of the Recipe
We’ve been writing about food for as long as we’ve been writing. The oldest known tablets, from the beginning of written civilization, show glyphs for beer, fish, and eating. The oldest known recipe dates to four millennia ago and describes a ritual for making beer. Like its cousin, bread, beer was a food of necessity. Beer was safer to drink than potentially polluted water, so ritualizing and recording the process of making it created a recipe of necessity and survival.
The ancient Romans expanded on recipes of necessity to recipes of indulgence (roasted flamingo, anybody?). While more complicated, their recipes still read more like short notes than precise protocols with measurements and descriptive steps.
Golden Corn Cake.
¾ cup corn meal.
1¼ cups flour.
¼ cup sugar.
4 teaspoons baking powder.
½ teaspoon salt.
1 cup milk.
1 egg.
1 tablespoon melted butter.
Mix and sift dry ingredients; add milk, egg well beaten, and butter; bake in shallow buttered pan in hot oven twenty minutes.
It wasn’t until the 1800s that cookbooks began to give more precise measurements, with Fannie Farmer’s the Boston Cooking-School Cook Book (Little, Brown & Company, 1896) being a notable early bellwether in the United States. Her book is still enjoyable today. Here is her recipe for what we’d call cornbread (although I think her name, Golden Corn Cake, is more apt).
Fannie Farmer’s book sold 4 million copies, changed the way we cooked, and set the stage for Irma Rombauer’s culinary classic Joy of Cooking (1931), which to date has sold 18 million copies. Ironically, both authors had difficulty with their initial printings, having to pay for the initial print runs themselves. Breaking the status quo has never been easy.
Joy’s innovation was “casual culinary chat,” weaving in the ingredient lists with the instructions that give the reader a description of what to look for. It’s one of the first books to walk the reader through the process of cooking, serving as both a culinary guide and source of notes for the aspiring cook. (Growing up and thumbing through my mom’s copy of the 1975 edition, I remember reading “How to Skin a Squirrel,” which made an impression on me of what cooking was like only a few generations ago. Plus, ewww. The latest edition has understandably dropped that section.)
Even modern recipes that inherit Fannie Farmer’s precise measurements and Joy’s woven narrative should still be viewed as notes from one cook to another. There’s simply too much variability in ingredients and preferences. A teaspoon of dried oregano in your drawer won’t necessarily be the same strength as a teaspoon of the dried oregano in my drawer, due to age, breakdown of the chemicals (carvacrol, in this case), and variations in production and processing. And food preferences are just too varied—there simply is no “perfect” chocolate chip cookie; we each have our own version.
What will the future of recipes look like? While I don’t believe—or choose not to believe!—that printed cookbooks will go away, we are clearly in the digital age. Books no longer need to be authoritative or exhaustive, but should be entertaining and inspirational. With Internet access becoming universal, you’ll be able to find a good recipe for chicken tagine or tofu scramble faster with an online search than by flipping to the index at the back of this book. Fannie Farmer and Irma Rombauer would be amazed.
When will we see a dynamically generated cookbook with recipes tailored to our individual tastes—emphasizing slow food, or healthy meals, or low-sugar recipes? Or recipe generators that allow us to choose our own parameters? “Computer, change the recipe to make the cookies crispier!” Some attempts at this exist, but they haven’t been breakout successes. In part, digital ebook formats don’t have the capabilities, and installing apps is a higher barrier than most creators imagine.
I also think we’ve reached a simplicity point: cooking for pleasure is a pastime. We find it enjoyable to have a challenge rewarded with success. I call this maker’s gratification: the emotional reward and sense of accomplishment that one gets by making something that has some level of difficulty. Good brownies, made from scratch, are gratifying to make and to eat. The food industry understands this all too well. Instant brownie mixes could be formulated to not need eggs, oil, and water, but then they wouldn’t deliver maker’s gratification. How much reward would you feel for putting a store-bought pan with batter into the oven and hitting the “on” button? Probably not much.
Condensed recipes, like those that Maureen Evans posts on Twitter (@cookbook), are easy to follow for experienced cooks:
Lemon Lentil Soup: mince onion&celery&carrot&garlic; cvr@low7m+3T oil. Simmer40m+4c broth/c puylentil/thyme&bay&lemzest. Puree+lemjuice/s+p.
Regardless of the source and format of a recipe—short note, culinary essay, flowchart, or whatever may come—read it thinking of the source and the author’s intent, translating as necessary in order to achieve what you want.
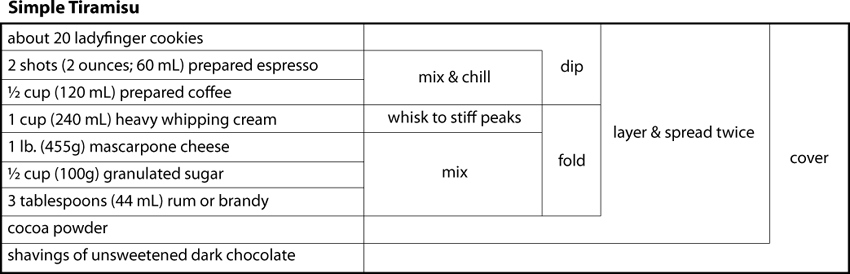
Visual recipes, like Michael Chu’s (http://www.cookingforengineers.com) tiramisu, communicate quantities and steps with minimal overhead using a time and activity chart:
If you’re a history buff, check out old cookbooks for inspiration. If there’s one time you definitely shouldn’t follow the recipe, it’s with a really old one. Take Maistre Chiquart’s recipe for parma torte in Du fait de cuisine (1420 AD). Translated into modern English, he starts with “take 3 or 4 pigs, and if the affair should be larger than I can conceive, add another, and from the pigs take off the heads and thighs.” He goes on for four pages, adding 300 pigeons and 200 chicks (or, “if the affair is at a time when you can’t find chicks, then 100 capons”). He calls for both familiar spices, like sage, parsley, and marjoram, and unfamiliar ones, such as hyssop and “grains of paradise.” The ending instructions say to place a pastry version of the house coat of arms on top of the pie crust and decorate the top with a “check-board pattern of gold leaf.”
Chiquart’s recipes were understandably complicated as they were designed for royal occasions and banquets. But even simple medieval recipes can be challenging: language, ingredients, and culinary tools have all changed. A lot. Consider this recipe for apple pie from The Forme of Cury, published around 1390 AD:
Tak gode Applys and gode Spycis and Figys and reysons and Perys and wan they are wel brayed coloure wyth Safron wel and do yt in a cofyn and do yt forth to bake well.
This roughly translates to: “Take good apples and good spices and figs and raisins and pears and when they are well crushed, color well with saffron and put it in a coffin and take it to bake.” (The coffin—little basket, same root as coffer—is the culinary ancestor to modern-day pie pastry but would not have been edible because of the way it was cooked.) Reading recipes like this can be a starting point for experimentation. Reading this gives me the idea of mixing a mash of apples and pears, some dried fruit, spices, and saffron as a festive applesauce for a holiday meal.
Many older texts are accessible via the Internet Archive (http://www.archive.org), Project Gutenberg (http://www.gutenberg.org), and Google Books (http://books.google.com). For parma torte, I worked out my own scaled-down adaptation, modifying the quantities for the much smaller affair of a dinner party. I later found an adaptation in Eleanor and Terence Scully’s Early French Cookery: Sources, History, Original Recipes and Modern Adaptations (University of Michigan Press, 1996); see http://cookingforgeeks.com/book/parmatorte/.
Don’t Always Follow the Recipe
Recipes shouldn’t be blindly followed, for a bunch of reasons:
• Recipes can’t be written to exact measurements. There’s too much variability in ingredients and techniques: mixing 3 cups of flour and 1 cup of water won’t reproduce the same results every time or for every cook. Professional bread bakers know to vary the amount of water based on weather (flour is moister with higher humidity) and the amount of yeast based on time of year (using more in the winter, when it works slower). Gain experience by paying attention to how dishes look and feel, and tweak quantities to get things to look and react like they did previously.
• Some recipes are just concepts. Stone soup? Kitchen sink salad? Congee? I can tell you what I did, based on what produce I found in my market, but you’d have to adapt. The recipe for congee, as you’ll see on the next page, is hardly a recipe, but it’s still written up with measurements and instructions. You’ll only need to read it once; after that, you’ll know the concept and never need the recipe again.
• Go off-recipe! Maybe you don’t like the taste of one suggested ingredient and want to substitute something else. Maybe you’ve read a few recipes for a dish and want to mix up the seasoning or vegetables. Recipes aren’t written in stone. (Well, excluding that beer recipe by the ancient Egyptians I mentioned earlier.)
A/B experiment to myth-bust. Make a recipe twice, changing just one thing (cookies: melt the butter or not?), and see what changes (if anything). If you’re not sure which way to do something, try both and see what happens. You’re guaranteed to learn something—possibly something the recipe writer didn’t even understand.
And finally, following recipes kills innovation. I often turn to the cuisine of different cultures, looking at their “flavor families,” or regional ingredients that are considered complementary. Lemon, tarragon, and wine—a common combination in French dishes—are pleasing together. Elsewhere it might be lemon, rosemary, and garlic. There are tons of regionally based cookbooks—pick up one that covers a region of interest to you. I find books from regions where two or more cultures mix together (Morocco, Israel, Vietnam) to be the most thought-provoking. The way techniques and ingredients get blended together is fascinating.
For off-recipe ingredients and inspiration, explore ethnic supermarkets and mom-and-pop stores. These tend to be small storefronts with new smells from the unfamiliar produce and spices and are typically located in old-style ethnic neighborhoods. Ask around to discover where they’re hidden. They can be amazing finds and introduce you to ingredients that will change the way you cook for the rest of your life—which won’t happen if you stick to the recipes you have.

Everybody has to eat, and every culture has a standard dish based on the grains that grow locally. Different regions of the world support growing different crops: oats and wheat in the United States, oats in parts of Europe, and rice in much of Asia. All of these come from the same family of plants (Poaceae—a.k.a. true grasses), so it’s not surprising that these grains can be boiled in water, or sometimes milk, to similar result. Wheat becomes cream of wheat, oats become porridge, and rice becomes congee.
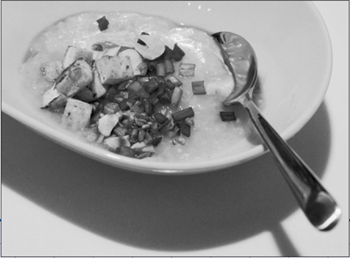
You’re unlikely to see congee on many restaurant menus or featured in many cookbooks, for the same reason that oatmeal and porridge don’t appear very often: it’s a home-cooked staple, not an eating-out “fancy” food. That doesn’t mean congee isn’t delicious and nutritious—a billion people eat it every day! For some, congee is the equivalent of chicken noodle soup: something nourishing to turn to when you’re sick or looking for comfort.
Congee can be subdivided into several different versions, depending upon the culture. The Chinese call it jook or zhou: runny rice porridge sometimes topped with eggs, fish paste, scallions, tofu, and soy sauce. In India, it’s called ganji—rice soup—and has flavorings such as coconut milk, curry, ginger, and cumin seeds added to it. When it’s cooked in sweet milk with cardamom and topped with pistachios or almonds, you have the dessert version, common in Indian restaurants.
Cooking congee is also a great opportunity to go off-recipe, because there isn’t one! Explore. Blend ingredients and flavors together. Try other grains, too. Why not try steel-cut oats with traditional congee toppings: savory steel-cut oats with green onion, fried garlic, and over-easy egg? Sounds delicious. Amazing culinary creations result where two different cultures mingle, such as in the Mediterranean (North African + Southern European), Southeast Asia (Asian + European), and the Caribbean (African + Western European). Israeli markets carry ingredients from the surrounding western regions of North Africa (especially Morocco) and Eastern Europe; Israeli cuisine is influenced by the traditions of both areas. Modern Vietnamese food was heavily impacted by French occupation in the 19th century. The United States, with so many different cultures mingling, is perhaps the most recent example of what’s termed fusion cooking: witness the African, Native American, and Spanish influences in Southern cooking; Western European and African backgrounds combining in Louisiana Creole food; and the infusion of Mexican cuisine in Tex-Mex. Congee is just one easy place to begin exploring fusion cooking. Think about how the rice is used, and how oats, cream of wheat, or corn grits might work. Experiment!
Cook for at least several hours in a cooker set to slow-cook mode, or in a pot set over very low heat:
4 |
cups (1 L) water or stock |
½ |
cup (100g) short- or medium-grain rice (no need to wash it—the extra starches will help the congee) |
½ |
teaspoon (3g) salt |
When you’re ready to eat, heat the rice to near boiling to finish cooking. The long, low-heat cooking will have broken down the starches; boiling the liquid will cause them to gelatinize and quickly thicken. I have a pressure cooker that has a slow-cook mode, so I switch it from slow-cook mode to rice mode, which is hotter and will take the rice up to near boiling. If you are doing this in a pot on the stovetop, set the pot over medium heat, periodically stirring and checking it while working on the rest of these instructions so that it does not burn on the bottom.
While the rice is cooking, prepare a number of toppings. There’s no fixed list of ingredients—a million cooks can’t be getting this wrong every day.
Here’s one combination that I enjoy:
Tofu, cut into small cubes and browned on all sides
Scallions, chopped into small pieces
Garlic, sliced into thin discs and toasted on each side to make “garlic chips”
Hot sauce, such as sriracha sauce
Soy sauce
Toasted almond slices
Some additional suggestions:
For savory congee, try various combinations of dried fish, rousong (a type of dried meat that’s a traditional topping for congee), shredded chicken, furikake (a Japanese seasoning used on top of rice, consisting of dried ground fish, seaweed powder, and sesame seeds), roasted sesame seeds, pickled cucumbers, fried gluten, miso paste, peanuts, cilantro, fried shallots/onions, butter.
For a sweeter congee, think about common traditional oatmeal toppings (sugar, honey, cinnamon, milk, fruit) and then imagine their relatives in other cuisines (coconut milk, coconut flakes, sweet red beans, mochi, dates, boiled sweetened peanuts).
You can serve this family-style, with the toppings in small bowls where your guests can help themselves, or you can portion the toppings out more formally: a tablespoon or two of tofu, a few teaspoons of scallions, a sprinkling of garlic chips, and a dash of sriracha and soy sauces. Quantity is not particularly important, but go easy on the hot and salty sauces.
Notes
• To toast the garlic, use a sharp knife to slice a few cloves (or more, if you’re a garlicphile) into thin discs. Place a frying pan on a burner set to medium-high heat, but do not add oil. Arrange the garlic wafers in a single, thin layer. Toast one side until medium brown, about 2–3 minutes, and then flip (try using tongs) to toast the second side.
• Try cracking an egg into the congee at the end of cooking, either in the pot (and then mix it in), or in the individual bowls (you might need to pop the congee into the microwave for a minute if it isn’t hot enough to fully cook the egg). Adding an egg will alter the texture and give the dish a much richer taste.
Jacques Pépin is a celebrated chef and educator who has authored over 20 books, including Jacques Pépin’s New Complete Techniques (Black Dog & Leventhal Publishers, 2012). He has hosted several shows about cooking on PBS, including Julia and Jacques Cooking at Home, which won an Emmy Award. He is the recipient of numerous James Beard Awards, including the Lifetime Achievement Award.
How did you first come to be in the kitchen?
Well, I was born into the kitchen in the sense that my parents had a restaurant. My brother and I would help with cleaning, or washing dishes, or peeling one thing or another. Either I was going to go be a cabinetmaker like my father or get into the kitchen like my mother. So it was a choice that I made very willingly. I thought the kitchen was exciting, with the noise, the smell, and so forth.
You were raised in France and then in 1959, you moved to the United States. Why?
I was doing very well in France. I worked in the biggest places—the Plaza Athénée, Fouquet’s, Maxim’s—and I even became the chef to the president. I’m saying that I had no real incentive to come to the US except for a profound desire to go like young people did. I thought that I would stay maybe a couple of years, learn the language, and go back. From the moment I was in New York, I loved it and I never went back.
Then you ended up working at Howard Johnson’s shortly after moving here, being hired by Mr. Johnson directly in 1961. You wrote in the New York Times that it was your most valuable apprenticeship. How so?
My most valuable American apprenticeship, certainly. I was asked to go to the White House and, to tell you the truth, I had no idea of the potential for publicity. The cook was in the kitchen and that was the end of it. When I was with the president in France, we were never asked to go into the dining room or had anyone coming to see us. If anyone came into the kitchen it was because something was wrong! When asked to go to the White House because of the experience I had in France, I didn’t want to do that and Howard Johnson represented a totally different world, a world that I didn’t know anything about: a world of mass production, a world of American eating habits.
You’ve been involved in American food for half a century and French cuisine for decades before that. Where do you think our relationship with food will go in the future?
I don’t know, but America is unique in the sense that, in France, 99% of people cook French food because that’s what they are born with. The food is good and that’s fine. In Italy, 99% of people cook Italian. Same thing in Spain, in Portugal, in Germany. America is quite different. People will cook Turkish one day and then they go from a Swahili restaurant to a Yucatan restaurant, then to a French restaurant, an Italian, and so forth. That situation has been created in the last 20 years or so in America; it’s the most exciting country in the world because of that type of diversity.
The cook, 50 years ago when I came here, was on the bottom on the social scale. Any good mother would have wanted her son to be an architect or a lawyer, certainly not a cook. Now we are geniuses. There are 400 television shows on cooking I was told, so it’s just absolutely amazing. Where will it go? I don’t know, but it will never go back to the way it was. The whole food industry in this country is enormous and people are getting very, very knowledgeable.
What do you tell people who are just learning to think about food, learning to cook?
I tell people if you don’t know where to start, but you know you’re going to go into the food world, start in the kitchen because this is the core of it. And whether you become a food critic or a food photographer, whatever you’ve learned there will be useful. It is not necessarily true if you start in another area of the food world. Food has moved into all areas, from academia to the simple bistro to food trucks.
You’ve mentioned that it’s a good thing that we have to take time out for the pleasure of eating every day. There must also be, of course, the pleasure of cooking.
I use the supermarket as a prep cook, which is feasible now and wasn’t before. I have a nonstick pan, I buy skinless boneless breasts of chicken, presliced mushrooms, and prewashed spinach, and with minimal effort, I can do a dish in 10 to 15 minutes. You can have pleasure in cooking, enjoy it, and have something nice and fresh.
That’s such a good observation that the modern grocery store has become the sous chef for the home cook. Do you think our understanding of how ingredients work, the chemistry of things, has changed over the past decades?
There has been some change, why hollandaise sauce breaks down and all that, but a chef learns in a different way. The way you sharpen a knife, the way you beat an egg white, the way you bone a chicken, or the way you make an omelet is the same now as it was 50 years ago. I can walk along the stove and I can tell you the chicken in the oven is done cooking because, we say, the chicken “chante.” It sings at the point that all of the juice has evaporated and the fat that has accumulated in the pan fries or “sings.” It’s like when you touch a piece of meat on the grill. That steak is medium or rare, the way you want it, and you take it off.
I have been with people who are very knowledgeable about the chemistry of food and how things work, and you end up eating a lousy meal. And then you go to the little Italian mama who would have absolutely no idea of the chemistry when she cooks a dish, but you’ll have the best meal in your life.
It’s quite different when cooking to create recipes rather than to just cook instinctively for the pleasure of it. I write down what I’m doing when I’m cooking a dish. Then I have that set of instructions that I’ve written down. There is no guarantee that it is going to be the same with you. The recipe is purely a moment in time where I report what happened on that particular day, at that particular temperature.
When I give the recipe to you, you are faced with a typewritten page that you have to abide by, which is the opposite of the freedom that I had when I created the recipe. However, I tell people, when you make a recipe, you should do exactly as the recipe said, to do justice to whoever did it. If it works out, you’re likely to do it again, but the second time you will take a faster look. By the third or the fourth time, you will improve the recipe by adapting it to your personal taste. The recipe is not static, it’s moving. You never have the same chicken exactly, with the same amount of fat.
I teach some classes at Boston University. Everybody wants to be “different.”
That’s an oxymoron because you cannot do the same thing as the person next to you does because you’re not that person. This is one of the paradoxes. I’ll do a roast chicken, buttered potatoes, and a salad. Then they all go to the stove with an hour and a half to redo it. I tell them, “Do not try to blow my mind, by doing something different. You don’t have to, because I have 15 students and will end up with 15 distinct chickens today. You cannot be the same as the person next to you. So don’t torture yourself to be different. Just cook with your gut and you will be different than the person next to you.”
You appeared on Top Chef, where you mentioned that your ideal final meal would be roast squab and fresh peas. I was curious as to why that?
Well, you know, fresh baby peas right out of the garden cooked with a small lettuce, tiny pearl white onions, butter and a dash of sugar and salt—Peas à la Française—it’s extraordinary. And I love squab roasted properly.
To tell you the truth, “What would be the last meal of your life?” is really a stupid question because if you know you’re going to die, you probably don’t have much of an appetite! I said the greatest bread and the greatest butter that I can think of—it’s hard to beat bread and butter. So, of course, when I said that, they said, “Well, that’s great, but that’s not enough.” So then, all right: squab and peas. (For Chef Pépin’s recipe, see http://cookingforgeeks.com/book/peas/.)
So good, good bread; good butter.
Extraordinary bread and extraordinary butter. Yes. Hard to beat.
A Place for Everything and Everything in Its Place
Not everyone is the neat-and-tidy type, but if there were ever a place to try to keep things in order, your kitchen would be it. Julia Child took the adage “a place for everything and everything in its place” seriously: pans were hung on pegboards that had outlines drawn around each item to ensure that it was always returned to the same location. Knives were stored above countertops on magnetic bars where she could easily reach out to take one. Common cooking items—spoons, whisks, oil, vermouth—were placed next to her stovetop. Her kitchen was organized around what the French call near to hand, with common tools and ingredients kept near where they would normally be used.
You should do the same thing in your kitchen. Every item should have a home location, to the point where you could hypothetically grab a particular tool or pan while blindfolded. (This isn’t hypothetical for the blind.) Store tools near the foods with which they are used: measuring spoons with the spices, garlic press with the garlic, and measuring cups with the dry goods. Speaking of dry goods, make sure to label any bulk goods with both what they are and their purchase date to avoid potentially unpleasant surprises months (years?!) later.
Keep often-used things out where you can reach them quickly. Every kitchen should have a container for spoons and spatulas next to the stove, and every kitchen should have a good, foot-pedal-operated trashcan right next to the cutting board. A good trashcan seems like an odd suggestion, but it’s way easier than having to open the cupboard below the kitchen sink while your hands are full of onion skins and whatnot. Consider removing cupboard doors as well, if the aesthetic appeals—having plates and bowls where you can reach out and grab them speeds things up. These tweaks are individually small, but you will be amazed at how much time they save when added up.
Countertop space is precious, so move rarely used appliances to cupboards. Anything in your cupboards that you haven’t used for more than a year should be foisted off on others. If you’re not sure you can part with some rarely used gadget (“but that’s the mango slicer from our honeymoon!”), find another home for it, outside the kitchen. If you find the idea of a marathon pruning session overwhelming, try doing one cupboard per week. Still too overwhelming? Remove one thing a day, no matter how small, until you reach a Zen state of tranquility. Keeping the kitchen functional is much easier as an ongoing habit than an annual ritual.

A Dinner Party for One
We should celebrate our opportunities to eat alone. How we cook and eat when no one is looking is fascinating: a bowl of cereal, bread and cheese, fried spam (!), takeout. There’s nobody else to please and no one to judge. Indulge yourself!
It needn’t take time if you’re busy. Scrounge for dessert while eating your dinner. Eat and read at the same time. Take the opportunity to think about what makes you happy. Set out a placemat. Pour yourself a drink. For the busy parent or working professional, eating alone should be a treat: a time to take care of yourself in whatever way you like.
Some tips for when you’re cooking solo: amortize costs by picking recipes that share ingredients. Extra tomatoes and cilantro purchased for a chicken dish can be used with eggs the next morning. Transform cooked chicken and vegetables from dinner into a sandwich. If your grocery store has a salad bar, look there for ingredients. Need a handful of cilantro? Snag the amount you need, already diced and sometimes cheaper than in the produce section.


Deborah was the founding chef of Greens Restaurant in San Francisco, California, and is the author of many books on vegetarian cooking. In 2009, she coauthored the book What We Eat When We Eat Alone (Gibbs Smith) with her husband, artist Patrick McFarlin.
What did you discover about how people cook when it’s just themselves?
We interviewed lots of people and began to see that people fell into categories. A woman who’s got small kids and a husband and finds herself home alone may make a bowl of oatmeal and eat it in the bathtub while listening to music. That’s very different from somebody who is eating alone day after day and makes something that’s healthful, delicious, and works for them. There’s a difference between people who are older, widowers or widows, compared to someone in school who’s simply tired of sandwiches. Then there are people who like to cook, who value good food and the experience of cooking. They have a whole other set of thoughts about cooking for themselves. Men are different from women a lot of times. Men tend to make a big thing and eat it all week long. This one bartender we talked to made a flank steak rolled with cheese and bacon. He was very proud of it and gave us the recipe. It served a lot of folks and that was his eat-alone food, so when he made it, he ate it all week.
I do have to say peanut butter was the most frequently mentioned eat-alone food. Peanut butter in all kinds of ways, many of them gross. A peanut butter sandwich with mayonnaise and fried onions and potato chips in it—you know, just crazy things. But people found their own taste. One woman made the most delicious plate of asparagus with torn bread and good olive oil and sharp vinegar. It’s a recipe I’ve used a lot and really like.
It sounds like some people get really creative when no one’s looking.
People come up with what they like to eat alone. I think some are very proud of it, even the gross bits, and it works for them. They’re getting themselves fed. Others feel guilty that they don’t do more. People have very different values around cooking for themselves. One man talked about going into the kitchen and making lunch: “I look for vegetables and I always use the old, tired vegetables first,” because he felt sorry for them. He takes these old, tired vegetables and something else and makes a sandwich. That was his routine and it didn’t sound like it varied a lot, but it worked for him. He was satisfied. He wanted to use up those vegetables; it was important to him.
What things about cooking alone surprised you?
What really delighted me was some of the young people we talked with. They were quite serious about cooking and they came to it for various reasons. This one medical student said he just couldn’t look at another Subway meatball sandwich. He went in for cooking lessons from his mother every Sunday. And then he was thrilled because he had the power to give a dinner party, and you can’t do that with a Subway sandwich. He said, “You know, it’s a lot like working in a lab. There are lots of things you’re paying attention to at once,” so he really enjoyed it. He loved being able to cook for his friends.
Another young person we talked to started to cook because he didn’t like the way his parents cooked. He wanted to be in charge. As he started to cook he found he could make those choices, which I thought was kind of sweet and amusing, and also effective because he learned to cook.
One woman said that when her kids were teenagers, but before they got super busy, she had them cook a meal one day a week. They had to do it all. She let them make mistakes, like not starting the brown rice until 15 minutes before dinner, so things didn’t come out at the same time. But she said they really learned that way and for her it was wonderful to come home at the end of a long workday and smell food cooking in the house. She said it was a great experience and when they finally grew up and left home, they had some basic survival skills. They could cook something.
The Power of a Dinner Party
Cooking and entertaining others has the amazing power of bringing people together. As the host, you’re able to create an experience exactly the way you want, from table settings to music. Don’t be scared of cooking for others, whether it’s a dinner party, brunch, elevenses, or any other meal. As I mentioned earlier when talking about fears in the kitchen, dinner parties are not about the perfection of the food. Bringing people together over food is about engaging in lively conversation and fostering community.
Here are some quick pointers if you’re new to throwing dinner parties or brunches:
• Bring people together with intent, thinking about whom you’re inviting and how they’ll get along with other guests. When extending an invitation, be clear if it extends to others (specifying “and guest” or “ and friends”), and set expectations (should your guests arrive at 7 pm sharp, 7-ish, or anytime? are you serving food or just snacks?).
• There’s an unofficial protocol in accepting dinner party invitations. It varies depending upon occasion and type of relationship, but when unsure, follow this script: guests should offer to bring something (“What can I bring?”), hosts should demur (“Just yourself!”), and guests should show up with something anyway (a bottle of whatever for the host to enjoy that night or another evening).
• Ask about allergies ahead of time. If you are cooking for someone with a true food allergy, you should take extra precautions. Likewise, if you have allergies yourself and are invited somewhere, it’s your duty to let the host know when you reply to the invitation; you may want to offer to bring a single portion of something for yourself to unburden the host from meeting your needs.
Take a look at page 445 for information on food allergies and common substitutions.
• Some guests may be following a restricted diet, either limiting certain types of foods (e.g., vegetarians don’t eat fish or meat, vegans avoid any animal products, and lacto-ovo-pescatarians eat milk, eggs, and seafood but no other meats) or limiting certain classes of foods (e.g., saturated fats, simple carbs, or salty foods). Then there are religious observations (e.g., kosher, halal). Regardless, if you’re up for the cooking constraints, talk with the guests to agree on something that suits their needs.
• Choose recipes that leave you time to spend with your guests. They’re there to see you! That doesn’t mean you need to have everything ready before guests arrive. Spending time with guests as you put together a meal can be a lovely beginning to an evening, as long as it lines up with what your guests expect.
• Have appetizers for your guests to snack on before you serve the meal. Simple things like bread and cheese, pita and hummus, or fresh fruit (grapes) and vegetables (carrots and dip) are quick, easy, and useful for guests who are hungry before the meal is ready.
Appetizers, amuse-bouches (“amuse the mouth”), hors d’oeuvres: whatever you call them, they’re small nibbles of intense flavors in delicious combinations to excite diners for the meal ahead—or fend off any grumbling stomachs.
Often they’re simple; heck, a slice of good bread counts in my book. One friend sometimes serves a small cup of soup (cauliflower and celery root purée, last time), and while some may be unaccustomed to starting a meal this way, it does have history. The very first restaurant, at least as it’s claimed in Western history, opened in France in 1765, serving soups and broths as a “restorative,” claiming that they restored people’s strength. The proprietor hung a sign outside saying as much, using the French word for restorative: restaurant.
Most appetizers for dinner parties should be simple: olives, or bread with spreads like hummus or tapenade (chopped olives, capers, and anchovies), or perhaps a small selection of sliced cured meats (charcuterie) picked up from the deli or butcher. Cheese and bread is common, but can be a dinner in and of itself if you’re not careful. (Eating cheese at the end of the meal makes more sense, in some ways.) What about some appetizers that take a little bit of prep work but are still quick and delicious? Here are a few of my favorite-to-make, favorite-to-eat appetizers.

Roasted Green Olives. This works well with large salt-brined green olives (pit-in) like Castelvetranos. If your variety doesn’t heat well, then just enjoy them cold. Using either your stovetop with a covered frying pan or your oven’s broiler with a heat-safe serving piece, heat the olives in a thin layer of olive oil at a moderate to high heat, occasionally shaking to roll the olives around. After a few minutes they should be slightly browned in a few areas and smell fragrant, with an almost floral aroma. Try roasting them with cherry tomatoes and adding fresh herbs after cooking.
Baked Goat Cheese with Almonds and Honey. Center a small, round piece of goat cheese on a microwave-safe plate, coat with a large spoonful of honey, and microwave for 30–60 seconds, until hot and partially melted. Toss a handful of Marcona almonds on top (they’re different from regular almonds—no papery skin and less bitter), or a layer of diced fresh herbs. Serve with crackers or bread.
Puff Pastry Squares or Twists. Snag a box of puff pastry from the freezer section of your grocery store. For appetizers, these can be cut into bite-sized squares and baked with any type of delightful, flavorful thing on top: cheese and a tomato slice, for example. Or make garlic twists: brush the top of a sheet with olive oil, sprinkle on diced garlic (or use a garlic press) and freshly ground pepper, and then cut into strips, ½” / 1 cm wide. Pick up, twist like wringing a towel dry, and then bake on a cookie sheet at 400°F / 200°C for 10–15 minutes, until medium brown.
Presentation and Plating
“Looks delicious!” is a seemingly impossible phrase. How can you see what something will taste like? Presentation and plating—the arrangement of food on a plate—set an expectation for how food will taste, and when cooking for others, can be a powerful signal of much more than taste and flavor.
Food presentation is a form of signaling, most easily understood by looking at what biologists call signaling theory. In biology, animals use signals to communicate many intentions. Bright red coloration on frogs signals “poison!”, warding off predators. With time, other animals mimic the signals—imagine non–poisonous frogs that happen to be red—which leads to a race between honest signalers and copycats. This is why harder–to–copy signals replace older, copyable ones. Some gazelles ward off predators by pronking (now there’s a Scrabble word), jumping up high to demonstrate that they can also run fast. The cheetah that sees a gazelle pronk quickly learns that the gazelle isn’t worth chasing, saving both the cheetah and the gazelle an energy–intensive race. Weaker gazelles can’t copy the honest signal and suffer.
Humans use signaling too. Expensive sports cars aren’t practical, at least for driving around town, but they do signal one’s economic status. (Incidentally, this is why high-end sports cars have only two seats and little storage space: if the car were practical for daily chores, then it wouldn’t be a good signal of wealth.) Cooking from scratch and spending time making a meal is a signal, letting others know that you value them. Inviting guests over and preparing food for them is a huge signal. Signaling theory partly explains why things like instant brownie mixes call for eggs and oil: in addition to the maker’s gratification I wrote about earlier in this chapter, requiring those ingredients leaves just enough work that the baker can signal their care.
Presentation doesn’t have to be fancy, difficult, or expensive to signal “special!”, but it does need to be considered and different than what you normally do to communicate that thought. Take brownies: even if you make them using a mix (guilty pleasure!), baking them in an orange changes the presentation and shows thought. Remember, presentation depends upon your context, so making brownies in an orange will be special in some contexts (the person who never cooks showing an effort) but déclassé in other contexts.
Cut the top off and trim out the center.
Fill with brownie mix.
Bake until a toothpick inserted 1” / 2.5 cm deep comes out clean. Dust with powdered sugar.
Different situations require different signals to communicate a message, and this makes writing a universal list of “how to plate food” tricky. To understand presentation, one has to understand the message that one is trying to communicate and then pick the appropriate signal for the context. If you’re cooking an everyday meal, you wouldn’t want a fussy presentation. (Using a fussy, special presentation on an everyday occasion would be its own signal, perhaps softening the blow of imminent bad news.) If it’s a special date night, setting out cloth napkins and spending time on the way the food is plated is a way of signaling that it’s a special occasion. And with good friends, setting up an environment that matches the expectations of your social circle communicates your understanding of the group norms. Following a fine-dining restaurant-style presentation can be charming, or can come across aggrandizing, depending upon your peers.
Here are a few basic presentation tips if you do want to present food using appearances common to Western fine-dining.
Match the color and size of the plate to the food. I’ve been surprised what a difference using a large plate can make; it’s like a frame around a picture. Some empty space on a plate is good! Color, too, can be instrumental. I find having two sets of plates—mine are either white or dark grey—makes it easier to pick one that contrasts well with the food. You can add color to a dish with food: a few herb leaves on the top of a bowl of soup, a dusting of freshly ground black pepper on roasted chicken breast, or powdered sugar on a chocolate dessert all add visual interest to otherwise monochromatic dishes.
Make it look different than traditional home-cooking. If you’re plating a meal that has a vegetable, starch, and protein component, traditionally the three items would be placed next to each other, like wedges of a circle. Try placing the starch in the center of the plate and spreading it out in a thin layer, then adding the vegetable component on top of the starch, and finally stacking the protein on top of the vegetables. (If you want to go for extreme height, use a large can with both its top and bottom removed and stack the food inside it, and then slide the can up and away.)
Think about the size and arrangement of the food. All the rules of visual composition taught in art class (preschool counts!) apply to plating food. The “rule of odds” is one of the easiest: seeing either three or five meatballs on top of a bowl of pasta is generally considered more visually interesting than seeing four or six. Contrasts in size and shape help, too. If you’re serving pork chops, try slicing them into two pieces and placing one part angled up on top of the other. This will show the interior of the chop, both revealing how the meat is cooked and adding visual interest from arrangement and color contrast.
The Basics of Kitchen Equipment
Figuring out which tools to have in your kitchen can be a daunting task. With so many products on the market, the number of choices you have can be overwhelming, especially for overly analytical perfectionists (you know who you are). What type of knife should I buy? Which pan is right for me? Should I buy that cherry pitter?
Take a deep breath and relax. To a newbie, kitchen equipment probably seems like the secret to success, but in all honesty, it isn’t that important. A sharp knife, a pan, a cutting board, and a spoon to stir with, and you’re covered for 80% of the recipes out there and have more kitchen equipment than 90% of the world’s population. Heck, in some parts of the world, people just have one pot and a spatula that’s been sharpened on one side to double as a knife.
Having good tools does make cooking more enjoyable. The right answer for which model of equipment to buy is: whatever works for you, is comfortable, and is safe. The next few pages offer my take on kitchen gear, but it’s up to you to experiment. Modify my suggestions to fit your needs.
The best kitchen gear tip that I can offer is this: look for a commercial restaurant supply store. These stores stock aisle after aisle of every conceivable cooking, serving, and dining room product, down to the “Please wait to be seated” signs. If you can’t find such a store, the Internet, as they say, “is your friend”: you can order anything online.
Use your hands when cooking! They’re the best tool in the kitchen. After a good scrubbing with soap, they’re just as clean as anything else and infinitely more dexterous. Tearing lettuce leaves? Squeezing a lemon? Putting the entrée on a plate? Use your hands.
Also, learn what various temperatures feel like: hold your hand above a hot pan, and notice how far away you can still “feel” the heat. Stick your hand in an oven set to medium heat, remember that feeling, then compare it to when you’re working with a hot oven. For liquids, you can generally put your hand in water at around 130°F / 55°C for a second or two, but at 140°F / 60°C it’ll pretty much be a reflexive “ouch!”

One piece of equipment that you’re probably stuck with is your oven. What makes an oven “good” is its ability to accurately measure and regulate heat. Since so much of cooking is about controlling the rate of chemical reactions using heat, an oven that keeps a steady temperature and isn’t too cold or too hot can make a huge difference in your cooking and baking. There are two things you can do to make sure you get the best results with what you have:
Calibrate your oven. Get a digital probe thermometer and check that setting your oven to 350°F / 180°C actually lines up with the thermometer, placing the thermometer in the same location in the oven as your baked goods are going to go. If the temperature is way off, check to see if your oven has either an adjustment knob or a calibration offset setting. Otherwise, keep in mind the offset when setting temperatures. Your oven will cycle a bit above and below the target temperature—the oven will overshoot its target temperature, then turn off, cool down, turn back on, and so on. It’s possible that your oven could be correctly calibrated but measure too hot or too cool, so check the thermometer several times over a span of 10 minutes.
Improve your oven’s recovery time and even out the heat: always keep a baking or pizza stone in your oven. Say you’re baking cookies: oven set to 375°F / 190°C, cookies on pan, ready to go. In an empty oven, the only thing hot is the air and the oven walls, and opening the door to pop the cookies in leaves you with just hot oven walls. You’ll get much better results by keeping a baking or pizza stone on the very bottom rack in your oven. (Don’t place the cookie sheet directly on the pizza stone!)
The baking stone does two things. First, it acts as a thermal mass, meaning faster recovery times for the hot air lost when you open the door to put your cookies in. Second, if you have an electric oven, the stone serves as a diffuser between the heating element and the bottom of your baking tray. The heating element emits a hefty kick of thermal radiation, which normally hits the bottom side of whatever bakeware you put in the oven. By interposing between the heating element and the tray, the stone blocks the direct thermal radiation and evens out the temperature, leading to a more uniform heat. Buy the thickest, heaviest stone you can. Like any thermal mass, a stone will add lag to heating up the oven (and cooling it down—that’s the point!), so make sure to allow extra time to preheat your oven.
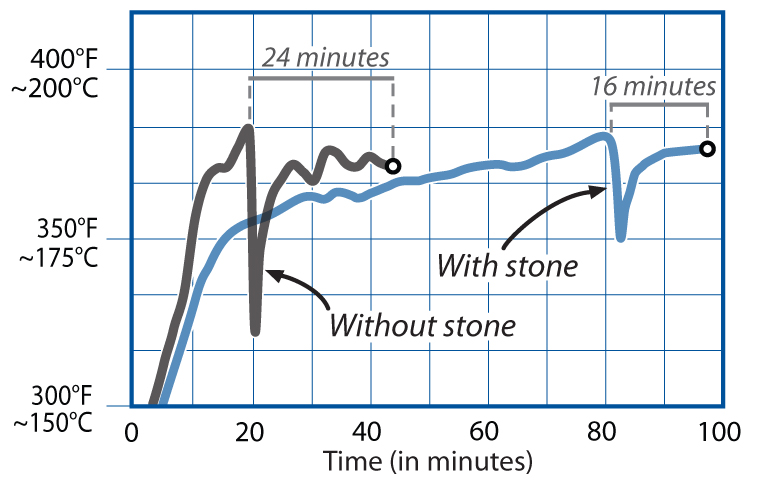
An oven with a baking stone takes longer to heat up but remains warmer when food is put in and bakes it faster.
What if you don’t have a digital thermometer and need to check an oven? It’s common practice to calibrate thermometers with ice water and boiling water because those have temperatures based on the physical properties of water. Water isn’t the only chemical in the kitchen with known temperature-dependent properties, though: you can also calibrate your oven’s thermometer using sugar!
Mankind has been harvesting sugar for millennia, but only in the past few hundred years have we industrialized it. The sugar you buy most likely comes from either the sugarcane or sugar beet plant, which is soaked in hot water to dissolve out its sugar into a syrup that’s then crystallized. The white table sugar that you’re familiar with is ~99% sucrose—a pure substance (C12H22O11)—with the rest being water and a tiny percentage of stuff like trace minerals and ash that come along for the ride.
• Aluminum foil
• Sugar
• A timer
• A plate (for hot sugar samples)
• And, obviously, an oven!
The sucrose in table sugar melts at 367°F / 186°C. It turns from the familiar white granulated substance to something resembling glass. (Sucrose undergoes a chemical breakdown at low temperatures; see page 221.) A properly calibrated oven won’t melt sugar when set to 350°F / 180°C but it will when set to 375°F / 190°C.
We’re going to bake two different samples of sugar at two different temperatures, one hopefully below and the other above sugar’s melting point, to check your oven’s temperature.
Preheat your oven to 350°F / 180°C.
Make two aluminum foil “sample containers”:
Tear the aluminum foil into 5” × 5” (12 cm × 12 cm) squares.
Fold the edges of each piece up, making a miniature pan that’s about 4” / 10 cm square and ½”/ 1 cm high.
Add a spoonful of sugar into each sample container.
Put the first sample container in the preheated oven (350°F / 180°C). Set a timer for 20 minutes and wait.
After 20 minutes, remove the first sample and transfer it to your plate. Remember, the sugar is hot, even if it doesn’t look it!
Set your oven to 375°F / 190°C and wait 10 minutes for it to adjust.
Put the second sample container in the oven. Set a timer for 20 minutes and wait.
After 20 minutes, remove the second sample and transfer it to your plate.
What differences do you see between the two samples? Why do you think that happened? Compare the 350°F / 177°C sample with some uncooked sugar; what do you notice? Why might that be happening? And the best part of the investigation: once the samples have cooled down, taste them! What does the 375°F / 190°C sample remind you of?
Sugar at 350°F / 177°C.

Sugar at 375°F / 190°C.
Knives
Knives are humankind’s oldest and most important tool, for good reason: they make cooking and eating possible. Cooking—preparing food for eating, in its most basic sense—is what created society, and over time, better knives advanced our ability to prepare food. Metal blades replaced ones of flint and obsidian, and this ability to work with metal literally defined the boundary between the Stone Age and the beginnings of historical times in some parts of the world.
Steel replaced other metals—bronze, iron—some 4,000 years ago, and presumably shortly thereafter was forged for culinary purposes. Modern steel knife blades are now manufactured in one of two ways: forging and stamping. Forged blades tend to be heavier and “drag” through cuts better due to the additional material present in the blade. Stamped blades are lighter and tend to be cheaper because of the way they’re manufactured. Which type of knife is better is highly subjective; to some, knives are a very personal choice. Personally, I’m perfectly happy with cheaper stamped knives. Make sure you know how the knife feels in your hand before you buy it!
Regardless of material when cutting, you should “pull” the knife through the food (don’t just press straight down, except for soft foods like cheese or a banana, and don’t “saw”; use smooth, long motions). Here are the three knives everyone should have:
Chef’s knife. A typical chef’s knife is between 8” / 20 cm and 10” / 25 cm long and has a slightly curved blade; this allows for rocking the blade for chopping and pulling the blade through foods. If you have smaller hands, you might want to look at a Santoku-style knife, a Japanese-inspired design that has an almost flat blade and a thinner cross section that’s best suited for straight up-and-down cutting motions.
Paring knife. A paring knife has a small (~4” / 10 cm) blade and is designed so you can hold the knife in one hand and the food item in the other, for tasks such as removing the core from an apple quarter or cutting out bad spots on a potato. The almost pencil-like grip design of some commercial paring knives allows you to rotate the knife between your fingers, so you cut around something by rotating the knife instead of rotating the food item.
Bread knife. A bread knife has a serrated blade, typically between 6” / 15 cm and 10” / 25 cm long. While not an everyday knife, they’re handy for cutting items besides bread: oranges, grapefruits, melons, and tomatoes all cut more easily with a serrated blade.
I’m always thinking about the “failure mode”: if the knife slips, where will it go? Watching someone use a knife improperly is like hearing fingernails on a chalkboard.
Keep the knife moving in one vertical plane, moving the food through instead of sliding the knife over. Feed items into the cutting plane with your fingers positioned so that they can’t get cut. Keep your fingers of the hand holding the item curled back so that if the knife slips your fingers will be out of harm’s way. You can also rub the side of the knife against your knuckles to maintain better control.
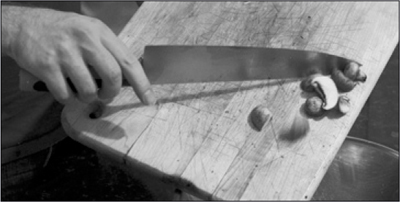
When scraping food off a cutting board, flip the knife over and use the back side of the blade to avoid blunting the sharp side.
There’s more than one way to hold a knife: instead of using a “club grip” (left), try using a “pinch grip” (right). You’ll have more dexterity this way.
A large chef’s knife, a cutting board, and a huge bag of onions: the perfect way to learn how to slice, dice, chop, and peel. If you’ve never made French onion soup, it’s easy if you have good knife technique. For a lovely demonstration of “the dog work” of knife technique and cutting onions, see the “Your Own French Onion Soup” episode of Julia Child’s The French Chef: http://cookingforgeeks.com/book/onionsoup/. While some things have changed—better metallurgy in knives, for one—the fundamental techniques haven’t. Watching her cook and teach is a joy.
Earlier recipes for soupe à l’oignon, like one from 1651, call for either water or beef broth; another old one suggests adding capers on top after cooking. Julia Child’s version calls for homemade chicken and beef stock, but while you should make your own stock at some point (see page 350), it takes more time than most of us have for an evening meal. My version here uses vegetable broth (I prefer the taste) and puts a microwave (“Imagine that!”) to clever use.
Set out a cutting board and, next to it, a large microwave-safe container for sliced onions. Add 4 tablespoons (60g) of butter to the container.
Slice 4-6 large yellow onions, about 2 pounds (900g). Start by cutting the root and stem ends off, slicing in half (top to bottom), and then peeling off the skin. Make sure to remove any tough outer layer, as it’ll end up in your soup. Chop the onion halves into slices, transferring to the container as needed to free up space on your cutting board.
Now for the unorthodox part. Cooking onions on the stovetop is a thermal balancing act between getting the stove hot enough to simmer the onions in their own liquid but keeping it cool enough to not dry them out and burn them. Microwaving onions may sound crazy, but it nails this balancing act perfectly: the microwave heats the water in the onions, causing them to simmer, but doesn’t excite the drier parts and thus doesn’t burn them. It still takes as long—30 to 45 minutes—but it’s astonishingly simple.
Microwave the onions and butter for 15 minutes on high power, then stir them together. The onions should be translucent and wilted at this point, but not brown. Fetch out any bits of onion skin that accidentally made it in while you’re at it. Nuke for another 15 minutes. Stir again, and again fetch out any bits of onion skin that somehow made it in. The onions should be getting smaller in volume at this point, and perhaps beginning to turn brown. Microwave for additional 5-minute intervals until the onions have reduced way down and are mahogany brown.
Transfer the onions to a pot and stir in:
1 |
quart (~1 liter) unsalted vegetable stock |
2 |
tablespoons (30 mL) brandy, whiskey, or sherry (optional, but adds a very nice depth; use sherry if you like the sweetness) |
1 |
teaspoon (6g) salt |
|
Freshly ground pepper |
Taste and adjust the seasoning as desired, taking care to not oversalt the liquid as the cheese will balance that out. You can store the soup at this point for several days in the fridge.
To serve, bring the soup to a simmer. Ladle it into oven-safe soup bowls (or a shallow oven-safe pan, if you’re serving family-style) and cover it with slices of dried, toasted bread. (Do not skip drying and toasting the bread; you will end up with soggy wet goo. You can use stale bread and toast it; otherwise, dry the slices of bread out in a 300°F / 150°C oven and then toast them.)
Cover the bread with a generous layer of sliced cheese that melts well, such as Gruyère, Fontina, or Emmental, creating a layer of ⅛” / 0.5 cm cheese slices across the entire top.
Melt and toast the cheese under a broiler, cooking it until a few spots are just on the verge of burning.
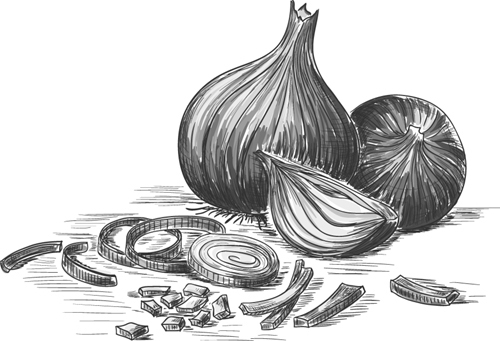
Why do onions make you cry?
We now know there’s more to it than onion juices splatting up into your eyes. When the cells of the onion are crushed, an enzyme (alliinase) reacts with sulfoxides from the onion’s cells to produce sulfenic acid, which stabilizes into a sulfuric gas (technically syn-propanethial-S-oxide) that can react with water to produce sulfuric acid. When you’re cutting onions, the sulfuric gas interacts with the water in your eyes’ lacrimal fluid to generate sulfuric acid, which triggers your eyes to tear up to flush the sulfuric acid.
Knowing the science behind why onions make you cry explains why some tricks to prevent crying work. There are three stages that lead to tears: alliinase reacting with sulfoxides, sulfuric gas reaching your eyes, and that gas interacting with your eyes. Interrupt any one of those stages, and you’ll reduce an onion’s lachrymatory properties. Here are a few methods:
Use a sharp knife and good technique. Using a sharp knife reduces the amount of liquid expelled from the onion tissue when cut; keeping the onion together as you slice it reduces the amount of sulfenic acid exposed to air.
Chill the onions first. Enzymatic reactions and volatile reactions are temperature dependent, so a good hour or two in the fridge or freezer will reduce the amount of sulfenic acid created. (Don’t store onions in the fridge, though—see page 119.)
Wet your knife, onions, and cutting board. The sulfides that lead to tears happen to be water soluble, so a modest amount of water can help. This isn’t a great solution, though—cutting slippery things is hard.
Keep the gases from reaching your eyes. Using a fan, cutting in a well-ventilated space, or even wearing ridiculous-looking swimming goggles will reduce the amount of sulfuric gas that can reach your eyes to trigger a reaction.
Cut the onion in half and place the cut side down on a cutting board. Make two to three horizontal cuts into the onion, cutting toward the root stem side. Don’t cut all the way through; leave the last part uncut so that the onion doesn’t come apart.

Make a set of vertical cuts, again taking care to leave the root end uncut.

Rotate the onion and make a final set of vertical cuts, which will result in diced onion bits.

PHOTOS USED BY PERMISSION OF BUCK RAPER
Buck Raper is the manager of manufacturing and engineering for Dexter-Russell, the largest and oldest cutlery manufacturer in the United States. Above, Buck holds a knife next to an edge sharpness and edge life test apparatus in the metallurgy lab.
How did you come to work at Dexter-Russell?
In a former life, I was working on a doctorate in synthetic organic chemistry.
Wow. What happened?
I got drafted to Vietnam.
And then you came back...
I came back and there weren’t many job opportunities for PhD chemists, and I was still looking at two more years in school, and I had a family to support. So I went and got an MBA and got twice the starting salary I would have gotten as a PhD. My family had always been in the cutlery business—my grandfather and my father—and all I ever heard was knife talk. When I was a Baby Buck, my father would take me into the pocketknife factory on Saturday mornings and hand me off to a foreman so he could get some work done, and I’d make knives with a foreman.
Did the background in chemistry, combined with your family’s history in knife making, complement each other?
To some degree... but it was more of the scientific method and analytical techniques that you learn in a hard science, applying them to manufacturing. I looked at it from a different standpoint than a history major MBA would, or an English major MBA would. Coming from a real science, you take a different approach, an engineering approach.
Can you give me an example?
Much of the heat treating, the grinding, and the choice of steels was done almost by folklore. It’s always been done that way and nobody remembers why. Now when we’re trying to choose a steel for a particular application, we do some testing, make some blades, and try them out to see what the results are. We have a control sample and record data. That’s the type of change that I made. Dexter-Russell is 192 years old, and we still have machinery and tooling that we were using at the turn of the century, from 1900. Those techniques still work and they’re still very good, but nobody really knew why we were doing things the way we were doing them.
What surprised you when you were testing the folklore?
We’re number one in professional oyster knives, and there’s the chronic problem with the tips of oyster knives breaking off. We had a heat-treatment process that we thought was making the steel hard enough to not break. The theory was if the blade is breaking, make it harder, and then the tip won’t break off. The reality was what we needed to do was to make tougher steel. So we changed our heat treatment process to create a tougher, softer steel.
What does it mean for a steel to be tough versus hard?
It’s a trade-off to hold an edge. The harder the steel is, the better it will hold an edge. But you also want to have some flexibility. If you need a flexible bone or fillet knife, a harder steel is more brittle; it would fracture. So you have to trade off the hardness for the toughness that allows you some flexibility. The toughness also gives you wearability, resistance to abrasion. One way an edge fails is that you literally wear away the grains of steel, and to resist that, you’re looking for a tough steel.
When you heat-treat steel, you martenize it to the temperature that’s going to give you the maximum hardness. [Martensite is a type of crystalline structure in metal formed by rapid changes in temperature.] But if you underheat it, if you undercook it a little bit, it comes out tougher. If you overcook it, it’s also tough, but then it corrodes. In our case, when we’re talking heat-treatable stainless 400 series steel, the optimum temperature is 1,934°F / 1,057°C. If you heat it to 1,950°F / 1,066°C, you get the same hardness that you would if you heat it to 1,920°F / 1,049°C, but one is tougher, and the other will corrode.
Steel is formed of grains. If you were to snap a knife blade in half, and look at it with the naked eye, the texture would look like fine cement inside the knife. What you’re seeing is groups of grains. Steel exists in 9 or 10 different phases. Depending on how it’s been processed, temperature-wise, it has a mixture of these various phases, and that determines the toughness of the steel. I use the analogy of baking a cake when I’m explaining heat treatment. You have raw dough and expose it to heat. There’s a chemical change and a phase change, and you go from slurry to a porous solid once it’s baked.
With steel, once it is heated to a critical temperature, cooling—called quenching—is also critical. You’ve probably seen old movies where the blacksmith is pounding away; when he gets the iron hot, he plunges it into the water and there’s a hiss of steam. The reason for that is the rapid cooling. In the case of stainless steel, you have to get it below 1,350°F / 732°C in less than three minutes in order to maintain the phase that you want. If you cool it slower, you get a different mixture of phases in the steel. So it’s not just in bringing it up to temperature; the cooling curve is key.
Steel is also determined by the alloy. There are two or three dozen different types of stainless cutlery steels, and stainless cutlery steels are just a very small subset of alloyed steels. Alloyed steels are a subset of carbon steels. And all the heat-treatment processes are determined by which alloy you’re working with.
Are there other types of steels that you would want to use for particular purposes for knife making?
We want to use a stainless steel, although carbon steel makes wonderful knives. Everybody likes their old carbon steel knives, but nowadays, with the National Sanitation Foundation and other regulatory bodies, you can’t use carbon steel knives in most restaurants. We choose stainless, which has chromium in it; the chromium makes it stainless. You also have to have carbon in the steel so that you can harden it. You add more carbon if you want to create a harder blade, and more chromium if you need to get more corrosion resistance. When you heat-treat it, you want to come out with a very fine texture, and things like molybdenum, vanadium, tungsten, and cobalt help you get a fine grain. Tungsten and cobalt help make the steel tougher.
What’s the rationale prohibiting carbon knives in restaurants?
They rust, and rust is iron oxide. It’s dirty, and where the blade has rusted, there are pits that will retain grease. The grease will breed bacteria. It’s usually controlled by city or state or county ordinance.
Carbon steel versus stainless steel: which is better?
That was a classic question that I wondered about for 30 years. I finally had a seminar with a metallurgist from a French steel mill, and he developed a machine to test the sharpness of edges and the life of edges. The answer is that you can get a carbon steel edge about 5% sharper while a stainless steel edge will last about 5% longer. With stainless steel being tougher, it is harder to create the edge, so stainless steel often gets a bad reputation because people can’t sharpen it correctly. It is possible to get carbon steel 5% sharper, but you would never perceive that using a knife. You need the scientific apparatus to bring out that difference. The practical difference is it’s very easy to bring up an edge on carbon steel, so most people’s carbon steel knives are sharper because they’re easier to resharpen. A carbon steel knife responds very easily to a butcher’s steel; you have to work a little bit more with a stainless steel knife.
I’m going to ask the question that’ll probably lead to the gates of hell: how do I sharpen a knife correctly?
There are lots of ways to do it. Probably the best general-purpose way and what I recommend to people is to use a diamond sharpening steel. The traditional serrated butcher’s steel is a ½” or 5/8” rod (1.2–1.6 cm) with ridges running longitudinally. Those are now being replaced by rods that are plated with diamond. The diamond rod brings up an edge very quickly, because it’s hard enough to remove metal, creating a new edge.
An edge is actually a whole bunch of little burrs, sort of like hacksaw teeth that are standing up, perpendicular to the back of the blade. When you cut, those little burrs (here we call them feathers) roll over. The first thing that happens when you swipe with a butcher’s steel is you stand those feathers up, and you have a real good edge. After a time, they bend back and forth. They work-harden and break off, like breaking a wire by twisting it until it work-hardens and snaps. Then you have to create a new edge, new burrs, and the grit on a diamond steel is perfect for that. That’s what the long serrations do on your regular butcher’s steel, but it’s a lot easier to do with a diamond steel. When you run a knife edge along a steel, you stand up the burrs, and you start thinning down the edge. I can do it with the back of a porcelain plate, or I can rub a knife on a brick wall and bring up the edge, but a diamond steel is best.
I’ve made a lot of trips to China, and they have very primitive kitchens as far as equipment, tools, and utensils go. They make do with the one basic knife. People call it a cleaver, but it’s not really a cleaver. It’s a slicer and a spatula and a scraper and everything else, but with that one knife, they stop and squat on the floor and bring the edge back on a brick that’s in the floor. They keep those knives very, very sharp. I learned in Chinese cooking how nicely things are sliced up counts as much as the taste, the presentation, and the freshness of ingredients. All of that can be ruined if you have cut raggedy chunks.
I would recommend either a diamond butcher’s steel or a whetstone. But a whetstone takes more skill, more training to use. I would stay away from electric sharpeners.
At some point the burrs snap off, and I presume that’s the point at which one needs to actually grind down the edge of the knife to form a new edge?
With a diamond steel, you’re doing grinding at the same time you’re straightening up the edge. A traditional butcher’s steel isn’t hard enough to remove metal. The deal with using a butcher’s steel is your steel has to be harder than the metal of the blade you’re sharpening. Otherwise, you get nowhere, like using a common file to smooth or shape metal. Your file won’t cut the metal if the file isn’t harder than the metal it’s cutting. If you let your knife get very dull, bringing the edge back is a real bear. If you give it a few strokes on a butcher’s steel every other day, or once a week, or every time you go to put the knife in the drawer, then the knife is always ready.
At what point is a knife effectively used up? [Buck shares with me the photo shown below.] I cannot believe how much the bottom knife has been sharpened away compared to the new knife on top. What’s the story with this actual knife?
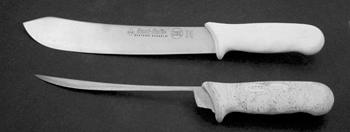
Whoever was resharpening that knife was very, very good. It came back to our customer service people for replacement from a mom-and-pop butcher shop. I train our sales force, and one of the questions they ask is how long is a knife useful. I show them this. That’s pushing the ridiculous. I would think that that knife had seen about five or six years of service.
We usually find in a restaurant that a knife is good for six to nine months. With professional cutlery, and in particular with packing houses, they’ll need a wide blade for breaking down a side of beef. They need a large curved knife, which we call a cimeter steak knife. When it starts out life, it’s about 2 ½” (6 cm) wide, and when it gets down to about 1” or 1 ¼” (2.5–3 cm) wide, it’s no longer suitable for breaking down the big sides of beef. So then they use it for the smaller cuts, and call it a breaking knife. When they wear it down to about under an inch, they use it as a boning knife.
So these knives actually go through a series of different lives? As they get smaller from sharpening, they get repurposed and reused?
They get narrower, and they get shorter. People find different applications for them. The poultry industry still does that. What I’m talking about is mostly pre-WWII. After WWII, people started coming to us and saying, “Hey, can’t you make this shape from scratch?” So we started to create the same shape as the worn-out knife. You wouldn’t have to wear out a giant cimeter; you could just buy a breaking knife off the shelf. A lot of our traditional knife shapes have evolved from large blades that were worn down and used for different applications, and then we started making a blade with that shape.
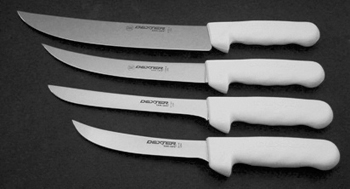
What advice would you give somebody new to the kitchen?
If I were being a smartass, I would tell you don’t run with a knife. Keep your knives out of the dishwasher. Wipe them clean with a damp rag. When you put them in the dishwasher, they bang together and you nick up your edges. If you do put them in the dishwasher, make sure you pull them right out of the basket and dry them off. Keep up with your sharpening; don’t let your knife get dull. Maintain the edge every time you use it or every other time you use it. Give it one or two strokes on a steel and sharpening will never be a chore, and you will always have a sharp knife.
Keeping your knives sharp is the kitchen equivalent of flossing or wearing sunscreen: it’s something you’re probably not doing often enough.
• Sharp knives require less pressure for making cuts, so there’s less force involved. You’re less likely to slip and cut yourself.
• Sharp knives cut cleaner; there is less “tear” through whatever you’re cutting.
• Sharp knives keep your arm from getting tired because you don’t have to muscle through things. Of course, you’d need to be slicing and dicing for many hours to notice.
Keeping your knives in good working order involves both keeping the blade “true” (in alignment) and grinding down the blade to reshape the edge if the trued shape is lost. To keep your knives true, use a sharpening steel (those steel rods ubiquitous in celebrity chef photos) as part of your cleanup and wash routine at the end of a cooking session. By running the knife against the sharpening steel, you push any portion of the edge that is out of alignment (“burrs”) back into alignment. (Don’t try to true a serrated knife—regular sharpening steels won’t fit against the serrated edge.) Look for a diamond-coated sharpening steel; the diamond coating is harder than the steel used even in stamped blades, so it can both realign the burrs and create a new edge, keeping the knife truly sharp, and actually remove the need to reshape the edge.
More serious sharpening involves grinding down the blade to form a new edge and can be done against any hard surface: a sharpening stone, grinding wheels, even a brick! (See the interview with Buck Raper on the preceding pages for details.) Sharpening by grinding the blade down, as opposed to truing the blade, has one major downside: creating the new edge removes material, reducing the life of the knife. Still, even with constant truing, knife blades will dull.
Regardless of how you sharpen a blade—sharpening stones (whetstones) are popular—you’ll need to think about blade angles. The angle of a blade can be measured in degrees between the side of the knife and the surface grinding it. A 10° angle is sharper than a 20° one, but also more prone to dull as the sharper angle means thinner metal at the tip, making the edge weaker. Blades have two sides, so a knife sharpened at 20° on each side has an edge that’s cumulatively 40°. Kitchen knives are generally around 15–20° (on each side). The angle isn’t necessarily the same on both sides. Some chefs like their knives with an asymmetric grind—say, 12° angle on one side and 20° angle on the other—so that when cutting, the knife doesn’t drift sideways. (A right-handed cook will line up the blade with the food by looking from the left side due to the food being positioned in the left hand, so there’s a bias in cutting.) Sharpening angles can become complicated by mixing two different angles, with a side having a second sharpening pass with a steeper angle; this leaves more metal near the tip to create a stronger base with a sharper edge that will last longer. Some commercial manufacturers even use convex, curving profiles. As you can see, there’s a lot to explore with sharpening! One tip: try coloring the edge of the blade with a black marker, so that you can more easily inspect the progress of your work.
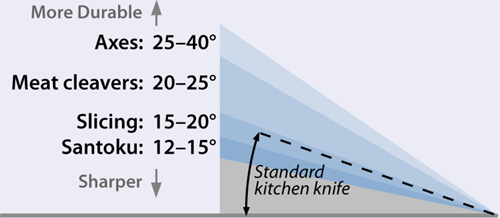
Cutting Boards
Cutting boards come in two main varieties: wooden and synthetic. Wooden cutting boards are made of close-grained hardwoods like maple or walnut and have a lovely, warm feel; synthetic boards are made of plastics like nylon or polyethylene and have the benefit of price. Avoid using glass or stone cutting boards for anything other than serving; they dull knives.
Which material is safer depends. Running a cutting board through a dishwasher sterilizes it, killing any salmonella or E. coli present from meats or unwashed veggies. Wooden cutting boards aren’t dishwasher safe—hot water warps wood—but wooden cutting boards are more forgiving to lapses in sanitization due to the chemical properties of wood. Researchers have found that home chefs using plastic cutting boards were twice as likely to contract salmonellosis than those using wooden cutting boards, even when they hand-washed the board after contact with raw meat. If you use synthetic cutting boards, make sure to wash them properly.

Use the butcher paper that meats come in as an impromptu disposable cutting board for them. One less dish to wash!
Personally, I use a plastic cutting board for raw meats and a wooden one for cooked items because I find the difference to be an easy visual reminder, and if I do slip up on washing one correctly, there’s less chance of cross-contamination. Beyond the food safety issues, there are a couple of practical aspects to keep in mind:
• Look for cutting boards that are at least 12” × 18” (30 cm × 45 cm); too small, and you won’t have space to chop or dice things.
• Some cutting boards have a groove around the edge to prevent liquids from running over the side. This is handy when you’re working with wet items, but it makes transferring dry items, such as diced herbs, more difficult. Keep this in mind when choosing a board.
• If your board starts to smell (say, from working with garlic or fish), use lemon juice and salt to neutralize the odors.
• Place a kitchen towel under your cutting board to prevent it from moving while you’re working.
Pots and Pans
I like to think I have a minimalist kitchen at the moment, having downsized in a recent move, but even so, my collection of pots and pans numbers five: two frying pans (one with a nonstick coating), a saucepan (an odd-lot one I picked up in college), a stockpot (thanks, Dad!), and a small cast iron pot. The cost of these five pans probably adds up to more than the rest of my current kitchen gear combined. That strikes me as about right.
Frying pans are shallow, wide pans with slightly sloped edges. If you can only have one pan, get a nonstick frying pan—it’s the easiest to use. Since nonstick coatings prevent the formation of fond (the bits of food that brown in the bottom of the pan and add flavor to sauces), consider purchasing a stainless steel frying pan as well.
Saucepans, roughly as wide as they are tall and with straight sides, hold a few quarts/liters of liquid. Look for a pan that has a thick base, as this will avoid hot spots. Make sure to pick up a lid as well; they’re sometimes sold separately.
Stockpots hold a gallon or more of liquid (~4+ liters) and are useful for blanching vegetables, cooking pasta, and making soups. The stockpot I use is one of the cheap stainless steel commercial varieties. Be sure to snag a lid!
Cast iron pans have a much higher thermal mass than other pans, making them ideal for searing foods. Certain sizes are also great for baking dishes like cornbread. Avoid stewing highly acidic ingredients such as tomatoes in cast iron; they’ll react chemically. Always, always dry your cast iron pan after washing: clean it by rinsing and optionally scrubbing with a plastic scouring pad (or salt and a towel), heat it over a burner for a minute, and then wipe the inside with a very thin layer of oil.
What’s seasoning a cast iron pan mean?
Seasoning is culinary lingo for developing a nonstick finish based on fats that have been heated high enough to break down and bond to each other and the pan’s surface.
You should season new pans (or reseason old ones in need of care) by thoroughly scrubbing them with soapy water, drying them on a burner for a minute, and then coating all sides with a thin layer of fat. Traditionally lard or tallow was used, although any oil should work; some cooks swear by raw flaxseed oil. Wipe away as much of the oil as possible, place the pan in the oven, set the oven to 500°F / 260°C, bake for 60–90 minutes, and then turn the oven off and allow the pan to cool inside. Repeat a few times if the finish seems too thin, or just do the wipe and baking steps as part of regular post-use cleaning the first few times you use the pan.
How do they get a nonstick coating to stick to the pan if it doesn’t stick to anything?
By using a chemical that sticks to both the nonstick coating and the pan, called an adhesion promoter. Perfluorooctanoic acid (PFOA) is the adhesion promoter of choice these days. Unfortunately, it’s rather toxic, but according to the US Environmental Protection Agency (EPA), it’s used only as a processing aid during manufacturing, and manufacturers claim that it’s not present in the finished products.
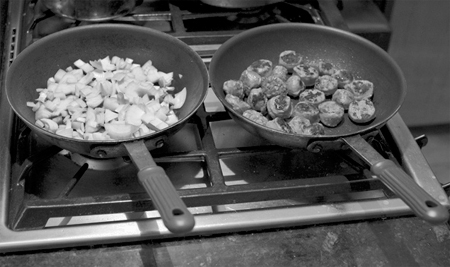
Buy more than one frying pan so you can cook different components of a dish at the same time.
What’s the deal with pans made of different metals or with various combinations sandwiched together? It has to do with the differences in thermal conductivity (how quickly heat energy moves through a material) and heat capacity (how much energy it takes to heat a material, which is the same as how much energy it’ll give off when cooling).
Let’s start with the thermal conductivity of common metals in pans, along with a few other materials for reference.
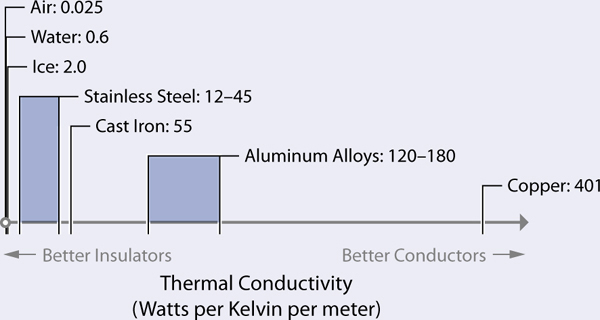
Pans made from materials with a lower thermal conductivity take longer to heat, because the thermal energy applied from the burner takes longer to transfer up and outward. In physics-speak, this is called slow thermal response time. In cooking, pans with low thermal conductivity (cast iron, stainless steel) are “sluggish” in response to changes in heat. Pop them on the burner, and nothing seems to happen for a while. Likewise, if you get them too hot and pull them off the burner, food in them will continue to cook for a while. (If you do find yourself with a pan full of ingredients that are starting to burn, dump the food into a bowl to halt this. Even off the burner, a pan will continue burning its contents.)
Given two pans of identical diameter, one cast iron and one aluminum, the aluminum pan will conduct the heat throughout the pan faster. Here’s a picture of this, using thermal fax paper (hey, not all of us can afford a thermal imaging camera!). Since thermal fax paper turns dark where heated, dark = hot and white = cold.

Cast iron pan on a gas burner = slower heat transfer.
Aluminum pan on a gas burner = faster heat transfer.
If you’re keen to try this yourself, grab some flour, sprinkle a thin dusting of it across the pan’s surface, and heat your pan on the burner for 30–60 seconds, watching where the flour turns brown first.
Notice that the gas burner has a wide radius and the gas jets are directed outward. Result? The center of the pan actually ends up being colder. The cast iron pan shows this well because the heat does not conduct through the material as quickly as it does with the aluminum pan, leading to a cold spot.
Specific heat is important, too. Specific heat is the thermal energy (measured in joules) needed to change a unit mass of material by a unit of temperature, and it differs between materials. That is, it’ll take a different amount of energy to raise a kilogram of cast iron 1°C versus a kilogram of aluminum, because of how the materials are structured at the atomic level. How do common metals in pans compare in terms of specific heat?
Cast iron has a lower specific heat than aluminum. It takes roughly twice as much energy (897 J/kg*K versus 450 J/kg*K) to heat the same amount of aluminum up to the same temperature, and because energy doesn’t just disappear (first law of thermodynamics), this means that a kilogram of aluminum will actually give off more heat than a kilogram of cast iron as it cools (e.g., when you drop that big steak onto the pan’s surface).
It’s not just the thermal conductivity or specific heat of the metal that matters, though; the mass of the pan is critical. I always sear my steak in my cast iron pan. It weighs 7.7 lbs / 3.5 kg, as opposed to 3.3 lbs / 1.5 kg in the case of my aluminum pan, so it has more heat energy to give off. When searing, pick a pan that has the highest value of specific heat * mass, so that once it’s hot, it won’t drop in temperature as much when you add the food.
There are a few other factors you should consider when picking a pan. Poorly seasoned cast iron and non-anodized aluminum pans react with acids, so pans made of those materials shouldn’t be used for simmering tomatoes or other acidic items. Nonstick pans shouldn’t be heated above 500°F / 260°C. And then there are cases where the pan isn’t the primary source of heat for cooking: when you’re boiling or steaming something, the water provides the heat transfer, so the material used in making the pan isn’t important. Likewise, if you’re using an ultra-high-BTU burner (like the 60,000 BTU burners used in wok cooking), the pan isn’t a heat sink so heat capacity isn’t important.
What’s the deal with cladded metals? You know, pans with copper or aluminum cores, encased in stainless steel or some other metal? (Clad means to encase with a covering.) These types of pans are a solution to two goals: avoiding hot spots by evening out heat quickly (by using aluminum or copper), and using a nonreactive surface (typically stainless steel, although nonstick coatings also work) so that the food doesn’t chemically react with the pan.
Finally, if you’re buying a pan and can’t decide between two otherwise identical choices, go for the one that has oven-safe handles. Avoid wood, and make sure the handles aren’t so big that they prevent you from popping the pan in the oven.
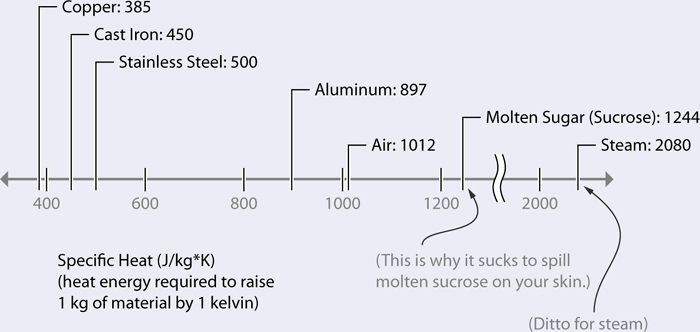
Kitchen Equipment Essentials
If you were to ask me for a shopping list for a brand new kitchen, I’d tell you to snag one of each type of knife and pan I mentioned earlier, a few cutting boards, and then the following list of “everything else.”
The “obvious” parts of “everything else” need merely a mention: a few wooden spoons for stirring, a whisk, bar towels, a kitchen timer, heat-safe metal measuring cups, a microwave-safe glass measuring cup for liquids, and measuring spoons. Then there are items where short comments may be useful to the culinarily uninitiated:
Metal and glass mixing bowls are easy to clean, cheap at commercial kitchen stores, and safe at low temperatures in the oven (for keeping cooked foods warm). Don’t use plastic ones; they’re far less versatile.
A silicone stirring spatula is perfect for scrambling eggs in a pan, folding egg whites into batters, and scraping down the edge of a bowl of cake batter. Silicone is a great material for cooking implements: it’s heat-stable up to 500°F / 260°C.
Tongs should be thought of as heatproof extensions of your fingers: useful for flipping French toast, turning chicken on the grill, and fetching ramekins out of the oven. I recommend spring-loaded tongs with scalloped-edge, heatproof silicone tips.
Kitchen shears are heavy-duty scissors useful for cutting through bones (see page 218) and trimming leafy greens (including as garnishes, such as snipping chives directly above a bowl of soup).
Garlic presses are great for more than garlic, if you get a heavy-duty one made of stainless steel. To use one with garlic, pop in an unpeeled clove, press, and then pull out the just-pressed peel and wash the press right away—5 seconds of work for fresh garlicky goodness. For ginger, slice off a thin piece, squeeze, and likewise, rinse the press immediately.
Immersion blenders, also called stick blenders, have a blade mounted onto a handle and are immersed into a container that holds whatever you want to blend, be it a smoothie, soup, or sauce. Quick to use, even quicker to wash.
Mixers shouldn’t be expensive: the cheapest hand-held mixer will work just fine; only splurge on a stand mixer if you’re baking a lot.
“Cream the butter and sugar” is a common step in recipes. Plenty is written about the microscopic air bubbles that the sugar crystals drag through the butter when they’re creamed. When you see a recipe call for creaming butter and sugar, use room-temperature butter—it needs to be plastic enough to hold on to the air bubbles yet soft enough to be workable—and use an electric mixer to thoroughly combine the ingredients until you have a light, creamy texture.
And finally, three items that are so worthwhile that I’m going to expand on their virtues:
A digital kitchen scale is a must-have item. Dry ingredients compress easily, so the amount of flour in “1 cup” will vary by a surprising amount. Digital scales solve this problem. Weighing ingredients also allows you to measure ingredients quickly. Look for a scale that has a flat surface on which you can place a bowl or dish and that’s capable of measuring up to at least 5 lbs (2.2 kg) in 0.05 ounce or one-gram increments.
Digital probe thermometers are awesome. Get one with a cable so that you can stick the probe into the food you’re cooking and set the controller to beep when it reaches the desired temperature. While timers are handy, time is just a proxy for temperature. Recipes that say “bake chicken for 20 minutes” assume it takes 20 minutes for the internal temperature of the chicken to reach 160°F / 71°C. Using a probe thermometer prevents overcooking: stick the probe in the chicken, set the alarm to beep at 150°F / 65°C, and when the alarm goes off, pull the chicken out of the oven. (Set the alarm a few degrees below the target temperature to allow for “carryover” heat to raise the temperature up the remaining few degrees.)
An electric pressure cooker with rice and slow-cook modes is another great tool. Some chemical processes in cooking require a long period of time at a relatively specific temperature. With pressure, you can cut six hours of cooking down to an hour. Electric pressure cookers are like automatic cars: you don’t get the same control as with an old-fashioned stovetop one, but you also don’t have to learn to press the clutch in or shift gears. Manual pressure cookers do have the advantage of slightly higher pressure and potentially faster heat-up times, plus no electronics to break. Still, if you’re new to them, I’d go electric, at least at first: they can safely be left on unattended without the worry of your kitchen burning down. This handy appliance makes an entire class of dishes (braised short ribs, duck confit, beef stew) trivially easy. Get a unit that also has rice and slow-cook modes (not everything is better “under pressure”); some units have settings for making yogurt and other temperature ranges too.

Do you need to weigh your flour? Yes! I asked 10 friends to measure out, then weigh, 1 cup of flour. The lightest weight reported was 124 grams; the heaviest, 163g. That’s a 31% difference!

Poke a probe thermometer into a quiche or pie to tell when the internal temperature indicates it is done—around 150°F / 65°C is hot enough to just set the egg custard without making a quiche dry.
Depends on whom you ask. The ancient Romans had their modius for measuring liquids, without any standardization, so historically speaking there is no single answer. Shockingly, that’s still true. Even today, we still haven’t reached a global consensus.
The standard US cup—8 US fluid ounces—has a volume of 237 mL. But if you’re talking about a US “legal” cup, as used on nutrition labels, it’s 240 mL. Live in Canada, eh? That’ll be 250 mL, please. Or are we British? An imperial cup is 284 mL. (This leaves me wondering: if I order a pint of Guinness in Ireland, will I get more than I would in the US?)
Then there’s the issue of measuring dry goods by volume instead of weight. The United States Department of Agriculture defines 1 cup of flour as weighing 125 grams; other sources use 137 grams. And the side of the package of flour in my kitchen? 120 grams. Some bakers define it as 140 grams, which is closest to the average weight I get when scooping flour with my 237 mL–based cup.
Differences in measurements like these are just one of many reasons why blindly following a recipe won’t work. Understand what the measurement is trying to control, and adjust accordingly. If you’re not familiar with metric—just how long is a meter?—consider the following “common conversion” table, which Randall Munroe of xkcd (http://www.xkcd.com) has kindly provided. It’s arguably the best conversion guide I’ve seen to date.
P.S. Which weighs more: an ounce of gold or an ounce of feathers? Hint: gold is weighed in troy ounces...


PHOTO BY ANDREW BARANOWSKI
Adam Ried writes the Boston Globe Magazine’s cooking column and appears as the kitchen equipment specialist on the PBS series America’s Test Kitchen. His personal website is http://www.adamried.com.
How did you end up writing for the Globe and working at America’s Test Kitchen?
I didn’t intend to be involved in food for a living. I went to school for architecture. I was quick to realize that a) I never should have been admitted to architecture school, and b) even though I was admitted, it would be a grave mistake for me to pursue it, because to quote Barbie, “Math is hard.”
So I was doing marketing for architecture firms. I spent a whole lot of time cruising cookbooks, making dinners, and having friends over, but the lightbulb hadn’t quite gone off. I would come in every Monday morning after a weekend of cooking, and regale my officemates with the various things that I had tried, and how they worked, and what I wanted to change. One day, someone just looked at me and said, “What are you doing here? Why don’t you just go to cooking school?” I mean, talk about feeling like a doofus. It had never gelled for me, even though my sister had been to cooking school, and my whole family cooks. I promptly quit my job and went to the Boston University Culinary Certificate Program.
At one point, I was in the office of the director, and there was another woman waiting in the office to speak with her. The woman and I struck up a conversation. She had done the program a year or two before me. She was an editor at Cook’s Illustrated, which I read, but again, doofus moment, it had never registered that it was just down the street in Brookline. I started talking to her about what her job was and how she liked it. Then and there, I decided that I wanted to write about food instead of actually cooking it.
I was on the poor woman and just kept after her for a freelance assignment here and there. That finally snowballed into a real job at Cook’s Illustrated. This was in the early 1990s. I remember being in school thinking, “Oh, God, I don’t want to work on the line in a restaurant. That’s too hard. I’m too old. I don’t like the heat. What am I going to do?” It’s one of those incredibly irritating “right place, right time” stories that you never want to hear when you’re on the other end of it.
From the perspective of cooking in the kitchen, what has turned out to matter more than you expected?
This sounds a little geeky, but the thing that I didn’t realize going into it, especially because I don’t have a scientific mind, was that understanding some of the science behind cooking is important. Leavening is still an uphill battle for me to understand. All these recipes rely primarily on baking powder, but sometimes include a little baking soda. Really understanding the acid neutralization in baking soda as an ingredient and what ingredients are acidic is not something that they really teach you in cooking school.
What turned out to be less important?
Not to shoot myself in the foot here, but kitchen tools. You really don’t need every conceivable tool to cook well.
What would you consider to be the few basic tools a kitchen needs?
Certainly a chef’s knife. A serrated knife is also really useful. A good, heavy aluminum core sauté pan is important. You can do a million different things in it: sauté obviously, braise, shallow fry, roast, bake... A good strainer, measuring cups, and spoons are useful. I love bowls that have the measurements on them so you can get the volume as you are mixing. I have an immersion blender that I use a ton. I would not want to go anywhere without my immersion blender. I use the food processor quite a bit. I have a standing mixer, but I could probably get away with a hand mixer for most of what I do. Those are some of the basics.
What’s your overall approach when you look at a piece of kitchen gear?
I do my best to dump all preconceptions. Because I have had years of experience in the area and exposure to the various tools and talked to various experts, I automatically know what I’m looking for. But I have to try and let go of that stuff and do the test as objectively as possible, because I may be surprised.
I remember testing grill pans that had ridges in the bottom, which are supposed to create the visual effect of real grill marks. I’m a big cast iron pan man. I like cast iron, and one of the pans in the line-up was a cast iron grill pan. Even doing my best to drop the preconceptions, I still thought, “It’s going to be fabulous.” In fact, it did heat up reasonably evenly, and it retained its heat. It made good grill marks. But I was surprised by the fact that it was a pain to clean because of the shape and placement of the ridges. Gunk would collect between them. I try not to use detergent and abrasives on cast iron, because I want to care for the seasoning. If I have really stuck-on gunk, I get in there with coarse salt and a stiff brush, and there just wasn’t enough room for the salt to really do its thing. After cleaning it twice, I swore I would never use it again.
What’s your process for going from a first version, or concept, to a final recipe for a Boston Globe article?
I’ve never really shaken the cook’s process, so I probably research and test more than I have to. For instance, I’m currently working on fruitcake for a Christmas holiday column. I start by looking online. I have a whole bunch of cookbooks at home, and I also make liberal use of all the libraries in our area. So I’ll look at as many fruitcake recipes as I can, say 40 or 50, or whatever is practical given my deadline. I will make a little chart for myself, just a quick handwritten thing, of the types and variables in a fruitcake recipe. Then I overlay my own food sensibilities. For example, what color scheme I want, what ratio of batter to fruit and nuts I want, what shapes, and so forth.
I will do what I call “cobbling together” a recipe. I’ll give it a try. I convene my tasters and we taste it and analyze it. There’s no such thing as a casual, thoughtless meal in this house. I want feedback on pretty much every bite that everyone puts in his or her mouth. Then I’ll go back and make it a second time. If I’m really, really lucky, I can nail it on the second try. More often than not, I will make it a third time. It’s a constant process of critique and analysis.
Are there cases where you just get stuck and can’t figure out why it’s not working?
I’m really lucky to have worked in the food world for long enough that I know a lot of people, much smarter than I am, who I can always call with questions. Actually, for one of my first columns for the Globe, I was doing a thing on mangos and I wanted to do mango bread. I was trying to get the leavening right. There was some molasses in there, and some puréed mangos, and this question of baking powder and baking soda came up. I ended up calling a million different bakers to help me understand the role of the baking powder and how it affected the browning.
I’ve been known to scrap recipes if they don’t work the way I want them to after the third or fourth try, or if it doesn’t taste as good as I want it to. But I don’t remember being so stuck in a problem that I wasn’t able to work it out without the help of many smart people.
Has there ever been a case where you’ve published a recipe, and in hindsight, said “oops,” or where the reaction was unexpected?
Oh, God, yes. It’s really difficult to please all of the people all of the time. I remember publishing one recipe early on and when I went back and looked at it a couple of years later, I thought, “What the hell was I thinking? That is just as convoluted as can be.”
Have any of your recipes caught you off guard by how well liked they were?
There was a lemony quinoa pilaf and asparagus with shrimp scampi recipe that I did. I had discussed quinoa off and on with my editor for a while, because I really like it. Now it’s in pretty much any supermarket, but at the point I was writing this recipe it was new to me. People loved it. I got so much positive response from readers on that one.

¼ |
cup (60 mL) olive oil |
3 |
tablespoons (45g) butter |
1 |
medium (100g) onion, finely chopped |
1½ |
cups (280g) quinoa, rinsed |
|
Salt and black pepper |
½ |
pound (225g) asparagus, ends snapped off and cut into 1.5” / 4 cm lengths |
1½ |
teaspoons (2g) lemon zest (about 1 lemon’s worth) |
¼ |
cup (60 mL) lemon juice (about 1 lemon’s worth) |
2 |
pounds (900g) large shrimp, peeled, deveined (if desired), rinsed, and dried |
4 |
cloves (12g) garlic, minced |
½ |
cup (120 mL) dry white wine |
|
Cayenne pepper |
¼ |
cup (15g) minced fresh parsley |
Adjust the oven rack to the center position, place an ovenproof serving dish on the rack, and heat the oven to 200°F / 95°C. In a large nonstick sauté pan set over medium heat, heat 2 tablespoons (30 mL) of oil and 1 tablespoon (15g) of butter. Add the onion and cook until soft, about 5 minutes. Add the quinoa and cook, stirring constantly, until it smells toasty, about 4 minutes. Add 2¾ cups (650 mL) of water and 1 teaspoon (6g) of salt, increase the heat to high, and bring to a boil. Reduce the heat to low, cover, and simmer until the quinoa is just tender, about 12 minutes. Off heat, sprinkle the asparagus over the quinoa, replace the cover, and set the pan aside until the quinoa has absorbed all of the liquid and the asparagus is tender, about 12 minutes. Add the lemon zest and juice, season with black pepper and additional salt, if desired, and stir. Transfer the quinoa to the warmed serving dish, spread it out to make a bed, and place it in the oven to keep warm.
Wipe out the sauté pan with a paper towel, add 1 tablespoon (15 mL) of oil, and set it over high heat. When the oil just begins to smoke, add half of the shrimp and cook them, without moving them, until they begin to turn opaque, about a minute. Quickly turn the shrimp and cook them until they’re fully opaque, about 45 seconds longer, then transfer them to a bowl. Add the remaining 1 tablespoon (15 mL) of oil to the pan, and repeat the process to cook the remaining shrimp. Add the remaining 2 tablespoons (30g) of butter to the pan and place it over medium-low heat. When the butter has melted, add the garlic and cook, stirring constantly, until fragrant, about 45 seconds. Add the wine and a pinch of cayenne and stir to blend. Return the shrimp and any accumulated juices to the pan, add the parsley, season with salt to taste, and stir to combine. Remove the serving dish from the oven, pour the shrimp and its juices over the bed of quinoa, and serve at once.

RECIPE USED BY PERMISSION OF ADAM RIED; ORIGINALLY RAN IN THE MAY 18, 2008, ISSUE OF THE BOSTON GLOBE MAGAZINE