3
Time and Temperature
Chapter Contents
85°F / 30°C: Average Melting Point of Fats
Chocolate, Cocoa Fats, and Tempering
104–122°F / 40–50°C: Fish and Meat Proteins Start to Denature
140°F / 60°C: The End of the Danger Zone
How to Reduce the Chances of Foodborne Illness
141°F / 61°C: Eggs Begin to Set
154°F / 68°C: Collagen (Type I) Denatures
158°F / 70°C: Vegetable Starches Break Down
Recipes
Salt-Roasted Fish with Lemon and Herbs
Buttermilk-Marinated Skirt Steak
Steak Tartare with Poached Egg
Crème Anglaise, Vanilla Custard, and Bread Pudding
Tomato, Herb, and Squid Bruschetta
Sautéed Greens with Sesame Seeds
EVER SINCE CAVEMEN DISCOVERED FIRE AND STARTED ROASTING THEIR DINNER, MANKIND HAS ENJOYED A WHOLE NEW SET OF FLAVORS IN FOOD. Heat transforms food by triggering physical and chemical reactions in the proteins, fats, and carbohydrates present in animal and plant tissues. These reactions change the flavor, texture, and appearance of food in incredibly satisfying and delicious ways.
The temperatures we cook at are only a proxy for heat-related reactions. Regardless of the temperature of your oven, it’s the temperature of the food itself that determines what changes will occur. Both boiling and steaming depend on water for heat, limiting the food’s temperature to the boiling point of water and in turn preventing foods from browning. Sautéing and roasting aren’t limited by water’s boiling point, allowing for higher temperatures and additional reactions.
Controlling the flow of heat into your ingredients and learning the temperatures at which various reactions begin to occur are your best weapons in the quest to conquer the kitchen. Different heating methods change how quickly foods cook, and understanding the key variables of time and temperature will provide the answer to that famous question: is it done yet?
Cooked = Time * Temperature
Cooking involves heat, but what is heat? Why can’t you double the heat and cook things twice as fast? And just what exactly happens to a ball of chocolate chip cookie dough as you bake it?
When you step into the kitchen, you’re unwittingly turned into a physicist and a chemist. As chocolate chip cookie dough heats up in the oven, proteins in the eggs denature (chemistry), water from the eggs and butter evaporates (physics), starches in the flour melt (more physics), and the outside of the cookie turns brown from the Maillard reaction and caramelization (more chemistry). And then you have a cookie!
Water turning into steam and starches melting are changes that physicists call phase transitions: a substance changing from one phase of matter (solid, liquid, gas) into another. These changes are reversible. Steam can turn back into water; fats can resolidify. The caramelization and Maillard reactions that turn cookies brown are chemical reactions: changes in substances that create different sets of molecules. Sometimes reactions are reversible, but usually they’re not. You can’t unburn something! How quickly a reaction happens (it’s never instantaneous) is called the rate of reaction. More formally, the rate is how much of a reaction occurs in a given amount of time.
Here’s the most important concept in this chapter: increasing the temperature increases the rate of reaction. This is basic kinetics, a Law of the Universe. A reaction that happens slowly at one temperature will occur more quickly at a higher temperature, assuming enzymes and any reactants stay unchanged. Because higher temperatures speed up rates of reactions, we get the rule of thumb cooked = time * temperature. The answer to “Is it done yet?” depends on whether enough of the necessary reactions have occurred, and those are based on time and temperature.
The question “Is it done yet?” does have a theoretical answer based on time and heat added. The below dynamic mathematical model includes factors for meat’s thermal conductivity as well as denaturation rates for proteins like actin and myosin. For more, see http://cookingforgeeks.com/book/meatmath/. Remember to cook until medium-rare!

SOURCE: M. A. BELYAEVA (2003), “CHANGE OF MEAT PROTEINS DURING THERMAL TREATMENT,” CHEMISTRY OF NATURAL COMPOUNDS 39 (4).
If you sprinkle sugar onto a hot cookie sheet and bake it in an oven at 320°F / 160°C for an hour, some percentage of it will react—it’ll caramelize—but slowly. Sprinkle the same amount of sugar onto a hotter cookie sheet and bake it at 340°F / 170°C, and the reaction will happen roughly twice as fast, meaning it’ll take only half an hour to reach the same amount of caramelization. This assumes the sugar jumps to those temperatures instantly! A more complete model of cooking includes the time that cold foods take to heat up when put into a hot oven.
Smell, touch, sight, sound, taste: learn to use all of your senses in cooking. Meat cooked to medium-rare will feel firmer and visibly shrink; cooked beyond medium-rare, it’ll shrink further as other types of proteins denature. The bubbling of a sauce as it’s boiled will sound different once the water is mostly evaporated. Bread crust that has had enough browning reactions will smell wonderful, and you’ll see the color shift toward mahogany-brown.
If hotter temperatures speed up reaction times, why not dial the temperature way up and cut cooking times way down? Because other reactions will speed up too, but not at the same ratios. The chocolate chip cookie is a great example: we have water in the interior and browning on the surface. If you increase the temperature too much, the outside of the cookie is going to be fully browned before the center is set. Other reactions will also start to happen; for example, reactions related to burning start to speed up at around 390°F / 200°C. On the other hand, if you set the temperature too low, the cookie will dry out before the outside is done and has the rich flavors you want. Time and temperature are a thermal and chemical balancing act, as we’ll see throughout this chapter.
There are two major aha! points here:
• The most important variable in cooking is the temperature of the food itself, not the temperature of the environment in which it’s being cooked. When you’re roasting a chicken, the temperature of the oven doesn’t determine the rate at which reactions will happen, although it does determine the rate at which the chicken will heat up. Ultimately, it’s the temperature of the chicken itself that matters.
• The temperature of the food determines the rate of reactions, but different reactions occur at different rates, even at the same temperature. Changing the temperature changes the ratio of chemical reactants that are produced. Heat takes time to transfer through foods, and that complicates this process further.
Many interesting changes happen to food when it’s heated, most of which occur in the fats, proteins, and carbohydrates of the food. This chapter is organized around the reactions listed in this chart. It’s useful to see the big picture of temperatures of reactions and temperatures of various cooking techniques—this is one of my favorite charts!
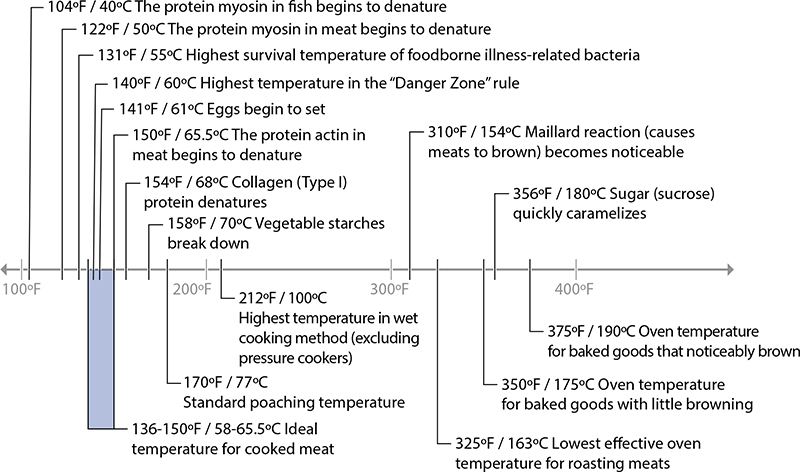
Cooking temperatures, and temperatures at which different reactions occur.
Heat Transfer
We’ve briefly looked at what happens to a chocolate chip cookie as it bakes—proteins denaturing, water evaporating, the outside browning—but how does a cookie actually heat up? Before digging into the heat-related reactions in cooking, we should look at how heat gets transferred into foods in the first place. Cookies are really complicated, so I’m going to talk about cooking steak here, but the concepts are universal.
The idea that you can just cook something like a steak any way you like until its center reaches the desired temperature sounds too easy—there must be a catch. There are a few, actually.
For one, how you get the heat into a piece of food matters. A lot. The center of a steak will reach medium-rare faster when the steak is placed on a hot grill than when it’s roasted in a warm oven. The laws of thermodynamics dictate this: any time there is a difference in temperature between two systems, heat will transfer from the hotter system (the grill) to the colder one (the steak). And the bigger the difference in temperatures between two systems is, the faster the heat will transfer (see chart).
This chart is an oversimplification, of course. It shows only the temperature at the center of the steak and ignores aspects like temperature stalls from evaporative cooling. (We’re also considering a spherical cow here, of course, but notably not in a vacuum.) If we took a cross-section of the two steaks right as their centers reached 135°F / 57°C, we’d see some pretty big differences between the grilled and oven-cooked versions.
This difference in temperature from the center to the outer edges is referred to as a temperature gradient. These two steaks have quite different gradients because the hotter grill transfers heat faster—the bigger difference in temperature results in a steeper “gradient of doneness,” and in this case, an overcooked grilled steak.
If the steak is overcooked, then what’s the appeal of cooking on a grill? It depends on how you like your meats cooked. A nicely cooked steak has an aromatic, browned sizzling surface—say, 310°F / 154°C—and an interior that’s somewhere between rare and well done. If you like your steak cooked rare (125°F / 52°C), you need a steeper gradient of doneness, so use a hotter environment and cook it briefly; if you like steaks cooked until well done (160°F / 71°C), cook them at lower temperatures for a longer time. Most of us like steak cooked to medium-rare (135°F / 57°C) because this produces a texture that has the right amount of tenderness and moisture to be most satisfying.

This temperature rule—higher heat, steeper temperature gradient—is why matching the right cooking temperature for your desired outcome matters. A recipe’s cooking time and temperature need to be chosen to heat the different regions of the food to the right levels. I know, in theory that sounds so simple, but how do you know what to set your oven to? As the saying goes: in theory, there’s no difference between theory and practice; in practice, there is. In practice, it’s best to make an educated guess on time and temperature and take note of whether the insides and outsides of the food are correctly cooked. If the outside is done before the inside—evidenced by a burnt outside or undercooked center—lower the temperature and cook the food longer next time. For baked goods like muffins, try dropping the temperature 25°F / ~15°C and increasing the baking time by 10%; for meats and vegetables, try a 50°F / ~25°C drop and adjust accordingly. For the opposite problem, increase the temperatures by these amounts and check what happens.
Cooking Methods
I’ve written a lot about temperature differences and temperature gradients, but cooking is really about heat transfer. Formally speaking, heat is the transfer of energy between two systems and happens because of differences in their temperatures. I know, that sounds confusing—what’s temperature, then?!—but a quick example makes this simple to understand.
A pot of boiling water has a temperature of 212°F / 100°C. Heating the pot is a transfer of kinetic energy from the burner to the pot, and then from the pot to the water. Adding heat—more kinetic energy—to the boiling water does not change its temperature! The water remains at 212°F / 100°C, even though it’s being heated. The heat turns the water to steam, and that’s where all that kinetic energy is transferred, even though the steam and boiling water are at the same temperature.
Cooking methods that transfer heat using water are called wet heat methods (also called moist heat methods). All other cooking methods are called dry heat methods. (Not to confuse you, but heating the pot of water on a burner is a dry heat method, but heating something inside that water would be a wet heat method because it’s using the boiling water.)
Wet cooking methods don’t involve enough heat to create flavors from caramelization or Maillard reactions. (One exception is pressure cooking, which can set up the necessary conditions while keeping the food moist—see page 308.) You should choose wet cooking methods when you want to avoid those flavors. Steamed vegetables won’t turn brown while cooking, giving you food with less of a flavor change, which is nice for things like broccoli. Sometimes, though, the flavors from browning help a dish. Brussels sprouts are commonly boiled and widely hated. Next time you cook them, quarter them, coat them with something like olive oil and sprinkle them with salt, and then bake them until lightly browned using a broiler set to medium. Cooked this way, they won’t be so widely disliked!
Wet and dry cooking methods can be grouped into three categories based on how they transfer heat: conduction, convection, and radiation.
Conduction
Conduction is the simplest type of heat transfer to understand: it’s what you experience whenever you touch a cold countertop or hold a warm cup of coffee. In cooking, methods that transfer heat through direct contact between food and a hot material, such as the hot metal of a skillet, are conduction methods.
Dropping a steak onto a hot cast iron pan causes thermal energy from the pan to be transferred to the colder steak as the neighboring molecules distribute kinetic energy to equalize the difference in temperature. As the part of the steak that’s touching the pan heats up, that part conducts heat up through the meat to colder regions—again, basic thermal equilibrium.
Different materials transfer heat at different rates—called thermal conductivity—which is why a piece of wood at room temperature doesn’t feel as cold to you as a piece of room-temperature metal. Different pans will conduct heat at very different rates based on the metals they’re made with (see page 46 for more on metals in pans).
The choice of cooking medium also changes conduction rate: hot water will transfer heat roughly 23 times faster than hot air at the same temperature, and 3.5 times faster than oil—that’s a huge difference! This is why hard-cooked eggs cook faster in boiling water or steam than in a hotter dry oven. This is also why humidity can change cooking and baking times—water vapor is still water! Higher humidity means more moisture in air, and more moisture means more heat transfer. (Helium happens to be a decent conductor of heat—about the same as olive oil—just in case you happen to have a tank around. Hydrogen is, too, but I don’t recommend that.)

Oil transfers heat faster than air but slower than water, but it can be heated up way higher than water! This makes it a fast cooking method with the benefit of being hot enough to trigger caramelization and Maillard reactions. (Mmm, doughtnuts!)
Convection
Convection methods of transferring heat—baking, roasting, boiling, steaming—all work by circulating a hot material against a cold one, causing the two materials to transfer heat by conduction. Technically, convection is a type of conduction cooking, but only indirectly; it’s the recirculation of a material that transfers heat into foods.
Foods themselves can transfer heat from one region to another via convection. Cake batters, before they’re set, will slowly flow, with the warmer outer regions rising and curling in toward the center.
In dry cooking methods, hot air, oil, or bare metal transfers heat. Cooking fries in a deep fat fryer relies on convection of oil to heat the cold potato; cookies in an oven are baked primarily by the circulation of hot air heating the cold dough. Convection ovens, which have a blower inside to move air around more quickly, heat up foods about a quarter faster and remove cold spots in the oven. (Technically, all ovens are convection ovens, in the sense that heat is transferred by the movement of hot air. Adding a fan just moves the air faster.)
In wet cooking methods, such as boiling and steaming, water transfers heat. Poached eggs and steamed buns are cooked by water or water vapor raising the temperature of the food’s surface. (All wet cooking methods are considered convection because water and water vapor are always moving.) It’s easy to overcook foods with wet methods because of the higher rate of heat transfer. For lean, tender cuts of meat and fish, take care that the food doesn’t get too hot when cooking in liquid! Keep your liquids at a gentle simmer, between 160°F / 71°C and 180°F / 82°C.
What’s the difference between steam and water vapor?
Oh, language, how tricky you can be. Water vapor is easy: it’s water in its gaseous form, invisible to the naked eye. Steam, though, can mean either water vapor or condensed water droplets suspended in air, the stuff you see “steaming” above a pot of boiling water.
There’s a huge thermal difference between water vapor and the billowing cloud of steam that you see when boiling water. Water as a gas packs a huge thermal punch: it gives off 540 calories of energy per gram of water when it condenses. I would much rather lean my face over a steaming pot of boiling water, where the water has already condensed in the air, than lean into an airstream of water vapor, which would burn my skin as it condenses and transfers its kinetic energy.
Radiation
Radiant methods of heating work by the transfer of electromagnetic energy, typically microwaves or infrared radiation. The warmth you feel when sunlight hits your skin is radiant heat. In cooking, radiant heat methods are the only ones in which the energy being applied to the food can be either reflected or absorbed by the food. Different foods will absorb or reflect radiant heat based on how the energy interacts with the molecules of the food. Microwaves, for example, are absorbed very well by polar molecules like water, but very poorly by nonpolar molecules like oil (for more on molecular polarity, see page 398).
Radiant energy travels in straight lines: from the broiler straight to the food, or possibly reflecting off the walls of an oven or the surface of a reflective cookie sheet. You can use this reflective property to change how something cooks. One technique for baking pie shells uses aluminum foil around the outer edge as a reflector to prevent overcooking the outer ring of crust. If you see one part of a dish cooking too fast and the heat source is radiant, a small sheet of aluminum foil can serve as a heat reflector: a clever “thinking like a geek” hack.
Darker colors absorb more radiant heat, which is why winter jackets are black and summertime outfits are lighter colored. Darker cookie sheets will absorb more radiant heat and then conduct that energy through the material to the underside of the cookies, causing them to bake faster on the bottom. If the bottoms of your cookies are coming out overcooked, drop your oven temperature by 25°F / ~15°C.
Gas ovens rely on circulating hot air that heats up the oven walls; those hot oven walls then radiate heat. If you have an electric oven, the heating element gives off a lot of radiant heat directly—straight from the bottom of the oven. This isn’t good for recipes that expect the heating to be done primarily by air convection—the undersides of the foods will heat too quickly! This is why I strongly recommend you always leave a pizza or baking stone on the bottom rack of an oven: it will absorb the radiant heat and diffuse it, giving your oven a much better heat profile. (See page 35 for notes on calibrating your oven.)
What’s the difference between gas and electric ovens?
Well, other than the source of heat, they bake things slightly differently, for a subtle reason: they handle humidity differently. Gas ovens usually (not always) vent the combustion byproducts—carbon dioxide, water vapor—through the oven chamber. This means they’re injecting a constant stream of moisture around the food being cooked. They’re also constantly venting the air from the oven chamber to the outside—the gas coming in has to displace something!
Electric ovens, on the other hand, start out much drier—there’s no gas being combusted and generating water vapor—but many models won’t vent air out as foods bake and give off moisture, so they end up getting more and more humid as the water in foods evaporates during cooking.

Cooking methods listed by type of heat transfer. |
|||
Conduction |
Convection |
Radiation |
|
Description |
Heat passes by direct contact between two materials |
Heat passes via movement of a heated material against a colder material |
Heat is transferred via electromagnetic radiation |
Example |
Steak touching pan; pan touching electric burner |
Hot water, hot air, or oil moving along outside of food |
Infrared radiation from charcoal |
Uses |
Sautéing |
Dry heat methods: |
Microwaving |
*Frying is a dry-heat method because oil, while a liquid, isn’t wet—there’s no water in it. |
|||
Combined methods of heat transfer
Cooking techniques invariably combine multiple methods of heat transfer. A cookie in an oven bakes because of hot air (convection), the pan heating up and cooking the underside (conduction), and some amount of radiant heat from the hot oven walls.
Some foods, like cookies, turn out better when heat is transferred into them from certain directions at certain rates. Sometimes it’s obvious. You can avoid cookies burning on the bottom by reducing how much heat is transferred to them from below: either use a different cookie sheet that doesn’t transfer heat as quickly (lighter color, different metal) or line the cookie sheet with parchment paper. Other dishes aren’t always so easy to figure out. Pies and custards, for example, do better when heat is transferred into them from the bottom up; this prevents the top from setting and then cracking from the bottom’s subsequent expansion. Setting them in a hot water bath or directly on top of a baking stone will help.
Here are some thoughts for choosing cooking techniques:
Use multiple cooking techniques.
My favorite lasagna starts out being baked (convection) to heat the center and melt the cheese, and then finishes with broiling (radiant) to give a delicious browned top. If you’re cooking by intuition, use cooking techniques that heat the various regions of the foods to the right target temperatures, mixing and matching as needed.
Match the cooking technique to the shape of the food.
In roasting and baking, heat comes from all directions, which is great for roasting whole chickens. In searing and sautéing, however, heat is transferred from only one side, which is well suited for flat fillets of fish or chicken breasts. This is why we flip pancakes (stovetop; heat from below) but not cakes (oven; heat from all directions).
Substitute similar cooking techniques for ones you can’t do.
If you don’t have a grill (radiant; heat from below), try using a broiler (radiant; heat from above) because it’s the closest comparable technique (flip the food over, too—the direction the heat enters a chicken from will change things!). If you don’t have a pressure cooker, use a pot full of liquid—both are wet cooking methods.
Experiment by switching up techniques.
Pancake batter, when deep-fat fried, produces something a lot like a funnel cake. Eggs cook just fine on top of rice in a rice cooker—add the egg on top just after the rice is done cooking. Chocolate chip cookie dough can be cooked in a waffle iron. And pears poached in a dishwasher? Why not? (See page 326.) It might be unconventional, but heat doesn’t have to come from a traditional cooking appliance!

Temperature of Cooking Environment
Frying is fastest; baking is slowest. This plot shows the amount of time it took to heat the centers of uniformly sized pieces of tofu from 36°F / 2°C to 140°F / 60°C for each cooking method. Cooking pan material (cast iron, stainless steel, aluminum) and baking pan material (glass, ceramic) had only minor impact on total time for this experiment with tofu, but for other foods like cookies it will make a difference.
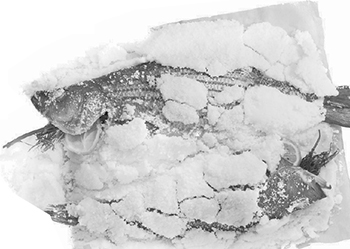
Salt can also be used as a “heat shield” on food during cooking. Packing foods such as fish, meats, or potatoes in a mound of salt protects the outer surface of the food; the salt ends up taking the brunt of any radiant heat and also cuts down on evaporation, keeping the food moister. If a whole fresh fish isn’t easy to get, try this with other foods, such as pork loin (add spices—black pepper, cinnamon, cayenne pepper—to the salt mixture) or even entire standing rib roasts.
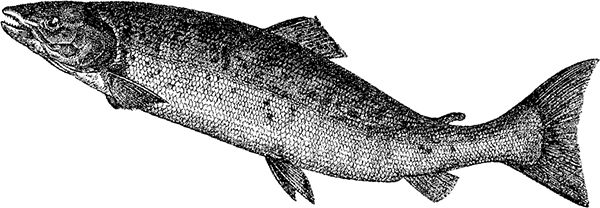
Snag a whole fish, such as striped bass or trout, in the range of 2 to 5 pounds / 1 to 2 kilos. Clean and gut the fish, rinse it thoroughly, and add lemon slices and herbs (try fresh dill or fresh oregano) in the center cavity. Leave the skin on; it’ll prevent the fish from getting too salty.
Prepare a salt mixture by adding just enough water to a few cups of kosher salt so that it forms a workable paste. You can use egg white instead of water—useful if you’re covering something with a more complicated shape than fish.
Line a baking pan or cookie sheet with parchment paper (this’ll make cleanup easier), and add a thin layer of the salt mixture. Place the fish on top of the salt, and then pack the rest of the salt around the sides and top of the fish. You don’t need to bury the fish too deeply. Go for about ½” / 1 cm of salt on all sides—enough to take the brunt of the surface temperature, but not so much that the center of the fish takes too long to actually reach temperature.
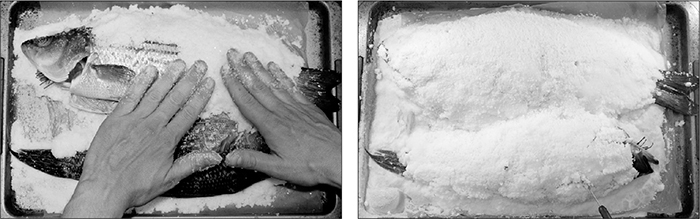
Bake the fish in an oven set to 400–450°F / 200–230°C for about 20–30 minutes, using a probe thermometer to check that the internal temperature reaches 125°F / 52°C. Remove the fish from the oven and let it rest 5–10 minutes (during which carryover will bring the temp up to 130°F / 54°C). Crack open the salt crust, brush off any salt sticking to the surface of the fish, and serve.
85°F / 30°C: Average Melting Point of Fats
All generalizations are false, including this one.
—Mark Twain
Here we are, at the first temperature range of the chapter. There’s one housekeeping detail I need to take care of first: the temperatures ranges for chemical reactions in foods are very, very tricky to define due to rate of reaction. For practical purposes, the temperature ranges given in this chapter are those that are applicable in cooking. (Collagen, which we’ll cover later, can technically denature below 104°F / 40°C, but you wouldn’t want to eat the results.) For fats, I’m generalizing their melting point. It’s a false generalization, but it’s still useful to understand the average for common fatty acids: many fats melt above room temperature but below body temperature. (This is one reason why one chocolate maker can say, “Melts in your mouth, not in your hand.”)

Fats and oils are essential to food. They add flavor, like salted butter on top of great bread or a good olive oil on salad. They bring texture, giving cookies and muffins the ability to crumble and ice cream a luscious mouthfeel. And they’re used to cook foods, conducting and convecting heat in sautéing and frying. But what is fat? How does it work in cooking and in eating? And what the heck are saturated, omega-3, and trans fats? To answer these questions, we need to start with a few simple chemistry building blocks.
Fats and oils—which are simply fats that are liquid at room temperature, so I’ll just say “fats” from now on—are a type of lipid called triglycerides. The word triglyceride describes the chemical structure of the lipid, and it’s this chemical structure that determines a fat’s properties. Tri is three, but three of what? It’s not three glycerides, but rather one glyceride that has three certain things attached to it. A glyceride starts with a molecule of glycerol (the molecule gets a new name when it’s attached to certain things), so the first part of understanding fat is to look at a glycerol molecule.
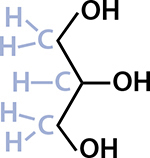
A molecule of glycerol with all the atoms drawn.
This is what chemists call a line structure. You needn’t be a chemistry geek to understand this! The Os stand for oxygen and the Hs are hydrogen. The lines show where electrons are being shared between the atoms. Every time a line bends, or ends by itself (which doesn’t happen in glycerol), that means there’s a carbon atom, and usually some hydrogen atoms too.
Carbon-based life forms contain a lot of carbon and hydrogen—about a fifth of you is carbon and a tenth is hydrogen! Those two elements are so common that line structures don’t show them when they’re by themselves. (Chemists, like cooks, have their equivalent of assuming you’ll know to add a pinch of salt.)
I’ve tinkered with the way this line structure is drawn; normally the shaded parts aren’t there. They show the carbon and hydrogen that a chemist would infer from how the lines are drawn. Carbon always has four bonds, so that’s why the middle C only has one hydrogen atom hanging off of it. Glycerol, the first building block in fats, has the molecular formula C3H8O3—three carbon, eight hydrogen, and three oxygen atoms—so counting all the Os, Hs, and Cs in the diagram will add up to that. (The molecular formula doesn’t tell you anything about the layout of the atoms, though!)
So that’s the first building block in the chemistry of fats: a glycerol molecule, holding onto three certain somethings. In fats, those somethings are three different fatty acids—chains of carbon atoms with a particular acid on one end (carboxylic acid) that happens to attach to those OH points in glycerol. It’s pretty simple to understand looking at a picture, so here’s what one of the common ones, oleic acid, looks like.
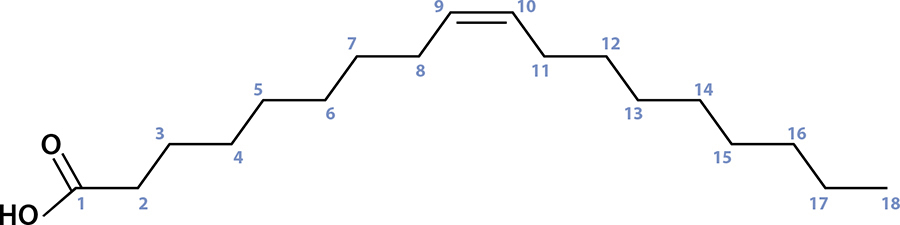
Oleic acid is a carbon chain, 18 carbons long, and has one double bond between the 9th and 10th carbon atoms.
Fatty acids are simple molecules with only two variables: how long the carbon chain is and if any of those connections are doubled up. Oleic acid has 18 carbon atoms (count ’em!) with a double bond between the 9th and 10th carbon atoms; you can see where one of the lines is drawn twice. A double bond occurs when the bond between one carbon atom and the adjacent one uses four electrons instead of two. If we were to add a hydrogen atom there, that double bond would become a regular bond, which would change the fatty acid. (In this case, oleic acid would become stearic acid.)
These double bonds are the secret to understanding fat. Saturated and unsaturated fats, omega-3 and omega-6 fats, trans fats, even the melting points of fats: these are all determined by where and how many of those double bonds there are.
Now you know the two building blocks of fats! Three fatty acids, plus a glycerol molecule, snap together to make up fats. (They happen to throw off a water molecule when bonding together—that’s why the diagrams are slightly different.)
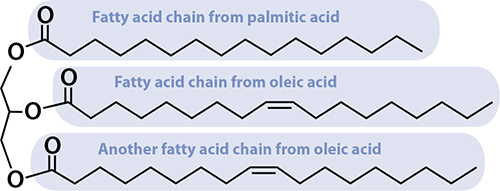
Fat is three fatty acids attached to a glycerol molecule. This one is common in olive oil, making up about 20–25% of the fat in it, and is polyunsaturated.
There are a few dozen common fatty acids, usually ranging between 8 and 22 carbons long and with 0 to 3 double bonds. Any given fat molecule can be a combination of a few dozen different fatty acids, meaning there are hundreds of possible variations of fat molecules. This is what creates so many complexities in fats!
Now that we’ve got the chemistry primer out of the way (fortunately, there’s no quiz), we can answer all the questions that have always bugged me about fats:
What’s the difference between saturated and unsaturated fats?
Fatty acids that have no double bonds between carbon atoms are called saturated fatty acids. They’re saturated with hydrogen atoms; there’s no way to shove more in. Palmitic acid, pictured above, is saturated. If a fatty acid has just one double bond, it’s called monounsaturated—it’s possible to shove exactly one hydrogen molecule into the fatty acid, right where the double bond is. Oleic acid, as you’ve seen, is monounsaturated. Fatty acids with two or more double bonds in the chain are called polyunsaturated. The same definition applies for fats: the example fat pictured has two double bonds in it, making it polyunsaturated. When it comes to health, unsaturated fats are usually better than saturated, but not always. There are good saturated fats and bad unsaturated fats. Plants usually create unsaturated fats, but not always (coconut oil, I’m looking at you); animals usually create saturated fats, but not always.
What determines the melting point of a fat molecule?
Melting point is determined by the shape of the fat molecule, which you can’t exactly see in the line structures, and how the molecules pack together. The shape is related to how many double bonds there are. Saturated fatty acids are extremely flexible—they can bend and pivot around each of the carbon links—and they normally stretch out into a straight line that easily stacks together to form solids. Oils have more double bonds, which can’t pivot, so they’re more “bent out of shape,” which makes it harder for them to pack together. More double bonds = less saturated = lower melting point = more likely to be oil. How the molecules pack together also makes a huge difference. Triglycerides can solidify into three possible crystalline structures, each with its own melting point. (There are also some technical differences related to isomerization.) These different crystalline structures are the key to good chocolate, which we’ll cover in a few pages.
What’s an omega-3 fatty acid? Or omega-6?
This is awesome to understand, given all the talk about their health benefits. Omega-3 fatty acids have a double bond at the third from last carbon atom (on the side opposite from the part that attaches to the glyceride). That’s it. Since there’s at least one double bond, they can’t be saturated fatty acids, by definition! Omega-6 is, as you’d imagine, a fatty acid that has a double bond at the sixth from last carbon atom. Oleic acid is an omega-9 fatty acid: try counting nine atoms in from the right on the diagrams. Your body needs omega-3 and omega-6 fatty acids but can’t create them from other fatty acids, which is why they’re called essential. (That doesn’t mean more is better!)
Then what’s a trans fat?
Trans is Latin for “across” or “opposite,” as opposed to cis, which is Latin for “same.” A trans fat is one where the carbon connections are on opposite sides of a double bond. Cis fats have the carbon connections on the same side of the double bond, and they’re super common—it’s how nature makes fatty acids that have double bonds. (Gut bacteria in animals actually convert some cis fat to trans fat, but not a lot—so trans fat does naturally occur. Dosage matters!) If you start with polyunsaturated fats and hydrogenate them—yes, this is the hydrogenated fat that shows up on ingredient labels, patented way back in 1902 by a German chemist—then you’re shoving hydrogen atoms into the fatty acids, changing some of the double bonds to regular bonds. This increases the melting point, making the fats solid at room temperature, which prevents them from migrating around the food. (Fun trivia: the name “Crisco” comes from crystalized cottonseed oil.) Its higher melting point is why we use butter instead of oil in baked goods; hydrogenating fats stiffens them up, making them suitable for a broader range of applications. But it’s also possible to make trans fats during hydrogenation because some processes used to add hydrogen atoms can also relocate existing ones. When this happens, a trans fat is created, and that fat has a structure that can stack on top of other trans fats. In large quantities this leads to health issues. (The molecules are “bent out of shape” in a way that happens to fit together.)
There’s one complication in the science of fat for cooks in the kitchen: the fats in animals and plants are mixtures of different types of fat molecules. If you had a container of just fats made of oleic acid (olive oil is mostly oleic acid), it would melt at exactly 41°F / 5°C. But there are other fatty acids in there, which is why a bottle of good olive oil turns cloudy but doesn’t solidify when stored in the fridge—some of the fats will solidify, while others will remain liquid.
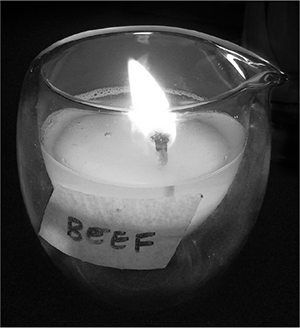
A candle made from a wick dropped in rendered beef fat. Beef fat is mostly stearic and oleic fatty acids, so it’s solid at room temperature. Fat is a great energy source!
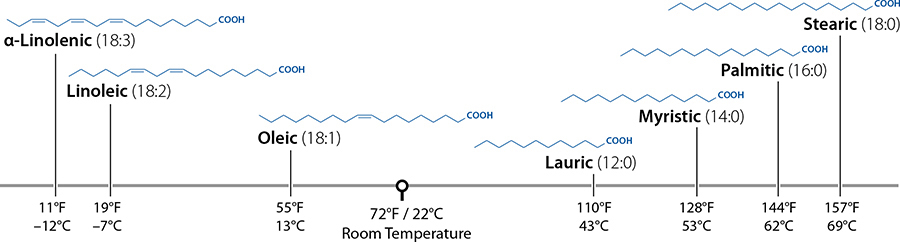
A few common fatty acids and their melting points—notice the much higher melting points for saturated fats (ones that have no double bonds, shown as “:0”) and that longer chains have higher melting points.
Why do some things melt and other things burn?
It depends on the properties of the compounds on hand. Melting is a physical change—a phase transition from solid to liquid that doesn’t change the molecular structure. Burning, on the other hand, is a chemical change (usually combustion or pyrolysis). Some substances melt and then burn, others will burn before melting, and yet others may or may not melt or burn. Foods are almost always mixtures of substances, making this more complicated. Take butter: as it’s heated, the fats melt first, and then at a higher temperature the milk solids burn.
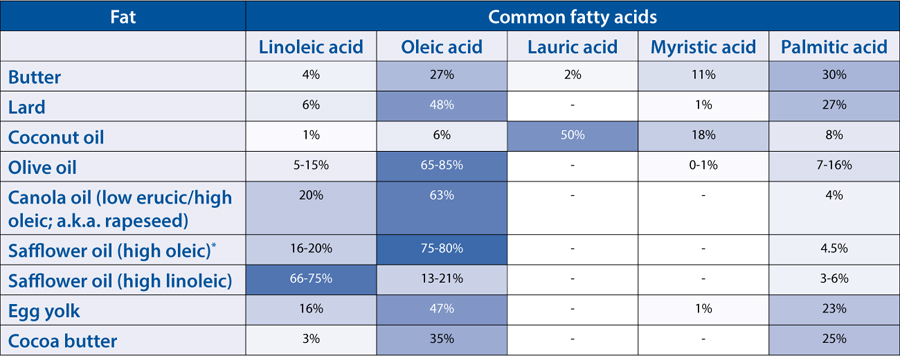
* Different varieties of the same plants can produce different fatty acid profiles. For example, safflower oil comes in two varieties: high oleic, which is used for cooking, and high linoleic, which is used in paints (and is similar to linseed oil). Some oils use different names to distinguish the varieties—canola is a low erucic acid variety of rapeseed, given a different name by industry. Growing conditions will also change the fatty acid composition.
Butter
Butter is fascinating stuff. Unlike other culinary fats, butter isn’t pure fat. It’s a mixture of milk fats (80–86%) and water (13–19%), where the water contains proteins, minerals, water-soluble vitamins, and any added salt. Butter’s remarkable flavor comes from this unlikely combination of water mixed into fat, made possible because of how the glyceride molecules in fat surround water droplets.
Butter is also remarkable for its melting temperatures. In the fridge, more than two-thirds of the fats are solid; left out on the counter on a warm summer day, only a third of the fats remain solid. This mixture of solid and liquid fats makes butter the only natural fat that’s plastic—deformable and spreadable while retaining its shape—at room temperature. The fatty acids in butter (mostly myristic, oleic, and palmitic acids) are present in different combinations of fat molecules that melt at temperatures between –11°F / –24°C and 164°F / 73°C; based on the normal composition, butter softens around 68°F / 20°C and melts at about 95°F / 35°C.
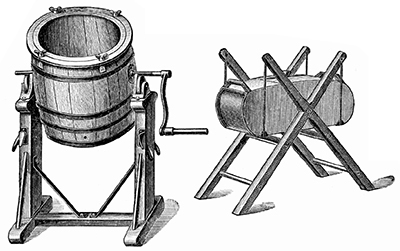
Making great butter is a lot more complicated than merely separating the fats from the cream by churning. Changes in the size of the fat globules in the butter, based on how quickly the cream is cooled during pasteurization, will change the texture, as does the amount of water left in the churned butter. The fats in cream can also vary in their fatty acid composition. Different ratios of fatty acids in cream will change the melting properties of the fats in the cream, and in turn create butter that has different hardness. (The ratio of the fatty acids depends on the cow’s diet; cream from grass-fed cows has less saturated fat and a lower melting point.) It’s worth making your own butter once to understand the process, but in practice, buying butter is far easier and more economical. But which type? And how to store it? Here are a few tips:
To see a video of how butter is made, see http://cookingforgeeks.com/book/butter/.
Salted and unsalted butter
Salted butter is great for eating—hopefully you know the joy of slathering a hearty pat of room temperature, salted butter onto a slice of freshly baked bread. Because the amount of salt in salted butter can vary (1.5–3%), though, it’s better to use unsalted butter in cooking so that you can add in a known amount of salt. When you see “butter” in a recipe, including in this book, use unsalted butter by default. Salted butter has one other benefit: salt inhibits bacterial growth, making salted butter less likely to spoil when stored at room temperature.
Sweet cream versus cultured butter
Butter was traditionally made using cream from milk that had been left out to separate; by the time the cream had floated to the top, it had fermented and gone slightly sour. (Leave it out longer, and you get sour cream!) Most Americans are used to sweet cream butter that’s made from cream that hasn’t fermented; in Europe and elsewhere, the cream is allowed to partly ferment, thus creating cultured butter.
Storing butter
The ideal butter is firm enough to retain its granular structure but soft enough to be spreadable, having a texture technically described as waxy. This simply isn’t possible with butter stored in the fridge. It’s safe to store salted butter on the counter; use a container that blocks light and limits airflow, and consume it within two weeks to avoid rancidity. (Oxygen can insert itself into the fatty acid, leading to butyric acid—which gets its name from rancid butter!) Unsalted butter should be kept in the fridge and left to warm for an hour before use; this step is essential for proper mixing with sugar when you are baking.
Baking with butter
Solid butter will mix differently into doughs and batters than melted butter will. Mixing solid butter with sugar will create small air bubbles; if melted fat is creamed with sugar, it’ll coat the sugar granules instead of trapping small air bubbles. Melting butter also separates out the water, allowing it to form more gluten than it would otherwise (see page 249). Also, different brands of butter can have slight differences in the amount of water present. This can impact baked goods like pies; try using higher-fat butter for buttery baked foods.
Homemade sour cream
Cultured butter starts with slightly soured cream—but what if you let it ferment even longer? You’d end up with sour cream! The flavor and creaminess is unmatched by what you can buy, and it’s incredibly easy to make.
Snag a container of heavy cream from the store, open it, and add a spoonful of plain unflavored yogurt that has active bacteria in it. Close the container and briefly shake it. If you have a slow or pressure cooker with a yogurt mode, place the container in the cooker, submerged in an inch of water, and ferment it for 12 hours; otherwise, culture the cream by leaving the container on your kitchen counter for a day or so. Store the sour cream in the fridge and use it within a week.
Chocolate, Cocoa Fats, and Tempering
Mmm, chocolate. Sweet, bitter; sometimes nutty, fruity, or spicy. It brings joy, pleasure, and for some, relief from negative moods. Any way you describe it, it’s delicious. No, really, scientifically, it’s delicious. Every single culture that’s ever been introduced to chocolate has accepted and desired it, a feat perhaps envied by bacon.
Part of what makes chocolate great is its texture and the way it snaps. That texture comes from how the sugar and fats in chocolate are mixed together (conched) and how cocoa fats are melted, cooled, and tempered—controlling the specific crystalline structure of the cocoa fats as they set during cooling. Tempered chocolate is used on the outside of chocolate truffles, for dipping fruits like dried apricots or fresh strawberries, and for covering baked goods and confections. It’s amazing that changing one thing—the way that triglycerides are stacked together—can change so much!
To understand tempering, we need to look at what chocolate itself is. Chocolate, at its simplest, is made up of cocoa butter and cocoa solids, both derived from the seeds of the Theobroma cacao plant. Sugar is added to sweeten it; sometimes other ingredients like milk and vanilla are also added for flavoring. Cocoa butter—really, cocoa fat—consists of triglycerides from the plant’s seeds, mostly made up of stearic, oleic, and palmitic acid (which is very close to butter’s composition, hence the similarity in melting points!). Cocoa solids are what’s left over after the fat is removed; ground up and processed, they become cocoa powder, a rich dark powder that brings almost all of the flavor to chocolate. Dutched cocoa powder is processed to improve solubility (it’ll mix better—it’s more hydrophilic) and alter the flavor. (The Dutching process raises the pH of cocoa powder, which is why Dutched cocoa powder shouldn’t be substituted for regular cocoa powder in baked goods that rely on it to react with baking soda; see page 273 for more).
M&Ms were developed in 1940 by Frank C. Mars and his son, Forrest Mars, Sr. During the Spanish Civil War (1936–1939), Forrest saw Spanish soldiers eating chocolate that had been covered in sugar as a way of “packaging” the chocolate to prevent it from making a mess.
Cacao versus cocoa is a bit of an etymological mystery. In Spanish, it’s always cacao, but somewhere along the way the metathesis cocoa entered the English language—perhaps in 1755 through dictionary maker Samuel Johnson, who had an entry for cocoa (and a note, “more properly written cacao”).
These days, in English, cacao is usually used to describe the plant and any unprocessed parts from it, and cocoa is used to describe products derived from the dried and fermented seeds. As an ingredient, cocoa can also refer to cocoa powder under US definitions, to the great frustration of Spanish translators.
When chocolate is melted and tempered, it’s the cocoa fats that actually melt. Cocoa solids don’t melt, so it’s not technically accurate to say “melting chocolate.” You temper chocolate by melting and then selectively solidifying the fats in cocoa fat. It can be an intimidating and finicky process. The traditional method is to heat the chocolate above 110°F / 43°C, then cool it to around 82°F / 28°C, and then reheat it to between 89°F / 31.5°C and 91°F / 32.5°C. Once it’s at this temperature, you must perform a thermal balancing act: too warm, you lose the temper; too cold, it hardens. Making great chocolate requires a great understanding of temperature, whether you use a good thermometer or careful observation (~90°F / 32°C happens to be just about the temperature of your lips).
But where do these temperatures come from? Cocoa fat can solidify into a crystalline structure in six possible different forms, based on how the fatty acids in the triglycerides are arranged, and each one of those forms melts at a slightly different temperature. The key to tempering is in changing how the fats crystallize; once melted, they can recrystallize into any of the six forms. It’s for this reason that tempering works at all. Tempering coerces the fats to solidify into the desired structure; in a properly tempered chocolate 3–8% of its mass consists of “good” cocoa fat crystals.
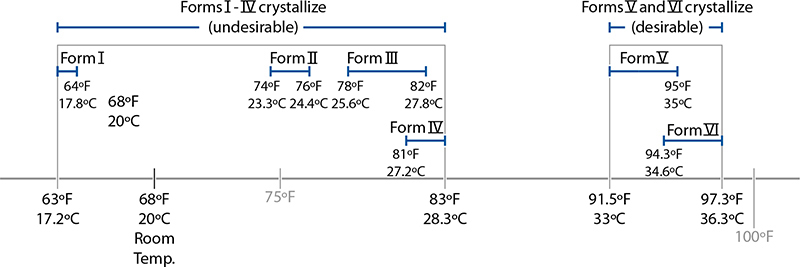
Melting points of the six polymorphs of cocoa fat.
Good cocoa fat crystals come in two forms, called Form V and Form VI. (The standard classification comes from a 1966 research paper; other researchers call these two forms beta2 and beta1 crystals.) These two versions can crystallize into a tighter grid, creating a firmer structure that gives chocolate a pleasing smoothness and firm snap when broken. (This has to do with the shape of the triglycerides of Forms V and VI, which can pack together more tightly than the other forms.) The other four crystalline structures, Forms I–IV, lead to a softer, chewier texture.
Chocolate can go bad (the horrors!) if exposed to extreme temperature swings, which will slowly convert the good cocoa fat crystals to Forms I–IV. Such chocolate is described as having bloomed, having a splotchy appearance and a gritty texture. Blooming happens because about a quarter of the cocoa fat is still liquid at room temperature, and with subtle changes in temperature over time those liquid fats can migrate to the surface, recrystallizing the good fats in the process. (If the entire bar just crumbles up like chalk, then the sugar has bloomed from moisture. Melt the whole bar and retemper it, and store it in a drier place next time.)
Like most natural fats, the fats in cocoa butters are a mix of different types of triglycerides (mostly made up of stearic, oleic, and palmitic acids). Plus, the T. cacao plants don’t all grow exactly the same. Chocolate from beans grown at lower elevations, for example, will have a mixture of fats with a slightly higher melting point than chocolate from beans grown at higher, cooler elevations. Still, the temperature variances are relatively narrow, so the ranges used here will generally work for dark chocolates. Milk chocolates require temperatures about 2°F / 1°C cooler; the additional ingredients affect the melting points of the different crystalline forms. When looking at chocolate for tempering, make sure it does not have other fats or lecithin added because these ingredients will also affect the melting point—more than about 0.5% lecithin will greatly slow down the tempering rate.
Luckily for chocolate lovers worldwide, chocolate has two quirks that make it so enjoyable. For one, the undesirable forms of fat all melt below 90°F / 32°C, while the desirable forms noticeably melt around 94°F / 34.4°C. If you heat the chocolate to a temperature between these two points, the undesirable forms melt and then solidify into the desirable form. The second happy quirk is a matter of simple biology: the temperature of the inside of your mouth is in the range of 95–98.6°F / 35–37°C, just above the melting point of tempered chocolate, while the surface temperature of your hand is below this point.
Traditional tempering works by melting all forms of fat in the chocolate, cooling it to a low enough temperature to trigger nucleation formation (i.e., causing some of the fat to crystallize into seed crystals, including some of the undesirable forms), and then raising it to a temperature high enough to melt Form I–IV crystals but cool enough for Forms V–VI to crystallize. This three-temperature process requires a watchful eye and, during the second and third steps, stirring to encourage the crystals to form while keeping them small.
What causes seized chocolate?
Assuming you haven’t been caught smuggling chocolate between countries, seized chocolate is what happens when a small amount of moisture gets mixed into the cocoa solids and fats. Think of what happens when a few drops of water are mixed into dry sand: it clumps up. It’s exactly the same with chocolate. The cocoa solids are like the sand, but instead of being surrounded by air, they’re surrounded by fat. Try pinching some cocoa powder between two dry fingers and rubbing; it’ll be smooth. Add a tiny amount of water and it seizes up; add a bit more water, and it’s back to being smooth. If you get water in your chocolate, you’ll have to mix in more liquid—about 20–40% by weight depending upon the amount of cocoa solids present—for the mixture to be able to flow again. You’ll be stuck with chocolate that won’t solidify, but it’s great for making ganache (see page 281)!
Some tempering methods call for adding chopped-up chocolate at the second temperature point to rapidly seed the chocolate; this also accelerates cooling, which can be useful. It’s also possible to temper small amounts of already-tempered chocolate (bars, not chocolate chips, which won’t be tempered—that’s why they’re cheaper!) by bringing it directly up to ~90°F / 32°C, either with careful control in a microwave (nuke for 10-second intervals, stirring each time, and make sure that temperature doesn’t exceed 92°F / 33.3°C) or in a water bath (see page 339).
To make tempering easier, use couverture chocolate (couverture is French for “cover”); this is chocolate used for covering other foods like fruits or cakes that is easier to temper due to a higher percentage of cocoa fats. In the EU, couverture chocolate must be at least 31% cocoa fat (not cocoa solids!); the US has no legal definition. With more cocoa fats in the mix, it’s easier to get a sufficient quantity to correctly crystallize and give the right metastructure. If you can’t find it, or you enjoy the experimentation process, buy cocoa fat and add 10% by weight to your chocolate as it melts. Make sure you buy cocoa fat and not white chocolate, which is only ~20–25% cocoa fat!

A bar of bittersweet chocolate is typically 54–80% cocoa. Both EU food law and the US FDA’s definition merely lump bittersweet bars in with semisweet chocolate (“not less than 35 percent by weight”), but as a guideline, they’re roughly 30% cocoa fat, 40% cocoa powder, and 30% sugar. When you see a bar of chocolate that says 70% bittersweet chocolate, that’s the amount of cocoa fat and cocoa powder. One manufacturer’s 70% might be 30 / 40% fat/powder; another’s could be 35 / 35%. Because cocoa powder is bitter—cocoa fat tastes something like shortening—a bar made with less cocoa powder and more cocoa butter will taste sweeter, even though both bars are 70%.
Cocoa powder, cocoa fats, and sugar are mixed together in a process called conching. Rodolphe Lindt, a Swiss entrepreneur, developed the conching process based on equipment he’d purchased from a spice mill back in 1879. The mixture is kept warm while being rolled between grindstones for anywhere from 6 to 72 hours, with longer times producing smoother textures by breaking up the sugar crystals and cocoa solids. To see what chocolate was like before Lindt’s improvements, try making your own small sample of unconched chocolate.
In a small bowl, melt 1 tablespoon (9g) of cocoa butter—assuming small pellets—either in a pan of simmering water or the microwave.
Remove the butter from the heat or the microwave and add 2 teaspoons (10g) of sugar and 2 tablespoons (12g) of cocoa powder. Using a spoon, mix thoroughly, stirring for 1–2 minutes.
Unsweetened chocolate is generally not conched (a few premium brands do conche theirs, as the cocoa solids still benefit). If you can’t find cocoa butter, try using 7 parts unsweetened chocolate to 3 parts sugar instead.
If you like, temper the chocolate following the temperature guidelines described in this section. Transfer it to a flexible mold or parchment-paper-lined container and allow it to cool in the fridge.
You’ll notice when tasting this chocolate that the initial flavor is astringent and bitter, followed by a sweeter, possibly floral taste as the sugar dissolves in your mouth. Using superfine sugar instead will give a smoother texture, but the chocolate won’t have the same mouthfeel as a conched bar.
Try experimenting by adding other ingredients—roasted nuts, cinnamon, chili flakes, ginger, cocoa nibs, sea salt, ground coffee beans, mint leaves, bacon. All the flavored bars of chocolate you see at the stores are simple to make!
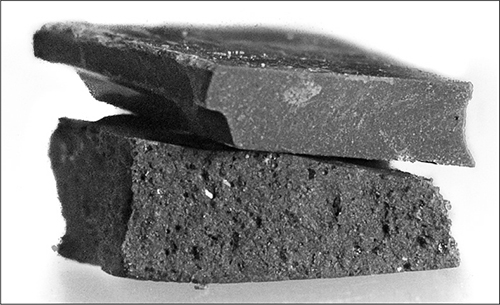
A close-up view of the difference between commercially conched chocolate (top) and this DIY unconched chocolate (bottom).
104–122°F / 40–50°C: Fish and Meat Proteins Start to Denature
Fish and meat, properly cooked, can be the centerpieces of the most amazing meals of a lifetime. Not to sound too much like a carnivore, but some of my fondest food memories involve things like my dad’s holiday turkey or discovering duck confit for the first time. What makes a turkey or duck leg delicious is a combination of six variables: appearance, aroma, flavor, juiciness, tenderness, and texture. As a cook, you steer these last two factors through time and temperature, and proper cooking can lead to amazing tenderness and texture. But to understand how to get there, we have to look at what meat itself is.
Chances are, you haven’t given much thought to the chemical reactions that happen in animal tissues when the animal is slaughtered. The most important change is, quite literally, that the circulatory system is no longer supplying muscle tissues with glycogen from the liver or oxygen-carrying blood. Without oxygen, cells in the tissues die, and preexisting glycogen in the muscle tissue dissipates. The thick and thin myofilaments in the muscle begin to consume the freed glycogen, resulting in the state called rigor mortis—Latin for “stiff death”—the stiffness created by the myofilaments binding together.
Somewhere around 8 to 48 hours later, the glycogen supply begins to taper off and enzymes naturally present in the meat begin to break down the bonds created during rigor mortis (postmortem proteolysis). Butchering before this process has run its course will affect the texture of the meat, as will the levels of glycogen present in the animal at slaughter. Long-term stress on the animal decreases the amount of glycogen in the muscle tissue at slaughter, causing pH changes post-slaughter that lead to faster-spoiling meat. Short-term stress spikes right before death (antemortem) increase glycogen in the blood, accelerating the rigor mortis phase and leading to pale, soft meat or fish that degrades. How a fish is killed will change its texture!

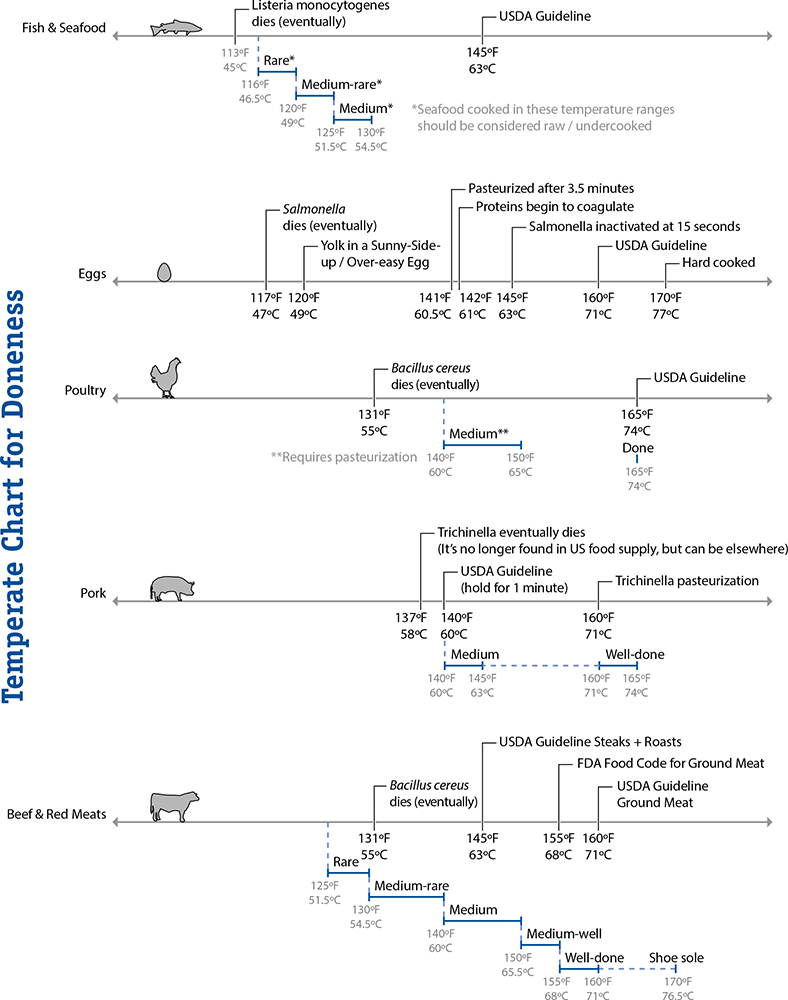
Denaturation temperatures of various types of proteins (top portion) and standard doneness levels (bottom portion).
Differences caused by butchering processes and how animals are handled are quite noticeable. Sensory panels have found that chicken breasts cut off the carcass before rigor mortis was complete have a tougher texture than meat left on the bone longer. (I knew there was a reason why roasted whole birds taste better!)
Other than shopping wisely, you have little control over how your fish and meats are handled before they end up at the store. Extremely cheap cuts of meats injected with brines, or poorly frozen fish, will provide nutrition but won’t have as good a texture. If your dishes are turning out subpar, check the quality of your ingredients and avoid labels that say “marinated” or “flavored.” If you are able to, find a fishmonger or butcher who can source properly handled fish and meats.
The challenge in cooking fish and meats invariably comes down to cooking them at temperatures high enough to kill pathogens but low enough to not overtighten the proteins. Fish and land animals are mostly water (65–80%), protein (16–22%), and fat (1.5–13%), with sugars such as glycogen (0.5–1.3%) and minerals (1%) contributing only a minor amount of the mass.
How much of the proteins are cooked determines a lot about the texture—tenderness versus toughness, dryness—in the cooked item. Proteins in meat can be divided into three general categories: structural, connective, and sarcoplasmic proteins. We’ll ignore the sarcoplasmic ones; they don’t impact cooking like the others. (If you’re into pumping iron, it is these proteins that you’ll be working on.) The structural and connective proteins, however, are of great importance.
Structural proteins (myofibrillar) enable muscles to contract. About 70–80% of the protein in fish is structural; for land mammals, it’s about 40–50%. When heated, proteins in this category set into a gel-like structure, which is why protein can act as a binder—an ingredient that holds foods together. There are several different types of myofibrillar proteins:
• Myosin makes up the majority of myofibrillar protein—about 55%—and is what actually contracts, using adenosine triphosphate (ATP) as a source of energy. Going back to rigor mortis, glycogen is converted to ATP and generates lactic acid as a byproduct. The amount of glycogen in just-slaughtered meat determines how much lactic acid will be generated as myosin burns through the remaining glycogen supply.
• Actin makes up about 25% of myofibrillar protein and binds with myosin; it’s that binding that turns the two into a machine that can contract a muscle.
• Other myofibrillar proteins help hold together the myosin–actin machinery. Some of them—titin, nebulin, and desmin—are broken down over time by calpain enzymes and change the meat’s texture, with notable textural differences happening starting a week after slaughter and continuing for several weeks. This is why aged steak has a more tender texture.
The third category of proteins, connective (stromal) proteins such as collagen, provides structure in muscle tissues like tendons. About 3% of protein in a fish is connective protein—in sharks, 10%! For a mammal, its connective proteins are about 17%. Understanding collagen in cooking is important enough that we’ll cover it separately later in this chapter (see page 195); for now, just know that high-collagen cuts of meat require their own cooking techniques.
The amount of the structural proteins actin and myosin differs by animal type and region, and the actual chemical structures of the proteins differ too—myosin is a family of proteins, and mammals have evolved to have different versions of the proteins from sea creatures. Myosin in fish begins to noticeably denature at temperatures as low as 104°F / 40°C; actin denatures at around 140°F / 60°C. In land animals, which have to survive warmer environments and heat waves, myosin denatures in the range of 122–140°F / 50–60°C and actin denatures at around 150–163°F / 66–73°C.
Dry, overcooked meats aren’t tough because of lack of water inside the meat; they’re tough because on a microscopic level, the proteins have become so tangled together that they become chewy. Applying heat to meats changes their texture by physically altering the proteins on the microscopic scale: as the proteins denature, they loosen up and uncurl. In addition to denaturing, upon uncurling, newly exposed regions of one protein can come into contact with regions of another protein and form a bond, allowing them to link to each other. This process is called coagulation, and while it typically occurs in cooking that involves protein denaturation, it is a separate phenomenon.
Researchers have determined through empirical data (“total chewing work” and “total texture preference” being my favorite terms) that the optimal texture of cooked meats occurs when they are cooked to 140–153°F / 60–67°C, the range that nicely lines up with temperatures at which myosin will have denatured but actin will remain in its native form. In this temperature range, fish is moist but not dry and red meat will typically have a pinkish color with juices that run dark red—although not always.
While hard to prove, the coincidence of the temperature ranges for ideal texture being above myosin’s denaturation point and below actin’s highly suggests that texture is based on the state of those two proteins. This lines up for both fish and mammalian temperatures, and extended hold periods at these temperatures eliminate the possibility that it’s merely a time-and-temperature rate-related effect. So, if you take only one thing away from this section, let it be this: denatured myosin = yummy; denatured actin = yucky. Of course, there are other proteins in play as well, and subtle changes in temperature will change the textural impact as those also denature, but with the vast majority of the muscle tissue being actin and myosin, those two proteins seem to be the key to good texture.
You can improve the texture of some cuts of meat by tenderizing them. Marinades and brines chemically tenderize the flesh, either enzymatically (relying on compounds like bromelain, from pineapple, which breaks down connective tissues; or papain, from papaya, which does more to muscle fibers) or by acting as a solvent (some proteins are soluble in salt solutions). Heat-activated chemical tenderizers are also sometimes injected into packaged meats. Dry aging steaks works by giving enzymes naturally present in the meat time to break down the structure of collagen and the myosin–actin machinery. Dry aging also changes the flavor of the meat: less-aged beef tastes more metallic and “bloodlike,” while more-aged beef tastes gamier. Which is “better” is a matter of personal taste preference. (Perhaps some of us are physiologically more sensitive to metallic tastes.) The red meat you buy at your grocer is typically five to seven days old, whereas some restaurants use red meats aged two to three weeks.
Then there are the mechanical methods for tenderizing, which aren’t actually so much tenderizing as they are cutting up the tough bits into smaller tough bits. Grinding meat for things like hamburgers slices up connective proteins and the myofibrillar structure. Thinly slicing muscle “against the grain”—perpendicular to the direction of the myofibrillar structure—also works, as is done in steak tartare (see page 174) and London broil. Some meat is microscopically sliced by very thin needles, sort of like stabbing it with a fork over and over. As we’ll see in the next section (on food safety), this has some potential issues.
Fishes like salmon and Atlantic char become dry and lose their delicate flavors when overcooked. The trick with poaching fish is to use a low temperature and give it time to cook. Poaching is an easy way to control the rate of heat being applied, and the results are amazingly tasty.
Place a fillet of fish, skin side down, in an oven-safe bowl just large enough for the fish to fit. Sprinkle a generous pinch of salt on top of the fish. Cover it with olive oil until the fillet is submerged. (Using a bowl that “just fits” the fish will cut down on the amount of olive oil needed.)
Place the fish into a preheated oven, set to medium heat (325–375°F / 160–190°C).
For a rare texture—amazing with good salmon—cook for about 15–20 minutes, using a probe thermometer set to beep at 115°F / 46°C. (Cooked rare, fish should be considered raw/undercooked unless pasteurized—see page 331 for more.)
For medium doneness, cook for about 20–25 minutes, until the interior reaches 130°F / 54°C.
Remove the fish when the thermometer goes off, letting carryover bring the temperature up a few more degrees.
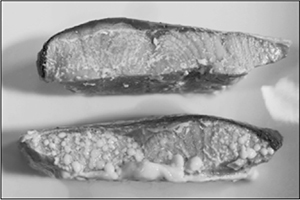
Salmon contains a protein, albumin, that is expressed out of the flesh and leads to an unsightly, curdlike layer forming on the surface of the fish when it’s poached, as shown in the bottom piece in this photo.
Notes
• Try serving the fish on top of a portion of brown or wild rice and spooning sautéed leeks, onions, and mushrooms on top. (A squirt of orange juice in the leeks is really good.) Or serve it with string beans sautéed with red pepper flakes and white rice, with a splash of soy sauce drizzled on top.
• Salmon contains a protein, albumin, that generates a white congealed mess on the outside of the flesh, as shown on the bottom piece in the photo. This is the same protein that leaches out of hamburgers and other meats, typically forming slightly gray “blobs” on the surface. You can avoid this by brining the fish in a 10% salt solution (by weight) for 20 minutes, which will set the proteins. The top piece in the photo was brined; you can see the difference. If you brine the fish, skip adding salt to it when cooking.
Pan searing is one of those truly simple cooking methods that produces a fantastic flavor and also happens to take care of bacterial surface contamination, which we’ll talk about in the next section.
The key to getting a rich brown crust is to use either a stainless steel or cast iron pan, both of which have a higher thermal mass than other types of pans (see page 45 for how quickly different metals transfer heat). I recommend using cast iron for this recipe, as there’s no worry about it warping at high temperatures. When you drop the tuna onto the pan, the outside will sear and cook quickly while leaving most of the center raw.
You’ll need 3–4 ounces (85–110 grams) of tuna per person. Slice the tuna into roughly equal-sized portions, since you’ll be cooking them one or two at a time.
On a flat plate, measure out 1 tablespoon (6g) cumin seed and ½ teaspoon (2g) sea salt (preferably a flaky sea salt) per piece of tuna. On a second plate, pour a few tablespoons (~30 mL) of a high-heat-stable oil, such as refined canola, sunflower, or safflower oil.
Place a cast iron pan on a burner set as hot as possible. Wait for the pan to heat up thoroughly, until it just begins to smoke.
For each serving of tuna, dredge all sides in the cumin/salt mix, and then briefly dip all sides in the oil to give the fish a thin coating.
Sear all sides of the fish. Flip to a new side once the current facedown side’s cumin seeds begin to brown and toast, about 30 seconds per side.
Slice the tuna into 1/3” / 1 cm pieces and serve it as part of a salad (place the fish on top of salad greens) or main dish (try serving with rice, risotto, or Japanese udon noodles).

Coat all sides of the tuna in cumin seeds and salt by pressing the tuna down onto a plate that has the spice mixture evenly spread out on it.
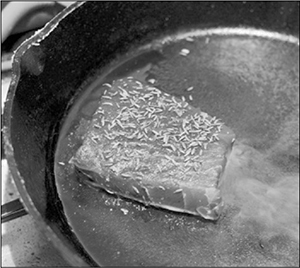
Make sure the pan is really hot. Some smoke coming off the fish as it sears is okay!
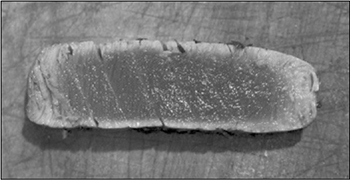
Pan-seared tuna will have a very steep “gradient of doneness”—a thin, well-done outside and a large raw center.
Notes
• This tuna is great for Nicoise salad. Add green beans, hard-cooked eggs, small potatoes, tomatoes, and olives on a bed of lettuce like Bibb or butterhead lettuce, dress it with a light vinaigrette, and enjoy.
• Keep in mind that the temperature of the pan will fall once you drop the tuna in it, so don’t use a piece of fish too large for your pan. If you’re unsure, cook the fish in batches.
• Use coarse sea salt, not rock (kosher) salt or the table salt you’d find in a salt shaker. The coarse sea salt has a large, flaky grain that won’t fully dissolve on the fish and then gives a nice flavor as it dissolves on your tongue.
140°F / 60°C: The End of the Danger Zone
The danger zone rule: don’t keep food between 40°F / 4°C and 140°F / 60°C for more than 2 hours.
While fans of music from the 1980s might want to take the “Highway to the Danger Zone,” when it comes to food, I’d suggest taking the highway in the other direction. The modern food supply is more interconnected and interdependent than ever before. As I write this, I’m eating my morning bowl of cereal, yogurt, bananas, and almonds. The muesli cereal is from Switzerland, the yogurt local to New England, the bananas from Costa Rica, and the almonds from California. The only direction from which food hasn’t come 3,000 miles is north, and that’s because not much grows at the North Pole!
While it’s a privilege to have year-round access to fresh produce and international ingredients, there is a downside: the number of people who can be affected by any given mistake has also increased. A contaminated batch of water sprayed onto a field of spinach can sicken hundreds of consumers across many state and international lines before the source of the contamination is identified.
Food safety, while not a sexy topic, is an important one, and there are some interesting aspects of biology involved. (Did you know some parasites can survive even in liquid nitrogen?!) Unlike in the rest of this chapter—heck, the rest of this book—I’m going to take a brief digression away from fun “how cooking works” ideas and look at “how to not kill yourself” for the next dozen or so pages. I’ll try to keep it entertaining.
The main culprits for unsafe food are bacteria and parasites combined with poor handling. Other aspects, like viruses, mold, and contaminants, are also of concern, but these are much easier to manage. You can transmit viruses by not washing your hands or by cooking while you’re sick, both of which are easy to mitigate (wash your hands; don’t cook for others when you’re ill). If you see mold growing on something, throw it out (see page 434 for an interview on mold). The idea that mold can only be present an inch away from where you see it is wrong. Finally, contaminants and toxins are primarily issues for producers of foods, so as a consumer you’re mostly off the hook for those. (If you grow your own veggies, test your soil for contaminants.)
Back to the world of bacteria and parasites. Most critters guilty of causing foodborne illnesses reproduce at temperatures above 40°F / 4°C, with some species active all the way up to 131°F / 55°C. Throw in a margin of safety of a few degrees, and you’ll see why the “danger zone” mentioned at the start of this section is defined as being between 40°F / 4°C and 140°F / 60°C. In the fridge, bacteria and parasites remain viable but generally won’t reproduce (there are exceptions), and above 140°F / 60°C they eventually die. Somewhere in between the two temperatures, though, is party central for bad bugs.
As you’d imagine, the time range given in the danger zone rule is a vast simplification of what’s really going on in the microbiological world. The rule limits the time window to two hours by assuming the worst-case scenario: food held longer than that can cause illness if contaminated with one of the more aggressive bad bugs, Bacillus cereus. (Who said scientists don’t have a sense of humor? Try saying B. cereus out loud.)
The temperature ranges are also grossly simplified. Organisms reproduce at different rates at different temperatures. Salmonella, for example, is happiest breeding at around 100°F / 37.8°C. (No wonder we have such issues if we get sick with it!) It doesn’t go from zero reproduction at 40°F / 4°C to full-on party mode at 41°F / 5°C; it’s a gradual ramp-up to that ideal breeding temperature. The danger zone and cooking temperature guidelines are simplifications, and by understanding the bigger picture you can cook better-tasting and safer food.
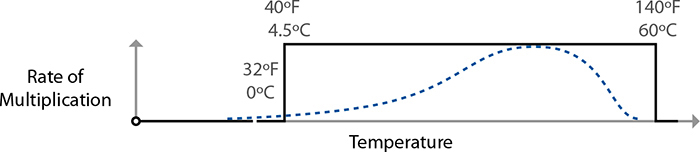
Multiplication rates of foodborne illness–related bacteria follow a curve with an ideal breeding range in the middle, nothing at all like what the danger zone rule implies.
To understand the simplifications of the time and temperature ranges, we need to talk about chance. Contracting a foodborne illness is a game of probabilities. For Listeria monocytogenes, the bacteria that causes listeriosis and is potentially present in raw milk, you’d need to swallow somewhere around a thousand of them. While that may sound like a lot, it’s not: a single sip of contaminated milk can make you sick. A single bacterium of E. coli isn’t likely to cause a problem (not that I want to volunteer!), but given 10 to 100 of them, the odds are grim. Cooking a hamburger to medium-rare reduces their count, assuming the bacteria are present, but doesn’t guarantee their elimination. What risks you should accept—do you really want that hamburger medium-rare?—requires knowing what the consequences are and the probabilities involved.
For most of us, the consequence of contracting most foodborne illnesses is gastrointestinal distress—diarrhea, vomiting, muscle spasms, and the like. However, for those who are in an at-risk group—anyone for whom having a foodborne illness can lead to further complications—such illnesses can be fatal. If you are cooking for someone who is elderly, extremely young, pregnant, or immunocompromised, be vigilant with food safety issues and skip dishes that have higher risks (including, alas, the medium-rare hamburger).
The odds of getting sick from food are about one in six in any given year, and about a quarter of a percent of those cases will require hospitalization, according to the United States Centers for Disease Control and Prevention (CDC). How we get sick from food is complicated. Let’s look at Salmonella specifically, keeping in mind that the concepts apply to other pathogens as well, just with different specifics.
Salmonella is surprisingly prevalent, infecting tens of million of people worldwide each year. Salmonella reproduces in the temperature range of 44–118°F / 7–48°C and survives at an even wider range. When cooked to 160°F / 71°C, it dies instantly; that is, its thermal death time—how long it takes a bacteria to die at a given temperature—is zero.
The United States Department of Agriculture (USDA) publishes cooking temperature guidelines for consumers. For chicken, which is commonly tainted with E. coli and Salmonella, the USDA guidelines say to cook it to 165°F / 74°C. It’s a guideline based on simplicity, not on cooking deliciously tasty chicken. Then there’s the US Food and Drug Administration (FDA), which writes the actual food laws. The FDA Food Code requires commercial vendors to cook chicken to only 155°F / 68°C (section 3-401.11, for the curious).
Why the difference in temperatures? In part, it’s down to the craziness that is the US’s food regulatory system and differences between organizations. (Seriously, who can keep track of when the USDA or FDA or CDC or NSA is supposed to be involved?) Consumer guidelines assume some amount of error, so err on the high side; commercial outfits are accountable to legal standards and assumed to have better measuring techniques and equipment.
Then there’s the issue of hold times—how long a food needs to remain at temperature. The FDA requirement is based on a thermal death time of 15 seconds at 155°F / 68°C, meaning cooked chicken has to hit that temperature and then stay there for 15 seconds.
The rate-of-reaction discussion at the beginning of this chapter is true for bacteria and parasites too. Extending hold times increases how many of the pathogens will be killed. There’s another group (and another acronym), the USDA’s Food Safety and Inspection Service (FSIS), that publishes charts of hold times based on exactly this. Chicken breast cooked to 145°F / 63°C has much better texture—it’s cooked yet not dry—but requires a hold time of 8.4 minutes, something that the consumer guidelines rightly assume home cooks can’t safely do. (Although with sous vide cooking, it’s possible—see page 320.) But at 150°F / 66°C, the hold time is only 2.7 minutes—something that with some care you can do. Don’t tell anyone, but that’s how I cook my chicken. I give myself a 5°F / 3°C error, shooting for 155°F / 68°C and holding it there for 3 minutes. (Shh!)
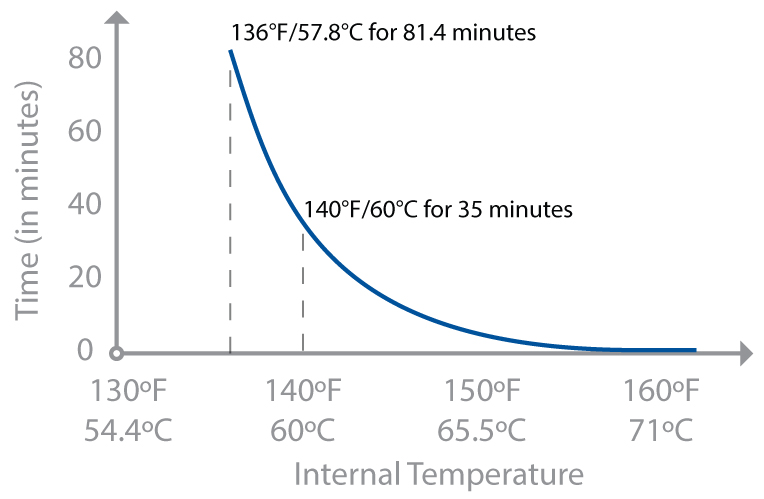
Hold time in minutes for cooking chicken, per USDA FSIS guidelines (assuming chicken with a 12% level of fat).
Following hold times involves more than reaching a temperature (though I’d rather eat from places cooking based on simplified guidelines than none at all). The specific hold times depend not only on the organism at hand, but also the food being cooked. For chicken, with its lower fat content and smoother surface, 8.4 minutes at 145°F / 63°C is long enough to pasteurize Salmonella. But when you’re making beef jerky, Salmonella can survive at 145°F / 63°C for 10 hours, presumably due to the evaporative cooling of the water from the beef as it dries out and the tiny crevices in the surface that remain cooler.
If hold times seem confusing—they were to me at first—think of them like time spent in a sauna. You can survive, even enjoy, dry heat for a while, but if you’re exposed to it for too long, you’ll eventually die. Jump into the sauna wrapped in a cold towel and with an iced drink, and you’ll last longer. The same is true for pathogens: given a long enough exposure, they will eventually die, but not instantly, so cooking at temperatures below the simplified guidelines requires looking up exactly what you’re cooking to correctly pasteurize it.
Pasteurization, by the way, is merely a reduction of the typical pathogens to a safe level. Don’t confuse this with sterilization, which would entirely eliminate pathogens. Obviously, if there are zero Salmonella bacteria present after cooking, the food won’t spontaneously become infected unless recontaminated. With pasteurization, the levels of pathogens are dropped but not necessarily to zero, so given time at reproductive temperatures they could creep back up to dangerous levels. Sterilized foods—canned tuna fish, irradiated milk—have none of the pathogens present and when properly sealed can be kept at room temperature indefinitely.
Hold times for pasteurization depend on how quickly a pathogen dies at a particular temperature and how many of them need to be killed, based on the difference between worst possible and acceptable contamination levels. Scientists use the term log10 reductions to talk about pasteurization, where one log10 reduction cuts the pathogen count by a factor of 10. For Salmonella, guidelines specify a 7 log10 reduction, meaning only 1 in 10 million bacteria should be able to survive.
If we can cook food to reduce the number of pathogens, why not just recook foods that are accidentally left out where the pathogens may have reproduced again? Sometimes it’s not the bacteria themselves that are the issue, but the toxins they produce. While appropriate cooking might safely reduce the bacterial count, the toxins themselves, such as those produced by B. cereus, can be heat-stable and remain in cooked foods.
We’ll take a look at the specific times and temperatures you should follow in the next section. For additional information on pathogens in food, check out the FDA’s Bad Bug Book; see http://cookingforgeeks.com/book/badbugbook/ for a current link.
To some, the idea of steak tartare is a delicacy; to others, it’s nauseating. Food preferences aside, carpaccio—thinly sliced raw meat—and tartare—minced raw meat—are surprisingly delicious and interesting from a science perspective. They’re based on mechanical tenderization by slicing through muscle tissues, and they’re a good example of managing food safety.
My technique here, a hot water dip treatment, removes more than 99% of any potentially present surface bacteria. As the old food science adage goes: there’s no such thing as safe food, just safer food. When dipped in 183°F / 83.5°C water, E. coli is reduced by 99.4% (a 2.23 log reduction) after 10 seconds and 99.9% (a 2.98 log reduction) at 20 seconds—pretty good, but not 100%. If you wouldn’t eat the poached egg—which could have Salmonella, at least in the United States—then you shouldn’t eat the steak tartare. If you’re game, give this a try; you might be surprised how good it is!
For each appetizer portion, you’ll need ¼ pound (~100g) beef tenderloin (fillet), top sirloin, or other lean “whole-muscle” cut. For 4 people, snag a single 1 pound (~450g) piece. Do not get ground meat. Make sure that the cut of meat is not mechanically tenderized (“pinned,” “jaccarded,” etc.); ask your butcher. I’m lucky that mine dry-ages meats for two weeks and does the butchering in the front part of the store, so I know what I’m buying.
Set the meat in a large pot and fill it with enough water to cover the meat. Remove the meat and heat the water to approximately 183°F / 83.5°C. Dunk the meat for 10–20 seconds, then remove it and blot it with a paper towel. The meat should be grey. (Fun fact: the color will partly revert over time.)
Store the meat in the freezer on a plate for 30 minutes, giving it time to firm up so that it’s easier to slice.
After the meat has firmed up in the freezer—don’t actually freeze it!—use a sharp, sharp knife to cut it into brunoise cuts—small cubes, about 1/8” / 0.3 cm. Start by cutting the meat into thin slices, then cut the slices into strips, and finally cut the strips into cubes, pressing down to pinch-cut them if a drag-cut doesn’t work. Transfer the meat to a bowl and liberally season it with good sea salt and pepper.
Tartare fans have strong opinions about how to prepare it and what should accompany it. If you’d like a starting suggestion, mix in a small amount of lemon juice, mustard, and olive oil to taste.
Steak tartare is almost always served with a raw egg yolk on top; I like to do it with a poached egg. The yolk is still runny, but it’s a more accessible presentation to people who dislike the idea of raw egg yolk. Place an individual portion of the tartare onto a plate, shaping it into a round patty. Top it with a poached egg (see page 193) and serve it with good potato chips.
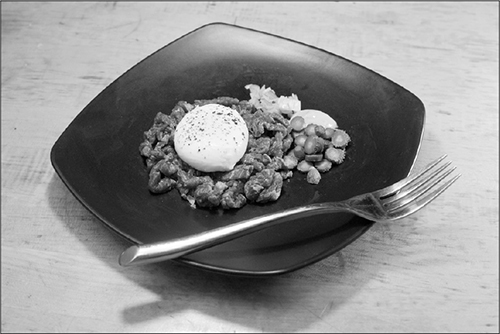
This scallop ceviche is a simple dish to prepare and refreshing on a warm summer day. It’s also a good example of how acids—in this case, the lime and lemon juices—are used to make foods safe to eat.
In a bowl, mix:
½ |
cup (120 mL) lime juice |
¼ |
cup (60 mL) lemon juice |
1 |
small (70g) red onion, sliced as thinly as possible |
2 |
tablespoons (20g or 1 bulb) shallot, thinly sliced |
2 |
tablespoons (30 mL) olive oil |
1 |
tablespoon (15 mL) ketchup |
1 |
clove (7g) garlic, chopped or run through a garlic press |
1 |
teaspoon (5 mL) balsamic vinegar |
Add and toss to coat:
1 |
pound (450g) bay scallops, rinsed and patted dry |
Store the mixture in the fridge, toss it again after 2 hours, and store it overnight to allow sufficient time for the acid to penetrate the scallops. Add salt and pepper to taste.
Notes
• Try slicing one of the scallops in half after 2 hours. You should see a white outer ring and a translucent center. The outer ring is the portion that has had time to react with the citric acid, changing color as the proteins denature (just as they would with heat applied). Likewise, after marinating for a day or two, a sliced scallop should show a cross-section that’s entirely white.
• Keep in mind that the pH of the marinade is important! At least 15% of the dish should be lime or lemon juice, assuming the remaining ingredients are not extremely basic. Lime juice is more acidic than lemon juice (pH of 2.0–2.35 versus 2.0–2.6).
• Try adding minor quantities of herbs like oregano to the marinade or adding cherry tomatoes and cilantro to the final dish (after marinating).
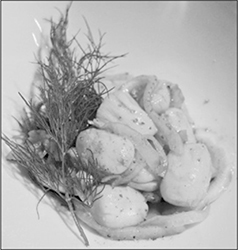
How effective is lime juice at getting rid of bacteria?
For the types of bacteria that might be present in seafood, it’s very effective. To quote from the literature: “In the face of an epidemic of cholera, consumption of ceviche prepared with lime juice would be one of the safest ways to avoid infection with [Vibrio] cholerae.” (L. Mata, M. Vives, and G. Vicente (1994), “Extinction of Vibrio cholerae in acidic substrata: contaminated fish marinated with lime juice (ceviche),” Revista de Biología Tropical 42(3): 472–485.)
Heat isn’t the only thing that denatures proteins and kills pathogens. A protein keeps its native shape because of the balance of forces pushing and pulling on the molecular structure. Adding an acid or base knocks these forces out of balance. The ions from an acid or base push on a protein’s structure, changing the electrical charges and thus causing the protein to change its shape. For dishes like ceviche—citrus-marinated seafood—the acid from the lime or lemon juice causes a change on the molecular level akin to cooking with heat. This change doesn’t happen only on the surface; given sufficient time, acidic and basic solutions will fully penetrate a food.
Ceviche is a classic example of using acids to kill pathogens. V. cholerae—a common seafood-borne pathogen—rapidly dies in environments with a pH level below 4.5, even at room temperature. Another example is cooked rice for sushi, where rice vinegar is added. Without the rice vinegar, cooked rice left sitting out at room temperature becomes a perfect breeding ground for B. cereus: it’s moist, at an ideal temperature, and has plenty of nutrients for bacteria to munch away on. But drop the pH level of the environment down to about 4.0, and the rice falls well outside a hospitable range for bacteria to grow. This is why proper preparation of sushi rice is so critical in restaurants: failure to correctly adjust the pH level can result in sickening diners.
Why doesn’t boiling rice get rid of bacteria?
It does get rid of bacteria, but only temporarily. Some bacteria, like B. cereus, reproduce with spores that are heat-stable and survive boiling. Because the spores are highly prevalent in soil and water, they’re nearly impossible to get rid of. Also, unless you’re using a technique like canning, pathogens can be re-introduced into the food from cross-contamination after they cool down.
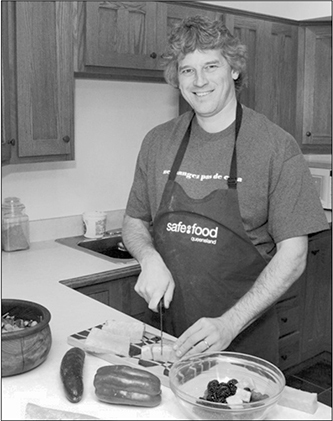
PHOTOS USED BY PERMISSION OF DOUG POWELL
Doug Powell is an associate professor at Kansas State University’s Department of Diagnostic Medicine and Pathobiology. His blog, “barfblog: musings about food safety and things that make you barf,” is at http://www.barfblog.com.
Is there a tension between safety and quality in cooking, and if so, are there methods to achieve both?
Safety and quality are two very different things. Quality is something that people love talking about, whether it’s wine, or organic food, or how it was grown, and people can talk themselves to death about all that. My job is to make sure they don’t barf.
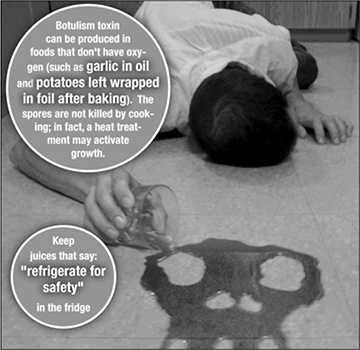
For somebody cooking at home, it’s easy for them to see a difference in quality. It’s very hard for them to see a difference in safety until they get sick, I imagine?
There are tremendous nutritional benefits to having a year-round supply of fresh fruits and vegetables. At the same time, the diet rich in fruits and vegetables is the leading cause of foodborne illness in North America because they’re fresh, and anything that touches them has the potential to contaminate. So how do you balance the potential for risk against the potential benefits? Be aware of the risks and put in place safety programs, beginning on the farm.
If you look at cancer trends in the 1920s, the most predominant cancers were stomach cancers. All everyone ate during the winter were pickles and vinegar and salt. Now that’s almost completely eradicated because of fresh food. But now you have to prevent contamination from the farm to the kitchen, because more food is eaten fresh. There are trade-offs in all of these things. In preparing hamburger and chicken, there is an issue with cooking it thoroughly and validating that with a thermometer, but most of the risk is actually associated with cross-contamination. Potatoes are grown in dirt, and birds crap all over them, and bird crap is loaded with Salmonella and Campylobacter. When you bring a potato into a kitchen or a food service operation, it’s just loaded with bacteria that get all over the place.
What’s the normal time between ingestion and symptoms?
It’s around one to two days for Salmonella and E. coli. For things like Listeria, it can be up to two months. Hepatitis A is a month. You probably can’t remember what you had yesterday or the day before, so how can you remember what you ate a month ago? The fact that any outbreak actually gets tracked to the source, I find miraculous. In the past, if a hundred people went to a wedding or a funeral, they all had the same meal. They all showed up at emergency two days later, and they would have a common menu that investigators would look at to piece it together. Nowadays, through DNA fingerprinting, it’s easier. If a person in Tennessee and a person in Michigan and a person in New York have gotten sick from something, they take samples and check against DNA fingerprints. There are computers working 24 / 7 along with humans looking to make these matches. And they can say these people from all across the country, they actually have the same bug, so they ate the same food.
Think of spinach contamination in 2006. There were 200 people sick, but it was all across the country. How did they put those together? Because they had the same DNA fingerprint and they were able to find the same DNA fingerprint in E. coli in a bag of spinach from someone’s kitchen. Then they were able to find the same DNA fingerprint from a cow next to the spinach farm. It was one of the best cases with the most conclusive evidence. Normally, you don’t have that much evidence.
What to do about it isn’t very clear-cut, but when you look at most outbreaks, they’re usually not acts of God. They’re usually such gross violations of sanitation that you wonder why people didn’t get sicker earlier. With a lot of fresh produce outbreaks, the irrigation water has either human or animal waste in it, and they’re using that water to grow crops. These bugs exist naturally. We can take some regulatory precautions, but what are we going to do, kill all the birds? But we can minimize the impact.
When farmers harvest crops, they can wash them in a chlorinated water system that will reduce the bacterial loads. We know that cows and pigs and other animals carry these bacteria and they’re going to get contaminated during slaughter. So we take other steps to reduce the risk as much as possible, because by the time you get it home and go to make those hamburgers, we know you’re going to make mistakes. I’ve got a PhD, and I’m going to make mistakes. I want the number of bacteria as low as possible so that I don’t make my one-year-old sick.
Is there a particular count of bacteria that is required to overwhelm the system?
It depends on the microorganism. With something like Salmonella or Campylobacter, we don’t know the proper dose response curves. We work backward when there is an outbreak. If it’s something like a frozen food, where they might have a good sample because it’s in someone’s freezer, we can find out more. With something like Salmonella or Campylobacter, it looks like you need a million cells to trigger an infection. With something like E. coli O157, you need about five.
You have to take into account the lethality of the bug. For 10% of the victims, E. coli O157 is going to blow out their kidneys and some are going to die. With Listeria, 30% are going to die. Salmonella and Campylobacter tend not to kill, but it’s not fun. So all of these things factor into it. A pregnant woman is 20 times more susceptible to Listeria. That’s why they are warned to not eat deli meat, smoked salmon, and refrigerated, ready-to-eat foods. Listeria grows in the refrigerator and they’re 20 times more susceptible and it can kill their babies. Most people don’t know that either.
Are there any particular major messages that you would want to get to consumers about food safety?
It’s no different than anything else, like drunk driving or whatever other campaign: be careful. The main message about food in our culture today is dominated by food pornography. Turn on the TV and there are endless cooking shows, and all these people going on about all these foods. None of that has anything to do with safety. You go to the supermarket today, you can buy 40 different kinds of milk and 100 different kinds of vegetables grown in different ways, but none of it says it’s E. coli–free. Retailers are very reluctant to market on food safety, because then people will think, “Oh my god, all food is dangerous!” All they have to do is read a newspaper, and they’ll know that food is dangerous.
A lot of the guidelines I see talk about the danger zone of 40–140°F / 4–60°C.
A lot of those guidelines are just complete nonsense. The danger zone is nice and it’s important not to leave food in the danger zone, but at the same time it doesn’t really get into any details. People learn by telling stories. Just telling people “Don’t do this with your food” doesn’t work; they say, “Yeah, okay, why?” I can tell you lots of stories of why or why not. The guidelines aren’t changing what people do and that’s why we do research on human behavior, how to actually get people to do what they’re supposed to do. As Jon Stewart said in 2002, if you think those signs in the bathrooms (“Employees must wash hands”) are keeping the piss out of your food, you’re wrong! What we want to do is come up with signs that work.
I’m wondering what your signs look like?
We have some good ones! Our favorite picture is the skull in the bed of lettuce. The dead person from carrot juice is pretty good, too.

How to Reduce the Chances of Foodborne Illness
Not long ago, I overheard the fishmonger at my local grocery store tell a customer that it was okay to use the wild salmon he was selling for making sushi. However, given that the fish wasn’t labeled as “previously frozen” and that it was in direct contact with other fish in the case, there was no guarantee that it was safe from harmful parasites or bacteria. What’s a shopper to do in the absence of a true fishmonger?
For starters, pay attention and understand where the risks are. Not all produce shares the same types of risk. Salmonella, for example, tends to show up in land animals and improperly handled produce—you’re actually more likely to get it from not washing your vegetables at this point! Other bacteria, such as Vibrio vulnificus, show up in fish that are exposed to the brackish waters of tidal estuaries, like wild salmon. Deep-water fish, such as some species of tuna, and some aquacultured fish like salmon, are of less concern. Few of us will remember such specifics—I know that I don’t have a good enough memory for such details about salmon—but there are broad rules that cover cooking most foods, sushi-making ones aside.
The safest way of preventing foodborne illness—well, other than living in a plastic bubble on a diet of irradiated gruel—is avoiding cross-contamination by cooking properly. Oh, cross-contamination, what a pain you are. Cross-contamination is more of a problem than undercooked meats! Wash your hands, wash your hands, wash your hands, and don’t dry those just-washed hands on a dirty towel.
USDA consumer guidelines:
145°F / 63°C: Fish and shellfish
145°F / 63°C: “Whole-muscle” beef and similar meats
160°F / 71°C: Ground meats
160°F / 71°C: Eggs
165°F / 74°C: Poultry and leftovers
As for cooking temperatures, the USDA recommends cooking foods based on temperatures needed to instantly kill pathogens that may be present. The USDA recommendations trade off deliciousness for safety, and when I’m retired and eating on a cruise ship or recovering in the hospital, that’s what I’d want. But the rest of the time? Using the given temperatures result in overcooked foods.
Assuming you have a good digital probe thermometer, following hold time guidelines will properly pasteurize foods and at the same time avoid overcooking them. As I’ve mentioned, the US FSIS publishes hold time tables; search online for FSIS time-temperature guidelines.
What if you’re willing to “consume raw or undercooked meats,” as the common menu warning goes? Depending upon the ingredients, you should still handle them wisely—avoid cross-contamination, keep foods cold—and then understand where the risks are in produce, meats, and seafood. Here’s a quick summary for each of those topics.
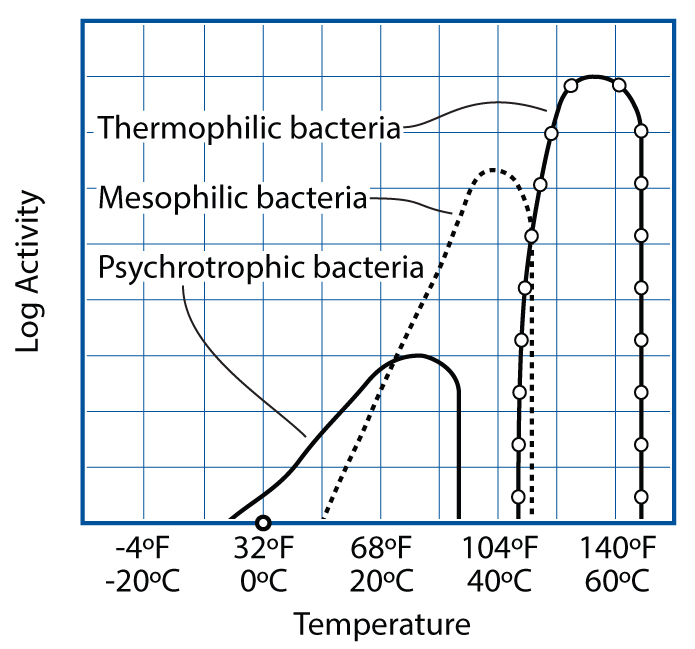
Safe cooking temperatures depend on which pathogens might be present and their survival temperature zones. Very few bacteria that cause foodborne illness are psychrotrophic—cold growers—which is why refrigeration staves them off. (Listeria is the exception.) Most bad bugs are mesophilic—most active near body temperature—and luckily only a few are heat-loving thermophiles (e.g., campylobacter).
GRAPH BASED ON E. ANDERSEN, M. JUL, AND H. RIEMANN (1965), “INDUSTRIEL LEVNEDSMIDDEL-KONSERVERING,” COL. 2, KULDEKONSERVERING, COPENHAGEN: TEKNISK FORLAG)
Avoid cross-contamination
Sponges and towels are notorious—ridiculously, absolutely notorious—for cross-contamination. You wipe down a dirty countertop, rinse the sponge or towel under hot soapy water, then wring it out. An hour later, you pick it up, wipe down another countertop, and bam! You’ve just spread a beautiful thin coat of bad bugs all over the place: your tap water isn’t hot enough to kill pathogens. Or you’ve washed your hands with hot water and soap after handling raw items—but then you dry your hands on a towel you touched while dirty, and boom!
Use paper towels for drying hands and wiping down spills, and keep a stack of clean dish towels so you can toss the current one in the wash after each meal. Microwave dish sponges (rinse them and give them 2 minutes on high), boil them for 5 minutes, or run them through the dishwasher on a weekly basis.
It should go without saying: keep separate cutting boards or plates for raw and cooked foods. You can use plastic wrap over a cutting board for a quick, disposable surface—or even use the wrapper the meats came in, if you’re careful not to cut through the paper.
Keep food cold
Have you checked what temperature your fridge is running at? It should be below 40°F / 4°C, and ideally on the chilly side (34–36°F / 1–2°C) so that foods will cool down more quickly and spoil more slowly.
While cooking food kills off most of the bacteria, there’s a chance a few will survive or make it back in via cross-contamination. There’s also the likely possibility of heat-resistant spores still kicking around. Given the right temperature range and time, they can reproduce to unsafe quantities. Stick leftovers in the fridge right away, as opposed to letting them sit around until post-meal cleanup. The exception to this is if you have a large quantity of hot food, in which case let it cool to 140°F / 60°C and then place it in an ice bath to quickly chill it even further before storing it in the fridge.
If you’re going to have foods out for a while—milk on the table for a leisurely long brunch, potato salad for a picnic in the park—keep them cold. Stash containers of liquids like milk in a bowl with crushed ice and use ice packs to keep containers of foods like potato salad cold. If you know your food has been properly cooked and chilled, you can use the danger zone rule as a guideline—2 to 4 hours is an okay exposure time, but beyond that, there are risks.
Wash produce
When’s the last time you cleaned the veggie drawer in your fridge? I thought so. (I’m guilty too!) Store veggies and lettuces in plastic bags, and rinse them before eating them. You can also steam vegetables to quickly kill any pathogens. Use a container with the lid mostly closed and a small amount of water inside; the lid will keep the steam in contact with the vegetables.
Contamination of fruits and vegetables can happen before you buy them, either from contaminated water used during farming or from other sources (birds poop when flying over growing fields!). Root vegetables—carrots, potatoes, beets— and anything that harbors soil should be thoroughly washed. Wash everything thoroughly; who knows if someone sneezed on it at the store. (I know, gross, but after reading the Reddit thread on what buffet restaurant workers will never eat...well, you may not want to know.)
Use “whole-muscle, intact” cuts of meats
The industry lingo “whole-muscle, intact” describes pieces of meat whose interior is untouched, meaning they’re not ground and not mechanically tenderized—stabbed with a whole bunch of tiny blades to microscopically cut them up. Whole-muscle intact cuts of beef, pork, veal, and lamb are great for delicious cooking: contamination is limited to the surface, so a quick sear or dunk in boiling water and you’re safe to eat the inside totally raw. Steak tartare? Perfectly fine with whole-muscle intact cuts.
But these two little words (okay, long words) “mechanically tenderized” should give you pause. About one in four retail steaks and roasts are mechanically tenderized, which does make them less tough but also shoves any surface contamination deep into the meat. Unfortunately, you can’t see the microcuts, and frustratingly, food labeling laws don’t require processors to label meats as mechanically tenderized. Advocacy groups have been trying for 20 years; so far, only Canada requires labeling. Short of knowing your butcher, you have no way of determining if that slab of beef is whole-muscle intact or not. Buyer beware!
Cook ground meats to well done
Ground meats like hamburger are all outside, in the sense that surface contamination will have been ground throughout the meat. The USDA says to cook ground meats to 160°F / 71°C. Alas, this temperature is also high enough that the majority of the proteins denature and give a tough texture. Since fats help mask dryness in meat, using ground beef that has more fat in it will lead to a juicier burger. Look for “85/15” beef—85% lean meat, 15% fat; using leaner ground beef will lead to dry burgers.
Note that change in color is not an accurate indicator of doneness. Myoglobin, oxymyoglobin, and metmyoglobin can begin to turn grey starting at 140°F / 60°C or remain pink at 160°F / 71°C when the pH is around 6.0. Use a digital probe thermometer when cooking ground meats!
It is possible to cook safe medium-rare hamburgers. If you’re up for grinding your own meat, buy whole-muscle intact and process it with the same directions given in the steak tartare recipe (see page 174). Otherwise, look for cold-pasteurized meat (a.k.a. irradiated) or cook it sous vide (see page 320) to pasteurize it yourself (roughly 30 minutes for a 1/2” inch / 15 cm–thick burger at 141°F / 61°C). If you have the equipment, the best burger I ever had was sous vide cooked, briefly fried, and liberally sprinkled with salt.
Select fish and seafood based on how you’re going to cook it
Most parasites in seafood don’t infect humans, and cooking the seafood also cooks the worms. However, Anisakis simplex and tapeworms (cestodes) are two parasites of general concern. For cooked seafood dishes—internal temperature of 145°F / 63°C—any parasite will be dead, and while the thought of eating a worm might be unappetizing, if it’s dead there’s little to worry about other than the mental factor. Just think of it as extra protein.
Raw and undercooked seafood is another matter entirely. Cod, halibut, or salmon cooked rare? Sashimi or cold-smoked fish? All potential hosts for roundworm, tapeworms, and flukes. Fortunately, like most animals, few parasites can survive freezing. (There are exceptions: trichomoniasis can survive being frozen in liquid nitrogen; thankfully it’s not found in food.) Select previously frozen fish when cooking it to only low temperatures.
If you want to freeze-pasteurize fish yourself, here is the guideline—if you happen to have access to dry ice or liquid nitrogen, quick-freeze the fish first for better texture:
US FDA 2005 Food Code, Section 3-402.11: “raw, raw-marinated, partially cooked, or marinated-partially cooked fish shall be: (1) Frozen and stored at a temperature of -20°C (-4°F) or below for a minimum of 168 hours (7 days) in a freezer; [or] (2) Frozen at -35°C (-31°F) or below until solid and stored at -35°C (-31°F) or below for a minimum of 15 hours.”
The second concern with undercooked fish is bacteria. While freezing kills parasites, it does not kill bacteria; it just puts them “on ice.” (This is why researchers routinely store bacterial samples at –94°F / –70°C to preserve them for future study.) Luckily, most bacteria in fish exist on the surface due to improper handling, so a quick pan sear will eradicate them.
If your grocery store sells both raw and “sashimi-grade” fish, the difference between the two will be in the handling and care related to the chances of surface contamination, and in many cases the sashimi-grade fish will have been previously frozen if it’s of a species of concern. The US FDA doesn’t actually define what sashimi-grade or sushi-grade means, but it does explicitly state that fish known to harbor parasites and not intended to be completely cooked before serving must be freeze-pasteurized. Some types of tuna and farm-raised fish (those that are fed only food pellets that wouldn’t contain live parasites) are exempt from this freezing requirement, as the parasites of concern aren’t found in them.
Parasites are to fish as bugs are to veggies: if you’ve eaten vegetables, you’ve eaten bugs; if you’ve eaten fish, you’ve eaten worms.
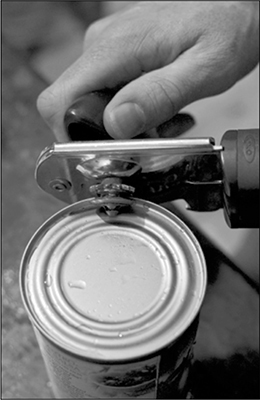
Wash can lids before opening them—and wash the can opener, too! The blade picks up food while cutting through the lid.
Luckily for oyster lovers, the US FDA excludes molluscan shellfish from the freezing requirement. Oysters can still carry V. vulnificus, which is undetectable at the dinner table. The number of reported cases of V. vulnificus infections spikes between May and October (V. vulnificus does better in warmer water), so buyer beware, and if you’re in an at-risk group, skip the raw oysters. (Sorry, Mom!)
141°F / 61°C: Eggs Begin to Set

Important temperatures in chicken eggs.
The lore of eggs is perhaps greater than that of any other ingredient. Eggs are used in both savory and sweet dishes, hot soups and frozen desserts, at breakfast and with dinner—and every culture uses them. They act as binders holding together meatloaf and stuffing; as rising agents in soufflés, certain cakes, and treats like meringues; and as emulsifiers in sauces like mayonnaise and hollandaise. Eggs provide structure to custards and body to ice creams. And all of this so far doesn’t even touch on their flavor or the simple joys of a perfectly cooked fresh egg.
Eggs have a light part and a dark part, and bind the culinary world together—no wonder they’re incredible! Next time you crack an egg into a frying pan, take a close look at what you see. There should be four visible parts along with the shell: the yolk, a thick white up near the yolk, a thin and watery white around the edge, and somewhere, a little white twisty thing called the chalaza. Each part has its own function:
• The shell itself is a marvel of engineering: shaped to allow a weak newborn chick an easy escape while protecting it from the outside world. (If you don’t mind wasting an egg, hold one in the palm of your hand, wrap your fingers around it, and then squeeze it over a sink. It takes a strong grip to break it!) Right below the shell are two tough membranes, made mostly of collagen proteins. The shell and the membranes have to allow air in and out so a developing chick can breathe, while keeping bacteria and pathogens out. By one estimate, the shell of a chicken egg has upward of 17,000 microscopic holes in it! The color of the shell has to do with the breed of chicken and has no impact on taste or nutrition.
• The yolk, contrary to what I thought as a kid, is not where the animal comes from. Yolks are about half water, half nutrients; the nutrients are two-thirds lipids, one-third protein, along with lots of fat-soluble micronutrients. They get their orange color from pigmentation in the chickens’ feed. Darker yolks might seem more appealing but don’t actually indicate better nutritional properties compared to lighter or even cream-colored yolks. Structurally, the yolk is composed of many layers of fats deposited around a center in almost-concentric rings. The layers are difficult to see in a hard-cooked chicken egg, but should you ever happen to hard-cook an ostrich egg—an expensive undertaking I’ve done exactly once—you can peel away the various fat layers of the cooked yolk.
• The chalaza is a twisted cord near the yolk that centers it in the egg, preventing the yolk from settling to the bottom of the shell. There’s really not much culinary value to the chalaza. You can fish it out with a fork, or if you’re whisking eggs into a liquid for something like a sauce or custard, strain it out.
• The thick white is what you see snugged up against the yolk when frying an egg is called the outer thick white. The whites in chicken eggs are 88–90% water; the rest is protein. What makes the thick white thick is a higher concentration of one of the proteins, ovomucin. One measure of egg quality is based on the height of the thick white when the egg is cracked onto a flat surface, and like everything else in food, this has its own special unit: Haugh units, named for the inventor Raymond Haugh (not someone with a bad accent saying, “How haugh is that white?”).
• The thin whites are runny and exist in two places: the thin outer white, found next to the eggshell’s membranes, and the inner white, right on the outside of the yolk. It’s the thin outer white that you see as a watery puddle around the thick white when looking down into the frying pan. Like the thick white, thin whites are mostly water with some proteins mixed in. Older eggs have more thin white as the thick white breaks down over time (and thus are measurable with Haugh units).
The challenge of cooking eggs comes from how these parts of the egg change over time and the way different proteins respond to heat. An egg is a complex, dynamic system that’s constantly changing: the thick white breaks down, air flows in and out of the shell, water evaporates—they’re not perfect little time capsules, frozen in time and space!
The main change in eggs as they age is in their pH. A chicken hen deposits carbon dioxide into the egg white as it is formed, giving the white a pH of between 7.6 and 8.4. Over the course of several weeks—or a few days at room temperature—the carbon dioxide comes out of solution and migrates away through the eggshell’s pores, driving the pH of the white up between 9.1 and 9.3. Changes in pH cause the thick white to break down, increasing the volume of the thin white.
What’s the right way to crack an egg?
Tap it on the counter, not the edge of a bowl. The shell of an egg cracked on a flat surface will have larger pieces that aren’t pushed into the egg. Eggs cracked on a sharp lip are much more likely to have little shards of shell poked into them that then end up in the bowl and have to be fetched out. (If that does happen, use half of the broken eggshell as a scoop to fetch out the shard.)

Bad
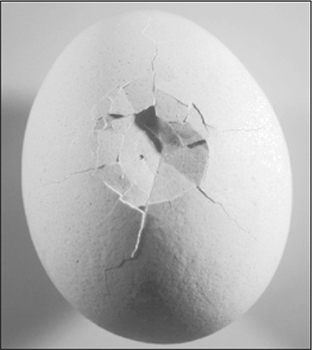
Good
In cooking, the pH changes make older eggs easier to peel when hard-cooked; the inner membrane binds less tightly to the egg white. If you’re lucky enough to have your own chickens, let the eggs rest for a few days at room temperature before hard-cooking them; steaming them also makes them far easier to peel. The change in volume of the thin white from the pH change leads to more wisps of whites floating around when you’re poaching eggs; straining them is far easier than using vinegar (see page 193 for cooking tips).
Now, for the complicated and fascinating part about cooking eggs: different proteins in the different parts of the eggs respond at various rates to heat. The whites and yolk are composed of dozens of different types of proteins, each of which begins to denature at a different temperature and progresses at a different rate. Let’s dig into some protein stuff here; it’ll help you make sense of the nifty photo and chart accompanying this discussion.
In their natural, native state, you can think of the proteins as curled-up little balls. They take this shape because portions of the molecular structure are hydrophobic (“water fearing”). Some of the atoms making up the protein are electromagnetically repulsed by the polar charge of water. Because of this aversion to water, those atoms cause the protein structure to fold up on itself.
As kinetic energy is added to the protein—usually from heat but also from mechanical energy (e.g., whisking egg whites)—the hydrophobic regions of the molecules start to unfold. This more open structure can then become tangled with other proteins, snagging around them and coagulating to form a linked structure. This is why cooked eggs are firm instead of flowing.
One of the most heat-sensitive proteins in chicken eggs is ovotransferrin, which begins to readily denature at around 141°F / 61°C and makes up 12% of the white’s protein content by weight. (Other species, like ducks, lay eggs with different forms and ratios of proteins; I’m going to stick to chicken eggs from here on out.) Another protein, ovalbumin, accounts for a whopping 54% of the egg white protein and denatures at higher temperatures, around 176°F / 80°C. Other egg white proteins denature between these temperatures, and there are enough of them that the texture changes over the 35°F / 19°C span between ovotransferrin and ovalbumin can lead to many possible outcomes (from watery to spreadable to stiff to crumbly). It’s this range that makes poaching eggs a fun challenge: not too difficult, but not trivial.
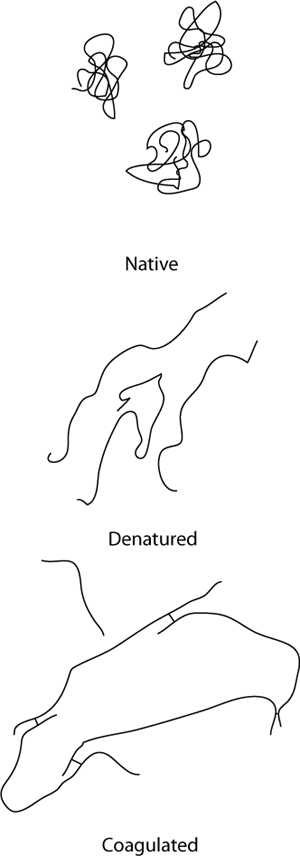
Hydrophobic regions of proteins in their native state (top) remain curled up to avoid interacting with the surrounding liquid. With heat, they denature (center) and uncurl as the kinetic energy exceeds the weaker level of energy generated by water molecules and regions of the proteins that repel each other. Once denatured and opened up, the hydrophobic parts of the protein that were previously unexposed can interact and bond with other proteins (bottom).
Egg yolk proteins have a tighter temperature span than the whites do. Runny yolks will begin to set firmer at between 149°F / 65°C and 158°F / 70°C, although some do set at lower temperatures with long holding times. (It’s technically possible to cook the egg yolk firmer than the white due to differences in the slopes of the rates of reaction.)
The denaturation of egg proteins, as you’d expect, is a change based on a rate of reaction. Proteins don’t denature instantaneously once they reach some magic temperature, and their denaturation temperatures change when they’re mixed with other compounds. Plus, the temperatures researchers report are usually based on isolating the proteins, not actually cooking up an egg—caveat archimagirus! And denaturation doesn’t happen with just temperature: whisking egg whites works via denaturation as well. (We’ll cover whisking later—see page 292.)
Your average, run-of-the-mill (or is that run-of-the-yard?) chicken laid only 84 eggs per year a century ago. By the turn of the millennium, improvements in breeding and feed had pushed this number up to 292 eggs per year—almost 3.5 times more.
Eggs will come out with whites with a soft, custard-like texture when cooked at above 141°F / 61°C for long enough to denature some of the proteins. If you heat an egg up above 156°F / 70°C for sufficient time, the white will have a firm, sliceable texture—good for sliced eggs and egg sandwiches. Above 176°F / 80°C for too long, the whites will become rubbery (presumably from ovalbumin denaturation). Proteins in the yolk will also overcook, producing a dry, unpleasant yolk. (Plus, you’ll end up with a grey surface on the yolk as sulfide compounds from the white mix with iron in the yolk.) Sometimes a picture is worth a thousand words, so check out the upcoming photo of eggs cooked at different times and temperatures.
Soft-cooked and hard-cooked eggs are normally prepared in nearly boiling water or by steaming them. Cooking for 7–8 minutes will yield a soft-cooked egg and 11–12 minutes creates a nice hard-cooked one. Lower temperatures will increase the cooking time, but work just fine—and for soft-cooked eggs are far, far better. Should you have the gear to hold an egg at a precise temperature in water, cooking for an hour or so at 144°F / 62°C will give you a runny soft-boiled egg, and 147°F / 64°C will result in something just on the edge of setting.
When a recipe calls for an egg, what size should you use?
By default, use large eggs, unless you’re in the EU, in which case use medium eggs when following American recipes. The different regions use different definitions for sizing eggs (weights include the shell!).
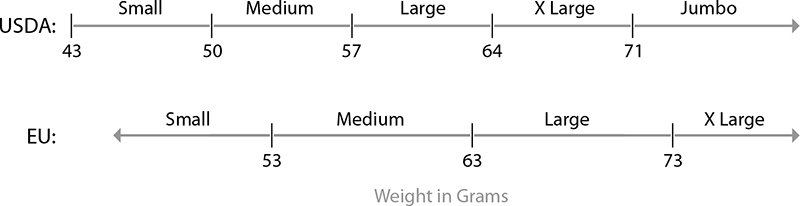
Time and temperature for eggs is exceedingly complicated. I’ve joked that an entire college course could be taught using only eggs. There are plenty of other details with eggs: how quickly the proteins denature changes their texture (faster denaturation leads to a finer gel structure of the white); egg whites are one of only two alkaline ingredients in the standard kitchen (the other being baking soda); and of course, which came first (the egg—reptiles were around long before chickens). Different species of birds have their own quirks—duck egg whites, for example, are harder to whisk up, but adding an acid like lemon juice improves them. I could go on and on about eggs, but then I’d have to change the name of this chapter...
Why do some countries refrigerate eggs but not others?
Eggs are refrigerated to prevent Salmonella enteritidis infection, but not because they’ve been washed! Yes, washing the shell of an egg does damage the cuticle to an extent that bacteria could get in, but the more likely route to Salmonella-infected eggs is the chicken that laid them: chickens infected with S. enteritidis can infect the eggs as they’re formed. Refrigerating eggs prevents the bacteria from multiplying, lowering the chances that a sunny-side-up egg will land you sunny-side down.
S. enteritidis started popping up in eggs in the US in the 1970s, around the time that other strains of Salmonella that had been killing chickens were eradicated. Careful flock management and vaccination of chickens prevent infection. If the chickens in your area are known to be free of S. enteritidis, then storing their eggs in the fridge isn’t necessary, although it will double the eggs’ shelf life.
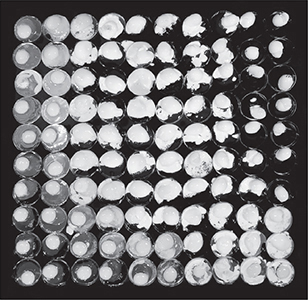
Eggs cooked at different times (y-axis) and temperatures (x-axis), from 6 minutes to 60 minutes and from 135°F / 57°C to 162°F / 72°C.
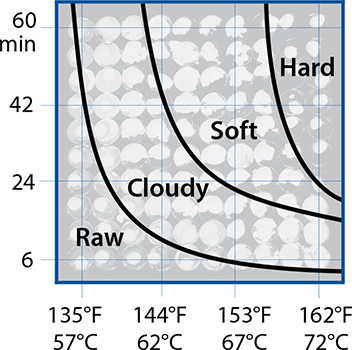
Here’s a labeled chart of the time and temperature egg photo. Proteins set at different rates at different temperatures; eggs become cloudy as the most heat-sensitive proteins denature before they soft-cook or hard-cook.
Ancient Romans figured this one out a long time ago: egg yolks mixed with cream and something sweet is delicious. Crème Anglaise, custards, and bread pudding are all successive improvements on the original idea, and all rely on egg for texture and flavor.
Crème Anglaise is also the base for vanilla ice cream. Freeze it in an ice cream maker, or see page 361 for more creative ways of making it. It also makes great French toast—soak thick slices of bread in the mixture for 10–15 minutes, then sauté in butter over medium-low heat for 3–5 minutes per side.
In a mixing bowl, thoroughly whisk together:
4 |
large (80g) egg yolks |
2 |
cups (480 mL) half-and-half; or 1 cup (240 mL) milk and 1 cup (240 mL) cream |
2 |
teaspoons (10 mL) vanilla extract; optionally add scrapings from ½ vanilla bean, sliced lengthwise |
¼ |
cup (50g) sugar |
|
Pinch of salt |
Pour the mixture through a fine-mesh strainer into a second bowl to separate out the eggs’ chalazae.
Crème Anglaise: Heat the mixture in a saucepan over medium heat until it reaches 170°F / 77°C, the point at which it just coats the back of a metal spoon. Take care to not overheat it; you’ll end up with egg curds.

Slice the bean open with a knife and then use a spoon to scrape the vanilla seeds out.
Custard: To make custard, pour the mixture into small serving ramekins or oven-safe cups and place them in a baking pan. Add enough water to the baking pan to submerge the ramekins or cups halfway up and then bake them in an oven at 325°F / 160°C for 45–60 minutes.
Bread pudding: To make bread pudding, slice about half of a small loaf of bread (250g) into ½–1” / 1–2 cm cubes—about 4 cups’ worth. Try using a cinnamon-raisin bread to add additional flavor, or add ¼ cup (40g) dried fruit and 1 tablespoon (8g) cinnamon to the mix. Transfer the cubes to a baking pan or individual serving cups, add the Crème Anglaise mix, and bake in a 325°F / 160°C oven for about 30–60 minutes, checking that the custard is set by jiggling the pan or cups and seeing that it holds its shape.
What’s half-and-half?
Half-and-half is half milk; half cream. In the United States, half-and-half must legally contain 10.5–18% milkfat. You can make your own half-and-half by mixing milk and cream. For a chart of fat levels in different types of milk and cream, see page 300.
Super-premium ice cream—the highest grade of ice cream sold in the grocery store—is 10–16% fat. If you’re using Crème Anglaise for making ice cream, aim for 12–22% fat (by weight). This recipe is about 12% fat; use whole cream instead of half-and-half for a 22% fat version.
You can poach eggs hours in advance, which makes them great for breakfast or brunch with friends. Slightly undercook them and store them in an ice-chilled water bath; when ready to use, briefly reheat them for a minute in a pan of hot water. There are three challenges to cooking poached eggs: feathery whites, flavor, and a properly set yolk.
• Feathery whites, the wispy junk on the outside of a poorly poached egg, are created from the outer thin layer of egg white mixing with hot water as the egg poaches. The outer thin layer has a lower concentration of ovomucin, the protein that makes egg whites thick. There’s an easy solution to feathery whites: drain the egg through a small fine mesh filter or slotted spoon before poaching. (Swirling the water to create a vortex and placing the egg in the center helps too, but cooking eggs one at a time is tedious for larger numbers.)
• Flavor, in my book, is why salt or vinegar should be added to the water. An egg poached in plain water is unseasoned and tastes flat; adding salt (about a 1–3% salt solution) vastly, vastly improves a poached egg’s flavor. Vinegar is commonly added to solve the feathery white problem, and it does help, but it also imparts a flavor that I don’t care for. If you like it though, add it.
• Properly set yolks are created by proper time at temperature. Cook room-temperature eggs in simmering (180–190°F / 82–88°C) water for 2–3 minutes; shorter if you like them runny, longer if you like them firm.

When I wrote the first edition of Cooking for Geeks, I included a clever “shock and awe” solution for creating tasty, easy-to-peel hard-cooked (hard-boiled) eggs. Shocking the eggs in boiling water for 30 seconds makes them easy to peel; then cooking them in a fresh batch of cold water brought to a near-boil finishes them with a more pleasing texture. Since then, I’ve discovered—well, rediscovered—that steaming eggs is far better. When the egg is steamed, the shell will crack and fall right off into two pieces.
Make sure your eggs are a few days old—or at least that the eggs have a pH on the higher side of things. If you’re lucky enough to have really fresh eggs, they can be harder to peel.
Optionally poke a hole in the bottom end of the shell, where the air pocket is. This doesn’t make sense when you’re cooking eggs in water—the water gets in and screws stuff up—but when you’re steaming eggs, the hole will prevent the shell from cracking by giving air from the air pocket an escape route as it expands during heating.
Boil ½” / 1 cm of water in the bottom of a pan, add the eggs, cover them with a lid, and wait 12 minutes. Keep the heat on high the entire time; you need steam to be constantly hitting the eggs for them to cook.
Before peeling the eggs, let them cool down. You don’t need to shock them in cold water to make them easy to peel, but dropping them in cold water—no ice necessary—will make the shape of the egg rounder (no “flat bottom”). You can peel them when they’re still steaming hot, but you need a little bit of water to release the inner membrane from the outer white.

Scrambling eggs is easy—if you don’t overcook them. For regular scrambled eggs, use medium heat—never high!—and remove them from the burner just before you think they’re done. The carryover heat in the eggs will continue to cook them.
The 30-minute method involves ultra-low heat, continuous stirring, and a vigilant eye. It takes time, but after many years of eating eggs, it’s nice to have them cooked a new way. Cooking the eggs over very low heat while continuously stirring breaks up the curds and evaporates most of the water, giving them a flavor that can be described as cheese- or creamlike and not like regular scrambled eggs—try them unseasoned, without even salt, to appreciate their flavor.
In a bowl, crack two or three eggs and whisk them thoroughly to combine the whites and yolks. Don’t add any salt or other seasonings; do this with just eggs. Transfer them to a nonstick pan on a burner set to the lowest heat possible.
Stir the eggs continuously with a silicone spatula, doing a “random walk” so that your spatula hits all parts of the pan. And low heat means really low heat: there’s no need for the pan to exceed 160°F / 71°C. If your burner is too hot, pull the pan off the stovetop for a minute to keep it from overheating. If you see any curds (lumps of scrambled eggs) forming, your pan is too hot.
Continue stirring until the eggs have set to a custard-like consistency. When I timed myself, this took about 20 minutes, but you might reach this point in as few as 15 minutes or upward of half an hour.
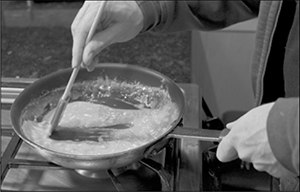
Fun trivia: Quail eggs weigh about 9 grams on average, while duck eggs typically weigh 70 grams. I was happy to learn that ducks themselves are also about eight times heavier than quails (just in case you find yourself on Jeopardy!).
154°F / 68°C: Collagen (Type I) Denatures
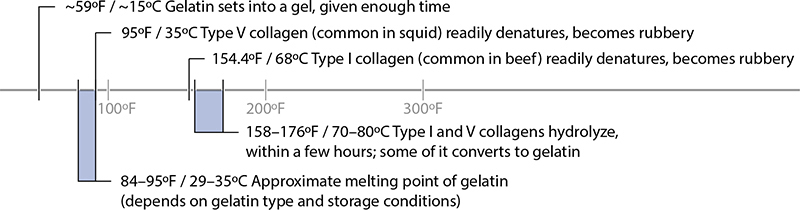
Temperatures related to collagen hydrolysis and the resulting gelatin.
When we covered animal proteins and denaturation earlier in this chapter, I mentioned that collagen was special enough that it deserved its own section. And here we are! First, a quick refresher. Animal proteins—fish and seafood included—can be grouped into three categories: structural, connective, and sarcoplasmic. Structural proteins are generally the most important ones to manage in cooking, but connective tissues become even more important for certain seafood and meats.
An animal’s connective tissues provide structure and support for the muscles and organs in its body. You can think of most connective tissues—loose fascia and ligaments between muscles as well as other structures such as tendons and bones—as a bit like steel reinforcement: they don’t actively contract like muscle tissue, but they provide structure against which muscles can pull and contract. (Fun fact: pound for pound, collagen is tougher than steel.)
The most common type of protein in connective tissue is collagen, and while there are several types of collagen in animals, from a culinary perspective the main chemical difference between them is the temperature at which they denature. Collagen shows up in two different ways: either as discrete chunks like tendons outside of the muscle, or as a network that runs through the muscle. Collagen is tough—it provides structure, after all—and becomes palatable only given sufficient time at sufficiently high temperatures.
Pressure cookers work wonders on collagen. Since the reaction rate for breaking down collagen is temperature dependent, raising the temperature up to 250°F / 120°C cuts cooking time by ~75%. See page 308 for more about pressure cookers.
It’s easy to deal with collagen that shows up as discrete pieces: get rid of it by cutting it off. For cuts of meats that have a thin layer of connective tissue on them (called silverskin, presumably because of its somewhat iridescent appearance), cut off as much as possible and discard it. Beef tenderloin cuts commonly have a side with this layer; trim off as much as possible before cooking. Chicken breasts also have a small but noticeable tendon connected to the chicken tenderloin. Uncooked, it’s a pearlescent white ribbon. After cooking, it turns into that small, white, rubber-band-like thing that you can chew on endlessly yet never get any satisfaction from. Generally, this type of collagen is easy to spot, and if you miss it, it’s easy to notice while eating and can be left on the plate.
The collagen that forms a 3D network through the muscle tissue is tougher to manage (pardon the pun). For cuts of meats that are high in it, the only way to remove its tough texture is to cook it—usually with long, slow cooking methods. The rate of reaction for collagen is much, much slower than for other proteins in meat. To understand the cooking challenges and how to solve certain problems you might see, we need to dive into the molecular structure of collagen.
In its native form, collagen is like a rope: it’s a linear molecule composed of three different strands that are twisted together. The three strands are held together by weak secondary bonds (but there are a lot of them!) and stabilized by a small number of crosslinks, which are stronger covalent bonds. (Covalent bonds are bonds where the electrons from an atom in one location are shared with another atom.)
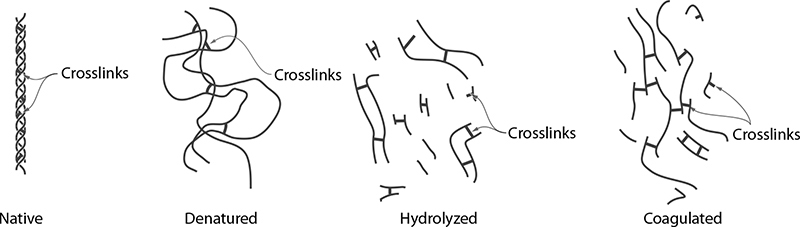
Collagen in its native form is a triple helix, held together in its helical structure by secondary bonds (left) and stabilized by crosslinks. Under heat, the secondary bonds break and the protein becomes denatured, but the crosslinks between the strands continue to hold the structure together (second from left). Given sufficient heat and time, the strands in the triple helix themselves break down via hydrolysis (third from left) and, upon cooling, convert to a loose network of molecules (right) that retains water (a gel).
In addition to being crosslinked, the strands also form a helical structure because of secondary bonds between different regions of the same molecules. You can think of it like a braided rope, where each strand wraps around the other two strands. It has a “curl” to it because the internal structure finds its optimal resting place in that shape.
Under the right conditions—in cooking, exposure to enough heat or the right kinds of acids—the native form of collagen denatures, losing its linear structure and untwisting into a random mess. This happens from kinetic energy literally vibrating the structure, bouncing it around. Too much bouncing around, and the electromagnetic energy that normally holds the triple helix structure in place can’t keep things together. As the energy increases, the collagen changes even more, tightening and shrinking up to about a third to a fourth of its original length. (There’s only one way for a protein to be native, but many ways for it to be wrong.)
Acids can also denature the collagen protein: their chemical properties provide the necessary electromagnetic pull to disrupt the secondary bonds of the helical structure. It’s only the twisting that goes away during denaturing in collagen; the crosslinks remain in place and the strands remain intact. In this form, collagen is like rubber—it actually is a rubber from a material science point of view—and for this reason you’ll find its texture...well, rubbery.
Given even more heat or acid, though, the collagen structure undergoes another important transformation: the strands themselves get chopped up and lose their backbone, and at this point the collagen has no real large-scale structure left. This reaction is called hydrolysis—thermal hydrolysis in the case of heat, acid hydrolysis in the case of acid. Hydrolysis takes time due to the amount of energy needed to break the bonds and the stochastic processes involved.
Hydrolyzing collagen not only breaks down the rubbery texture of the denatured structure, but also converts a portion of it to gelatin. (This is where gelatin—the stuff that makes Jell-O—comes from!) When collagen hydrolyzes, it breaks into variously sized pieces, the smaller of which are able to dissolve into the surrounding liquid, creating gelatin. Gelatin gives dishes such as braised oxtail, slow-cooked short ribs, and duck confit their distinctive mouthfeel. Gelatin can also be extracted and added to other dishes, making gelatin desserts, aspics, and many other products.
Since dishes like short ribs and braised oxtail rely on gelatin to provide that wonderful texture, they need to be made with high-collagen cuts of meat. Trying to make a beef stew with lean cuts will result in tough, dry meat. The actin proteins will denature (recall that this readily occurs at temperatures of 150–163°F / 66–73°C), but the gelatin won’t be present in the muscle tissue to mask the dryness and toughness brought about by the denatured actin. Don’t try to “upgrade” your beef stew with a more expensive cut of meat; it won’t work!
“Great,” you might be thinking, “but how does any of this tell me whether I need to slow-cook a piece of meat?” Think about the piece of meat (or fish or poultry) that you’re working with and consider what part of the animal it comes from. For a land-based animal, those regions of the animal that bear weight generally have higher levels of collagen.
This should make sense. Because the weight-bearing portions have a higher load, they need more structure, so they’ll have more connective tissue. This isn’t a perfect rule of thumb, though, and cuts of meat generally have more than one muscle group in them.
For animals like fish, which don’t have to support their weight on land, the collagen levels are much lower. Squid and octopus are notable exceptions to this weight-bearing rule. Their collagen provides support equivalent to that of bone structures for fish. The trick to cooking them is either to give them a very brief exposure to heat, keeping the proteins native, or to give them enough time at temperature to hydrolyze. Anything in between, and you’ve got rubber.
Another rule of thumb on collagen: older animals have higher levels of collagen. As animals age, the collagen structure has more time to form additional crosslinks between the strands in the collagen helix, resulting in increased toughness. This is why older chickens are traditionally cooked in long, slow roasts. (The French go so far as to use different words for old versus young chickens: poule instead of poulet.) Most animals raised for meat are young at time of slaughter, so age is as important a factor as the type or cut of meat.
The other easy rule of thumb for collagen levels is to look at the relative price of the meat: because high-collagen cuts require more work to cook and come out with a generally drier texture, people tend to favor other cuts, so the high-collagen cuts are cheaper.
Try marinating a small cube of meat in mashed up papaya—which contains an enzyme, papain, that acts as a meat tenderizer by hydrolyzing collagen—and then feeling its texture.
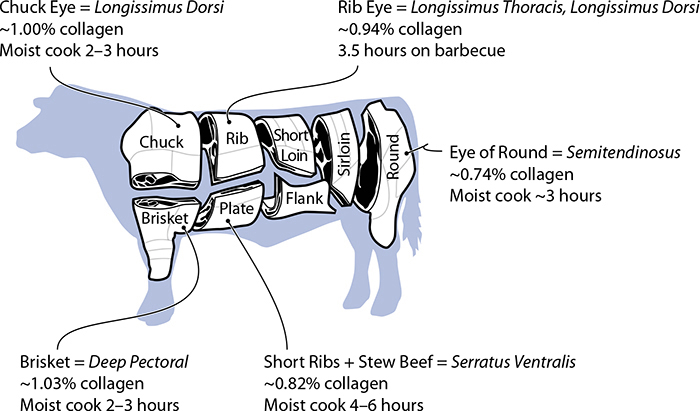
Cuts of meat from a part of an animal that supports its weight will be higher in collagen and need a longer cooking time—primarily muscles in the chuck, rib, brisket, and round.
Squid was a culinary mystery to me for a long time. You either cook it for a few minutes or an hour; anywhere in between, and it becomes tough, like chewing on rubber bands. (Not that I chew on rubber bands often enough to say what that’s like.) Why is this?
The collagen in squid is enjoyable in either its native state or hydrolyzed state, but not in its denatured state. It takes a few minutes to denature, so with just a quick pan sear it remains in its native state (tossed with some fresh tomatoes and dropped on top of bruschetta, it’s delicious). And hydrolysis takes hours to occur, so a slowly simmered braised octopus turns out fine. Braising it in tomatoes further helps by dropping the pH levels, which accelerates the hydrolysis process.
To make a simple squid bruschetta, start by preparing a loaf of French or Italian bread by slicing it into ½” / 1 cm slices. You can create larger slices by cutting on a bias. (Save the triangular end piece for munching on when no one is looking.) Lightly coat both sides of the bread with olive oil (this is normally done with a pastry brush, but if you don’t have one, you can either fold up a paper towel and “brush” with it or pour olive oil onto a plate and briefly dip the bread into it). Toast the bread. A broiler works best (the slices of bread should be 4–6” / 10–15 cm from the heat). Flip the slices as soon as they begin to turn golden brown. If you don’t have a broiler, you can use an oven set to 400°F / 200°C. For small batches, a toaster also works.
Once your bread is toasted, place it on a plate and store it in the oven (with the heat off) so that it remains warm.
Slice with a knife or, better yet, cut into bite-sized pieces using kitchen shears:
1 |
pound (450g) squid (either a mix of bodies and tentacles or just bodies) |
Bring a sauté pan up to medium heat. You want the pan hot enough so that the squid will quickly come to temperature. Add a small amount of olive oil—enough to coat the pan thinly when swirled—and drop the squid into the pan.
Use a wooden spoon or silicone spatula to stir the squid. Take note when it starts to turn white—it should become subtly less translucent—and cook it for another 30 seconds or so. Add to the pan and toss to combine:
1 |
cup (250g) diced tomato (about 2 medium tomatoes, seeds removed) |
1 |
tablespoon (5g) fresh herbs, such as oregano or parsley |
¼ |
teaspoon (1g) sea salt |
|
Ground pepper to taste |
Transfer the squid and tomato topping to a bowl and serve it with the toasted bread.
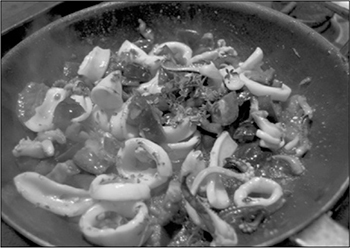
Try using a pair of kitchen shears to snip the squid into small pieces directly into a hot pan. Add tomatoes and herbs, toss, and serve.
Duck confit—duck legs cooked in fat—tastes entirely different from duck cooked almost any other way. It’s like bacon and pork—to quote Homer Simpson, they’re from “some wonderful, magical animal.” (Apparently my magical animal is the duck...)
Good duck confit is succulent, flavorful, tender, mouth-watering, and perhaps a bit salty. Cooking duck “confit-style” is all about converting tough collagen proteins into gelatin.
I’m a pragmatic cook. Traditional recipes for duck confit prescribe a long, drawn-out affair, which is fine for a leisurely Sunday afternoon spent in the company of friends and a bottle of good wine, but doesn’t line up with keeping things simple.
The secret to duck confit is in the time and temperature, not the actual cooking technique. The upshot? You can make duck confit in a slow cooker or in an oven set at an ultra-low temperature. The type of fat used to cook the duck doesn’t matter either; some experiments have shown that duck confit cooked in water and then coated in oil is indistinguishable from traditionally cooked duck confit. Regardless, definitely skip the exotic block of duck fat; duck legs are expensive enough as it is.
Rub salt into the outside of the duck legs, 1 per person, covering both the side with skin and the side with meat exposed. I use roughly 1 tablespoon (18g) of salt per duck leg; you want enough to coat the outside thoroughly.
Place the salted duck legs in a bowl or plastic bag and store them in the fridge for several hours to brine. Salting the meat adds flavor and draws out a little bit of the moisture, but if you’re in a real rush, you can skip this step and just lightly coat the duck legs with a few pinches of salt. After dry-brining the duck legs, wash off all the salt.
Remember: store raw meats in the bottom of the fridge so if they drip, the runoff won’t contaminate fresh produce or ready-to-eat foods.
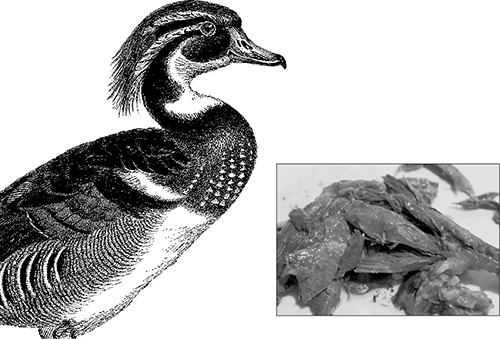
Duck legs that have been cooked long enough fall apart easily because most of the collagen and connective tissues that normally hold muscles together are gone.
At this point, you have a choice of heat sources:
Slow-cooker method
Arrange duck legs in the bowl of a slow cooker or in a multipurpose rice or pressure cooker. Cover them with oil (I use canola or olive oil) and set the cooker to slow-cook mode for at least 6 hours (preferably 10–12).
Oven method
Arrange duck legs in an oven-safe pan and cover them with oil. Place them in an oven set at 170°F / ~80°C for a minimum of 6 hours.
The duck legs will become more tender with longer cook times. I’ve cooked batches of 36 duck legs overnight using a large pot held at temperature in an oven. If you do cook a large batch, remember that the core temperature needs to get to about 140°F / 60°C within 2 hours. In this case, heat the oil up to ~250°F / 120°C before placing the duck legs in it. This way, the hot oil will impart a solid thermal kick to get the cold legs up to temperature faster.
After it’s cooked, the duck skin will still be flabby and, frankly, gross. But the meat should be tender and yield with a bit of poking. You can either remove the skin (pan-sear it by itself for duck lardons!) or score the skin with a knife and then pan-sear the skin side of the duck legs to crisp it up.
If you are not going to use the duck legs straightaway, store them in the fridge.
After cooking, the oil will be a blend of duck fat and your starting oil. Save it! You can also use it for sautéing greens and shallow-frying potatoes.
Notes
• Traditional recipes call for duck fat instead of olive oil. One advantage to the duck fat is that, upon cooling to room temperature, it solidifies, encasing and sealing the duck leg in a sterilized layer of fat, somewhat like how some jams are preserved with a wax seal. If you were living in France a century ago, this would’ve been a great way to preserve duck legs for a long winter, but with the invention of refrigeration and modern grocery stores, there’s no need for the duck fat to store the meat safely for the few days it might last. Use olive oil. It’s cheaper and healthier.
• If you pour off the oil and liquid into another container, a layer of gelatin will separate out on the bottom once it cools. Use that gelatin! Try tossing it into soups.
Prepare two duck legs, confit-style, as just described. These can be done in advance and stored in the fridge. If you’re not in the mood to wait a day, check if your grocery store sells prepared duck confit, or if you have a pressure cooker, use it to rapidly cook the duck legs.
In a large pot, bring salted water to a boil for making pasta.
Prepare the duck meat by pulling the meat off 2 legs of duck confit, discarding the bones and skin or saving them for stock. In a pan, lightly sauté the duck leg meat over medium heat to brown it.
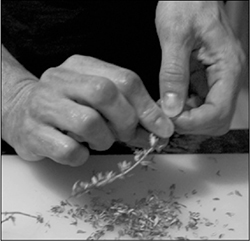
To strip the leaves, grip near the bud end of the plant...

...then run your fingers down toward the base of the stem.
Add to the pan:
28 |
ounce (800g) can diced tomatoes |
8 |
ounce (225g) can tomato sauce |
¼-½ |
teaspoon (0.5–1g) cayenne pepper |
Simmer the tomatoes and tomato sauce for 5 minutes or so. While the sauce is simmering, add to the pot of boiling water and cook per the directions on the package:
1/3 |
pound (150g) long pasta—ideally, pappardelle (an egg-based noodle with a wide, flat shape) or spaghetti |
Once the pasta is cooked, strain (but do not rinse) it and add it to the sauté pan. Add and stir to thoroughly combine:
2 |
tablespoons (2g, about 12 sprigs) fresh oregano or thyme leaves (dried is nowhere near as good) |
½ |
cup (50g) grated Parmesan cheese |
¼ |
cup (30g) grated mozzarella cheese |
Notes
• You might find it easier to transfer the duck mixture to the pasta pot and stir in there, because your frying pan might not be big enough. When serving, you can grate Parmesan cheese on top and sprinkle on more of the oregano or thyme leaves.
• The secret to this recipe is its combination of ingredients: the heat of the cayenne pepper is balanced by the fats and sugars in the cheese, the fats in the duck are cut by the acids in the tomatoes, and the aromatic volatile compounds in the fresh herbs bring a freshness to this dish that’s just plain delicious. If the world were going to end tomorrow, I’d want this tonight.
• When you’re separating duck meat from a cold duck leg (from the fridge), the duck fat will be whitish and slippery; the meat will be darker and more strandlike. When in doubt, if it looks yummy, it probably is. Since the meat is to be browned, don’t include the dark jellylike stuff—that’s gelatin—as it will melt and then burn as the water boils off.
• When pulling fresh thyme off the stem, be careful not to get the actual stem in the food. It’s woody, chewy, and not enjoyable. Pinch the top of the stem with one hand and run the fingers of your other hand down the stem, against the direction the leaves grow in, to strip them off.
Short ribs and other high-collagen cuts of meat aren’t difficult to work with; they just require time at a temperature at which the collagen can hydrolyze. This is what slow-cooking the meat achieves. Either use a cooker with slow-cook mode, or use an oven-safe baking pan and cook for several hours—this is great in the cold months of winter!
(While you can do this quicker in a pressure cooker, not everyone has one, and even if you do, you can’t see what’s happening to the texture of the meat as it cooks.)
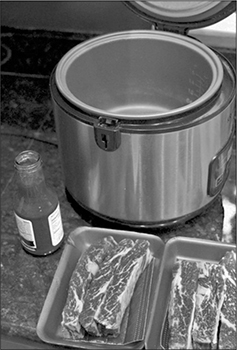
This is an intentionally easy recipe, but don’t let that fool you about its taste: slow-cooked meats can be amazingly good, and if you’re cooking for a dinner party, they make for easy work when you go to assemble the dinner.
If you have a rice cooker or pressure cooker, check to see if it has a slow-cook setting. In this mode, the cooker will heat foods to a temperature typically in the range of 170–190°F / 77–88°C, which is warm enough to be safe from bacterial contamination and cool enough to not steam-dry the meat.
If you don’t have a pressure cooker, use an oven-safe baking pan and cover it with aluminum foil before baking the short ribs in an oven set to 180°F / ~80°C.
Pour a bottle of barbecue sauce into the cooking container. (I’m listing store-bought sauce here because it’s convenient, which is part of the appeal of slow cooking; to make your own sauce, use the recipe on page 312.)
Add the short ribs, arranging them in a layer so that the barbecue sauce covers the meat.
Slow-cook the short ribs for at least 4 hours (longer is fine). Try starting this in the morning before going to work—the slow cooker will keep the food safe, and the extra time will help ensure that the collagen is fully dissolved.
Notes
• Ideally, you should pan-sear the short ribs for a minute or two before cooking. This will cause browning reactions, bringing a richness to the final product.
• Keep in mind the danger zone rule covered earlier. Don’t load up a slow cooker with so much cold meat that the cooker will be unable to raise the temperature above 140°F / 60°C within a 2-hour period.
• Try adding other ingredients to the sauce, or making your own sauce if you like. I’ll often pour a tablespoon or so of wine or port into the empty BBQ sauce jar to “rinse out” the thick sauce, then pour the port-sauce slurry into the slow cooker.
158°F / 70°C: Vegetable Starches Break Down
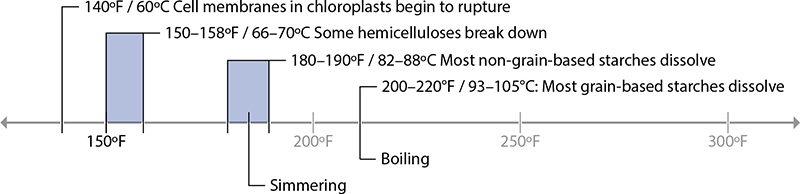
Temperatures related to plants and cooking.
Whereas meat is predominantly proteins and fats, plants are composed primarily of carbohydrates. Compared to proteins in meat, which have a narrow temperature range between undercooked and shoe leather, carbohydrates are generally more forgiving, although cooking them too long will lead to mushy textures and color loss.
Cells in plants contain different compounds of culinary interest. As you’d expect, the different compounds have different properties. Here are five of the more common ones and how they react to heat:
• Cellulose gives plant cell walls their primary structure. It’s completely indigestible to humans in its raw form and gelatinizes at such a high temperature, 608–626°F / 320–330°C, that we can ignore it while discussing chemical reactions in cooking. (There’s evidence that pressure-cooking beans does break down some cellulose—always exceptions to the rule!)
• Lignin is fibrous, stringy stuff that shows up in secondary cell walls that appear in some plant cells, like those in wood. Like cellulose, lignin doesn’t change much in cooking. When it does show up, it gets stuck between your teeth and feels vaguely like chewing on wood (I’m looking at you, asparagus). The base of an asparagus stalk can develop a fair amount of lignin, which is why you can (and should!) snap it off.
• Hemicellulose, not the same thing as cellulose, is any of a large variety of polysaccharide compounds found in cell walls that hold the cellulose and lignin together. It’s easily broken down by acids, bases, and enzymes starting in the temperature range of 150–158°F / 66–70°C. In cooking tender plants, it’s the hemicelluloses that we’re targeting, being mindful to not break them down too much in order to avoid mushy textures. Unlike lignin and cellulose, hemicellulose is partly soluble in water. These three compounds make up the bulk of insoluble dietary fiber and help your body flush out the digestive tract.
• Starch is a plant’s energy store and is what gives us energy when we eat plants. Starches as they natively exist are semicrystalline structures made up of two carbohydrate molecules, amylose and amylopectin. When heated and exposed to water, the semicrystalline structure gelatinizes—absorbs water, melts, and breaks down. Upon cooling, it continues to hold on to the absorbed water. Cooking converts that semicrystalline structure to a form that can be more easily digested; this is the basis for the theory that humans gained an advantage over other species when we first started cooking plants. There are a few temperature ranges involved in gelation—one range for amylopectin absorbing water and a higher one for the melting of the amylose structure, and then a potential third range for when the gel sets during cooling. These temperatures depend on the ratios and specific structures of amylose and amylopectin, as well as environmental factors like the acidity or alkalinity of the liquid they’re exposed to. In cooking, which one we care about depends on the way starch is being held onto by the plant’s cells. We care primarily about the higher temperature range where amylose dissolves, which typically happens at between 135° and 220°F / 57° and 105°C.
• Pectin is cellular glue that holds cell walls together, similar to how collagen holds muscle tissues together. Firmer fruits get their structure from pectin compounds; the skins and cores of apples are 10–20% pectin. These compounds begin to degrade when heated above 140°F / 60°C in acidic conditions (pH of 1.5–3). For pectin to gelatinize in jams and jellies, the recommended target temperature is 217°F / 103°C (easily reached with sugary liquids). Pectin isn’t a major component in most fruits and veggies in cooking, but for jam making it’s critical (see page 419).
How does all of this relate to cooking your veggies or fruits? You can determine what temperature you need to cook fruits and vegetables to based on their composition. The length of time at temperature, the amount of moisture in the tissue, and processing conditions will impact the exact temperatures needed, so treat these as guidelines:
• Cook root vegetables such as potatoes above 175°F / 80°C. Cooking to higher temperatures will yield additional texture changes from water steaming up (fluffier baked potatoes), but slightly lower temperatures are fine, as you can see in potato gratin. Root vegetables have a higher percentage of amylopectin as compared to grains, which means the starches from them gelatinize more easily (typically at around 135–160°F / 57–70°C). When cooking, use a temperature range a bit above this for reasonable cooking times. Root vegetables contain enough moisture that you don’t need to worry about adding a liquid for the starch to absorb during gelation. Of course, if you’re working with a starch extracted from a plant—arrowroot or potato starch (sometimes called potato flour, but it’s actually starch)—it’ll need a liquid to absorb. (See page 408 for more.)
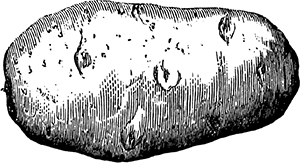
• Cook grains like rice in near-boiling liquid. While the amylopectin degrades at lower temperatures, there’s more amylose in the structure of grains, and that doesn’t dissolve until around 200–220°F / 93–105°C. (If you’re familiar with sous vide cooking—see page 320—this is why you can sous-vide-cook root vegetables but not grains.) Most grains also don’t have enough water in them to gelatinize—they’re seeds meant to last through the winter!—so you must use water when cooking them.
• Cook firm fruits like apples long enough for the pectin in the cell walls to break down. The temperature depends upon how acidic the fruit is; somewhere between 140 and 212°F / 60 and100°C is necessary. Use firmer fruits when poaching to avoid mushy results! Likewise, the secret to great fruit pies, according to some, is to mix two varieties or even species of fruits: one that’s firm and remains intact when heated combined with a second type that breaks down under cooking. Try combining a baking apple with a sauce apple, like Granny Smith with McIntosh, or mix types: baking pears like Bosc or Bartletts with sauce apples like McIntosh, Cortland, or Golden Delicious. (For more about pectin, see page 419.)
• Cook fruits and veggies that have high amounts of water at moderate temperatures: 150–158°F / 66–70°C is sufficient to break down the hemicelluloses. Less sturdy leafy greens, like spinach, can be quickly wilted in a pan with a small amount of water or oil; even a quick toss in hot pasta that was just strained will do the trick. Sturdier greens, like Swiss chard and kale, should have the stalks and ribs removed and cooked first, as those parts of the plant have more structure and will need more of the hemicelluloses broken down to become pleasantly soft.
There are other compounds in fruits and vegetables that change when heated. One in particular is worth pointing out: chlorophyll. When green vegetables are cooked, their color shifts from vivid green to dull brown because of this compound changing. The membranes around the chloroplasts in the cells rupture under heat, causing the chlorophyll to react and change into a different molecule (pheophytin) that has a brownish color. This conversion is pH and temperature dependent, so more acidic environments speed it up while lower heat slows it down. Adding a pinch of baking soda to cooking water will inhibit the reaction. (Too much baking soda, though, causes other reactions—we’ll cover water chemistry in the next chapter.) Taking care to cook in hot but not boiling water and not overcooking is the traditional solution, and quickly transferring the cooked foods to very cold water will drop their temperatures and stop the reaction as well. Personally, I err on the side of undercooking string beans and asparagus—slightly undercooked and they’re still tasty, but overcooked? Yuck.
Sautéing something like diced veggies and want to tenderize but not brown them? Toss in a splash of water to drop the temperature if it gets too high.
Microwave ovens make quick work of cooking firmer greens and high-starch vegetables. Yams, potatoes, and other root vegetables all respond well to a few minutes of cooking in a microwave. You can steam vegetables in a microwave, too!
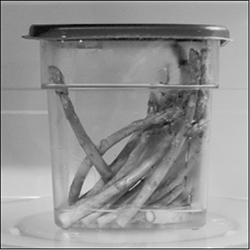
In a microwave-safe container, place asparagus stalks with the bottoms trimmed or snapped off, and add a thin layer of water to the bottom. Put the lid on, but leave it partially open so that the steam can escape. Microwave for 2–4 minutes, checking for doneness partway through and adding more time as necessary.
Notes
• This technique cooks the food using two methods: radiant heat (electromagnetic energy in the form of microwaves) and convection heat (from the steam generated by heating the water in the container). The steam circulates around the food, ensuring that any cold spots (areas missed by the microwave radiation) get hot enough to both cook the food and kill any surface bacteria that might be present.
• Try adding lemon juice, olive oil, or butter and sautéed crushed garlic to the asparagus.
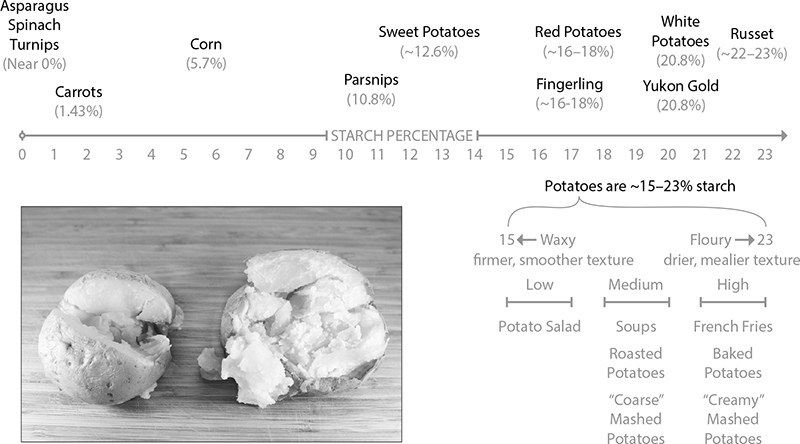
Root vegetables with higher starch levels require more time to cook, which is why roasting carrots is faster than roasting potatoes. Higher starch levels also lead to fluffier textures, as you can see in the photograph of two cooked potatoes, one low in starch (left) and one high in starch (right).
Greens like spinach and the more tender parts of hardier-leafed plants like kale cook quickly—there’s not much starch or fiber to break down. It’s all about the hemicelluloses!
In a sauté or nonstick pan preheated over medium heat, add:
2 |
tablespoons (30 mL) sesame or olive oil (enough to coat the pan) |
1 |
tablespoon (8g) sesame seeds |
Briefly toast the sesame seeds, then add:
1 |
bunch spinach, Swiss chard, collard greens, or other leafy green; stems and thick veins removed, and sliced or torn into 1" strips |
Using tongs, quickly toss the greens to coat them with oil and seeds. Your pan should be reasonably hot so that the greens heat quickly, but not so hot that the oil burns. Continue tossing the greens while cooking so that they wilt evenly. Add salt and pepper to taste.
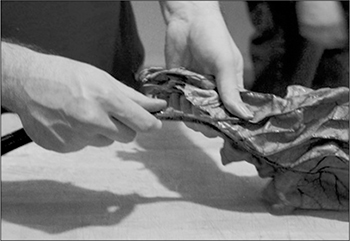
Notes
• Depending upon your tastes, extend this recipe by adding one of these combinations:
5 cloves garlic, minced; juice from half a small lemon (about 1 teaspoon / 5 mL)
2 teaspoons (10 mL) balsamic vinegar, and possibly a pinch of sugar
1 teaspoon (5 mL) sherry vinegar; ¼ teaspoon (0.3g) crushed red pepper flakes; 1 15 ounce (425g) can cannellini beans; 3 cloves garlic, minced
¼ red onion, sliced thinly and sautéed; ½ apple sliced into bite-sized pieces and cooked; handful of chopped walnuts, toasted
• Try cooking some strips of bacon, removing the bacon, and then sautéing the greens in the rendered bacon fat, adding a teaspoon or so (~5 mL) of balsamic vinegar. Dice the bacon and combine the two, and optionally add some blue (or other) cheese. Quantity of ingredients is really down to personal preference, so experiment!
• You can strip the stem and thicker veins from hardy greens such as Swiss chard by grabbing the stalk with one hand and the green leaf portion with the other hand, and pulling the stalk out.
When wilting greens, pull them off the heat before they’re done. Carryover heat will finish them.
Poached pears are easy, tasty, and quick. Much of our enjoyment of fruit comes from not just their flavor but also their texture. Consider an apple that’s lacking in crispness or a banana that’s been bruised and become mushy: without their customary texture, their appeal is lost. But this isn’t always the case. Poaching fruits such as pears causes similar changes in the structure of the fruit’s flesh, breaking down cell walls and affecting the bonds between neighboring cells to create a softer texture that’s infused with the flavor of the poaching liquid.
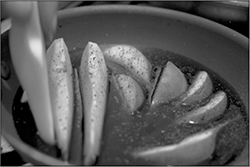
In a shallow saucepan or frying pan, place:
2 |
medium (350g) pears, sliced lengthwise (longitudinally) into eighths or twelfths, and cores removed |
1 |
cup (240 mL) red wine; or 1 cup (240 mL) water, ½ cup (100g) sugar, and 1 teaspoon (5 mL) vanilla extract |
¼ |
teaspoon (0.5g) ground pepper |
Set the pan over low to medium heat, bringing the wine to a simmer and then poaching the pears for 5–10 minutes, until soft. Flip them halfway through, so that both sides of the slices spend some time facedown in the liquid. Remove the pears and discard the liquid. (You can also reduce the liquid down into a syrup.)
Notes
• Fun chemistry fact: the boiling point of wine is lower than that of water. The exact temperature depends upon the sugar and alcohol levels, and as the wine simmers, the ratios shift. It’ll start somewhere around 194°F / 90°C. It’s doubtful that this will actually help you avoid overcooking the pears, though.
• Pears are one of those fruits that are underripe until you look away and then go rotten before you can look back. To encourage them to ripen, you can keep underripe pears in a paper bag so the plant tissue will be exposed to the ethylene gas they give off. I find I can get away with poaching pears that are a little more underripe than I might want to eat fresh, but your pears should be at least a little soft.
• Try serving this dish with caramel sauce (see page 228) and vanilla ice cream. Or try poaching other fruits, like fresh figs, and using other liquids. Figs poached in port or a honey/water syrup with a small amount of lemon juice and lemon zest added after poaching are sweet and tasty.
• You don’t need to actually measure out the ingredients. As long as the pears have enough liquid to poach in, they’ll turn out great. Add freshly ground pepper to suit your tastes.
Never use preground pepper. Preground pepper quickly loses its complex aromatic flavors—well before it makes it into your hands—leaving it with a hot spicy kick but none of the subtlety of peppercorns.
Grilling is as American as apple pie, which is to say that while it’s part of our culture, its roots can be traced back to somewhere on the other side of the Atlantic Ocean. Grilling became an American tradition after World War II, when one of the owners of Weber Brothers Metal Works came up with the Weber Grill and ignited a backyard pastime.
Whether a propane or charcoal grill is better depends on your usage. Propane grills are easier to fire up if you just want to cook a quick burger or roast a few veggies. Charcoal grills, on the other hand, take a bit more work to get going but create a hotter cooking environment that can lead to better flavor development (more browning reactions). Regardless of what you go for, grilling is a great way to cook relatively thin items such as skirt steaks, burgers, or sliced vegetables. You can also slow-cook larger items on a grill—I’ve enjoyed a few summertime afternoons drinking with friends while waiting for an entire hog to cook.
The second major difference between propane and charcoal grills is temperature. While propane itself burns at somewhere around 3,100°F / 1,700°C, by the time the heat dissipates around the grill it cools down to about 650°F / 340°C. Using a generous but reasonable amount of wood or charcoal generates a heat source with a much higher amount of thermal radiation. When I’ve metered wood and charcoal grills, I’ve gotten temperatures around 850°F / 450°C.
Grilled veggies are a fantastic treat, and easy, too. While someone might yet find a way to make lettuce kabobs work, it’s easier to stick with the classics: choose sturdy vegetables low in water content (e.g., asparagus, squash, bell peppers, onions).
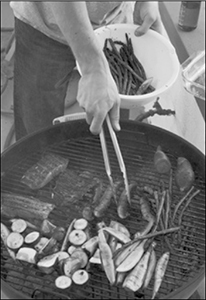
Slice your vegetables into large pieces and toss them into a bowl with a small quantity of olive oil and a few pinches of salt. You can get fancy with marinades and sauces, but if you’re working with great produce, it seems like a shame to mask the flavor.
I generally grill my burgers or whatever meat I’m cooking first, and grill the vegetables while the meat rests. Grill the veggies for a few minutes, flipping them halfway through.
Slice a sweet potato into wedges. (Can’t find sweet potatoes? Look for yams. Americans use the word yam when they really mean Ipomoea batatas.)
Coat the outside of the sweet potatoes with olive oil and sprinkle them with coarse sea salt. Place them on the grill for 10 minutes, flip, and grill until tender, about another 10 minutes. Serve while hot.
Instead of the olive oil/salt coating, you can make a sweet coating by brushing the wedges with a mixture of roughly equal parts of butter and honey melted together. Or try sprinkling red pepper flakes on the cooked wedges for a spicy version.
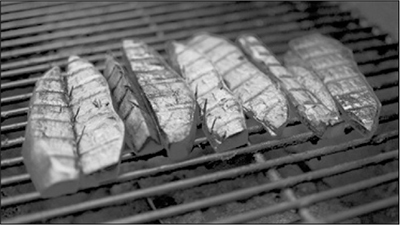
This simple mashed potato recipe uses a microwave to cook the potatoes. Cooking a potato—or any other starchy root vegetable—requires gelatinizing the starches in the vegetable. For this to occur, two things need to happen: the starch granules need to get hot enough to literally melt, and they need to be exposed to water so that the granules absorb and swell up, which causes the texture of the tissue to change. Luckily, there’s enough water naturally present in potatoes for this to happen without any intervention needed. Try popping a sweet potato in your microwave for 5–8 minutes to see—use a fork to poke holes in it first!
Microwave until cooked, about 12–15 minutes:
3–4 |
medium (600g) red potatoes |
After cooking, cut the potatoes into small pieces that can be mashed with the back of a fork. Add and mash together:
½ |
cup (120 mL) sour cream |
1/3 |
cup (80 mL) milk |
4 |
teaspoons (20g) butter |
2 |
teaspoons (2g) finely chopped fresh rosemary leaves |
¼ |
teaspoon (1g) salt (2 large pinches) |
¼ |
teaspoon (0.5g) ground pepper |
Notes
• For a tangy version, trying substituting plain yogurt for a portion of the milk.
• Different types of potatoes have different amounts of starch. Varieties with high starch content (e.g., russets, the brown ones with rough skin) turn out lighter and fluffier when baked and are generally better for baked or mashed potatoes. Lower-starch varieties (red or yellow potatoes, typically smaller and smooth-skinned) hold their shape better and are better suited for applications in which you want the potato to stay intact, such as potato salad. Of course, there’s still a lot of room for personal preference. When it comes to mashed potatoes, I prefer a coarse texture to the creamy, perfectly smooth potatoes so often shown in movie scenes associated with Thanksgiving, so I tend to use red potatoes.
