
Chapter 5. Commit Scripts
Commit scripts are a powerful way to modify the commit process. They let you transform the
configuration between the time the user types commit and the time the configuration is read by
the daemons. You can enforce custom configuration checks, automatically fix
common configuration mistakes, and dynamically expand the configuration. In
short, you can customize the configuration process to make it work for
your environment.
Use Cases
Before diving into the details, let’s take a look at some of the target use cases for commit scripts.
Custom Configuration Checks
The Junos software enforces a set of configuration checks that ensure basic configuration sanity. For example, the Junos software may prevent you from committing a BGP configuration that references a policy that is undefined, or it may prevent you from configuring the same IP address for two different BGP peers. However, these configuration checks do not ensure the configuration is correct for your environment. Rather, they merely check that the configuration may be suitable for some environment. Put differently, they check that the configuration is syntactically correct, not contextually correct. And this behavior makes sense. After all, how is the Junos software to know what makes sense in any given network?
However, you may know a certain configuration is appropriate, or inappropriate, for your environment. Some organizations distill this knowledge into standards or configuration templates. Using commit scripts, you can add configuration checks to enforce these standards.
For example, assume that you know that all BGP neighbors should be
in one of three BGP groups: internal,
peers, or customers. You can add a commit check that
ensures no additional BGP groups are configured.
Next, let’s assume your configuration standard requires all BGP
neighbors in the peers and customers groups to have both import and
export policies applied to them, and that the last policy in each policy
chain must be the deny-all policy.
You can add commit checks to enforce these constraints.
If you find the configuration changes do not meet your standards, you can have the commit script issue a warning to the user (but allow the commit process to continue), issue an error to the user (and stop the commit process), or take other actions (such as logging an error message through syslog).
This gives you a small idea of the kinds of commit checks you can do. However, there are many (almost limitless!) possibilities for commit checks.
Automatically Fixing Mistakes
Just as you can find places where the configuration does not meet your standards, you can also attempt to automatically correct the configuration.
Perhaps the best examples of this use case are in the area of MPLS
or ISIS configuration. For both protocols, something must often be
configured at both the [edit
interfaces] and [edit
protocols] hierarchy levels in order to achieve the desired
results.
For MPLS, it is often the case that any interface listed in the
[edit protocols mpls] hierarchy
should also have family mpls
configured on the interface. For ISIS, any non-passive interface listed
in the [edit protocols isis]
hierarchy should also have family iso
configured on the interface.
If this is not the case, using a commit script, you can detect this error and attempt to correct it by adding the missing configuration. You can also include your configuration corrections in the static configuration database.
Dynamically Expanding Configuration
Often, configuration elements are formed from a template. For example, all customer BGP sessions may use the same configuration, except for the IP address, AS number, import policy, and export policy. This network standard allows customer BGP configurations to be simplified to a template with variables that are replaced as appropriate. For example, the template in a particular network might look like Example 5-1.
Example 5-1. A sample BGP configuration template
protocols {
bgp {
group customers {
neighbor $ip_addr {
import [ filter-customer-generic prefix-size
handle-communities as-$peer_as deny-all ];
family inet {
unicast {
accepted-prefix-limit {
maximum $limit;
teardown 80 idle-timeout 10;
}
}
}
family inet6 {
unicast {
accepted-prefix-limit {
maximum $limit;
teardown 80 idle-timeout 10;
}
}
}
export [ $route_type deny-all ];
peer-as $peer_as;
}
}
}
}Here, the critical pieces of information are the neighbor IP, peer AS, prefix limit, and type of routes the user wants to receive. You can write a commit script that takes those options as input parameters and outputs the correct neighbor configuration. You can even choose to have the commit script dynamically modify the configuration every time there is a commit. This functionality has the impact of reducing the size of the candidate configuration, while also ensuring that any changes to the template are reflected in the existing BGP sessions. (In other words, the configuration can be dynamically updated to reflect the new template when the configuration template is updated.)
A commit script’s input values can be stored in apply-macro
configuration statements or derived from other configuration elements,
or you can simply use default values. For example, the configuration for
a customer BGP session could look like Example 5-2.
Example 5-2. A sample configuration snippet that provides values for a commit script
interfaces {
ge-1/0/0 {
unit 0 {
family inet {
address 192.168.1.1/30 {
apply-macro bgp {
peer_as 65534;
route_type full_routes;
}
}
}
}
}
}The commit script can read this configuration snippet and infer
the remote IP address, apply a default prefix limit of 10,000 prefixes,
and use the supplied values from the apply-macro bgp configuration hierarchy. It
can expand this configuration to that shown in Example 5-3.
Example 5-3. A sample configuration after a commit script has applied a template
interfaces {
ge-1/0/0 {
unit 0 {
family inet {
address 192.168.1.1/30;
}
}
}
}
protocols {
bgp {
group customers {
neighbor 192.168.1.2 {
import [ filter-customer-generic prefix-size
handle-communities as-65534 deny-all ];
family inet {
unicast {
accepted-prefix-limit {
maximum 10000;
teardown 80 idle-timeout 10;
}
}
}
family inet6 {
unicast {
accepted-prefix-limit {
maximum 10000;
teardown 80 idle-timeout 10;
}
}
}
export [ full_routes deny-all ];
peer-as 65534;
}
}
}
}There are, of course, many options for expanding the
configuration. Some users may prefer to configure the customer’s BGP
information, stored in the apply-macro
bgp statement, under the [edit
protocols bgp] hierarchy, while others may prefer to group all
customer information together in the [edit
interfaces] hierarchy. Likewise, some users may prefer to keep
the simple template values (shown in Example 5-2) in their static
configuration, while others may prefer to have the commit script expand
the template one time and store the expanded configuration (shown in
Example 5-3) in their static
configuration. Whichever way you choose to use commit scripts, they can
help you apply templates to your network.
Basic Execution Flow
You configure commit scripts at the [edit system
scripts commit] configuration hierarchy level. When a user
initiates a commit operation, MGD launches a utility (called CSCRIPT) to
process each commit script. After the results of each commit
script have been incorporated into the commit process, the commit process
continues and the final configuration is committed.
This flow is one of the only places where something in your configuration takes effect before the commit process has completed. But it makes sense, if you really think about it.
When a user initiates a commit operation, MGD processes the
configuration through the commit scripts listed in the
candidate configuration. If a user makes changes to
the set of commit scripts listed in the candidate configuration, the new
set of commit scripts will be used to process any commit operations for
that candidate configuration, even a commit
check.
This makes sense if you consider commit scripts to be an indispensable part of the configuration. (Indeed, they may be indispensable, as the actual committed configuration is the candidate configuration as modified by the commit scripts.) Therefore, don’t be surprised when Junos uses your newly configured commit scripts before they are even completely committed the first time.
Warning
Commit scripts are applied whenever a commit operation occurs. In
this context, the commit check
command counts as a commit operation. Therefore, even running commit check can cause a change in the
candidate configuration:
[edit] user@r0#show | compare[edit] user@r0#commit check[edit interfaces interface ge-1/0/0 unit 0] warning: Adding 'family mpls' to ge-1/0/0.0 configuration check succeeds [edit] user@r0#show | compare[edit interfaces ge-1/0/0 unit 0] + family mpls;
XML Transformations
When you execute a SLAX or XSLT script, the script undertakes an XML transformation. As illustrated in Figure 5-1, the script works on an input document and transforms it into an output document.

Figure 5-1. A sample XML transformation
With Junos SLAX or XSLT scripts, the input document contains information for the script’s execution and the output document contains information for the Junos software. In the case of op or event scripts, the output document contains XML data that the CLI can render for the user. In the case of commit scripts, the output document contains instructions for how the Junos software should proceed with the commit operation.
Commit Script XML Input and Output Documents
MGD (through CSCRIPT) sends each commit script a copy of the candidate configuration
(in XML format) as its input document. The candidate configuration
includes the expansion of configuration data from configuration groups.
(Essentially, commit scripts work on the output of show | display
inheritance.)
Each commit script gets the same candidate configuration. Commit scripts do not see each other’s changes. Therefore, you should ensure that each commit script does not take actions that rely on another script’s changes, or which may interact in unpredictable ways with the changes your other scripts make.
Likewise, MGD (through CSCRIPT) expects to receive an XML output
document (which may include zero or more directives) from the commit
script. This XML response document’s root tag must be the <commit-script-results> tag; however,
the Junos infrastructure should produce this tag for you automatically.
Within the response document, you can include directives specified by
the following XML tags:
<xnm:error>Contains an error message that is displayed to the user, and directs MGD to stop the configuration process.
<xnm:warning><syslog><change>Directs MGD to make the indicated configuration change in the candidate database prior to completing the commit process.
<transient-change>Directs MGD to make the indicated configuration change to the committed configuration as part of the commit process, but not to include the change in the configuration that is shown to users. (The difference between
<change>and<transient-change>is explained further in “Changing the Configuration”.)
Note
In practice, you don’t always need to use these XML tags directly. Instead, you can sometimes call predefined templates that insert these tags for you. However, they are listed here so you can better understand the communication mechanism that occurs behind the scenes.
Figure 5-2 illustrates commit
script input and output documents. The figure shows a sample XML input
document containing a Junos configuration. The SLAX or XSLT script
processes the input and produces an XML output document. The output
document contains an error indicating that the configuration for
interface ge-0/0/0 used an
unauthorized VLAN value.
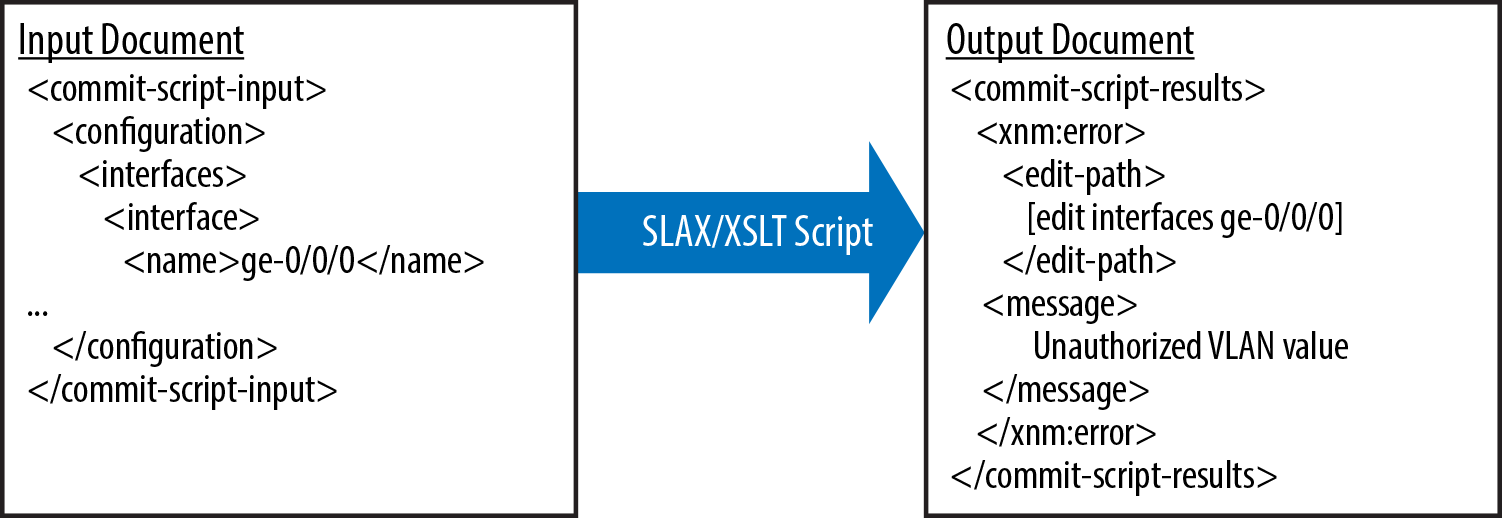
Figure 5-2. Sample commit script XML documents
Optimization for large configurations
With large configurations, the process of generating the configuration, passing it to
CSCRIPT, and parsing it within CSCRIPT can take a large amount of time
and memory. To overcome this limitation, you can configure [edit system scripts commit direct-access].
When you configure this setting, CSCRIPT directly reads the shared
configuration database instead of expecting to receive a copy from
MGD. This should reduce processing time and memory consumption for
large configurations.
Passing information to commit scripts
One of the useful ways you can pass information to commit scripts is using the
hidden apply-macro
configuration statement. As demonstrated in Example 5-2, the apply-macro statement takes a name and a
list of attribute/value pairs. The apply-macro statement is meaningless to any
Junos daemon. Its raison d'être is to provide a
way to pass information to commit scripts.
When you write a commit script, you can program it to read data
from apply-macro statements that
appear at various places in the configuration. Your commit script then
processes this information according to the logic you provide.
In addition to users manually configuring apply-macro statements, you can also use
this statement as a communication mechanism between the current
invocation of a commit script and a commit script invoked during a
future commit. For example, a commit script might add an apply-macro statement to tell itself which
template version was used to expand a piece of the configuration. By
reading this data, it can then ensure it uses the same template
version during future invocations.
Using apply-macro statements,
you can do better than passing a single set of global arguments to the
commit script. In fact, you can pass a different set of arguments for
each configuration stanza, if necessary. This can be a powerful tool
that you can use to customize the way commit scripts work.
Warning
The apply-macro statement
is useful to pass information to future commit operations (future
invocations of a commit script), but it cannot be used to pass
information between commit scripts during the same commit operation.
As explained at the beginning of “Changing the Configuration”, each commit script
receives its own copy of the candidate configuration. A commit
script cannot see the changes another commit script may make to the
candidate configuration during the commit process.
Performing Other Operations
While processing the configuration, a commit script can execute operational RPCs against the local system, or even against remote systems. “Interacting with Operational State” contains a description of the way to execute these RPCs.
While these operations are allowed, care must be taken to use the information appropriately. The general Junos philosophy is to allow configuration that is valid even if it is not meaningful in the current operational state. A good example of this is the ability to preconfigure interfaces. Even though an interface may not be present at the time the configuration is committed, Junos still accepts valid configuration statements for that interface. Once the interface becomes available, Junos begins using that portion of the configuration.
Likewise, there may be cases where a user attempts to configure statements that are not currently meaningful in your environment. Perhaps the user is trying to preconfigure a customer BGP session, or preconfigure a new internal route reflector. If you add commit checks that, for example, condition acceptance of a BGP configuration on whether the router can currently ping the BGP neighbor, you may prevent the user from including valid configuration. Even worse, when he tries to commit an unrelated configuration change later, the commit may fail if any BGP neighbors are unreachable.
While there are times that operational state can help inform commit checks, you must take care to ensure your checks are not so stringent that they prevent users from making valid changes, or cause unrelated commits to fail inappropriately.
Changing the Configuration
Commit scripts can make two kinds of changes to the configuration: permanent changes and transient changes. Both have value in different circumstances. Thankfully, you can choose which to use. A commit script can use either kind or even both kinds of changes.
Let’s give an example of the two kinds of changes, referring back to “Dynamically Expanding Configuration”. (At this point, you might also find it useful to refer to the information in “Creating the merged configuration view”, including Figure 1-9.)
Prior to committing the candidate configuration, it contains the statements shown in Example 5-2. A commit script expands the candidate configuration to the statements shown in Example 5-3. This expanded configuration becomes part of the “post-inheritance” static configuration, which is combined with other data sources and passed to the Junos daemons to activate.
If the commit script makes this change as a permanent change, the
committed configuration looks like Example 5-3. Running show
configuration displays the configuration from Example 5-3, and the commit script does
not expand the configuration again during future commit operations.
On the other hand, if the commit script makes this change as a
transient change, the committed configuration looks like Example 5-2. Running show configuration displays the configuration
from Example 5-2, and the commit
script does expand the configuration again during each future commit
operation.
As you can imagine, there are cases where each of these options may be desirable. You should be able to integrate either approach with proper operational policies and procedures to produce a solution that meets your users’ needs.
Handling Transient Changes
Using transient changes provides several important benefits. First, it lets you
group configuration in ways that you find useful. (Referring again to
Example 5-2, you can see how an
organization that likes to configure all customer information at the
interface level may find this sort of configuration useful.) Second, it
reduces the size of the committed configuration by only showing the
pieces that are unique to a particular customer. The defaults are not
shown. Third, because the commit script performs the expansion for each
commit operation, using transient changes allows a company to easily
update a template and apply that update to all customer configurations.
(This can be especially handy when it is necessary to fix an error in
the template!) Fourth, it makes it easy to remove
the configuration. When you remove the apply-macro statement, the software will not
expand the (now-deleted) configuration in the next commit
operation.
On the other hand, because the expanded configuration is not included in the configuration database users see, some users may feel that transient changes obscure the full configuration. Additionally, there may be legitimate concern about applying updated templates to the existing configuration. Also, because the expanded configuration is not stored in the committed configuration, there may be concerns about the traceability of configuration changes. Finally, because the expanded configuration does not appear in the committed configuration, you cannot easily make changes to just one aspect of it.
To address these concerns, we suggest the following methodology:
Train users to use the
display commit-scriptspipe command to see the expanded configuration.Write scripts to support template versioning. When a new configuration snippet is added, the scripts can automatically use the latest template version and store that version identifier with the configuration snippet. Then, as you update the configuration templates, you can choose whether to have the scripts apply updates to various template versions. This process lets you quickly deploy changes to existing customer configurations, while also still allowing you to deploy template changes that will only apply to new customer configurations.
Treat commit script changes like configuration changes. (In fact, commit script changes essentially are configuration changes.) Always deploy new commit script versions with a new name, and leave the old files available for some time. This recommendation has a few benefits:
The new commit script is only used once you modify the configuration to use the new commit script. When you commit the configuration change to use the new commit script, the router will immediately return any errors caused by the way the commit script expanded the present router configuration. If this initial commit detects errors, you can easily rollback the configuration to resume using the previous commit script.
If you encounter unexpected operational results after you commit the new commit script, you can easily rollback the configuration to a point that uses the old commit script. (In fact, you can even use
commit confirmedif you follow this recommendation.)This practice provides traceability to determine the configuration that was deployed at any given point. A previously active configuration can be expanded from the rollback configuration and the commit scripts referenced in that rollback configuration.
There is no question of whether you actually activated the configuration produced by the new commit script. If you merely update the contents of the existing commit script file, without changing its filename, the new commit script will not alter the active configuration until the next time you perform a commit.
If you think users may need to customize the configurations expanded from templates, you should either use permanent changes (instead of transient changes), or provide a user-configurable option to expand a particular configuration stanza using permanent changes.
Warning
The display commit-scripts
pipe command dynamically applies the commit scripts listed in the
configuration. If you change the contents of a commit script file on
the disk, without changing its name, the output from the display commit-scripts pipe command reflects
the contents of the new commit script, even if you have not yet
committed the configuration using the new commit script.
Therefore, if you modify the contents of a commit script file on
the disk without changing its name, the output from the display commit-scripts pipe command may not
accurately reflect the active configuration.
This is yet another reason to follow the practice we recommend in this section when making changes to your commit scripts.
Handling Permanent Changes
After reading about transient changes, you might think that using permanent changes will be a piece of cake. In reality, they have their own considerations.
First, because permanent changes modify the committed configuration, the size of the committed configuration can grow very quickly. This behavior may prove to be unwieldy in some situations. Second, because permanent changes are expanded and applied only once, you cannot easily correct errors in your templates. Third, if you need to remove the configuration, you will need to manually delete all the configuration elements the commit script created.
To effectively use permanent changes, we suggest the following methodology:
Delete the appropriate
apply-macrostatements as part of your configuration change. This action ensures the commit script does not attempt to reapply the same configuration changes the next time you commit the configuration.Use the hidden
apply-flags omitconfiguration statement to hide pieces of the configuration hierarchy that are cumbersome for users to view directly on a regular basis. If you do this, you should educate users that they can use thedisplay omitpipe command to view the hidden portions of the configuration.Use good version control on your commit scripts, including the practices we suggest in “Handling Transient Changes”. Here, the reasoning is slightly different; however, it is still good practice to ensure you can track which commit scripts were in use at a given time, and be sure that commit operations with the new commit script will succeed.
Writing Commit Scripts in SLAX/XSLT
You have two language choices for commit scripts: SLAX and XSLT. Phil Shafer, the creator of SLAX, has said that SLAX is just “syntactic eye candy” on top of XSLT. In other words, its primary function is to make it easier to read and write XSLT. For this reason, we will essentially treat them as having equivalent functionality for the purposes of the book.
In this section, we give an overview of the SLAX language. This is not intended to be a comprehensive language reference. Rather, it is meant to give an overview of some of the important concepts in the language, with particular attention to the concepts that arise in the context of Junos automation scripts. For a more complete language reference, refer to the SLAX language documentation.
If you are new to “XML transformations” (which is the term used to describe XSLT’s work), you may find SLAX and XSLT to be a little awkward to use. However, while SLAX and XSLT have a limited set of capabilities, they are very good at what they do: find XML, parse XML, and produce XML. And that really is a core part of a commit script’s activities: parse an input XML document (the candidate configuration) and produce an output XML document (the directives giving the management system actions to take).
Overview of a SLAX Script
A SLAX script parses XML input and produces XML output. It uses one or more match templates (see “Templates”) to match portions of the XML input document and begin processing them. Once a match template is executing, the SLAX script begins producing XML output.
A SLAX script consists of a series of statements. Statements can span multiple lines, and the SLAX processor generally ignores extra whitespace. Each statement ends with a semicolon or a code block enclosed in curly braces.
Because the whole point of a SLAX script is to produce an XML output document, the language has a unique property: any XML element enclosed in angle brackets becomes a statement. As shown in “XML output”, you can use this property of the language to produce an XML hierarchy.
As the script is executed, each code block produces results, which can be text or XML node sets. The results of these code blocks are used appropriately, depending on the context. The results of the match templates’ code blocks become the script’s output document.
Some common SLAX statements include:
match,templateThese statements introduce template definitions. Templates contain SLAX code. The processor runs match templates when it encounters XML nodes in the input document that match the given pattern. The processor runs named templates when the user includes a
callstatement. Templates are described in more detail in “Templates”.Templates can return data. The data is either included in the output XML document or included in the results of the code block that called the template.
callThis statement tells the SLAX processor to run a named template. The SLAX processor runs the indicated template. The output of the template forms part of the results of the code block containing the
callstatement. Thecallstatement is described in more detail in “Templates”.varThis statement introduces a variable declaration. The value of the variable can be provided in an XPath expression, in text, or in a code block. Variables are scoped and are also immutable. Variables are described in more detail in “SLAX variables”.
copy-ofThis statement takes an XPath expression argument and outputs a complete copy of the XML hierarchy indicated by the XPath expression. The result of the
copy-ofstatement forms part of the results of the enclosing code block.exprThis statement takes an XPath expression argument and returns the “value of” the XPath expression. Normally, you should use the
copy-ofstatement to make copies of XML hierarchies; however, you can use theexprstatement to return the value of a particular XML leaf node.The
exprstatement is useful when you want to include raw text or the value of a variable in the results of a code block. Theexprstatement is also useful when you want to execute a function and include the function’s return value in the results of a code block.
Basic SLAX template
You can start writing a SLAX commit script using the basic template shown in Example 5-4.
Example 5-4. Template for a SLAX commit script
version1.1;nsjunos="http://xml.juniper.net/junos/*/junos";nsxnm="http://xml.juniper.net/xnm/1.1/xnm";nsjcs="http://xml.juniper.net/junos/commit-scripts/1.0";import"../import/junos.xsl";matchconfiguration{/* Insert code here */}
The ns statement defines namespaces. As described in “XML data”, namespaces help disambiguate multiple
elements with the same name. In the case of SLAX or XSLT scripts, they
are very important. Certain extension functions and templates appear
in alternate namespaces (most commonly, the jcs and slax namespaces). You must use the
appropriate namespace prefix when using one of the functions or
templates in these namespaces.
The next thing the template does is import a standard XSLT file. This XSLT file includes some Juniper templates that can help you perform certain tasks. The XSLT file also contains code that automatically extracts some information from the input document and encloses the output document in the correct XML tags. (Again, if you don’t understand XML translations in detail, suffice it to say that you always want to include this.)
Finally, the template script has a match template. In XSLT and SLAX, templates serve a role similar to subroutines or functions in other languages. (Actually, XSLT and SLAX also have functions, which are distinct from templates, so it is important to maintain the terminology distinction. However, it may be helpful if you think about templates serving a similar role as subroutines or functions in other languages.)
A match template tells SLAX to execute the template once for
each piece of the input document hierarchy with a matching XML tag. In
the context of a commit script, the <configuration> tag only appears once
and is the root tag for the input document, the candidate
configuration. Therefore, a template that matches the <configuration>
tag (as this one does) can serve the same role as a main() function in a C program.
Inside a template, you put code that examines the XML data, obtains external data using function calls, and outputs appropriate data for the script’s XML output document.
Building an Output Document
As described in “Commit Script XML Input and Output Documents”, the main goal of a commit script is to produce an output document telling the Junos software what actions it should take. However, in some cases, there may be no action to take. In those cases, you simply return an empty document, which is perfectly acceptable. However, the overall goal of a SLAX commit script is to return an XML document that tells the Junos system what actions to take.
In fact, one of the important things to understand about SLAX is that the SLAX script is building an output document. You can place XML output directly in that document. You can also call functions or templates and place the results of those calls directly in the output document.
SLAX also supports various forms of logic (such as loops and conditional statements). However, these loops can contain direct XML output that will form part of the output document, or populate a variable. Once you understand the way these items can be combined seamlessly, it opens up opportunities to write powerful and compact scripts.
XML output
Returning XML is as easy as putting it right in your SLAX script. XML that appears in an executed code path that is not assigned to a variable or used as an argument to a template or function will form part of the return document. In SLAX, you can use a shorthand syntax to express XML tags in a format that looks similar to the Junos configuration syntax. Here are some examples of the way you would represent sample XML hierarchies in a SLAX script:
| XML syntax | SLAX syntax |
|---|---|
<tag>example</tag> | <tag> "example"; |
<tag/> | <tag>; |
<tag>
<tag2>example</tag2>
</tag> | <tag> {
<tag2> "example";
} |
<tag>
<tag2>
<name>example</name>
<function>explaining</function>
<important/>
</tag2>
</tag> | <tag> {
<tag2>
<name> "example";
<function> "explaining";
<important>;
}
} |
Here, the SLAX commit script uses the <xnm:warning> tag to return a simple
warning message when it sees the <configuration> hierarchy of the
candidate configuration:
[edit] user@r0#show system scripts commitfile basic.slax { optional; } [edit] user@r0#run file show /var/db/scripts/commit/basic.slaxversion 1.1; ns junos = "http://xml.juniper.net/junos/*/junos"; ns xnm = "http://xml.juniper.net/xnm/1.1/xnm"; ns jcs = "http://xml.juniper.net/junos/commit-scripts/1.0"; import "../import/junos.xsl"; match configuration { <xnm:warning> { <edit-path> "[edit]"; <message> "Saw 'configuration' hierarchy."; } } [edit] user@r0#commit check[edit] warning: Saw 'configuration' hierarchy. configuration check succeeds
Formatting text
There are times when you need to do something more advanced. In those instances, SLAX has a few features you can use to help you format your text correctly.
Accessing variables and XML data
You can output variables and data from the XML input document as text (as long as they are representable as text). To do this, you simply place the appropriate expression in the output document (outside quotes).
In summary, to access a variable, you use $. To
access XML data, you use an XPath expression. “Working with Variables and XML Data” contains much more
information about variables and using data from the XML input
document.varname
For example, the XPath expression to get the name of the
current XML node in the input document is name(.). Therefore, you could modify the
preceding example to print the name of the current XML node,
configuration:
[edit] user@r0#show system scripts commitfile basic.slax { optional; } [edit] user@r0#run file show /var/db/scripts/commit/basic.slaxversion 1.1; ns junos = "http://xml.juniper.net/junos/*/junos"; ns xnm = "http://xml.juniper.net/xnm/1.1/xnm"; ns jcs = "http://xml.juniper.net/junos/commit-scripts/1.0"; import "../import/junos.xsl"; match configuration { <xnm:warning> { <edit-path> "[edit]"; <message> name(.); } } [edit] user@r0#commit check[edit] warning: configuration configuration check succeeds
Text splicing
SLAX offers Perl-style text splicing using the underscore (_)
character. For example, the SLAX syntax "Yes, " _ "I " _ "can!" would produce a
single string rendered as "Yes, I
can!".
Text splicing is useful for concatenating static strings together with values obtained dynamically from XML data or variables.
For example, we can refine our preceding examples like this:
[edit] user@r0#show system scripts commitfile basic.slax { optional; } [edit] user@r0#run file show /var/db/scripts/commit/basic.slaxversion 1.1; ns junos = "http://xml.juniper.net/junos/*/junos"; ns xnm = "http://xml.juniper.net/xnm/1.1/xnm"; ns jcs = "http://xml.juniper.net/junos/commit-scripts/1.0"; import "../import/junos.xsl"; match configuration { <xnm:warning> { <edit-path> "[edit]"; <message> "Saw '" _ name(.) _ "' hierarchy."; } } [edit] user@r0#commit check[edit] warning: Saw 'configuration' hierarchy. configuration check succeeds
printf()-like formatting
Sometimes you just need printf()-like
formatting. When this occurs, you can use the jcs:printf() function. This function
works very similarly to the standard Unix printf() call; however, Juniper provides a
few extensions that you may find useful. (You can read about the
extensions in Juniper’s
documentation.)
Here is an example of using the jcs:printf() function to obtain the same
results as from the preceding example:
[edit] user@r0#show system scripts commitfile basic.slax { optional; } [edit] user@r0#run file show /var/db/scripts/commit/basic.slaxversion 1.1; ns junos = "http://xml.juniper.net/junos/*/junos"; ns xnm = "http://xml.juniper.net/xnm/1.1/xnm"; ns jcs = "http://xml.juniper.net/junos/commit-scripts/1.0"; import "../import/junos.xsl"; match configuration { <xnm:warning> { <edit-path> "[edit]"; <message> jcs:printf("Saw '%s' hierarchy.", name(.)); } } [edit] user@r0#commit check[edit] warning: Saw 'configuration' hierarchy. configuration check succeeds
Concatenation
You can use code to create XML node content or the values used for
variable assignments. You use curly braces to enclose the code that
the parser runs to create the value. If the code produces text, any
text will be automatically concatenated to produce the final output.
For example, consider the following two <message> elements:
<message>{expr"t";expr"e";expr"s";expr"t";}<message>"test";
Both of the preceding <message> elements will produce this
XML node:
<message>test</message>
Logical statements
One interesting thing about SLAX is that you can intermix XML output and
logical statements. For example, using the call statement (which we will discuss in
“Defining and calling named templates”), you can call other
templates to produce XML that is inserted at the point of the call statement.
Here is a common example used when generating errors or
warnings. In this example, the call
jcs:edit-path() statement is replaced by the results of the
jcs:edit-path() template. The
jcs:edit-path() template emits an XML hierarchy that represents the current XML
node in the input document in the normal Junos [edit] format:
matchconfiguration{<xnm:warning>{calljcs:edit-path();<message>"Saw 'configuration' hierarchy.";}}
You can even include for
loops, if statements, and other
logical constructs. This example lists all interfaces in the
configuration using a for-each operator
(which we will discuss in “for-each loops over XML nodes”):
matchconfiguration{<xnm:warning>{calljcs:edit-path();<message>{expr"Saw these interfaces: ";for-each(interfaces/interface){expr" "_name;}}}}
If you run this script, you’ll see output like the following.
For each interface, the expr statement
prints a space and the interface name, resulting in a space-separated
list of interfaces:
[edit]
user@r0# commit check
[edit]
warning: Saw these interfaces: ge-1/0/0 ge-1/0/1 lo0 fxp0
configuration check succeedsWorking with Variables and XML Data
Obviously, static script elements (such as those we’ve used up to this point) are useful. However, most scripts need to access some piece of dynamic information. SLAX has two mechanisms for working with dynamic information: XML data and variables.
XML data
It is fairly easy to access XML data in the candidate configuration (the commit script’s XML input document). Simply reference the XPath expression. (See “Accessing XML data with XPath” for more information on XPath expressions.) For example, consider this input document:
<configuration><interfaces><interface><name>ge-1/0/0</name><description>interface 1</description></interface><interface><name>ge-1/0/1</name><description>interface 2</description></interface></interfaces></configuration>
To access the description of interface ge-1/0/0, use the XPath expression interfaces/interface[name="ge-1/0/0"]/description. This code prints the interface
description for ge-1/0/0:
matchconfiguration{<xnm:warning>{<edit-path>"[edit]";<message>"ge-1/0/0 description is: "_interfaces/interface[name="ge-1/0/0"]/description;}}
Note that XPath expressions are relative to the current position
in the input document’s hierarchy. Like in a Unix filesystem, you can
use / to refer to the root of the
document, . to refer to the current
node, .. to refer to the parent
node, and the tag name of a child node to refer to that child
node.
Warning
The root node of the input document is a <commit-script-input> element. To
access the root of the Junos configuration, you can use the XPath
expression /commit-script-input/configuration.
The current node can change in a few circumstances (which we
will cover in more detail elsewhere), including for loops and match templates. When a node
matches a match template, the SLAX parser executes the match template
and sets the current node to the node that matched the template’s
expression.
As an example, imagine we want to print the descriptions for all interfaces. We could rewrite our SLAX script like this:
matchconfiguration/interfaces/interface{<xnm:warning>{<edit-path>"[edit]";<message>name_" description is: "_description;}}
Note we’ve used the XPath expressions name and description to access the <name> and <description> nodes within the
interface. When the match template matches a node, SLAX moves the
current node (the “dot” location, if you will) to each matching node
as it executes the template. Therefore, our XPath expressions are
stated relative to the matching node. Note how easy it is to retrieve
information about the matching node!
When we run this script, we see it produces this output:
[edit]
user@r0# commit check
[edit]
warning: ge-1/0/0 description is: interface 1
[edit]
warning: ge-1/0/1 description is: interface 2
[edit]
warning: lo0 description is:
[edit]
warning: fxp0 description is:
configuration check succeedsNote the lo0 and fxp0 interfaces show up with blank
descriptions. Those two interfaces exist in the configuration, but
don’t have descriptions configured; therefore, there is no <description> element for those
interfaces. A nonexistent XML node is rendered as an empty string,
which is perfectly fine in this case.
SLAX variables
Variables in XSLT have a seemingly simple quirk that can produce trouble at times: they are usually immutable. Once you set an XSLT variable, you cannot change it or unset it. Like in XSLT, SLAX variables are usually immutable; however, SLAX does have an extension that relaxes these rules. (We discuss this extension in the next section.)
In addition to being immutable, variables in XSLT and SLAX are scoped. You can define variables at various levels of the hierarchy, and use the variables at the same or lower levels. However, variables disappear once the script exits the code block in which they were defined.
Once you have set a variable using the var statement, you access the value of the
variable using the $
syntax.varname
Here, we rewrite the preceding example to use variables:
[edit] user@r0#run file show /var/db/scripts/commit/basic.slax | find "^m"match configuration/interfaces/interface { var $intname = name; var $intdescr = description; <xnm:warning> { <edit-path> "[edit]"; <message> $intname _ " description is: " _ $intdescr; } } [edit] user@r0#commit check[edit] warning: ge-1/0/0 description is: interface 1 [edit] warning: ge-1/0/1 description is: interface 2 [edit] warning: lo0 description is: [edit] warning: fxp0 description is: configuration check succeeds
Note that variables can hold various data types, including XML hierarchies. Here, we modify the script from the preceding example. Instead of directly accessing XML nodes, we first assign the current XML node to a variable and then use an XPath expression to reference data in XML nodes within that variable’s value:
[edit] user@r0#run file show /var/db/scripts/commit/basic.slax | find "^m"match configuration/interfaces/interface { var $current = .; <xnm:warning> { <edit-path> "[edit]"; <message> $current/name _ " description is: " _ $current/description; } } [edit] user@r0#commit check[edit] warning: ge-1/0/0 description is: interface 1 [edit] warning: ge-1/0/1 description is: interface 2 [edit] warning: lo0 description is: [edit] warning: fxp0 description is: configuration check succeeds
You wouldn’t normally use this method to access XML nodes in the
current hierarchy. Instead, you would just reference the node
directly. In the preceding example, $current/name is equivalent to name. Normally, you would just use the
simpler name expression. However,
assigning the current node to the variable $current served as a good (albeit contrived)
example of assigning an XML hierarchy to a variable.
Also, note that variable assignments can use a code block to
assign the variable value. For example, this code block assigns the
value test to the $test variable:
var$test={expr"t";expr"e";expr"s";expr"t";}
Mutable variables
SLAX has an extension over XSLT variables: mutable variables. If you declare a
variable with mvar instead of
var, the SLAX processing engine
allows you to change the variable’s value using the set statement.
Additionally, you can append XML node sets using the
special append
statement, such as in this example:
mvar$rv=<output>"foo";append$rv+=<output>"bar";set$rv=<output>"foo";append$rv+=<output>"baz";
At the end of all of this, $rv is set to:
<output>foo</output><output>baz</output>
Templates
There are two kinds of templates in XSLT and SLAX: named
templates and match templates. The
boilerplate template shown in Example 5-4 contains a
match template that will be executed when the parser encounters an
element with the <configuration> tag.
Named templates have names, they can accept arguments, and they
are only executed when you call them using the call SLAX
statement. By contrast, match templates take an XPath expression, and
they are automatically executed for each matching XML element in the
input document. Match templates do not have names and they do not accept
arguments. However, when SLAX executes a match template, it
automatically moves the current XML node (the “dot” location) to the
matching node. (Recall the significance of the “dot” location from our
discussion of XPath expressions in “XML data”. In XPath expressions, you
specify XML nodes relative to the “dot” location.) Named templates leave
the current XML node unchanged.
In this sense, the match
configuration template in the boilerplate template is really
only an example template. You can have many
different templates that only match the specific pieces of the input
document in which you are interested. Depending on your mindset, this
may be an easier way to write your code. On the other hand, you may
prefer the concept of a single main()
function. In that case, you can stick with the match configuration template. As explained in
“Overview of a SLAX Script”, this template only
matches the root of the configuration; therefore, it is always executed
once, and only once.
Defining match templates
Match templates are one of the fundamental control-flow constructs within SLAX.
They operate similarly to a for-each loop, but with different syntax
(and slightly different behavior). By the end of this section, you
should understand why match templates are powerful.
You define match templates by specifying an XPath expression.
When the SLAX processor finds a matching XML hierarchy in the input
document, it executes the match template against that XML hierarchy.
For example, match configuration
matches any XML <configuration> node.
As the SLAX parser processes the XML hierarchy, beginning at the root and descending to all the leaf nodes, it looks for matching templates. Once it finds a matching template, it executes the matching template for that node and ceases further processing on the node. Importantly, once a node matches a template, children of that node are not checked for any match templates. This behavior implements a “most-general-template” match criterion.
The SLAX processor only applies a single match template to a given node. Therefore, even if there are multiple match templates that match a given node, the processor only executes one of the templates. (At this point, you might be tempted to wonder about the precedence; however, our advice is to simply avoid the situation where precedence matters.)
Because all match templates are checked against all nodes (until a match is found for a node), you have slightly more flexibility in writing the XPath expressions that define the match templates. Due to this behavior, the match template’s XPath expression typically only needs to match the righthand side of a node’s path.
Consider the interface matched by the XPath expression configuration/interfaces/interface[name="ge-1/0/0"].
You could use any of the following match template definitions to match
the same node:
match configuration/interfaces/interface[name="ge-1/0/0"]match interfaces/interface[name="ge-1/0/0"]match interface[name="ge-1/0/0"]
However, you need to be aware of possible collateral damage from
underspecifying an XPath expression. For example, the last match
template in the previous listing also matches [edit snmp interface ge-1/0/0], and possibly
others.
On the other hand, there are times you can use this behavior to
your advantage. For example, specifying match
interfaces/interface[name="ge-1/0/0"] is helpful if you want
to match any interface configuration in both the main logical system
and also child logical systems.
Finally, keep in mind where we are: we are talking about match
templates. Just as in Python and other languages, there are many ways
to arrive at the same end. Match templates are just one way to operate
on a specific node. You also have the option of merely matching on the
<configuration> tag and then
using conditionals, for-each loops,
and other SLAX operations to operate on specific nodes.
Note
There is a way to override the “most-general-template” match
criterion discussed in this section. Specifying apply-templates
XPath inside a more general template
indicates the SLAX processor should try to apply additional match
templates to any node matching the XPath expression. Alternatively,
entering apply-templates without
an XPath expression causes the SLAX processor to try to apply
further match templates against all children of the current XML
node.
Whether or not you specify an XPath expression, the apply-templates
statement causes the SLAX processor to follow the normal match
template process. The SLAX processor will begin with the selected
nodes and descend to all the leaf nodes until it finds a matching
template. And, once it finds a matching template, it will execute
the matching template and cease further processing on that
node.
For example, this syntax causes the SLAX processor to execute
the contents of the match
interfaces template and continue checking for other match
templates that match the XML node’s children. Therefore, the SLAX
processor executes the match
interfaces template against the [edit interfaces] hierarchy, and also
executes the match
interfaces/interface template against each [edit interfaces interface
hierarchy:interface]
matchinterfaces{/* Do something. */apply-templates;}matchinterfaces/interface{/* Do something else. */}
Defining and calling named templates
By contrast to match templates, named templates are quite easy to understand
because they more easily map to concepts from other programming
languages. You define named templates with a template statement; however, named templates
are only executed when another template contains a call statement. The current XML node (the
“dot” location) is inherited from the calling template.
The syntax to define a named template is similar to the syntax
to define a method in Python. You use the template statement, provide a template name,
and then provide a list of parameters. Like in Python, the parameters
can optionally have default values.
Here is an example of a named template that produces a warning:
templateemit-warning($message){<xnm:warning>{calljcs:edit-path();<message>$message;}}
This template is named emit-warning(). It takes a single parameter,
$message, which must be provided at
the time the template is called.
We can add a default value to the $message parameter using syntax similar to
Python. In Example 5-5, we use the text
(none) as the default value for the
$message parameter.
Example 5-5. The emit-warning() template
templateemit-warning($message="(none)"){<xnm:warning>{calljcs:edit-path();<message>$message;}}
To call named templates, you use the call statement. Here is an example that
calls the emit-warning() template
with the message of test:
callemit-warning($message="test");
Alternatively, you can use the with statement to
provide longer parameters, or parameters with complex syntax. Using
the with statement, you can use
curly braces to define logic that the SLAX processor uses to build the
parameter values that are passed to a template.
Here is an extraordinarily simple example of the with statement:
callemit-warning{with$message="test";}
Here is an example of a more complex use of the with
statement:
calldo-something{with$xml-frag={<root>{<leaf>;}}with$data={callanother-template();}}
Template results
Templates return XML fragments. By default, the XML fragments are output at
the point of the call or apply-templates statement. When one template
calls another, the called template’s output may become part of the
calling template’s return document.
In this example, the match template matches each interface in
the main configuration. It then calls the print-descr() template. The output of the
print-descr() template is placed
right where the call statement
appears. In other words, it forms part of the XML emitted by the
match
configuration/interfaces/interface template.
Similarly, the print-descr()
template calls the emit-warning()
template shown in Example 5-5. The output
of the emit-warning() template is
placed where the call statement
appears. In other words, it forms part of the XML returned by the
print-descr() template:
templateprint-descr(){callemit-warning{with$message={expr"Interface "_name_": ";if(description){exprdescription;}else{expr"(no description)";}}}}matchconfiguration/interfaces/interface{callprint-descr();}
After running this script, you will see a return document like this:
<xnm:warning><edit-path>[edit interfaces interface ge-1/0/0]</edit-path><message>Interface ge-1/0/0: interface 1</message></xnm:warning><xnm:warning><edit-path>[edit interfaces interface ge-1/0/1]</edit-path><message>Interface ge-1/0/1: interface 2</message></xnm:warning><xnm:warning><edit-path>[edit interfaces interface lo0]</edit-path><message>Interface lo0: (no description)</message></xnm:warning><xnm:warning><edit-path>[edit interfaces interface fxp0]</edit-path><message>Interface fxp0: (no description)</message></xnm:warning>
And, if you invoke this as a commit script, you’ll see output like this:
[edit]
user@r0# commit check
[edit interfaces interface ge-1/0/0]
warning: Interface ge-1/0/0: interface 1
[edit interfaces interface ge-1/0/1]
warning: Interface ge-1/0/1: interface 2
[edit interfaces interface lo0]
warning: Interface lo0: (no description)
[edit interfaces interface fxp0]
warning: Interface fxp0: (no description)
configuration check succeedsYou can also use template results in other ways, such as
assigning them to variables in your code. Take, for example, this
reformulation of the preceding script. Here, the print-descr() template calls the get-message() template to create the
$message argument to the emit-warning() template. Because the result
of the get-message() template is
placed right where the call
statement appears, the result becomes the contents of the $message argument:
templateget-message(){expr"Interface "_name_": ";if(description){exprdescription;}else{expr"(no description)";}}templateprint-descr(){callemit-warning{with$message={callget-message();}}}matchconfiguration/interfaces/interface{callprint-descr();}
Flow Control
As you have seen in previous examples, SLAX offers normal flow control statements, such
as for loops and if/else
statements. Obviously, these statements are very useful in controlling
the logic of a script.
for-each loops over XML nodes
You can loop over XML nodes that match an XPath expression using the
for-each statement. The SLAX
processor finds matching XML nodes and changes the current node (the
“dot” location) to each matching node in turn. You can then perform
actions on each matching node.
So, let’s reformulate the repetitive interface description
printing examples to use the for-each statement. Here, we match on the
<configuration> node, and
then use a for-each statement to
loop through all interfaces and print their descriptions. This example
uses the emit-warning() template we
showed in Example 5-5:
matchconfiguration{for-each(interfaces/interface){callemit-warning{with$message={expr"Interface "_name_": "_description;}}}}
When called as a commit script, this again produces the expected results:
[edit]
user@r0# commit check
[edit interfaces interface ge-1/0/0]
warning: Interface ge-1/0/0: interface 1
[edit interfaces interface ge-1/0/1]
warning: Interface ge-1/0/1: interface 2
[edit interfaces interface lo0]
warning: Interface lo0:
[edit interfaces interface fxp0]
warning: Interface fxp0:
configuration check succeedsfor loops over number ranges
Sometimes, you want to loop over a range of numbers. For example, this
code creates 10 units (logical interfaces) on the ge-1/0/0 physical interface:
matchconfiguration/interfaces/interface[name="ge-1/0/0"]{calljcs:emit-change{with$content={for$i(1...10){<unit>{<name>$i;<vlan-id>$i;<family>{<inet>{<address>{<name>"10.10."_$i_".1/24";}}}}}}}}
After running this commit script, 10 units are added to the configuration:
[edit] user@r0#commitcommit complete [edit] user@r0#show | compare rollback 1[edit interfaces ge-1/0/0] + unit 1 { + vlan-id 1; + family inet { + address 10.10.1.1/24; + } + } + unit 2 { + vlan-id 2; + family inet { + address 10.10.2.1/24; + } + } + unit 3 { + vlan-id 3; + family inet { + address 10.10.3.1/24; + } + } + unit 4 { + vlan-id 4; + family inet { + address 10.10.4.1/24; + } + } + unit 5 { + vlan-id 5; + family inet { + address 10.10.5.1/24; + } + } + unit 6 { + vlan-id 6; + family inet { + address 10.10.6.1/24; + } + } + unit 7 { + vlan-id 7; + family inet { + address 10.10.7.1/24; + } + } + unit 8 { + vlan-id 8; + family inet { + address 10.10.8.1/24; + } + } + unit 9 { + vlan-id 9; + family inet { + address 10.10.9.1/24; + } + } + unit 10 { + vlan-id 10; + family inet { + address 10.10.10.1/24; + } + }
if/else statements
You can use if/else statements to control the flow of your program. The if statement’s test conditions are XPath
expressions (with added support for the &&, ||, and !
logical operators). Some XPath expressions (such as starts-with()) return Boolean values. Other
XPath expressions are generally “true” if they match one or more
nodes, and “false” if they match zero nodes.
Let’s write a quick script to configure a description on any
interface that does not already have a description. Here, we choose to
use a match template that matches all interfaces, and then use an
if statement to match the
interfaces with no description. And, just to demonstrate the use of
the else statement, we print a
warning message if there already is a description:
matchconfiguration/interfaces/interface{if(!description){calljcs:emit-change{with$content={<description>"Automatically configured description";}}}else{callemit-warning($message="Already had a description");}}
When executed, this script prints a warning for the interfaces that already had descriptions, and adds a description to any that need one:
[edit] user@r0#commit[edit interfaces interface ge-1/0/0] warning: Already had a description [edit interfaces interface ge-1/0/1] warning: Already had a description commit complete [edit] user@r0#show | compare rollback 1[edit interfaces fxp0] + description "Automatically configured description"; [edit interfaces lo0] + description "Automatically configured description";
SLAX also supports the else
if construction. You can string a list of conditionals
together with else if statements.
The list is optionally terminated with a single else statement. The software executes the
first conditional that evaluates to true.
For example, this script takes different actions depending on the kind of interface it is evaluating:
matchconfiguration/interfaces/interface{if(starts-with(name,"fe-")||starts-with(name,"ge-")||starts-with(name,"xe-")){/* Add VLAN tagging. */calljcs:emit-change{with$content={<vlan-tagging>;}}}elseif(name=="lo0"){/* Add MPLS. */calljcs:emit-change{with$content={<unit>{<name>0;<family>{<mpls>;}}}}}elseif(name=="fxp0"){/* Warn if unit 0 does not have an IPv4 address. */if(!unit[name=="0"]/family/inet/address){callemit-warning($message="No IPv4 address configured");}}}
When run as a commit script, it takes appropriate actions:
[edit] user@r0#commitcommit complete [edit] user@r0#show | compare rollback 1[edit interfaces ge-1/0/1] + vlan-tagging; [edit interfaces lo0 unit 0] + family mpls;
Predefined Templates
Juniper provides access to several predefined templates you may find helpful.
jcs:emit-change()
This template creates changes to the Junos configuration. It has several options to cover a variety of situations.
It accepts the following arguments:
$contentThis argument is the XML representation of the configuration change. The configuration change is relative to the current node. For example, if the current node is
[edit protocols bgp], you could simply add a BGP group without specifying the<protocols>and<bgp>hierarchies.This is the only required argument.
$tagThis argument controls whether the change is a transient change or a permanent change. The default value is
change, which indicates this is a permanent change. Alternatively, you can specifytransient-changeto make this a transient change.$messageThis argument specifies a warning message the template displays to the user. By default, the template displays no warning message.
$dotThis argument changes the current node for the purposes of this template. The
$contentargument is evaluated relative to the new current node. This argument also changes the[edit]path of any message displayed to the user.For example, assume the current node is
configuration/protocols/bgp(corresponding to the[edit protocols bgp]configuration hierarchy), but you want to make a change to the[edit routing-options]hierarchy. You can specify a$dotargument of../../routing-options. Including this argument causes the$contentargument to be evaluated relative to the[edit routing-options]hierarchy.The
$dotargument must point to a node that already exists. You cannot use the$dotargument to “wish” a node into existence. Instead, if you need to create a new node, you can use the$dotargument to choose a higher level of hierarchy that already exists and use the$contentargument to create the new hierarchy you want to add under that higher level.By default, the value of the
$dotargument is the current node at the time the template is called.$nameSome Juniper documentation lists the
$nameargument. However, you should not use this argument. It appears that the main purpose of the argument is to support recursive calls to thejcs:emit-change()template.
The jcs:emit-change()
template is fairly easy to use. This example sets a description on an
interface and warns a user about the action:
matchconfiguration/interfaces/interface[not(description)]{calljcs:emit-change{with$message="Setting default description";with$content={<description>"Automatically configured description";}}}
When executed, the output looks like this:
[edit] user@r0#commit[edit interfaces interface fxp0] warning: Setting default description commit complete [edit] user@r0#show | compare rollback 1[edit interfaces fxp0] + description "Automatically configured description";
jcs:edit-path()
This template creates an appropriate [edit] path to a configuration hierarchy.
The template is useful in creating warning and error messages.
However, rather than calling this template directly, we suggest
you simply create appropriate templates to emit warning or error
messages for you. For example, the emit-warning() template from Example 5-5 generates a suitable warning. The
emit-warning() template calls the
jcs:edit-path() template to display
the current node.
Like the jcs:emit-change()
template, this template accepts an optional $dot parameter, which points to an alternate
node to use as the current location.
Commit Script Examples
Now that you have some background about basic commit script operations and SLAX, let’s implement the examples from our introductory use cases. These examples demonstrate how to use commit scripts to meet specific configuration needs. You can use the same concepts to solve the configuration needs of your network.
Example: Custom Configuration Checks
Let’s begin with the use case in “Custom Configuration Checks”. This use case checks the BGP configuration. We can distill the requirements to:
Only three BGP groups are allowed:
internal,peers, andcustomers.All BGP neighbors in the
peersandcustomersgroups must have both import and export policies applied.For BGP neighbors in the
peersandcustomersgroups, thedeny-allpolicy must be the last policy in each import and export policy chain.
We can combine these three checks into fairly succinct logic. But let’s start with the first requirement: only three BGP groups are allowed.
We could either create a match template for configuration/protocols/bgp/group or create a
match template for configuration and
use the for-each statement to loop
over all BGP groups. The difference is somewhat stylistic. The logic
within the for-each loop would be the
same as the logic within a match template that matched on configuration/protocols/bgp/group. Here, we
use a match template that matches on configuration/protocols/bgp/group.
Within the match template, we simply use an if statement to ensure the group has an
appropriate name:
matchconfiguration/protocols/bgp/group{if(name=="internal"||name=="peers"||name=="customers"){/* This is acceptable. */}else{/* This is NOT acceptable. */}}
Now that we have the logic to detect an error, we need to define
the action to take when this error occurs. Because we could end up with
a variety of errors, let’s write a named template to report errors. We
want to let the user specify a message and an alternate node to use when
emitting the [edit] path for the
error message.
Also, just to demonstrate the concept, we send an error message to the user (aborting the commit) and also send a message to the device’s syslog.
This template meets the requirements:
templateemit-error($message,$dot=.){/* Get the [edit] path. */var$path={calljcs:edit-path($dot=$dot);}/* Emit the error. */<xnm:error>{expr$path;<message>$message;}/* Log the syslog message. */<syslog>{<message>jcs:printf("%s: %s",$path/edit-path,$message);}}
The code is fairly obvious, except for, perhaps, one important
detail. The jcs:edit-path() template
returns the [edit] path (e.g.,
[edit protocols bgp]) within an XML
fragment suitable for using in the <xnm:warning> or <xnm:error> tags. This means the text of
the [edit] path is contained in an
<edit-path> element. This is
the appropriate formatting for use within the <xnm:error> tag. However, when you want
to use only the text of the <edit-path> tag in a syslog message, you
must access the content of the <edit-path> tag. The $path/edit-path XPath expression returns the
value of the matching node. It is used as one of the arguments in the
jcs:printf() function call.
Now, we modify the match template to call the emit-error() template:
matchconfiguration/protocols/bgp/group{if(name=="internal"||name=="peers"||name=="customers"){/* This is acceptable. */}else{callemit-error($message=jcs:printf("Group %s is not allowed",name));}}
Let’s test what we have so far and see how it works. When we have a valid configuration, it appears to work correctly:
[edit] user@r0#show protocols bgpgroup internal { neighbor 10.1.1.4 { peer-as 655532; } } group peers { neighbor 10.2.2.4 { peer-as 65533; } } group customers { neighbor 10.3.3.4 { peer-as 65534; } } [edit] user@r0#commit checkconfiguration check succeeds
However, once we hit one of the error conditions, we see some strange errors:
[edit] user@r0#rename protocols bgp group customers to group other[edit] user@r0#commit checkerror: Invalid type error: xmlXPathCompOpEval: parameter error error: xmlXPathCompiledEval: 1 objects left on the stack. error: runtime error: file /var/db/scripts/commit/test.slax line 23 element value-of error: XPath evaluation returned no result. error: Group other is not allowed error: 6 errors reported by commit scripts error: commit script failure
Notice the error messages point to line 23 of the script. Line 23
is the jcs:printf() call
in the emit-error() template:
/* Log the syslog message. */<syslog>{<message>jcs:printf("%s: %s",$path/edit-path,$message);}
The problem is that the $path
variable is a result tree fragment. As we noted in “XML Result Tree Fragments”, you can’t just create a result tree
fragment and then access its contents using an XPath expression.
Instead, you must convert the result tree fragment to a node set using
the := SLAX operator. (How did we
know this was the cause of the error message? It was a good guess based
on experience. And, now that you’ve read this book, you can make the
same guess when you see similar errors in your own scripts.)
This simple change to the script helps a great deal:
/* Get the [edit] path. */var$path:={calljcs:edit-path($dot=$dot);}
With the change made, let’s execute the script again:
[edit]
user@r0# commit check
error: Group other is not allowed
error: 1 error reported by commit scripts
error: commit script failureThis output seems odd. It does contain our error message, but
where is our [edit] path? To
troubleshoot further, look at the XML response:
[edit]
user@r0# commit check | display xml
<rpc-reply xmlns:junos="http://xml.juniper.net/junos/15.2D0/junos">
<commit-results>
<routing-engine junos:style="normal">
<name>re0</name>
<xnm:error xmlns:xnm="http://xml.juniper.net/xnm/1.1/xnm">
[edit protocols bgp group other]
<message>
Group other is not allowed
</message>
</xnm:error>
</routing-engine>
<xnm:error xmlns="http://xml.juniper.net/xnm/1.1/xnm"
xmlns:xnm="http://xml.juniper.net/xnm/1.1/xnm">
<message>
1 error reported by commit scripts
</message>
</xnm:error>
<xnm:error xmlns="http://xml.juniper.net/xnm/1.1/xnm"
xmlns:xnm="http://xml.juniper.net/xnm/1.1/xnm">
<message>
commit script failure
</message>
</xnm:error>
</commit-results>
<cli>
<banner>[edit]</banner>
</cli>
</rpc-reply>That output seems quite strange. The path ([edit protocols bgp group other]) appears in
the <xnm:error> element, but it
is not enclosed in <edit-path>
tags, as expected. Looking at our code more closely, we see the problem.
We used the expr statement:
/* Emit the error. */<xnm:error>{expr$path;<message>$message;}
The expr statement tells SLAX to insert the value of an
expression. In this case, $path is an
XML node set. Therefore, SLAX should insert the node set here, right?
Not exactly. Instead, an expr
statement causes SLAX to insert the CDATA elements (basically, the text
values, but none of the tags) from an XML node set. That is why we saw
the path in the XML output, but we didn’t see the XML tags we
expected.
Because we actually want to output a copy of the node tree here
(including the XML tags, attributes, etc.), we can use the copy-of statement instead of the expr statement. (Recall that all variables in
SLAX need to be used in some context. You can use variables as arguments
to functions or templates, or with a statement to tell the SLAX
processor how to use them. If you simply want to output a variable, the
expr or copy-of statements usually will let you accomplish your task, with the slight
difference demonstrated here.)
When we make the change from using the expr statement to using the copy-of statement, things work much
better:
[edit]
user@r0# commit check
[edit protocols bgp group other]
Group other is not allowed
error: 1 error reported by commit scripts
error: commit script failureHere is our full script so far:
version1.1;nsjunos="http://xml.juniper.net/junos/*/junos";nsxnm="http://xml.juniper.net/xnm/1.1/xnm";nsjcs="http://xml.juniper.net/junos/commit-scripts/1.0";import"../import/junos.xsl";templateemit-error($message,$dot=.){/* Get the [edit] path. */var$path:={calljcs:edit-path($dot=$dot);}/* Emit the error. */<xnm:error>{copy-of$path;<message>$message;}/* Log the syslog message. */<syslog>{<message>jcs:printf("%s: %s",$path/edit-path,$message);}}matchconfiguration/protocols/bgp/group{if(name=="internal"||name=="peers"||name=="customers"){/* This is acceptable. */}else{callemit-error($message=jcs:printf("Group %s is not allowed",name));}}
Let’s move on to the next requirement: all BGP neighbors in the
peers and customers groups must have both import
and export policies applied. This requirement is somewhat ambiguous.
Does it require each neighbor have its own import
and export policy applied to it at the neighbor level? Or does it merely
require that each neighbor have some import and
export policy applied, even if it is inherited from the group or global
BGP configuration? In this case, we assume the latter interpretation:
each neighbor must have some import and export
policy applied, even if it is inherited from the group or global BGP
configuration.
We’ll integrate this check with our existing logic. First, split
the if statement into two parts: one
accepts the peers and customers groups, and another accepts the
internal group.
Next, add the per-neighbor check into the block that accepts the
peers and customers groups:
matchconfiguration/protocols/bgp/group{if(name=="internal"){/* This is acceptable. */}elseif(name=="peers"||name=="customers"){/* This is acceptable. */for-each(neighbor){/* Check each neighbor's policies. */}}else{callemit-error($message=jcs:printf("Group %s is not allowed",name));}}
Now, how do we implement the policy check? Because the logic for checking import and export policies is the same, we write a template that our script can call twice: once for import policies and once for export policies. This template does the trick:
templatecheck-neighbor-policies($type){/** Make sure the type of policy exists at either the* current (neighbor), parent (group), or parent's parent* (BGP global) level.*/if(not(*[name()==$type]||../*[name()==$type]||../../*[name()==$type])){callemit-error($message=$type_" policy required, but not defined");}}
This template is called with a $type argument of either import or export (the names of the tags used for import
and export policies, respectively). Recall that we will run this
template with the current node set to a BGP neighbor. The logic looks
for any child of the current node with a tag name equal to the $type argument, any child of the parent’s node
with a tag name equal to the $type
argument, and any child of the grandparent’s node with a tag name equal
to the $type argument. If none of
these nodes exist, there is no policy of that type applied to the
neighbor. In that case, the script returns an error message. (The script
includes the $type argument in the
error message to explain which type of policy is missing.)
We add calls to the check-neighbor-policies() template from the
neighbor loop. Once we do that, the script looks like this:
version1.1;nsjunos="http://xml.juniper.net/junos/*/junos";nsxnm="http://xml.juniper.net/xnm/1.1/xnm";nsjcs="http://xml.juniper.net/junos/commit-scripts/1.0";import"../import/junos.xsl";templateemit-error($message,$dot=.){/* Get the [edit] path. */var$path:={calljcs:edit-path($dot=$dot);}/* Emit the error. */<xnm:error>{copy-of$path;<message>$message;}/* Log the syslog message. */<syslog>{<message>jcs:printf("%s: %s",$path/edit-path,$message);}}templatecheck-neighbor-policies($type){/** Make sure the type of policy exists at either the* current (neighbor), parent (group), or parent's parent* (BGP global) level.*/if(not(*[name()==$type]||../*[name()==$type]||../../*[name()==$type])){callemit-error($message=$type_" policy required, but not defined");}}matchconfiguration/protocols/bgp/group{if(name=="internal"){/* This is acceptable. */}elseif(name=="peers"||name=="customers"){/* This is acceptable. */for-each(neighbor){/* Check each neighbor's policies. */callcheck-neighbor-policies($type="import");callcheck-neighbor-policies($type="export");}}else{callemit-error($message=jcs:printf("Group %s is not allowed",name));}}
When the script is run, you will immediately see that it reports the missing policies:
[edit] user@r0#show protocols bgpgroup internal { neighbor 10.1.1.4 { peer-as 655532; } } group peers { neighbor 10.2.2.4 { peer-as 65533; } } group customers { neighbor 10.3.3.4 { peer-as 65534; } } [edit] user@r0#commit check[edit protocols bgp group peers neighbor 10.2.2.4] import policy required, but not defined [edit protocols bgp group peers neighbor 10.2.2.4] export policy required, but not defined [edit protocols bgp group customers neighbor 10.3.3.4] import policy required, but not defined [edit protocols bgp group customers neighbor 10.3.3.4] export policy required, but not defined error: 4 errors reported by commit scripts error: commit script failure
After defining export policies at the group level and import policies at the neighbor level, the configuration commits successfully:
[edit] user@r0#show protocols bgpgroup internal { neighbor 10.1.1.4 { peer-as 655532; } } group peers { export [ customer-routes deny-all ]; neighbor 10.2.2.4 { import [ AS_65534_routes deny-all ]; peer-as 65533; } } group customers { export [ customer-routes peer-routes transit-routes deny-all ]; neighbor 10.3.3.4 { import AS_65535_routes; peer-as 65534; } } [edit] user@r0#commit checkconfiguration check succeeds
Finally, let’s move on to the last requirement. This requirement
specifies the deny-all policy must be
the final policy in the policy chains for all peers in the peers and customers groups. In order to enforce this
requirement, we need to first determine which policy applies to a peer:
the one configured at the neighbor level, the one configured at the
group level, or the one configured at the global BGP configuration
level. Then, we need to select the last policy from the list.
At this point, it is helpful to ensure we understand the structure of the XML we are evaluating. Let’s take a look at the way an example policy chain is represented in XML:
[edit] user@r0#show protocols bgp group peers neighbor 10.2.2.4import [ AS_65534_routes deny-all ]; peer-as 65533; [edit] user@r0#show protocols bgp group peers neighbor 10.2.2.4 | display xml<rpc-reply xmlns:junos="http://xml.juniper.net/junos/15.2D0/junos"> <configuration junos:changed-seconds="1443558469" junos:changed-localtime="2015-09-29 13:27:49 PDT"> <protocols> <bgp> <group> <name>peers</name> <neighbor> <name>10.2.2.4</name> <import>AS_65534_routes</import> <import>deny-all</import> <peer-as>65533</peer-as> </neighbor> </group> </bgp> </protocols> </configuration> <cli> <banner>[edit]</banner> </cli> </rpc-reply>
Note the way import policies are listed: each one is in an
<import> node, and the nodes
are listed in order. We can use the XPath last() function to select the last
node.
We reformulate the check-neighbor-policies() template to handle
these extra checks:
templatecheck-neighbor-policies($type){/* * For the type of policy, determine whether the policy * chain is at the current (neighbor), parent (group), or * parent's parent (BGP global) level. * * Then, determine the last policy in the policy chain at * that level. */var$last-policy={if(*[name()==$type]){expr*[name()==$type][last()];}elseif(../*[name()==$type]){expr../*[name()==$type][last()];}else{expr../../*[name()==$type][last()];}}if($last-policy==""){callemit-error($message=$type_"policy required, but not defined");}elseif($last-policy!="deny-all"){callemit-error{with$message={exprjcs:printf("%s policy error: last policy should be"_"'deny-all', but found '%s' instead",$type,$last-policy);}}}}

Here, we use one of the SLAX tricks of making the contents of a variable depend on a conditional. We have broken the previous conditional into three parts, which we use to determine the level of the hierarchy where the policy exists.

Once we have determined which policy chain we will use, we select the set of nodes with matching names using
*[name() == $type]. We then select the last node of that set using the[last()]selector.
The
elsestatement performs correctly here even if there is no policy chain at the global BGP level. At this point in the code, either there is a policy chain at the global BGP level or there is no matching policy chain for this neighbor. Either way, we can try to select the policy chain from the global BGP level. If there is no policy chain defined at the global level, the variable will end up being empty.
Here, we check if the
$last-policyvariable is empty. If it is, the code raises an error indicating no import or export policy is applied to this peer.
If the value of the
$last-policyvariable is notdeny-all, the code raises an error explaining the problem.
Finally, we have our complete script:
version1.1;nsjunos="http://xml.juniper.net/junos/*/junos";nsxnm="http://xml.juniper.net/xnm/1.1/xnm";nsjcs="http://xml.juniper.net/junos/commit-scripts/1.0";import"../import/junos.xsl";templateemit-error($message,$dot=.){/* Get the [edit] path. */var$path:={calljcs:edit-path($dot=$dot);}/* Emit the error. */<xnm:error>{copy-of$path;<message>$message;}/* Log the syslog message. */<syslog>{<message>jcs:printf("%s: %s",$path/edit-path,$message);}}templatecheck-neighbor-policies($type){/** For the type of policy, determine whether the policy* chain is at the current (neighbor), parent (group), or* parent's parent (BGP global) level.** Then, determine the last policy in the policy chain at* that level.*/var$last-policy={if(*[name()==$type]){expr*[name()==$type][last()];}elseif(../*[name()==$type]){expr../*[name()==$type][last()];}else{expr../../*[name()==$type][last()];}}if($last-policy==""){callemit-error($message=$type_" policy required, but not defined");}elseif($last-policy!="deny-all"){callemit-error{with$message={exprjcs:printf("%s policy error: last policy should be "_"'deny-all', but found '%s' instead",$type,$last-policy);}}}}matchconfiguration/protocols/bgp/group{if(name=="internal"){/* This is acceptable. */}elseif(name=="peers"||name=="customers"){/* This is acceptable. */for-each(neighbor){/* Check each neighbor's policies. */callcheck-neighbor-policies($type="import");callcheck-neighbor-policies($type="export");}}else{callemit-error($message=jcs:printf("Group %s is not allowed",name));}}
Now, test the script by disabling one of the import policies:
[edit protocols bgp] user@r0#deactivate group customers neighbor 10.3.3.4 import[edit protocols bgp] user@r0#commit check[edit protocols bgp group customers neighbor 10.3.3.4] import policy required, but not defined error: 1 error reported by commit scripts error: commit script failure
At this point, we breathe a sigh of relief, because the script seems to be working correctly. Thinking we are all done, we rollback to the previous configuration and commit it:
[edit protocols bgp] user@r0#top[edit] user@r0#rollbackload complete [edit] user@r0#commit[edit protocols bgp group customers neighbor 10.3.3.4] import policy error: last policy should be 'deny-all', but found 'AS_65535_routes' instead error: 1 error reported by commit scripts error: commit script failure
Uh-oh. Looking at the configuration, you see the error reported is
exactly correct: this neighbor’s import policy does not have the
deny-all policy as the last policy in
the import policy chain:
[edit]
user@r0# protocols bgp group customers neighbor 10.3.3.4
import AS_65535_routes;
peer-as 65534;And that is a wonderful feeling. Your commit script may have just prevented its first major outage. Unfiltered BGP neighbors have been the source of serious Internet outages in the past. Your commit script just caught the fact that one of your BGP neighbors was not properly filtered.
Once you fix this configuration error and commit, you will have extra protection against a user accidentally leaving a peer unfiltered:
[edit protocols bgp] user@r0#set group customers neighbor 10.3.3.4 import deny-all[edit protocols bgp] user@r0#commitcommit complete
Example: Automatically Fixing Mistakes
Next, let’s revisit one of the examples we gave in “Automatically Fixing Mistakes”. In particular,
we will write a commit script that ensures any interface listed in the
[edit protocols mpls] hierarchy also
has family mpls configured on the
interface.
Let’s begin by considering the algorithm. We could approach this
one of two ways. On the one hand, we could examine all interfaces in the
[edit interfaces] hierarchy that do
not have family mpls configured and
then consult the [edit protocols
mpls] hierarchy to determine whether they should have it
configured. On the other hand, we could examine the interfaces listed in
the [edit protocols mpls] hierarchy
and then check that all of those interfaces have family mpls configured in the [edit interfaces] hierarchy.
While either approach could work, the former approach seems easier. Let’s look at the data structures to understand the challenge. Example 5-6 shows a partial configuration sample in both text and XML formats.
Example 5-6. Interface and MPLS configuration sample in text and XML formats
interfaces {
ge-1/0/0 {
unit 0 {
family inet {
address 10.1.1.4/24;
}
family mpls;
}
}
ge-1/0/1 {
unit 0 {
family inet {
address 10.2.2.4/24;
}
}
}
fxp0 {
unit 0 {
family inet {
address 10.255.255.17/24;
}
}
}
lo0 {
unit 0 {
family mpls;
}
}
}
protocols {
mpls {
interface all;
interface ge-1/0/0.0 {
disable;
}
}
}<configuration><interfaces><interface><name>ge-1/0/0</name><unit><name>0</name><family><inet><address><name>10.1.1.4/24</name></address></inet><mpls/></family></unit></interface><interface><name>ge-1/0/1</name><unit><name>0</name><family><inet><address><name>10.2.2.4/24</name></address></inet></family></unit></interface><interface><name>fxp0</name><unit><name>0</name><family><inet><address><name>10.255.255.17/24</name></address></inet></family></unit></interface><interface><name>lo0</name><unit><name>0</name><family><mpls/></family></unit></interface></interfaces><protocols><mpls><interface><name>all</name></interface><interface><name>ge-1/0/0.0</name><disable/></interface></mpls></protocols></configuration>
Using the XPath expression configuration/interfaces/interface/unit[not(family/mpls)],
it is easy to get a list of logical interfaces (interface units) that do
not have family mpls configured. On
the other hand, it may be difficult to get a list of interfaces enabled
under the [edit protocols mpls]
hierarchy. If the user has enabled interface
all in this hierarchy, then MPLS is enabled on all interfaces
listed in the [edit interfaces]
hierarchy, except those the user has specifically disabled in the
[edit protocols mpls]
hierarchy.
Given a single interface, it is fairly easy to assess whether that
interface is enabled in the [edit protocols
mpls] hierarchy. However, it is much harder to devise a loop
through the interfaces that are enabled in the [edit protocols mpls] hierarchy.
For this reason, we recommend looping through the logical
interfaces in the [edit interfaces]
hierarchy that do not have family
mpls enabled and then checking the [edit protocols mpls] hierarchy to see if
those logical interfaces should have family
mpls enabled.
Let’s build the script now. The basic building blocks are the
XPath to match the logical interfaces over which we want to loop, the
XPath to determine whether a logical interface is enabled in the
[edit protocols mpls] hierarchy, and
the call to the jcs:emit-change()
template to make the configuration change.
We start with the basic decision of which kind of template to use.
As we discussed in “Example: Custom Configuration Checks”, we
could either create a match template for configuration/interfaces/interface/unit[not(family/mpls)]
or create a match template for configuration and use the for-each statement to loop over all the
matching logical interfaces. Because we chose to use a match template
for the specific items in the preceding section, we’ll use a for-each loop in this section.
Let’s start with the basic structure and then build on it:
version1.1;nsjunos="http://xml.juniper.net/junos/*/junos";nsxnm="http://xml.juniper.net/xnm/1.1/xnm";nsjcs="http://xml.juniper.net/junos/commit-scripts/1.0";import"../import/junos.xsl";matchconfiguration{var$mpls=protocols/mpls;for-each(interfaces/interface/unit[not(family/mpls)]){/* Insert logic here */}}
You will notice that we saved the configuration hierarchy matched
by the protocols/mpls XPath
expression in the $mpls variable.
Recall that a for-each loop changes
the current node during each iteration to point to one of the elements
matching the for-each loop’s XPath
expression. By saving the [edit protocols
mpls] hierarchy to a variable before we enter the for-each loop, we are able to access data from
it more easily later.
Now, we add the logic to detect whether matching logical
interfaces are enabled in the [edit protocols
mpls] hierarchy. The basic logic is that a logical interface
is enabled if either interface all or
the specific logical interface is listed, unless the specific logical
interface is disabled. One small additional detail is that interface all may itself be disabled. The
script must check for this condition and, if found, ensure the
particular logical interface is present and not disabled.
We add this logic to our script:
version1.1;nsjunos="http://xml.juniper.net/junos/*/junos";nsxnm="http://xml.juniper.net/xnm/1.1/xnm";nsjcs="http://xml.juniper.net/junos/commit-scripts/1.0";import"../import/junos.xsl";matchconfiguration{var$mpls=protocols/mpls;for-each(interfaces/interface/unit[not(family/mpls)]){/* Calculate the IFL name. */var$intname=../name_"."_name;/** Determine if the interface is configured under* protocols/mpls. The interface is "configured" if:* 1. "interface all" is configured (and not disabled), or* "interface $intname" is configured.* and* 2. "interface $intname" is not disabled.*/if(($mpls/interface[name=="all"&¬(disable)]||$mpls/interface[name==$intname])&¬($mpls/interface[name==$intname]/disable)){/* Do configuration change here. */}}}
Note that we calculated the logical interface name
(interface.unit)
using the interface’s name (../name)
and the unit’s name (name). We use
text splicing to insert a dot (.)
between them and store the result in the $intname variable.
Now, all that is left is to add the logic to actually configure
family mpls on the interface. We use
the jcs:emit-change() template to
perform that configuration. At the same time, we have the jcs:emit-change() template log a warning
message to inform the user of the configuration change.
With these additions, our final script looks like this:
version1.1;nsjunos="http://xml.juniper.net/junos/*/junos";nsxnm="http://xml.juniper.net/xnm/1.1/xnm";nsjcs="http://xml.juniper.net/junos/commit-scripts/1.0";import"../import/junos.xsl";matchconfiguration{var$mpls=protocols/mpls;for-each(interfaces/interface/unit[not(family/mpls)]){/* Calculate the IFL name. */var$intname=../name_"."_name;/** Determine if the interface is configured under* protocols/mpls. The interface is "configured" if:* 1. "interface all" is configured (and not disabled), or* "interface $intname" is configured.* and* 2. "interface $intname" is not disabled.*/if(($mpls/interface[name=="all"&¬(disable)]||$mpls/interface[name==$intname])&¬($mpls/interface[name==$intname]/disable)){/** This IFL is enabled under [edit protocols mpls],* but does not appear to have "family mpls"* configured on the IFL. Add it.*/calljcs:emit-change{with$content={<family>{<mpls>;}}with$message="Adding 'family mpls' to "_$intname;}}}}
Now, let’s try the script on the configuration shown in Example 5-6:
[edit] user@r0#commit[edit interfaces interface ge-1/0/1 unit 0] warning: Adding 'family mpls' to ge-1/0/1.0 [edit interfaces interface fxp0 unit 0] warning: Adding 'family mpls' to fxp0.0 commit complete [edit] user@r0#show | compare rollback 1[edit interfaces ge-1/0/1 unit 0] + family mpls; [edit interfaces fxp0 unit 0] + family mpls;
Next, let’s delete family mpls
from logical interface ge-1/0/0.0,
but leave ge-1/0/0.0 disabled in the
[edit protocols mpls] hierarchy. Our
script correctly ignores this interface:
[edit] user@r0#delete interfaces ge-1/0/0 unit 0 family mpls[edit] user@r0#commitcommit complete [edit] user@r0#show | compare rollback 1[edit interfaces ge-1/0/0 unit 0] - family mpls;
What if we remove the statement from the [edit protocols mpls] hierarchy that disables
the ge-1/0/0.0 interface? Our script
now tries to correct that interface:
[edit] user@r0#delete protocols mpls interface ge-1/0/0[edit] user@r0#show | compare[edit protocols mpls] - interface ge-1/0/0.0 { - disable; - } [edit] user@r0#show protocols mplsinterface all; [edit] user@r0#commit[edit interfaces interface ge-1/0/0 unit 0] warning: Adding 'family mpls' to ge-1/0/0.0 commit complete [edit] user@r0#show | compare rollback 1[edit interfaces ge-1/0/0 unit 0] + family mpls; [edit protocols mpls] - interface ge-1/0/0.0 { - disable; - }
Note
Those of you with eagle eyes may have noticed that the [edit] paths produced by the commit script
were not quite correct in some cases. In particular, [edit interfaces interface ge-1/0/0 unit 0]
is not quite right; rather, it should be [edit interfaces ge-1/0/0 unit 0].
This occurs because of the mechanical way in which the jcs:edit-path() template converts the XML
hierarchy into a path. It takes the tag name from each hierarchy level
and inserts it into the [edit]
path. In a very few cases, this is incorrect because the XML tag name
does not appear in the [edit] path.
The template does not currently have a way to detect this situation,
leading it to make the wrong decision in these cases.
Even with this small bug, the path is still helpful and usable, as it still uniquely and clearly identifies the location in question.
Example: Dynamically Expanding Configuration
Finally, let’s implement the example we gave in “Dynamically Expanding Configuration”. It is a complex example, so it may be worth rereading it. In summary, we want to read information from the configuration found in Example 5-2, apply it against the template found in Example 5-1, and expand it to the configuration found in Example 5-3.
One thing to consider is whether we want to make these changes transient or permanent. To make it easier to understand the implications of both, we show the change both ways. We start by making it a transient change.
We want to match on any interface IP address that has the apply-macro bgp configuration. To make this
easier to understand, let’s view the XML representation of the
configuration in Example 5-2
(shown in Example 5-7).
Example 5-7. The XML representation of a sample configuration snippet that provides values for a commit script
<configuration><interfaces><interface><name>ge-1/0/0</name><unit><name>0</name><family><inet><address><name>192.168.1.1/30</name><apply-macro><name>bgp</name><data><name>peer_as</name><value>65534</value></data><data><name>route_type</name><value>full_routes</value></data></apply-macro></address></inet></family></unit></interface></interfaces></configuration>
To match on any interface IP address that has the apply-macro bgp configuration, we use the
following XPath expression. This XPath expression finds an IPv4 <address> node that has an <apply-macro> node which itself has a
<name> node with a value of
bgp:
matchconfiguration/interfaces/interface/unit/family/inet/address[apply-macro[name=="bgp"]]{}
Next, we assign values from the <apply-macro> node to variables. Because
we chose to match on the <address> node, we need to get the
values from the <apply-macro>
node. If we find one of the required values is missing, or empty, we
return an error (using our old friend, the emit-error() template).
Don’t forget that we also have one optional value: a prefix limit.
We apply a default of 10,000 if this value is missing. To catch a
malformed prefix-limit value, we convert it to a number and then check
to make sure that the number is valid (its string representation is not
NaN) and the number is within a sane
range:
version1.1;nsjunos="http://xml.juniper.net/junos/*/junos";nsxnm="http://xml.juniper.net/xnm/1.1/xnm";nsjcs="http://xml.juniper.net/junos/commit-scripts/1.0";import"../import/junos.xsl";templateemit-error($message,$dot=.){/* Get the [edit] path. */var$path:={calljcs:edit-path($dot=$dot);}/* Emit the error. */<xnm:error>{copy-of$path;<message>$message;}/* Log the syslog message. */<syslog>{<message>jcs:printf("%s: %s",$path/edit-path,$message);}}matchconfiguration/interfaces/interface/unit/family/inet/address[apply-macro[name=="bgp"]]{var$peer_as=apply-macro[name=="bgp"]/data[name="peer_as"]/value;var$route_type=apply-macro[name=="bgp"]/data[name="route_type"]/value;var$prefix_limit={if(apply-macro[name=="bgp"]/data[name="prefix_limit"]){number(apply-macro[name=="bgp"]/data[name="prefix_limit"]/value);}else{number("10000");}}if(not($peer_as)||string-length($peer_as)==0){callemit-error{with$dot=apply-macro[name=="bgp"];with$message="Required 'peer_as' element is missing or "_"empty";}}elseif(not($route_type)||string-length($route_type)==0){callemit-error{with$dot=apply-macro[name=="bgp"];with$message="Required 'route_type' element is missing or "_"empty";}}elseif(not($prefix_limit)||string($prefix_limit)=="NaN"||$prefix_limit<1||$prefix_limit>10000000){callemit-error{with$dot=apply-macro[name=="bgp"];with$message="Optional 'prefix_limit' element appears to "_"be malformed (expected a number between "_"1 and 10000000";}}}
Now, we need to work out the last piece of information we need to
fill in our configuration template: the peer’s IP address. We assume
this network follows a standard of always applying the lower IP address
of a /30 network to the local device
and the higher IP address to the peer.
To accomplish this task, we create a new named template that
expects an IP address in the form of
w.x.y.z/nn:
templateget-remote-ip($local-address){var$pattern="([0-9]+.[0-9]+.[0-9]+.)([0-9]+)/";var$ip-split=slax:regex($pattern,$local-address);if(string($ip-split[1])!=""){exprjcs:printf("%s%d",$ip-split[2],number($ip-split[3])+1);}}
This regular expression is used to parse the IP address. We really don’t need to make a variable to hold this. The main reason we did that was just to make the script format better for the book.
The regular expression uses parentheses to create two groups. The first group holds the first three octets of the IP address and the trailing dot. The second group holds the final octet. These groupings are significant, because we will later be able to access the values that match each group.
The trailing slash is not part of any group. It ensures that the second grouping matches everything up to the slash.
This line matches the regular expression (given in the first argument) against a string (given in the second argument). The result is a node set that you can evaluate with an array-like syntax.
Warning
Because of the XPath standard, the first node has an index of 1, rather than 0. In addition, the first node contains the entire matching string. Subsequent nodes contain, in order, the values that matched each group from the regular expression.
Given a
$local-addressargument of192.168.1.1/30, we expect the following values:Variable Value $ip-split[1]192.168.1.1/$ip-split[2]192.168.1.$ip-split[3]1This line checks whether a match occurred. If a match occurred,
string($ip-split[1])should be a nonempty string. On the other hand, if no match occurred,string($ip-split[1])should evaluate to the empty string.If no match occurred, the template will simply return nothing. The calling template can check for that condition and react accordingly.
This line prints the value of the remote IP address. Because we assume that the lower IP address is always assigned to the local device, we calculate the remote address by merely adding one to the last octet of the local IP address.
We can test this function using one of our favorite tricks: the
spurious warning or error. This trick is handy for debugging. You can
use it to print out data to see what is occurring during the operation
of your script. You can even print XML hierarchies (using the copy-of statement) and then view them using
the commit check |
display
xml command.
Here, we add a simple diagnostic line to our main template to print out the remote IP address:
matchconfiguration/interfaces/interface/unit/family/inet/address[apply-macro[name=="bgp"]]{var$peer_as=apply-macro[name=="bgp"]/data[name="peer_as"]/value;var$route_type=apply-macro[name=="bgp"]/data[name="route_type"]/value;var$prefix_limit={if(apply-macro[name=="bgp"]/data[name="prefix_limit"]){number(apply-macro[name=="bgp"]/data[name="prefix_limit"]/value);}else{number("10000");}}var$peer-ip={callget-remote-ip($local-address=name);}<xnm:error>{<message>"local address:"_name_"; remote ip:"_$peer-ip;}if(not($peer_as)||string-length($peer_as)==0){callemit-error{with$dot=apply-macro[name=="bgp"];with$message="Required 'peer_as' element is missing or"_"empty";}}elseif(not($route_type)||string-length($route_type)==0){callemit-error{with$dot=apply-macro[name=="bgp"];with$message="Required 'route_type' element is missing or"_"empty";}}elseif(not($prefix_limit)||string($prefix_limit)=="NaN"||$prefix_limit<1||$prefix_limit>10000000){callemit-error{with$dot=apply-macro[name=="bgp"];with$message="Optional 'prefix_limit' element appears to"_"be malformed (expected a number between"_"1 and 10000000";}}}
Recall that this statement is executed in the context of an
<address>node. And, as you can see in Example 5-7, the IP prefix is contained in the<name>node. Therefore, we pass the contents of the<name>node as the$local-addressargument to theget-remote-ip()template. We store the results of theget-remote-ip()template in the$peer-ipvariable.Here, we print a simple error message that shows the local IP prefix from the
<name>node and the remote IP address we calculated.
When we run the script, we see that our get-remote-ip() template appears to be working
correctly:
[edit]
user@r0# commit check
error: local address: 192.168.1.1/30; remote ip: 192.168.1.2
error: 1 error reported by commit scripts
error: commit script failureNow that we know all the variables, we just need to emit the
configuration change to implement the configuration template from Example 5-1. We create a new SLAX
template named emit-bgp-config():
templateemit-bgp-config($peer-ip,$peer-as,$route-type,$prefix-limit){<protocols>{<bgp>{<group>{<name>"customers";<neighbor>{<name>$peer-ip;<import>"filter-customer-generic";<import>"prefix-size";<import>"handle-communities";<import>"as-"_$peer-as;<import>"deny-all";<family>{<inet>{<unicast>{<accepted-prefix-limit>{<maximum>$prefix-limit;<teardown>{<limit-threshold>"80";<idle-timeout>{<timeout>"10";}}}}}<inet6>{<unicast>{<accepted-prefix-limit>{<maximum>$prefix-limit;<teardown>{<limit-threshold>"80";<idle-timeout>{<timeout>"10";}}}}}<export>$route-type;<export>"deny-all";<peer-as>$peer-as;}}}}}}
You will notice that we have put the <name> element in the group hierarchy. As we explained in “Discovering the Unique Key Used to Identify Configuration
Elements”, you must include the keys to
differentiate between multiple elements that use the same tag. In this
case, the <group>
elements are distinguished by their <name> element.
We now modify the main match template to call the emit-bgp-config() template with the
appropriate arguments:
var$top-level=../../../../../..;calljcs:emit-change{with$tag="transient-change";with$dot=$top-level;with$content={callemit-bgp-config{with$peer-ip=$peer-ip;with$peer-as=$peer-as;with$route-type=$route-type;with$prefix-limit=$prefix-limit;}}}
You will notice that we found the top level of the hierarchy using
a relative XPath statement, which will be applied relative to the
address node. This allows you to extend the same template to work
equally well in a logical system as the main logical system. If you
don’t care about logical systems, another way to find the top of the
hierarchy is with the XPath expression /commit-script-input/configuration.
To allow this transient change to occur, we must also configure Junos to permit transient changes:
[edit]
user@r0# set system scripts commit allow-transientsFinally, we check the new BGP configuration with the display
commit-scripts pipe command:
[edit]
user@r0# show protocols bgp | display commit-scripts
error: load of commit script changes failed (transients)Obviously, that doesn’t look good! Now may be a good time to introduce you to troubleshooting steps for commit scripts. You can see the input and output of the commit script by activating traceoptions. In this case, let’s start by just looking at the commit script’s output:
[edit] user@r0#set system scripts commit traceoptions flag output[edit] user@r0#set system scripts commit traceoptions file commit-script[edit] user@r0#show protocols bgp | display commit-scriptserror: load of commit script changes failed (transients) [edit] user@r0#run show log commit-scriptOct 1 05:48:45 cscript script processing begins Oct 1 05:48:45 reading commit script configuration Oct 1 05:48:45 testing commit script configuration Oct 1 05:48:45 opening commit script '/var/db/scripts/commit/test.slax' Oct 1 05:48:45 script file '/var/db/scripts/commit/test.slax': size = 5421 ; md5 = fe39e3dcca9b4bef7c0646a922154bcb sha1 = 09303aedfe3fb07fa86728da39912604777c2264 sha-256 = 863a79ea08f6d4c56364dac18b0b647a96cdf63b4eade34a1c590318af5bd53a Oct 1 05:48:45 reading commit script 'test.slax' Oct 1 05:48:45 running commit script 'test.slax' Oct 1 05:48:45 processing commit script 'test.slax' Oct 1 05:48:45 results of 'test.slax' Oct 1 05:48:45 begin dump <commit-script-results> <transient-change> <protocols xmlns:junos="http://xml.juniper.net/junos/*/junos" xmlns:xnm="http://xml.juniper.net/xnm/1.1/xnm" xmlns:jcs="http://xml.juniper.net/junos/commit-scripts/1.0"> <bgp> <group> <name>customers</name> <neighbor> <name>192.168.1.2</name> <import>filter-customer-generic</import> <import>prefix-size</import> <import>handle-communities</import> <import>as-65534</import> <import>deny-all</import> <family> <inet> <unicast> <accepted-prefix-limit> <maximum>10000</maximum> <teardown> <limit-threshold> 80 </limit-threshold> <idle-timeout> <timeout>10</timeout> </idle-timeout> </teardown> </accepted-prefix-limit> </unicast> </inet> <inet6> <unicast> <accepted-prefix-limit> <maximum>10000</maximum> <teardown> <limit-threshold> 80 </limit-threshold> <idle-timeout> <timeout>10</timeout> </idle-timeout> </teardown> </accepted-prefix-limit> </unicast> </inet6> <export>full_routes</export> <export>deny-all</export> <peer-as>65534</peer-as> </family> </neighbor> </group> </bgp> </protocols> </transient-change> </commit-script-results>Oct 1 05:48:45 end dump Oct 1 05:48:45 no errors from test.slax Oct 1 05:48:45 saving commit script changes for script test.slax Oct 1 05:48:45 summary of script test.slax: changes 0, transients 1 (allowed), syslog 0 Oct 1 05:48:45 cscript script processing ends
This output makes the problem obvious: we accidentally included
the export policy chain and peer AS in the <family> hierarchy. Fixing the issue is
as simple as moving the export policy chain and peer AS out of the
<family> hierarchy. Once we
make this change, we can view the new configuration both with and
without the transient changes:
[edit] user@r0#show protocols bgp group customerstype external; [edit] user@r0#show protocols bgp group customers | display commit-scriptstype external; neighbor 192.168.1.2 { import [ filter-customer-generic prefix-size handle-communities as-65534 deny-all ]; ## 'as-65534' is not defined family inet { unicast { accepted-prefix-limit { maximum 10000; teardown 80 idle-timeout 10; } } } family inet6 { unicast { accepted-prefix-limit { maximum 10000; teardown 80 idle-timeout 10; } } } export [ full_routes deny-all ]; peer-as 65534; }
The good news is this output matches our configuration template!
The bad news is that this highlights another thing we should consider.
Note the comment on the import policy chain that policy as-65534 is not defined. This results in a
commit failure:
[edit]
user@r0# commit check
[edit]
'policy-options'
Policy error: Policy as-65534 referenced but not defined
[edit protocols bgp group customers neighbor 192.168.1.2]
'import'
BGP: import list not applied
error: configuration check-out failedDepending on the way this script will be used, you may actually want to fail the commit until the appropriate policy is configured. However, in other cases, you may want to insert an appropriate default policy.
Here, we decide to add an appropriate default policy that simply skips over the policy if it is not defined. This decision seems safe enough, given the fact that the next policy in the chain denies all routes. We also display a warning message if this occurs.
So, we modify our script by adding logic that implements this
decision. We add a new template (emit-default-policy()) that emits the XML
configuration for the new policy. If it is necessary to add the default
policy, we call the emit-default-policy() template from the main
match template and emit the change:
templateemit-default-policy($peer-as){<policy-options>{<policy-statement>{<name>"as-"_$peer-as;<then>{<next>"policy";}}}}...outputtrimmed...if(!$top-level/policy-options/policy-statement[name=="as-"_$peer-as]){calljcs:emit-change{with$tag="transient-change";with$dot=$top-level;with$content={callemit-default-policy($peer-as=$peer-as);}with$message={exprjcs:printf("Adding default '%s' policy","as-"_$peer-as);}}}...outputtrimmed...
After making this change, the commit check succeeds:
[edit]
user@r0# commit check
[edit]
warning: Adding default 'as-65534' policy
configuration check succeedsWe can also look at the new policy. However, you see that an
attempt to view the specific policy with the command show
policy-options policy-statement as-65534 | display
commit-scripts fails to show the policy:
[edit]
user@r0# show policy-options policy-statement as-65534 | display commit-scripts
[edit]
user@r0#This command fails to show the policy because the requested
configuration node does not exist in the candidate configuration.
Instead, you need to choose a higher-level node that does exist and use
the display commit-scripts pipe
command while displaying the configuration of that node.
In this case, the direct parent of the policy ([edit policy-options]) does exist in the
candidate configuration, so we display that hierarchy using the display commit-scripts pipe command:
[edit] user@r0#edit policy-options[edit policy-options] user@r0#show | display commit-scripts | find "policy-statementpolicy-statement as-65534 { then next policy; } ...output trimmed...as-65534"
Finally, the new configuration commits successfully:
[edit policy-options]
user@r0# commit
[edit]
warning: Adding default 'as-65534' policy
commit completeExample 5-8 shows the complete script.
Example 5-8. A SLAX script to expand BGP configuration using transient changes
version1.1;nsjunos="http://xml.juniper.net/junos/*/junos";nsxnm="http://xml.juniper.net/xnm/1.1/xnm";nsjcs="http://xml.juniper.net/junos/commit-scripts/1.0";import"../import/junos.xsl";templateemit-error($message,$dot=.){/* Get the [edit] path. */var$path:={calljcs:edit-path($dot=$dot);}/* Emit the error. */<xnm:error>{copy-of$path;<message>$message;}/* Log the syslog message. */<syslog>{<message>jcs:printf("%s: %s",$path/edit-path,$message);}}templateget-remote-ip($local-address){var$pattern="([0-9]+.[0-9]+.[0-9]+.)([0-9]+)/";var$ip-split=slax:regex($pattern,$local-address);if(string($ip-split[1])!=""){exprjcs:printf("%s%d",$ip-split[2],number($ip-split[3])+1);}}templateemit-bgp-config($peer-ip,$peer-as,$route-type,$prefix-limit){<protocols>{<bgp>{<group>{<name>"customers";<neighbor>{<name>$peer-ip;<import>"filter-customer-generic";<import>"prefix-size";<import>"handle-communities";<import>"as-"_$peer-as;<import>"deny-all";<family>{<inet>{<unicast>{<accepted-prefix-limit>{<maximum>$prefix-limit;<teardown>{<limit-threshold>"80";<idle-timeout>{<timeout>"10";}}}}}<inet6>{<unicast>{<accepted-prefix-limit>{<maximum>$prefix-limit;<teardown>{<limit-threshold>"80";<idle-timeout>{<timeout>"10";}}}}}}<export>$route-type;<export>"deny-all";<peer-as>$peer-as;}}}}}templateemit-default-policy($peer-as){<policy-options>{<policy-statement>{<name>"as-"_$peer-as;<then>{<next>"policy";}}}}matchconfiguration/interfaces/interface/unit/family/inet/address[apply-macro[name=="bgp"]]{var$peer-as=apply-macro[name=="bgp"]/data[name="peer_as"]/value;var$route-type=apply-macro[name=="bgp"]/data[name="route_type"]/value;var$prefix-limit={if(apply-macro[name=="bgp"]/data[name="prefix_limit"]){number(apply-macro[name=="bgp"]/data[name="prefix_limit"]/value);}else{number("10000");}}var$peer-ip={callget-remote-ip($local-address=name);}if(not($peer-as)||string-length($peer-as)==0){callemit-error{with$dot=apply-macro[name=="bgp"];with$message="Required 'peer_as' element is missing or "_"empty";}}elseif(not($route-type)||string-length($route-type)==0){callemit-error{with$dot=apply-macro[name=="bgp"];with$message="Required 'route_type' element is missing or "_"empty";}}elseif(not($prefix-limit)||string($prefix-limit)=="NaN"||$prefix-limit<1||$prefix-limit>10000000){callemit-error{with$dot=apply-macro[name=="bgp"];with$message="Optional 'prefix_limit' element appears to "_"be malformed (expected a number between "_"1 and 10000000";}}else{var$top-level=../../../../../..;calljcs:emit-change{with$tag="transient-change";with$dot=$top-level;with$content={callemit-bgp-config{with$peer-ip=$peer-ip;with$peer-as=$peer-as;with$route-type=$route-type;with$prefix-limit=$prefix-limit;}}}if(!$top-level/policy-options/policy-statement[name=="as-"_$peer-as]){calljcs:emit-change{with$tag="transient-change";with$dot=$top-level;with$content={callemit-default-policy($peer-as=$peer-as);}with$message={exprjcs:printf("Adding default '%s' policy","as-"_$peer-as);}}}}}
One of the benefits of the current script design is that your configuration stays small. As we saw earlier when we viewed the new configuration with and without the transient changes, the BGP configuration in the candidate configuration is much smaller than the committed configuration.
However, not all users like this behavior. Some users prefer to see the full configuration appear in the static configuration database. In that case, we merely use the commit script to make initial provisioning easier and forgo some of the other benefits of using transient changes (as described in “Handling Transient Changes”).
In order to modify the commit script so it changes the candidate
configuration, rather than using transient changes, we need to do two
things. First, we need to change the $tag argument for each call to the jcs:emit-change() template. Instead of setting
a value of transient-change, the
value should now be change. (Or,
because change is the default value
for the $tag argument, we could
instead remove the $tag argument
altogether.) Second, as explained in “Handling Permanent Changes”, we must delete the
apply-macro bgp configuration from
the interface.
All of these changes occur in the main match template. We have called out the changes in the template:
matchconfiguration/interfaces/interface/unit/family/inet/address[apply-macro[name=="bgp"]]{var$peer-as=apply-macro[name=="bgp"]/data[name="peer_as"]/value;var$route-type=apply-macro[name=="bgp"]/data[name="route_type"]/value;var$prefix-limit={if(apply-macro[name=="bgp"]/data[name="prefix_limit"]){number(apply-macro[name=="bgp"]/data[name="prefix_limit"]/value);}else{number("10000");}}var$peer-ip={callget-remote-ip($local-address=name);}if(not($peer-as)||string-length($peer-as)==0){callemit-error{with$dot=apply-macro[name=="bgp"];with$message="Required 'peer_as' element is missing or"_"empty";}}elseif(not($route-type)||string-length($route-type)==0){callemit-error{with$dot=apply-macro[name=="bgp"];with$message="Required 'route_type' element is missing or"_"empty";}}elseif(not($prefix-limit)||string($prefix-limit)=="NaN"||$prefix-limit<1||$prefix-limit>10000000){callemit-error{with$dot=apply-macro[name=="bgp"];with$message="Optional 'prefix_limit' element appears to"_"be malformed (expected a number between"_"1 and 10000000";}}else{var$top-level=../../../../../..;calljcs:emit-change{with$content={<apply-macrodelete="delete">{<name>"bgp";}}}calljcs:emit-change{with$tag="change";with$dot=$top-level;with$content={callemit-bgp-config{with$peer-ip=$peer-ip;with$peer-as=$peer-as;with$route-type=$route-type;with$prefix-limit=$prefix-limit;}}}if(!$top-level/policy-options/policy-statement[name=="as-"_$peer-as]){calljcs:emit-change{with$tag="change";with$dot=$top-level;with$content={callemit-default-policy($peer-as=$peer-as);}with$message={exprjcs:printf("Adding default '%s' policy","as-"_$peer-as);}}}}}
We added another call to the
jcs:emit-change()template. This one deletes the<apply-macro>node that is identified by a<name>element with the valuebgp. Thedelete="delete"attribute on the<apply-macro>node tells Junos to delete that node.Recall that changes are relative to the current location (unless we include the
$dotargument, which we have not done here). That is why we only need to specify the<apply-macro>element (which is a child of the current node) without including any of the hierarchy above it.We changed the
$tagargument fromtransient-changetochange.We changed the
$tagargument fromtransient-changetochange.
After committing the configuration, you see the changes take effect, as expected:
[edit] user@r0#commit[edit] warning: Adding default 'as-65534' policy commit complete [edit] user@r0#show | compare rollback 1[edit interfaces ge-1/0/0 unit 0 family inet address 192.168.1.1/30] - apply-macro bgp { - peer_as 65534; - route_type full_routes; - } [edit protocols bgp group customers] + neighbor 192.168.1.2 { + import [ filter-customer-generic prefix-size handle-communities as-65534 deny-all ]; + family inet { + unicast { + accepted-prefix-limit { + maximum 10000; + teardown 80 idle-timeout 10; + } + } + } + family inet6 { + unicast { + accepted-prefix-limit { + maximum 10000; + teardown 80 idle-timeout 10; + } + } + } + export [ full_routes deny-all ]; + peer-as 65534; + } [edit policy-options] + policy-statement as-65534 { + then next policy; + }
Chapter Summary
Commit scripts are very powerful tools for working with Junos configurations. Using commit scripts, you can enforce configuration standards, implement provisioning templates, and attempt to automatically correct errors.
Commit scripts receive a copy of the configuration, process it, and produce an appropriate output XML document. The output XML document directs Junos on how it should proceed with the commit operation. The script can make configuration changes, log messages, produce warnings, or abort the commit with an error.
Because commit scripts work on XML input and produce XML output, the Junos software uses XML transformations to process the XML data. The XML transformation is conducted by a script written in XSLT or SLAX. A SLAX script is functionally equivalent to an XSLT script, but the SLAX syntax may be easier to learn. Once mastered, the SLAX language provides powerful tools for parsing Junos configurations.
As we will see in the following chapters, you can also use SLAX or XSLT to write op and event scripts. Op and event scripts allow you to further customize the Junos software to fit the needs of your network.