
Chapter 2. Installation
In the following section we are going to build a fully functional MCollective environment on several of your hosts. We are going to deploy a simple, yet secure, configuration for your initial tests. We will use this baseline configuration as we expand your knowledge in each of the following chapters.
This baseline configuration will use:
- ActiveMQ as the Messaging Broker Middleware
- Pre-Shared Keys to encrypt data between the clients and the servers
- A simple Admin User Has Total Control authorization scheme
You’ll find this configuration useful as a baseline from which to build upon as your mcollective installation grows.
Requirements
Before you install MCollective, you will need to check that you have all of the required elements, as listed below.
Tip Puppet Labs Repositories
If you are using RedHat, Fedora, CentOS, Debian, or Ubuntu Linux and are willing to use the Puppet Labs repositories, you can skip this section, as all of these components are available in your operating system packages or supplied in the Puppet Labs Products or Dependencies repositories.
Are these versions higher than Puppet Labs documentation?
The versions specified here are chosen to avoid known bugs and common problems as reported in the MCollective e-mail, irc, and ticketing support channels. You can use the lower versions from the Puppet Labs documentation, but you may encounter well-known issues you’d avoid by using these versions.
MCollective Clients and Servers
Working time synchronization
Many problems that are reported on the mailing list are due to systems having a different idea of what time it is. It is essential that all systems in the collective have a consistent view of the current time through use of Network Time Protocol (NTP). Active Directory/W32Time, the Unix Time Protocol used by
rdate, and the original Daytime protocol are not accurate enough to provide sufficiently high-resolution time synchronization.Ruby 1.8.7 or 1.9.3
At the time this book was written, MCollective does not work with version 2.0 or higher of Ruby. It also will not work with versions below 1.8.7. If your operating system does not provide you with a modern version of ruby, refer to the Appendix OS Specifics for assistance.
- MCollective 2.5.0 or higher
- Ruby Stomp Gem 1.2.10 or higher
- 5 megabytes of disk space
- 256 megabytes of RAM
Middleware Broker
- 500MB of memory minimum
Messaging Middleware, one of:
- ActiveMQ 5.8 or higher (preferred) with STOMP Connector from http://activemq.apache.org/stomp.html
- RabbitMQ 2.8 or higher with the STOMP Connector from http://www.rabbitmq.com/stomp.html
- Disk space dependent on middleware service installed. Usually 15mb for ActiveMQ
The middleware broker will not require any disk space beyond the installation packages, but will need processor and network capacity for handling at least two concurrent connections for each server node. Most modern systems can handle hundreds of MCollective server connections. Instructions for tuning the broker to handle thousands of concurrent connections is provided in Large-Scale Broker Configurations.
Passwords and Keys
We are going to simplify the initial installation of MCollective in order to make it easy for you to understand and work with it initially. For this installation we will need three unique strings used for authentication. You won’t type these strings at a prompt—they’ll be stored in a configuration file. So we shall make them long and complex.
If you don’t have a favorite password generation tool, I recommend that you run the following command three times and write the values down:
$ openssl rand -base64 32
Type the three random strings into your Sticky app, Notepad, or write them down on something for just a few minutes. We’re going to use them in the next few sections when configuring your service.
The first string will be the Client Password used by clients to connect to ActiveMQ with permissions to issue commands to the server hosts.
The second string will be the Server Password used by servers to connect to ActiveMQ with permissions to subscribe to the command channels.
The third string will be a Pre-Shared Key used as a salt in the cryptographic hash used to validate communications between server and client, ensuring that nobody can alter the request payload in transit.
Ensure that the client and server passwords are different.
Many online guides for setting up MCollective suggest to use the same username and password for clients and servers. This leads to a problem where the compromise of any server allows control messages to be sent from the compromised server to any host in the collective. We’ll explain this problem in Detailed Configuration Review.
You want the username and password installed on every server to be able to subscribe to command channels, but not to be able to send commands on them. If you use the same username and password for both, someone who can read any one server’s configuration file will be able to issue commands to every host in the collective. Keep these usernames and passwords distinct and separate.
In Chapter 11, we will discuss alternate security plugins. The SSL/TLS security plugins can encrypt the transport and provide complete cryptographic authentication. However, the simplicity of the PSK model is useful to help get you up and running quickly and provides a reasonable level of security for a small installation.
Puppet Labs Repository
Puppet Labs provides APT and YUM repositories containing packages for open source products and their dependencies. These community repositories are intended to supplement the OS vendor repositories for the more popular Linux distributions. These repos contain the Puppet Labs products used in this book, including MCollective, Puppet and Facter, and packages for the dependencies of these products, including Ruby 1.8.7 for RHEL 5.x systems.
Supported Platforms
Following are the Operating Systems for which Puppet Labs maintains Product and Dependency repositories. Other operating systems can use MCollective by following the instructions in the OS Specifics.
Enterprise Linux 6
$ sudo yum install http://yum.puppetlabs.com/puppetlabs-release-el-6.noarch.rpm
Note
Enterprise Linux versions include RedHat, CentOS, Scientific, Oracle and all downstream linux distributions using the same number.
Enterprise Linux 5
This repository includes a build of Ruby 1.8.7 for RHEL-based 5.x systems, which is essential for MCollective.
$ sudo yum install http://yum.puppetlabs.com/puppetlabs-release-el-5.noarch.rpm
Fedora
At the time this book was written, Fedora 18 - 20 are supported and available as below:
$ sudo yum install http://yum.puppetlabs.com/puppetlabs-release-fedora-20.noarch.rpm
Debian and Ubuntu
For Debian and Ubuntu systems you have to download the .deb file appropriate for your release. It is best to browse to http://apt.puppetlabs.com/ and look at the files available there to decide the appropriate one to install.
If you are running the latest release of Debian (Sid) at the time this book was written, you would install the repository as follows:
$wget http://apt.puppetlabs.com/puppetlabs-release-sid.deb$sudo dpkg -i puppetlabs-release-sid.deb$sudo apt-get update
Likewise if you were running the latest Ubuntu (Saucy Salamander) you might use
$wget http://apt.puppetlabs.com/puppetlabs-release-saucy.deb$sudo dpkg -i puppetlabs-release-saucy.deb$sudo apt-get update
Other Platforms
Most platforms (e.g. Solaris, FreeBSD) have package repositories which contain binary packages for MCollective. Consult the appendices of this book for specific instructions to get MCollective packages installed on other operating systems.
Configuring ActiveMQ
The one thing that every MCollective environment must have is Publish-Subscribe middleware. In this section we will install ActiveMQ, the middleware recommended by Puppet Labs for being best performing, most scalable, and best tested. After you have a working installation, instructions for changing the middleware to RabbitMQ are provided in Using RabbitMQ.
Install the Software
The first step is to install the middleware used for communication between clients and servers. You can install this on an existing Puppet or Chef server. Unless you have many hundreds of servers, it won’t require a dedicated system. Its resource needs are very minimal.
RedHat, CentOS, Fedora-based Systems:
$sudo yum install activemq$sudo chkconfig activemq on
Debian or Ubuntu:
$sudo apt-get install activemq$sudo sysv-rc-conf activemq on
FreeBSD:
$sudo pkg add activemq$echo "activemq_enable=YES" | sudo tee -a /etc/rc.conf
Tune the Configuration File
Next we will tune the ActiveMQ configuration file, which should be installed in the appropriate etc directory for your platform (/etc/activemq/activemq.xml on most Linux systems). Edit the default file installed by the ActiveMQ package according to the following suggestions. At the time this book was written, even the default configuration provided by the Puppet Labs-provided package needed some tweaking.
Enable Purging in the Broker
Look for the broker statement (usually located five lines into most default configurations I have seen). You’ll need to add the useJmx and schedulePeriodForDestinationPurge parameters to this.
<brokerxmlns="http://activemq.apache.org/schema/core"brokerName="localhost"useJmx="true"schedulePeriodForDestinationPurge="60000">
Disable producerFlowControl
The broker contains policyEntry statements to enable or disable flow control. We want to ensure that flow control is disabled for MCollective.
<destinationPolicy><policyMap><policyEntries><!-- MCollective generally expects producer flow control to be turned off. --><policyEntrytopic=">"producerFlowControl="false"/><!-- MCollective will generate many single-use reply queues,which should be garbage-collected after five minutes to conserve memory. --><policyEntryqueue="*.reply.>"gcInactiveDestinations="true"inactiveTimoutBeforeGC="300000"/></policyEntries>
Define logins for clients and servers in simpleAuthenticationPlugins
You will find this section in the ActiveMQ default configuration provided by Puppet Labs, but you will have to add it to most other vendor or stock Apache configurations. If your configuration file has a plugins section then replace it completely with our example below. If your configuration file doesn’t have one, then place this just below the destinationPolicy section above. In this section we will define the usernames and passwords used by our server hosts and our administrators:
<simpleAuthenticationPlugin><users><authenticationUserusername="client"password="Client Password" groups="servers,clients,everyone" /><authenticationUserusername="server"password="Server Password" groups="servers,everyone" /></users></simpleAuthenticationPlugin>
Note that plugins does not terminate here. We have broken the plugins block in two halves for ease of reading. The plugins xml block closes at the end of the authorization section.
Define permissions for clients and servers in authorizationPlugins
In the remainder of the plugins block we define rights and permissions for the users we created above. Be very careful to get this text exactly correct, as periods, wildcards, and > characters in particular are very significant.
<authorizationPlugin><map><authorizationMap><authorizationEntries><authorizationEntryqueue=">"write="admins"read="admins"admin="admins"/><authorizationEntrytopic=">"write="admins"read="admins"admin="admins"/><authorizationEntryqueue="mcollective.>"write="clients"read="clients"admin="clients"/>/><authorizationEntrytopic="mcollective.>"write="clients"read="clients"admin="clients"/>/><authorizationEntryqueue="mcollective.nodes"read="servers"admin="servers"/>/><authorizationEntryqueue="mcollective.reply.>"write="servers"admin="servers"/>/><authorizationEntrytopic="mcollective.*.agent"read="servers"admin="servers"/>/><authorizationEntrytopic="mcollective.registration.agent"write="servers"read="servers"admin="servers"/><authorizationEntrytopic="ActiveMQ.Advisory.>"read="everyone"write="everyone"admin="everyone"/></authorizationEntries></authorizationMap></map></authorizationPlugin>
We will go over this configuration in great detail in Chapter 8. At this time it is simply essential that it is entered exactly as above.
Transports
Only one transport should be enabled. Comment out or remove all other transports and leave only the STOMP transport enabled:
<transportConnectors><transportConnectorname="stomp+nio"uri="stomp+nio://[::0]:61613"/></transportConnectors>
Disable the Web Console
ActiveMQ comes with a web console for management. This is unnecessary for MCollective and could have security implications if left open for abuse. Comment this out:
<!-- disabled for security implications<import resource="jetty.xml"/>-->
Start the Service
Now that we’ve updated the configuration file, it is time to start the service.
$ service activemq start
Starting ActiveMQ Broker...
After starting the service, check to see that ActiveMQ is listening on tcp port 61613.
$ netstat -an | grep 61613
If you don’t see a LISTEN socket available for incoming connections, check the logfile. Java errors can be quite verbose, so page through the output carefully.
$ tail -200f /var/log/activemq/activemq.log | less
Firewall Change
You should ensure that inbound TCP sessions to port 61613 can be created from every MCollective Server and Client.
Most Linux systems use iptables firewalls. On a Linux system you could use the following steps to add a rule before the global deny. If all of your servers will fit within a few subnet masks, it is advisable to limit this rule to only allow those subnets, as shown below:
$sudo iptables --list --line-numbersChain INPUT (policy ACCEPT) num target prot opt source destination 1 ACCEPT all -- anywhere anywhere state RELATED,ESTABLISHED ...etc $sudo iptables --list --line-numbersChain INPUT (policy ACCEPT) num target prot opt source destination 1 ACCEPT all anywhere anywhere state RELATED,ESTABLISHED 2 ACCEPT ipv6-icmp anywhere anywhere ...etc
Look through the output and find an appropriate line number for the new rule. Then use the following syntax to insert the rule into this location in the list:
$sudo iptables -I INPUT$20-m state --state NEW -p tcp \ --source192.168.200.0/24--dport 61613 -j ACCEPTsudo ip6tables -I INPUT20-m state --state NEW -p tcp \ --source2001:DB8:6A:C0::/24--dport 61613 -j ACCEPT
Don’t forget to save that rule to your initial rules file. For RedHat-derived systems this can be as easy as this:
$sudo service iptables saveiptables: Saving firewall rules to /etc/sysconfig/iptables:[ OK ] $sudo service ip6tables saveip6tables: Saving firewall rules to /etc/sysconfig/ip6table:[ OK ]
Warning
I’ve shown you the syntax here for both IPv4 and IPv6 using non-routed networks. Customize to suit your local networks. You can ignore the steps for one protocol or the other if you don’t have hosts on both protocols. You can find more details about how to best handle dual-stack hosts in IPv6 Dual-Stack Environments.
Check the appendix for platform-specific instructions.
Installing Servers
Servers are nodes which will receive requests from Clients. These are your target nodes which you desire to make requests of. You should set up several of these in your initial setup.
Install the Software
RedHat, CentOS, Fedora-based Systems:
$sudo yum install mcollective$sudo chkconfig mcollective on
Debian or Ubuntu:
$sudo apt-get install ruby-stomp mcollective$sudo sysv-rc-conf mcollective on
FreeBSD:
$sudo pkg add mcollective$echo "mcollectived_enable=YES" | sudo tee -a /etc/rc.conf
Server Configuration File
The following is the MCollective server configuration file, which should be installed on every host you want to control. Edit the default /etc/mcollective/server.cfg file installed by the package to look like this:
# /etc/mcollective/server.cfg daemonize = 1 direct_addressing = 1 # ActiveMQ connector settings: connector = activemq plugin.activemq.pool.size = 1 plugin.activemq.pool.1.host =activemq.example.netplugin.activemq.pool.1.port = 61613 plugin.activemq.pool.1.user = server plugin.activemq.pool.1.password =generated password #2plugin.activemq.heartbeat_interval = 30 # Send these messages to keep the Stomp connection alive. # This solves NAT and firewall timeout problems. registerinterval = 600 # Security provider securityprovider = psk plugin.psk =pre-shared key #3# Override platform defaults? libdir =/usr/libexec/mcollective#logger_type = file #loglevel = info #logfile = /var/log/mcollective.log #keeplogs = 5 #max_log_size = 2097152 #logfacility = daemon
Note
Note that you have to replace two of the passwords in this file, and also the libdir directory.
Note that libdir will vary between operating systems. For this stage of the learning process, either test on a single operating system or adjust it by hand as necessary for each different OS. We’ll introduce you to a Puppet module in the Chapter 6 section of this book which will handle this cleanly for you.
Start the Service
$ service mcollective start
Starting mcollective:                                      [  OK  ]
At this time you should see the server bound to the activemq server on the port listed in both the server.cfg and activemq.xml files:
$ netstat -an | grep 61613
tcp   0   0 192.168.200.10:58006         192.168.200.5:61613          ESTABLISHED
If you are using IPv6 the response may look like this:
$ netstat -an -A inet6 | grep 61613
tcp   0   0 2001:DB8:6A:C0::200:10:45743 2001:DB8:6A:C0::200:5:61613  ESTABLISHED
Note
You may find that you are using IPv6 when you didn’t expect it. This isn’t generally a problem in most sites, so don’t rush to turn it off. How to control which protocol to use is covered in IPv6 Dual-Stack Environments.
Creating a Client
You only need to install the client software on systems from which you will be sending requests. This may be your management hosts, a bastion host, or could be your laptop or desktop systems in the office.
Install the Software
RedHat, CentOS, Fedora-based systems:
$ sudo yum install mcollective-client
Debian or Ubuntu:
$ sudo apt-get install mcollective-client
FreeBSD:
$ sudo pkg add mcollective-client
Client Configuration File
The following is the client configuration file, which should be installed only on hosts from which you will submit requests. Edit the /etc/mcollective/client.cfg file installed with the package to look like this:
direct_addressing = 1 # Connector connector = activemq plugin.activemq.pool.size = 1 plugin.activemq.pool.1.host =activemq.example.netplugin.activemq.pool.1.port = 61613 plugin.activemq.pool.1.user = client plugin.activemq.pool.1.password =generated password #1plugin.activemq.heartbeat_interval = 30 # Security provider securityprovider = psk plugin.psk =pre-shared key #3# Use auto-discovery default_discovery_method = mc # ...or pre-configure the list of nodes #default_discovery_method = flatfile #default_discovery_options = /etc/mcollective/nodes.txt # Miscellaneous settings color = 1 rpclimitmethod = first # Performance settings direct_addressing_threshold = 10 ttl = 60 # Override platform defaults? libdir =/usr/libexec/mcollective#logger_type = console #logfacility = daemon #loglevel = warn #logfile = /var/log/mcollective.log #keeplogs = 5 #max_log_size = 2097152
Note
Note that you have to replace two of the passwords in this file, and also the libdir directory if the operating systems differ.
Security Considerations
With the pre-shared key security model, anyone who can read the client.cfg file can find the key used to control the hosts. I recommend that you limit the people who can read the client file to the people who you trust to execute commands on every system.
$sudo chmod 640 /etc/mcollective/client.cfg$sudo chown root:wheel /etc/mcollective/client.cfg
Note
The Puppet module provided in this book does this step for you. You only need to execute the above commands during our initial learning installation. Later on, if you are using the provided Puppet module this will be handled for you.
We’ll cover more flexible security designs in Chapter 11.
Installing from Source
If you have installed the packages from the Puppet Labs repository, you can skip directly down to Testing Your Installation below.
If there are no suitable packages for your operating system, you can install MCollective from source. The installer will place the files in the standard Ruby locations for your platform, or to directories which you give it as options.
You will need to set up an init scripts for your platform on your own. We’ll show you where the examples are that you can build from.
Warning
Do not attempt to install from RubyGems. The version in RubyGems is not maintained by Puppet Labs and is quite a bit older than, and incompatible with, recent versions of MCollective. It also does not install the connector or security plugins.
Using the Installer
Download a source tarball from https://github.com/puppetlabs/marionette-collective/tags/.
Use the installer to place the files in your standard system locations:
$tar xzf marionette-collective-$2.5.0.tar.gzcd marionette-collective-$2.5.0sudo ./install.rbmc-call-agent: mco: mcollectived: log.rb: mcc............. agent_definition.rb: mmc..... standard_definition.rb: mmc.... ...snip test results... Files: 113 Classes: 137 Modules: 151 Methods: 788 Elapsed: 23.397s mkdir -p -m 755 /etc/mcollective install -c -p -m 0644 etc/facts.yaml.dist /etc/mcollective/facts.yaml mkdir -p -m 755 /etc/mcollective install -c -p -m 0644 etc/server.cfg.dist /etc/mcollective/server.cfg mkdir -p -m 755 /etc/mcollective install -c -p -m 0644 etc/client.cfg.dist /etc/mcollective/client.cfg mkdir -p -m 755 /etc/mcollective ...snip many more files...
You could also install to a different path and use the RUBYLIB environment variable to add it to Ruby’s load path.
$cd marionette-collective-$2.5.0sudo$/path/to/ruby ./install.rb --configdir=/opt/mcollective/etc--bindir=/opt/mcollective/bin--sbindir=/opt/mcollective/sbin--plugindir=/opt/mcollective/plugins--sitelibdir=/opt/mcollective/libexport PATH=${PATH}:$/opt/mcollective/binexport RUBYLIB=${RUBYLIB}:/opt/mcollective/lib
Creating an Init Script
If you didn’t install MCollective from a package, you’ll need to create an init script to start MCollective at system boot time. There are a few startup scripts in the MCollective source tree to use as starting points:
- ext/debian/mcollective.init
- ext/redhat/mcollective.init
- ext/solaris/mcollective.init
You’ll have to use these examples to tailor an appropriate startup script for the MCollective server daemon.
Creating a Package
You may want to create a package for your platform, to avoiding having to install from source on every node. To create a package for your operating system, you invoke the installer with an option to build a chroot tree for you:
$cd marionette-collective-$2.5.0./installer.rb --destdir=/package/root/mcollectiveNo newer files. Files: 0 Classes: 0 Modules: 0 Methods: 0 Elapsed: 0.009s mkdir -p -m 755 /package/root/mcollective/etc/mcollective install -c -p -m 0644 etc/facts.yaml.dist /package/root/mcollective/etc/mcollective/facts.yaml mkdir -p -m 755 /package/root/mcollective/etc/mcollective install -c -p -m 0644 etc/server.cfg.dist /package/root/mcollective/etc/mcollective/server.cfg mkdir -p -m 755 /package/root/mcollective/etc/mcollective install -c -p -m 0644 etc/client.cfg.dist /package/root/mcollective/etc/mcollective/client.cfg ...snip many more files...
Once you have done this, copy the init script you created into the package root, adjust the configuration files if necessary, and then build the package according to your operating system standards.
Testing Your Installation
After you have set up a middleware host, at least one server and one client, you can run a test to confirm that your configuration settings are correct. At this point the installation used for this chapter looks like this:
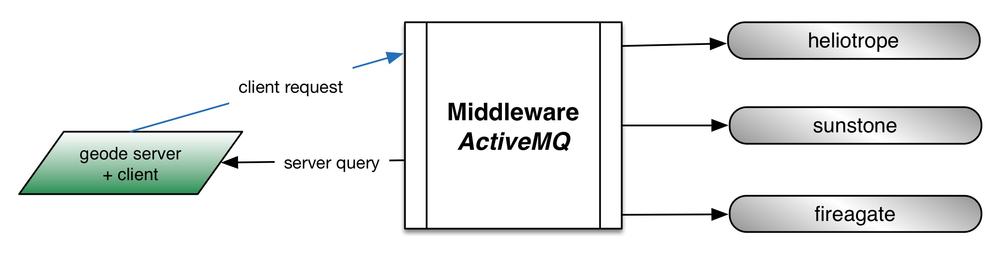
Note that host geode has both the server and client software installed. It will receive requests through the middleware the same as every other server.
The ping test is a very low-level query that confirms that the server node is communicating through the middleware.
jrhett@geode$ mco ping
sunstone                                 time=88.09 ms
geode                                    time=126.22 ms
fireagate                                time=126.81 ms
heliotrope                               time=127.32 ms

---- ping statistics ----
4 replies max: 127.32 min: 88.09 avg: 117.11
If you get back a list of each server connected to your middleware and its response time, then Congratulations! You have successfully created a working MCollective framework.
Troubleshooting
If you didn’t get the responses we expected above, here are some things to check.
Passwords
The number one problem you’ll see is that you didn’t use the correct passwords in each location. Ensure that the three passwords we created are used correctly. Replace them if you need to do so for testing purposes.
-
Client Password: Should be assigned to the user
clientin the /etc/activemq/activemq.xml file, and also used for plugin.activemq.pool.1.password in /etc/mcollective/client.cfg. -
Server Password: Should be assigned to the user
serverin the /etc/activemq/activemq.xml file, and also used for plugin.activemq.pool.1.password in /etc/mcollective/server.cfg. - Pre-Shared Key: Should be used as the value for plugin.psk in both /etc/mcollective/server.cfg and /etc/mcollective/client.cfg.
Networking
The second most likely problem is a firewall blocking access between the server and the middleware, or the client and the middleware. Test the server connectivity by going to the middleware system and confirm that you see connections to port 61613 from each of the servers.
$ netstat -a |grep 61613
tcp   0   0 :::61613                    :::*                          LISTEN
tcp   0   0 192.168.200.5.61613         192.168.200.10:58028          ESTABLISHED
tcp   0   0 192.168.200.5.61613         192.168.200.11:22123          ESTABLISHED
tcp   0   0 192.168.200.5.61613         192.168.200.12:42488          ESTABLISHED
tcp   0   0 2001:DB8:6A:C0::200:5:61613 2001:DB8:6A:C0::200:5:32711   ESTABLISHED
tcp   0   0 2001:DB8:6A:C0::200:5:61613 2001:DB8:6A:C0::200:13:45743  ESTABLISHED
If you don’t see connections like these, then there is a firewall that prevents the servers from reaching the middleware broker.