You want to customize the debug and release build types, or create additional types of your own.
Solution
The buildTypesblock inside android is used to configure build types.
Discussion
A build type determines how an app is packaged. By default, the Android plug-in for Gradle supports two different types of builds: debug and release. Both can be configured inside the buildTypes block inside of the module build file. The buildTypes block from the module build file in a new project is shown in Example 3-1.
Example 3-1. Default buildTypes block from module build file
The only build type shown in the example is the release build, but it is just as easy to add a debug block as well if you want to configure the default settings. Either block supports a range of properties. The complete set of properties and methods can be found in the DSL reference for the com.android.build.gradle.internal.dsl.BuildType class.
In the release block on the example, minifyEnabled refers to the automatic removal of unused resources in the packaged app. If true, Gradle also removes resources from dependent libraries if they are not needed. This only works if the shrinkResources property is also set to true.
Another property available in build types is debuggable. Debug builds automatically have debuggable set to true, while all other builds default to false.
In order to install multiple build types on a single device, Android must be able to distinguish their application IDs. The applicationIDsuffix property allows Gradle to generate multiple APKs, each with its own ID (Example 3-3).
Example 3-3. Adding a suffix to the application ID and version name
android{// ... other properties ...buildTypes{debug{applicationIDsuffix'.debug'versionNameSuffix'-debug'}// .. other build types ...}}
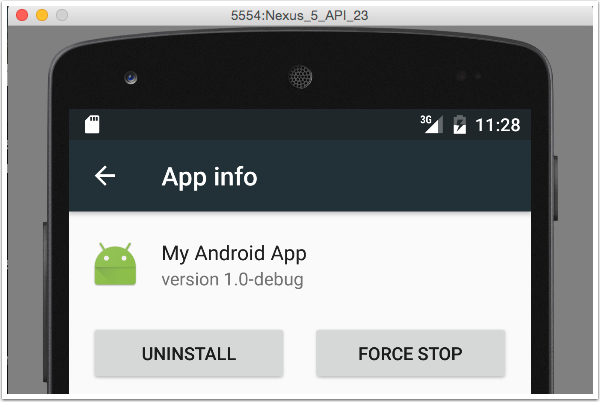
Now both a release and a debug version of the app can be deployed to the same device. If you access the Settings on the device and go to Apps, you can see that both the debug and release versions are on the same app (Figure 3-1).
Figure 3-1. Both debug and release versions are deployed
To distinguish them, select each version and view the full version name in the “App info” settings, as in Figure 3-2.
Figure 3-2. Version name in App info settings
Changing the name of the apps involves merging resources, discussed in Recipe 3.3. Different build types also allows you to create separate source trees for each. Merging sources from separate build types (and flavors) is discussed in Recipe 3.5.
See Also
Flavors are discussed in Recipe 3.2. The combination of a flavor and a build type is a variant. Each variant allows for separate resources, manifest entries, and Java source code, the merger of which is part of Recipes 3.3 and
3.5.
3.2 Product Flavors and Variants
Problem
You want to build essentially the same application, but with different resources and/or classes.
Solution
Product flavors allow you to create multiple different versions of the same app.
Discussion
Build types are part of the development process, normally used as an app evolves from development to production. The default build types, debug and release, reflect that.
Flavors allow you to build multiple versions of the same app. This could happen when you need to customize the look and feel of an app for different clients, or if you need both a free and a paid version of the same app.
To declare a product flavor, use the productFlavors block in the android closure.
Consider a “Hello, World” style of Android app that greets a user based on a simple EditText name entry. You can give the app an attitude by introducing “friendly,” “arrogant,” and “obsequious” flavors, as in Example 3-4.
In this case, each has a slightly different applicationId, so that all three can be installed on the same device.
Note
Flavor names can’t match existing build type names or the predefined name androidTest.
Each product flavor can have its own values of the following properties, among others, which are based on the same properties from defaultConfig:
applicationId
minSdkVersion
targetSdkVersion
versionCode
versionName
signingConfig
Each flavor defines its own source set and resources, which are siblings of the main source set. For the flavors defined in Example 3-4, that means in addition to app/src/main/java, you can also add source files in:
app/src/arrogant/java
app/src/friendly/java
app/src/obsequious/java
You can also add additional resource files in:
app/src/arrogant/res
app/src/arrogant/res/layout
app/src/arrogant/res/values
as well as any other subdirectories of res. The same resource structure would also apply for all flavors. A simple example is shown in Figure 3-3.
A similar folder structure is supported for build types as well. The combination of a build type and a flavor is called a variant. For the two default build types (debug and release) and the three flavors shown here (arrogant, friendly, and obsequious), six different variant APKs can be generated.
Figure 3-3. Product flavors with source code and resources
To see all the available variant names, add the custom task in Example 3-5 to your module build.
Example 3-5. A custom task to print available variants
To deploy a particular variant, Android Studio provides a Build Variants view. Choose the proper variant from the dropdown list, as shown in Figure 3-4, and deploy as usual.
Figure 3-4. Build Variants view in Android Studio
When product flavors are used, the assemble task builds all possible variants. The assemble<Variant> task builds only that particular combination of build type and flavor. You can also run assemble<BuildType> to build all flavors in that build type, or assemble<Flavor> to build all build types for that flavor. The install tasks are specific to each variant, as in installArrogantDebug or installFriendlyRelease.
See Also
Merging resources from different flavors and build types is discussed in Recipe 3.3. Changing Java classes in each is discussed in Recipe 3.5. Writing your own custom tasks in Gradle is shown in Recipe 4.1.
3.3 Merging Resources
Problem
You want to change the images, text, or other resources in a product flavor.
Solution
Add the proper resource directories to your flavor, add the relevant files, and change the values they contain.
Discussion
Consider the “Hello World with Attitude” application discussed in Recipe 3.2, which defined three flavors for the Hello, World app: arrogant, friendly, and obsequious. In each case, the app prompts the user for a name and then greets the user by name. The Java code for each is identical, but the look and feel for each flavor is different.
The product flavors are defined in the Gradle build file, as shown in Example 3-7.
Example 3-7. Product flavors in the build.gradle file
android{// ... other settings ...productFlavors{arrogant{applicationId'com.oreilly.helloworld.arrg'}friendly{applicationId'com.oreilly.helloworld.frnd'}obsequious{applicationId'com.oreilly.helloworld.obsq'}}}
Each flavor is given a separate applicationId so that they can all be deployed to the same device for demonstration purposes.
Example 3-8 contains the MainActivity class, with its onCreate and sayHello methods.
Example 3-8. The MainActivity class from the Hello, World app
The activity has an attribute of type EditText, used for the user’s name. The sayHello method retrieves the name, adds it to an Intent as an extra, and starts the WelcomeActivity with the intent.
The layout for the main activity is simply a vertical LinearLayout with a TextView, an EditText, and a Button (Example 3-9).
The MainActivity is the launcher. Figure 3-5 shows the initial screen for the application, customized for the arrogant flavor.
Figure 3-5. Hello screen in the Arrogant flavor
How were the application name and initial greeting set? All three flavors have their own resources directory, under app/<flavor>/res. In each case, a subfolder called values was added, and a copy of the strings.xml file from app/src/main/res/values was copied into it. The project structure for the arrogant flavor is shown in Figure 3-6.
The strings.xml file for the arrogant flavor is shown in Example 3-10.
Example 3-10. The strings.xml file in the Arrogant res/values folder
<resources><stringname="app_name">Arrogant</string><stringname="title_activity_welcome">His/Her Royal Highness</string><stringname="hello_world">Arrogant</string><stringname="greeting">We condescend to acknoweldge your
presence, if just barely, %1$s.</string></resources>
Merging resources by combining the values in the res folder of the project flavor with the same folder from a build type and the main directory tree. The priority is: build type overrides Product Flavor, which overrides the main source set.
Tip
Non-Java resources override each other, where build type has highest priority, then flavor, then the main directory.
The WelcomeActivity has an onCreate method that retrieves the user’s name and greets the user (Example 3-11).
Example 3-11. The WelcomeActivity, which greets the user
Each flavor has its own values.xml and animal.png files, which change the greeting given. The values in Example 3-10 result in the welcome shown in Figure 3-7.
Each additional flavor is handled the same way. The friendly flavor uses the strings.xml file shown in Example 3-13.
Example 3-13. The strings.xml file in the Friendly res/values folder
<resources><stringname="app_name">Friendly</string><stringname="title_activity_welcome">We are BFFs!</string><stringname="hello_world">Friendly</string><stringname="greeting">Hi there, %1$s!</string></resources>
Finally, the Obsequious strings are shown in Example 3-14.
Example 3-14. The strings.xml file in the Obsequious res/values folder
<resources><stringname="app_name">Obsequious</string><stringname="hello_world">Obsequious</string><stringname="title_activity_welcome">your humble servant</string><stringname="greeting">O great %1$s, please accept this pathetic
greeting from my unworthy self. I grovel in your
general direction.</string></resources>
Figure 3-7. Welcome in the Arrogant flavor
Figure 3-8. Welcome in the friendly flavor
The resulting Obsequious welcome page is shown in Figure 3-9.
Figure 3-9. Welcome in the Obsequious flavor
Merging non-Java resources is easy. Just add the proper folders and files, and the flavor values will override those from main. To deploy an individual flavor of the app, choose it from the Build Variants view, as in Figure 3-10.
Figure 3-10. Build Variants view in Android Studio
See Also
Flavors and variants are discussed in Recipe 3.2. Merging source code is in Recipe 3.5.
3.4 Flavor Dimensions
Problem
One product flavor is not enough. You need another criterion to distinguish different versions of your app.
Solution
Add flavorDimensions to your product flavors.
Discussion
The recipe in Recipe 3.2 showed a “Hello, World” app with three product flavors: arrogant, friendly, and obsequious. That means the different flavors are being distinguished based on attitude.
Suppose, however, that different clients would like their own branded versions of each flavor of the app. The source code is essentially the same for each. Only a couple of minor resources are different.
To keep from having too much duplication, introduce an additional flavor dimension. The build file is shown in Example 3-15.
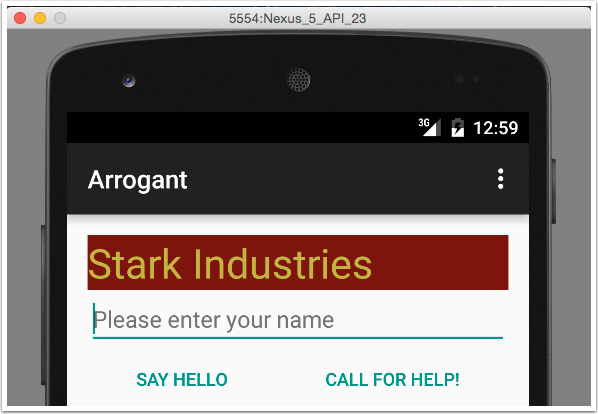
There are now two dimensions of flavor: attitude and client. The arrogant, friendly, and obsequious flavors are all in the attitude dimension, and the stark and wayne flavors are types of client.
The combination generates many more variants. Running the printVariantNames custom task from Recipe 4.1 now shows the results in Example 3-16.
The textColor attribute uses the color resource for each flavor, and the text attribute uses the string value provided by each flavor.
As a result, Figure 3-12 shows the arrogant flavor from Stark Industries.
Figure 3-12. The Arrogant debug flavor from Stark Industries
By contrast, the friendly flavor from Wayne Enterprises is shown in Figure 3-13.
One additional note is necessary here. The flavorDimensions tag in the Gradle build file listed attitude before client, which means values from the attitude dimension will have higher priority than the client dimension. Therefore, the hello_world string resource was removed from each of the attitude flavors. Switching the order of client and attitude would have worked just as well, of course.
Figure 3-13. The Friendly debug flavor from Wayne Enterprises
See Also
Flavors and variants are shown in Recipe 3.2. Resource merging is in Recipe 3.3, and merging Java source code is in Recipe 3.5. Build types are discussed in Recipe 3.1.
3.5 Merging Java Sources Across Flavors
Problem
You want to add Android activities or other Java classes to individual product flavors.
Solution
Create the proper source folders, add your Java classes, and merge them with the main source set.
Discussion
While string and layout resources in flavors and build types override the corresponding values in the main source set, Java classes are different. If your code in the main source set refers to a particular class, then each flavor and build type can have its own implementation of that class as long as you don’t have one in main.
That sounds more complicated than it is. The “Hello, World” app discussed in Recipe 3.2 and Recipe 3.4 has two flavors that represent clients. Consider now a modified version of that app that adds a button to the main activity to call for help. The additional button has the label “Call for Help!”
The main (launch) activity for the friendly, wayne flavor is shown in Figure 3-14.
Figure 3-14. Main activity for the “wayne” client
The “stark” page is the same, just with a different header, as shown in Figure 3-15.
Figure 3-15. Main activity for the “stark” client
Clicking the “Call for Help!” button creates an Intent that starts the CallForHelpActivity. This activity, and its associated layout, have been removed from the main source tree, and a copy was added to both the stark and wayne source sets. The overall project layout when working with the friendly, wayne, debug variant is shown in Figure 3-16.
Figure 3-16. Source folders for main, stark, and wayne flavors
The figure shows that the Java sources in the wayne flavor are currently in the classpath and those in the stark tree are not. Both flavors contain the CallForHelpActivity, but the implementations of each are completely different.
For the wayne flavor, the help screen contains just a single fragment containing a TextView, as shown in Figure 3-17.
Figure 3-17. Help activity for wayne flavor
The help page for the stark flavor consists of a ListFragment with several entries, shown in Figure 3-18.
Figure 3-18. Help activity for stark flavor
Any class referenced by an element in the main source set must exist in each flavor. After that, the implementations are completely independent.
See Also
Recipe 3.2 shows how to implement flavors and variants. Recipe 3.3 is about merging non-Java resources. Recipe 3.4 shows how to have multiple flavor dimensions.