
Chapter 12. iPhoto File Management
For years, iPhoto fans experienced the heartache of iPhoto Overload—the syndrome in which the program gets too full of photos, winds up gasping for RAM, and acts as if you’ve slathered it with a thick coat of molasses. And for years, true iPhoto fans adopted an array of countermeasures to keep the speed up, including splitting their iPhoto libraries into several smaller chunks.
These days iPhoto is faster (see the box on Demystifying 64-bit) and can manage a whopping one million pictures per library, so such drastic measures aren’t generally necessary. And with the plummeting cost of external hard drives, backing up your iPhoto library isn’t the painful process that it used to be.
Nonetheless, learning how iPhoto manages its library files is still a worthy pursuit. It’s the key to burning your photos—or an exported slideshow (Exporting a Saved Slideshow)—to CD or DVD, and transferring them to other machines, as well as swapping photo libraries and merging them together.
iPhoto Backups
Unfortunately, bad things can happen to digital photos. They can be accidentally deleted with a slip of your pinkie. They can become mysteriously corrupted and subsequently unopenable. They can get mangled by a crashed hard drive and lost forever. Losing one-of-a-kind family photos can be extremely painful—and in some documented cases, even marriage-threatening. So if you value your digital photos (and your relationships), you should back them up regularly, perhaps after each major batch of new photos joins your collection, and certainly before upgrading iPhoto when a new version comes out.
If you’re using your Mac’s Time Machine feature, then you’re already covered. Your entire machine is constantly backed up, as the box on Turn On Your Time Machine explains.
If you have an iCloud account and you’ve turned on photo sharing (Using iCloud’s Photo Stream), then the last 1,000 pictures you’ve taken or imported into iPhoto are secure…but that’s it. (Of course, the free iCloud account offers only 5 GB of storage space, although you can buy more.)
Happily, there are other ways to back up your precious photos, as the following sections spell out.
Note
Veteran iPhoto jockeys may remember a feature called iPhoto Discs, which let you burn your entire iPhoto library—originals, thumbnails, titles, keywords, comments, ratings, and so on—onto one or more discs to create an archive. But the burning process was slow, newer laptops don’t even have disc drives, and most libraries are too big to burn onto disc anyway; that feature is gone now. These days, it’s faster and more efficient to preserve your iPhoto Library file by copying it onto an external hard drive, as the following section explains.
Backing Up to a Hard Drive
One of iPhoto’s main jobs is to keep all your photos together in one place—one icon that’s easy to copy to a backup disk of any kind.
That all-important icon is the iPhoto library, which resides inside the Pictures folder of the Home folder that bears your name. If your user name (the short name you use to log into OS X) is Casey, for example, then the full path to your iPhoto library file from your main hard drive window drive is Macintosh HD→Users→Casey→Pictures→iPhoto Library. Alternatively, pop open a Finder window and choose Go→Home, and then double-click the Pictures folder.
As described in Chapter 2, the iPhoto library contains not just your photos, but also a huge assortment of essential elements:
All the thumbnails you see in the photo-viewing area.
The originals of photos you’ve edited in iPhoto or an external editor.
Various data files that keep track of your iPhoto keywords, flags, ratings, albums, and so on.
To prepare for a disaster, you should back up all these components.
To perform a complete backup, quit iPhoto and then Option-drag the iPhoto library icon to another location on your hard drive. However, copying it to another spot on the same disk means you’ll lose both the original iPhoto library and its backup if, say, your hard drive crashes or an asteroid hits your computer. Copying it to a different hard drive—to another external hard drive or another Mac via the network—is the best route—drag the icon to an external drive to begin the copying (no modifier key required).
You’d be surprised at how cheap hard drives are these days. As of this writing, you can buy a 1-terabyte hard drive (that’s 1,000 gigabytes) for way under $100, for goodness’ sake—and hard drive prices-per-gigabyte only go down.
Burning Files to CD or DVD
Burning a CD or DVD is handy for backing up your photos, transferring them to another computer (even a Windows PC), mailing them to somebody, or offloading (archiving) older files to free up hard drive space. You can buy blank CDs and DVDs incredibly cheaply in bulk via the Web.
Tip
When you’re shopping for CDs or DVDs, Verbatim DataLifePlus is a good brand to look for (especially their archival-quality DVDs, which allegedly last for 100 years).
CDs can store about 700 megabytes of data. Single-layer DVDs store roughly six times as much data as a CD, for a total of 4.3 gigabytes. Dual-layer DVDs—like the ones you get when you rent or buy a Hollywood movie—are more expensive but hold twice the data of their single-layer brethren (8.5 gigabytes). So, if your iPhoto library file is smaller than, say, 4 gigabytes, you could burn it onto a single-layer DVD; if it’s smaller than 8 gigabytes, you can squeeze it onto a dual-layer DVD. With this method, your entire iPhoto realm remains intact.
Tip
Not sure what kinds of discs your Mac can burn? Choose
![]() →About This Mac, and then click More Info.
In the resulting dialog box, click the Storage tab. Scroll down
(if necessary) and there it is, plain as day: a list of the
formats your machine can write (that is, burn). For example,
depending on your Mac’s model, you might see “CD-Write: -R, -RW,
DVD-Write: -R, -RW, +R, +RW, -R DL.”
→About This Mac, and then click More Info.
In the resulting dialog box, click the Storage tab. Scroll down
(if necessary) and there it is, plain as day: a list of the
formats your machine can write (that is, burn). For example,
depending on your Mac’s model, you might see “CD-Write: -R, -RW,
DVD-Write: -R, -RW, +R, +RW, -R DL.”
However, if your iPhoto Library file is larger than 8 gigabytes, you’ll need to export your photos and videos first, and then burn the individual files to disc instead. The downside to this approach is that, depending on the export options you pick, any edits you’ve made to the photos become permanent and you lose the organizational structure you’ve worked so hard to create in iPhoto (like folders and albums). If you’ve added flags or star ratings, they get stripped out too, though keywords and location tags can remain intact if you turn on those two options in the Export dialog box as described in step 1 below).
Tip
Another option is to spring for an external Blu-ray burner, which can store a whopping 25 GB on a single layer BD-R!
Whether you’re burning your entire iPhoto library onto disc, or individually exported photos, video, or a slideshow, the process is the same. Here’s how it works:
Prepare your files.
Exactly how you do this depends on what you’re planning to burn:
If you’re burning your iPhoto library file, locate it by opening a Finder window that points to your Macintosh HD→Users→[your user name]→Pictures folder, or by choosing Go→Home→Pictures.
If you’re exporting individual files, in iPhoto, select the album, photos, or videos that you want to burn, and then choose File→Export. In the dialog box that appears, click the File Export tab. To export full-size photos with your edits intact (though undoable should you import these photos back into iPhoto), set the Kind menu to JPEG, the JPEG Quality menu to Maximum, and, if you’ve added keywords or Places tags, turn on “Title and keywords” and “Location information.” Set the Size menu to Full Size and, if you’ve given your pictures custom filenames, choose “Use title” from the File Name menu (if you haven’t, leave it set to “Use filename”).
To export your original photos without any edits you’ve made, pick Original from the Kind menu instead.
Note
For detailed instructions on exporting slideshows, see Exporting a Saved Slideshow.
Click Export and then, in the next dialog box, pick a destination for the exported files. Click OK to get the export process under way.
Put a blank CD or DVD into your burner and tell your Mac what to do with the disc.
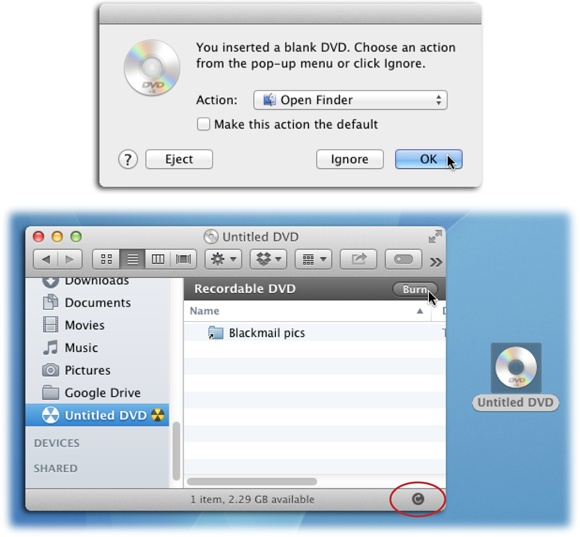
A few seconds after you insert the disc, you see the dialog box shown in Figure 12-1, top. Choose “Open Finder,” and then click OK.
Now the disc’s icon appears on your desktop as Untitled CD or Untitled DVD, as well as in the sidebar of any Finder window, complete with the burn symbol (
 ).
).Drag the file(s) onto the disc’s icon.
At this point you can drag your files and folders onto the disc’s icon on your desktop, or double-click the icon to open a window like the one in Figure 12-1 (bottom), and then drag the files into the window. These files may include your iPhoto library (if it’s not too big), photos and videos you’ve exported from iPhoto, an exported slideshow movie, or any combination thereof.
You can add, remove, reorganize, and rename the files on the not-yet-burned disc just as you would in any Finder window. All you’re really doing is dragging aliases (shortcuts) around; the real files are left untouched on your hard drive.
Figure 12-1. Top: You might not see this dialog box if you’ve fiddled with your Mac’s “CDs & DVDs” System Preferences. If you do see it, you can bypass it next time by turning on “Make this action the default.” Bottom: Click the disc’s icon in the sidebar and then, at the bottom of the window, you can see how much free disc space you’ve got left (if any). (In this example, there are 2.29 gigabytes left on the DVD.) Click the icon circled here to refresh the free-space value as you add or remove files.Tell your Mac to get ready to burn the files.
When the disc’s icon contains the files and folders you want to immortalize, do one of the following:
On your desktop, click the disc’s icon and then choose File→Burn [disc name].
Click the
next to the disc’s name in the
sidebar of a Finder window.In the upper-right corner of the disc’s window (Figure 12-1, bottom), click Burn.
On your desktop, drag the disc’s icon toward the Trash icon in the Dock. As soon as you begin to drag, the Trash icon turns into a yellow
; drop the disc’s icon onto it.On your desktop, Control-click the disc’s icon and choose Burn [disc name].
In any case, a confirmation dialog box appears.
Edit the disc’s name, if you want, and then click Burn.
You can rename the CD or DVD just as you would a file or a folder.
Once you click Burn, your Mac saves the files onto the CD or DVD. When the recording process is over (it’ll take several minutes), eject the disc by pressing the
 key or by Control-clicking the disc’s
icon on your desktop and choosing “Eject [disc name].”
key or by Control-clicking the disc’s
icon on your desktop and choosing “Eject [disc name].”
There’s another approach: In the Finder, choose File→New Burn Folder. A new folder cleverly named—you guessed it—Burn Folder appears on your desktop. Name it anything you want, and then drag your files inside. Now open the folder and click the Burn button in the upper-right corner. The Mac asks for a blank CD or DVD and then walks you through the process of burning it. (This method is especially handy when you don’t have any blank discs lying around. Simply gather up the files you want to back up, and then perform the burn whenever you get around to buying some discs.)
Either way, once you’ve tested that the disc(s) you’ve burned work, you can delete the exported files on your hard drive to reclaim some space.
Note
The discs that your Mac burns work equally well on Macs and on Windows (or Linux) PCs. If you plan to insert a disc into a PC, however, remember that Windows doesn’t permit certain symbols in filenames. So you’ll run into trouble if any of your filenames contain these symbols: / : * ? “ < > |. In fact, you won’t be able to open any folders on your disc that contain illegally named files.
Managing Photo Libraries
These days iPhoto can comfortably manage around a million photos in a single library, give or take a few thousand, depending on what model your Mac is and how much memory it has.
But some people feel uneasy about keeping that many eggs in a single basket. They wish they could break up their libraries into several smaller, easier-to-manage, easier-to-back-up chunks.
If that’s your situation, then you can archive some of your photos to CD or DVD as described in the previous section, and then delete the archived photos from your library to shrink it down in size. For example, you might choose to archive older photos, or albums you rarely use.
Note
Remember, burning photos to disc doesn’t remove them from iPhoto; you have to do that part yourself (Deleting Photos). If you don’t, your library won’t get any smaller. Just make sure that the CD or DVD you’ve burned works properly before deleting your original photos from iPhoto.
There are two kinds of people in the world: those who have a regular backup system—and those who will. You’ll get that grisly joke immediately if you’ve ever known the pain that comes with having your hard drive die. All those photos, all that music you’ve ripped and organized into playlists, all your email—gone.
If you don’t have much to back up, you might be able to get by with a free online backup system like Dropbox, CrashPlan, or iDrive. But those methods leave most of your Mac—all your programs and settings—unprotected (well, save for CrashPlan). What you really want is a backup that’s rock solid, complete, and automatic. That’s the idea behind Time Machine, a marquee feature of OS X. It’s a silent, set-it-and-forget-it path to peace of mind.
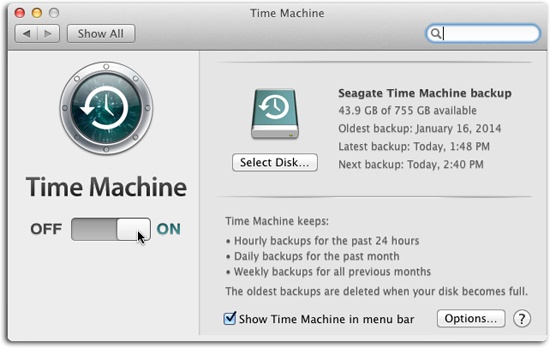
Setting up Time Machine is easy, though it requires a second hard drive like an external USB, FireWire, or Thunderbolt hard drive; an AirPort Time Capsule (an AirPort wireless base station/network backup hard drive in one, available in gigantic capacities); another internal hard drive; or something similar. Whatever you use, the backup disk has to be bigger than the drive you’re backing up (preferably much bigger).
The moment you connect an external hard drive (or the first
time you turn on your Mac after installing an internal one), you see
a message inviting you to use it as Time Machine’s backup drive. If
you click “Use as Backup Disk,” you’re taken to the Time Machine pane of System
Preferences (you can also open this pane directly). You see a huge
off/on switch on the left side of the pane, showing that Time
Machine is now on, your backup disk has been selected, and the
copying process has begun. Your Mac starts copying
everything on your hard drive, including OS X
itself, all your programs, and everyone’s Home folders. You know
that because you see both a progress message and the
![]() symbol that appears next to the backup
drive’s name in the Finder’s sidebar.
symbol that appears next to the backup
drive’s name in the Finder’s sidebar.
And that, ladies and gentlemen, is the easiest setup for a backup program in history.
The following section explains a couple of other options: using disk images and splitting one library into several.
iPhoto Disk Images
The one disadvantage of the abovementioned offload-to-disc technique is that it takes a big hunk of your photo collection offline, so that you can no longer get to it easily. If you suddenly need a set of photos that you’ve archived, for example, you have to hunt down the right disc. That could be a problem if you happen to be in New York and need the photos you left on a DVD in San Francisco.
Here’s a brilliant solution to that disc-management problem: Turn your discs into disk image files on your hard drive. These files are basically virtual CDs that you can keep on your hard drive at all times.
To create one, open Disk Utility (which sits in your Applications→Utilities folder); then insert the CD or DVD you’ve burned (Burning Files to CD or DVD). In the left pane of the Disk Utility window, click the disc’s icon (see Figure 12-2).
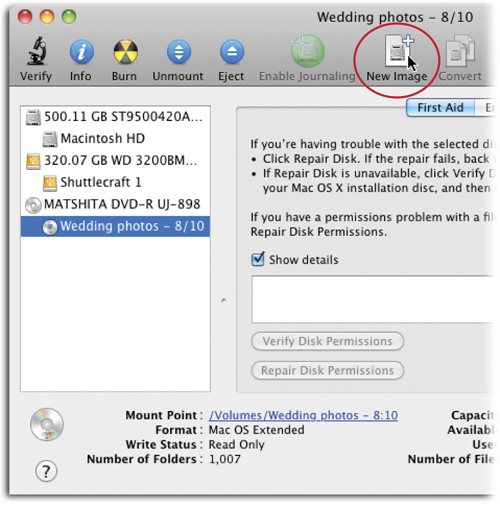
Then choose File→New→“Disk Image from [disc name],” or click New Image at the top of the window (circled in Figure 12-2). In the resulting Save As dialog box, you can type a name for the disk image you’re about to create. You can even password-protect it by choosing “128-bit AES” from the Encryption pop-up menu. Next, choose a location for the disk image, such as your desktop, and then click Save.
You’ve just created a disk image file whose name ends with .dmg. When you want to view its contents in iPhoto, double-click the .dmg file’s icon. You’ll see its contents appear in the form of a CD icon in iPhoto’s Source list, just as though you’d inserted the original disc.
You can spin off numerous chunks of your iPhoto collection this way, and “mount” as many of them simultaneously as you like—a spectacular way to manage tens of thousands of photos, chunk by chunk, without having to deal with a clumsy collection of discs.
Multiple iPhoto Libraries
Now that iPhoto can hold tons of photos in a single library, there’s not as much need to split it into separate libraries as there once was. Still, there are two good reasons why you might want to consider it:
Splitting your collection into several libraries may make iPhoto run faster, especially during scrolling, because there are fewer photos in it. (Fortunately, iPhoto is noticeably faster than previous versions, as explained in the box on Demystifying 64-bit.)
You can keep different types of collections or projects separate. You might want to maintain a Home library for personal use, for example, and a Work library for images that pertain to your business. Or you can start a new library every other year.
Note
The iCloud photo streams you learned about on Using iCloud’s Photo Stream work with one library at a time. So if you create a new library and then switch to it, iPhoto offers to push your photo streams to the new library instead (they won’t show up in the old one).
Creating New Libraries
iPhoto includes a tool for creating fresh libraries and switching among several of them. Here’s how to use it:
Quit iPhoto.
You’re going to do the next step in the Finder.
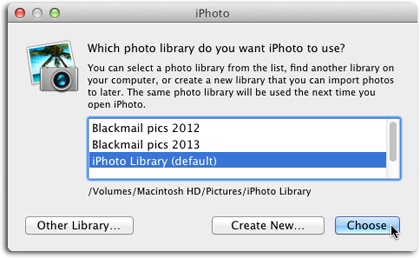
While pressing the Option key, open iPhoto again.
When iPhoto starts up, it senses that you’re up to something and offers you the chance to create a new library or choose an existing one (Figure 12-3).
Click Create New, fill in the Save As dialog box that opens, and then click Save.
You’re offered not only the chance to create a new library, but also to choose a location for it if it’s not your regularly scheduled Pictures folder. Type a name for the new library (Wedding Photo Library or whatever), and then click Save. When iPhoto finishes opening, all remnants of your old iPhoto library are gone. You’re left with a blank window, ready to import photos.
Using this technique, you can spawn as many new photo libraries as you need. You can archive the old libraries on CD or DVD, move them to another Mac, or just keep them somewhere on your hard drive so that you can swap any one of them back in whenever you need it.
As for how you swap them back in, you have two options: Apple’s way and an easier way.
Swapping Libraries (Apple’s Method)
Once you’ve built yourself at least two iPhoto libraries, you can use the same Option-key trick (see step 2 above) to switch between them. When the dialog box in Figure 12-3 appears, select the library you want to open in the list, and then click Choose. (If you don’t see the library you want, then click Other Library and hunt it down on your hard drive.)
When iPhoto finishes reopening, you’ll find the new set of photos in place.
Swapping Libraries (Automatic Method)
If you think that Option-key business sounds a little disorienting, you’re not alone. Brian Webster, a self-proclaimed computer nerd, thought the same thing—but he decided to do something about it. He wrote iPhoto Library Manager, a $30 program that streamlines the process of creating and swapping iPhoto libraries (see Figure 12-4). If you’ve got the extra cash, waste no time in downloading it from Brian’s site, www.fatcatsoftware.com/iplm. (The free version lets you swap libraries, but not much else.)
The beauty of this program is that it offers a tidy list of all your libraries, and you can switch among them with two quick clicks.
![iPhoto Library Manager lets you quickly switch among as many iPhoto libraries as you want.Select a library from the list on the left and the other columns show its albums and thumbnails. (The active [open] library has a checkmark next to its name.) You can download the program for free, though the $30 version includes more features.](http://imgdetail.ebookreading.net/design/7/9781491948385/9781491948385__iphoto-the-missing__9781491948385__httpatomoreillycomsourceoreillyimages2143073.png.jpg)
Here are a few pointers for using iPhoto Library Manager:
The program doesn’t just activate existing iPhoto libraries; it can also create new libraries for you. Just click Create Library in the toolbar, choose a location and name for the library, and then click OK.
You still have to quit and relaunch iPhoto for a change in libraries to take effect. Conveniently, iPhoto Library Manager includes Quit iPhoto and Launch iPhoto buttons in its toolbar (just widen the program’s window if you don’t see them).
iPhoto Library Manager is fully AppleScript-able. If you’re handy with writing AppleScript (discussed in Chapter 11), then you can write one that swaps your various libraries automatically with a mere double-click.
Merging Photo Libraries
You’ve just arrived home from your safari of deepest Kenya. You’re jet-lagged and dusty, but your MacBook Pro is bursting at the seams with fresh photos. You can’t wait to transfer the new pictures into your main iPhoto library—you know, the one on your Mac Pro 6-Core Dual GPU with 64 gigs of RAM and a Sharp 4K display.
Or, less dramatically, suppose you’ve just upgraded to iPhoto. You’re thrilled that you can fit a million pictures into a single library—but you still have six old iPhoto 5 library folders containing about 10,000 pictures each.
In both cases, you have the same problem: How are you supposed to merge the libraries into a single, unified one?
How Not to Do It
You certainly can combine the photos of two Macs’ photo libraries—just export them from one (File→Export) and then import them into the other (File→“Import to Library”). As a result, however, you lose all of your album organization, your ability to undo edits, your ratings and comments, and so on.
Your next instinct might be: “Hey, I know! I’ll just drag the iPhoto library icon from computer number 1 into the iPhoto window of computer number 2!”
Big mistake. You’ll wind up with duplicates or triplicates of every photo in the viewing area, in one enormous, unmanageable, uncategorized, sloshing library. You could also use CDs or DVDs as intermediaries, but that’s time-consuming and uses up blank discs.
The Good Way
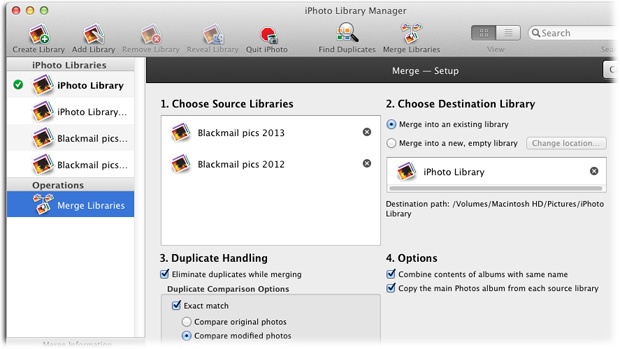
The only sane way to merge libraries is to use iPhoto Library Manager, described on Swapping Libraries (Apple’s Method). For $30, you can unlock some features that aren’t available in the free version—including a miraculously simple Merge Libraries command. All you do is click Merge Libraries in the toolbar at the top of its window, and then proceed as shown in Figure 12-5.
Beyond iPhoto
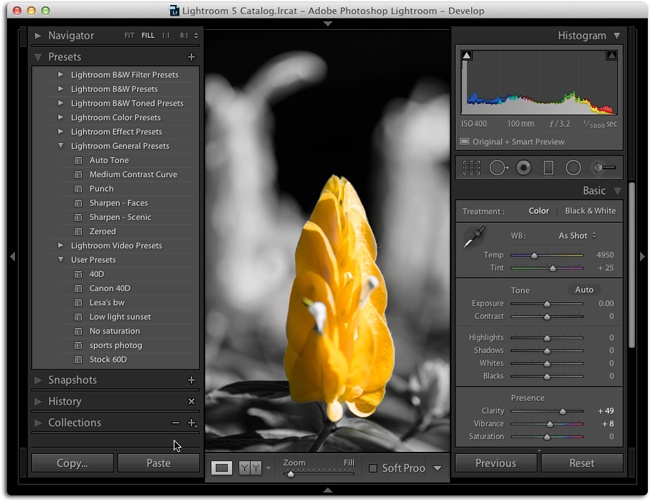
Depending on how massive your digital photo collection grows and how you use it, you may find yourself wanting more editing or file-management power than iPhoto offers. Maybe you want to adjust the exposure of multiple files at once, build your own treatments that you can apply to photos as presets, create partial-color effects (see Figure 12-6), build fine-art-gallery-level templates for printing, or you’d like a system that lets a whole workgroup share a library of photos simultaneously.
To enjoy such features, you’ll have to move beyond iPhoto into the world of professional image-management and editing software, which means spending money. Programs like Adobe Photoshop Lightroom ($150, www.adobe.com/lightroom), Apple’s own Aperture ($80, www.apple.com/aperture), or, for larger operations, Extensis Portfolio Server Studio ($2,000, www.extensis.com) are all terrific programs for someone who wants to take the next step up. If you’re mainly interested in powerful, pixel-level editing for tricks like swapping heads, removing complex objects, combining images into composites, adding text, and so on, the consumer-level Adobe Photoshop Elements or the pro-level Photoshop CC might make better sense. (Adobe offers free trial versions of most of its software at www.adobe.com.) That said, the highly affordable Pixelmator has an impressive following ($30, www.pixelmator.com).
Some of these features are obviously mentioned with professionals in mind, like graphic designers and studio photographers. But these kinds of programs are worth considering if and when your photo collection—and your passion for digital photography—one day outgrows iPhoto.
Tip
To learn more about Adobe Photoshop, Photoshop Elements, and Photoshop Lightroom, check out your co-author’s training videos and ebooks at www.PhotoLesa.com.