
Chapter 14. Editing Photos on the iPad
As you learned in Chapter 5, iPhoto lets you edit your photos in myriad ways. You also know that you can undo your edits anytime to get back to your original shot. Happily, editing on your iPad works the exact same way. Interestingly, you can actually do more editing in iPhoto for iOS than you can with iPhoto for Mac.
For example, the edits you make using iPhoto on your Mac affect the entire photo. There’s no way to tell the program, “Hey, I want you to make this edit only in this one area.” It’s a different story in iPhoto on your iPad, where its brushes let you paint edits onto your photo in the areas where you want them. This feature is incredibly useful when you need to lighten, darken, or even sharpen certain spots of a photo. You’ll learn all about iPhoto’s brushes on Using Brushes.
You also have access to far more effects in iPhoto on your iPad than you do on your Mac. As of this writing, there are nine different effect categories, each containing at least seven fun photo treatments. Coverage of these goodies starts on Fun with Effects.
Once you start editing images on your iPad, it’s important to understand how iPhoto for iOS handles syncing those edited photos. You’d think it’d be an easy, two-way syncing process, but it’s not. As you’ll learn in the box on Copying Edited Photos to Your Computer, getting the edited versions onto your computer takes some doing (and in the process, your edits become permanent).
You’ve already learned how to do a little editing on your iPad by using the Auto-Enhance and Rotate tools (Auto-Enhancing and Rotating). This chapter teaches you how to do everything else.
Editing Basics
To edit a photo, tap its thumbnail to open it. (To get to your thumbnails, you have to be in Photos or Albums view [Browsing Photos]).
Once you open a photo, a row of editing tools appears at the bottom of your screen (Figure 14-1). Tap a tool to see its settings appear to its right.
Note
The screen on your iPhone or iPod Touch is too small to display all of these editing tools. Instead, you see a white toolbox icon; tap it to make the editing tools appear. When you’re finished editing, tap the Browse icon at the lower left.

As Figure 14-1 explains, once you edit a photo, a tiny white toolbox appears on its thumbnail to indicate that it’s been messed with. In addition, the Show Original icon at the top right of your screen lights up. Tap it once to see your original photo in all its pre-edited glory, and tap it again to see the edited version (you can do this dance as many times as you want). This is a fantastic way to see if the edits you’re making are having enough of an effect on the photo.
Before you dive in and start tweaking images, it’s helpful to know a few techniques that can save your bacon if you make a mistake. The following sections teach you how to undo your edits and revert to the original version of a photo. You’ll also discover how to copy and paste edits from one picture to another, how to sync edited photos, and how iPhoto handles raw files.
Tip
On an iOS device, any editing tool you use automatically deactivates itself when you tap another thumbnail. To keep the same tool active when you open another photo, head to iPhoto’s main screen (the one with Photos, Albums, and Projects listed at the bottom) and tap the Options icon (the three dots). In the resulting menu, turn on Keep Edit Tool Enabled.
Undoing Edits
iPhoto on your iPad saves your edits automatically, but you can always back out of them. Here are your choices:
Undo/Redo. iPhoto keeps track of all the edits you make while a photo is open; you can think of this as the photo’s temporary editing history. Once you make an edit, you can tap the Undo/Redo icon labeled in Figure 14-1 to undo what you’ve just done. Keep tapping the button to undo as many edits as you want; there’s no limit. If you change your mind after undoing an edit, you can redo it by tapping the same icon again and then choosing “Redo [tool name].”
However, once you close the photo (by tapping another thumbnail or returning to iPhoto’s main screen), iPhoto resets the photo’s history. You lose the ability to back out of your edits one by one.
Reset/Erase. Depending on the editing tool you used, the Options menu gives you the chance to either reset or erase individual edits whenever you want (even after you close the photo). For example, if you’ve used the Exposure tool, you can tap that tool to reactivate it (if it isn’t still active), tap the Options icon at the bottom right of your screen, and then tap Reset Exposure. Likewise, if you’ve used the Brushes tool, you can get rid of some of your brushstrokes (say, by tapping “Erase [Sharpen] Strokes”), or you can zap them all by tapping Erase All Strokes. If you’ve applied an Effect, you can tap Remove Effect. (The choices don’t appear in the menu until an editing tool is selected.)
Revert to original. You can also undo all the edits you’ve made to a photo, anytime you want, by reverting to the original version. With a photo open and without any editing tools active (just tap Browse to deselect any tool), tap the Options icon, and then tap Revert at the top of the resulting menu. To make this life-saving command easier to spot, Apple made it red. (The Revert command is visible at the bottom of Figure 14-2, though it’s grayed out because no edits had been made to that photo.) Once you revert to the original version of a photo, iPhoto removes the image from the Edited album (Viewing Albums).
As the box on Copying Edited Photos to Your Computer explains, edits made in iPhoto on your iPad become permanent in the version of the photo that you transfer to your computer by either plugging the device into your Mac and importing the photos into iPhoto or by using iTunes file sharing. That said, you can always get back to the original photo in iPhoto on your iPad.
Editing Raw and Full-Sized Photos
While iPhoto is happy to let you start with a raw file (Raw Files), that’s not what you end up with once you edit it. You get a downsized JPEG instead.
When you import a raw file onto your iPad (Importing Pictures) and then edit the file in iPhoto, you’re actually viewing and editing a JPEG version of the file that’s embedded in the raw file, just like you do in iPhoto for Mac (Editing Raw Files). The same thing happens if you shoot raw + JPEG, wherein your camera captures one file of each format when you snap a shot—iPhoto uses the JPEG. Why? Because a raw file is like a film negative that iPhoto has to convert to JPEG format for displaying, editing, and exporting.
Tip
You can transfer unedited raw files from your iPad to your computer using iTunes’ file-sharing feature. Flip ahead to Using iTunes File Sharing for the details.

When you edit a full-size JPEG derived from a raw file, your iPad automatically saves a downsized version of the picture back to your iPad’s Camera Roll. (Apple knows you’ve got less space on your iOS device than you do on your computer, so it tries to optimize photos for your device’s screen size.)
To save a full-sized version of the
edited JPEG derived from a raw file, you have to save it to your
device’s Camera Roll manually. Just tap the ![]() near the top right of your screen and, in the
resulting menu, tap Camera Roll. After you do that, the next time
you plug your device into your Mac, a full-sized version of the file
will get transferred to your computer. Be aware that photos in the
Camera Roll are sorted chronologically by the date they were taken,
which means you’ll have to do some scrolling to locate the edited
version.
near the top right of your screen and, in the
resulting menu, tap Camera Roll. After you do that, the next time
you plug your device into your Mac, a full-sized version of the file
will get transferred to your computer. Be aware that photos in the
Camera Roll are sorted chronologically by the date they were taken,
which means you’ll have to do some scrolling to locate the edited
version.
Incidentally, this maneuver is just the ticket for saving different versions of pictures you edit in iPhoto. For example, if you’re trying to decide between creative effects—say, black-and-white, sepia, or duotone—saving each version to your Camera Roll produces multiple copies so you can keep them all.
Cropping and Straightening
Cropping means shaving off unnecessary portions of a photo. Usually, you crop an image to improve its composition—adjusting where the subject appears within the frame of the picture. Often, a photo has more impact if it’s cropped tightly around the subject, especially in portraits. Or maybe you want to crop out wasted space, like big expanses of sky. You can even chop a former romantic interest out of an otherwise perfect family portrait. Cropping is also very useful if your photo needs to have a certain aspect ratio (length-to-width proportion), like 8 x 10 or 5 x 7 inches.
To crop a photo, open it and then tap Crop; a white border surrounds your photo (Figure 14-3, top). You can then either crop the photo using a size preset or manually using gestures:
Crop with presets. If you tap the Options icon, you get a choice of 12 canned proportions: 3 x 2, 4 x 3, 1 x 1, 16 x 9, 8 x 10, and so on (Figure 14-3, top). These options limit the cropping frame to preset proportions, which is important if you plan to order prints of photos that you’ve taken with an iOS device.
For example, prints come only in standard sizes like 4 x 6, 5 x 7, 8 x 10, and so on. But unless you crop them, the iPad’s photos are all 4 x 3 (iPhone photos are 3 x 2), which doesn’t divide evenly into most standard print sizes. Limiting your cropping to one of these standard sizes guarantees that your cropped photos will fit perfectly into Kodak prints. (If you don’t constrain your cropping this way, then Kodak—not you—will decide how to crop them to fit.)
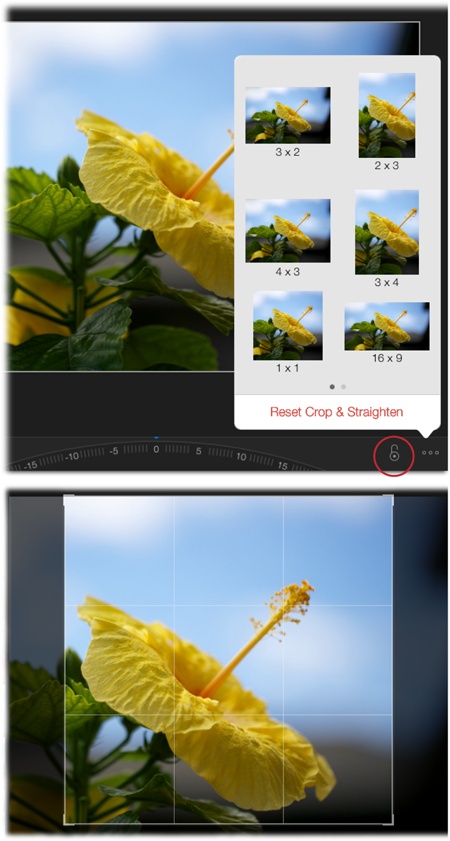
Crop manually. Using your finger, drag inward on any edge or corner; a tic-tac-toe grid appears on your photo (Figure 14-3, bottom), just in case you want to crop according to the Rule of Thirds (see http://tinyurl.com/yw3dvm). You can drag the cropping rectangle into any size and proportions. When you remove your finger from the screen, the part of the photo outside the crop box disappears. You can recenter the photo within the crop box by dragging any part of the photo, inside or outside the box (at which point you see the photo’s original edges, though they’re dimmed).
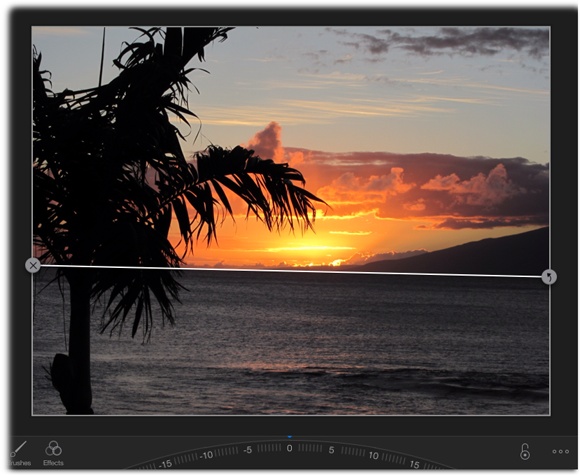
Straightening, on the other hand, lets you fix crooked objects (or a horizon) if your camera was tilted when you took the shot. See the big dial that appears at the bottom of your screen when the Crop tool is active? You can drag this dial to straighten your photos manually. You can also straighten or fine-tune the rotation of a picture by placing two fingers on the screen and twisting them.
Tip
Another way to straighten a photo is by using your iOS device’s built-in gyroscope. Tap the dial at the bottom of your screen with your finger; a grid appears on your photo. Tilt your iPad, iPhone, or iPod Touch to make the photo rotate. When you get it just right, tap the dial again (or anywhere on your screen).
iPhoto can also straighten a photo automatically, as Figure 14-4 explains.
Of course, you can always use the Rotate tool to flip a photo 90 degrees: Just tap the Browse icon at the bottom left of your screen; the tool’s icon appears beneath the photo.
To uncrop or unstraighten a photo, tap the Options icon; in the resulting menu, tap Reset Crop & Straighten. If you used the Rotate tool, keep tapping the tool’s icon until your photo is back the way you want it, or tap Revert to restore your original.
Adjusting Exposure and Contrast
As you learned back in Chapter 5, iPhoto on the Mac lets you change your photo’s exposure and contrast, as well as darken or lighten its shadows and highlights. You can do the same things in iPhoto on your iPad, but the controls are a lot more fun.
Note
To lighten or darken only certain parts of your photo (rather than the whole thing), use iPhoto’s Brushes. Using Brushes has the details.
To tweak exposure and contrast, open a photo and tap Exposure. A blue slider with five icons appears beneath your photo. You can adjust the exposure and contrast in two ways:
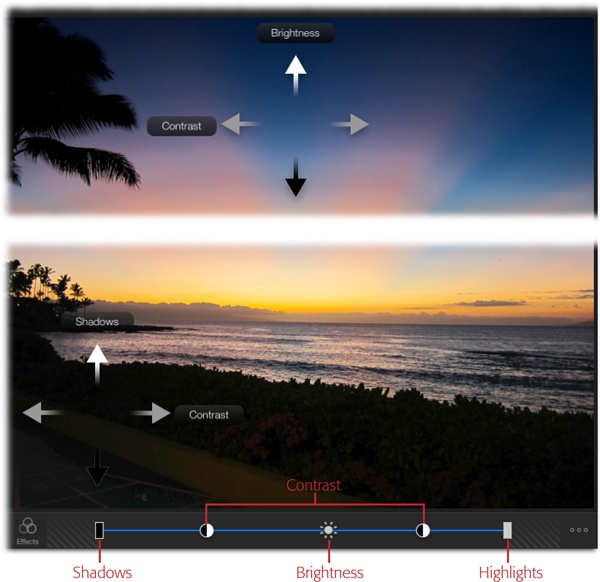
Using the slider. The five icons perched atop the blue slider (they’re labeled in Figure 14-5) are draggable. Here’s how to use them:
Drag the Brightness icon left to darken your photo or right to lighten it.
Dragging the Shadows icon leftward darkens just the shadows; dragging it rightward lightens them. If you drag the icon leftward into the striped area, that area in the slider temporarily turns red to indicate that you’re forcing some shadow pixels to pure black (so they lose detail).
Likewise, dragging the Highlights icon left darkens just the highlights and dragging right lightens them. If you drag this icon rightward into the striped area, it turns red, warning you that some highlight pixels are being forced to pure white (and getting stripped of detail).
Drag one of the Contrast icons leftward to decrease overall photo contrast, or drag it rightward to increase it (it doesn’t matter which one you drag; moving one moves them both).
Using on-image gesturing. Instead of using the slider, you can drag up, down, left or right atop your photo, as Figure 14-5 explains.
To undo exposure and contrast changes, tap the Options icon and choose Reset Exposure.
Adjusting Color
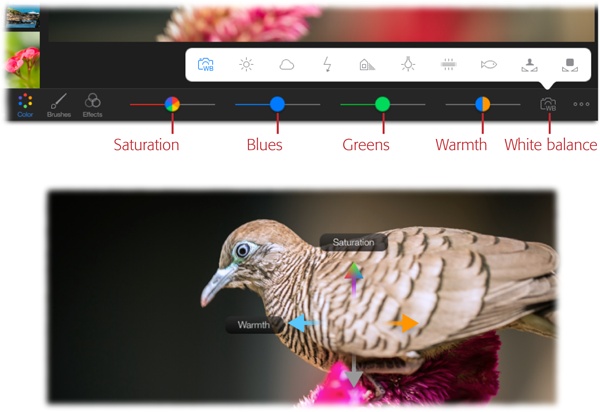
You can use iPhoto’s Color tool to tweak a photo’s overall saturation (Saturation), the intensity of just the blues or just the greens in the photo, as well as the photo’s overall color temperature (Color Balance) from cool to warm. This same tool also lets you change the photo’s white balance (Color Balance) and, as Figure 14-6 describes, that’s the best edit to start with.
As with the Exposure tool, you can also change the colors in your photo by tapping and holding your photo, and then using on-image gesturing (see Figure 14-6, bottom).
Tip
If you’ve got people in your picture, you can have iPhoto preserve their skin tones when you’re using the Color tool. To do that, tap the Options icon and tap the Preserve Skin Tones slider (the slider turns green to let you know the feature is turned on).
Changing White Balance
As mentioned above, you can change a photo’s white balance using the presets shown in Figure 14-6 (top); just tap one to apply it. Here’s what the icons mean from left to right: original (what your camera was set to), sun, cloudy, flash, shade, incandescent (think old-fashioned light bulbs), fluorescent, and underwater.
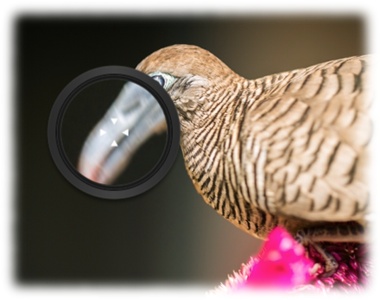
The last two icons aren’t actually presets at all. Instead, they let you change the white balance manually by dragging a magnification loupe atop your photo. Tap the second-to-last icon (which represents “custom white balance based on skin tone”) and then drag the loupe atop a person’s face or other area of skin. Alternatively, tap the last icon (“custom white balance”) and then drag the loupe to an area of your photo that should be white or neutral gray, as shown in Figure 14-7.
To undo all the changes you’ve made with the Color tool, tap the Options icon and choose Reset Color.
Using Brushes
Congratulations—you’ve finally made it to the section on digital finger-painting!
Most of the editing you’ve accomplished in your iPhoto career affects a whole photo. But with iPhoto for iPad’s Brushes tool, you can use on-image gesturing to affect a photo in just the areas that need it.
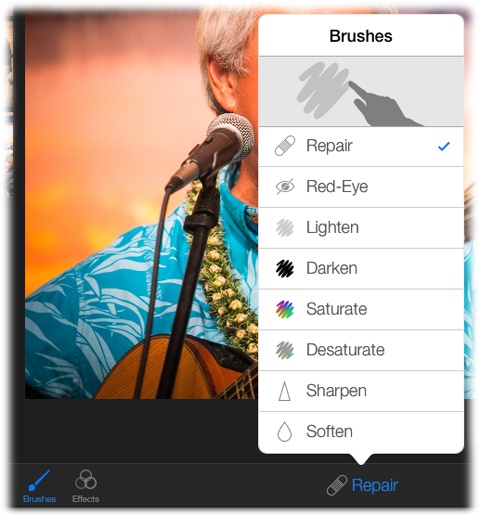
All eight of iPhoto’s brushes work the same way: Open a photo, tap Brushes, and then choose the brush you want to use (Figure 14-8). Then use your finger to paint the change onto the area that needs it. To switch to a different brush, tap the name of the current brush at the bottom of your screen, and then tap a new one.
Tip
The size of the area affected by your brushstrokes is directly proportional to your photo’s zoom level. For example, to adjust fine details (like eyes), zoom way into the photo using the spread gesture (Viewing Individual Photos). (Once you’ve zoomed in, use two fingers to reposition the photo; using one finger applies brushstrokes.) To adjust larger areas (like a background), zoom out using the pinch gesture (Viewing Individual Photos).
Here’s what each brush does:
Repair. This brush is great for removing blemishes, spots caused by specks of dust on your camera’s sensor, or small objects. Painting with this brush copies nearby pixels onto the area you’re fixing and blends them together to make the change look realistic. Alas, you can’t use this brush to remove a whole person from your picture; that’s a job for Photoshop or Photoshop Elements.
Red-Eye. As you might suspect, painting with this brush removes the creepy, possessed look sometimes introduced by your camera’s flash (Fixing Red-Eye). When you swipe with this brush, a message says, “Tap each red-eye.” If you do that, iPhoto turns the red in each eye black. (If iPhoto can’t find any red eye to fix, the brush shakes, and you hear a menacing sound.)
Tip
The Auto-Enhance tool (Auto-Enhancing and Rotating) also tries to get rid of red eye.
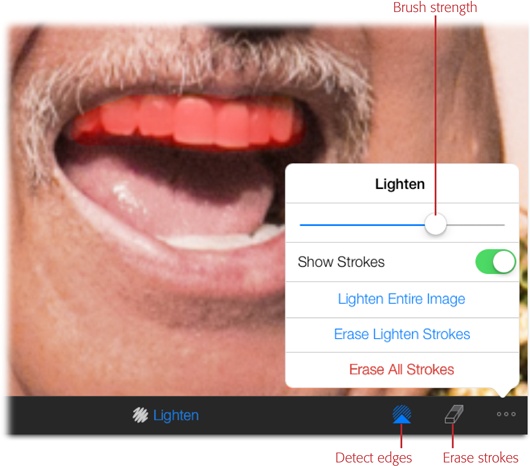
Lighten. Use this brush to lighten an area that’s in shadow (if your camera’s flash didn’t fire, say). You can also use it to lighten teeth (Figure 14-9) or each iris of your subject’s eyes.
Darken. This brush darkens areas that are too light. It’s great for recovering details in overexposed skies.
Saturate. Painting with this brush intensifies colors. You might use this tool to accentuate a colorful flower.
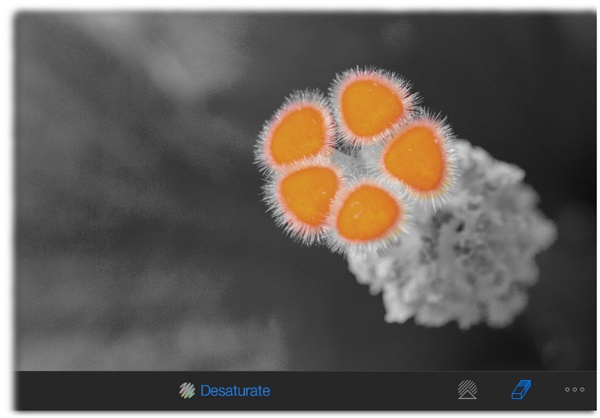
Desaturate. You can use this brush to reduce the intensity of color in an area or, if you keep painting over the same area, remove color entirely. With a little patience, you can use the brush to create the partial-color effect shown in Figure 14-10.
Sharpen. If there are details in your photo that you want to exaggerate—such as eyes, lips, and hair in a portrait, a flower’s petals, or an animal’s fur—use this brush. If you want to sharpen the entire photo, don’t waste your time painting the whole image. Instead, activate this brush and then tap the Options icon. In the resulting menu, tap Sharpen Entire Image and call it done (see Figure 14-11).
Soften. This brush lets you soften an area by blurring it. It’s handy when you’ve got a distracting background. However, it’s really easy to go too far with this brush, so use it sparingly or you’ll turn your pictures into pixel pudding.
Thankfully, iPhoto understands how difficult it can be to finger-paint changes onto a photo. Once you’ve activated the Brushes tool, you’ll spot two more tools at the bottom of your screen (they’re labeled back in Figure 14-9):
Detect Edges. Give this icon a tap to make iPhoto try its best to apply your brushstrokes to areas that are similar to the ones you drag across in terms of color and brightness values. Turn on this setting when you’ve got decent contrast between the object you’re painting and its background. It’s particularly helpful when you’re lightening teeth or eyes, desaturating the background of a photo to create a partial-color effect, and so on.
Tip
While it’s true that you can have hours of fun brushing with your fingers, if you want to edit your pictures precisely, you’ll get better results using a stylus (a pen-sized, artistic brush with a special tip designed to work on touchscreens). A couple of good ones include the Sensu (www.sensubrush.com; $39) and the Bamboo Stylus (www.wacom.com; $30).
Brush Options
Whenever the Brushes tool is active, you get some incredibly useful commands in the Options menu, which are ripe for the tapping. Here are your choices:
Strength. Depending on which brush you’re using, you either get a strength slider (for the Lighten, Darken, Saturate, and Desaturate brushes), as shown in Figure 14-9, or Low, Medium, and High buttons (for the Sharpen and Soften brushes), as shown in Figure 14-11.
Show Strokes. Turn on this setting to see your brushstrokes as a red overlay. It’s incredibly helpful to toggle this switch on and off while you’re using a brush, especially if you’re doing detail work and trying to be precise.
[Brush] Entire Image. Technically, this command defeats the purpose of using iPhoto’s brushes, as it applies the change to the whole image. However, it’s perfect for use with the Sharpen brush because it keeps you from spending an hour trying to paint across your entire photo in order to sharpen the whole darn thing.
Erase [brush] Strokes. Tap this option to turn your brush into an effect-removal brush. Now when you “paint” with your finger, you erase the previous effect of your brushing.
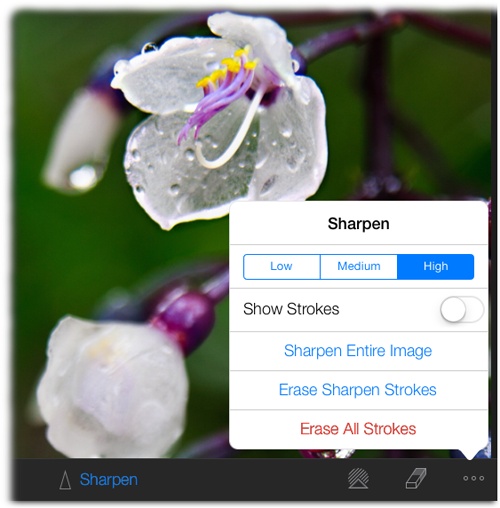
Erase All Strokes. As you might suspect, this option deletes all the strokes you’ve made with that particular brush.
All in all, iPhoto’s brushes work incredibly well, and you can use as many brushes on a photo as you want. However, it’s worth noting that your brushstrokes might be temporarily hidden while you’re editing with other tools. If you’re using the Crop tool, for example, iPhoto hides your brush handiwork until you’re finished cropping.
Fun with Effects
As you learned back in Chapter 5, iPhoto’s effects let you do things like adjust the lighting and colors in your pictures, and even tweak their borders. There are far more effects for you to experiment with in iPhoto for iOS than there are in iPhoto on your Mac. Consider it a bonus for plunking down the money for an iOS gadget.
Once you’ve opened a photo, tap Effects. You see the screen shown in Figure 14-12. Tap an effect thumbnail to apply it to your photo and then, if the effect can be customized, tap and drag on the photo to adjust the effect’s settings. (The following list explains which effects are customizable.)

Tip
iPhoto lets you apply only one effect to a photo, but there’s
a workaround. Apply the first effect, tap ![]() , and then tap Camera Roll. Go to Albums view
(Browsing Photos), tap the Camera Roll album, and
then scroll to find the photo you just applied the effect to
(thumbnails appear in chronological order according to their
shot dates, not edit
dates). Then you can tap Effects and add your
second effect. This technique is handy when you
want to, say, create a watercolor and then give it a painterly
edge.
, and then tap Camera Roll. Go to Albums view
(Browsing Photos), tap the Camera Roll album, and
then scroll to find the photo you just applied the effect to
(thumbnails appear in chronological order according to their
shot dates, not edit
dates). Then you can tap Effects and add your
second effect. This technique is handy when you
want to, say, create a watercolor and then give it a painterly
edge.
iPhoto’s effects are divided into nine categories, with each one containing at least seven creative treatments that you can apply to your photos. Here’s a sampling of what effects let you do:
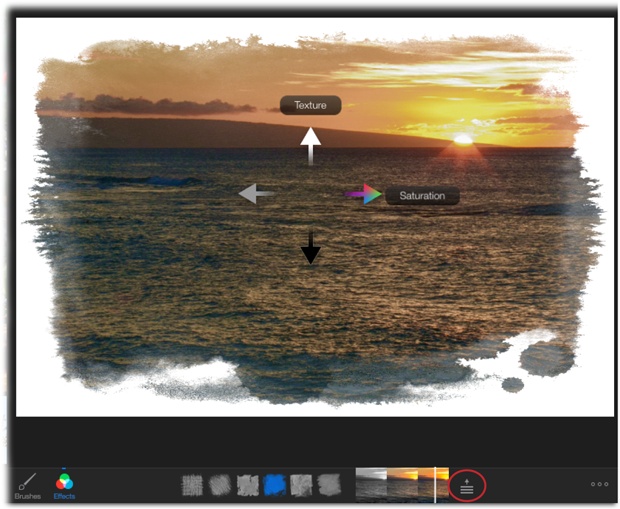
Ink. This category lets you add painterly edges to a photo, including crosshatch, diagonal, palette knife, splatter, chalk, and waterdrop edges. It also lets you adjust the saturation of the colors in your photo from any point between black and white and full color. After applying one of the effects in this category, touch and drag atop your photo to adjust texture and saturation, as Figure 14-13 explains.
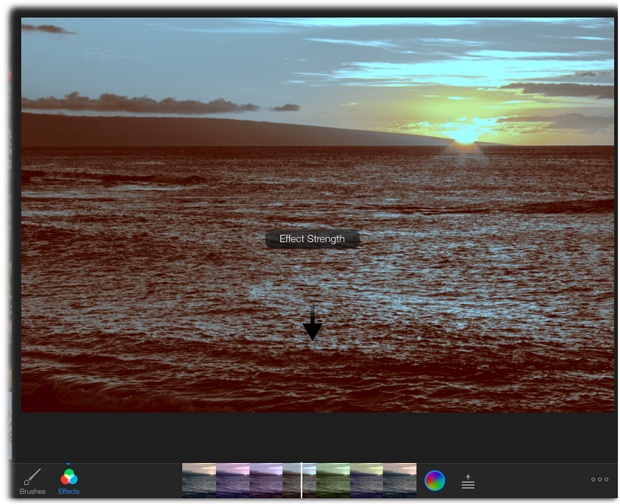
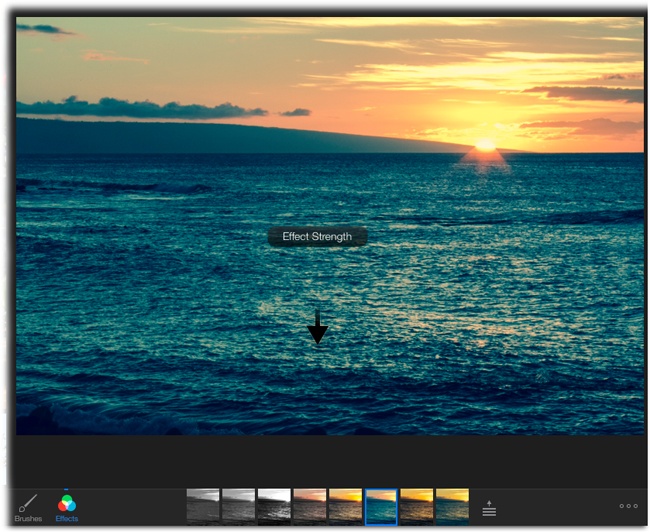
Warming & Cooling. The effects in this category apply orange (warming) or blue (cooling) tones to your photo. The effects in this group are one-trick ponies and can’t really be customized. However, once you tap a thumbnail to apply one of these effects, a white vertical line appears atop the thumbnails beneath the photo; drag it left for more warming or right for more cooling.
Duotone. With these effects, iPhoto turns your image black and white and then tints the shadows with one color (a.k.a. tone) and your highlights with another (hence the name “duotone,” for the two colors involved). Once you apply an effect in this category, tap the image and drag upward to increase the effect, or downward to decrease it. Figure 14-14 has more.
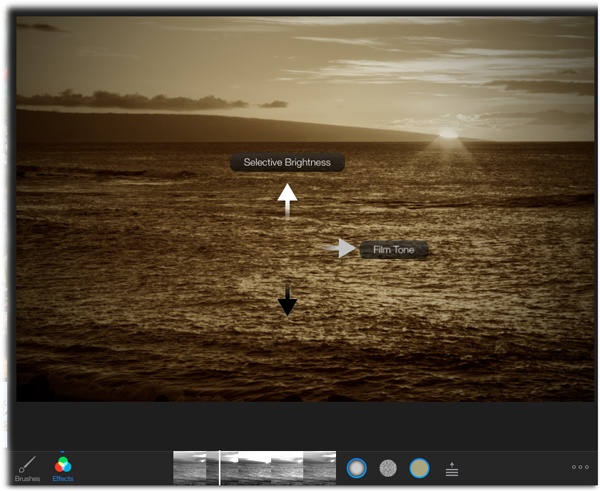
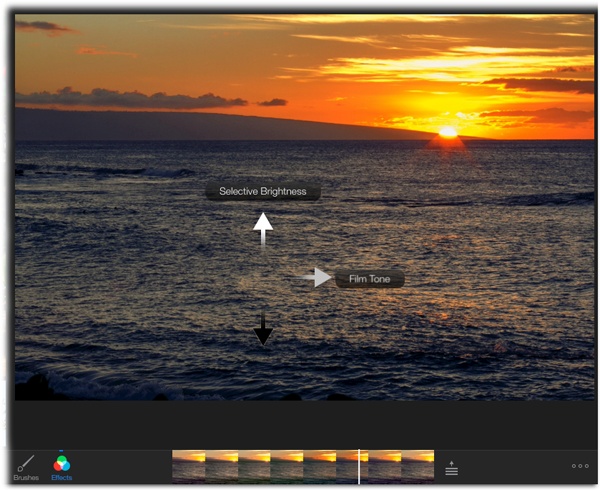
Black & White. You guessed it: The effects in this category convert a color photo to black and white. You can also add a soft, dark edge to your photos using the Vignette effect (which is also available in the Vintage and Artistic categories). Effects in this group are customizable by touching your photo and dragging left or right to adjust film tone, as shown in Figure 14-15. You can also drag up or down to adjust the picture’s brightness. Below the photo, dragging the white vertical bar atop the thumbnails changes contrast.
Drama. Exaggerate the contrast in your photo using the effects in this category. Once you apply one, you can change brightness and film tone by dragging atop your photo (see Figure 14-16).
Aura. The effects in this category accentuate the brightest colors in your image and make the other colors appear either black and white or black and white with a hint of a color overlay (similar to the effects in the duotone category). Drag the white vertical bar atop the thumbnails beneath your photo to fine-tune these effects.
Vintage. Make your photo look old by adding an effect from this category. This grouping includes effects that simulate older film qualities such as early chrome, Sixties, saturated film, neutral film, and muted. It also gives you the option of adding an edge vignette (see Figure 14-17).

Camera Filters. The trendiest effects of all, this group lets you apply a mono, tonal, noir, fade, chrome, cross process, transfer, or instant (camera) look to your picture, as Figure 14-18 shows.
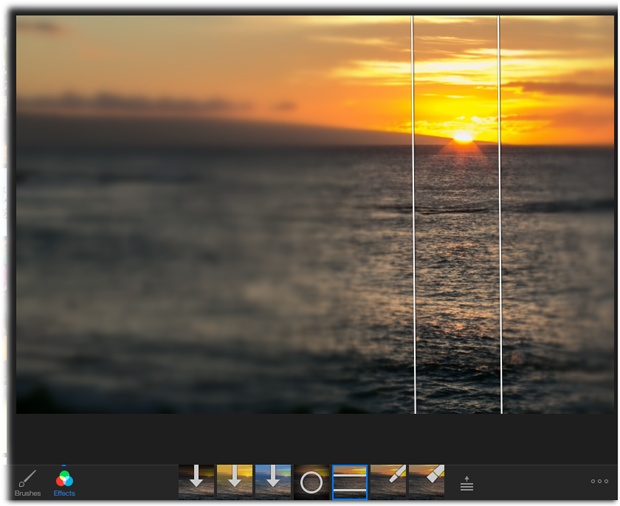
Artistic. Perhaps the most creative of iPhoto’s effects, the ones in this group let you add a dark gradient, warm gradient, cool gradient, vignette, tilt-shift blur, oil paint, or watercolor effect to your photo. The gradients are helpful for fixing overexposed skies. And you can make a photo look like a miniature by adding a Tilt-Shift blur (named for the tilting camera lens that makes this look possible); see Figure 14-19.
If you decide you don’t like the effect(s) you’ve applied, no problem. You can return to a picture anytime you want and remove the effect, thereby restoring it to its original pristine condition. You can also copy an effect from one photo and apply it to other photos. Here’s how:
Remove an effect. To remove an effect from a photo, select the image (or use the techniques described on Ordering Prints to select multiple photos), and then tap the Options icon at the bottom right of your screen; choose Remove Effect.
Copy/paste and effect. Select the image whose effect you like, and then tap the Options icon and choose Copy Effect. Next, select the thumbnail(s) of the photo(s) that you want to apply the effect to, and then tap the Options icon again and choose Paste Effect.