
Chapter 6. Video Chunks: Favorites and Rejects
In iMovie, all your imported footage sits in your Event browser, like paints on a palette, ready to inspire your editorial brilliance. But that blessing is also a curse, because you likely have a huge pile of video to manage—and a lot of it’s dreck.
Fortunately, iMovie comes with two tools to help you sort and manage these vast chunks of video. Working in the Event browser, you can do the following:
Tag pieces of clips as Favorites, making them easy to find later.
Flag pieces of clips as Rejects—bad footage you’ll either probably or definitely not use in a project. The “probably” stuff you can just hide from view. The “definitely” stuff you can delete, freeing up space on your hard drive.
This chapter explores these clip-flagging tools and describes the proper way to get rid of bad shots forever.
Mark Clips as Favorites or Rejects
For iMovie’s marking tools to actually save you time, they need to be easy to use. And they are. Marking footage as a Favorite or a Reject is just a two-step process:
In the Event pane, select the video you like (or don’t like).
You can select an entire clip (double-click it), multiple clips (⌘-click each one), or only part of a clip (drag your selection).
Flag it.
To flag the selection as a Favorite, press the letter F key on your keyboard, choose Mark→Favorite, or Control-click on the clip and choose Favorite.
To flag the footage as a Reject, press the Delete key, choose Mark→Reject, or Control-click the clip and choose Reject.
Tip
You don’t have to follow step 1 if you’re comfortable marking favorites or rejects in 4-second chunks. If you skim to any spot in your clip and then hit the F or Delete key, iMovie marks the 4 seconds of footage following the playhead as a Favorite or a Reject, respectively.
Why 4 seconds? It’s been a strange obsession ever since iMovie ’08. For whatever reason, Apple thinks 4 seconds (and not 3 or 5) is the most useful length for video clips.
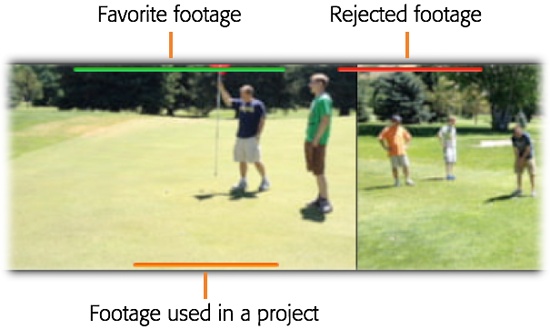
If you flag a selection as a Favorite, it sprouts a green line across the top. If you mark something as a Reject, you see a red line across the top (see Figure 6-1). (If you see a red line and the selection promptly disappears from view, you must have chosen Hide Rejected from the pop-up menu in the top-right corner of the Event browser—see Hiding and Showing Favorites and Rejects.)
Tip
To mark an entire clip as a Favorite or a Reject, double-click it (or Option-click it). That’s a lot faster than dragging through the whole clip.
Once you get the hang of these tools, you have an amazingly fast way to zoom through a freshly imported pile of footage, marking favorites and rejects as you go. And that, in turn, streamlines your editing, because you can work with just the good stuff.
Tip
If you mark something as a Favorite or a Reject by mistake, you can unmark it quickly: Press ⌘-Z, or use the Unmarking tool (read on).
Selecting Marked Footage
In time, your event footage will twinkle with green, red, and even orange bars (orange means you used the clip in a project, as explained on The Orange Stripe). But the stripes aren’t just markers—they serve as turbo selection tools, too. Double-click a stripe, and presto!, iMovie neatly selects just that piece of film, ready for unmarking, cutting, deleting, or placing in a project.
Hiding and Showing Favorites and Rejects
Marking clips won’t save you any time if all it does is draw stripes on your footage. The payoff comes when you tell iMovie to hide everything except your Favorites or Rejects, making it easy to work with a big pool of extraordinary footage, or to review all your lousy footage before you delete it.
Note
If you upgraded from iMovie ’11, some of your event footage may show blue and purple stripes as well. These are holdovers from back when iMovie let you mark footage with keywords and face names. This new version of iMovie doesn’t offer those tools, but Apple must have figured the markings might still be useful to you. Don’t like them? Too bad: You can’t unmark them in this version of iMovie, either.
You find the hide/show options in the Show pop-up menu in the top-right corner of the Event browser (Figure 6-2). These are your options:
All Clips. iMovie displays everything: favorites, rejects, project-embedded footage, and unmarked footage. This view can work wonders when you know you have a certain shot but you can’t find it using any of the other views.
Hide Rejected. You’ll probably use this option most of the time. It hides the dreck and shows your favorite clips, embedded footage, and unmarked footage.
Favorites. Shows the cream of the crop.
Rejected. You see only the bad stuff. Summon this view to review your rejected footage before deleting it for good (described next), or to hunt for a clip you can’t seem to find among the good stuff (you may have rejected it by mistake).

Say Goodbye to Rejected Footage
When you mark a shot as a Reject, iMovie can hide it from view (see Figure 6-2) so you spend less time wading through mountains of bad video as you build your project. (Whether or not iMovie hides the rejected footage depends on your Show menu setting, as just explained.)
But marking shots as Rejects doesn’t actually delete them from your computer. They’re still there, gobbling up hard drive space. If you’re sure you’ll never need the footage again, you can permanently delete it from your Mac to reclaim that space.
A Warning Before You Delete Rejects
In previous versions of iMovie, when you deleted rejected footage from your Mac, iMovie did the magic of cutting just the bad bits out of the longer clip and sticking them in the Trash, leaving the rest of the footage available for you to work with. Things no longer work that way.
Now if you delete Rejects, iMovie sends the entire clip, not just the rejected part, to the Trash. That’s a bummer, because the previous feature was a handy, hassle-free way to dump bad footage, reclaim disk space, and still have the rest of the footage to work with.
In the new version of iMovie, you need to be extra careful when you delete bad footage, because you could be throwing out good footage with the bad. You might want to take the extra step of selecting All Clips from the Show menu, looking for the red stripe of crud, and reviewing the entire clip before you move on to deleting rejected footage.
Delete Rejected Footage for Good
Once you’re sure you don’t need any part of a clip that contains rejected footage, you can purge the clips from your Mac:
Choose Rejected from the Show menu.
Tip
You don’t actually have to reject a clip before you delete it. These steps work just fine with any clip you select in the Event browser. But rejecting clips beforehand is a nice way to set them all aside before you delete them.
iMovie displays only the rejected parts of clips in the Event browser. This is your last chance to skim or play these clips to double-check their worthlessness.
Note
If you spot an orange stripe on any of these clips, you’ve used that footage in a project, though you might have marked part of it as rejected afterward. In this case, don’t worry about deleting the clip, because iMovie made a copy of it in the project itself. Therefore, moving the event clip to the Trash won’t remove it from your project.
But it will remove the clip from your event footage, making it unavailable to use anywhere else once you delete it. So your current project isn’t ruined, but future projects could be.
Select the clip(s) you want to delete.
If you’re in the Rejected clips view, iMovie automatically selects all of the clips for you. Otherwise, you need to manually select the clips you want to delete.
Choose File→“Move to Trash” (or press ⌘-Delete).
If you’re not using the clip in a project, iMovie warns you that this is the “last” version of the file, and you won’t have it around for future projects. (See Figure 6-3 to learn why iMovie refers to this as your “last” clip. You get the same warning if you delete a clip from a project and the original clip isn’t in your Event library anymore.)
Figure 6-3. When you delete the last copy of a clip from the Event browser, iMovie makes sure you know that you won’t be able to use that clip anymore. It also warns you when you delete a clip from a project if that clip isn’t in the Event library anymore.iMovie places all the rejected files in your Trash, and the filmstrips disappear from the Event browser.
Note
At this point, the video isn’t yet gone from your hard drive. If you accidentally moved a clip to the Trash, you can undo your mistake by choosing Edit→“Undo Move to Trash” (or pressing ⌘-Z).
Say, however, that you quit and restarted iMovie in the meantime. Then the Undo command won’t work. You have one last, desperate chance to resurrect your deleted clip (assuming you haven’t already followed step 4). Click
 in your Dock. There you’ll find the
deleted clip.
in your Dock. There you’ll find the
deleted clip.To rescue the clip, drag it out of the Trash folder and import it into the event where you want to restore it. (Refresh your memory on how to import files by flipping back to Importing Video.)
Empty your Trash.
In other words, switch to the Finder (click the Finder smiley face in the Dock), and choose Finder→Empty Trash. Or, if you can see
in your Dock, right-click it and then
choose Empty Trash from the shortcut menu. Then enjoy the newly
liberated space on your hard drive!
