
Chapter 9. Stabilization, Color Fixes, Cropping, and Rotating
Not every piece of video needs fancy effects. In fact, most video is probably better off without a Dream filter or a Picture-in-Picture overlay. The unadulterated stuff straight from your camera usually looks best.
If your footage needs any help at all, it’s probably in the camera operator department. Don’t take this personally. Handheld shots, the most common kind of home video, are notoriously unstable, and that’s an instant giveaway that you’re an amateur. You can have the hands of a surgeon and still end up with shaky footage. This is true even with all the newfangled image-stabilization technology that comes in the latest cameras.
Don’t give up (and don’t resort to carrying a tripod everywhere). iMovie can stabilize your video after the fact—one of its most amazing features.
And stabilization isn’t the only way iMovie can fix your footage, either. The Adjust tool lets you make slight or gigantic changes to the white balance, skin-tone balance, brightness, saturation, and other image qualities of any clip.
For example, if a shot looks too dark and murky, you can bring details out of the shadows without blowing out the highlights. If the snow in a skiing shot looks too bluish, you can de-blue it. If the colors don’t pop quite enough in the shot of a winning soccer goal, you can boost their saturation levels.
In addition, iMovie offers two other features that make up for human error:
Cropping. If you’re just not close enough to your subject, cropping video lets you home in on just a portion of the frame; it’s like an artificial zoom.
Rotation. If you shot video with a vertical orientation (see Aspect Ratios: The Missing Manual for all the reasons you shouldn’t do this), you can turn the entire image 90 degrees. You can even turn it upside-down if you’re going for a cool effect.
Best of all, iMovie does most of this—color fixes, cropping, and rotating—instantaneously and nondestructively. That is, you don’t have to wait around while iMovie renders (processes) your edits, which makes joyous, real-time experimentation possible. (Stabilization is the major exception to the instantaneous thing, but that doesn’t make the results any less impressive.) Furthermore, you’re never actually making changes to your original clips—you can restore the original video anytime you like.
This chapter introduces you to all of iMovie’s more subtle video effects.
Video Stabilization
Say what you will about iMovie, one thing’s for sure: It has powers that leave other “beginner” video-editing programs panting with envy. It’s filled with tools you’d historically find only in professional editing programs. iMovie inherited its stabilization feature, for example, from Apple’s $1,000 Final Cut Pro software. Its rolling shutter fix was built for Final Cut, too—but only as a separately sold plug-in. (That’s right, you’re getting a feature that Final Cut users had to pay for, for free. How’s that for a deal?)
Video stabilization works by analyzing every frame in a clip, recognizing the changes in both camera position (movement up, down, left, or right) and camera rotation. Once it figures that bit out, it knows how to slide and rotate your clips to iron out the shakes.
You need to know three things about how iMovie does all this:
First, iMovie won’t let you stabilize clips in your Event browser. It saves the analysis work for clips added to a project.
Secondly, and unfortunately, this sort of analysis takes a long time—roughly 1–2 minutes for every minute of video (more or less, depending on your Mac’s speed). The results, however, are worth it. The stabilization feature works absolute magic on most jerky, bumpy handheld footage. It works so well, in fact, that it can look positively creepy, as though you were floating along on a magic carpet.
Finally, iMovie fixes two kinds of stabilization problems: normal shaky footage and “jellyroll” footage (see Fix Jellyroll Footage). But for iMovie to fix these two problems, it has to analyze the clip through two separate processes. (You can tell iMovie to do both at once, however.)
So to summarize, when you add a clip to a project and turn on either of these two settings—fixing shake and fixing jellyroll—iMovie gets to work in the background, analyzing each frame. Lucky for you, in the meantime you can keep editing your movie. Eventually, iMovie finishes its analysis, and your footage no longer looks like you shot it during an earthquake.
Fix Shaky Footage
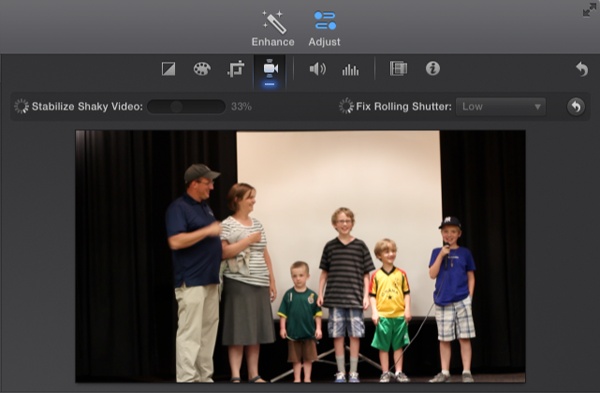
If you need to stabilize a clip in your project, select the clip and then click the Adjust button in the iMovie toolbar. Click the Stabilization tool (Figure 9-1) and you’ll see two checkboxes: Stabilize Shaky Video and Fix Rolling Shutter.
Turn on the Stabilize Shaky Video checkbox and iMovie replaces the checkbox with a little spinny-thing to tell you it’s thinking, analyzing the clip’s frames so it knows how to stabilize them. If you’re stabilizing a long clip, don’t bother waiting for iMovie to finish. Carry on editing, and iMovie will eventually fully analyze and stabilize the clip.
Note
If you later decide to lengthen the clip you stabilized by more than a second, iMovie needs to do more analyzing. It’ll automatically analyze the clip to cover what was added, without your needing to check the box again.
Degrees of Stabilization
Once you stabilize some video, you may be delighted and amazed at how professional and smooth it looks. You might ask yourself, “Was I wearing a Steadicam?” (those gyro-mounted camera harnesses the Hollywood pros wear for stability). Or not.
You may be a little alarmed by how fake it looks. You were running down a flight of stairs, for crying out loud—it should look a little like you were on foot, not like you were gliding down a sheet of ice.
For that reason, you can throttle back the amount of stabilizing that iMovie does. Select the clip in your storyboard and go back into the Stabilization tool shown in Figure 9-1. Next to the checkbox, you see a percentage slider.
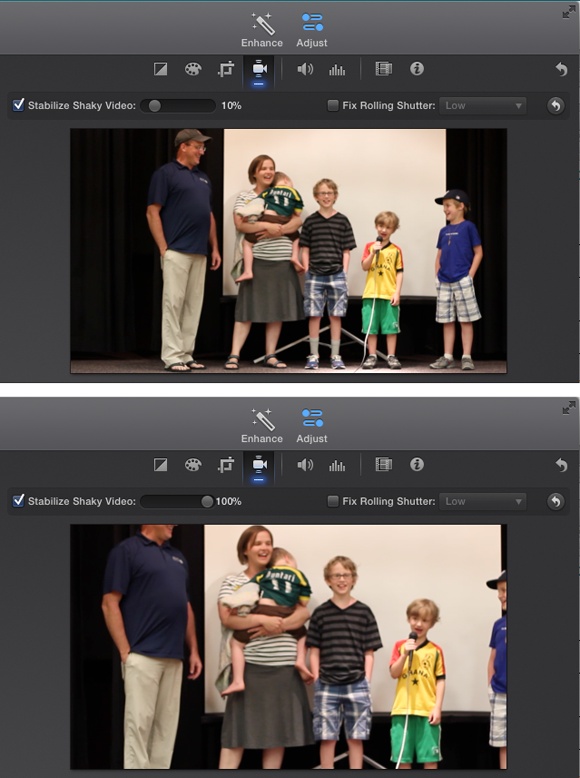
What does the percentage slider do? It changes the amount of zoom in your stabilized clip. iMovie does the stabilizing trick by rotating and shifting the whole picture around in the frame, counteracting your hand shakes pixel by pixel. This means, however, that you would see momentary glimpses of black emptiness between the video and the frame around it, which would be even more distracting than the shaky video. So iMovie conceals those slivers of blackness by zooming the video just enough to fill the frame and eliminate the exposed black emptiness. See Figure 9-2 to see the difference between a 10% zoom and a 100% zoom.
Of course, magnifying a photo (or a video frame) also reduces its resolution, and therefore its quality. It’s very unlikely you’ll actually notice the degradation, but if you think you do, here’s another reason for the stabilizing zoom slider: It can reduce the degree of zooming-in. In other words, the slider limits both the stabilizing effect and the zooming that goes along with it.
Two more stabilization notes:
The more shake in your footage, the more zoom iMovie offers. 100% zoom for a really shaky clip will zoom in on your shot far more than 100% zoom for a relatively tranquil clip.
If you crop away the shakiest part of a clip, iMovie may do a better job of stabilizing the rest. That’s because iMovie figures out exactly how far it needs to zoom in to fix the shakiest part of a project clip, and then applies that zoom to the whole clip.
Remove Stabilization
You may change your mind and decide that a clip looks better without stabilization. It can happen (see Fix Shaky Footage). Just select the clip and uncheck Stabilize Shaky Video in the Stabilization tool. The shake comes back.
And don’t worry about having to reanalyze footage if you change your mind yet again. Once analyzed, always analyzed.
Fix Jellyroll Footage
There’s a second type of distortion you should know about, called jellyroll footage. It arises when you shoot with a camera that contains a so-called CMOS light-sensor chip. Most cameras these days, including iPhone and iPad cameras, contain this sort of chip. (In fact, fewer and fewer cameras use the alternative technology, called CCD, so odds are this section on jellyroll footage will apply to you.)
Unfortunately, CMOS cameras use a rolling shutter, which means that the sensor records an image starting at the top and working its way down to the bottom, really fast. If the camera moves too much as you film, the subject gradually shifts left or right as the sensor records the image.
The resulting image makes the world look like it’s suddenly made of jelly—a source of endless frustration and bewilderment to amateurs and pros alike. “Dang it!” they say, “what’s wrong with my camera?”
Unfortunately, iMovie’s stabilization feature tends to exaggerate this bizarre jelly effect.
Rolling Shutter Adjustments
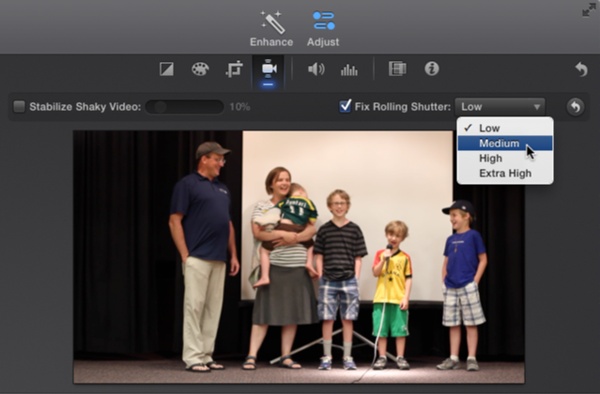
To reduce the jellyroll effect, select the clip in your project and click the Adjust button in the toolbar. Under the Stabilization tool shown in Figure 9-2, check the Fix Rolling Shutter box. iMovie immediately gets to work analyzing the clip and will show a successfully checked box when it’s done.
The jelly effect is the product of how fast your camera’s rolling shutter works. Slower shutters need the High or Extra High settings in the Amount menu (Figure 9-3). Faster shutters can use the Low or Medium settings.
Less expensive cameras, like point-and-shoots, need the High or Extra High setting (they have slower shutters). Midrange cameras, like most consumer camcorders, typically need the Medium setting. Expensive cameras, such as DSLRs, generally get by with the Medium or Low setting because they have very fast shutters.
Tip
Of course, if you want to get precise adjustments, test things out with your own camera. Find a vertical, linear object like a telephone pole. Film it while you pan side to side. (Use a tripod if you want to be really exact.) Pan quickly enough to get the jellyroll effect going. Now just import and analyze the footage, add the clip to your project, and try different Amount settings until you get a nice, straight telephone pole.
Auto Enhance
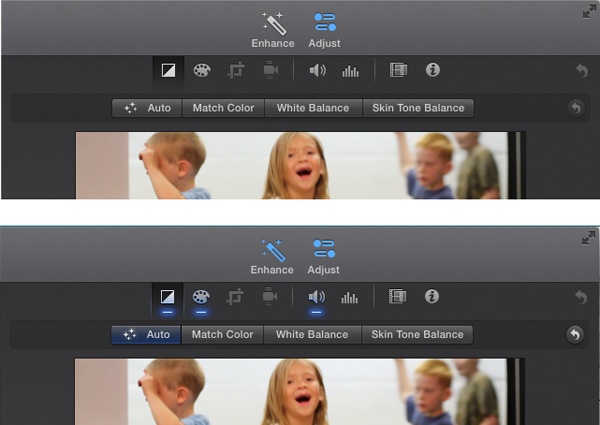
Before digging into the color adjustment tools that follow, you may decide it’s worth skipping all of this thanks to iMovie’s magical Enhance button. (The magic wand tells you it’s magical.) Found in the iMovie toolbar, Enhance instructs iMovie to automatically assess a clip and fix its color and sound to, well, look and sound the best it can.
What really happens when you click Enhance is that iMovie uses built-in tools to adjust color balance, exposure, temperature, and even background noise. Once you click Enhance, the tools in the Adjust menu light up to show you that iMovie made changes to the clip’s color and sound (Figure 9-4).
You can take these adjustments exactly as iMovie makes them, or you can go in and tweak them to your liking using the instructions that follow. If you change your mind completely, just click the Enhance button again to turn off all the adjustments.
Color Balance
iMovie can apply some technologically advanced color-balance effects to your video, and no matter what camera you’re using, you’ll probably need them. That’s because digital cameras work by capturing light that then gets processed by what are basically little computers that manipulate light according to their settings. Depending on the combination of the camera settings with the lighting of the room, things will look very different to the camera than they do to the human eye. (For example, fluorescent lighting can sometimes make everything look greenish.)
Most cameras have an automatic feature that tries to balance the colors back to where they belong, but these features don’t always work out. If your camera gets the balance wrong, iMovie gives you the chance to make it right.
iMovie offers four ways to balance color, and for all of them, you’ll need the Color Balance tool that appears when you select a clip and click the Adjust button in the toolbar (selected in Figure 9-4).
iMovie can apply color fixes only to an entire clip at once. You can’t make the effect fade in or out, you can’t apply it to just a portion of a clip, and you can’t apply it to multiple clips at once (although you can copy and paste the adjustments you make).
Before you apply an effect, therefore, you may want to start by isolating the piece you want. You can always chop up a clip into smaller pieces (Split a Clip).
But, unlike stabilization effects, you can correct color balance for clips in your Event browser, not just clips in your project. Select any clip anywhere in iMovie, and these tools let you make color changes. (Of course, the truth is, you’re never really changing anything at all. You can remove all your changes and revert to the original camcorder-captured clip at any time, even months or years from now.)
iMovie offers four color-balancing options.
Auto Balance
The easiest of the Color Balance tools is the automatic one. When you click this to turn it on, iMovie will decide what balance it thinks looks best, using complex algorithms devised by very smart Apple engineers. Auto gets it right more often than not, so this should be your go-to tool.
Color Matching
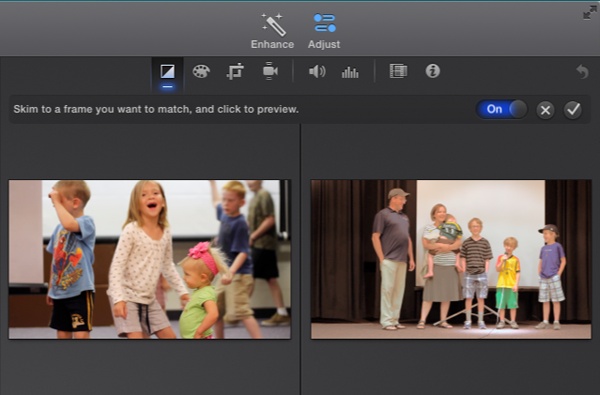
Colors often change as you shoot, especially if you shoot outdoors. (A cloud passing in front of the sun can dramatically change how everything looks to your camera.) The Match Color tool gives you the chance to make up for this.
Once you click this tool (shown in Figure 9-5), iMovie previews the clip you’re editing on the right, next to the preview of a clip from somewhere else in your storyboard or the Event browser. Skimming around in your other clips will change the left-hand preview (Figure 9-5). Notice how your cursor turns into a dropper tool.
The idea is to pick a clip from a similar setting where the
colors are just right. Once you find it, click with the dropper tool
and iMovie shows what your edited clip will look like with the
matched colors. Use the On/Off switch to see the before and after.
Click the ![]() button to save your changes and the
button to save your changes and the
![]() button to cancel.
button to cancel.
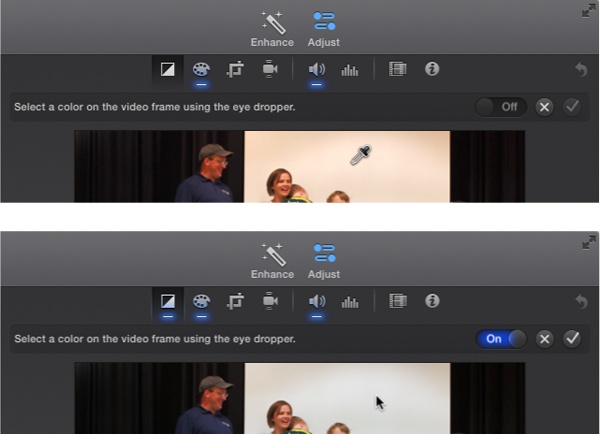
White Balance
Color balance is easiest when you have an anchor color to rely on. That color is good ol’ white. White light, scientifically speaking, contains all the colors in the spectrum, so a perfectly white object will reflect all those colors at once. With this knowledge in hand, iMovie can do really nice color balancing as long as you tell it what should look white.
When you click the White Balance tool, iMovie changes your cursor to a little dropper tool (Figure 9-6). Use it to click anything in your frame that should look white. Once you click, iMovie changes all the colors based on this reference point.
Note
Of course, if you click something that isn’t really white and actually a little beige, iMovie doesn’t know that. The adjusted colors will be off accordingly. In fact, if you want to have some fun, pick a most-definitely-not-white part of your clip and see how iMovie reacts.
Skin Tone Balance
This tool works the same way as the White Balance tool, but instead of choosing something that should look white, you choose a spot on someone’s skin that should look like skin, like his face or arm. Of course, shading and natural skin color can alter what changes iMovie applies, but overall it does a pretty nice job for all skin types.
Color Correction
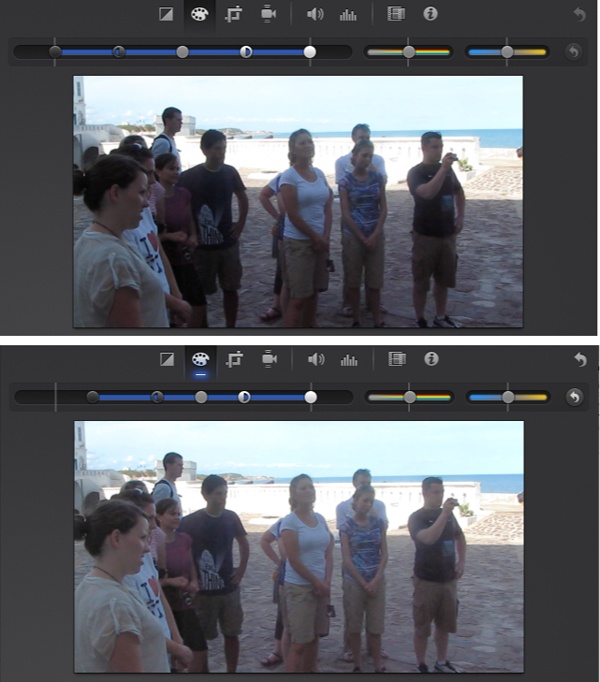
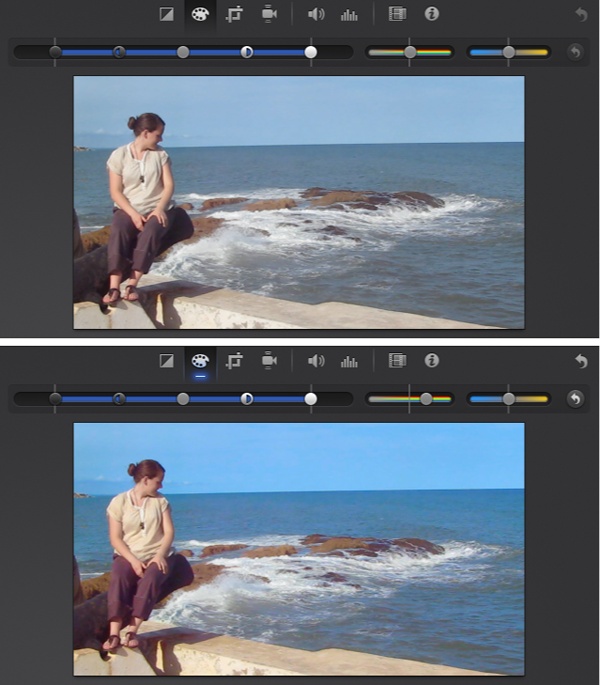
Color balance is only half of what iMovie can do to change the colors of your footage. As impressive as the balance tools are, they’re quite limited in terms of the control they offer. If you want to be pickier about how your clips look, the Color Correction tools hand you a lot more power.
There are basically three correction sliders available to you, all from the Color Correction tool in the Adjust toolbar. The first slider gives you control over the light and dark (or contrast) aspects of your video. The second changes how vivid the clip’s colors appear (also called saturation). The last one makes your clip look warmer or cooler (the clip’s temperature).
Contrast
Sometimes your colors are fine, but the problem is too much or too little light. It can be a problem for all of a shot or different parts within a shot. In any case, making adjustments to the clip’s lighting can fix these problems.
The contrast tool can’t fix all lighting problems, however. Whenever you shoot video, your camera has to decide how much light to let in, based on the amount of available light in the room. Too much light can overwhelm your camera. It also can’t make up for too little light, like in a dark room.
In some cases, it can have too much light in one part and too little in another. If you video someone standing in front of a daytime window, for example, your camera has to make a choice. Does it let in lots of light to better see the person’s face, but in the process overexpose everything coming in from the window? Or does it dial down the sensitivity, making the window look normal but the person just a dark shadow?
iMovie’s contrast tool can do its best with problems like these, but ultimately it can only draw on whatever light your camera captured. Avoid these problems by making sure you film with adequate lighting. Preview your camera’s light sensitivity before you start filming.
Assuming your clip’s lighting is within iMovie’s reach, follow these steps to make contrast adjustments:
Select the clip in your storyboard or Event browser that you want to edit.
Click the Adjust button and then the Color Correction tool (shown in Figure 9-7).
The Viewer displays three sliders above the preview of your clip.
Adjust the contrast slider (Figure 9-7).
That’s the leftmost tool here. Apple calls this curious thing a multislider. That means it has more than just one point to drag around. In fact, this one has five.
The center point changes the clip’s overall brightness. Drag it left and everything gets darker. Drag it right and everything gets lighter.
The far left and far right points change the lowlights and highlights. The left one makes just the dark parts darker or lighter. The right one makes just the bright parts darker or lighter.
Finally, the remaining two points adjust the contrast, reducing or increasing the difference between the light and dark parts. (Drag either one of these points and the other one comes along for the ride.)
You can always come back and make more changes to a clip later; iMovie doesn’t do anything permanent to a clip’s contrast. To return a clip to its original appearance, click the undo button (the swirling arrow whose tooltip says “Remove color adjustments”) to the far right of the color sliders.
Saturation
Sometimes what you’ve shot looks dull. Not because the clip isn’t interesting, but because the lighting washed out the colors. (Hazy weather or a lens flare can have this effect.) iMovie’s saturation slider can make up for this.
Click the Adjust button and then the Color Correction tool to show the middle of the three sliders (Figure 9-8). Dragging the slider to the left will strip a clip’s color, all the way down to black and white. Drag it to the left and the colors become much more vibrant.
You can undo any of these changes after the fact with the slider itself or the undo button on the far right.
Warmth
Most light that hits your subjects isn’t pure white. It’s either on the cool side (bluer) or on the warm side (oranger). This difference is called color temperature. The warmth slider is a way to compensate for shots that are too cool or warm.
This slider basically works like the saturation slider, but instead of making footage bland as you drag it left, this makes everything more blue. Dragging it to the right turns everything yellowish-orange.
As always, you can make these changes and undo them later with the slider or the undo button to the far right of your color sliders.
Tip
Although iMovie comes with a Sepia effect built-in (Apply a Video Effect), you can use the warmth and saturation sliders to create your own. Drag the warmth slider a bit to the right and the saturation slider a little bit left. Voilà! Homemade Sepia.
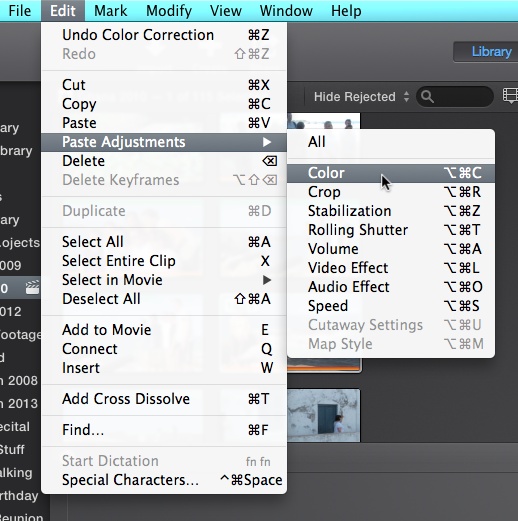
Copy and Paste Adjustments
While you can make color adjustments on more than one clip at a time (see Select by Dragging on selecting multiple clips), this is helpful only if you had the foresight to select multiple clips while you were making changes. Instead of going back to try to figure out the exact changes you made, you can copy and paste just the color adjustments. Once you get the blue cast worked out of the first skiing shot, for example, you can wipe it out of each additional shot with a single command. Figure 9-9 shows the drill.
Tip
If you’re the kind of person who plans ahead, consider this: If you intend to excerpt several clips from a single, long, master clip in the Event browser, you’ll save time by fixing the original clip before you start adding the clips to your storyboard.
The reason: If you make color adjustments to the master clip before you grab chunks of it, the pieces inherit the fixes. If you adjust the master clip after you add pieces of it to the storyboard, the pieces themselves won’t change. (You can always use the Paste Adjustments command at that point, of course, but that’s still more steps.)
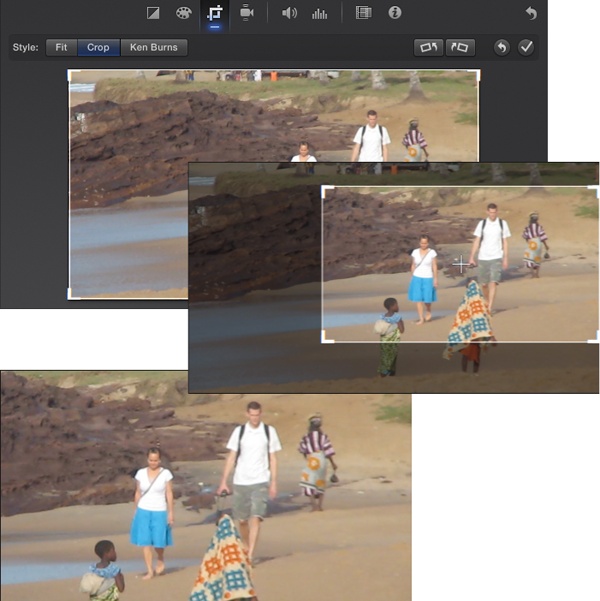
Crop Video
Something as sophisticated as cropping video was previously relegated to the stratosphere of professional video-editing programs like Final Cut Pro. This tool lets you crop a video clip the same way you crop a photo; that is, you chop off the edges of the video frame.
Figure 9-10 gives you the idea.
Cropping isn’t something you’ll do every day, but it can be handy in situations like these:
You add a clip to a project that’s got the wrong aspect ratio (Aspect Ratios: The Missing Manual). For example, say you’re creating a regular widescreen movie, but you want to put an older, squarish, standard-definition clip into it. The Cropping tool lets you lop off the top and bottom of the standard-def clip so it fits perfectly into the widescreen frame without using any black bars.
There’s something at the margins of the picture that you want to get rid of. Maybe your finger was on the lens. Maybe there’s some ugly pipe or wire that you didn’t notice. Maybe a telephone pole appears to be sticking out of your interviewee’s head. Or maybe you just want to crop out the bonehead who kept trying to get on camera.
The scene is off-center. Maybe the camera was on a tripod, self-running, when you and a buddy did your comedy shtick, but you didn’t frame the scene right. By cropping away the empty part of the frame, you can recenter the whole thing.
The subject of the shot isn’t prominent enough. This happens often with accidental footage: That is, you were filming Uncle Ned reminiscing about his days working for the National Guard when, bam!, there’s a three-car collision in the intersection behind him. By cropping away Uncle Ned, you can isolate the car-crash portion of the frame. It now fills the screen; in effect, you created an artificial zoom.
Whenever you crop video, you leave fewer pixels behind. You therefore lose resolution and create a less-sharp picture. If you crop away a huge amount of video info—more than half of the frame—you may wind up with noticeable pixelation and graininess.
If that happens, you can either live with it or use Undo.
In any case, here’s how you crop a shot in iMovie:
Select the clip in your event or storyboard that you want to edit.
By skimming, find a good representative frame of the clip to work with in the Viewer. Remember, you’re working with video here, so things do tend to move around on the screen, but the iMovie cropping area doesn’t move. You don’t want to crop the clip in a way that centers your subject nicely in frame 50 but cuts it out completely in frame 100.
Click the Adjust button and then the Cropping tool (shown in Figure 9-10).
Now the Viewer window sprouts a few new controls at the top, with Fit, Crop, and Ken Burns. Select the Crop control. A white selection rectangle appears over the Viewer.
Adjust the white rectangle in the Viewer window to select what you want to keep.
As you work, you can drag inside the rectangle to move it around the frame. And you can drag any of the four corners to make the rectangle bigger or smaller. (You can crop away almost all of your clip, but the result will look terribly pixelated.)
Drag the playhead in the storyboard to spot-check the video, to make sure you don’t crop out anything important somewhere else in the clip. Or just click the Play button (or press your space bar) to play the clip as a preview.
This completes the crop.
Adjust or Remove a Crop
Cropping, like any iMovie edit, is nondestructive. That is, you haven’t done anything permanent to the source video on your hard drive, and you can adjust or remove the cropping anytime you like.
To do that, just follow steps 1–4 on the previous page, resizing the white rectangle to the better size and position.
To remove the cropping altogether, click the Fit button in the Viewer.
Rotate Video
If there’s any iMovie feature you’ll use even less often than cropping, it’s rotating. But sure enough, iMovie lets you rotate a clip by 90 degrees, or even upside-down.
When would you use this? Well, here are a couple of possibilities:
Somebody actually filmed the scene with the camera turned 90 degrees. (This often happens when people record video with a smartphone, which they’re used to holding vertically. People forget that they shouldn’t hold it that way when they shoot video. See Aspect Ratios: The Missing Manual for all the reasons why.)
You shot a kid crawling along the rocks and want to make it look like he’s mountain-climbing, vertically, straight up a cliff.
You’re making some strange, avant-garde film, and you’re hoping to intentionally disorient your audience.
Anyway, if you’re reading this, you must have your reasons, so here’s how you rotate video:
Select the clip in your storyboard.
Click the Adjust button and then the Cropping tool.
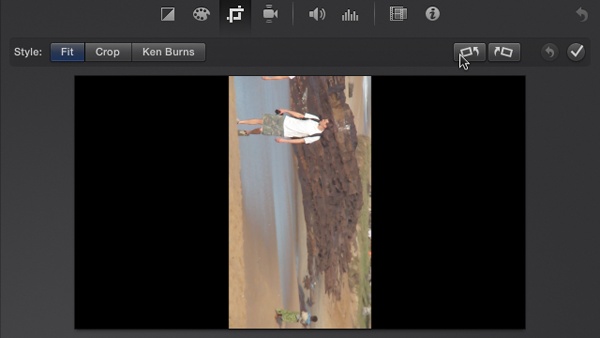
Click one of the Rotate buttons at the top of the Viewer (Figure 9-11).
With each click, the entire video image rotates 90 degrees in the corresponding direction. If you click twice, you flip the whole picture upside-down.
Figure 9-11. With each click of the rotation arrows, you rotate the image 90 degrees. Use for special effects, or just for fun.If you rotate the image only 90 degrees, of course, the video no longer fits in the frame and black bars appear on either side. At this point, you have two options: You can either leave it as is, or you can crop it so that it fills the frame.
To do the latter, click the Crop button in the Viewer, and then drag the white rectangle exactly as described in the previous section.
Adjust or Remove the Rotation
When you rotate your video, you’re not changing the underlying footage. You can adjust or remove the rotation anytime. Click those rotation arrow buttons again until the video looks the way you want it to.