
Chapter 11. Music, Sound Effects, and Narration
If you’re lucky, you may someday get the chance to watch a movie whose soundtrack isn’t yet finished. Maybe you’ll be scanning TV channels and stumble across a special about how movies are made, or you’ll see a tribute to a film composer, or you’ll rent a movie that includes a “making of” documentary. These shows sometimes include a couple of minutes of the finished movie as it looked before the music and sound effects were added.
At that moment, your understanding of the film medium will take an enormous leap forward. “Jeez,” you’ll say, “without music and sound effects, this $100 million Hollywood film has no more emotional impact than…my home movies!”
And you’d be right. It’s true that the visual component of a film is the most, well, visible. Movie stars and directors become household names, but not the sound editors, composers, foley (sound effects) artists, and others who devote their careers to the audio experience of film.
But without music, sound effects (called SFX for short), and sound editing, even the best Hollywood movie will leave you cold and unimpressed.
iMovie’s more powerful than it’s ever been at editing your movie’s audio. You can use traditional methods to make simple volume changes, like the classic rubber-band tool (Volume Adjustments), or advanced techniques that reduce background noise (Reduce Background Noise). This chapter explains everything iMovie has to offer in audio editing.
Three Kinds of Audio
You’ll work with three kinds of audio in iMovie: clip audio, background music, and connected audio.
Clip Audio
Clip audio gets recorded with your video footage. It stays fixed to the clip unless you ask iMovie to “detach” it—see Detach Clip Audio for how and why you’d want to do that.
Background Music
A lot of iMovie owners like to add music to their movies. It’s a fun way to augment otherwise mundane shots, and can evoke the feeling of the moment. (Think of an end-of-year slideshow set to “Gangnam Style,” or whatever song was big that year.)
To make editing music easier, iMovie can set it as background music, a solid block of audio that sits “under” the clips in your project, playing through everything, no matter how you shuffle the clips around. You can even line up a playlist of several songs; iMovie plays them consecutively, with a nice crossfade in between.
Note
There’s much more on editing to music in this chapter, starting on Edit to the Beat.
Connected Audio
Background music remains steadily in place no matter how you rearrange your footage, but some audio should move with your video. When you add a connected audio clip, you attach an audio file to a specific spot in your video. You’d use connected audio for things like sound effects, to trigger a laugh track, for example, or the roar of applause. As you rearrange your clips during the editing process, the connected audio goes along for the ride.
Audio Sources
In addition to the audio built into every video clip, you can add sound to a project from any of these sources:
Video camera audio. You can extract the audio from a camera video clip to use as an independent sound clip, for use somewhere else in your movie.
iTunes tracks. Adding background music to your movie is easy. As described later in this chapter, iMovie displays your iTunes music collection, playlists and all. (iMovie’s integration with iTunes is an example of what makes Apple’s iLife software a suite, and not just a handful of separate programs.)
Sound effects. Choose these effects (gunshots, glass breaking, applause, and so on) from iMovie’s Audio palette.
Narration. This can be anything you record with a microphone.
MP3, WAV, AIFF, and AAC files. iMovie can directly import files in these popular music formats. You can drag them in from the Finder or bring them in from iTunes.
This chapter covers all these sound varieties.
Volume Adjustments
This section covers all the ways you can adjust the volume in your movie.
The Rubber Band
If “rubber-banding” makes you think of office supplies instead of volume levels, then meet an iMovie tool that’s super useful. (Audio editors call volume adjustments “rubber-banding” because the line you grab to adjust the fade-in and fade-out points in an audio track seems to stretch as you fine-tune those points.)
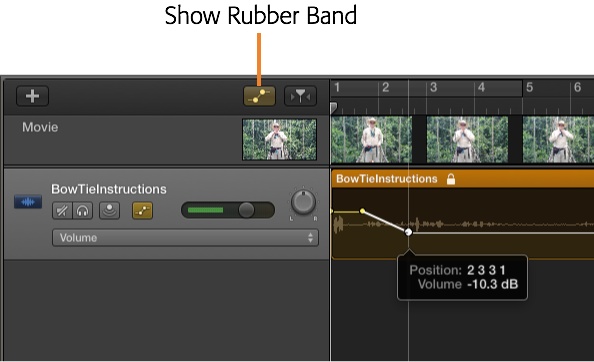
Finding the Rubber Band
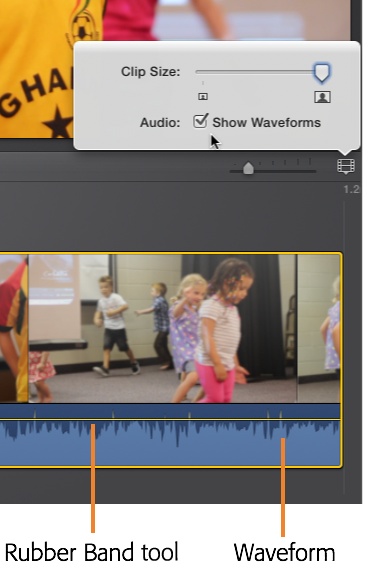
To see the rubber-band tool, turn on the Show Waveforms checkbox, hidden in the Clip Size slider you read about on Phase 1: Review Your Clips (see Figure 11-1).
Note
A “waveform” shows volume changes in your audio. It looks like a bunch of peaks and valleys (see Figure 11-1). Waveforms let you visualize sound changes without having to listen to them.
When you do, iMovie displays an audio track just below your filmstrip. It represents the audio levels for everything in your project that produces sound.
A single, thin line runs horizontally across your waveform, looking as though it wants to chop off their tips (Figure 11-1). That’s the rubber-band tool.
Use the Rubber Band
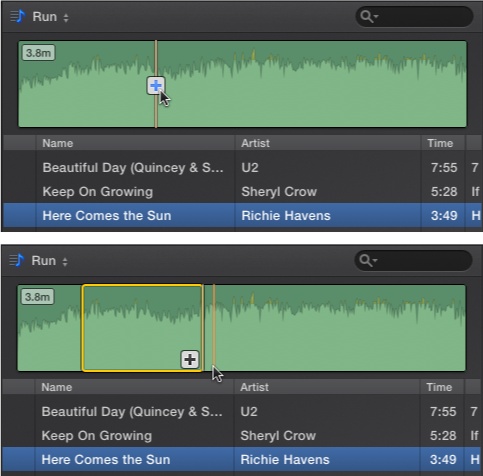
The height of the rubber band determines the volume of your clip. The higher the line, the louder the clip. The band’s starting position, about a third of the way down from the top, is the standard 100% volume. If you drag the line higher or lower, iMovie displays a floating bubble that shows you the new volume level (Figure 11-2).
If all you could do was change the height of the line for the entire clip, there wouldn’t be much point to the tool. (After all, you can change the volume of a clip in the Adjustments pane.) The beauty of it comes when you stretch it up or down on just part of your clip. You can, for example, soften the background music when Grandma Alice tells her story. Alternatively, you can increase the volume when a soft-spoken interviewee appears onscreen.

To make these adjustments, first select the part of a clip you want to affect. To do that, click the clip and hold down the mouse button until a vertical yellow line appears. Then drag your mouse—as you drag, the yellow line expands into a box that selects the underlying clip fragment (Figure 11-2, middle). Drag the rubber band within that selected area to adjust the volume. You can see the rubber band move up and down as you drag.
Note
Any whole or partial volume adjustments you make in your project are project-specific. That is, other projects that use the same clip don’t see (or hear) the changes. That’s not true, however, for volume changes you make to clips in the Event library. Any volume changes to Event footage affect every project that uses that footage.
Once you deselect the clip fragment by clicking anywhere else in the storyboard, you can see the “stretched” parts of the rubber band, where iMovie fades the volume in or out to reach the fragment’s setting.
To change the length of the fade—that is, to make it gradual or abrupt—grab the little yellow diamonds on either end of the adjustment and drag them horizontally (Figure 11-2, bottom). Dragging them outward makes the volume change more gradually. Dragging them inward makes the volume change more suddenly, which you might do, for example, to make a song pop back in really loudly.
Note
You might have noticed that some of the waveform waves go above the rubber-band line, while most stay below it. That’s because the rubber band just sets the base volume for your clip. Every movie still has loud parts and quiet parts, no matter where you set the volume. The high peaks in your waveforms are the loud parts.
Finally, you can add your own yellow diamonds—iMovie calls them keyframes—by Option-clicking the volume-level line. You can drag these added keyframes the same way you do the iMovie-generated diamonds, and to the same effect—fading the volume in or out.
To delete a keyframe, right-click it and then select Delete Keyframe, or select the keyframe and then choose Edit→Delete Keyframes, or press Shift-Option-Delete.
Ducking
Anytime you hear competing audio tracks in a movie, the editor has probably dropped the volume in one track so you could hear the sound in the other. (You’ve seen this when actors in a music montage stop for a moment to have a brief discussion. The music dips down so you can understand the dialogue.) This is called ducking, where you “duck,” or drop the volume in, one audio track to make room for the audio in another.
Ducking is a convenient way to make sure your audience hears your audio, regardless of where the rubber band is—that’s because ducking makes the volume adjustments for you. It really all comes down to a checkbox and a slider.
Note
Ducking works only for entire clips. You can’t choose part of a clip and duck the other audio competing with that part. The ducking slider will reduce the volume for anything competing with the entire clip.
If you want to reduce the volume of competing clips for just part of your main clip, you’ll have to select the parts of the competing clips and reduce their volume directly with the rubber band, as explained on Volume Adjustments.
To make sure that one of your audio tracks is always heard, do the following:
Select the clip whose audio you want to change.
You might want to adjust the clip’s native audio, or the volume of an audio track you added to the clip, such as a background track or a connected audio clip (all explained on Three Kinds of Audio).
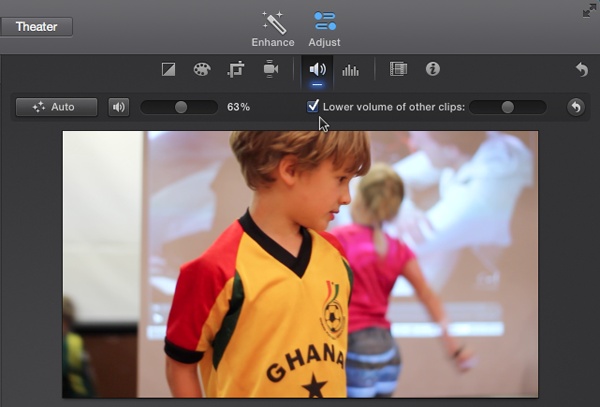
In the Viewer toolbar, click the Adjust button, followed by the Volume button (the speaker icon).
iMovie displays the volume adjustment tools, where you can change the clip’s audio in multiple ways (Figure 11-3).
Turn on the “Lower volume of other clips” checkbox and then adjust the slider to your liking.
The lower you move the slider, the quieter other audio clips become. You can skim and play your project to make sure you’ve got the right setting.
Tip
If you’re making volume adjustments and for some reason you can’t get one loud enough, it may be because another clip competing with it has the ducking feature turned on.
To undo the ducking on a track, turn off the “Lower volume of other clips” checkbox.
Music
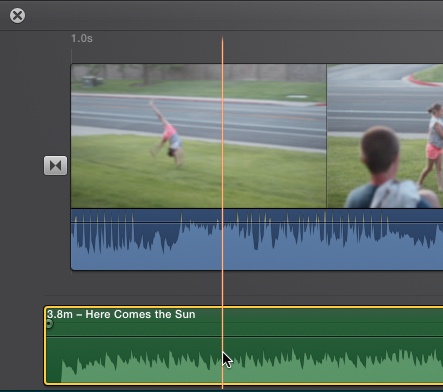
If you drag a piece of music to the very bottom of your storyboard—where you see a clip silhouette with a musical note in it—the clip turns into long green waveform (Figure 11-4). That’s your clue that you just added a piece of what Apple calls background music. (Make sure you drag the song all the way to the bottom of the storyboard and not immediately under the video clip—that would make it a connected audio clip, as explained on Three Kinds of Audio.)
Understanding what, exactly, Apple means by this term—and figuring out how it differs from connected audio—isn’t especially easy. This much, though, is clear:
Background music generally plays from the beginning of your movie. You can drag it to a different spot, however, as described in a moment.
If you add two pieces of background music, one after the other, iMovie plays them consecutively, with a crossfade in between. You add the second piece the same way you added the first one, by dragging it. (Two pieces of background music can never overlap, though.)
Putting your background music in its own track makes sense because the music is usually ancillary to the story you’re telling (unless you’re editing a video to music, as described on Edit to the Beat). Adding the song as a background track puts it conveniently out of your way, impervious to whatever video edits you make.
Music Sources
Before getting into the details of how background music works, you need to add a song to your project. iMovie gives you three ways to do that: via iTunes, Garage-Band, and the Finder.
iTunes
When you have a project open, iMovie displays a list of media sources in the Content Library in the bottom-left corner of the window. One of the options is your iTunes library, where you can tap into your entire iTunes song list, without actually having to open iTunes itself, a real convenience.
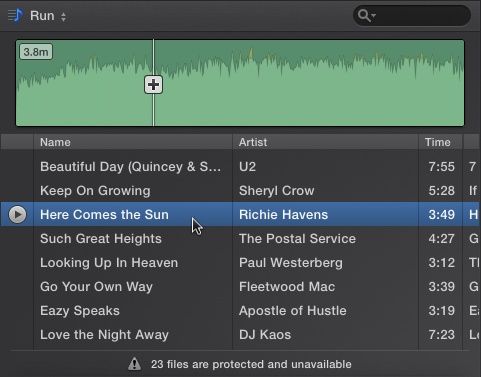
When you click iTunes in the Content Library. iMovie replaces the Event browser with a music browser (Figure 11-5) that displays your song list and a waveform representing the currently selected tune. A dropdown menu lets you sort your music by stock iTunes listings (My Top Rated, Recently Played, and so on) or by playlist.
Tip
Playlists are a great way to store music you want to use in your movie. Just create the playlist in iTunes and then choose it from the drop-down menu in iMovie. Voilà! All your movie music in one place.
If you can’t find the song you want, use the search field in the top-right corner of the music browser. As you type, iMovie narrows your choices. You can search song titles, album titles, and artist names all at once. (Typing “fun” would show the results for the band Fun., the album “Funeral” by Arcade Fire, and the song “Girls Just Want to Have Fun.”)
Garageband
If you’re a GarageBand composer, you can access your compositions from within iMovie. With a project open, choose GarageBand from the Content Library in the bottom-left corner. The music browser for GarageBand looks and acts just like the one for iTunes, described previously. For more on using GarageBand, see Editing Audio in GarageBand.
The Finder
If you have a music file that’s on your hard drive but not in iTunes or GarageBand, you can always just drag it into the iMovie storyboard from the Finder. You don’t get the benefit of a handy music browser, but once you add the file to your project, it behaves just like any iTunes or GarageBand song.
Preview a Song
As you go over your list of songs in the music browser, position your mouse over any one of them and a small Play button appears on the left. Click it to play back the song and see its waveform. (Double-clicking the song does the same thing.) A playhead line drifts over the waveform.
You can skim the playhead to any point in the song and hit the space bar to start playback from that spot.
Add All of a Song
You can add an entire song to your project in two ways. One is to drag the tune from the song list to the very bottom of your storyboard, where you see the clip silhouette that has the musical note in it.
The other is to click the + button in the song’s waveform in the music browser (Figure 11-6). That has the added advantage of automatically trimming the end of your song should it go longer than your project.
You can add multiple songs to your project’s background track. If you do that through the + button in the waveform, iMovie lines them up sequentially. If you already have a background song in your project and drag another one in, iMovie starts playing it at whatever point you drop it, even if it has to trim the song added beforehand.
Add Part of a Song
You can use the green waveform to select just part of a song, too.
Drag the mouse across the waveform to highlight the song section with a yellow border (Figure 11-6). You can refine the selection by dragging either end of the border. Once you finish, click the + button or drag the selection into your project.
Trim a Song
Once you have a song in the storyboard, you’re not stuck with it. In fact, the awesome editing-by-reference trick that iMovie does with video (The Concept of iMovie Projects) works on music, too.
To trim a song, move your mouse over the beginning or end of the clip. When you do, iMovie changes your cursor from an arrow to two arrows with a line between them. Drag to trim or extend that part of the song.
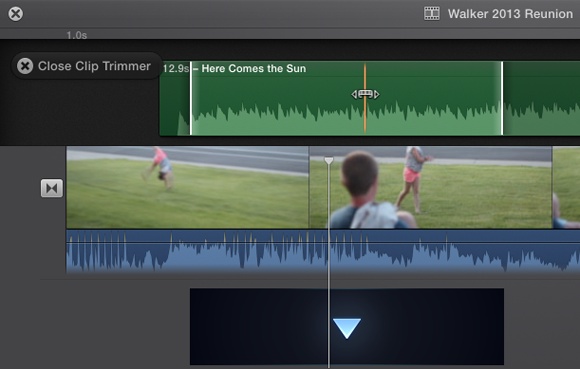
That approach isn’t nearly as versatile as the Clip Trimmer, which you can use to fine-tune your track edit, as explained in the sidebar here.
Move a Song
By default, iMovie starts your song at the beginning of your project, but you can drag it to whatever starting point you want.
Change the Volume of a Song
You change the volume of background music the same way you change the volume of any other clip. Use one of the methods described on Volume Adjustments.
Delete a Song
To delete background music, select the clip in your storyboard and then press Delete.
Edit to the Beat
If you’ve ever made a music video, you know how easy it is to pull your hair out trying to match a transition with a beat in the background. To make sure you don’t go bald, iMovie offers a subtle but very powerful tool called a marker.
Markers are specially designed indicators you add to your movie that correspond to particular moments. You can use markers for all sorts of editing strategies, like noting when you want a title to appear or a clip to end. You can also use markers to tap out beats in a song. Then, as you add video clips to your project, you can easily match the clips’ length and cuts to the beat of the music. The markers even work with adjustments you make using the Precision Editor (The Precision Editor)—those edits will also snap to line up with the beats you mark.
The truth is, markers are one of the coolest iMovie features that no one talks about. But what markers lack in recognition, they make up for in power. They’ll save you huge swaths of time editing a movie to the beat of a song.
Tip
You can mark beats in any kind of audio track: pinned, unpinned, sound effect, or even a voiceover.
Editing to the beat is a three-phase process. Before you dive in, make sure you have snapping enabled by heading to View→Snapping (you’ll see a checkmark if you have Snapping turned on).
Phase 1: Add Your Background Music
Start with a new project. Drop a background music track into your project, as described on Music.
“Wait a minute!” you may protest. “I don’t even have any video clips in place!” Your concern is justified—your song appears like a lonely green blob in your timeline. But there’s a good reason to put the song in first: You can resize the video clips and photos you place later to match the beat markers you’re about to add to the song. In addition, you can edit the song itself to make audio adjustments (Volume Adjustments) or change its start and end points using the Clip Trimmer (Use the Clip Trimmer).
Tip
You can add markers to projects you’ve already created, and then resize your clips to fit the beats. But as you do, the changes you make cascade throughout your movie, potentially wreaking havoc on the timing of the visuals you so carefully assembled. If you plan to cut a movie to a song’s rhythm, it’s best to mark all the beats from the start.
Phase 2: Insert Markers to the Beat
You can mark beats in your song a couple of ways. As you skim through the song, you can hear and spot (using the song’s waveform) places where the beat would make a well-timed cut. As you line up your playhead on that spot, choose Mark→Add Marker (or press the letter M key on your keyboard).
In addition to tagging beats, mark any spot you want to get special attention as you edit, like a big musical swell or key bit in the lyrics.
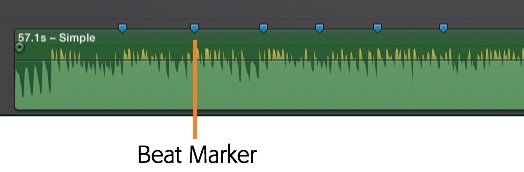
The markers show up as tiny blue tags resting on top of your song (Figure 11-8).
Alternatively, you might find it a lot simpler to just hit the letter M key as your song plays. That way, you can have all your markers in place by just going through the song.
Play the audio track from the beginning. As it plays, tap the M key on every beat where you want the video to cut to a new shot. (It’s OK to boogie in your chair; no one is watching.)
Once you tap out the whole song, take a moment to review your markers and fix mistakes. Beat markers are draggable, even after you place them. You can remove a marker by dragging it off the top of the clip, or by right-clicking it and selecting Delete from the shortcut menu. There’s no way to get rid of all the markers at once, however. If you want to start over, delete the entire song from your project. Then add the song back into your project and begin again.
Tip
Usually, if you cut right on the beat, the cut will appear to be late. If you practice tapping the M key just barely before the beats, your cuts will look just right.
Don’t group your markers too closely together unless you’re trying to get a very fast-paced effect. If the video cuts happen too quickly, your viewers won’t be able to absorb them.
Once you’re happy with the beat placements, it’s time to start adding video clips.
Phase 3: Add and Resize Clips
You should be back in your Event browser now, having a basically blank project awaiting some footage. Grab a video chunk from the browser and add it to your project.
Now you need to resize it to match the beat. Grab the end of the clip and drag it toward the closest marker. As you get close, the yellow line you’re dragging snaps to the closest marker as though it were magnetized.
Because of a quirk in the way iMovie works, it might look like trimming the video displaces your marker (the marker appears to jump to the right of the yellow border). But when you play back your project, you’ll find that the clip ends right on the beat. Try it with a photo now (Two Ways to Add Photos). Isn’t that cool? (If you don’t see any snapping, make sure you have View→Snapping turned on.)
You can use the Precision Editor (The Precision Editor) to make sure the right moments in your video line up with the right beats. Snapping works here, too.
After very little work, your project will look something like the one in Figure 11-9.
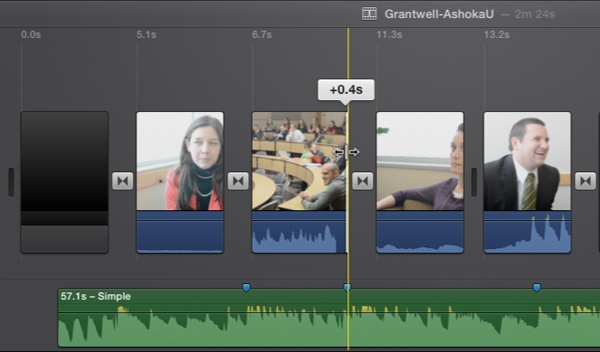
Notice how the markers show up in your project? That reminds you that you cut to the beat there, in case you want to make an edit that would displace the cut.
Snap to Beats in Your Project
With snapping turned on, your markers in place, and your footage added, you can start adding things like titles and sound effects. As you drag these elements around, they, too, snap into position against markers, as though magnetically attracted. (Turn off View→Snapping if this is getting in the way.) You can adjust their timing too, so they match the beats in your project.
Beat Markers in the Precision Editor
What if you added beat markers after you added your footage? Or what if your video doesn’t display the exact image you want on the beat? That’s where the Precision Editor can help.
With your song at the bottom of the project window and all its beat markers in place, double-click any empty space between two video clips to launch the Precision Editor. The Precision Editor covers the basic operation of the editor, but you should know that it offers some handy extras when you work with beat markers (Figure 11-10).
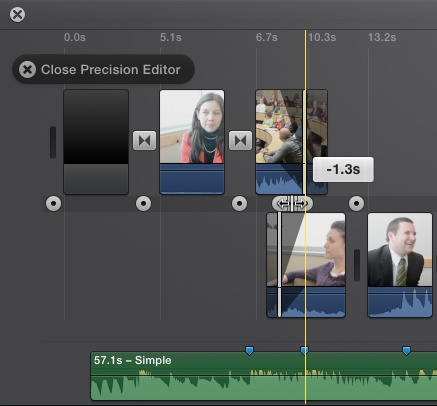
To line up a transition with a beat, drag the gray transition bubble around. Each time it approaches a beat marker in the song, the bubble snaps to the marker.
Here’s a rundown of how you could use beat markers in the Precision Editor:
If you added beat markers after you added your clips, you can go back through the movie to make sure the cuts work in sync with the background music.
You can line up video elements, like a poignant image or a title, to match a beat.
You can override the snapping effect to line up a video moment with the music (and that moment, like the crack of a bat at a ball game, may take place in the middle of a clip).
Connected Audio
Background music works when you want a song to play behind whatever is onscreen, but sometimes you want to marry an audio file to a particular moment in your video. You might, for example, want a laugh track to start right after your actor tells a joke.
That’s where connected audio comes in. It lets you pin audio to video. (It’s analogous to connected video clips, explained on Reverse a Clip’s Playback Direction.) If you move the video clip, the audio track goes with it. This gets super handy when you shuffle clips around or change your project timing with added transitions (see A Long Discussion of Transition Lengths for transitions and project timing).
Sound Effects
This is a great time to introduce iMovie sound effects, since you’ll almost always use them as connected audio. With a project open, you’ll see the Content Library in the bottom-right corner of the iMovie window. One of the sources listed is Sound Effects.
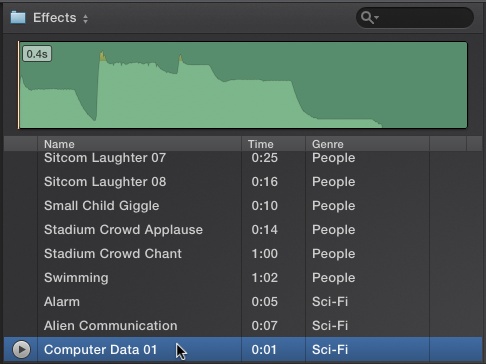
When you click it, iMovie opens the music browser you saw for iTunes, now full of premade sound effects (Figure 11-11). There are hundreds to choose from, so use the search box and/or the drop-down menu to narrow things down.
Add and Edit Connected Audio
To add all or part of an audio track as a connected clip, you have to drag it into your project. (Don’t use the white + button that appears in the waveform preview—that adds the track as background music.) Drop the audio onto your video clip where you want to connect it.
A few things about connected audio clips:
While background songs can’t overlap, connected audio clips can. You can stack multiple ones on top of one another.
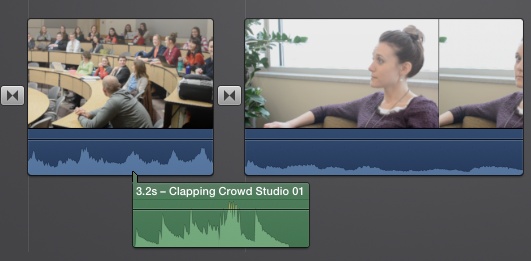
Connected audio attaches to your video clips with a little green flag staking their ground (Figure 11-12). The position of the flag tells you when the clip will play.
You can edit connected audio clips just as you do background music. Drag either end to lengthen or shorten the clip. Double-click it to use the Clip Trimmer. Move it by dragging it with your mouse.
All the volume-adjustment tools (described on Volume Adjustments) work on connected audio clips.
Delete a connected audio clip by right-clicking it and choosing Delete, or by selecting it and pressing the Delete key.
Narration
If anyone ever belittles iMovie for being underpowered, point out an iMovie feature that isn’t even available in many more expensive video-editing programs: the ability to record narration while you watch your movie play back. If your Mac has a microphone, you can easily create any of these effects:
A reminiscence. As your footage shows children playing, we hear you saying, “It was the year 2009. It was a time of innocence. Of sunlight. Of children at play. In the years before the Great Asteroid, nobody imagined that one 6-year-old child would become a goddess to her people. This, then, is her story.”
Voiceover. The technique of superimposing an unseen narrator’s voice over video is called a voiceover. It’s incredibly popular in TV, commercials, and movies (such as Saving Private Ryan, Sin City, and, of course, the Look Who’s Talking movies).
Identify the scene. Even if your movie isn’t one with a story line, iMovie’s narration feature offers an extremely convenient way to identify your home movies. Think about it: When you used to get photos developed at the drugstore, the date was stamped across the back. Even years later, you knew when you took the photo.
Some video cameras offer an optional date-stamp feature, but it’s a crude, ugly, digital readout that permanently mars your footage. And few people are compulsive enough to film, before each new shot, somebody saying, “It’s Halloween 2014, and little Chrissie is going out for her very first trick-or-treating. Mommy made the costume out of some fishnet stockings and a melon.”
Using iMovie, it’s easy to add a few words of shot-identification narration over your establishing shot. (To find out the time and date when you shot the footage, double-click the clip.)
Provide new information. For professional work, narration is an excellent way to add another layer of information to whatever is playing onscreen. Doctors use iMovie to create narrated slideshows, having created a storyboard filled with still images of scanned slides (see Chapter 12). Real-estate agents feature footage of houses for sale, narrating key features that can’t be seen (“Built in 1869, this house was extensively renovated in 1880…”). And it doesn’t take much imagination to think of how lawyers can exploit iMovie.
To create a voiceover (a narration), follow these steps:
Choose Window→Record Voiceover, or press the letter-V key.
The Viewer displays iMovie’s voiceover tools (Figure 11-13).
Click the Voiceover Options button to choose a sound source.
Your Mac’s microphone takes one of two forms: built-in or external. The built-in mic, a tiny hole in the facade of the iMac, eMac, or MacBook, couldn’t be more convenient. It’s always with you, and always turned on.
If your Mac doesn’t have a built-in microphone, you can plug in an external USB microphone or a standard microphone with an adapter (like the iMic from Griffin Technology [www.griffintechnology.com]).
The Input Source menu lists all the audio sources the Mac knows about—Built-in Microphone, Built-in Input (meaning the audio-input jack on the back or side), USB Microphone, or whatever you’ve connected.
Set the input level.
That is, move close to the microphone and practice your spiel. If the green sound meter inside the little microphone (Figure 11-13) is too low (say, just a couple of bars), your narration isn’t loud enough. On playback, it’ll probably get drowned out by the other audio track.
If the meter turns bright red, you’re too loud, and the recording will have an unpleasant, “overdriven” distortion.
To change the recording volume, drag the Volume slider left or right. (You can learn tricks for boosting the volume of audio tracks later in this chapter, but it’s much better to get the level right the first time.)
Figure 11-13. Choose Window→Record Voiceover (or press V on the keyboard) to narrate a clip. The voiceover tool (pictured) appears in the Viewer. When you press the microphone button to start recording, you get a brief countdown followed by a growing, burning-red audio clip that cools to green as you continue talking. Speak clearly into the mic, and then click the microphone button again to stop recording.Turn the Mute Project checkbox on or off.
The question you’re answering here is this: Do you want to hear the audio from your movie playing back while you record? Usually, the answer is “Yes” (so you want to turn off this checkbox), because you don’t want to talk over the on-camera conversation, and you can time your own utterances to perfection. The problem is, your microphone hears the movie playback coming out of your Mac’s speakers and records it anyway, or even triggers squealing feedback.
Therefore, turn off the Mute Project checkbox only if you’re wearing headphones to monitor playback.
Find the spot in your video where you want to start narrating.
You can use all the usual techniques to navigate your clips: skim (point without clicking), press the space bar to play the movie, and so on.
When you find the right spot, click the microphone button (Figure 11-13).
A big, orange 3-2-1 countdown timer appears in the Viewer, accompanied by attention-getting countdown beeps. You even see preroll—the Viewer shows the 3 seconds of video that lead up to the point you clicked. All of this is intended to help you get ready to speak at the spot you selected.
Once the numbers in the Viewer disappear, start talking. Press the space bar (or click the glowing red microphone button) to stop.
A new connected audio clip appears below your filmstrip, bearing the label “VO-1:” and your project name, as shown in Figure 11-13. (VO stands for “voiceover.”) As you speak, the audio stripe starts off a burning red and then cools into the standard audio green as you continue narrating. After you finish recording, point to a spot just before the beginning of the new recording, and then press the space bar to listen to your voiceover.

If the narration wasn’t everything you hoped for, it’s easy enough to record another take. Just hit ⌘-Z (Undo) or highlight the green voiceover stripe, and then press Delete. Then repeat this process.
You can record as many overlapping narration takes as you like. The green stripes just pile up, and they behave exactly like the sound-effects stripes described on Connected Audio. That is, you can do the following:
Delete a stripe by clicking it and then pressing the Delete key.
Shorten a stripe by dragging its endpoints (or by double-clicking the stripe, and then using the Clip Trimmer, as described on Use the Clip Trimmer).
Move a stripe by dragging it to a new spot, using the middle of it as the handle.
Change the volume using the tricks explained on Volume Adjustments.
Detach Clip Audio
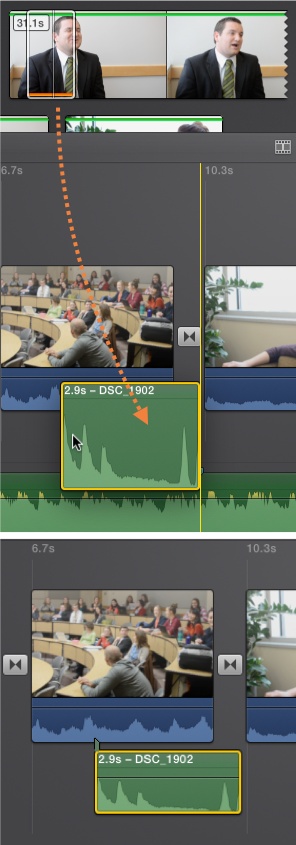
iMovie is perfectly capable of letting you add just the audio portion of a piece of video footage to your storyboard. The recorded audio shows up as an independent, connected audio clip. Its green flag indicates that it’s locked to wherever in the storyboard you dropped it. Figure 11-14 shows the process.
Adding just a clip’s audio to your project unleashes all kinds of useful new tricks that are impossible to achieve any other way:
Create an echo. This is a cool one. Park the extracted audio clip a few frames to the right of the original. Use the volume controls (Volume Adjustments) to make it slightly quieter than the original. Repeat a few more times, until you get a realistic echo or reverb sound.
Tip
If you’re not picky about fine-tuning the echo effect, consider using the Echo or Cathedral audio effects, covered on A Word on Audio and Transitions.
Reuse the sound. You can put the extracted audio elsewhere in your movie. You’ve probably seen this technique used in dozens of Hollywood films: About 15 minutes before the end of the movie, the main character, lying beaten and defeated in an alley, suddenly pieces together the solution to the central plot, as snippets of dialog we’ve already heard float through his brain, finally adding up.
Tip
You may be tempted to extract audio to create a cutaway, something like you see in documentaries. An interviewee starts on-camera, but historic pictures soon replace the video while the interviewee’s voice forges on excitedly about the history of dirt.
Don’t. Cutaways like these are much easier to make using the dedicated Cutaway feature, covered on Adjust the Fade-In and -Out.
Grab some ambient sound. In real movie-editing studios, it happens all the time: A perfect take is ruined by the sound of a passing bus during a tender kiss and you don’t discover it until you’re in the editing room, long after the actors and crew have moved on to other projects.
You can eliminate the final seconds of sound from a scene by cropping or splitting the clip, of course, but that won’t result in a satisfying solution—you’ll have three seconds of silence during the kiss. The real world isn’t truly silent, even when there’s no talking. The air is always filled with ambient sound, such as breezes, distant traffic, or the hum of fluorescent lights.
Even inside, in a perfectly still room, there’s room tone. When you want to replace a portion of an audio track with silence, what you usually want, in fact, is ambient sound.
Professionals always record about 30 seconds of room tone or ambient sound just so they’ll have material to use in case of an emergency. You may not need to go to that extreme; you may well be able to grab some sound from a different part of the same shot (when nobody is talking). The point is that by extracting the audio from another part of the scene, you’ve got yourself a useful piece of ambient sound footage you can use to patch over unwanted portions of the originally recorded audio.
Add narration. The technique described on Narration is ideal for narration that you record at one sitting, in a quiet room. But you can add narration via video camera, too. Just record yourself speaking, import the footage into iMovie, extract the audio, and then throw away the video. You may want to do this if you’re editing on a mic-less Mac, or if you want the new narration to better match the video camera’s original sound.
It’s important to note that iMovie never removes the audio from the original video clip. You’ll never be placed into the frantic situation of wishing that you’d never done the extraction at all, unable to sync the audio and video together again (which sometimes happens in “more powerful” video-editing programs).
Instead, iMovie places a copy of the audio in the storyboard. The original video clip retains its original audio. As a result, you can extract audio from the same clip over and over again, if you like. iMovie simply spins out another copy of the audio each time.
A Word on Audio and Transitions
When you transition between video clips, the audio needs to transition, too. With video transitions, you get to choose how they look because you choose from any of iMovie’s many transitions (Adjust Automatic Transitions).
In the case of audio, iMovie always crossfades between clips for the duration of the transition. That means a 2-second transition will cause a 2-second audio crossfade between clips.
If you don’t want this, you can always use the Precision Editor to change when the audio changes between clips, as explained on The Precision Editor.
Audio Effects and Enhancements
If all iMovie could do in the audio department is make volume changes and add some music, it would be good enough. But who wants good enough? Apple makes iMovie even more formidable, audio-wise, by adding a slew of effects and enhancements.
Audio Effects
iMovie’s audio effects are really cool and a ton of fun to play with. Want your dad to sound like a mouse? Piece of cake. Want your baby to sound like a robot? Easy-peasy. Want to be able to sing like T-Pain, the rapper who made autotuning famous? You get the idea.
Applying an Audio Effect
Here’s how you apply an audio effect to a clip, song, sound effect, or voiceover.
Select the clip, song, sound effect, or voiceover track; click Adjust in the Viewer toolbar; and then choose the Video and Audio Effects tool (the overlaid film strip).
The Viewer displays buttons for both video effects and audio effects. You read about video effects on Video Effects; audio effects work almost the same way.
Tip
You can’t apply an audio effect to part of a clip or song. You have to split the clip or song in question first. To do so, put the playhead right where you want the effect to start or end, and then right-click (or Control-click) that spot and choose Split Clip (⌘-B) from the shortcut menu. (You might need to repeat this step if you cut out a piece from the middle of something.) Once you have the bit you need separated from the rest, proceed with the steps that follow.
In the Viewer, click Audio Effect.
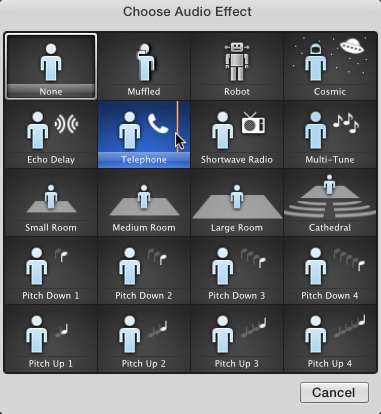
iMovie displays a grid of skimmable effects (Figure 11-15), not unlike the one for video effects (Fast/Slow/Reverse). As you skim, iMovie previews the audio effect. Pause for a moment to enjoy the fact that this takes zero rendering time.
Skim through the effects, and then click the one you want.
Once you choose an audio effect, iMovie applies it to your entire clip or song.
If you change your mind and want the clip’s audio back to normal, choose None from the Audio Effect grid.
The Audio Effects Catalog
Although you’ve got the adorable little stick figures doing interpretive performances of each effect (Figure 11-15), you might still like a rundown of each effect and what it accomplishes:
Muffled. This makes people sound like they’re talking through a pillow.
Robot. If you’re making a throwback B-movie about robots attacking earth, this will overlay your actors’ voices with a monotone, buzzing noise that sounds, well, robotic.
Cosmic. Imagine taking an FM radio dial and turning it from bottom to top to bottom. The Cosmic effect makes your voice sound as though it were coming from a radio. (It also adds a monotone effect to enhance the cosmicness.)
Echo. Although iMovie calls this effect Echo, it sounds a lot more like reverb, because the “echo” is fast and doesn’t fade the way an echo would in a large space.
Telephone. This option slightly muffles the sound to match what you’d hear over the phone. A great way to simulate a phone conversation if your actor is on the phone and you can hear the audio track of the other person on the line.
Shortwave Radio. A lot like the Cosmic effect, just tamed down.
Multi-Tune. You’ve heard this effect before, even if you don’t know it. The rest of the world calls it autotune; it was popularized by rapper T-Pain, Auto-Tune the News, and others. It tunes your voice (or any sound) to the nearest musical tone, rounding off the pitch to the nearest piano-key note. Autotune is applied gently to just about every pop singer’s recording to fix the pitch, but turned up all the way, it creates a distinctive mechanical, clicky edginess to the singing. Normal speaking doesn’t really show off this effect, but singing, or drawn-out vocal sounds, make it sound really cool. Play around with this effect just for the fun of it.
Small/Medium/Large Room. These three options create the same level of echo you’d encounter in a correspondingly sized room.
Cathedral. Like the Small/Medium/Large room effects, but in a really big room. This is a nice alternative to the Echo effect.
Pitch Down/Up. These effects lower or raise a person’s voice by an amount that you can control by choosing one of the four pitch up/down options. Here you can make your 5-year-old daughter sound like a man—or your bowling buddy sound like your 5-year-old daughter.
Auto Enhance
You enhance the audio in your movie one of two ways. If you click the Enhance button in the Viewer toolbar, iMovie makes all the video enhancements it can, along with all the audio enhancements it can make, too.
To work on the audio portion of your movie only, click the Adjust button in the Viewer toolbar and then select the Volume tool (the speaker icon). Click the Auto button there, and iMovie adjusts just your audio track to produce what it thinks is the best sound possible.
The Equalizer
Traditionally, an equalizer is a set of sliders that lets you increase or reduce the low, medium, and high tones in an audio track. They’ve been around for years, but most people don’t ever use them.
That’s because most people don’t need them. Usually they show up only in music-playback software like iTunes. If you have decent speakers and the song was recorded professionally, there’s little point in messing around with audio levels. The balancing work has been done for you.
Your camera’s audio, on the other hand, hasn’t been professionally adjusted. As a result, you might find that the bass guitar at the concert you’re (legally) recording sticks out like a sore thumb. That’s where the equalizer comes in handy. You can reduce the low-end sounds to make everything balance out.
iMovie doesn’t want to bother you with sliders, but it still helps you improve a clip’s sound the way an equalizer can. Figure 11-16 shows you the iMovie equalizer menu. You get to it by clicking Adjust, and then the bar graph icon, a.k.a. the “Noise reduction and equalizer” button.
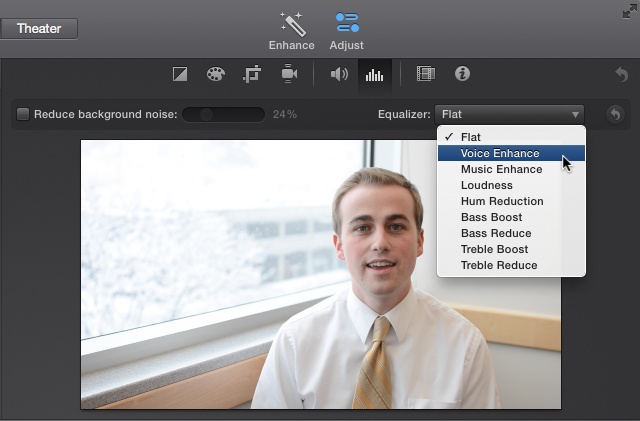
If you’re not sure which Equalizer menu option to choose, try one. If you choose Bass Reduce, for example, the lower-tone sounds in your clip drop away. You can preview the result by clicking a spot in your audio and then pressing the space bar. Change your equalizer setting at any time; iMovie makes the change instantly, with no rendering.
Reduce Background Noise
File this feature under “Amazing power turned on with a mere checkbox.” Among iMovie’s many cool tricks, this is one of the coolest. All of us suffer from the problem this feature fixes.
Other than shaky video (Video Stabilization), the surest sign of amateur video is bad audio. Most people pay so much attention to what they’re filming that they tune out the sound they’re recording. So without your even noticing it, your camera’s microphone can pick up the hum of fluorescent lights, the drone of a clothes dryer, or even the whir of its own zoom lens. Professionals know all this, and that’s why they’re famous for shouting, “Quiet on the set!” They know that you can point a camera lens right where you want it, but microphones aren’t so discriminating.
As you’re out and about filming, unless you’ve brought professional audio equipment like a boom mike and a mixing board, you’re using the microphone in your camera. Unfortunately, built-in mics have a reputation for being undiscerning. That is, they generously record any and every sound that hits them. That’s no big deal if you’re recording an interview in a quiet room, but it really stinks if the air conditioner in the room kicks in. The drone in the background makes the whole clip sound like amateur hour.
So if you’re at the beach and just got a great little shot of your 4-year-old singing “Bob the Builder” over his sand castle, you want to hear the singing and not the wind or waves. Here’s where iMovie steps in to save the day. It magically scrubs your audio, removing sounds like waves, fan noise, traffic, and other messiness.
Note
While this tool can reduce even a roaring waterfall to a low hum, it can’t entirely eliminate many background noises. In fact, if you ratchet the effect too high, it makes your clip sound like it’s playing from a set of broken speakers.
To use this feature, select the audio clip and then click the Adjust button. Choose the “Noise reduction and equalizer” tool (the bar graph) shown in Figure 11-17, and then turn on the checkbox labeled “Reduce background noise.”
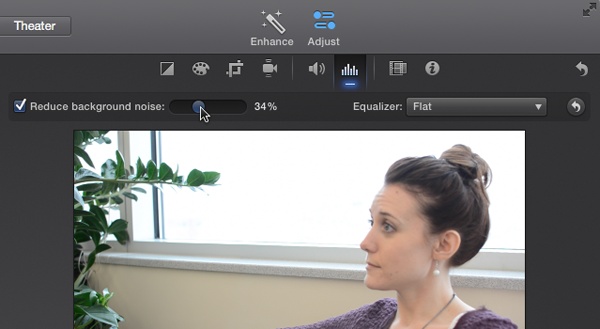
Your clip immediately sounds cleaner. If it’s not clean enough (or if it’s too clean to sound real for the surroundings), then move the slider left or right to change the amount of noise reduction.
Multiple Audio Adjustments
Let’s say you make a few audio adjustments to a clip: upped the volume, ducked other tracks, and added an effect. Now you want to do the same to a lot of other clips. Luckily for you, iMovie saves you the many clicks it would take to repeat the process. You can copy and paste the audio adjustments in one clip to a bunch of others.
Select the clip you’ve adjusted and choose Edit→Copy (⌘-C). Then select the clip(s) you want to adjust and choose Edit→Paste Adjustments. In the menu that appears, you can choose Volume (Option-⌘-A) or Audio Effect (Option-⌘-O). The first pastes all the volume adjustments, including rubber-band changes, auto enhance, and ducking, and the second pastes whatever audio effect you applied to the copied clip.
Note
Unfortunately, you can’t copy and paste changes in the equalizer or background noise settings. You have to do those by hand.
Because you can select multiple clips at once (Select by Dragging), you can make all these audio changes in one fell swoop.
Editing Audio in GarageBand
What if you really want to dig into your movie’s audio? iMovie’s audio tools are great and all, but they could leave you wanting. What you need is an audio-editing program. Perhaps one like the application that Apple offers for free in the App Store!
That would be GarageBand, the music composition program that’s part of iLife. It offers all kinds of audio-specific tools not found in iMovie, the most prominent being the composition tools you can use to create your own movie scores.
Fortunately, you can export your movie to GarageBand to edit the soundtrack with its much more powerful tools. Don’t read any further, however, until you absorb these two warnings:
Your movie arrives in GarageBand with only a single, boiled-down audio track. You can’t adjust the video camera’s audio and the iMovie music independently. (That’s a good argument for avoiding adding any music in iMovie—wait until you’re in GarageBand to add all music and sound effects.)
The iMovie→GarageBand train goes only one way. Once you work with a movie in GarageBand, you can no longer return to iMovie for further edits, either video or audio. You can return to iMovie, edit the video, and re-export the whole thing, but you lose all the audio work you did in GarageBand the first time.
GarageBand Basics
GarageBand is a music composition program containing dozens of powerful tools. It lets you combine multiple audio tracks, giving you fine control over each track’s sound effects, volume, and even stereo panning.
But if you’re like most people, you’ve never even set foot in GarageBand. (Apple says GarageBand is the second least-used iLife program.) Here’s a crash course:
Export your movie from iMovie.
Use one of the file export options explained in Chapter 15.
Open GarageBand.
GarageBand’s icon looks like an electric guitar; it’s in your Applications folder. If this is your first time in GarageBand, a welcome screen greets you with a list of choices. If you have worked in GarageBand, it opens the last project you worked on.
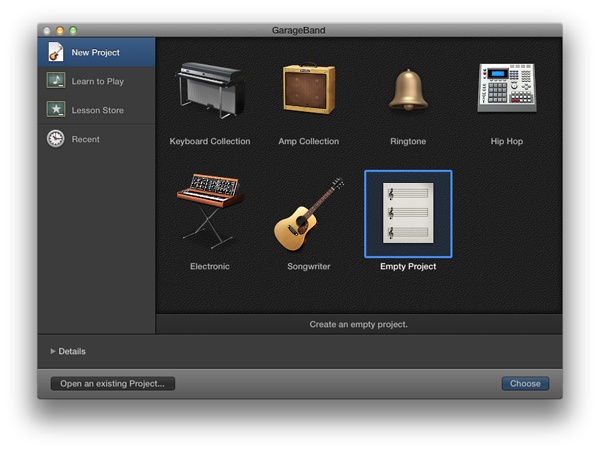
Create a new project.
Choose File→New and then select Empty Project from the window that appears (Figure 11-18).
iMovie asks you what kind of audio track you want to start with. Choose Software Instrument and then click Create.
Add your movie from the Finder.
Find your movie in the Finder, and then drag it into the big, empty part of the GarageBand window. (At this point, GarageBand opens a preview window showing your movie. You can close this by clicking the X in the top-left corner.)
GarageBand creates its own thumbnails to represent your movie.
Edit your movie’s audio track.
Once GarageBand imports your movie, you’ll see an audio track directly under the video track. This is the audio from your exported movie. It contains all your movie’s audio, merged into one track. Now that it’s in GarageBand, you can manipulate the audio in a multitude of ways. At the left edge of the window, under your movie, tiny icons let you mute, isolate, lock, and pan the audio (shift the stereo sound right or left). You can also make the volume rise and fall at particular points, as shown in Figure 11-19.
Add audio tracks.
Add additional tracks, if you like, by choosing Track→New Track (Option-⌘-N), or by clicking the + button in the toolbar. You might use these new tracks to create a custom score (read on). In GarageBand, you can create as many parallel audio tracks as you like, although a huge number slows your Mac to a crawl.
You can also drag songs from the Media Browser (View→Show Media Browser) right into a blank area of the GarageBand window. GarageBand automatically creates a new track and places the song in it.
Once you finish editing the audio, send the movie out into the world by choosing File→Movie→“Export Audio to Movie.” Save the file to your computer, and now it’s ready to use for whatever you had in mind.
Scoring in GarageBand
Because GarageBand is a music program, its greatest strength is its ability to help you create a custom score for your movie. You can actually record or compose music crafted to run in perfect harmony with your video, turning you into a regular John Williams. (Actual musical ability may vary.) GarageBand shows the movie in the timeline, frame by frame, so you know exactly where to add a cymbal crash or a guitar riff.
Here’s a super-condensed review of the different tools for scoring:
Use prerecorded loops. Choose View→Show Apple Loops to see all the different categories of prerecorded loops (music building blocks) you can drag directly into new tracks beneath your video. Once you add it, you can drag the upper-right corner of a loop to make it repeat over and over, for as long as you drag to the right. (This works well with drum parts.)
Record a MIDI instrument. If you have a MIDI instrument connected to your Mac (usually a keyboard or a synthesizer), choose Track→New Track, click Software Instrument, and then click Create. Now you can choose an instrument sound from the list that appears at the lower right, and then click the red, round Record button to begin recording as you play. You can even use the Tempo control (hold your mouse down on the digits) to make the movie play back more slowly, so that you have a better chance at a perfect performance. After you finish playing, you can crank the tempo back up to its original speed.
Record a live instrument or voice. GarageBand can record live sounds, like your own singing or saxophone playing. Choose Track→New Track, click either choice under Audio, and then click Create. Next, choose a reverb preset from the list at the left (like Female Basic or Male Rock Vocals). Click the Record button to begin recording.
When you finish the soundtrack, export the results using the instructions given previously. With enough practice, you might eventually wind up on Steven Spielberg’s speed dial.