
Chapter 17. QuickTime Player
QuickTime Player is a small, free program that comes with every Macintosh (it’s in your Applications folder). While you can use it to play back movies (duh), you can also use it to upload them to video-sharing sites, to record what happens on your Mac desktop as you mouse around, and to video your own antics using the iSight camera.
There are two reasons QuickTime Player is worth knowing about. First, if you save your iMovie projects as files (Chapter 15), you can use QuickTime as the playback program, and, second, the software serves as a mini-iMovie for quick-and-dirty edits.
This chapter covers QuickTime Player version 10.3, the one that comes with any Mac capable of running the newest iMovie.
Note
You may remember an older version of QuickTime called QuickTime Pro. That was a much more sophisticated (and complicated) piece of software, one that Apple stopped updating a few years ago. If you have it and want to put it to good use, previous editions of this book cover it in great detail.
QuickTime Basics
You can open a movie file in QuickTime by double-clicking its file name, by dragging it onto QuickTime’s icon in the Dock, or by opening the QuickTime Player and then choosing File→Open File.
Tip
If your movie file ends in the extension .M4V, then double-clicking its file name might open the movie in iTunes. To open it in QuickTime, drag it onto the Dock icon or choose File→Open File.
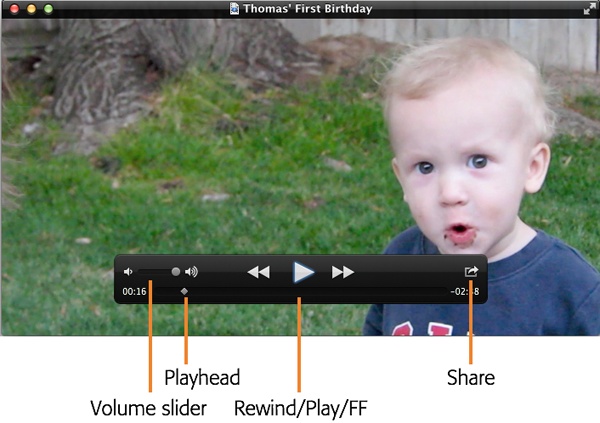
Once your movie is open, you see QuickTime’s streamlined, minimalist playback window (Figure 17-1). This design works great when all you want to see is your movie. In fact, if you move your mouse away as the movie plays, the title bar and controls go away, leaving nothing but your movie. When you move your cursor back over the screen, the controls reappear. (You’ll find all the controls explained in Figure 17-1.)
Share Using QuickTime
You can export any movie file that QuickTime can play. To see your options, click the share icon in the QuickTime toolbar (Figure 17-1) or choose File→Share from the menu bar. Here’s what you’ll find:
Email. When you choose Share→Email, QuickTime opens a new Apple Mail message with your movie already attached. The same thing happens when you share by email from iMovie (Share via Email), but the QuickTime player doesn’t resize the file for you—you need to manually verify that the file isn’t too big to send as an attachment. To check, choose Window→Show Movie Inspector (⌘-I).
Messages. Apple offers a free texting service, called Messages, with every iCloud account, but it works only on Macs, iPads, iPhones, and iPod Touches. When you choose Messages from the share menu, QuickTime opens a new message with the movie file already in the text window. Type in another Messages user’s name, and then click Send. Like email, Messages has a maximum file size limit, 100 MB, which is much more generous than most email services.
AirDrop. Apple’s AirDrop lets you wirelessly share files with any other AirDrop-capable Mac nearby. The coolest part is that you don’t need to be on a network to share. When you choose AirDrop, QuickTime launches a small window with your movie “paper-clipped” to it. On the other Mac, open the Finder and choose AirDrop from the left-hand column. When you do, that computer shows up in QuickTime’s AirDrop window. Choose that computer and then click Send. On the other Mac, accept the transfer, and the file shoots from your Mac to the other one.
Vimeo/Facebook/YouTube/Flickr. You can upload to all four of these services from QuickTime, just as you can from iMovie. When you choose a service by selecting File→Share, QuickTime asks you to sign into your account (or to create one—it handily launches the System Preferences’ Internet Accounts window for that purpose). Once you select a service, QuickTime launches a window that lets you add the information unique to that service (like YouTube’s keyword tags or Facebook’s limits on who can see your video). A Share window shows you the progress as QuickTime exports and uploads the file.
If you want to remove a shared movie, you have to go to each site and delete them manually.
Export from QuickTime
QuickTime can export into multiple formats any movie it can play. So if you have, say, a big movie that you need to make smaller so you can email it, go to the File→Export menu. There you’ll see several options. When you choose 1080p, 720p, or 480p, QuickTime opens the Finder so you can save the video somewhere on your Mac. It starts the export when you click Save.
You can export just the audio portion of a film, too (choose File→Export→Audio Only). QuickTime saves the soundtrack as an .m4a file, which plays back in pretty much any modern device.
Of course, once you have the movie file, you may want to get it onto your other Apple gadgets. Syncing through iTunes is the easiest way, so consider just choosing that last export option, File→Export→iTunes.
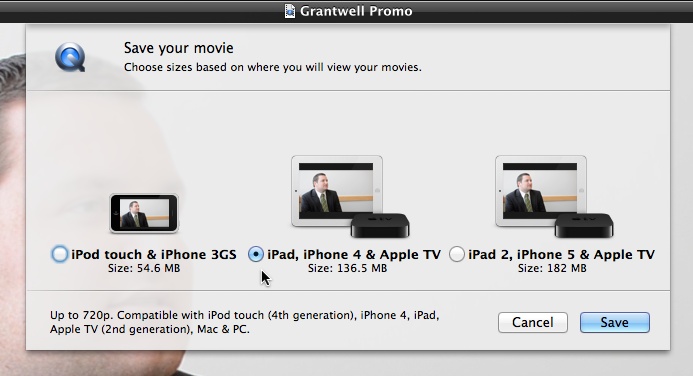
When you do, QuickTime shows you a window like the one in Figure 17-2. Choose a quality to match your device and then click Share. QuickTime exports the movie to iTunes’ Home Videos library. Then all you have to do is sync from iTunes to your device (read how on From iTunes to iPad, iPhone, iPod Touch, or Apple TV).
But you might be exporting a file you’ll copy to another computer for syncing through a different iTunes library. For that, choose File→Export→“iPad, iPhone, iPod Touch, & AppleTV.” QuickTime lists three sets of destination iDevices (similar to what you see in Figure 17-2). Choose one by turning on the radio button for your device. When you do, QuickTime displays more details about compatible devices at the bottom of the screen. Click Save and then choose a file location.
Trim a Movie
If you need to make a quick trim to a movie, you can save loads of time by using QuickTime instead of iMovie. That’s because iMovie requires you to add the movie to the Event library, create a project with it, edit the movie, and then export the result. QuickTime lets you trim the movie on the spot, with one limitation: You can edit only the ends of your movie; you can’t make any cuts in the middle of it.
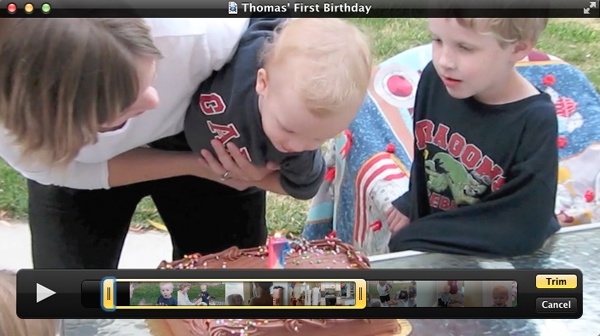
To trim your movie from either end, open it in QuickTime, and then choose Edit→Trim (⌘-T.) QuickTime displays a filmstrip of your movie enclosed by the same yellow editing border you see in iMovie (see Figure 17-3). It works the same way, too (Select by Dragging).
Drag the handles on either end of the yellow border inward to trim your movie. (Make sure everything you don’t want is outside the yellow border.) As you drag the handles, the playback window shows you exactly where you’ll be making the cut. Once you isolate the part of the movie you want to keep, click the yellow Trim button and QuickTime deletes all the unwanted footage.
Click File→Save. You can’t save your edited movie with the same name as the original, so choose a new file name and a location for your edited movie.
Combine Videos
Another trick that works faster in QuickTime than in iMovie is combining clips. In iMovie, you’d have to import the videos, start a new project, add the clips, and then export the combined movie. In QuickTime, you can do all that in a couple of steps.
In QuickTime, open a movie and then choose Edit→“Add Clip to End.” QuickTime opens the Finder. Pick a second video file, and then click “Choose media.” QuickTime combines the videos in a new file, which you can name and save wherever you like.
If you want to insert another clip into the middle of a movie, you need to split the movie first. Position the playhead on the spot where you want to insert the clip, and then choose Edit→Split Clip. QuickTime lops your movie into two pieces. Click the first clip to select it and then choose Edit→Insert Clip After Selection. Choose the clip you want to insert from the Finder, and QuickTime puts it between the two pieces.
Record with QuickTime Player
If you ever need to record a quick webcam video wishing your mom a happy birthday, record a track of audio only, or record what happens on your screen (to show a colleague how to use a program, for example), QuickTime Player makes the process easy.
Under the File menu, choose from one of three options:
New Movie Recording (Option-⌘-N). This records a movie using your built-in iSight camera.
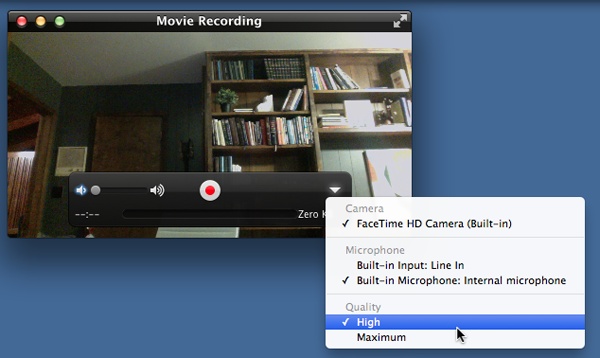
New Audio Recording (Control-Option-⌘-N). This records an audio “movie” using the sound input source you select from the drop-down menu in the record window (Figure 17-4).
New Screen Recording (Control-⌘-N). This records all the action on your screen as you mouse around it, including what happens as you use an application. It also records audio from the sound source you choose in the drop-down menu (click the down-arrow button in the Screen Recording window).
Tip
If you ever need to teach someone how to do something on a computer, like run Software Update, QuickTime Player’s screen-recording feature is an awesome way to show rather than simply tell. Just record the steps, narrating as you go, and then export an email-sized version of your movie and send it on.
To start and stop recording, click the big red button in the Screen Recording window. (If you’re recording your computer screen, the Stop button appears in the menu bar.) Once you stop, QuickTime automatically creates a new, untitled movie that you can save by typing in a file name and destination.
Once your movie file is ready to go, use one of the sharing options listed on Share Using QuickTime to send it off to the world.