
Chapter 22. iMovie for iOS Photos
Not everything in a movie has to move. Sometimes a nicely placed photo tells the best story. In an iMovie for iOS project, you can use any photo that you take with or sync to your device.
However, if you’re accustomed to iMovie for the Mac, don’t expect the same photo versatility in iMovie for iOS; you’re limited in certain frustrating ways. For example, you can’t use cutaway, picture-in-picture, or side-by-side effects, nor can you apply photo effects, like making an image appear black and white. (You can, however, edit a photo in something else first, like iPhoto for iOS.) Finally, and most frustratingly, you can add only one photo at a time to your timeline. That makes assembling a slideshow of 100 photographs in iMovie for iOS unrealistic.
Tip
iPhoto for iOS has a perfectly capable slideshow tool of its own. Consider trying that app instead to create a quick slideshow.
That said, all the basic photo-editing tasks are here. You can rotate and zoom in on a photo, add a title, and change its duration. This chapter covers all the ways you can use photos in iMovie for iOS.
The Photo Library
What photos does iMovie use? The short answer is all the ones on your device. You can see them using the Photos app on your iPhone, iPad, or iPod Touch.
Note
Lots of other apps can snap and edit pictures. If you want to shoot or edit an image that you can use in iMovie, be sure that the app stores and retrieves photos to and from your Camera Roll.
But you don’t need to open Photos to pick images for your movie. iMovie can display pictures from your Camera Roll and then insert them straight into the timeline (another example of Apple programs that seamlessly talk to each other).
To do that, tap Add Media→Photos. iMovie groups the photos on your device by their source (Figure 22-1). The list includes your Camera Roll, your iCloud photo stream, and the names of any photo albums you created. (If you see a bunch of photo squares instead of album names, tap < to get to the album-listing screen.)
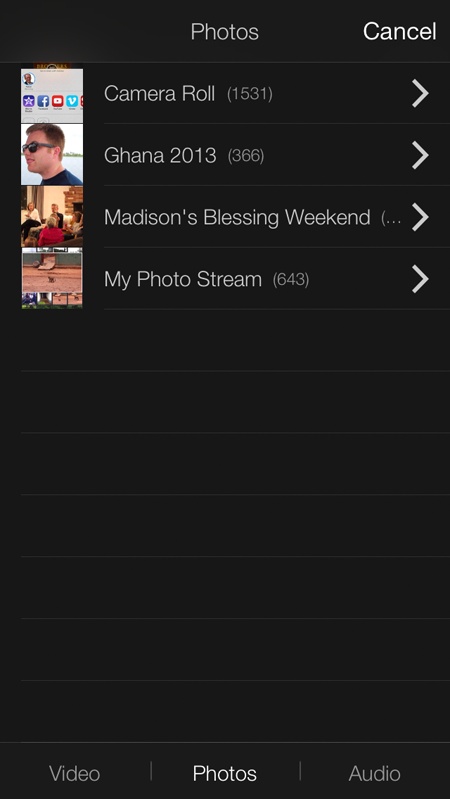
Choose any album. iMovie displays thumbnails of the photos it contains (see Figure 22-2). Don’t worry, iMovie hasn’t cropped your photos to fit the grid; it displays them this way to save space.
To get a better look at a photo, tap it; iMovie presents a larger version in a pop-up window (Figure 22-2). That preview uses the photo’s real dimensions, too (unlike the standardized grid squares), so you can see its orientation before you add it to your project.

Once you find the photo you want, tap it to add it to your project. iMovie inserts it at the end of the clip under the playhead. (iMovie won’t split a clip to insert a photo.)
Once inserted, a photo plays for 3 to 6 seconds, depending on the length of the transition on either side of it (different transitions take different times to fade to and from a photo). In addition, iMovie automatically applies the Ken Burns effect to each photo. (To change that, see Duration.)
Shoot with Your Camera
Of course, your iPhone, iPad, or iPod Touch comes with a built-in camera, and you can use it to take pictures and add them straight to your timeline.
To add photos directly into iMovie, open the Camera app and then slide the capture choice to Photo, as shown in Figure 22-3. You can’t use some advanced features like HDR and effects, but you can focus with a screen tap, shoot flash photography, and flip between the front and back cameras.
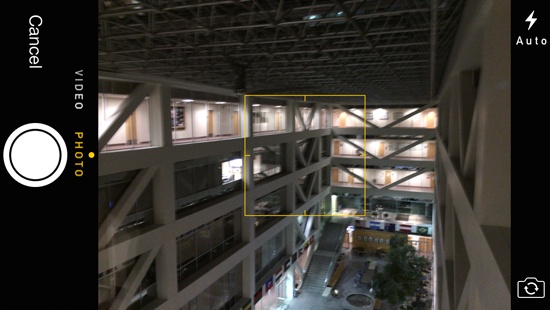
After you snap a photo, tap Use Photo, and iMovie inserts it into your project at the playhead.
Note
When you use the camera in iMovie to record video, you can save those videos to your Camera Roll (see Duplicate Audio). You can’t do the same with iMovie-shot photos, however—they work in your movie projects only. To save and access a photo for other uses, take the picture with the Camera app and then import it into iMovie.
Video Freeze Frames
Sometimes the best photo is trapped in a video. To freeze a frame of a clip and save it as a photo for use in iMovie (see the Note that follows), position the playhead on the perfect moment. Tap the video clip to highlight it and then choose Freeze from the toolbar (Figure 22-4). When you do, iMovie splits the clip at the playhead and sticks in the still image.
Note
You can’t create a still image using the freeze frame trick described here and then use that image in another app. iMovie for iOS doesn’t store the image anywhere; it simply adds it to your timeline, making the pic inaccessible to other apps.

You can treat the captured image pretty much like any other photo in your timeline—move it around, change its duration, add a title, or duplicate it. Oddly enough, though, you can’t apply a Ken Burns effect to it, even though iMovie automatically applies that effect to other photos. And you can split the photo, which iMovie doesn’t allow with other photos. Go figure.
Tip
While you can’t apply the Ken Burns effect to a freeze frame, you can zoom in on it—see Split Clips.
Adjust Photos
Odds are, a photo you dropped into your timeline won’t behave exactly the way you want it to. You may not like its timing, its rotation, or how iMovie automatically applied the Ken Burns effect to it. And you might want to add a title. Once a photo is in your timeline, you can change all these attributes.
Duration
Altering a photo’s duration works just like trimming a video clip (Re-Edit a Clip), except that you’re not trimming the image; you’re telling iMovie how long to display it.
Tap a photo in your timeline so the two yellow highlight handles appear at either end. Drag an end left or right to shorten or lengthen the duration of your photo. (It doesn’t matter which handle you drag.)
When you let go, your photo retains its new timing. If you want to time the duration just right in relation to the shots that come before and after it, zoom in on the timeline so you can precisely position the yellow handles. If you’re editing to sound and you’re on an iPad, turn on the waveform (tap the squiggly line button) to edit to the audio pattern.
Rotation
You can rotate the photos in iMovie just as you can rotate the video (see Rotate a Clip). With a photo selected and displayed in the preview window, put two fingers on the window, and twist them right or left. With each twist, iMovie rotates the clip a quarter-turn in that direction.
Adjust the Zoom Level and Ken Burns Effect
iMovie on the Mac made the famous panning zoom effect created by documentarian Ken Burns even more famous. That’s when a movie gradually zooms in on and slides across a photo to make it appear more dynamic and interesting. What used to take special camera equipment, you can now do on your handheld Apple device.
iMovie automatically applies the Ken Burns effect to all the photos you add to your timeline. If you don’t like what iMovie did, you can always change it.
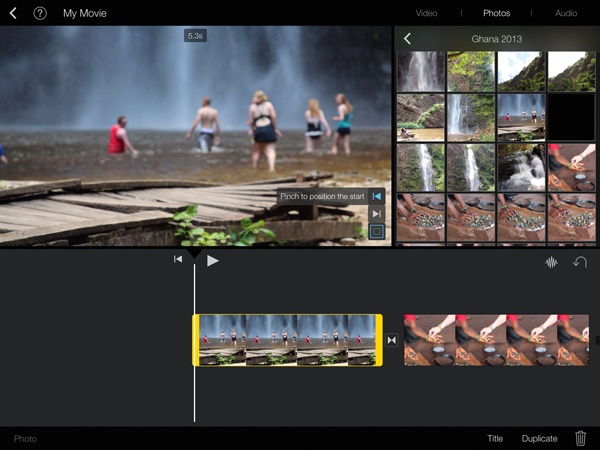
Tap a photo in your timeline to select it. When you do, the preview screen includes options to set the start and end points of the Ken Burns pan and zoom (see Figure 22-5). To “remove” the Ken Burns effect, position the start and end points to be exactly the same, showing all your photo. Your photo will stay still in the movie. (To zoom in on or out of a photo, pinch it; to reposition a photo, drag it.)
To show just part of a photo, zoom in on it until just the part you want people to see is visible, and then make sure the start and end points are the same.
To create your own Ken Burns effect, set the start and end points differently. iMovie automatically creates the pan and zoom effect that moves the shot from one position to the other. For example, if you want to zoom out during the effect, start with a zoomed-in point and end with a zoomed-out one. If you want to pan across a photo, zoom in the same amount for both points, but position the photo at one side for the start point and the other side for the end point.
Add Titles
Add a title to a photo the same way you add a title to a clip, as explained on Turn Theme Music On or Off.
Delete Photos
Deleting a photo from your timeline couldn’t be easier. Tap to
select the photo, and then tap ![]() . Poof. The photo is gone. (But not gone from
your device, necessarily. Anything you added from a photo album is
still in that album, safe and sound. Only photos you shot from within iMovie are gone
forever.)
. Poof. The photo is gone. (But not gone from
your device, necessarily. Anything you added from a photo album is
still in that album, safe and sound. Only photos you shot from within iMovie are gone
forever.)