
Chapter 23. iMovie for iOS Trailers
Trailers, the 1- to 2-minute previews you see before a movie, have become a form of entertainment on their own. Today, it’s common for an action-movie trailer on YouTube to get millions of views before the film even hits theaters.
iMovie for the Mac pulls off super cool, complex tricks with its trailers feature (Chapter 13). Using high-quality animations, titles, and music, it lets you easily create a preview featuring your family, friends, or, heck, even your pets. With over two dozen trailer styles to choose from, you’re sure to find one that tells your story.
iMovie for iOS does the same thing, albeit with fewer styles (14 instead of 29). But it also offers something iMovie for the Mac can’t: the ability to both shoot and then build your trailer on your handheld device. This chapter explains how to do that and everything else trailer-related.
Note
Before you get too deeply into building an iOS trailer, note that you can’t convert it to a project and tweak it with custom edits on an iPhone, iPad, or iPod Touch.
Create a Trailer
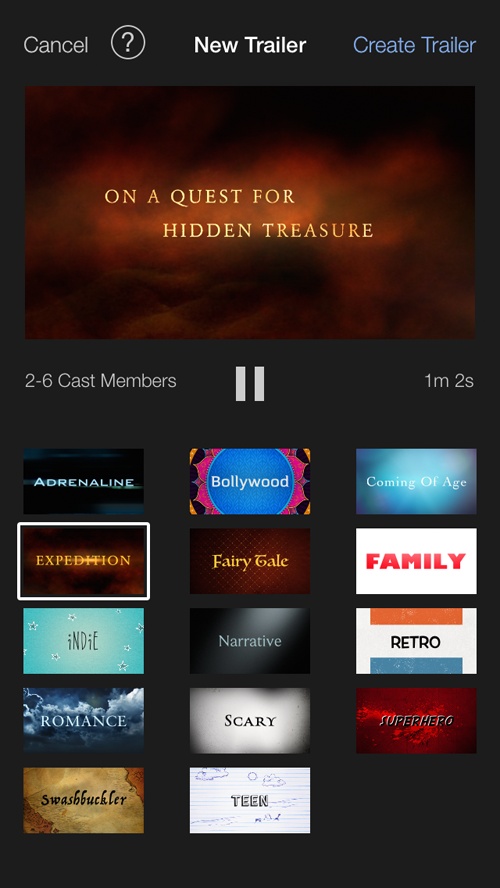
To build a trailer, open the iMovie app, tap the + button, and
then choose Trailer from the New Project screen. When you do, iMovie
shows you a range of trailer styles, each with a unique thematic flair
(Figure 23-1). Apple
thoughtfully put together a preview for each trailer style so you can
imagine what your story will look like. To preview a preview, select a
style and then tap ![]() . Tap Create Trailer when you find one you
like.
. Tap Create Trailer when you find one you
like.
You can build and edit a trailer two ways. In the first, you supply basic facts about your movie, and iMovie feeds that information to the trailer storyboard, which, in turn, dictates the shots you need for a great trailer. Alternatively, you can go straight to the storyboard and film your trailer “live,” by shooting scenes and having iMovie save them directly to your trailer. Both methods are described next.
The Outline
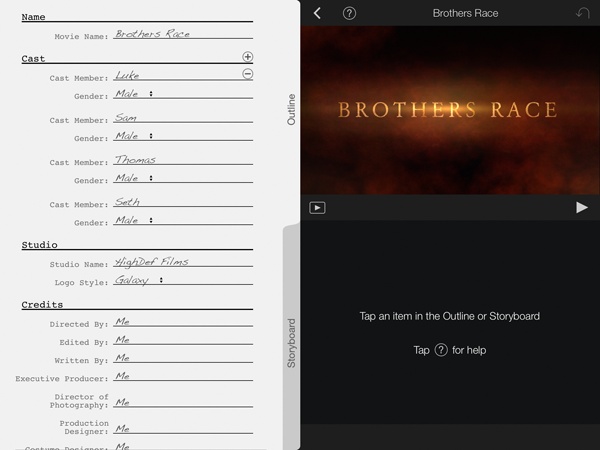
Great filmmaking almost always starts with an outline. It helps you organize your story before you ever focus a camera lens. iMovie for iOS’s trailer-builder’s outline feature works something like that. You record details about your movie—its name, the names of your cast members, and so on—and it uses that info later on, when you assemble clips and photos in the storyboard (Figure 23-2). For example, if you list two actors in the outline, the trailer storyboard will call for closeups of each of the actors.
Fill in the Details
After you click Create Trailer, iMovie takes you to a screen with two tabs, labeled Outline and Storyboard. Tap the Outline tab.
iMovie lists the info it wants using dummy text: Name, Cast, Studio, and so on. To change the placeholder text, tap it. iMovie brings up the keyboard so you can type in your own info. Tap Done when you finish.
Some questions, like the gender of your actors, require you to choose from a drop-down menu. Tap the item to call up the menu.
Other questions, like how many actors appear in your movie, need a number for an answer. Tap the + and – buttons to add or subtract items to and from the list (see Figure 23-2).
Note
iMovie adds new items, like an additional actor, to the top of the list, not to the bottom. (Subtracting items also removes items from the top of the list, not the bottom.) This matters if you want the names of your actors in a particular order. The best way to achieve that is to first add the correct number of actors to the outline. Then change the dummy text to list your actors from most important to least important, beginning with the topmost item. iMovie preserves that order in the trailer.
Once you fill in the outline, tap the Storyboard tab to go to the trailer’s timeline, where you’ll add video clips, photos, and titles to your preview-in-progress.
The Storyboard
The trailer storyboard looks nothing like a typical project timeline (see Figure 23-3). Instead of a blank slate that moves horizontally, the trailer storyboard looks more like a bunch of standalone frames you fill up with video clips and photos.

The frames appear in the order they play during the trailer, and each recommends a particular style of shot. For example, some call for a closeup, while others recommend a landscape scene. These suggestions are purposeful—Apple designed the trailers to be fast-paced and visually interesting. (They’re actually like lessons in storytelling.) Of course, iMovie won’t refuse a clip that doesn’t match the frame’s label, so it’s up to you to follow (or not) the advice.
Each clip has a fixed duration, which you can’t change, but that minor limitation is a small price to pay for having iMovie do so much of the trailer-building work.
Add Clips or Photos to the Storyboard
To add video or photos to a trailer, tap any empty frame to launch the Media screen. To see a particular type of media, tap Video or Photos in the toolbar. You can use the media selection tools described on Find Audio and Photos for video (so you can sort your footage) and The Photo Library for photos (to get access to all your device’s photo folders).
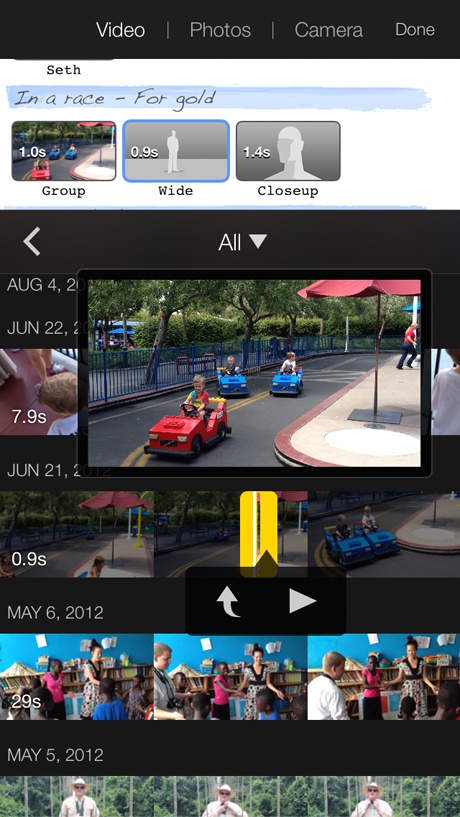
Choosing the right video clip is a little tricky, because you want to display just the right moment in the few seconds the trailer gives you. First, select a clip. That calls up the yellow highlight box with the edit handles, but this time the handles are immobile—you can’t drag them to change the clip’s length—remember, trailers use clips of fixed duration. But you can drag the entire yellow box, and that’s the trick to getting the shot you want: Drag the box until the right section of the clip sits within it (Figure 23-4).
As you drag the border around, iMovie previews the clip in the
viewer. Tap ![]() to play the selection as it will appear in
your trailer. When you’re satisfied, tap
to play the selection as it will appear in
your trailer. When you’re satisfied, tap ![]() to add your selection to the
storyboard.
to add your selection to the
storyboard.
For photos, the selection process is simple: Find the photo you want, and then tap it to add it to the storyboard.
Film Straight to the Storyboard
Perhaps the coolest thing about making trailers on your iPad, iPhone, or iPod Touch is not having to capture a frame of movie footage before you build your trailer. You can start a new trailer project and film the shots as you go.
When you tap a frame to add a shot, choose Camera instead of Video or Photos. iMovie displays a special camera screen above your storyboard (see Figure 23-5). Use this camera to film a shot, and iMovie saves it straight to the trailer. Talk about on-the-fly editing! iMovie at its best, really.
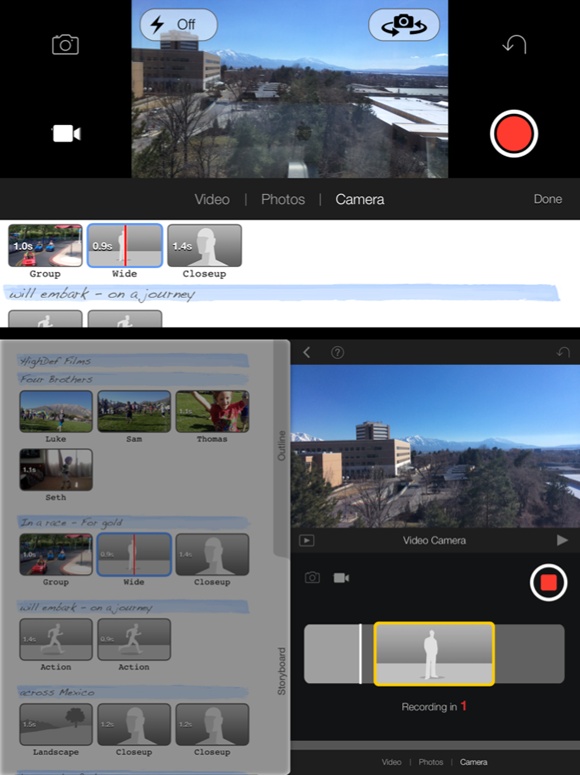
The video version of the camera has a few unique features. It displays the destination frame for your footage right below the camera, and it lists the clip’s duration in the frame, so you can better plan your shot.
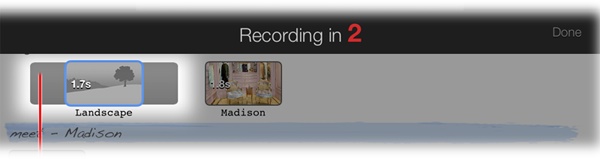
When you hit the Record button, the camera counts you in and displays an elongated destination frame (Figure 23-6). That frame has the trailer shot at its core, and room on either side that serves two purposes: It lets you prepare to shoot—as the red “playhead” moves across the frame, you can see where your trailer shot goes “live.” And second, it gives you some extra footage in case you need to fine-tune the shot later (read on).
The photo version of the trailers camera is really simple. Just point and shoot. The photo you take fills the trailer frame.
Adjust Clips and Photos
The video clips and photos you put in a trailer frame will sometimes be off a little. Video clips might be off because of timing, with the wrong moment displayed in the frame. Photos might be off because the Ken Burns effect iMovie automatically applies doesn’t look quite right. You can fix both issues easily.
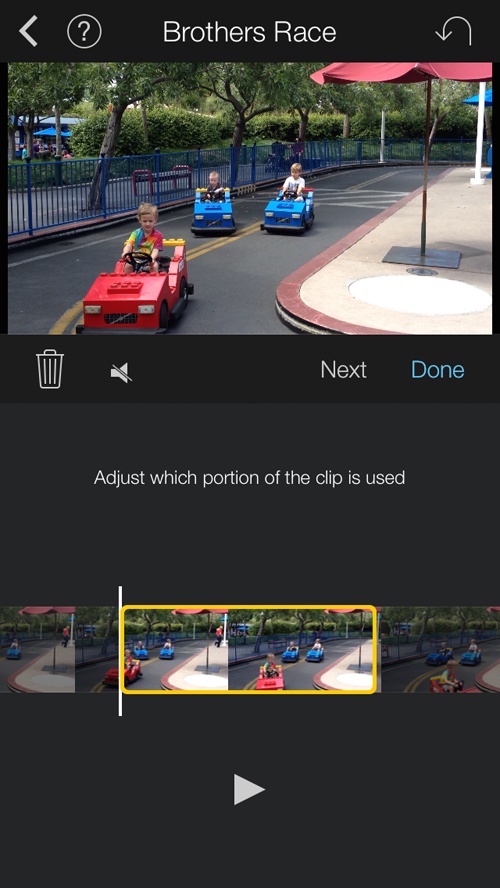
If, after you shoot a clip, your timing is a little off, you don’t have to retake the shot. Tap the frame that has the errant footage. iMovie opens the Edit Shot window. It displays the clip as a filmstrip, with the trailer shot highlighted in yellow. To adjust the shot, drag the filmstrip until the section you want sits within the yellow box (Figure 23-7).
You can also unmute a clip here, and delete it if you want to start over.
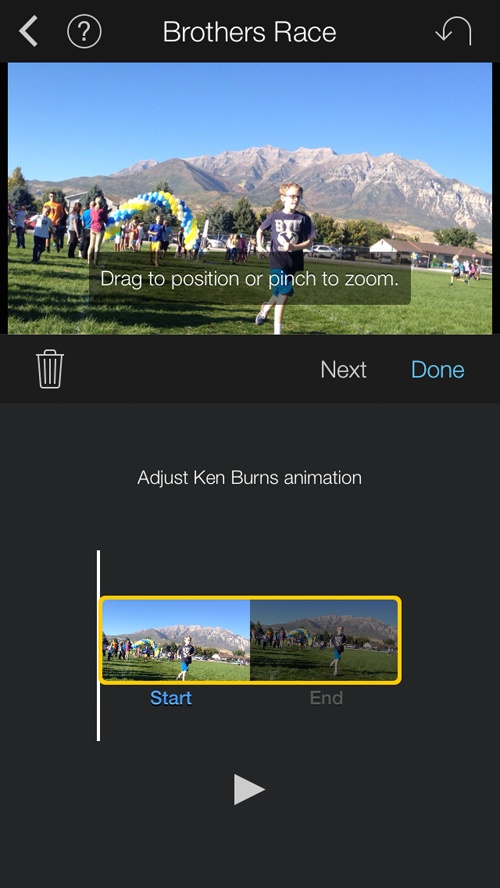
The Edit Shot screen for trailer photos is different (Figure 23-8). iMovie applies the Ken Burns effect to photos, so the edit screen lets you set the start and end points for the zoom and pan.
iMovie displays the image in a yellow highlight box. Just
under that, tap Start and then use the preview screen above to
position (by dragging) and zoom in on (by pinching) the photo. When
you finish, tap End and do the same thing. iMovie uses the
difference between the two positions to determine how to apply the
Ken Burns effect. (For a description of the process, see Duration.) Press ![]() to preview the shot. Tap Done when you
finish, or the trash can to delete the photo and start
over.
to preview the shot. Tap Done when you
finish, or the trash can to delete the photo and start
over.
Tip
Notice the Next button in Figures Figure 23-7 and Figure 23-8? It takes you from one trailer shot to the next. Rather than stepping in and out of the Edit Shot screen, start with the first trailer frame and then tap Next when you finish with each one. You can edit your entire trailer this way.
Change Titles
Part of what makes trailers so great are the impressive titles Apple designed for them. They make your movie look like you spent a lot of money on animators and designers. The fact that you can type in whatever you want and have it look so good is amazing.
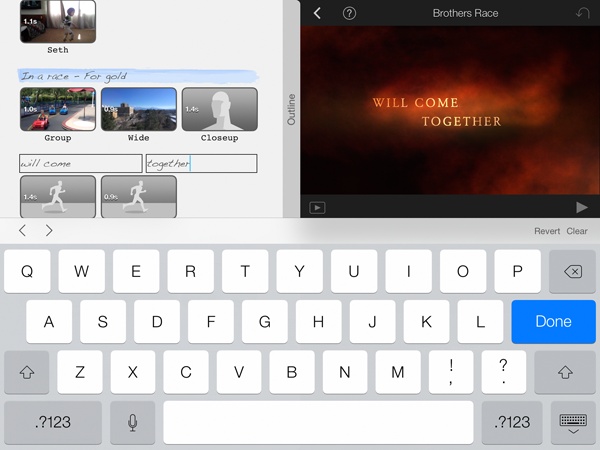
To change the text of a title, tap it in the storyboard (be sure to tap the title itself, not the frame under it). iMovie launches the keyboard (Figure 23-9). Type in the new text and see what it looks like in the preview window. Tap Done to save your changes.
Be sure to take the time to update all the text in the trailer. Although iMovie provides placeholder copy, odds are you can come up with something better that will make the trailer your own.
Preview Your Trailer
Once you finish your trailer, press either the Preview or “Preview full screen” buttons (see Figure 23-3). Review your work to see if you want to make any more edits.
When you finish, share your trailer with the world—to do that, see the next chapter.