Appendix A. iMovie, Menu by Menu
As you’ve certainly noticed by now, iMovie doesn’t look like a standard Mac program. Part of its radical charm is that it uses such a unique interface to edit movies, unlike any other software out there.
While a lot of what it does happens in the main movie window, some of its cooler features—like One-Step Effects (Move and Trim a PiP Clip)—require a trip to the menu bar.
Note
You don’t have to go to the menu bar if you’ve got a good memory. Just about every menu item in iMovie has a keyboard shortcut. Appendix B lists them all.
Here’s a rundown of the commands in iMovie’s menus:
iMovie Menu
In OS X, Apple names the first menu (the one after the
![]() menu) for the program you’re using—in this
case, iMovie.
menu) for the program you’re using—in this
case, iMovie.
About iMovie
This command opens the About box, containing the requisite Apple legal information. There’s really only one good reason to open this window: It’s the easiest way to find out exactly which version of iMovie you have.
Preferences
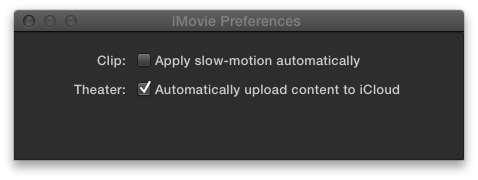
Opens the Preferences window (Figure A-1). No, your eyes do not deceive you. iMovie’s preferences consist of two checkboxes, nothing else. If you thought this must be a mistake, it’s probably because you’re accustomed to applications that have dozens of preference settings. In iMovie, there really are just two.
Here’s what they do:
Clip: Apply slow-motion automatically. If you shot footage with an iPhone or iPad capable of shooting slow-motion video (filmed at 120 frames per second), iMovie will automatically slow it down to quarter-speed (30 frames per second, the standard frame rate for movies) when you stick it in your project. If you turn off this checkbox, you have to do the speed adjustment yourself, as explained on Fast/Slow/Reverse.
Theater: Automatically upload content to iCloud. Sharing Basics tells you all about iMovie Theater, a way to share your iMovie projects with other Apple devices that use the same iCloud account. But iMovie doesn’t have to upload your movies to iCloud if you don’t want it to. Instead, it can store them just in the iMovie Theater tab on your Mac. You can always manually upload them to iCloud from there. But if you want that to be automatic, make sure you turn on this checkbox.
Provide iMovie Feedback
This command takes you to a web form on Apple’s website where you can register complaints, make suggestions, or gush enthusiastically about iMovie.
Services
Services are like mini tools in OS X for doing simple tasks on things like pictures, snippets of text, or other random things on your Mac. There aren’t any built for iMovie, so this menu won’t help much. But if you want to know more about it for other uses, choose the Services Preferences to see what’s offered there.
Hide iMovie, Hide Others, Show All
These aren’t iMovie commands—they’re OS X’s.
In any case, they determine which of the various programs running on your Mac are visible onscreen at any given moment. The Hide Others command is probably the most popular of the three. It zaps away the windows of all other programs—including the Finder—so that the iMovie window is the only one you see.
Tip
If you know this golden OS X trick, you may never need to use the Hide Others command: To switch into iMovie from another program, hold down the Option and ⌘ keys when clicking the iMovie icon in the Dock. Doing so simultaneously brings the software to the front and hides all other programs you have running, producing an uncluttered, distraction-free view of iMovie.
File Menu
As in any Mac program, the File menu serves as the program’s interface to the rest of the Macintosh world. It lets you import movies and video, manage events, create or duplicate projects, or quit the program.
New Movie/Trailer
Creates either a new movie or a new trailer project, ready for filling with video snippets from the Event browser.
New Event
Creates a new event in the Event list, which you can do before you import any video. This also lets you reorganize your events just how you want them (Review Event Footage).
Import Media
This is just another way to bring up the Import screen you read about on From an iPhone/iPad/iPod Touch.
Open Library
Libraries, explained on Move Individual Clips to Another Event, contain both events and projects. The idea is that you can keep different libraries for different parts of your life, like home and work. Use this menu to open past libraries, make new ones, or open libraries others have shared with you.
Close Library “[Library Name]”
If you want a selected library to get out of your way in iMovie, use this command. It’s grayed out if you have only one library open.
Copy to Library/Move to Library
These commands also work only with more than one library open. Select any event, project, or clip and you can copy it to another library (so it lives in both libraries) or move it (so it leaves one library and lives in the new one). You can also use these menus to create a new library.
Merge Events
iMovie sticks imported video into events—which you can choose as explained on Review Event Footage. You may sometimes find it useful, however, to combine several events into one, like an entire family reunion you originally broke into events for each day.
To use this command, first highlight the events you want to merge. (Click one, and then ⌘-click each additional one.) Then choose this command. iMovie names the new event after the first event you folded into this one, going alphabetically.
Consolidate Library Files/Project Media
Sometimes you might end up using footage from one library in a project that’s stored in another library. Because iMovie edits by reference (The Concept of iMovie Projects), your project won’t have the footage it needs if the original library isn’t available. This would happen if you copied a library to another computer, for example, and then deleted it from the first computer.
Choose Consolidate Project Media so all the files iMovie needs are available in the same library where you stored the project itself. Select Consolidate Library Files to do the same thing for all of a project’s files, not just footage.
Share
What fun is iMovie if you can’t share your work with the world? This menu contains all the same sharing options as the big Share button in the iMovie toolbar. Each is explained in Chapters Chapter 15 and Chapter 16.
Convert Trailer to Movie
If the constraints of the trailer-builder are holding you back, this option turns a trailer into a normal movie project, but the trip is one-way—you can’t later change the project back into a trailer.
Reveal in Event
This handy option lets you click a clip in the storyboard and then jump to the corresponding raw footage in the Event browser. Seeing the original clip gives you a lot more information; for example, you can see how much of the clip you’ve used or whether or not you’ve used pieces of the clip elsewhere in the project (as indicated by the orange stripes).
Reveal in Finder
Although iMovie hides all the individual video files in a big, single library file (explained on Project Properties), you can still get access to them. Select any clip and choose this command. Your Mac opens a new Finder window and highlights the file.
Update Projects and Events
When you first open iMovie, the software offers to import and update projects and events from a previous version of iMovie. Because this process can take a long time, you can skip this step. If you decide to import all of these events and projects later, use this menu command.
Move to Trash
To delete most things in iMovie, like transitions, titles, or sound clips, you just click the item and then press the Delete key. All you’re really doing when you delete these things is to remove them from your project. But that’s not the same as moving things to the trash.
The trash is for things that take up space in your iMovie library, like projects, events, and imported video. When you move them to the trash, they go in one of two places: the internal iMovie trash you never see, or the Macintosh Trash in the Finder. Say Goodbye to Rejected Footage explains the process.
Edit Menu
The Edit menu contains many of the basic tools you need to build your movies.
Undo
In iMovie, you can take back not only the last edit you made, not only the last 10, but an infinite number of steps, all the way back to the last time you opened iMovie. The ability to change your mind, or to recover from a particularly bad editing decision, is a considerable blessing.
The wording of this command changes to show you which editing step you’re about to reverse. It might say Undo Adjust Volume, Undo Split, and so on.
Redo
We’re only human, so it’s entirely possible that sometimes you might want to undo your Undo.
For example, suppose you just used the Undo command a few times, retracing your steps back to a time when your movie was in better shape, and then decide that you’ve gone one step too far. That’s when the Redo command is useful; it tells iMovie to undo your last Undo, so you can step forward in time, redoing the steps you just undid. (If you haven’t yet used the Undo command, then iMovie dims Redo.)
Cut, Copy, Paste
You can use the Cut, Copy, and Paste commands just as you would in any other program: to move stuff around. You can cut, copy, and paste whatever you select: entire filmstrips or just chunks of them.
For example, you can cut a selection from a clip and paste it into another spot, or you can copy a selection and paste it into another project.
Cut, Copy, and Paste also work when you edit text, such as the names of your clips or the text for your credits and other titles.
Paste Adjustments
Once you painstakingly edit the look of a clip (to correct its color, for example), a photo (to direct a Ken Burns effect, for example), or some audio (to boost the volume, for example), you can rapidly enhance a bunch of other footage the same way. Just copy the first clip, and then, after selecting the other clips, use the Paste Adjustments commands. You have a lot of options:
Color: Color changes
Crop: Crop, fit, or Ken Burns changes
Stabilization: Stabilization and zoom changes
Rolling Shutter: Rolling shutter setting changes
Volume: Volume changes
Video Effect: Video effect changes
Audio Effect: Audio effect changes
Speed: Timing changes
Cutaway Setting: Unique characteristics (such as fade and opacity) of cutaway, picture-in-picture, and side-by-side clips
Map Style: Type of map changes
Delete (Reject)
More ways to get rid of stuff. If it’s anything in a project, Delete removes it (but not from your Event library).
In the Event browser, this command says Reject instead of Delete, but only because rejecting, in iMovie, is the first step toward deleting footage for good. Say Goodbye to Rejected Footage has the details.
Delete Keyframes
When you animate a picture-in-picture clip, you do it with keyframes (Adjust the PiP Size and Position). This command deletes those keyframes so you can start over.
Duplicate
In the Event browser, makes an exact copy of whatever project or clip you selected.
Select All
Use this to select everything, at least everything in one part of iMovie.
If you select a clip (or part of a clip) in an event, it selects all the clips in that event.
If you select a project in an event, this highlights all the projects in the same event.
If you highlight something in the storyboard, the command selects everything in the project storyboard.
If you highlight some text in a text box, this selects all the text in the box.
Select Entire Clip
When you hover your mouse pointer over a clip, this surrounds the whole thing with a selection border.
Select in Movie
You have even more options available to you under Edit→“Select in Movie.” If you want to make changes to all your transitions, for example, you can use this command to select all your transitions first. Use this to select all video clips, transitions, photos, maps, and backgrounds.
Deselect All
Removes any selection.
Add to Movie
Inserts a selected clip (or a selected part of a clip) in the Event browser to the end of your movie.
Connect
Inserts a selected clip (or a selected part of a clip) in the Event browser as a connected clip (Reverse a Clip’s Playback Direction), starting at the position of your playhead.
Insert
Splits the clip under your playhead and inserts the Event browser selection between the two pieces.
Add Cross Dissolve
iMovie’s preferred transition is the cross dissolve. How do you know? It’s the only one that gets its own menu item and keyboard shortcut, saving you a trip to the Transitions library.
Find
If the clips you import into an event have custom names to tell them apart, you can use the Find command (or the search field at the top of the Event browser) to search for these clips by name. Most often, this is useless because cameras tend to name clips with meaningless combinations of numbers or letters.
Start Dictation
This is a standard menu item in all OS X apps. It makes your computer read back selected text with one of the built-in text-to-speech voices. If you haven’t noticed, there’s not a lot of text in iMovie to dictate.
Special Characters
You’re creating a subtitle for an interview with the CEO of “I’ve Got a ¥en™” Productions. But how the heck do you type the ¥ symbol—or the ™ symbol? Easy. Choose this command and then double-click the symbol you want from the palette arrayed before you.
Mark Menu
The Mark menu holds a pretty short list of items, related to either categorizing your footage or flagging important moments in it for other uses.
Favorite/Delete/Unrate
There are three categories of footage in iMovie: favorite footage, rejected footage, and unrated footage (neither favorited or rejected). Select a clip in the Event browser and choose one of these three to decide a clip’s fate. (Or use these to change its fate if you categorized it wrong.)
Add Marker
Resize Clips in Place explains how video markers work. This command adds a marker at the playhead.
Delete Marker
After you click a video marker to select it, this command removes it.
Modify Menu
This menu offers various tools for making changes to the video clips in your project.
Enhance
This does the same thing as the Enhance button in the iMovie toolbar. The software analyzes your selected clip and improves its appearance and sound automatically.
Fade to Black & White/Sepia/Dream
These three video effects are explained on Move and Trim a PiP Clip. These commands split a clip at the playhead, apply the chosen effect to the second piece, and transition smoothly into the effect you chose.
Add Freeze Frame
Does the trick explained on One-Step Effects.
Mute Clip
This completely silences a clip, or restores the volume setting if you’d already muted the clip.
Trim to Playhead/Selection
Use this command to trim excess footage off a storyboard clip, the part of the clip that follows the playhead’s current position. If you have selected part of a storyboard clip, this cuts off everything outside the selection border.
Split Clip
It’s often convenient to chop a clip in half; this command splits a clip at the playhead.
Join Clips
If, having split a clip as just described, you want to rejoin the pieces, place them consecutively in the storyboard, and then use this command. (You can’t join clips that were never part of one clip to begin with.)
Detach Audio
This handy command takes the sound from the selected project clip and puts it in as a sound effect (Detach Clip Audio), still synced up with the clip. The source clip itself is now soundless.
Slow Motion/Fast Forward/Instant Replay/Rewind
These next four menu items in the Modify menu are covered in detail starting on One-Step Effects. Go there to learn what each of these does.
Reset Speed
If you’ve made any speed changes to a project clip (Fast/Slow/Reverse), this undoes them all.
Adjust Clip Date and Time…
You’ll use this command to fix any event footage that just didn’t happen when iMovie thinks it happened.
View Menu
This menu is mostly about changing the way iMovie displays your video while you work.
Play
Starts previewing a clip from the playhead.
Play Selection
Plays whatever you’ve selected, from the beginning of the selection.
Play from Beginning
Previews a set of event clips or a project from the start.
Play Full Screen
Fills your screen with a preview of whatever you’re working on (event footage or a project).
Show Separate Days in Events
By default, iMovie lumps all the footage in an event together. This command visually distinguishes them by the days they were filmed, using the embedded date and time.
Loop Playback
When you’re playing something, turn this on and iMovie will go back to the beginning and play it again automatically.
Sort By
As explained on How Events Work, this command lets you view event clips in a different order.
Show/Hide Waveforms
This is how you can visualize the audio in your video and sound clips, as Chapter 11 explains.
Show/Hide Used Media Ranges
If you don’t like seeing the orange stripes telling you what footage you’ve already used, this makes them go away.
Show/Hide Skimmer Info
When you turn this option on, a balloon pops out of the playhead when you move it over event footage, displaying the clip’s file name.
Wrapping Timeline
If you want your project clips to flow more like text in a word processor, making use of vertical screen space, turn this on. (Hide/Show Clip Audio explains how it works.)
Zoom In/Out
Shows longer or shorter filmstrips representing your footage (Phase 1: Review Your Clips).
Zoom All Clips
Displays all your event clips as single frames. (This basically zooms all the way out.)
Snapping
Snapping is when the playhead is “magnetically” drawn to nearby markers or clip ends, saving you tedious hand-positioning. You’ll need this feature if you want to follow the useful advice on editing to a beat (Edit to the Beat).
Audio Skimming
When you skim (see Skim Filmstrips), iMovie plays the audio simultaneously, which may sound fragmented and disturbing. Turn off this option if you’d rather skim in silence.
Window Menu
This Window menu is fairly standard in OS X programs. The Minimize and Zoom commands are almost always present; they let you minimize iMovie (hide its window by collapsing it into a Dock icon) or expand the window to fill your screen.
But iMovie’s Window menu is quite a bit more detailed.
Go to Library/Theater
These commands give you access to the same parts of iMovie that the Library and Theater tabs in the middle of the iMovie toolbar do.
Show Adjustments Bar
You’ve seen the Adjustments bar a million times by now. It’s where you make all kinds of adjustments, like video and audio effects. This command does the same thing as clicking the Adjust button in the iMovie toolbar.
Hide/Show Libraries
If the Libraries list on the left side of iMovie is cramping your style, make it go away with this command.
Content Library
This command offers direct access to any of the Content libraries that live in the lower-left corner of iMovie when you’re editing a project: Transitions, Titles, Maps & Backgrounds, iTunes, Sound Effects, and GarageBand.
Show/Hide Clip Trimmer
This option opens the Clip Trimmer tool described on Use the Clip Trimmer.
Show/Hide Precision Editor
This command opens the Precision Editor tool described on The Precision Editor.
Sports Team Editor
The really cool Sports theme provides you with a team roster you can customize with player names and other information. This is where you edit the roster. Customize Transitions That Are Maps explains.
Record Voiceover
Shows the voiceover tool, covered on Narration.
Movie Properties
This changes the Viewer to show information about your project. You first see basic information about the video quality, length, and share status of your project. Click Settings in the Viewer (Figure A-2) and you can adjust the following:
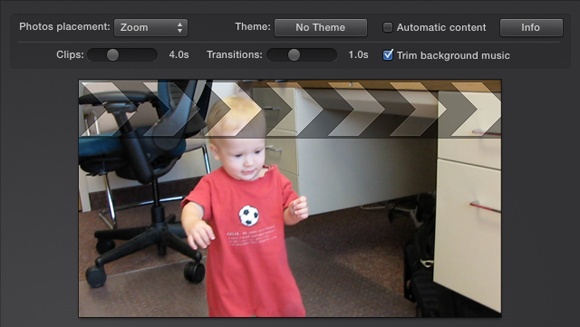
Photo Placement. This pop-up menu tells iMovie how to handle photos that don’t exactly fit the aspect ratio (proportions) of your movie project. It can either crop them (enlarge them to fill the frame), fit the frame (“Fit in Frame”) by adding letterbox bars, or execute the Ken Burns effect (perform a slow zoom and pan across them).
Theme. Here you can change the theme choice you made when you started your project.
Automatic Content. If you want theme titles and transitions automatically inserted, make sure you turn on this checkbox.
Clips. When adding clips from the Event browser, you can just position the playhead and hit the letter E key, without actually selecting any part of a clip. This slider determines how much of the event clip will be added from the playhead forward.
Transitions. Drag this slider left or right to determine how long a newly added transition takes.
Trim Background Music. With this box checked, any audio clips placed in the background (Three Kinds of Audio) of your project will automatically stop playing at then end of your last video clip.
Swap Project and Event
This command flips the top and bottom halves of the editing screen, so that the storyboard is now on the bottom. The advantage is that there’s no Viewer window taking up the bottom of iMovie’s screen, so you get a more expansive workspace.
Revert to Original Layout
If you’ve monkeyed with your window layout in iMovie using any of the previously described commands, this command returns it back to the way it looked on first launching iMovie.
Enter Full Screen
Uses iMovie in the full screen format available to all apps in OS X.
Help Menu
iMovie doesn’t come with a manual—if it did, you wouldn’t need this book. Instead, you’re expected to learn its functions from the online help.
Search
This search box does two things when you type in text:
If the text appears in a menu command, the command shows up in the resulting list. Pointing to the list item will even open up and highlight the corresponding command.
If the text appears in the Help documentation, it provides a link to the corresponding help article, which opens in the Help window (read on).
iMovie Help
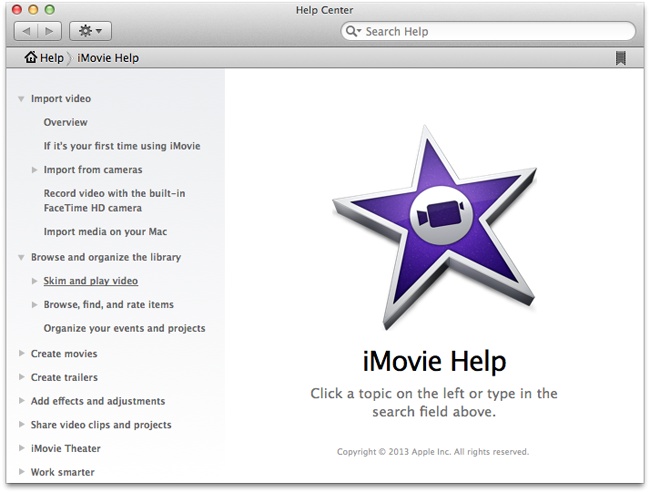
Choose this command to open the iMovie Help Center window, where you’ll see a list of help topics (Figure A-3).
You can use the Help Center in either of two ways:
Keep clicking colored links, burrowing closer and closer to the help topic you want. You can backtrack by clicking the left-arrow button at the top of the window, exactly as in a web browser.
Type a search phrase into the top window, such as cropping, and then click Search (or press Return), as shown in Figure A-3.
Either way, you’ll probably find that iMovie’s online assistance offers a helpful summary of the program’s functions, but it’s a little light on “what it’s for” information, illustrations, tutorials, speed, and jokes.
Keyboard Shortcuts
This is really just another link into the Help Center, but a particularly valuable part of it. It takes you to a table showing about 50 keyboard shortcuts in iMovie. (They’re among the listings in Appendix C of this book.)
Supported Cameras
This takes you to a handy web page Apple designed to list all the cameras iMovie supports. You can use this to plan your next camera purchase.
Service and Support
Opens your web browser and takes you to Apple’s iMovie help website. Which, by the way, is a pretty great resource for asking questions and getting answers.
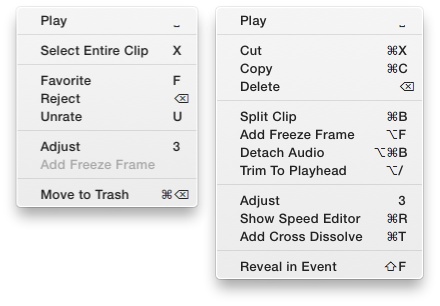
The Shortcut Menu
If you Control-click clips in the Event browser or the project storyboard, iMovie offers quick access to some common commands. Figure A-4 shows you what they look like.