
Chapter 9. Applying Proven Modernization Recipes
Building software is inherently a creative task. In past years, businesses thought they could build “software factories” in which interchangeable people churned out lines of code. That era is thankfully ending, as wise leaders recognize that well-designed, smartly constructed software is a business differentiator. That said, there are software patterns we can follow over and over again to accomplish foundational goals while not diminishing the overall creativity of the software delivery process. In this chapter, we look at five patterns, or recipes, for modernizing your software. By implementing these, you can accomplish many of your cloud-native goals and still maintain the freedom to innovate.
Use Event Storming to Decompose Your Monolith
You have a million-line-of-.NET-code behemoth that runs your business. The thought of deploying an update to this monster makes you break out into a cold sweat. It’s chewed up and spit out any developer that tried to make improvements. Today is the day that you slay this foul beast. But how? How do you even begin to tear this creature apart and get it under control? Event storming is one effective approach.
Created by Alberto Brandolini, event storming is a technique for creating a domain model. When you’re finished, you’ll better understand what the software does and how to tackle decomposition.
Event storming is usually done in a workshop with a small group—perhaps 5 to 10 people made up of technical and line-of-business staff. It’s led by someone who understands domain-driven-design (DDD). You’ll need some office supplies, namely a large surface to write on (often a giant sheet of paper or wall-sized whiteboard), markers, and different colored sticky notes.
You begin by having everyone write down meaningful things that happen in the business domain. Record those domain events on one color of sticky note, like orange. Domain events are things like “money withdrawn,” “user registered,” or “order canceled.” Next, you identify the cause of a given event. If that cause is a command or trigger, like “register user,” it’s written on a blue sticky note and placed next to the event. If one event causes another event, place those events next to each other. And if the cause of an event is time itself—for example, consider an event like “cart expired”—you add a note indicating “time.” Figure 9-1 shows how this process might look.

Figure 9-1. Team doing an event storming workshop with Pivotal
Next up, you identify aggregates that take in commands and result in events, and start grouping aggregates into what’s called a bounded context. You end up with a behavioral model that drives widespread understanding of the problem space. Developers can take this model and potentially define microservices for a given bounded context. In this manner, you can begin to identify slices of your .NET monolith that you can carve out and rebuild, piece by piece.
Externalize Your Configuration
When I had configuration data for my .NET apps, I typically stored it in keys within my web.config file. Oh, how wrong I was. As we discussed earlier, having any configuration values in your .NET project itself means that you need to change the package as it moves between environments and make any production changes by starting back at the source code. Not good. This recipe looks at how you externalize your configuration into remote config stores, by using Steeltoe libraries that talk to a Spring Cloud Config Server.
To begin, go to http://start.spring.io. From here, you can create the scaffolding for Spring Boot projects. Provide a group ID, artifact ID, and name for your project. Next, select the Config Server package (see Figure 9-2).

Figure 9-2. Creating the scaffolding for Spring Boot projects at start.spring.io
Download the resulting package. After ensuring that you have a current version of Java on your machine, open this Spring Boot project in your favorite code editor. Eclipse, Atom, and Visual Studio Code all have integration with Spring Tools for easier development.
There’s only a single line of code you need to write, thanks to Spring Boot. Open the *.java file in the src/main/java directory, and add the @EnableConfigServer annotation above the @SpringBootApplication annotation, as shown in Figure 9-3.

Figure 9-3. Enabling the Spring Cloud Config Server in Spring Boot code
The Spring Cloud Config Server can pull configuration values from a local filesystem, SVN repository, database, Git repository, or HashiCorp Vault backend. Powerful stuff. The Spring Cloud Config Server combines all the relevant configurations it finds into one bucket for your application to access. In the example repo that we’re using here, there are three configuration files. One of them is bookdemos.properties, which contains the following entries:
#greeting
greeting=Hello, O'Reilly book readers!

#logging toggles
loglevel=info
server.port=8888

spring.cloud.config.server.git.uri=/
    https://github.com/rseroter/book-demo-configs
That completes the Config Server setup. Start the Java project so that the server loads all the configuration files and is ready to serve them to requesting applications, as demonstrated in Figure 9-4.

Figure 9-4. Configuring and starting up your Spring Cloud Config Server
Suppose that you have a .NET Framework console app in which you store the configuration values as static variables. You want to replatform that app to .NET Core, and refactor it to grab configuration values from the Spring Cloud Config Server.
With the latest .NET Core SDK installed, go to a command prompt, create a project directory, and run dotnet new console in that directory. Add the following packages by typing dotnet add package [fill in the package]:
-
Microsoft.Extensions.Configurationto build up the configuration objects in code. -
Microsoft.Extensions.Configuration.FileExtensionshelps us read from the filesystem to get the location of the Config Server. -
Microsoft.Extensions.Configuration.Jsonhelps read the JSON config file on the filesystem. -
Steeltoe.Extensions.Configuration.ConfigServerCorepulls in the Steeltoe Config Server client.
Next, add an appsettings.json file to the console project. This file points your app to the Config Server and provides a “name,” which helps the Config Server client read the correct configuration files. The application name typically maps to the name of the configuration files themselves:
{
  "Logging": {
    "LogLevel": {
      "Default": "Warning"
     }
  },
  "AllowedHosts": "*",
  "spring": {
    "application": {
      "name": "bookdemo"
    },
    "cloud": {
      "config": {
        "uri": "http://localhost:8888"
      }
    }
  }
}
Finally, we have our .NET code. Add the following using statements to the Program.cs file:
using System.IO;
using Steeltoe.Extensions.Configuration.ConfigServer;
using Microsoft.Extensions.Configuration;
static void Main(string[] args){
  //retrieve local configurations, and those from the config
  //server
  var builder = new ConfigurationBuilder()
        .SetBasePath(Directory.GetCurrentDirectory())
        .AddJsonFile("appsettings.json")
        .AddConfigServer();
  var configuration = builder.Build();

  string logLevel = configuration["loglevel"];

  Console.WriteLine("value from config is: " + logLevel);
  Console.ReadLine();
}
When you run the application, you see that this .NET Core console application now reads configurations from a remote store, as illustrated in Figure 9-5.

Figure 9-5. Reading configurations from a remote store
You’ll also probably use this pattern with ASP.NET and ASP.NET Core web applications, so be sure to read the official Steeltoe documentation for the instructions. And, if you’re a Cloud Foundry user, Steeltoe pulls any Config Store connection info directly from the environment. No local config settings needed!
Introduce a Remote Session Store
By default, ASP.NET apps use an in-memory session state provider. You designate that in the web.config file:
<sessionState mode="InProc"
    customProvider="DefaultSessionProvider">
  <providers>
    <add name="DefaultSessionProvider"
        type="System.Web.Providers.DefaultSessionStateProvider,
        System.Web.Providers, Version=1.0.0.0, Culture=neutral,
        PublicKeyToken=31bf3856ad364e35" connectionStringName
        ="DefaultConnection" />
  </providers>
</sessionState>
However, that’s not a cloud-native approach. Any loss of host results in lost session data. We want a highly available, remote session store. This recipe looks at how to refactor your web apps to use Redis as that store. Let’s assume you have some code like the following that stores a timestamp in ASP.NET session state:
string timestamp = Session["timestamp"] as string;

lblmsg.Text = "timestamp is: " + timestamp;

if (timestamp == null)
{
  timestamp = DateTime.Now.ToString();
  Session["timestamp"] = timestamp;
}
Begin by getting Redis running on your machine. You have multiple options here. Redis runs on Unix-based or Windows machines. You can also pull a Docker image instead of installing Redis yourself. Since I’m working with a “classic” Windows app, I used the Chocolatey package manage to install Redis on a Windows Server 2012 R2 machine (Figure 9-6).

Figure 9-6. Running Redis on Windows Server
Back in our ASP.NET code, add a new NuGet package. Find Microsoft.Web.RedisSessionStateProvider (Figure 9-7). I chose version 2.2.6.
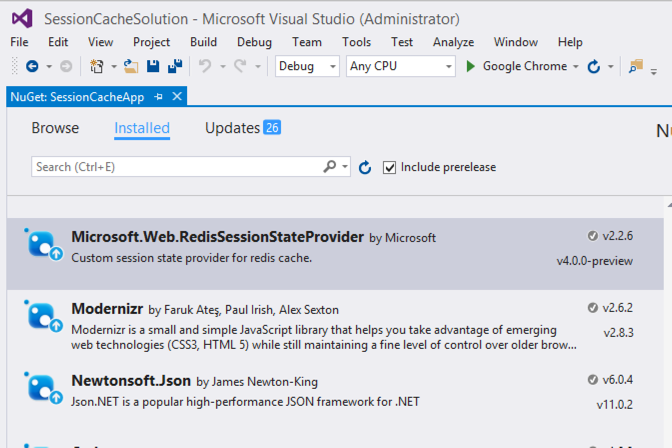
Figure 9-7. Installing a NuGet package
After the package is installed, a new section is automatically added to our web.config file. Comment out the previous InProc and session state provider and then configure the Redis one. Then, provide the host port, and any other values specific to your Redis installation:
<sessionState mode="Custom"
    customProvider="MySessionStateStore">
  <providers>
    <add name="MySessionStateStore"
            type="Microsoft.Web.Redis.RedisSessionStateProvider"
            host="127.0.0.1" port="6379" accessKey="" ssl="true"
            />
  </providers>
</sessionState>
Start the ASP.NET application; you’ll see that the timestamp values are stored and retrieved from our Redis-based session state. Stopping and starting your application doesn’t “purge” the session state, because it’s stored in Redis instead of in memory. Querying the “KEYS” of the Redis instance shows the session information for the connected clients (see Figure 9-8).

Figure 9-8. Querying session information stored in Redis
Move to Token-Based Security Schemes
One of the stickier issues when you’re considering a replatforming and migration of ASP.NET applications is security—specifically, untangling Integrated Windows Authentication from your code. As we saw earlier, using this scheme is an antipattern because it’s not cross-platform or particularly friendly to other programming languages. A more cloud-native option would be OpenID Connect. In this recipe, we remove the Integrated Windows Authentication from our app, and replace it with OpenID Connect.
For example purposes, I created a new ASP.NET Web Forms app (Figure 9-9) with Integrated Windows Authentication enabled. This represents our “classic” app infested with bad practices.

Figure 9-9. ASP.NET Web Forms app with Integrated Windows Authentication enabled
When creating or reviewing a project that uses Windows Authentication, you’ll see something like this in your web.config file:
<authentication mode="Windows" />
<authorization>
  <deny users="?" />
</authorization>
Your Windows-infused code has operations annotated with Authorize or PrincipalPermission statements, or checks to see if the user is in a particular role. This takes advantage of the .NET identity system. With Integrated Windows Authentication and the IIS web server, a user’s roles are typically populated by Active Directory. Here’s my Default.aspx.cs file.
protected void Page_Load(object sender, EventArgs e)
{
  //pull user name
  string username = User.Identity.Name;

  //check roles within a c# method
  bool rolecheck = User.IsInRole("WebAdmins");

  //variable that holds value from protected call
  string result = String.Empty;

  //call "protected" operation
  try
  {
    result = GetSecureData();
  }
  catch(System.Security.SecurityException ex)
  {
    result = ex.Message;
  }

  //print results
  lblMessage.Text = String.Format(@"The username is {0},
  it is {1} that they are a WebAdmin, and result of protected
  call is {2}",
    username,
    rolecheck.ToString(),
    result);
}

[PrincipalPermission(SecurityAction.Demand, Role="WebAdmins")]
private string GetSecureData()
{
  return "super secret info!";
}
In this recipe, we use Azure Active Directory (Azure AD) to expose an OpenID Connect (OIDC) endpoint for authentication. Then, we refactor our code to use OIDC and still retain the functionality we had previously. Note that you can perform variations of this pattern using Active Directory Federation Services, or identity services like Okta or Auth0. You can also swap in Pivotal’s Single Sign-On (SSO) tile and Steeltoe’s identity libraries for the custom code I use next. But here, I wanted to demonstrate a vanilla recipe that you could easily try yourself.
Provision an Azure AD instance in the public cloud, as demonstrated in Figure 9-10. This is a fairly straightforward process and can fit within its free usage tier.

Figure 9-10. Provisioning an Azure AD instance
Using the “app registrations” section of Azure AD, register a new application with a callback URL to your application (Figure 9-11). Note that my URL maps to the localhost instance I’m using in this recipe.

Figure 9-11. Registering a new application with a callback URL
After creating the registered app, you can see values like the application ID and object ID. The application ID maps to the client ID in the OAuth world, so save that value for future use. We have a couple key configurations to set in Azure AD before switching to code. First, under Settings, we set the Reply URLs. This value instructs Azure AD where to redirect the client and also helps verify that the source and destination domain are the same. Figure 9-12 shows that the value I set equaled my primary site URL.

Figure 9-12. Setting key configurations in Azure AD
Back on the starting page of the registered app, you’ll find a button labeled “manifest.” Here, we can view and edit the identity configuration, including the setting to return the “groups” associated with the user. I changed the groupMembershipClaims to “SecurityGroup” so that I had access to these claims after signing in from my ASP.NET application.
Finally, to demonstrate that group/role functionality, I returned to the Azure AD instance and added multiple groups, and added my user to each of them (Figure 9-13). Be aware that each group has an object ID (represented as a GUID), and that’s the value returned to the client as a claim ID.

Figure 9-13. Adding groups to an Azure ID instance
Next up in the recipe is refactoring our code. First, I added three NuGet packages to my project:
-
Microsoft.Owin.Security.OpenIdConnect -
Microsoft.Owin.Security.Cookies -
Microsoft.Owin.Host.SystemWeb
These packages bring in the necessary Open Web Interface for .NET (OWIN) middleware components for doing cookie-based SSO.
Before adding code, we update our configuration with some application settings. Specifically, we’re adding keys used by our code to redirect to Azure AD. In the web.config, add the following:
<appSettings>
  <add key="ClientId"
          value="[app id from registered app]" />
  <add key="Tenant"
          value="[name of tenant].onmicrosoft.com" />
  <add key="AzureADInstance"
          value="https://login.microsoftonline.com/{0}" />
  <add key="PostLogoutRedirectUri"
          value="http://localhost:55585" />
</appSettings>
That uses the application ID from our Azure AD–registered application, our tenant name, and the redirection URL, which should map to the reply URL we set up in Azure AD. Given our previous pattern, you could also use a Config Store to stash and retrieve these values.
Next, we need to add a Startup.cs class that configures all the OpenID Connect authentication. Right-click the project folder, choose “Add” and select “OWIN Startup class.” Name the class Startup.cs. There are four “using” statements automatically added at the top, and introduce these eight additional ones.
using System;
using System.Threading.Tasks;
using Microsoft.Owin;
using Owin;
//added
using System.Configuration;
using System.Globalization;
using Microsoft.Owin.Security;
using Microsoft.Owin.Security.Cookies;
using Microsoft.Owin.Security.OpenIdConnect;
using Microsoft.Owin.Security.Notifications;
using Microsoft.IdentityModel.Protocols.OpenIdConnect;
using Microsoft.IdentityModel.Tokens;
At the top of the Startup.cs class, we define variables that pull configuration values from the web.config file:
private static string clientId =
    ConfigurationManager.AppSettings["ClientId"];
private static string aadInstance =
    ConfigurationManager.AppSettings["AzureADInstance"];
private static string tenant =
    ConfigurationManager.AppSettings["Tenant"];
private static string postLogoutRedirectUri =
    ConfigurationManager.AppSettings["PostLogoutRedirectUri"];

string authority = String.Format(CultureInfo.InvariantCulture,
                                 aadInstance,
                                 tenant);
The heart of this class is the Configuration operation, which triggers a cookie-based authentication:
public void Configuration(IAppBuilder app)
{
  app.SetDefaultSignInAsAuthenticationType(
       CookieAuthenticationDefaults.AuthenticationType);
  app.UseCookieAuthentication(new CookieAuthenticationOptions());

  app.UseOpenIdConnectAuthentication(
    new OpenIdConnectAuthenticationOptions{
      ClientId = clientId,
      Authority = authority,
      PostLogoutRedirectUri = postLogoutRedirectUri,
      RedirectUri = postLogoutRedirectUri,
      ResponseType = OpenIdConnectResponseType.IdToken,
      Notifications =
          new OpenIdConnectAuthenticationNotifications
      {
        AuthenticationFailed = context =>
        {
          context.HandleResponse();
          context.Response.Redirect(
               "/Error?message=" + context.Exception.Message);
          return Task.FromResult(0);
        }
      }
    }
  );
}
How do we initiate the login event? Let’s add an explicit login command to our application. In the Site.Master definition, add a LoginView to the top menu. I placed it after the tag that defined the navigation menu:
<asp:LoginView runat="server" ViewStateMode="Disabled">
  <AnonymousTemplate>
    <ul class="nav navbar-nav navbar-right">
      <li>
        <a
          href="Site.Master"
          runat="server"
          onserverclick="btnLogin_Click">Login</a>
      </li>
    </ul>
  </AnonymousTemplate>
  <LoggedInTemplate>
    <ul class="nav navbar-nav navbar-right">
      <li>
        <asp:LoginStatus runat="server"
          LogoutAction="Redirect"
          LogoutText="Logout"
          LogoutPageUrl="~/"
          OnLoggingOut="Unnamed_LoggingOut" />
      </li
    </ul>
  </LoggedInTemplate>
</asp:LoginView>
In the codebehind of the Site.Master, I added four using declarations:
//added
using Microsoft.Owin.Security;
using Microsoft.Owin.Security.OpenIdConnect;
using System.Web.Security;
using Microsoft.Owin.Security.Cookies;
Then, I added functions for the login and logout command. Notice that the login command triggers an authentication request:
protected void btnLogin_Click(object sender, EventArgs e)
{
  if (!Request.IsAuthenticated)
  {
      HttpContext.Current.GetOwinContext().Authentication
         .Challenge(
         new AuthenticationProperties { RedirectUri = "/" },
         OpenIdConnectAuthenticationDefaults.AuthenticationType);
  }
}

protected void Unnamed_LoggingOut(
    object sender, LoginCancelEventArgs e)
{
  Context.GetOwinContext().Authentication.SignOut(
      CookieAuthenticationDefaults.AuthenticationType);
}
The final step? Refactoring that Default.aspx.cs code that checks user roles. First I updated the “secured” operation to no longer demand a role, but still demand an authenticated user:
[PrincipalPermission(SecurityAction.Demand)]
private string GetSecureData()
{
  return "super secret info!";
}
Next, to do security checks, I added three using statements at the top of the class:
//added for OIDC
using Microsoft.Owin.Security;
using Microsoft.Owin.Security.OpenIdConnect;
using System.Security.Claims;
Then, I changed the code that looked up the username, looked up user roles, and called the secure function. Notice that while we get the user’s group assignments as claims, we don’t automatically get the friendly name. You could use another Azure AD API lookup to translate it, if needed:
string username = User.Identity.Name;
//using object ID, as we don't get the friendly name in the claim
const string bookGroup = "2c4e035e-9aba-4ea9-be4b-fc67bd762242";
string rolestatus = "no";
string result = String.Empty;
var userClaims =
    User.Identity as System.Security.Claims.ClaimsIdentity;

//look for claim associated with the desired user role
Claim groupDevTestClaim = userClaims.Claims.FirstOrDefault(
          c => c.Type == "groups" &&
          c.Value.Equals(
             bookGroup,
             StringComparison.CurrentCultureIgnoreCase));

if (null != groupDevTestClaim)
{
  rolestatus = "yes";
}

try
{
  result = GetSecureData();
}
catch (System.Security.SecurityException ex)
{
  result = ex.Message;
}

//print results
lblMessage.Text = String.Format@(
  "The username is {0}, {1} they are a book author,
  and result of protected call is {2}",
  username,
  rolestatus,
  result);
Don’t forget to “turn off” Windows Authentication in your web.config file. Simply switch authenticationMode to None and delete the authorization block.
With that, the ASP.NET application is refactored to use a cross-platform, non-Windows-specific way to authenticate and authorize users. When starting up the application and clicking login, I’m immediately redirected to log in, as shown in Figure 9-14.

Figure 9-14. Being redirected to log in
After logging in, I’m redirected to the application, and my code executes to confirm that I’m logged in and authorized, as depicted in Figure 9-15.

Figure 9-15. Confirming login and authorization
Put .NET Core Apps on Pipelines
If you do nothing else that I recommended in this book, do this. By putting your apps on pipelines, you set yourself up for a repeatable path to production. This recipe walks you through the necessary steps to put an ASP.NET Core app on a Concourse pipeline that deploys the app to Pivotal Cloud Foundry. Even if your destination is somewhere else or you’re using the .NET Framework, this pattern should be useful.
Concourse is a declarative, pipeline-oriented CI/CD system. It uses the concepts of resources, jobs, and steps. Resources are the things you’ll use in your pipeline. A resource might be a Git repo or an Azure Blob Storage account. Jobs determine what your pipeline actually does. They explain how the resources pass through the pipeline and how you visualize the flow. A job is made up of steps. Each step may grab a resource or execute a low-level task. Tasks execute in ephemeral containers, so when a pipeline is finished, there’s no mess to clean up.
A complete .NET Core pipeline should: fetch source code; run tests, including unit, integration, smoke, and performance tests; and then deploy the software. That deployment phase consists of generating a build artifact and pushing that artifact to the target environment.
In this recipe, we build a basic pipeline that runs unit tests and publishes the result to Cloud Foundry. We begin with an ASP.NET Core application that has some xUnit test baked in. My TestClass.cs file defines a couple of basic unit tests against a simple web controller (ValuesController), as shown in Figure 9-16:
using Xunit;
using tested_core_app.Controllers;

namespace unittests {
  public class TestClass {
    private ValuesController _vc;

    public TestClass() {
      _vc = new ValuesController();
    }

    [Fact]
    public void Test1(){
      Assert.Equal("pivotal", _vc.Get(1));
    }

    [Theory]
    [InlineData(1)]
    [InlineData(3)]
    [InlineData(9)]
    public void Test2(int value) {
      Assert.Equal("public", _vc.GetPublicStatus(value));
    }
  }
}
Local unit tests confirm that our code passes. I then checked this code into a GitHub repository so that my deployment pipeline could “see” it.
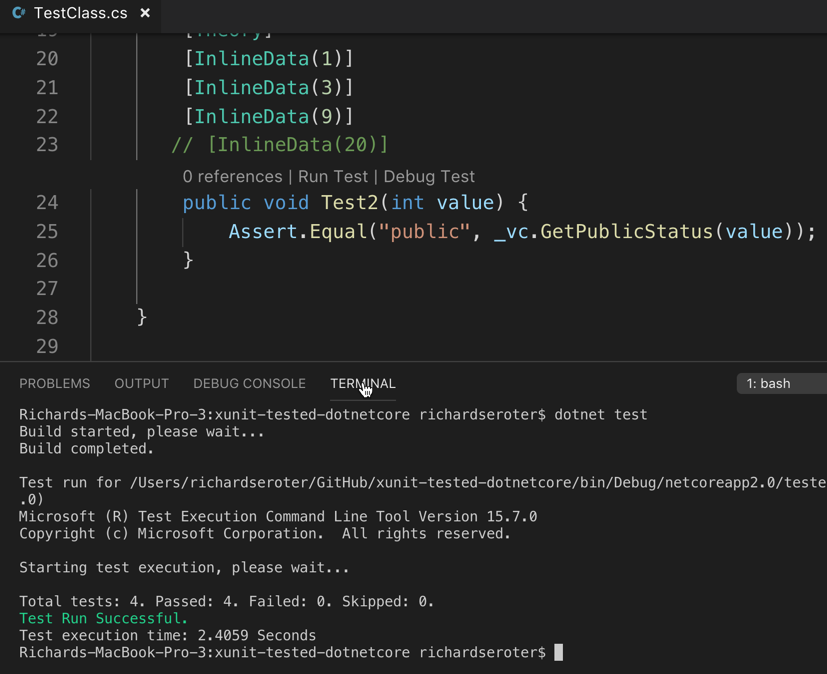
Figure 9-16. Running local unit tests
Note that although Concourse can use Windows-based worker nodes to execute tasks, this recipe uses a Linux-based runtime. The simplest way to get Concourse up and running on any OS is via Docker Compose. After Concourse is up and running, you can log in to the fly CLI to create and manage pipelines; see Figure 9-17.

Figure 9-17. Concourse, up and running
Concourse pipelines are defined in a YML format. We define a GitHub repo and Pivotal Cloud Foundry endpoint as the two resources:
---
resources:
- name: seroter-source
  type: git
  source:
    uri: https://github.com/rseroter/xunit-tested-dotnetcore
    branch: master
- name: pcf-on-aws
  type: cf
  source:
    api: https://api.run.pivotal.io
    skip_cert_check: false
    username: [username]
    password: [password]
    organization: [org]
    space: development
The pipeline then has two jobs. The first executes unit tests. Notice that it uses a Microsoft-provided Docker image to host the tests. Next, it runs a dotnet test command to execute the xUnit tests:
jobs:
- name: aspnetcore-unit-tests
  plan:
    - get: seroter-source
      trigger: true
    - task: run-tests
      privileged: true
      config:
        platform: linux
        inputs:
        - name: seroter-source
        image_resource:
          type: docker-image
          source:
            repository: microsoft/aspnetcore-build
        run:
          path: sh
          args:
          - -exc
          - |
              cd ./seroter-source
              dotnet restore
              dotnet test
If that job passes, the second job kicks off. Note that there’s no data passing directly between jobs. You can share files between tasks in a job, but not between jobs. In a real-world scenario, you’d likely drop the results of the first job into an artifact repository and then pull from that repository in the next job. In this recipe, we simply grab the source code again from the GitHub repo (if the tests pass) and push it to PCF:
jobs:
- name: aspnetcore-unit-tests
  [..]
- name: deploy-to-prod
  plan:
    - get: seroter-source
      trigger: true
      passed: [aspnetcore-unit-tests]
    - put: pcf-on-aws
      params:
        manifest: seroter-source/manifest.yml
Deploying a pipeline is easy. From the fly CLI, you provide the name of your pipeline and point to the pipeline.yml file.
fly -t rs set-pipeline -p book-pipeline -c pipeline.yml
The result? A green pipeline, as shown in Figure 9-18, if all the unit tests pass.

Figure 9-18. Success!
And we get a running app on PCF (see Figure 9-19). From this point on, any check-in to my code on GitHub triggers the pipeline and pushes my code to Cloud Foundry. What a straightforward way to automate the path to production!

Figure 9-19. The app up and running on PCF
Summary
All of these recipes can help you quickly modernize your .NET apps and remove constraints that prevent those apps from being cloud-native. Instead of simply moving apps unchanged from one host to the next, consider investing in modernization.