
Chapter 5. Operating a Lightning Network Node
After having read this far, you have probably set up a Lightning wallet. In this chapter, we will take things one step further and set up a full Lightning node. In addition to setting one up, we will learn how to operate it and maintain it over time.
There are many reasons why you might want to set up your own Lightning node. They include:
-
To be a full, active participant in the Lightning Network, not just an end-user.
-
To run an e-commerce store or receive income via Lightning payments.
-
To earn income from Lightning routing fees or by renting channel liquidity.
-
To develop new services, applications, or plugins for the Lightning Network.
-
To increase your financial privacy while using Lightning.
-
To use some apps built on top of Lightning, like Lightning-powered instant messaging apps.
-
For financial freedom, independence, and sovereignty.
There are costs associated with running a Lightning Network node. You need a computer, a permanent Internet connection, lots of disk space, and lots of time! Operational costs will include electricity expenses.
But the skills you will learn from this experience are valuable and can be applied to a variety of other tasks too.
Let’s get started!
Note
It is important that you set your own expectations correctly on accurate facts. If you plan to operate a Lightning node solely to gain income by earning routing fees, please do your homework diligently first. Running a profitable business by operating a Lightning node is definitely not easy. Calculate all your initial and ongoing costs in a spreadsheet. Study Lightning Network statistics carefully. What is the current payment volume? What is the volume per node? What are the current average routing fees? Consult forums and ask for advice or feedback from other community members who have already gained real-world experience. Form your own educated opinion only after you have done this due-diligence exercise. Most people will find their motivation for running a node not in financial gain, but somewhere else.
Choosing your platform
There are many ways you can run a Lightning node ranging from a small mini-PC hosted in your home or a dedicated server to a hosted server in the cloud. The method you choose will depend on the resources you have and how much money you want to spend.
Why is reliability important for running a Lightning node?
In Bitcoin, hardware is not particularly important unless one is specifically running a mining node. The Bitcoin Core node software can be run on any machine that meets its minimum requirements and does not need to be online to receive payments; only to send them. If a Bitcoin node goes down for an extended period of time, the user can simply reboot the node and once it connects to the rest of the network, it will re-sync the blockchain.
In Lightning, however, the user needs to be online both to send and to receive payments. If the Lightning node is offline, it cannot receive any payments from anyone and thus its open invoices cannot be fulfilled. Furthermore, the open channels of an offline node cannot be used to route payments. Your channel partners will notice that you are offline and cannot contact you to route a payment. If you are offline too often, they may consider the bitcoin locked up in their channels with you to be underutilized capacity, and may close those channels. We already discussed the case of a protocol attack where your channel partner tries to cheat you by submitting an earlier commitment transaction. If you are offline and your channels aren’t being monitored, then the attempted theft could succeed and you will have no recourse once the timelock expires. Hence, node reliability is extremely important for a Lightning node.
There are also the issues of hardware failure and loss of data. In Bitcoin, a hardware failure can be a trivial problem if the user has a backup of their mnemonic phrase or private keys. The Bitcoin wallet and the bitcoin inside the wallet can be easily restored from the private keys on a new computer. Most information can be re-downloaded from the blockchain.
In contrast, in Lightning the information about the user’s channels, including the commitment transactions and revocation secrets, are not publicly known and are only stored on the individual user’s hardware. Thus, software and hardware failures in the Lightning Network can easily result in loss of funds.
Types of hardware Lightning nodes
There are three main types of hardware Lightning nodes:
-
General-purpose computers: A Lightning Network node can be run on a home computer or laptop running Windows, Mac OS, or Linux. Typically this is run alongside a Bitcoin node.
-
Dedicated hardware: A Lightning node can also be run on dedicated hardware like a Raspberry Pi, Rock64, or mini-PC. This setup would usually run a software stack including a Bitcoin node and other applications. This setup is popular as the hardware is dedicated to running and maintaining the Lightning node only and is usually set up with an installation “helper”.
-
Pre-configured hardware: A Lightning Network node can also be run on purpose-built hardware specifically selected and configured for it. This would include “out-of-the-box” Lightning node solutions that can be purchased as a kit or a turn-key system.
Running in the “cloud”
Virtual Private Server (VPS) and “cloud computing” services such as Microsoft Azure, Google Cloud, Amazon Web Services (AWS), or DigitalOcean are quite affordable and can be set up very quickly. A Lightning node can be hosted for between $20 and $40 per month on such a service.
However, as the saying goes, "Cloud is just other people’s computers”. Using these services means running your node on other people’s computers. This brings along the corresponding advantages and disadvantages. The key advantages are convenience, efficiency, uptime, and possibly even cost. The cloud operator manages and runs the node to a high degree automatically providing you with convenience and efficiency. They provide excellent uptime and availability, often much better than what an individual can achieve at home. If you consider that just the electricity cost of running a server in many western countries is around $10 per month, then add to that the cost of network bandwidth and the hardware itself, the VPS offering becomes financially competitive. Lastly, with a VPS you need no space for a PC at home, and don’t have any issues with PC noise or heat. On the other hand there are several notable disadvantages. A Lightning node running in the “cloud” will always be less secure and less private than one running on your own computer. Additionally, these cloud computing services are very centralized. The vast majority of Bitcoin and Lightning nodes running on such services are located in a handful of data centers in Virginia, Sunnyvale, Seattle, London, and Frankfurt. When the networks or data centers of these providers have service problems, it affects thousands of nodes on so-called “decentralized” networks.
If you have the possibility and capacity of running a node on your own computer at home or in your office, then this might be preferable to running it in the cloud. Nonetheless, if running your own server is not an option, by all means consider running one on a VPS.
Running a node at home
If you have a reasonable capacity Internet connection at home or in your office, you can certainly run a Lightning node there. Any “broadband” connection is sufficient for the purpose of running a lightweight node, and a fast connection will allow you to run a Bitcoin full node too.
While you can run a Lightning node (and even a Bitcoin node) on your laptop, it will become annoying quite fast. These programs consume your computer’s resources and need to run 24/7. Your user applications like your browser or your spreadsheet will find themselves competing against the Lightning background services for your computer’s resources. In other words, your browser and other desktop workloads will be slowed down. And when your word-processing app freezes up your laptop, your Lightning node will go down as well leaving you unable to receive transactions and potentially vulnerable to attacks. Furthermore, you should never turn off your laptop. All this combined together results in a set-up that is not ideal. The same will apply to your daily-use personal desktop PC.
Instead, most users will choose to run a node on a dedicated computer. Fortunately, you don’t need a “server” class computer to do this. You can run a Lightning node on a single-board computer, such as a Raspberry Pi or on a Mini PC (usually marketed as home theater PC’s). These are simple computers which are commonly used as a home automation hub or a media server. They are relatively inexpensive, when compared to a PC or a laptop. The advantage of a dedicated device as a platform for Lightning and Bitcoin nodes is that it can run continuously, silently, and unobtrusively on your home network, tucked behind your router or TV. No one will even know that this little box is actually part of a global banking system!
What hardware is required to run a Lightning node?
At a minimum, the following will be required to run a Lightning node:
-
CPU: Sufficient processing power will be required to run a Bitcoin node, which will continuously download and validate new blocks. The user also needs to consider the Initial Block Download (IBD) when setting up a new Bitcoin node, which can take anywhere from several hours to several days. A 2-core or 4-core CPU is recommended.
-
RAM: A system with 2GB of RAM will barely run both Bitcoin and Lightning nodes. It will perform much better with at least 4GB of RAM. The Initial Block Download will be especially challenging with less than 4GB of RAM. More than 8GB of RAM is unnecessary, because the CPU is the greater bottleneck for these types of services, due to cryptographic operations such as signature validation.
-
Storage drive: This can be a Hard Disk Drive (HDD) or a Solid State Drive (SSD). An SSD will be significantly quicker (but more expensive) for running a node. Most of the storage is used for the Bitcoin blockchain, which is hundreds of gigabytes in size. A fair tradeoff (cost for complexity) is to buy a small SSD to boot the OS from and a larger HDD to store large data objects (mostly databases).
Note
Raspberry Pis are a common choice for running node software, due to the cost and parts availability. The OS that runs on the device usually boots from an SD card. For most use-cases, this is a non-issue, but Bitcoin Core is notorious for being I/O heavy. You should make sure to place the Bitcoin blockchain and Lightning data directory on a different drive because long-term intensive I/O can cause an SD card to fail.
-
Internet connection: A reliable Internet connection will be required to download new Bitcoin blocks, as well as to communicate with other Lightning peers. During operation the estimated data use ranges from 10GB to 100GB per month, depending on configuration. At startup, a Bitcoin full node downloads the full blockchain.
-
Power supply: A reliable power supply is required as Lightning nodes need to be online at all times. A power failure will cause in-progress payments to fail. For heavy duty routing nodes, a backup or uninterruptible power supply (UPS) is useful in the event of power outages. Ideally, you should connect your Internet router to this UPS as well.
-
Backup: Backup is crucial as a failure can result in loss of data and hence in loss of funds. The user will want to consider some kind of data backup solution. This could be a cloud-based automated backup to a server or web service the user controls. Alternatively, it could be an automated local hardware backup, such as a second hard drive. For the best results, both local and remote backup can be combined.
Switching server configuration in the cloud
When renting a cloud server, it is often cost effective to change the configuration between two phases of operation. A faster CPU and faster storage will be needed during the Initial Block Download (e.g. the first day). After the blockchain has synced, the CPU and storage speed requirements are much less, so the performance can be downgraded to a more cost-effective level.
For example, on Amazon’s cloud, we would use a 8-16GB RAM, 8-core CPU (e.g. t3-large or m3.large) and faster 400GB SSD (1000+ provisioned IOPS) for the Initial Block Download, reducing its time to just 6-8 hours. Once that is complete, we would switch the server instance to a 2GB RAM, 2-core CPU (e.g. t3.small) and storage to a general purpose 1TB HDD. This will cost about the same as if you ran it on the slower server the entire time, but it will get you up and running in less than a day instead of having to wait almost a week for the IBD.
Permanent data storage (drive)
If you use a mini-PC or rent a server, the storage can be the most expensive part, costing as much as the computer and connectivity (data) added together.
Let’s have a look at the different options available. First there are two main types of drives, Hard Disk Drives (HDDs) and Solid State Drives (SSDs). HDDs are cheaper and SSDs are faster, but both do the job.
The fastest SSDs available today use the NVMe interface. The NVMe SSDs are faster in high-end machines, but also more costly. Traditional SATA-based SSDs are cheaper, but not as fast. SATA SSDs perform sufficiently well for your node setup. Smaller computers might not be able to take advantage of NVMe SSDs. For example, the Raspberry Pi 4 cannot benefit from them because of the limited bandwidth of its USB port.
To choose the size, let’s look at the Bitcoin blockchain. As of April 2021, its size is 338GB including the transaction index and grows by roughly 60GB/year. If you want to have some margin available for future growth or to install other data on your node, purchase at least a 512GB drive or better yet a 1TB drive.
Using an installer or helper
Installing a Lightning node or a Bitcoin node may be daunting if you are not familiar with a command-line environment. Luckily, there are a number of projects that make “helpers”, i.e. software that installs and configures the various components for you. You will still need to learn some command-line incantations to interact with your node, but most of the initial work is done for you.
RaspiBlitz
One of the most popular and complete “helpers” is RaspiBlitz, a project built by Christian Rotzoll. It is intended to be installed on a Raspberry Pi 4. RaspiBlitz comes with a recommended hardware “kit” that you can build in a matter of hours or at most a weekend. If you attend a Lightning “hackathon” in your city, you are likely to see many people working on their RaspiBlitz setup, swapping tips, and helping each other. You can find the RaspiBlitz project here:
https://github.com/rootzoll/raspiblitz

In addition to a Bitcoin and Lightning node, RaspiBlitz can install a number of additional services, such as:
-
TOR (run as hidden service)
-
ElectRS (Electrum server in Rust)
-
BTCPayServer (cryptocurrency payment processor)
-
BTC-RPC-Explorer (Bitcoin blockchain explorer)
-
Ride The Lightning (Lightning node management GUI)
-
LNbits (Lightning wallet/accounts system)
-
SpecterDesktop (multisig Trezor, Ledger, Coldcard wallet & Specter-DIY)
-
LNDmanage (command-line interface for advanced channel management)
-
Loop (submarine swaps service)
-
JoinMarket (CoinJoin service)
MyNode
MyNode is another popular open source “helper” project including a lot of Bitcoin related software. It is easy to install: you “flash” the installer onto an SD card and boot your mini-PC from the SD card. You do not need any monitor to use myNode as the administrative tools are accessible remotely from a browser. If your mini-PC has no monitor, mouse, or keyboard; you can manage it from another computer or even from your smartphone. Once installed, go to http://mynode.local/ and create a Lightning wallet and node in two clicks.
You can find the MyNode project here:
In addition to a Bitcoin and Lightning node, MyNode can optionally install a variety of additional services, such as:
-
Ride The Lightning (Lightning node management GUI)
-
OpenVPN (VPN Support for remote management or wallet)
-
LNDmanage (command-line interface for advanced channel management)
-
btc-rpc-explorer (A Bitcoin blockchain explorer)
Umbrel
Famous for their UX/UI, Umbrel provides a very easy and accessible way to get your Bitcoin and Lightning node up and running in no time, especially for beginners. A very distinctive feature is that Umbrel utilizes Neutrino/SPV during the Initial Blockchain Download (IBD) so you can instantly start using your node. Once Bitcoin Core is fully synced in the background it automatically switches over and disables SPV mode. Umbrel OS supports the Raspberry Pi 4 and can also be installed on any Linux-based OS or on a virtual machine on macOS or Windows. You can also connect any wallet that supports Bitcoin Core P2P, Bitcoin Core RPC, the Electrum protocol or lndconnect.
There’s no need to wait for a rainy day - you can find the project here: https://getumbrel.com

In addition to a Bitcoin and Lightning node, Umbrel introduced the Umbrel App Store, where you can easily install additional services, such as:
-
Lightning Terminal (interface for managing channel liquidity, loop-in & loop-out)
-
Ride The Lightning (Lightning node management GUI)
-
Specter Desktop (watch-only coordinator for multi-signature and single-key Bitcoin wallets)
-
BTCPayServer (cryptocurrency payment processor)
-
BTC-RPC-Explorer (Bitcoin blockchain explorer)
-
ThunderHub (monitor and manage your node)
-
Sphinx Relay (handling connectivity and storage for Sphinx chat)
-
mempool.space (mempool visualizer and block explorer)
-
LNbits (Lightning wallet/accounts system)
Umbrel is currently still in beta and not considered secure.
BTCPay Server
While not initially designed as an installation “helper”, the e-commerce and payment platform BTCPay Server has an incredibly easy installation system that uses Docker containers and docker-compose to install a Bitcoin node, Lightning node, and payment gateway, among many other services. It can be installed on a variety of hardware platforms, from a simple Raspberry Pi 4 (4GB recommended) to a mini-PC, old laptop, desktop or server.
BTCPay Server is a fully-featured self-hosted self-custody e-commerce platform that can be integrated with many e-commerce platforms such as Wordpress Woocommerce and others. The installation of the full node is only a step of the e-commerce platform installation. While originally developed as a feature-for-feature replacement of the Bitpay commercial payment service and API, it has evolved past that to be a complete platform for BTC and Lighting services related to e-commerce. For many sellers or shops it is a one-shop turn-key solution to e-commerce.
More information can be found at:
In addition to a Bitcoin and Lightning node, BTCPay Server can also install a variety of services, including:
-
c-lightning or LND Lightning node
-
Litecoin support
-
Monero support
-
Spark server (c-lightning web wallet)
-
Charge server (c-lightning e-commerce API)
-
Ride The Lightning (Lightning node management web GUI)
-
Many BTC forks
-
BTCTransmuter (event-action automation service supporting currency exchange)
The number of additional services and features is growing rapidly, so the list above is only a small subset of what is available on the BTCPay Server platform.
Bitcoin node or lightweight Lightning
One critical choice for your setup will be the choice of the Bitcoin node and its configuration. Bitcoin Core, the reference implementation, is the most common choice but not the only choice available. One alternative choice is btcd, which is a Go-language implementation of a Bitcoin node. Btcd supports some features that are useful for running an LND Lightning node and are not available in Bitcoin Core.
A second consideration is whether you will run an archival Bitcoin node with a full copy of the blockchain (some 350GB in mid-2021) or a pruned blockchain that only keeps the most recent blocks. A pruned blockchain can save you some disk space, but you will still need to download the full blockchain at least once (during the Initial Block Download). Hence it won’t save you any network traffic. Using a pruned node to run a Lightning node is still an experimental capability and might not support all the functionality. However, many people are running a node like that successfully.
Finally, you also have the option of not running a Bitcoin node at all. Instead you can operate the LND Lightning node in “lightweight” mode, using the neutrino protocol to retrieve blockchain information from public Bitcoin nodes operated by others. Running like this means that you are taking resources from the Bitcoin network without offering any in return. Instead, you are offering your resources and contributing to the Lightning Network community. For smaller Lightning nodes this will generally reduce network traffic in comparison to running a full Bitcoin node.
Keep in mind that operating a Bitcoin node allows you to support other services, besides and on top of a Lightning node. These other services may require an archival (not pruned) Bitcoin node and often can’t run without a Bitcoin node. Consider upfront what other services you may want to run now or in the future to make an informed decision on the type of Bitcoin node you select.
The bottom line for this decision is: If you can afford a disk larger than 500GB, run a full archival Bitcoin node. You will be contributing resources to the Bitcoin system and helping others who cannot afford to do so. If you can’t afford such a big disk, run a pruned node. If you can’t afford the disk or the bandwidth for even a pruned node, run a lightweight LND node over neutrino.
Operating system choice
The next step is to select an operating system for your node. The vast majority of Internet servers run on some variant of Linux. Linux is the platform of choice for the Internet because it is a powerful, open-source operating system. Linux, however, has a steep learning curve and requires familiarity with a command-line environment. It is often intimidating for new users.
Ultimately, most of the services can be run on any modern POSIX operating system, which includes Mac OS, Windows, and of course Linux. Your choice should be driven more by your familiarity and comfort with an operating system and your learning objectives. If you want to expand your knowledge and learn how to operate a Linux system, this is a great opportunity to do so with a specific project and a clear goal. If you just want to get a node up and running, go with what you know.
Nowadays, many services are also delivered in the form of containers, usually based on the Docker system. These containers can be deployed on a variety of operating systems, abstracting the underlying OS. You may need to learn some Linux CLI commands nonetheless, as most of the containers run some variant of Linux inside.
Choose your Lightning node implementation
As with the choice of operating system, your choice of Lightning node implementation should depend primarily on your familiarity with the programming language and development tools used by the projects. While there are some small differences in features between the various node implementations, those are relatively minor and most implementations converge on the common standards defined by the BOLTs.
Familiarity with the programming language and build system, on the other hand, is a good basis for choosing a node. That’s because installation, configuration, ongoing maintenance, and troubleshooting will all involve interacting with the various tools used by the build system. This includes:
-
make, autotools, and GNU utilities for c-lightning
-
go utilities for LND
-
Java/Maven for Eclair
The programming language doesn’t just influence the choice of build system, but also many other aspects of the program. Each programming language comes with a whole design philosophy and affects many other aspects, such as:
-
format and syntax of configuration files
-
file locations (in the filesystem)
-
command-line arguments and their syntax
-
error message formatting
-
prerequisite libraries
-
Remote Procedure Call interfaces
When you choose your Lightning node, you are also choosing all of the above characteristics. So your familiarity with these tools and design philosophies will make it easier to run a node. Or harder, if you land in an unfamiliar domain.
On the other hand, if this is your first foray into the command-line and server/service environment, you will find yourself unfamiliar with any implementation and have the opportunity to learn something completely new. In that case you might want to decide based on a number of other factors, such as:
-
quality of support forums and chat rooms
-
quality of documentation
-
degree of integration with other tools you want to run
As a final consideration, you may want to examine the performance and reliability of different node implementations. This is especially important if you will be using this node in a production environment and expect heavy traffic and high reliability requirements. This might be the case if you plan to run the payment system of a shop on it.
Installing a Bitcoin or Lightning node
You decided not to use an installation “helper” and instead to dive into the command-line of a Linux operating system? That is a brave decision and we’ll try to help you make it work. If you’d rather not try to do this manually, consider using an application that helps you install the node software or a container-based solution, as described in XREF HERE.
Warning
This section will delve into the advanced topic of system administration from the command-line. Linux administration is its own skill set that is outside the scope of this book. It is a complicated topic and there are many pitfalls. Proceed with caution!
In the next few sections we will briefly describe how to install and configure a Bitcoin and Lightning node on a Linux operating system. You will need to review the installation instructions for the specific Bitcoin and Lightning node applications you decided to use. You can usually find these in a file called INSTALL or in the docs sub-directory of each project. We will only describe some of the common steps that apply to all such services, and the instructions we offer will be necessarily incomplete.
Background services
For those accustomed to running applications on their desktop or smartphone, an application always has a graphical user interface even if it may sometimes run in the background. The Bitcoin and Lightning node applications, however, are very different. These applications do not have a graphical user interface built in. Instead, they run as headless background services, meaning they are always operating in the background and do not interact with the user directly.
This can create some confusion for users who are not used to running background services. How do you know if such a service is currently running? How do you start and stop it? How do you interact with it? The answers to these questions depend on the operating system you are using. For now we will assume you are using some Linux variant and answer them in that context.
Process isolation
Background services usually run under a specific user account in order to isolate them from the operating system and each other. For example, Bitcoin Core is configured to run as user bitcoin. You will need to use the command-line to create a user for each of the services you run.
In addition, if you have connected an external drive, you will need to tell the operating system to relocate the user’s home directory to that drive. That’s because a service like Bitcoin Core will create files under the user’s home directory. If you are setting it up to download the full Bitcoin blockchain, these files will take up several hundred Gigabytes. Here, we assume you have connected the external drive and it is located on the /external_drive/ path of the operating system.
On most Linux systems you can create a new user with the useradd command, like this:
$ sudo useradd -m -d /external_drive/bitcoin -s /dev/null bitcoin
The m and d flags create the user’s home directory as specified by /external_drive/bitcoin in this case. The s flag assigns the user’s interactive shell. In this case, we set it to /dev/null to disable interactive shell use. The last argument is the new user’s username bitcoin.
Node startup
For both Bitcoin and Lightning node services, “installation” also involves creating a so called startup script to make sure that the node starts when the computer boots. Startup and shutdown of background services is handled by an operating system process, which in Linux is called init or systemd. You can usually find a system startup script in the contrib sub-directory of each project. For example, if you are on a modern Linux OS that uses systemd, you would find a script called bitcoind.service, that can start and stop the Bitcoin Core node service.
Here’s an example of what a Bitcoin node’s startup script looks like, taken from the Bitcoin Core code repository:
[Unit]
Description=Bitcoin daemon
After=network.target

[Service]
ExecStart=/usr/bin/bitcoind -daemon
                            -pid=/run/bitcoind/bitcoind.pid
                            -conf=/etc/bitcoin/bitcoin.conf
                            -datadir=/var/lib/bitcoind

# Make sure the config directory is readable by the service user
PermissionsStartOnly=true
ExecStartPre=/bin/chgrp bitcoin /etc/bitcoin

# Process management
####################

Type=forking
PIDFile=/run/bitcoind/bitcoind.pid
Restart=on-failure
TimeoutStopSec=600

# Directory creation and permissions
####################################

# Run as bitcoin:bitcoin
User=bitcoin
Group=bitcoin

# /run/bitcoind
RuntimeDirectory=bitcoind
RuntimeDirectoryMode=0710

# /etc/bitcoin
ConfigurationDirectory=bitcoin
ConfigurationDirectoryMode=0710

# /var/lib/bitcoind
StateDirectory=bitcoind
StateDirectoryMode=0710

[...]

[Install]
WantedBy=multi-user.target
As the root user, install the script by copying it into the systemd service folder /lib/systemd/system/ and then reload systemd:
$ sudo systemctl daemon-reload
Next, enable the service:
$ sudo systemctl enable bitcoind
You can now start and stop the service. Don’t start it yet, as we haven’t configured the Bitcoin node.
$ sudo systemctl start bitcoind
$ sudo systemctl stop bitcoind
Node configuration
To configure your node, you need to create and reference a configuration file. By convention, this file is usually created in /etc, under a directory with the name of the program. For example, Bitcoin Core and LND configurations would usually be stored in:
/etc/bitcoin/bitcoin.conf
/etc/lnd/lnd.conf
These configuration files are text files with each line expressing one configuration option and its value. Default values are assumed for anything not defined in the configuration file. You can see what options can be set in the configuration in two ways. First, running the node application with a help argument will show the options that can be defined on the command-line. These same options can be defined in the configuration file. Second, you can usually find an example configuration file, with all the default options, in the code repository of the software.
You can find one example of a configuration file in each of the Docker images we used in Chapter 4. For example, the file code/docker/bitcoind/bitcoind/bitcoin.conf:
regtest=1
server=1
debuglogfile=debug.log
debug=1
txindex=1
printtoconsole=0

[regtest]
fallbackfee=0.000001
port=18444
noconnect=1
dnsseed=0
dns=0
upnp=0
onlynet=ipv4
rpcport=18443
rpcbind=0.0.0.0
rpcallowip=0.0.0.0/0
rpcuser=regtest
rpcpassword=regtest
zmqpubrawblock=tcp://0.0.0.0:12005
zmqpubrawtx=tcp://0.0.0.0:12006
That particular configuration file configures Bitcoin Core for operation as a regtest node and provides a weak username and password for remote access, so you shouldn’t use it for your node configuration. However, it serves to illustrate the syntax of a configuration file and you can make adjustments to it in the docker container to experiment with different options. See if you can use the bitcoind -help command to understand what each of the options does in the context of the docker network we build in Chapter 4.
Often, the defaults suffice, and with a few modifications your node software can be configured quickly. To get a Bitcoin Core node running with minimal customization, you only need four lines of configuration:
server=1
daemon=1
txindex=1
rpcuser=USERNAME
rpcpassword=PASSWORD
Even the txindex option is not strictly necessary, though it will ensure your Bitcoin node creates an index of all transactions, which is required for some applications. The txindex option is not required to run a Lightning node.
A c-lightning Lightning node running on the same server also requires only a few lines in the configuration:
network=mainnet
bitcoin-rpcuser=USERNAME
bitcoin-rpcpassword=PASSWORD
In general, it is a good idea to minimize the amount of customization of these systems. The default configuration is carefully designed to support the most common deployments. If you modify a default value, it may cause problems later on or reduce the performance of your node. In short, modify only when necessary!
Network configuration
Network configuration is normally not an issue when configuring a new application. However, peer-to-peer networks like Bitcoin and the Lightning network present some unique challenges for network configuration.
In a centralized service, your computer connects to the “big servers” of some corporation, and not vice-versa. Your home Internet connection is actually configured on the assumption that you are simply a consumer of services provided by others. But in a peer-to-peer system, every peer both consumes from and provides services to other nodes. If you’re running a Bitcoin or Lightning node at your home, you’re providing a service to other computers on the Internet. Your Internet service by default is not configured to allow you to run servers and may need some additional configuration to enable others to reach your node.
If you want to run a Bitcoin or Lightning node, you need to make it possible for other nodes on the Internet to connect to you. That means enabling incoming TCP connections to the Bitcoin port (port 8333 by default) or Lightning port (port 9735 by default). While you can run a Bitcoin node without incoming connectivity, you can’t do that with a Lightning node. A Lightning node must be accessible to others from outside your network.
By default, your home Internet router does not expect incoming connections from the outside, and in fact incoming connections are blocked. Your Internet router IP address is the only externally accessible IP address, and all the computers you run inside your home network share that single IP address. This is achieved by a mechanism called Network Address Translation (NAT) which allows your Internet router to act as an intermediary for all outbound connections. If you want to allow an inbound connection you have to set up Port Forwarding, which tells your Internet router that incoming connections on specific ports should be forwarded to specific computers inside the network. You can do this manually by changing your Internet router configuration or, if your router supports it, through an automatic port forwarding mechanism called Universal Plug and Play (UPNP).
An alternative mechanism to port forwarding is to enable The Onion Router (TOR), which provides a kind of virtual private network overlay that allows incoming connections to an onion address. If you run TOR, you don’t need to do port forwarding nor enable incoming connections to Bitcoin or Lightning ports. If you run your nodes using TOR, all traffic goes through TOR and no other ports are used.
Let’s look at different ways you can make it possible for others to connect to your node. We’ll look at these alternatives in order, from easiest to most difficult.
It just works!
There is a possibility that your Internet service provider or router is configured to support UPNP by default and everything just works automatically. Let’s try this approach first, just in case we are lucky.
Assuming you already have a Bitcoin or Lightning node running, we will try and see if they are accessible from the outside.
Note
For this test to work, you have to have either a Bitcoin or Lightning node (or both) up and running on your home network. If your router supports UPNP, the incoming traffic will automatically be forwarded to the corresponding ports on the computer running the node.
You can use some very popular and useful websites to find out what is your external IP address and whether it allows and forwards incoming connections to a known port. Here are two that are reliable:
https://www.whatismyip.com/port-scanner/
By default, these services only allow you to check incoming connections to the IP address from which you are connecting. This is done to prevent you from using the service to scan other people’s networks and computers. You will see your router’s external IP address and a field for entering a port number. If you haven’t changed the default ports in your node configuration, try port 8333 (Bitcoin) and/or 9735 (Lightning).
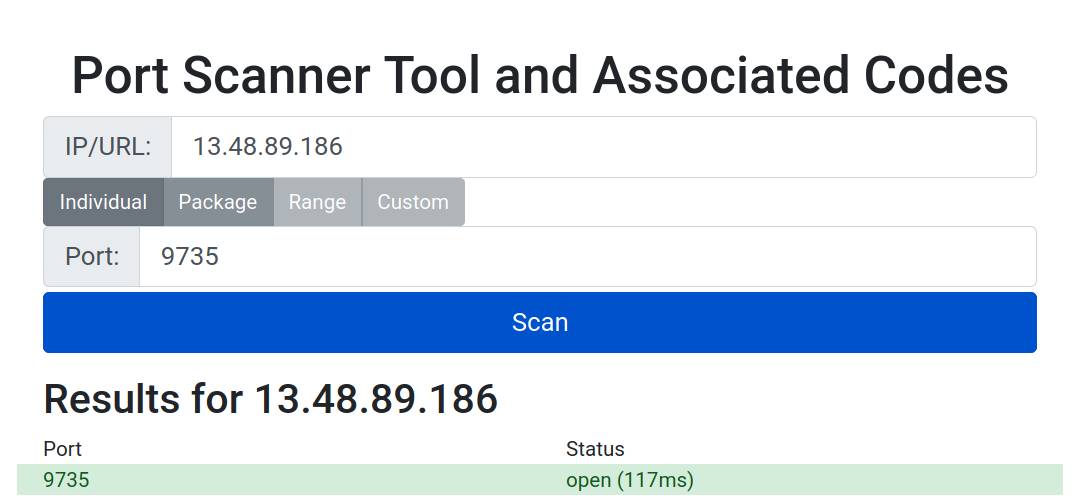
Figure 5-1. Checking for incoming port 9735
In Figure 5-1 you can see the result of checking port 9735 on a server running Lightning, using the whatismyip.org port scanner tool. It shows that the server is accepting incoming connections to the Lightning port. If you see a result like this, you are all set!
Automatic port forwarding using UPNP
Sometimes, even if your Internet router supports UPNP, it may be turned off by default. In that case you need to change your Internet router configuration from its web administration interface:
-
Connect to your Internet router’s configuration website. Usually this can be done by connecting to the gateway address of your home network using a web browser. You can find the gateway address by looking at the IP configuration of any computer on your home network. It is often the first address in one of the non-routable networks, like 192.168.0.1 or 10.0.0.1. Check all stickers on your router as well for the gateway address. Once found, open a browser and enter the IP address into the browser URL/Search box, e.g. “192.168.0.1” or “http://192.168.0.1”.
-
Find the administrator username and password for the web configuration panel of the router. This is often written on a sticker on the router itself and may be as simple as “admin” and “password”. A quick web search for your ISP and router model can also help you find this information.
-
Find a setting for UPNP and turn it on.
Restart your Bitcoin and/or Lighting node and repeat the open port test with one of the websites we used in the previous section.
Using TOR for incoming connections
The Onion Router (TOR) is a virtual private network with the special property that it encrypts communications between hops, such that any intermediary node cannot determine the origin or destination of a packet. Both Bitcoin and Lightning nodes support operation over TOR, which enables you to operate a node without revealing your IP address or location. Hence, it provides a high level of privacy to your network traffic. An added benefit of running TOR is that because it operates as a VPN, it resolves the problem of port forwarding from your Internet router. Incoming connections are received over the TOR tunnel, and your node can be found through an ad-hoc generated onion address instead of an IP address.
Enabling TOR requires two steps: First you must install the TOR router and proxy on your computer. Second, you must enable the use of the TOR proxy in your Bitcoin or Lightning configuration.
To install TOR on a Ubuntu Linux system that uses the apt package manager, run:
sudo apt install tor
Next, we configure our Lightning node to use TOR for its external connectivity. Here is an example configuration for LND:
[Tor]
tor.active=true
tor.v3=true
tor.streamisolation=true
listen=localhost
This will enable TOR (tor.active), establish a v3 onion service (tor.v3=true), use a different onion stream for each connection (tor.streamisolation), and restrict listening for connections to the local host only, to avoid leaking your IP address (listen=localhost).
You can check if TOR is correctly installed and working by running a simple one-line command. This command should work on most flavors of Linux:
curl --socks5 localhost:9050 --socks5-hostname localhost:9050 -s https://check.torproject.org/ | cat | grep -m 1 Congratulations | xargs
If everything is working properly, the response of this command should be "Congratulations. This browser is configured to use Tor.".
Due to the nature of TOR, you can’t easily use an external service to check if your node is reachable via an onion address. Nonetheless, you should see your TOR onion address in the logs of your Lightning node. It is a long string of letters and numbers followed by the suffix .onion. Your node should now be reachable from the Internet, with the added bonus of privacy!
Manual port forwarding
This is the most complex process and requires quite a bit of technical skill. The details depend on the type of Internet router you have, your service provider settings and policies, and a lot of other context. Try UPNP or TOR first, before you try this much more difficult mechanism.
The basic steps are as follows:
-
Find the IP address of the computer your node is on. This is usually dynamically allocated by the Dynamic Host Configuration Protocol (DHCP) and is often somewhere in the 192.168.0.X or 10.0.0.X range.
-
Find the Media Access Control (MAC) address of your node’s network interface. This can be found in the Internet settings of that computer.
-
Assign a static IP address for your node so that it is always the same one. You can use the IP address it currently has. On your Internet router, look for “Static Leases” under the DHCP configuraiton. Map the MAC address to the IP address you selected. Now your node will always have that IP address allocated to it. Alternatively, you can look at your router’s DHCP configuration and find out what its DHCP address range is. Select an unused address outside of the DHCP address range. Then, on the server, configure the network to stop using DHCP and hard-code the selected non-DHCP IP address into the operating system network configuration.
-
Finally, set up “Port Forwarding” on your Internet router to route incoming traffic on specific ports to the selected IP address of your server.
Once done re-configuring, repeat the port check using one of the websites from the previous sections.
Security of your node
A Lightning node is, by definition, a hot-wallet. That means that the funds (both on-chain and off-chain) controlled by a Lightning node are directly controlled by keys that are loaded in the node’s memory or stored on the node’s hard disk. If a Lightning node is compromised, it is trivial to create on-chain or off-chain transactions to drain its funds. It is therefore critically important that you protect it from unauthorized access.
Security is a holistic effort, meaning that you have to secure every layer of a system. As the saying goes: the chain is only as strong as the weakest link. This is an important concept in information security and we will apply it to our node.
Despite all security measures you will take, remember that the Lightning Network is an early-stage experimental technology and there are likely to be exploitable bugs in the code of any project you use. Do not put more money than you are willing to risk losing on the Lightning Network.
Operating system security
Securing an operating system is a vast topic that is beyond the scope of this book. However, we can establish some basic principles.
To secure your operating system, here are some of the top items to consider:
-
Provenance: Start by ensuring that you are downloading the correct operating system image and verify any signatures or checksums before installing it. Extend this to any software that you install. Double-check any source or URL from where you download. Verify the integrity and correctness of the downloaded software via signature and checksum verification.
-
Maintenance: Make sure that you keep your operating system up to date. Enable automated daily or weekly installation of security updates.
-
Least privilege: Set up users for specific processes and give them the least access needed to run a service. Do not run processes with admin privileges (e.g. root).
-
Process isolation: Use the operating system features to isolate processes from each other.
-
File system permissions: Configure the file system carefully, on the least-privilege principle. Do not make files readable or writable by everyone.
-
Strong authentication: Use strong randomly generated passwords or, whenever possible, public-key authentication. E.g. it is safer to use Secure Shell (SSH) with a cryptographic key pair instead of a password.
-
Two-factor authentication (2FA): Use two-factor authentication wherever possible, including Universal 2-Factor (U2F) with hardware security keys. This applies to all external services you might be using such as your cloud service provider. You can apply this also to your own set-up such as your own SSH configuration. Use 2FA also for indirect services. For exmaple, say you are using a cloud service. You gave your cloud service provider an email address, so you should also protect your email address with 2FA.
-
Backup: Make backups of your system, and make sure you protect the backups with encryption too. Perform these backups periodically. At least once test if you can restore your backup and that your backup is complete and accessible. If possible, keep one copy of your backups on a different disk to avoid that a single hard disk failure destroys both your active node as well as your backup copies.
-
Vulnerability and exposure management: Use remote scanning to ensure you have minimized the attack surface of your system. Close any unnecessary services or ports.
-
Minimize: Install only software and packages that you really need and use. Uninstall packages that you no longer use. It is recommended that you do not use your node computer for non-node activities that you can perform on another of your computers. Especially, if you can, do not use your node computer for browsing, surfing the Internet, or reading your email.
-
This is a list of the most basic security measures. It is by no means exhaustive.
Node access
Your Lightning node will expose a Remote Procedure Call (RPC) Application Programming Interface (API). This means that your node can be controlled remotely by commands sent to a specific TCP port. Access control to that RPC API is achieved by some form of user authentication. Depending on the type of Lightning node you set up, this will either be done by username/password authentication or by a mechanism called an authentication macaroon. As the name implies, a macaroon is a more sophisticated type of cookie. Unlike a cookie, it is cryptographically signed and can express a set of access capabilities.
For example, LND uses macaroons to grant access to the RPC API. By default, the LND software creates three macaroons with different levels of access, called admin, invoice, and readonly. Depending on which macaroon you copy and use in your RPC client, you either have “readonly” access, “invoice” access (which includes the “readonly” capabilities), or “admin” access which gives you full control. There is also a macaroon “bakery” function in LND that can construct macaroons with any combination of capabilities with very fine-grained control.
If you use a username/password authentication model, make sure you select a long and random password. You will not have to type this password often as it will be stored in the configuration files. You should therefore pick one that cannot be guessed. Many of the examples you will see include poorly chosen passwords, and often people copy these into their own systems, providing easy access to anyone. Don’t do that! Use a password manager to generate a long random alpha-numeric password. Since certain special characters such as $?/!*&%‘"’ can interfere with the command line, it is best to avoid these for passwords that will be used in a shell environment. To avoid problems stick with long random alpha-numeric passwords.
A plain alphanumeric sequence that is longer than 12 characters and randomly generated is usually sufficient. If you plan to store large amounts of money on your Lightning node and are concerned about remote brute-force attacks, select a password length of more than 20 characters to make such attacks practically infeasible.
Node and channel backups
A very important consideration when running a Lightning node is the issue of backups. Unlike a Bitcoin wallet, where a BIP39 mnemonic phrase can recover all the state of the wallet, in Lightning this is not the case.
Lightning wallets do use a BIP39 mnemonic phrase backup, but only for the on-chain wallet. However, due to the way channels are constructed, the mnemonic phrase is not sufficient to restore a Lightning node. An additional layer of backups is needed, which is called the Static Channel Backup (SCB). Without an SCB, a Lightning node operator may lose all the funds that are in channels if they lose the Lightning node data store.
Warning
Do not fund channels until you have put a system in place to continuously backup your channel state. Your backups should be moved “offsite” to a different system and location from your node, so that they can survive a variety of system failures (power loss, data corruption, etc.) or natural disasters (flood, fire, etc.).
Static Channel Backups are not a panacea. First, the state of each channel needs to be backed up every time there is a new commitment transaction. Second, restoring from a channel backup is dangerous. If you do not have the last commitment transaction and you accidentally broadcast an old (revoked) commitment, your channel peer will assume you are trying to cheat and claim the entire channel balance with a penalty transaction. To make sure you are closing the channel, you need to do a cooperative close. But a malicious peer could mislead your node into broadcasting an old, revoked commitment during that cooperative close, thereby cheating you by making your node inadvertently try to “cheat”.
Furthermore, the backups of your channels need to be encrypted to maintain your privacy and your channel security. Otherwise, anyone who finds the backups can not only see all your channels, they could use the backups to close all your channels in a way that hands over the balance to your channel peers. In other words, a malicious person that gets access to your backups can cause you to lose all your channel funds.
You can see that SCBs are not a fool-proof safeguard. They are a weak compromise because they swap one type of risk (data corruption or loss) for another type of risk (malicious peer). To restore from a static channel backup, you have to interact with your channel peers and hope they don’t try to cheat you by either giving you an old commitment or by fooling your node into broadcasting a revoked commitment so they can penalize you. Despite the weaknesses of SCB, SCBs do make sense and you should perform them. If you do not perform SCBs and you lose your node data, you will lose your channel funds forever. Guaranteed! However, if you do perform SCBs and you lose your node data, then you have a reasonable chance that some of your peers are honest and that you can recuperate some of your channel funds. If you are lucky, you might recover all your funds. In conclusion, it is best for you to perform continuous Static Channel Backups to a disk other than the primary node hard disk.
Channel backup mechanisms are still a work-in-progress and a weakness in most Lightning implementations.
Static Channel Backups (SCB)
At the time of writing this book, only LND offers a built-in mechanism for static channel backups. Eclair has no backup on the server side, although Eclair mobile does offer optional backup to a Google Drive. C-lightning recently merged the necessary interfaces for a plugin to implement channel backups. Unfortunately, there is no consistent, agreed upon backup mechanism across different node implementations.
File-based backups of the Lightning node databases are at best a partial solution because you run the risk of backing up an inconsistent database state. In addition, you may not reliably catch the latest state commitments. It is much better to have a backup mechanism that is triggered every time there is a state change in a channel, thereby ensuring data consistency.
To set up static channel backups in LND, set the backupfilepath parameter either on the command-line or in the configuration file. LND will then save an SCB file in that directory path. Of course, that’s only the first step of the solution. Now, you have to setup a mechanism that monitors this file for changes. Each time the file changes the backup mechanism must copy this file to another, preferably “off-site” disk. Such backup mechanisms are beyond the scope of this book. Nonetheless, any sophisticated backup solution should be able to handle this scenario. Recall, the backup files should be encrypted too.
Hot wallet risk
As we’ve discussed previously, the Lightning Network consists of a network of hot wallets. The funds you store in a Lightning wallet are online all the time. This makes them vulnerable. Hence, you should not store large amounts in a Lightning wallet. Large amounts should be kept in a cold wallet that is not online and which can transact only on-chain.
Even if you start small, as time passes you may still find you have a significant amount of money in a Lightning wallet. This is a typical scenario for store owners. If you use a Lightning node for an e-commerce operation, your wallet will likely receive funds often, but send funds rarely. You will therefore end up having two problems simultaneously: First, your channels will be imbalanced with large local balances outweighing small remote balances. Secondly, you will have too much money in the wallet. Fortunately, you can also solve both of these problems simultaneously.
Let’s look at some of the solutions you can use to reduce the funds exposed in a hot wallet.
Sweeping funds
If your Lightning wallet balance becomes too large for your risk tolerance, you will need to “sweep” funds out of the wallet. You can do so in three ways: on-chain, off-chain, and loop-out. Let’s look at each one of these options in the next few sections.
On-chain sweep
Sweeping funds on-chain is accomplished by moving the funds from the Lightning wallet to a Bitcoin wallet. You do that by closing channels. When you close a channel, all funds from your local balance are “swept” to a Bitcoin address. The Bitcoin address for on-chain funds is usually generated by your Lightning wallet so it is still a hot-wallet. You may need to do an additional on-chain transaction to move the funds to a more secure address, such as one generated on your hardware wallet.
Closing channels will incur an on-chain fee and will reduce your Lightning node’s capacity and connectivity. However, if you run a popular e-commerce node, you will not lack incoming capacity and can strategically close channels with large local balances, essentially “bundling” your funds for movement on-chain. You may need to use some channel re-balancing techniques (see XREF HERE) before you close channels to maximize the benefits of this strategy.
Off-chain sweep
Another technique you can use involves running a second Lightning node that is not advertised on the network. You can establish large capacity channels from your public node (e.g. the one running your shop) to your unadvertised (hidden) node. On a regular basis, “sweep” funds by making a Lightning payment to your hidden node.
The advantage of this technique lies in the fact that the Lightning node that receives payments for your shop will be publicly known. This makes it a target for hackers, as any Lightning node associated with a shop would be assumed to have a large balance. A second node that is not associated with your shop will not easily be identified as a valuable target.
As an additional measure of security, you can make your second node a hidden TOR service so that its IP address is not known. That further reduces the opportunity for attacks and increases your privacy.
You will need to set up a script that runs at regular intervals. The purpose of this script is to create an invoice on your hidden node and to pay that invoice from your shop’s node, thereby shifting funds over to your hidden node.
Keep in mind that this technique does not move funds into cold storage. Both Lightning nodes are hot wallets. The objective of this sweep is to move funds from a very well-known hot wallet to an obscure hot wallet.
Submarine swap sweep
Another way to reduce your Lightning hot-wallet balance is to use a technique called a submarine swap. Submarine swaps, conceptualized by co-author Olaoluwa Osuntokun and Alex Bosworth, allow the exchange of on-chain bitcoin for Lightning payments and vice versa.
A node operator can initiate a submarine swap and send all available channel balances to the other party who will send them as a result on-chain bitcoin in exchange.
In the future, this could be a paid service offered by nodes on the Lightning Network who advertise exchange rates or charge a flat fee for the conversion.
The advantage of a submarine swap for sweeping funds is that no channel needs to be closed. That means that we preserve our channels, only re-balancing our channels through this operation. As we send a Lightning payment out, we shift some balance from local to remote on one or more of our channels. Not only does that reduce the balance exposed in our node’s hot wallet, it also increases the balance available for future incoming payments.
You could do this by trusting an intermediary to act as a gateway, but this risks your coins being stolen. But in the case of a submarine swap, the operation does not require trust. Submarine swaps are non-custodial atomic operations. That means that the counterparty in your submarine swap cannot steal your funds because the on-chain payment depends on the completion of the off-chain payment and vice-versa. We will discuss submarine swaps in more detail in XREF HERE.
Submarine swaps with Loop
One example of a submarine swap service is Loop by Lightning Labs, the same company that builds LND. Loop comes in two variations: Loop In and Loop Out. Loop In accepts a Bitcoin on-chain payment and converts it into a Lightning off-chain payment. Loop Out converts a Lightning payment into a Bitcoin payment.
Note
To use the Loop service you must be running an LND Lightning node.
For the purpose of reducing the balance of your Lightning hot wallet, you would use the Loop Out service. To use the Loop service, you need to install some additional software on your node. The Loop software runs alongside your LND node and provides some command-line tools to execute submarine swaps. You can find the Loop software and installation instructions here:
https://github.com/lightninglabs/loop
Once you have the software installed and running, a Loop Out operation is as simple as running a single command:
loop out --amt 501000 --conf_target 400
Max swap fees for 501000 sat Loop Out: 25716 sat
Regular swap speed requested, it might take up to 30m0s for the swap to be executed.
CONTINUE SWAP? (y/n), expand fee detail (x): x

Estimated on-chain sweep fee:        149 sat
Max on-chain sweep fee:              14900 sat
Max off-chain swap routing fee:      10030 sat
Max no show penalty (prepay):        1337 sat
Max off-chain prepay routing fee:    36 sat
Max swap fee:                        750 sat
CONTINUE SWAP? (y/n): y
Swap initiated

Run `loop monitor` to monitor progress.
Note that your maximum fee, which represents a worst-case scenario, will depend on the confirmation target that you select.
Lightning node uptime and availability
Unlike Bitcoin, Lightning nodes need to be online almost continuously. Your node needs to be online to receive payments, open channels, close channels (cooperatively), and monitor protocol violations. Node availability is such an important requirement in the Lightning Network that it is a metric used by various automatic channel management tools (e.g. autopilot) to decide which nodes to open channels with. You can also see “availability” as a node metric on popular node explorers (see “Lightning Explorer”) such as 1ml.com.
Node availability is especially important to mitigate and resolve potential protocol violations (i.e. revoked commitments). While you can afford short interruptions from an hour up to one or two days, you cannot have your node offline for longer periods of time without risking loss of funds.
Keeping a node online continuously is not easy, as various bugs and resource limitations can and will occasionally cause downtime. Especially if you run a busy and popular node, you will run into limitations of memory, swap space, number of open files, disk space, and so forth. A whole host of different problems will cause your node or your server to crash.
Tolerate faults and automate
If you have the time and skills you should test some basic fault scenarios on the Lightning testnet. On the testnet you will learn valuable lessons without risking any funds. Any step you perform to automate your system will improve your availability.
-
Automatic computer server restart: What happens when your server or the operating system crashes? What happens when there is a power outage? Simulate this fault by pressing the “reset” button on your PC or by unplugging the power cable. After crash, reset, or power failure the computer should automatically restart itself. Some computers have a setting in their BIOS to specify how the computer should react on power failures. Test it to make sure the computer really restarts automatically on power failure without human intervention.
-
Automatic node restart: What happens when your node or one of your nodes crashes? Simulate this fault by killing the corresponding node processes. If a node crashes, it should automatically restart itself. Test it to make sure the node or nodes really restart automatically on failure without human intervention. If this is not the case, most likely your node is not set up correctly as an operating system service.
-
Automatic network reconnection: What happens if your network goes down? What happens when your ISP goes temporarily down? What happens when your ISP assigns a new IP address to your router or your computer? When the network comes back, do the nodes your are running automatically reconnect to the network? Simulate this fault by unplugging and later re-plugging the Ethernet cable from the device hosting your nodes. The nodes should automatically reconnect and continue operation without human intervention.
-
Configure your log files: All of the above failures should leave textual entries behind in the corresponding log files. Turn up the verbosity of logging if needed. Find these error entries in the log files and use them for monitoring.
Monitoring node availability
Monitoring your node is an important part of keeping it running. You need to monitor not only the availability of the computer itself, but also the availability and correct operation of the Lightning node software.
There are a number of ways to do this, but most require some customization. You can use generic infrastructure monitoring or application monitoring tools, but you have to customize them specifically to query the Lightning node API to ensure the node is running, synchronized to the blockchain, and connected to channel peers.
There is a specialized service that offers Lightning node monitoring. It uses a Telegram bot to notify you of any interruptions in service. This is a free service, though you can pay (over Lightning of course) to get faster alerts. Find more information at:
Over time, we expect more third-party services to provide specialized Lightning node monitoring payable via micro-payments. Perhaps such services and their APIs will become standardized and will one day be directly supported by Lightning node software.
Watchtowers
Watchtowers are a mechanism for outsourcing the monitoring and penalty resolution of Lightning protocol violations.
As we mentioned in previous chapters, the Lightning protocol maintains security through a penalty mechanism. If one of your channel partners broadcasts an old commitment transaction, your node will need to exercise the revocation clause and broadcast a penalty transaction to avoid losing money. But if your node is down during the protocol violation, you might lose money.
To solve this problem, we can use one or more watchtowers to outsource the job of monitoring protocol violations and issuing penalty transactions. There are two parts to a watchtower setup: a watchtower server (or simply “watchtower”) that monitors the blockchain, and a watchtower client that asks the watchtower server for this monitoring service.
Watchtower technology is still in the early stages of development and is not widely supported. However, below we list some experimental implementations that you can try.
LND software includes both a watchtower server and a watchtower client. You can activate the watchtower server by adding the following configuration options:
[watchtower]
watchtower.active=1
watchtower.towerdir=/path_to_watchtower_data_directory
You can use LND’s watchtower client by activating it in the configuration and then using the command-line to connect it to a watchtower server. The configuration is:
[wtclient]
wtclient.active=1
LND’s command-line client lncli shows the following options for managing the watchtower client:
$ lncli wtclient

NAME:
   lncli wtclient - Interact with the watchtower client.

USAGE:
   lncli wtclient command [command options] [arguments...]

COMMANDS:
     add     Register a watchtower to use for future sessions/backups.
     remove  Remove a watchtower to prevent its use for future sessions/backups.
     towers  Display information about all registered watchtowers.
     tower   Display information about a specific registered watchtower.
     stats   Display the session stats of the watchtower client.
     policy  Display the active watchtower client policy configuration.

OPTIONS:
   --help, -h  show help
C-lightning has the API hooks necessary for a watchtower client plugin, though no such plugin has been implemented yet.
Finally, a popular standalone watchtower server is The Eye of Satoshi (TEOS). It can be found here:
Channel management
As a Lightning node operator, one of the recurring tasks you will need to perform is management of your channels. This means opening outbound channels from your node to other nodes, as well as getting other nodes to open inbound channels to your node. In the future, cooperative channel construction may be possible, so you can open symmetric channels that have funds committed on both ends on creation. For now, however, new channels only have funds on one end, on the originator’s side. Hence, to make your node balanced with both inbound and outbound capacity, you need to open channels to others and entice others to open channels to your node.
Opening outbound channels
As soon as you get your Lightning node up and running, you can fund its Bitcoin wallet and then start opening channels with those funds.
You must choose channel partners carefully as your node’s ability to send payments depends on who your channel partners are and how well connected they are to the rest of the Lightning Network. You also want to have more than one channel to avoid being susceptible to a single point of failure. Since Lightning now supports multi-path payments, you can split your initial funds into several channels and route bigger payments by combining their capacity. At the same time, avoid making your channels too small. Since you need to pay Bitcoin transaction fees to open and close a channel, the channel balance should not be so small that the on-chain fees consume a significant portion. It’s all about balance!
To summarize:
-
Connect to a few well connected nodes.
-
Open more than one channel.
-
Don’t open too many channels.
-
Don’t make the channels too small.
One way to find well connected nodes is to open a channel to a popular merchant selling products on the Lightning Network. These nodes tend to be well funded and well connected. So, when you are ready to buy something online via Lightning, you can open a channel directly to the merchant’s node. The merchant’s node ID will be in the invoice you will receive when you try to buy something. That makes it easy.
Another way to find well-connected nodes is to use a Lightning Explorer (see “Lightning Explorer”) such as 1ml.com and browse the list of nodes sorted by channel capacity and number of channels. Don’t go for the biggest nodes as that encourages centralization. Go for a node in the middle of the list so that you can help them grow. Another factor to consider might be the time span a node has been in operation. Nodes established for more than a year are likely to be more reputable and less risky than nodes that started operation a week ago.
Autopilot
The task of opening channels can be partially automated with the use of an autopilot, which is software that opens channels automatically based on some heuristic rules. Autopilot software is still relatively new and it doesn’t always select the best channel partners for you. Especially in the beginning, it might be better to open channels manually. Autopilots currently exist in 3 forms.
-
lndincorporates an autopilot that is fully integrated withlndand runs constantly in the background while turned on. -
lib_autopilot.pycan offer autopilot computations for any node implementation based on the gossip and channel data. -
A
c-lightingplugin based onlib_autopilot.pyexists that provides an easy to use interface forc-lightningusers.
Be aware that the lnd autopilot will start running in the background as soon as it is turned on via the config file. As a result it will start opening channels immediately if you have onchain outputs in your lnd wallet.
If you want to have full control over the bitcoin transactions that you make and the channels that you open, make sure to turn the autopilot off before you load your lnd wallet with bitcoin funds.
If the autopilot was previously turned on, you might have to restart your lnd before you top up your wallet with an on-chain transaction or before you close channels, which effectively gives you on-chain funds again.
It is crucial that you set key configuration values if you want to run the autopilot.
Have a look at this example configuration:
[lnd-autopilot]
autopilot.active=1
autopilot.maxchannels=40
autopilot.allocation=0.70
autopilot.minchansize=500000
autopilot.maxchansize=5000000
autopilot.heuristic=top_centrality:1.0
This configuration file would activate the autopilot. It would open channels as long as the following two conditions are met:
-
Your node has currently less than 40 channels open.
-
Less than 70% of your total funds are off-chain in payment channels.
The numbers 40 and 0.7 are chosen completely arbitrarily here as we cannot make any recommendations that are valid for everyone about how many channels one should have open and what percentage of one’s funds should be off chain.
The autopilot in lnd will not take into account on-chain fees. In other words, it will not delay opening channels to a time period when fees are low.
To reduce fees, you can manually open channels during a time period when fees are low, e.g. during the weekend.
The autopilot will make channel recommendations whenever the conditions are met and will immediately try to open a channel by using the appropriate current fees.
According to the above configuration file, the channels will be between 5 mBTC (minchansize=500000 satoshi) and 50 mBTC (maxchansize=5000000 satoshi) in size.
As is common, the amounts in the configuration file are enumerated in satoshi.
Currently channels below 1 mBTC are not very useful and we do not recommend you open channels that are too small and below this amount.
With the wider adoption of multipath payments, smaller channels are less of a burden. But for the time being, this is our recommendation.
The c-lightning plugin works very differently in comparison to the lnd autopilot.
First, it differs in the algorithms used to make the recommendations. We will not cover this here. Secondly, it differs in its user interface.
You will need to download the autopilot plugin from the c-lightning plugin repository at https://github.com/lightningd/plugins/tree/master/autopilot and activate it.
We have already explained how to activate plugins in c-lightning.
The autopilot in c-lightning is controlled via 3 configuration values which can be set in the config file or as command line arguments when you start lightningd.
[c-lightning-autopilot]
autopilot-percent=75
autopilot-num-channels=10
autopilot-min-channel-size-msat=100000000msat
These values are the actual default config and you do not need to set them at all.
The autopilot will not automatically run in the background like in lnd.
Instead, you have to start a run specifically with lightning-cli autopilot-run-once if you want the autopilot to open the recommended channels.
But if you want it to just provide you with recommendations, from which you can handpick the nodes, you can append the optional dryrun argument.
A key difference between the lnd and the c-lightning autopilots is that the c-lightning autopilot will also make a recommendation for the channel size.
For example, if the autopilot recommends opening a channel with a small node that only has small channels, it will not recommend opening a large channel.
However, if it opens a channel with a well-connected node that also has many large channels, it will probably recommend a larger channel size.
As you can see the c-lightning autopilot is not as automatic as lnd’s, but it gives you a little bit more control.
These differences reflect personal preferences and could actually be the deciding factor for you to choose one implementation over the other.
Keep in mind that current autopilots will primarily use public information from the gossip protocol about the current topology of the Lightning Network. It is obvious that your personal requirements for channels can only be reflected to a certain degree. More advanced autopilots would use historical and usage information that your node has gathered when running in the past, including information about routing successes, who you have paid in the past, and who paid you. In the future, such improved autopilots might also use this collected data to make recommendations on closing channels and re-allocating funds.
Overall, at the time of writing of this book, be cautious not to depend or rely too heavily on autopilots.
Getting inbound liquidity
In the current design of the Lightning Network, it is more typical for users to obtain outbound liquidity before obtaining inbound liquidity. They will do so by opening a channel with another node, and more often they’ll be able to spend bitcoin before they can receive it. There are three typical ways of getting inbound liquidity:
-
Open a channel with outbound liquidity and then spend some of those funds. Now the balance is on the other end of the channel, which means that you can receive payments.
-
Ask someone to open a channel to your node. Offer to reciprocate, so that both of your nodes become better connected and balanced.
-
Use a submarine swap (e.g.
Loop-In) to exchange on-chain BTC for an inbound channel to your node. -
Pay a third party service to open a channel with you. Several such services exist. Some charge a fee to provide liquidity, some are free.
Here is a list of currently available liquidity providers who will open a channel to your node for a fee:
-
Bitrefill’s Thor service at https://www.bitrefill.com/thor-lightning-network-channels/
-
Lightning To Me at https://lightningto.me/
-
LNBig at https://lnbig.com/
-
Lightning Conductor at https://lightningconductor.net/channels
Creating inbound liquidity is challenging from both a practical and user experience perspective. Inbound liquidity does not happen automatically, so you have to find ways to build it for your node. This asymmetry of payment channels is also not intuitive. In most other payment systems you get paid first (inbound) before you pay others (outbound).
The challenge of creating inbound liquidity is most noticeable if you are a merchant or sell your services for Lightning payments. In that case, you need to be vigilant to ensure that you have enough inbound liquidity to be able to continue to receive payments. What if there is a surge of buyers on your store, but they can’t actually pay you because there is no more inbound capacity?
In the future these challenges can be partially mitigated by the implementation of dual-funded channels, which are funded from both sides and offer balanced inbound and outbound capacity. The burden could also be mitigated by more sophisticated autopilot software, which could request and pay for inbound capacity as needed.
Ultimately, Lightning users need to be strategic and proactive about channel management to ensure that sufficient inbound capacity is available to meet their needs.
Closing channels
As discussed earlier in the book, a mutual close is the preferred way of closing a channel. However, there are instances where a force close is necessary.
Some examples:
-
Your channel partner is offline and cannot be contacted to initiate a mutual close.
-
Your channel partner is online, but is not responding to requests to initiate a mutual close.
-
Your channel partner is online and your nodes are negotiating a mutual close, but they become stuck and cannot reach a resolution.
Re-balancing channels
In the course of transacting and routing payments on Lightning, the combination of inbound and outbound capacities can become unbalanced.
For example, if one of your channel partners is frequently routing payments through your node, you will exhaust the inbound capacity on that channel, while also exhausting the outbound capacity on the outgoing channels. Once that happens, you can no longer route payments through that route.
There are many ways to re-balance channels, each with different advantages and disadvantages. One way is to use a submarine swap (e.g. Loop-Out) as described previously in this chapter. Another way to re-balance is to simply wait for routed payments that flow in the opposite direction. If your node is well connected, when a specific route becomes exhausted in one direction, the same route becomes available in the opposite direction. Other nodes may “discover” that route in the opposite direction and start using it as part of their payment path, thereby re-balancing the funds again.
A third way to re-balance channels is to purposefully create a circular route that sends a payment from your node back to your node, via the Lightning Network. By sending a payment out on a channel with large local capacity and arranging the path so that it returns to your node on a channel with large remote capacity, both of those channels will become more balanced. An example of a circular route re-balancing strategy can be seen in Figure 5-2.

Figure 5-2. Circular route re-balancing
Circular re-balancing is supported by most Lightning node implementations and can be done on the command-line or via one of the web management interfaces such as Ride the Lightning (RTL) (see XREF HERE).
Channel rebalancing is a complex issue that is the subject of active research and covered in more detail in XREF HERE.
Routing fees
Running a Lightning node allows you to earn fees by routing payments across your channels. Routing fees are generally not a significant source of income and dwarfed by the cost of operating a node. For example, on a relatively busy node that routes a dozen payments a day, the fees amount to no more than 2000 satoshis.
Nodes compete for routing fees by setting their desired fee rate on each channel. Routing fees are set by two parameters on each channel: a fixed base fee that is charged for any payment and an additional variable fee rate that is proportional to the payment amount.
When sending a Lightning payment, a node will select a path so as to minimize fees, minimize hops, or both. As a result, a routing fee market emerges from these interactions. There are currently many nodes that charge very low or no fees for routing, creating downward pressure on the routing fee “market”.
If you make no choices, your Lightning node will set a default base fee and fee rate for each new channel. The default values depend on the node implementation you use. The base fee is set in the unit of millisatoshi (thousandths of a satoshi). The proportional fee rate is set in the unit of millionths and is applied to the payment amount. The unit of millionths is often abbreviated with ppm (parts per million). For example, a base fee of 1,000 (millisatoshi) and a fee rate of 1,000 ppm (millionths) would result in the following charges for a 100,000 satoshi payment:
Example 5-1.
P = 100,000 satoshi
F_base = 1,000 millisatoshi = 1 satoshi
F_rate = 1,000 ppm = 1,000/1,000,000 = 1/1,000 = 0.001 = 0.1%
F_total = F_base + ( P * F_rate )
Rightarrow F_total = 1 satoshi + ( 100,000/1,000 ) satoshi
Rightarrow F_total = 1 satoshi + 100 satoshi = 101 satoshi
Broadly speaking, you can take one of two approaches to routing fees. You can route lots of payments with low fees, making up for low fees by high volume. Alternatively, you can choose to charge higher fees. If you choose to set higher fees, your node will be selected only when other cheaper routes don’t exist. Therefore, you will route less frequently but earn more per successful routing.
For most nodes, it is usually best to use the default routing fee values. This way, your node is competing on a mostly level playing field with other nodes who use the default values.
You can also use the routing fee settings to re-balance channels. If most of your channels have the default fees but you want to rebalance a particular channel, just decrease the fees on that specific channel to zero or to very low rates. Then sit back and wait for someone to route a payment over your “cheap” route and re-balance your channels for you as a side-effect.
Node management
Managing your Lightning node on the command-line is obviously not easy. It gives you the full flexibility of the node’s API and the ability to write your own custom scripts to satisfy your personal requirements. But if you don’t want to deal with the complexity of the command line and only need some basic node management capabilities, you should consider installing a web-based user interface that makes node management easier.
There are a number of competing projects that offer web-based Lightning node management. Some of the most popular ones are described below.
Ride The Lightning (RTL)
RTL is a graphical web user interface to help users manage Lightning node operations for the three main Lightning node implementations (LND, c-lightning, and Eclair). RTL is an open source project developed by Suheb, Shahana Farooqui, and many other contributors. You can find the RTL software here:
https://github.com/Ride-The-Lightning/RTL
Here is an example screenshot of RTL’s web interface, as provided on the project repository:

Figure 5-3. Example RTL web interface
LNDMon
Lightning Labs, the makers of LND, provide a web-based graphical user interface called lndmon to monitor the various metrics of an LND Lightning node. lndmon only works with LND nodes. It is a read-only interface for monitoring and as such does not allow you to actively manage the node. It cannot open channels or make payments. Find lndmon here:
Thunderhub
A very aesthetically pleasing web-based graphical user interface similar to RTL but exclusive to LND. It can be used to make payments, rebalance channels and manage the node through a variety of features. Find Thunderhub here:
Conclusion
As you maintain your node and gain experiences you will learn a lot about the Lightning Network. Being a node operator is a challenging but rewarding task. Mastering these skills will allow you to contribute to the growth and development of this technology and the Lightning Network itself. You will furthermore gain the ability to send and receive Lightning payments with the greatest degree of control and ease. You will play a central role in the network’s infrastructure and not just be a participant on the edges.