

1
Leaf Me Alone!: Scratch Basics
Scratch is neat tool for making animations, games, and movies. In this book, we’ll focus on making games, so our projects will be playful and interactive. Scratch is mostly self-contained: for example, if you need a character for your game, you can draw it directly in Scratch or upload an image you already have. You can also choose one of the built-in Scratch characters.
We’ll use Scratch’s simple, block-based programming language to code the interactive parts of our game. Scratch uses a system of blocks that represent different functions. They snap together like puzzle pieces into complete lines of code.

How Scratch code blocks fit together
These stacks of code blocks tell the objects in your games what to do. As you’ll see shortly, using code blocks in Scratch is very easy.
Getting Started with Scratch
To begin, you need to sign up for your own Scratch account. It’s free, and after you’ve registered, you can start saving and sharing your games. In your web browser, open the official Scratch website at https://scratch.mit.edu/.
On the Scratch website, click Join Scratch in the upper right. When asked, add your email address and some information about yourself. Then you’ll get an email asking you to confirm your email address. Check your inbox and click the link in the email. Bam! You should now have your own Scratch account.

The Scratch home page
Click the Create button at the top of the Scratch home page if you’re not already in Scratch’s editor. You’ll see a blank white box with a smiling orange cat, as shown in the following figure. This box is the game window, which is the only part of the editor your players will see. The cat is your first sprite. Let’s talk about what a sprite is and what you can do with it.

Opening the Scratch editor
That orange cat is Scratchy, Scratch’s mascot. With every new Scratch project, Scratchy is automatically included in a noble effort to encourage more people to make games about cats.
Does Scratchy love lasagna? Does Scratchy hate Mondays? No one knows. But we do know that Scratchy is a sprite, which is any object in a Scratch game that can do something, like change its appearance or play music. Each sprite can have scripts, costumes, and sounds attached to it. A script is a group of coding blocks that fit together, telling the sprite what to do. A costume is a snapshot or a frame of a sprite that you can use to create animation. For example, the pose Scratchy is in right now is one of two default costumes that come with Scratchy. Click the Costumes tab on the top left (between Code and Sounds) to see the Scratchy sprite’s costumes.
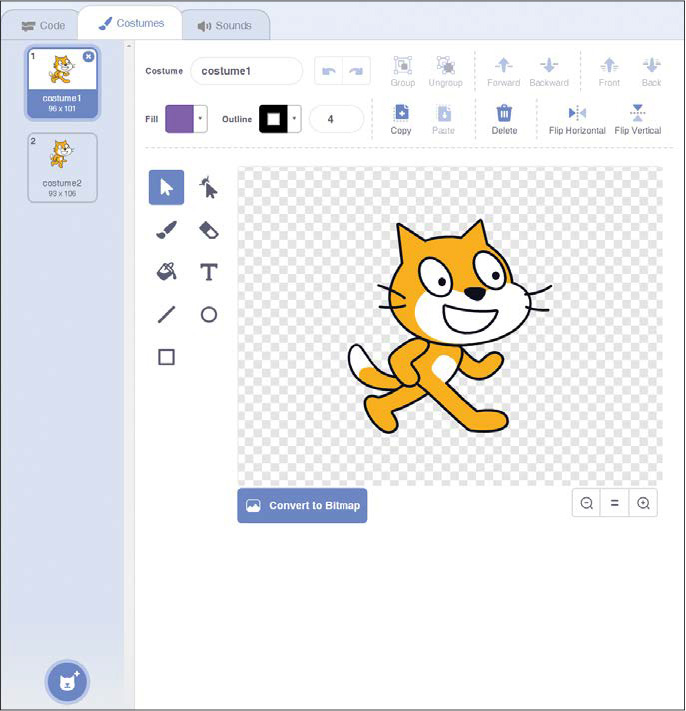
Scratchy comes with two costumes
When you flip between the two costumes by clicking one and then the other like a flip book, Scratchy should look they’re walking. We’ll use costumes to animate our sprites or change their appearance.
Sprites can also have sound effects that they can play. For example, Scratchy comes with a meow sound. Click the Play button in the Sounds tab to hear it.

Leaf Me Alone (While I Eat This Leaf)
We’ll create a simple game in Scratch called Leaf Me Alone (While I Eat This Leaf). It’s about a hungry little bug who wants to eat a leaf and wants to do so in solitude. You can first play it at https://scratch.mit.edu/projects/117199134/, and then we’ll create it.

Exploring the Leaf Me Alone game
Click the green flag to start the game. The little bug starts moving forward automatically! Press the left or right arrows to make the bug change direction. As the bug eats the leaf, it leaves a trail of munches behind. This hungry little bug never stops munching. When you want to stop the game, click the red stop sign in the upper-right corner. If you click the green flag again, the game will start over.
It seems pretty simple, right? Now, let’s make this game from scratch!
Creating Your Own Sprites
You’ll need to draw your own sprites for the Leaf Me Alone game. One of Scratch’s cool features is that you can use the mouse to draw characters for your game. Then you can give them instructions to make them do different things. It’s okay if they turn out messy or imperfect. Don’t worry!
Right-click Scratchy and click Delete. Zoink! Scratchy disappears. (You won’t really hear a zoink sound. I made that part up.)
Next, look at the Sprites list below the game window.

Opening the Sprites list
The Stage, which is currently a plain white rectangle, is the background for the game. When you click it, it should be surrounded by a blue highlight. Because we deleted Scratchy, no sprites are in our Stage right now. Let’s fix that by adding a new sprite!
Hover over the cat icon below the Stage to display four more buttons. Click Choose a Sprite to select a sprite from the Sprites Library. The Paint button lets you create your own sprite. The Surprise button selects a random sprite, and the Upload button lets you use an image from your computer.
Drawing Weird Bugs
Let’s click the Paintbrush to draw a sprite for our game. Then click the Costumes tab. Now you’re in the costume window where you can draw a costume for your new sprite.

Drawing a new costume for your bug
On the left side of the drawing area is a menu of drawing tools. Make sure the paintbrush is selected. On the top of the drawing area is a color selector. To the right of the paintbrush icon is a number you can change to control the size of the paintbrush.
I drew a caterpillar, but you can draw any kind of bug you’d like. You should see a tiny plus sign (+) in the middle of the drawing area. That is the center point of the sprite: draw the bug’s head there so its head is about the size of the plus sign (+).

That’s a pretty small bug! To make drawing easier, use the magnifying glass buttons in the lower right to zoom in so you can see the bug better. The magnifying glass with the plus sign (+) zooms in, and the minus sign (–) zooms out. You can see what your sprite looks like at its normal size by looking over at the game window.
You can make your bug look however you want, but make sure it’s facing toward the right. Scratch will automatically rotate your bug as it walks around the leaf, but sprites should always start by facing toward the right. So, if you want to give your bug a big weird butt, make sure its butt is pointing to the left side in the opposite direction of the head.
If you make a mistake while drawing your sprite, click the Undo button, which is the left arrow above your drawing. This button will undo the last change you made. If you decide you didn’t want to undo the change, you can click the Redo button, which is the right arrow at the top of your drawing.
When you’re happy with your bug, look at the Sprites list below the Stage again. Your bug should be there now, but it will be called empty. That’s not the best name for a bug, but you can change it. Enter your new name into the Sprite field just below the stage. Change its name to something like weird bug or my perfect creation.
Drawing a Backdrop
The Stage is a lot like a sprite in that it also has its own scripts, costumes, and sounds. Costumes for the Stage are called backdrops. Any image you create for the Stage becomes the backdrop for the entire game window. You can make multiple backdrops and switch between them at different moments in your game. For example, the first level of your game could take place in a forest, and the second level could take place underwater. For Leaf Me Alone, we need only one backdrop because there is only one level. Let’s draw it now.
Click the Stage (the blank white rectangle) to the right of the Sprites list. The Stage should show the text 1 backdrop below it. Below that is a blue button with a stage icon that works just like the Choose a Sprite button. Hover over it to show four buttons that do the same things as the Sprite buttons but for backdrops.
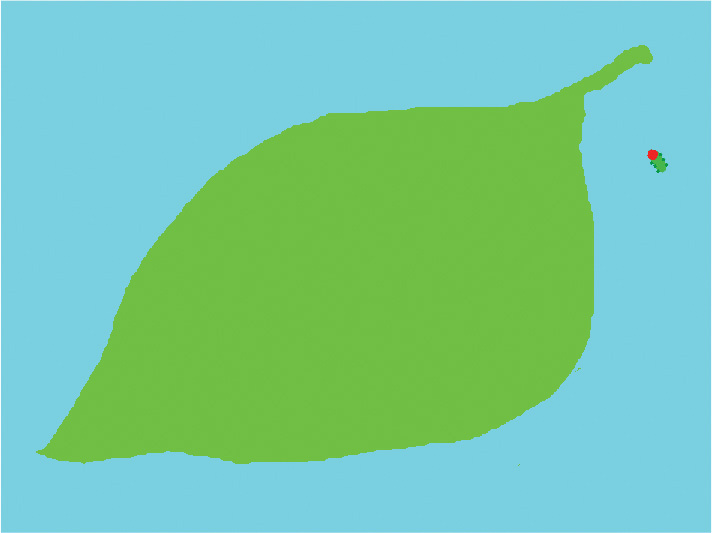
Instead of making a new backdrop, we’ll just paint over the empty white one we started with. If you’re not in the drawing window, click the Backdrops tab. Let’s draw the background for the game: a big juicy leaf for the bug to eat.
If you zoomed in to draw the bug, you might still be zoomed in. Click the button in between the two magnifying glasses (=) to go back to normal view. You should see the entire backdrop. If you can see sliders around the edges to scroll the view, it means you’re still zoomed in.

Drawing the leaf backdrop
We’ll use two colors for this backdrop: one for the background and one for the leaf. (I used sky blue for the background and leaf green for the leaf.) Using just two colors here will be important when you write your program later, so make sure not to add more colors right now. You can also rename the background by clicking the text backdrop1 in the text field and entering a new name.
Now that we have our bug and our leaf, it’s time to get our bug moving.
Using Event Blocks
Click your bug in the Sprites list, and then make sure you’re in the Code tab. The empty area on the right is where we’ll snap our code blocks together to write directions for our sprites. On the left are several categories that hold the different blocks that we can choose. Click a few of the categories to see which code blocks they contain.
For example, click Events to view the Events blocks, which let you sense events and trigger other code blocks:

Exploring the Events blocks
Most categories are pretty self-explanatory. Motion blocks control movement. Looks blocks change the sprite’s appearance. Sound blocks play sounds.
Every stack of programming blocks you’ll write begins with an Events block. Click Events and you’ll see that all the Events blocks have big round tops. Like a chef following directions to bake a cake, Scratch always reads directions from top to bottom. Keep in mind that an Events block always goes first; all other blocks can only attach underneath it.

Events blocks always go first (at the top).
Events answer the important question When do I do this? The Events block we want to use right now is when green flag clicked. Click and drag it into the area on the right.
Recall that you started the example game by clicking the green flag. The game had the when green flag clicked event, which tells the program to run the code blocks when the player clicks the green flag. Our game will start with this Events block too. Next, we’ll write code that tells our bug to move.
Moving the Bug
Think of a bug crawling along a wall and the weird, winding path it takes. That kind of movement is very easy to replicate. The bug can keep moving forward until the player makes it turn to the left or right. To make our bug move, we’ll use the blocks Scratch has for moving forward and turning. The player will have to do their best to guide the bug as it moves nonstop, making the game fun to play.
Let’s start by making our bug move forward. The block that moves a sprite forward moves the sprite only one step forward. Because we don’t want the bug to stop after just one step, we need to add a loop. A loop is a block that makes something happen more than once. To make our bug keep moving, we’ll use a loop block to repeat a move instruction over and over for as long as the green flag is on.
Click the Control category to find all the blocks that handle branching, which is when you write different scripts that will run in certain situations. Think of branching code as branches growing off the main part of your code (the trunk). When different actions happen in your game, Scratch will make specific parts of the branch run. On their sides, branching blocks have empty slots in which to fit other blocks. For example, looping is a form of branching that can have different outcomes depending on the situation.
We want to use the simplest loop, which is a forever loop. Once a forever loop starts, it just keeps running over and over until the game is over. We use a forever loop because we want our bug to keep moving as long as the game is running. Click and drag a forever loop to attach it to the bottom of the when green flag clicked block. A shadow of the block should appear to show you can connect it.

Attaching a forever block
You can put as many other code blocks inside a forever loop as you want. The loop runs the blocks inside it in order from top to bottom and then jumps back to the start of the loop to repeat them. The forever loop continues repeating the loop until you click the stop sign to end the game.
We’ll add a move () steps block into the forever loop to move our bug forever. You can find this block in the Motion category. We’ll also add a block that prevents the bug from moving off the Stage, because the player won’t be able to see the bug and it might get lost. So, we’ll add an if on edge, bounce block to the loop that makes the bug change directions when it hits the edge of the Stage.
Click Motion. Click and drag the move 10 steps and if on edge, bounce blocks into the forever loop.

Creating a motion loop
The move 10 steps block makes a sprite take 10 steps in the direction it’s currently facing. Double-click the number 10 to change the number of steps the bug will move. A lower number makes the bug move slower. I changed the number of steps to 5.
Click the green flag to test your code. The bug should start moving to the right until it hits the edge of the Stage; then it will reverse direction and walk back to the left, then reverse toward the right again. And on and on.
Testing your bug’s movement
While your game is running, a glow should appear around the stack of code blocks you just made. The glow indicates that the bug is currently following the directions in that stack. For example, if you didn’t have a forever loop, the glow would disappear after that stack of code was finished running. You can use this glow to keep track of which parts of your code Scratch is running at any given time and to help make sure all parts of your program work properly. The glow comes in handy when you try to debug your code later on!
Steering the Bug
Our bug can move only in a straight line, but we want the player to use the arrow keys to turn the bug left and right. First, we need to check whether the player is pressing a key that makes the bug turn. Second, when we know which key the player is pressing (left or right arrow), we need to make the bug turn in the correct direction.
We’ll use branching again as well as an if () then block to check first whether the player is pressing a key; then (and only then) will we make our bug turn. Again, all the blocks related to branching are in the Control category.
Click and drag an if () then block and place it under the if on edge, bounce block inside the forever loop. We put the if () then block in our forever loop so the player can turn the bug as long as the game is still running.
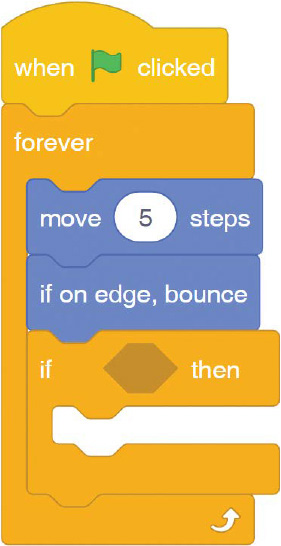
Using an if () then block
The hexagonal hole in the middle of the if () then block holds Sensing blocks. Sensing blocks check whether a specific action has happened, such as whether two sprites are touching or whether a player is pressing a key. The Sensing blocks are pointy and hexagonal, just like the hole they fit into. Click and drag the Sensing block if key space pressed? and place it into the hole in the if () then block.
Because the space key isn’t the key we want to check for, click the small black triangle next to it and choose left arrow from the drop-down menu. The block should now show if key left arrow pressed? then.
When the player presses the left arrow key, we want the bug to turn left! In the Motion category, find the turn left 15 degrees block. It should have a counterclockwise arrow on it. Drag that block over and snap it onto the bottom of the if key left arrow pressed? then block. The space between the two blocks should light up to show you where the connection will be. Finally, change 15 to 10 in the turn left 15 degrees block to make the left turns a little less sharp.

Checking whether the player is pressing the left arrow key
Run the game and see if you can make your bug turn in circles by holding down the left arrow key! Now let’s make the bug turn right as well.
Right-click the if key left arrow pressed? then block and select duplicate. A copy of that block including the turn left 10 degrees block inside it should appear under your cursor. Place that copied if () then block below the preceding if () then block.

Checking whether the player is pressing the right arrow key
Be sure to click the black arrow next to left arrow and change it to right arrow. Then remove the turn left 10 degrees block by clicking and dragging it back into the block list on the left side. Next, find the Motion block turn right 15 degrees (it has a clockwise arrow). Place this block inside the if key right arrow pressed? then block and change the number to 10 (otherwise, the bug will turn right at a different angle than it does when turning left).
Test your code again, and make sure pressing the left arrow key turns the bug left, pressing the right arrow key turns the bug right, and pressing neither makes the bug move straight.
If you hold down the right arrow key and the bug turns left, you forgot to replace the block inside the if key right arrow pressed? then branch! If the bug keeps turning, even when you’re not holding down an arrow key, you put the turning block in the main forever loop instead of inside the if () then branch! Check your code blocks against the ones shown in the book to make sure all your blocks are in the correct places.
Chewing Holes in the Leaf Using Pen Blocks
Now our bug is moving all over the leaf, but it’s not really wreaking a path of destruction yet. Let’s make it chew its way through the leaf, leaving a trail of bite holes behind it!
To do this, we’ll use the Pen blocks. Imagine a mass-produced room-cleaning robot with a marker taped to it that moves in a straight line across your kitchen floor, scaring your cat: the device would leave a line on the floor behind it, showing where it moved. (Don’t try this at home!) Just like this cleaning robot, a sprite can use a pen to draw on the backdrop.
We’ll draw the color of the sky onto the leaf, making it look like the bug has chewed holes through it. That’s why it was important to make the background behind the leaf just one color!
To add the Pen blocks, click the blue button at the bottom-left corner of the screen. This should pull up a library of Extensions. Click the Pen extension to add it. We need to place all the Pen blocks before the forever loop, not inside it, because we want them to happen only once at the start of the game. Think of this part of the code as the setup area.

Add the set pen color to block. We’ll set the pen color to the color of the sky by clicking the colored box in the set pen color to block, clicking the dropper at the bottom of the menu that pops up, and then clicking the backdrop of the Stage. Add the set pen size to block and change the size to 5 because that seems like a reasonable size for the bug’s mouth. Then add the pen down block to start drawing, similar to lowering a pen to paper. (The pen up block stops drawing.)
Notice that there is a set pen size to as well as a change pen size by block. Setting makes the pen size a specific value, such as 1, 10, or 187. Changing adds a number to that pen size. If the pen size is 1 and you use a set pen size to 1 block, the pen size is still 1. If the pen size is 1 and you use a change pen size by 1 block, the pen size is 2 because you’ve added 1 to 1. Don’t get them mixed up!

Adding the Pen stack before the loop
After you have all your Pen blocks in place, click the green flag. The bug should now leave a trail through the leaf as it chews. Using the arrow keys, try making the bug chew big, curving lines.
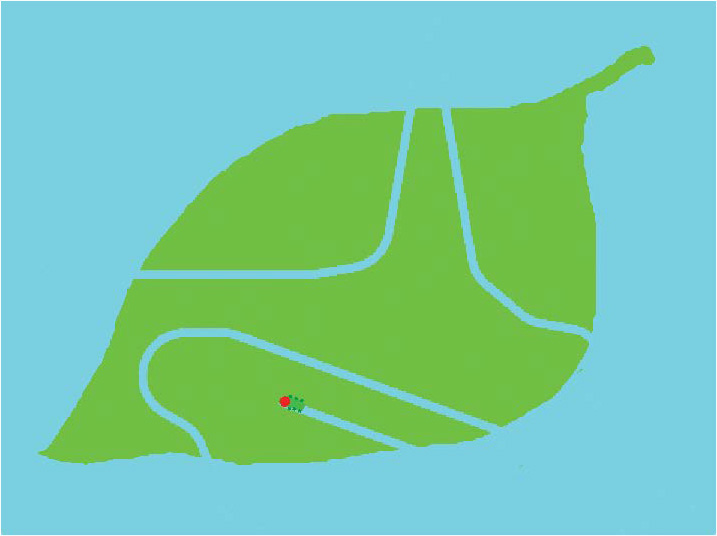
The bug leaves a trail of blue that makes it look like the bug is chewing through the leaf!
Our bug is making lines through the leaf now, but the lines look a bit too neat and smooth to be holes left behind by a hungry bug. Let’s make the line a little chompier by changing the line as it’s drawn.

Click another set pen size to block (set not change) and drag it into the forever loop, as shown here.

Varying pen size to make bug bites look more realistic
We want the set pen size to block inside the forever loop so we can change the size again and again, every time the bug moves. We’ll change it at random.
You already know that you can change a number that is in a hole in a block by entering another number. Well, some Scratch blocks can also calculate numbers using the numbers you fill in. Those blocks are in the Operators category, as shown here.

Operators blocks
Operators blocks perform mathematical operations. Any rounded block can fit into a round hole in any other block (including other rounded blocks!). The first four blocks perform simple mathematical functions: addition, subtraction, multiplication, and division. We’ll use the fifth block: click pick random 1 to 10, and drop it directly over the number 1 on the set pen size to 1 block, as shown here. Any rounded block can fit into a round hole in any other block (including other rounded blocks!).

Randomizing pen size
The pick random operator picks a random number between the two numbers you specify. In our code, the number could be between 1 and 10 but could also include the numbers 1 and 10. With this block as part of our forever loop, every time the bug moves the pen size will change.
Now the trail that the bug leaves should look like it’s made up of individual bite marks because each chomp will be a slightly different size. Click the flag and see what happens!

Using randomized pen lines to make bug bites look more realistic
The new lines look chompier—nice!
But notice that all the old chomp lines from the bug’s previous meals still appear. They never go away! Let’s add some instructions to make sure the game starts with a clean leaf every time we run it.
Starting Fresh Each Game
To refresh the game each time it starts, we’ll add three blocks to the setup part of our code: the part before the forever loop starts. The setup code runs once when the game starts and never again until the game starts over.
The first two blocks we need to refresh our game are the Motion blocks go to x: y: and point in direction. The two blocks make sure the bug always starts in the same position. The third block we need is a Pen block called erase all, which we’ll use to clear the trail the bug drew in the previous game.
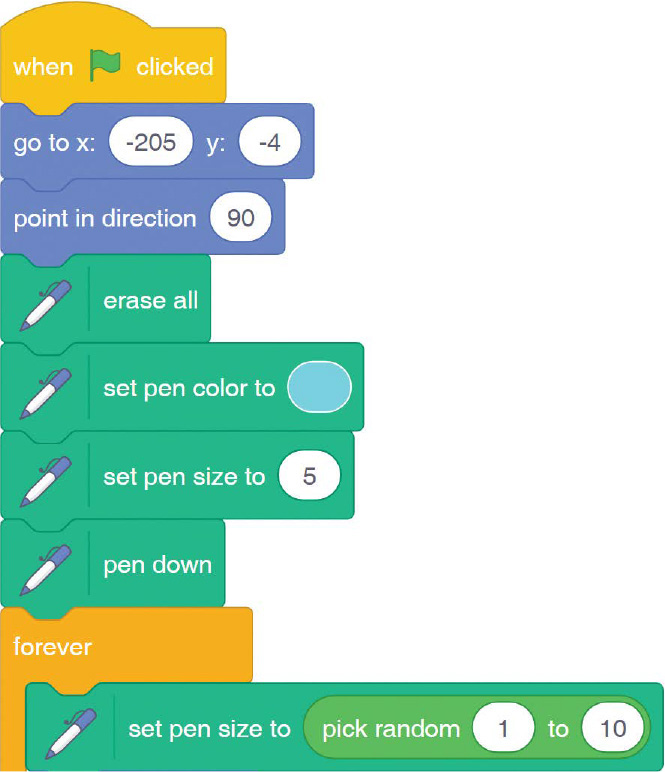
Code blocks to refresh the game
Using the Grid
The go to x: y: block moves a sprite to any position on the screen, which you define using two numbers x and y. In Scratch, we use numbers on a grid to locate the position of different objects. Imagine an invisible grid over the Stage. This grid is made up of two number lines that intersect at the center of the screen. The numbers on the horizontal line (x) increase to the right and decrease to the left. The numbers on the vertical line (y) increase up the line and decrease down the line. Any numbers to the left of the center point on the horizontal number line or below the center point on the vertical line are negative.
The value x is the sprite’s place along the horizontal line, and y is its place on the vertical line. Every possible position on the screen has an x-coordinate and y-coordinate that indicates how far it is from the center of the screen. For example, in the bottom-right corner of the game screen, you’ll see the x- and y-coordinates showing the current position of your mouse. Watch how these numbers change as you move your mouse around the screen.

Tracking the location of your mouse with x- and y-coordinates
Setting Your Bug’s Starting Position
The go to x: y: block always starts with the current position of the sprite. (Try dragging and dropping the bug in different places on the screen; the numbers in the go to x: y: block will change.)
An easy way to set the bug’s starting position is to first drag the bug to wherever you want it to start at the beginning of the game. Then drag the go to x: y: block into your stack in the setup area. The coordinates of the bug’s current position will be filled.
Setting Your Bug’s Starting Direction
The go to x: y: block sets the bug’s starting position but doesn’t affect the bug’s starting direction. To set the bug’s starting direction, you need to use the point in direction block. Click the triangle on the point in direction block and, from the drop-down menu, choose 90, the direction we want the bug to start in.
Every direction has a number associated with it. In Scratch, when the bug turns, its direction number changes. The direction number is the angle the sprite is facing. Imagine a circle that has a number line wrapped around its circumference with the sprite positioned in the middle of the circle. The sprite’s direction at 0 means it’s facing straight up (the very top of the circle). Each number is called a degree, and the angle of the circle can range from 0 to 360 degrees. As the degree number changes, the sprite changes the direction it’s facing. For example, 90 degrees changes the sprite’s starting direction to the right, which is the direction we want the sprite to face when the game starts.

The sprite’s direction in degrees
Resetting the Background
The erase all block clears all the pen marks that have been drawn so far, making our leaf pristine and new again. Place the erase all block directly below the go to x: y: block and point in direction block at the beginning of your stack so they run first when a player clicks the green flag.
Click the green flag to run the game and make sure all the blocks work. Click the flag a few more times to reset the game each time. Your game should start in the same condition every time.
Checking for Contact Between the Bug and the Leaf
To really sell the idea that the bug is tearing right through this leaf, let’s play a munching sound effect whenever the bug is chewing on it. To do that, we first need to check whether the bug is touching the leaf. If we played the sound all the time, whether or not the bug was on the leaf, it wouldn’t match what was happening onscreen. So we want to be sure to check for contact between the bug and the leaf.
To check for contact, we’ll use one Control block and one Sensing block to branch our code when the bug is on the leaf, just like we checked for a left or right arrow keypress earlier. To keep our stack neat, we’ll add a second when green flag clicked block instead of adding to the existing one. As a result, we’ll have two identical stacks that begin with the when green flag clicked block.
Creating two stacks like this works well. In fact, you can have as many identical events as you want. When you click the green flag to start the game, all the when green flag clicked events will run at the same time. You’ll find this technique useful when you want to run multiple loops with different timings or when you just want to organize the code, like we’re doing now.
Start the new code stack by clicking and dragging a new when green flag clicked block from Events. Put it next to the other one, creating a new stack. Then give it its own forever block. We use the forever block because we want the bug to keep checking whether it’s touching the leaf during the entire game. Inside the forever block, place an if () then block.
To check whether the bug is touching the leaf, add the if touching color ? then block inside the if () then block. When you click the colored box in the block, a menu pops down; click the dropper and then the leaf, and the color in the box should change to the color in the leaf.

Checking whether the bug is touching a color
Because we drew the leaf using just one color, we only have to check that the bug is touching that color. Next, we’ll add the sound we want to play inside the branch.
Playing Sounds
Click the Sound blocks category and drag the play sound pop until done block into the if touching color ? then branch. In Scratch, sprites come with the pop sound by default. You can click the Sounds tab to play the sound.

Playing the pop sound effect
A sprite can have multiple scripts and costumes attached to it, and it can have multiple sounds as well. Right now the only sound our bug has is pop, but that’s not a sound a bug might make while eating a leaf. Let’s find a better sound.
Scratch comes with a huge library of sound effects, such as beatboxing, animal sounds, and music. Click the Choose a Sound button to add a sound. Hover over it to display the other options. The Record button lets you record a sound, the Surprise button selects a random sound for you, and the Upload button lets you upload a sound from your computer.

Exploring the Sound Library
You’ll find a ton of sounds in the Sound Library! Click the Animals category to narrow the list down. Listen to sounds by hovering over them. Try to find a bug munching sound. When you find a sound you like, double-click it to add it to your sprite’s sounds. Try the chomp sound for this example.

Now that your bug has its new sound effect, return to the Code tab. Click the triangle on the play sound until done block to change the sound from pop to chomp. Your bug should now play the chomping sound effect while eating the leaf. Run the game to hear what it sounds like!
It sounds a little weird—definitely not the same as the preview! The game plays the entire sound effect only after the bug moves off the leaf. The reason is that the bug tries to play its sound whenever it’s in contact with the leaf; however, the sound restarts every moment the bug is in contact with the leaf, down to a fraction of a second. So it sounds like a continuous drone instead of a series of distinct sounds. We need to use the Control category’s wait block to make the bug wait just long enough for the entire sound effect to play before replaying the sound.
Drag the wait 1 seconds block into your stack, just above the if () then block. Place it before the branch, not inside it. Otherwise, it will check whether the bug is touching the leaf and then wait one second before playing the sound.
One second is a bit too long between chomps. Instead, let’s try using 0.2 seconds, which is two-tenths of a second. One complete second is a surprisingly long amount of time in a game!

Waiting before replaying the sound effect
Run the game now. With a 0.2 second delay between chomps, the chomps should sound a whole lot better. Chomp chomp chomp chomp chomp chomp chomp.
Organizing Your Code
Our game is basically complete, but let’s take a moment to think about how best to lay out the Code area visually. Where should you put the instructions for your sprite in the Code area? Blocks need to be connected in the right places or they won’t work correctly.
Right now, I’m not talking about situations where there’s an obvious right answer. I’m talking about the decisions that don’t affect how your code runs, but do affect how it looks when someone is reading it. For example, when you use two different when green flag clicked stacks, where should you place them? Do you put one below the other? Or perhaps side by side?

This question is about form, not function. It’s entirely a matter of personal preference. It doesn’t matter to Scratch whether two stacks of code are above and below each other or side by side. They could be on top of each other in a messy heap, and as long as the code blocks are connected in the right ways, Scratch will still run them. So, does it matter where you place your stacks of code?
Well, yes, it does! Your Code area is like the inside of your head. The way you organize the Code area reflects your thought processes and how you think about your game. When the Code area is disorganized, your thoughts are jumbled and hard to follow. If one of your players clicks the See inside button to look at how you did something in your game, how you arranged your scripts will make a big difference in whether or not it makes sense to them.

Organizing the Leaf Me Alone code stacks
A thoughtful layout can help you keep your thoughts in order, help you remember what all your script parts do, and help make your script clearer to others who look at your work.
Placing related stacks next to each makes the most sense to me. For example, putting the when green flag clicked events next to each other is logical because they start at the same time and run simultaneously.
Scratch offers a couple of helpful functions for organizing your code. When you right-click the coding area, you can click Clean up Blocks to arrange all your stacks neatly, or you can click Add Comment to attach a note to your code. You can even attach a note to a specific block by right-clicking on the block and choosing Add Comment. Comments help explain the block’s purpose in the game to others (and help you remember what the block does). Comments don’t change how the code runs—they just make it a lot easier for humans to understand!
The layout of your game doesn’t have to match my layout exactly. But the layouts you use should make sense to you. Think of rearranging the stacks in your Code tab as a way of organizing your thoughts.
Challenge Level
With the Scratch knowledge you have now, try this optional task: make your bug burp after it has eaten some leaf. To make this work, you’ll probably want to use the following:
- A forever loop to make sure the burp is not a one time effect
- A Sensing block to check whether the bug is on the leaf
- A wait block to make sure the burp doesn’t happen too often
- A little randomness to keep the game interesting
- A burping sound (Try recording your own burp sound using the microphone on your computer. Do your best pretend burp!)

Recording your own burping sound
If you need help completing this task, click the See inside button on Leaf Me Alone to see how I did it! (Not the burping sound, just the code.)
Sharing Your Game
All you need to do now is share your game with the world! Right now, no one can see your game except you. You can tinker with it as much as you want—no one’s looking! After you’ve shared your game, other people can find it and play it, so make sure you’ve made all the changes and final touches you want before sharing it. But don’t worry; you can keep changing it after you share it or just temporarily unshare it again to make changes.
There are two buttons at the top of the Scratch editor: Share and See Project Page. Don’t click Share just yet. You still need to do a few more tweaks before you make your game public.
Click See Project Page to go to the page your players will see when they look at your game.

The See Project Page
At the top of this page is a handy reminder that you’ve not yet shared the game. You should fill out the Instructions to tell players how to play the game (for example, “Use the left and right arrow keys to help the caterpillar eat that leaf!”), and add the Notes and Credits (for example, your name or “my finest creation!”).
Use a hashtag (#) to create a link to the search results for that word. For example, try adding your username, the title of your game, or words like games and animations as keywords to help others find your game.
When the game is complete, click Share. Now people on the Scratch site can find your game, or you can share it with a friend by giving them the link. You’ve finished your first game!
One last detail: click your username in the top right, and then click My Stuff in the drop-down menu to go to your personal My Stuff page. The My Stuff page keeps track of all your projects, finished and unfinished, shared and unshared. You can also see how many people have looked at your game, sort through all your projects, and even unshare a game you’ve shared by clicking the Unshare link.

Viewing all your projects on the My Stuff page
Think of the My Stuff page as your personal, secret headquarters. From here, you can unleash all your diabolical Scratch plans on the unsuspecting masses! Or, you can just keep track of every project you’re working on.

What You Learned
You learned a bunch of good stuff in this chapter! You used Scratch’s block-based programming to create backdrops and sprites for a game. You also learned how to use loops, how to take input from a player, and how to use conditionals and branching. In Scratch, you can use x-coordinates and y-coordinates to keep track of where your sprites are onscreen. You know how to share your game when you finish it and how to use the My Stuff page to keep track of all your cool projects.
In Chapter 2, we’ll make a game that becomes more challenging as the player improves. We’ll also talk about more advanced programming ideas, like coding sprites to clone themselves. See you there!