
Chapter 5. Automation pipeline for micro-frontends: A use case
Now that we’ve discussed the theory of a micro-frontends automation pipeline, let’s review a use case, including the different steps that should be taken into consideration based on the topics we covered. Keep in mind that not all the steps or the configuration described in this example have to be present in every automation strategy because companies and projects are different.
Setting the Scene
ACME Inc. empowers its developers and trusts them to know better than anyone else in the organization which tools they should use for building the micro-frontends needed for the project. Every team is responsible for setting up a micro-frontend build, so the developers are encouraged to choose the tools needed based on the technical needs of micro-frontends and on some boundaries, or guardrails, defined by the company.
The company uses a custom cloud automation pipeline based on docker containers, and the cloud team provides the tools needed for running these pipelines.
The project is structured using micro-frontends with a vertical split architecture, where micro-frontends are technically represented by an HTML page, a JavaScript, and a CSS file.
Every development team in the organization works with unit, integration, and end-to-end testing, a decision made by the tech leaders and the head of engineering to ensure the quality and reliability of code deployed in production.
The architecture team, which is the bridge between product people and techies, requested using fitness functions within the pipeline to ensure the artifacts delivered in the production environment contain the architecture characteristics they desire. The team will be responsible for translating product people’s business requirements to technical ones the techies can create.
The development teams decided to use a monorepo strategy, so all the micro-frontends will be present in the same repository. The team will use trunk-based development for its branching strategy and release directly from the main branch instead of creating a release branch.
The project won’t use feature flags, it was decided to defer this decision for having less moving parts to take care of, so manual and automating testing will be performed in existing environments already created by the DX team.
Finally, for bug fixing, the teams will use a fix-forward strategy, where they will fix bugs in the trunk branch and then deploy.
The environments strategy present in the company is composed of three environments: development (DEV), staging (STAG), and production (PROD), as we can see in figure 8.1.

Figure 5-1. 1 - An example of an environments strategy
The DEV environment is in continuous deployment so that the developers can see the results of their implementations as quickly as possible. When a team feels ready to move to the next step, it can promote the artifact to user acceptance testing (UAT). At this stage, the UAT team will make sure the artifact respects all the business requirements before promoting the artifact to production where it will be consumed by the final user.
Based on all this, figure 8.2 illustrates the automation strategy for our use case project up to the DEV environment. It’s specifically designed for delivering the micro-frontends at the desired quality.

Figure 5-2. 2 - High-level automation strategy design
A dashboard built in house will promote artifacts across environments. In this way, the developers and QAs have full control of the different steps for reviewing an artifact before it is presented to users.
Such an automation strategy will create a constant, fast feedback loop for the developers, catching potential issues as soon as possible during the continuous integration phase instead of further down the line, making the bug fixing as cheap as possible.
The automation strategy in this project is composed of six key areas, within which there are multiple steps:
-
Version of control
-
Pipeline initialization
-
Code-quality review
-
Build
-
Post-build review
-
Deployment
Let’s explore these areas in detail.
Version of Control
The project will use monorepo for version of control, so the developers decided to use Lerna, which enables them to manage all the different micro-frontend dependencies at the same time. Lerna also allows hoisting all the shared modules across projects in the same node_modules folder in the root directory, so that if a developer has to work on multiple projects, they can download a resource for multiple micro-frontends just once.
Dependencies will be shared, so a unique bundle can be downloaded once by a user and will have a high time-to-live time at CDN level. Considering the vendors aren’t changing as often as the application’s business logic, we’ll avoid an increase of traffic to the origin.
ACME Inc. uses GitHub as a version of control, partially because there are always interesting automation opportunities in a cloud-based version of control like GitHub.
In fact, GitHub has a marketplace with many scripts available to be run at different branching lifecycles. For instance, we may want to apply linting rules at every commit or when someone is opening a pull request. We can also decide to run our own scripts if we have particular tasks to apply in our codebase during an opening of a pull request, like scanning the code to avoid any library secrets being presented or for other security reasons.
Pipeline Initialization
The pipeline initialization stage includes several common actions to perform for every micro-frontend, including:
-
Cloning the micro-frontend repository inside a container
-
Installing all the dependencies needed for the following steps
In figure 8.3 we can see the first part of our automation pipeline where we perform two key actions: cloning the micro-frontend repository and installing the dependencies via yarn or npm command, depending on each team’s preference.
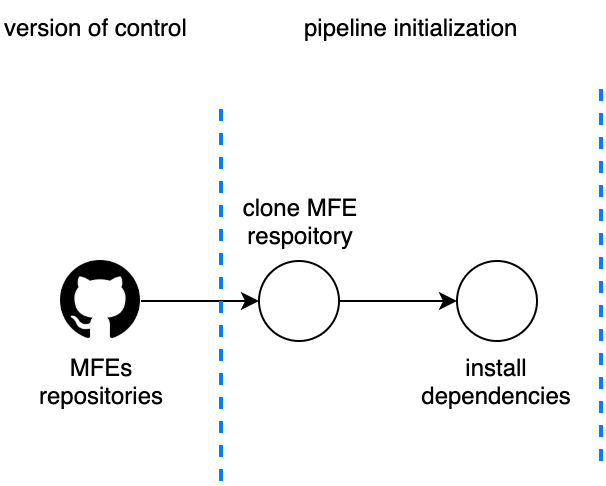
Figure 5-3. 3 - Pipeline initialization stage, showing two actions: cloning the repository and installing the dependencies
The most important thing to remember is to make the repository cloning as fast as possible. We don’t need the entire repository history for a CI process, so it’s a good practice to use the command depth for retrieving just the last commit. The cloning operation will speed up in particular when we are dealing with repositories with years of history tracked in the version of control.
git clone -–depth [depth] [remote-url]
An example would be:
git clone -–depth 1 https://github.com/account/repository
Code-Quality Review
During this phase, we are performing all the checks to make sure the code implemented respects the company standards.
Figure 5-6.4 shows several stages, from static analysis to visual tests. For this project, the company decided not only to cover unit and integration testing but also to ensure that the code was maintainable in the long term, the user interface integration respects the design guidelines from the UX team, and the common libraries developed are present inside the micro-frontends and respect the minimum implementations.
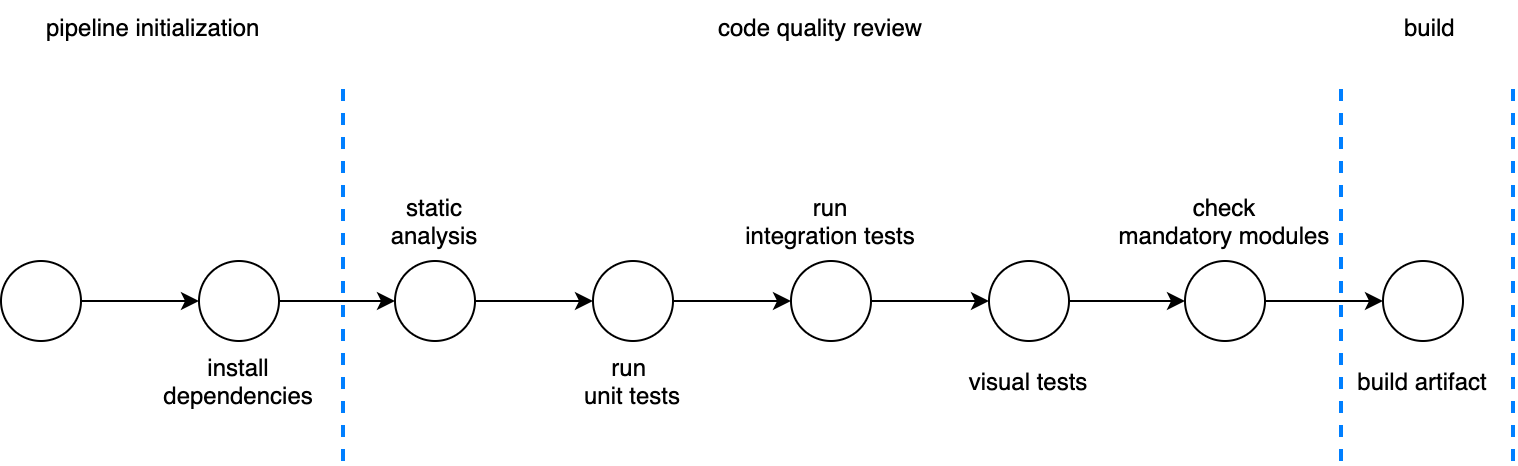
Figure 5-4. 4 - Code-quality checks like unit testing, static analysis, and visual regression tests
For static analysis, ACME Inc. uses SonarQube with the JavaScript plugin. It retrieves many metrics, including cyclomatic complexity (CYC), which tech leaders and architects who aren’t working every day in the codebase need in order to understand the code quality produced by a team.
Often underestimated, CYC can provide a lot of useful information about how healthy your project is. It provides a score on the code complexity based on the number of branches inside every function, which is an objective way to understand if the micro-frontend is simple to read but harder to maintain in the long run.
Take this code example for instance:
const myFunc = (someValue) =>{
	// variable definitions
	if(someValue === “1234-5678”){ //CYC: 1 - first branch
// do something
} else if(someValue === “9876-5432”){ //CYC: 2 - second branch
	// do something else
} else { //CYC: 3 - third branch
	// default case
}
// return something
}
This function has a CYC score of 3, which means we will need at least three unit tests for this function. It may also indicate that the logic managed inside the function starts to become complex and harder to maintain.
By comparison, a CYC score of 10 means a function definitely requires some refactoring and simplification; we want to keep our CYC score as low as possible so that any change to the code will be easier for us but also for other developers inside or outside our team.
Unit and integration testing are becoming more important every day, and the tools for JavaScript are becoming better. Developers, as well as their companies, must recognize the importance of automated testing before deploying in production.
With micro-frontends we should invest in these practices mainly because the area to test per team is far smaller than a normal single-page application and the related complexity should be lower. Considering the size of the business logic as well, testing micro-frontends should be very quick. There aren’t any excuses for avoiding this step.
ACME Inc. decided to use Jest for unit and integration testing, which is standard within the company. Since there isn’t a specific tool for testing micro-frontends, the company’s standard tool will be fine for unit and integration tests.
The final step is specific to a micro-frontends architecture: checking on implementing specific libraries, like logging or observability, across all the micro-frontends inside a project.
When we develop a micro-frontends application, there are some parts we want to write once and put them in all our micro-frontends.
A check on the libraries present in every micro-frontend will help enforce these controls, making sure all the micro-frontends respect the company’s guidelines and we aren’t reinventing the wheel.
Controlling the presence inside the package.json file present in every JavaScript project is a simple way to do this; however, we can go a step further by implementing more complex reviews, like libraries versions, analysis on the implementation, and so on.
It’s very important to customize an automation pipeline introducing these kinds of fitness functions to ensure the architectural decisions are respected despite the nature of this architecture. Moreover, with micro-frontends where sharing code across them may result in way more coordination than a monolithic codebase, these kinds of steps are fundamental for having a positive end result.
Build
The artifact is created during the build stage. For this project, the teams are using webpack for performing any code optimizations, like minifying, magnifying, and, for certain cases, even obfuscating the code.
Micro-frontends allow us to use different tools for building our code; in fact, it may be normal to use webpack for building and optimizing certain micro-frontends and using Rollup for others. The important thing to remember is to provide freedom to the teams inside certain boundaries. If you have any particular requirements that should be applied at build time, raise them with the teams and make sure when a new tool is introduced inside the build phase—and generally inside the automation pipeline—it has the capabilities required for maintaining the boundaries.
Introducing a new build tool is not a problem per se, because we can experiment and compare the results from the teams. We may even discover new capabilities and techniques we wouldn’t find otherwise.
Yet we don’t have to use different tools. It’s perfectly fine if all the teams agree on a set of tools to use across the entire automation pipeline; however, don’t block innovation. Sometimes we discover interesting results from an approach different from the one agreed to at the beginning of the project.
Post-Build Review

Figure 5-5. 5 - In the post-build review, we perform additional checks before deploying an artifact to an environment.
The post-build stage (figure 8.5) is the last opportunity to confirm our artifact has all the performance characteristics and requirements ready to be deployed in production.
A key step is storing the artifact in an artifacts repository, like Nexus or Artifactory. You may also decide to use a simpler storage solution, like an Amazon Web Services (AWS) S3 bucket.
The important thing is to have a unique source of truth where all your artifacts are stored.
ACME Inc. decided to introduce additional checks during this stage: end-to-end testing and performance review.
Whether these two checks are performed at this stage depends on the automation strategy we have in place and the capability of the system. In this example, we are assuming that the company can spin up a static environment for running end-to-end testing and performance checks and then tear it down when these tests are completed.
End-to-end testing is critical for micro-frontends. In this case where we have a vertical split and the entire user experience is inside the same artifact, testing the entire micro-frontend like we usually do for single-page applications is natural.
However, if we have multiple micro-frontends in the same view with a horizontal split, we should postpone end-to-end testing to a later stage in order to test the entire view.
When we cannot afford to create and maintain on-demand environments, we might use web servers that are proxying the parts not related to a micro-frontend.
For instance, webpack’s dev server plugin can be configured to fetch all the resources requested by an application during end-to-end tests locally or remotely, specifying from which environment to pull the resources when not related to the build artifact.
If a micro-frontend is used in multiple views, we should check whether the code will work end to end in every view the micro-frontend is used in.
Although end-to-end testing is becoming more popular in frontend development, there are several schools of thought about when to perform the test.
You may decide to test in production—as long all the features needed to sustain testing in that environment are present. Therefore, be sure to include feature flags, potential mock data, and coordination when integrating with third parties to avoid unexpected and undesirable side effects.
Performance checks have become far easier to perform within an automation pipeline, thanks to CLI tools now being available to be wrapped inside a docker container and being easy to integrate into any automation pipeline.
There are many alternatives, however. I recommend starting with Lighthouse CLI or Webhint CLI. The former is available inside any recent version of Chrome, while the latter allows us to create additional performance tests for enhancing the list of tests already available by default.
With one of these two solutions implemented in our automation strategy, we can make sure our artifact respects key metrics, like performance, accessibility, and best practices.
Ideally we should be able to gather these metrics for every artifact in order to compare them during the lifespan of the project.
In this way, we can review the improvements and regressions of our micro-frontends and organizing meetings with the tech leadership for analyzing the results and determining potential improvements, creating a continuous learning environment inside our organization.
With these steps implemented, we make sure our micro-frontends deployed in production are functioning (through end-to-end testing) and performing as expected when the architectural characteristics were identified.
Deployment
The last step in our example is the deployment of a micro-frontend. An AWS S3 bucket will serve as the final platform to the user, and Cloudfront will be our CDN. As a result, the CDN layer will take the traffic hit, and there won’t be any scalability issues to take care of in production, despite the shape of user traffic that may hit the web platform.
An AWS lambda will be triggered to decompress the tar.gz file present in the artifacts repository, and then the content will be deployed inside the dev environment bucket.
Remember that the company built a deployment dashboard for promoting the artifacts through different environments. In this case, for every promotion, the dashboard triggers an AWS lambda for copying the files from one environment to another.
ACME Inc. decided to create a very simple infrastructure for hosting its micro-frontends, neatly avoiding additional investments in order to understand how to scale the additional infrastructure needed for serving micro-frontends.
Obviously, this is not always the case. But I encourage you to find the cheapest, easiest way for hosting and maintaining your micro-frontends. You’ll remove some complexities to be handled in production and have fewer moving parts that may fail.
Automation Strategy Summary
Every area of this automation strategy (figure 8.6) is composed of one or more steps to provide a feedback loop to the development teams for different aspects of the development process from different testing strategies, like unit testing or end-to-end testing, visual regression, bundle-size check, and many others. All of these controls create confidence in the delivery of high-quality content.
This strategy also provides developers with a useful and constant reminder on the best practices leveraged inside the organization, guiding them to delivering what the business wants.

Figure 5-6. 6 - The end-to-end automation strategy diagram
The automation strategy shared in this chapter is one of many a company may decide to use. Different micro-frontends architectures will require additional or fewer steps than the ones described here. However, this automation strategy covers the main stages for ensuring a good result for a micro-frontends architecture.
Remember that the automation strategy evolves with the business and the architecture, therefore after the first implementation, review it often with the development teams and the tech leadership. When the automation serves the purpose of your micro-frontends well, implementation has a greater chance to be successful.
As we have seen, an automation strategy for micro-frontends doesn’t differ too much from a traditional one used for an SPA.
I recommend organizing some retrospectives every other month with architects, tech leaders, and representatives of every team to review and enhance such an essential cog in the software development process.
And since every micro-frontend should have its own pipeline, the DX team is perfectly positioned to automate the infrastructure configurations as much as possible in order to have a frictionless experience when new micro-frontends arise. Using containers allows a DX team to focus on the infrastructure, providing the boundaries needed for a team implementing its automation pipeline.
Summary
In this chapter, we have reviewed a possible automation strategy for micro-frontends which
discussed many concepts from the previous chapter.Your organization may benefit from some of these stages but bear in mind that you need to constantly review the goals you want to achieve in your automation strategy. This is a fundamental step for succeeding with micro-frontends. Avoid it, and you may risk the entire project.
Micro-frontends’ nature requires an investment in creating a frictionless automation pipeline and enhancing it constantly.
When a company starts to struggle to build and deploy regularly, that’s a warning that the automation strategy probably needs to be reviewed and reassessed.
Don’t underestimate the importance of a good automation strategy, it may change the final outcome of your projects.