Chapter 2. Core Concepts
By “core concepts”, the CKAD curriculum refers to the basic concepts, the API, and the commands to operate an application on Kubernetes. In this chapter, we’ll discuss the basic structure of Kubernetes primitives and the main entry point for interacting with them - the command line-based client kubectl.
A Pod is the Kubernetes primitive for running an application in a container. We’ll touch on the predominant aspects of a Pod. As part of the discussion, we’ll also briefly discuss Docker, the containerization technology employed by Kubernetes.
At the end of the chapter, you will understand how to create Kubernetes objects imperatively and declaratively, and know how to create a Pod and define its most basic configuration.
On a high-level, this chapter covers the following concepts:
-
Namespace
-
Pod
-
Container
Kubernetes Primitives
Kubernetes primitives are the basic building blocks anchored in the Kubernetes architecture for creating and operating an application on the platform. Even as a beginner to Kubernetes, you might have heard of the terms Pod, Deployment, and Service — all of those terms are Kubernetes primitives. Apart from the ones mentioned, there are many more that serve a dedicated purpose in the Kubernetes architecture.
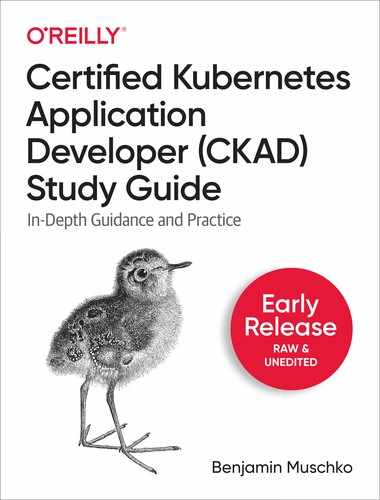
To draw an analogy think back to concepts of object-oriented programming (OOP). In object-oriented programming languages, a class defines the blueprint of a real-world functionality, its properties and behavior. A Kubernetes primitive is the equivalent of a class. The instance of a class in object-oriented programming is an object, managing its own state with the ability to communicate with other parts of the system. Whenever you create a Kubernetes object, you produce such an instance.
Origin for Kubernetes object terminology
When Kubernetes started out years ago, its initial implementation was based on the Java programming language. For various reasons, the system has been rewritten in Go. While the Go language doesn’t have a concept of objects, the terminology stuck which is the reason why we are still referring to Kubernetes objects.
For example, a Pod in Kubernetes is the class of which there can be many instances with their own identity. Every Kubernetes object has a system-generated unique identifier (also known as UID) to clearly distinguish between the entities of a system. Later, we’ll have look at the properties of a Kubernetes object. Figure 2-1 illustrates the relationship between a Kubernetes primitive and an object.
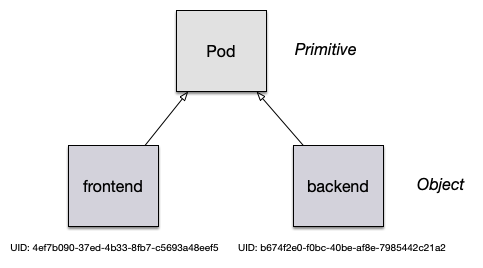
Figure 2-1. Kubernetes object identity
Each and every Kubernetes primitive follows a general structure which you can observe if you have a deeper look at a manifest of an objects, as shown in Figure 2-2. The primary markup language used for a Kubernetes manifest is YAML.

Figure 2-2. Kubernetes resource structure
Let’s discuss each section and its relevance within the Kubernetes system.
- API version
-
The Kubernetes API version defines the structure of a primitive and uses it to validate the correctness of the data. The API version serves a similar purpose as XML schemas to a XML document or JSON schema to JSON document. The version usually undergoes a maturity process e.g. from alpha to beta to final. Sometimes you see different prefixes separated by a slash e.g.
apps. You can list the API versions compatible with your cluster version by running the commandkubectl api-versions. - Kind
-
The kind defines the type of primitive e.g. a Pod or a Service. It ultimately answers the question “What type of object are we dealing with here?”.
- Metadata
-
Metadata describes higher-level information about the object e.g. its name, what namespace it lives in or whether it defines labels and annotations? This section also defines the UID I mentioned earlier, the object’s identity.
- Spec
-
The specification or short “spec” describes the desired state. How should this object look like after is has been created? For example, how to decide which image to run in the container or which environment variables to set.
- Status
-
The status describes the actual state of an object. The Kubernetes scheduler constantly tries to transition a Kubernetes object from the desired state into the actual state. The object has not be materialized yet if the YAML status shows the value
{}.
With this basic structure in mind, let’s have a look at how to create a Kubernetes object with the help of kubectl.
Using kubectl to Interact with the Kubernetes Cluster
Kubectl is the primary tool to interact with the Kubernetes clusters from the command line. The CKAD exam is exclusively focused on the use of kubectl. Therefore, it’s paramount to understand the ins and outs of kubectl and practice its use heavily.
In this section, I want to provide you with a very brief overview on its typical usage pattern. Let’s start by looking at the syntax for running commands first. A kubectl execution consists of a command, a resource type, a resource name and optional command line flags.
$ kubectl [command] [TYPE] [NAME] [flags]
The command specifies the operation, you are planning to run. Typical commands are create, get, describe, or delete. Next, you’ll need to provide the resource type you are working on either as full resource type or its short form. For example, you could work on a service here or use the short form svc. The name of the resource identifies the user-facing object identifier, effectively the value of metadata.name in the YAML representation. Be aware that the object name is not the same as the UID. The UID is an auto-generated, Kubernetes-internal object reference which you usually don’t have to interact with. The name of an object has to be unique across all objects of the same resource type within in a namespace. Finally, you can provide zero to many command line flags to describe additional configuration behavior. The --port flag to expose of a Pod’s container port is a typical example of a command line flag.
Figure 2-3 shows a full kubectl command in action.

Figure 2-3. Kubectl usage pattern
In the course of this book, we’ll explore the kubectl commands that make you the most productive during the CKAD exam. There are many more, however, and they usually go beyond the ones you’d use as application developer on a day-to-day basis. Next up, we’ll have a deeper look at the create command, the imperative way to create a Kubernetes object. Moreover, we’ll compare the imperative object creation approach with the declarative approach.
Object Management
You can create objects in a Kubernetes cluster in two ways, imperatively or declaratively. The following sections will describe each approach including their benefits, drawbacks and use cases.
Imperative Approach
The imperative method for object creation does not require a manifest definition. You would use the kubectl run or kubectl create command to create an object on-the-fly. Any configuration needed at runtime is provided by command line options. The benefit of this approach is the fast turnaround time without the need to wrestle with YAML structures.
$ kubectl run frontend --image=nginx --port=80
pod/frontend created
Declarative Approach
The declarative approach creates objects from a manifest file (in most cases that’s a YAML file) using the kubectl create or kubectl apply command. The benefit of using the declarative method is reproducibility and improved maintaince as the file is commonly checked into version control in most cases. It is the recommended way to use the declarative approach to create objects in production environments.
$ vim pod.yaml
$ kubectl create -f pod.yaml
pod/frontend created
Hybrid Approach
Sometimes, you may want to go with a hybrid approach. You can start by using the imperative method to produce a manifest file without actually creating an object. You do so by executing the kubectl run command with the command line options -o yaml and --dry-run=client.
$ kubectl run frontend --image=nginx --port=80
  -o yaml --dry-run=client > pod.yaml
$ vim pod.yaml
$ kubectl create -f pod.yaml
pod/frontend created
$ kubectl describe pod frontend
Name:         frontend
Namespace:    default
Priority:     0
...
Which Approach to Use?
In earlier Kubernetes versions, you were still able to create objects other than Pods with the kubectl run command. For example, with the right combination of command line options you could create Deployments and CronJobs, however, kubectl run rendered a deprecation message to remind you that support for it will go away in a future version.
Kubernetes 1.18 only allows creating Pods with the run command now. You will have to use the kubectl create command for imperatively creating any other primitive. You will find a lot of CKAD preparation material on the web that still uses the kubectl run pattern. This will not work in the exam environment anymore as the Kubernetes version has already been upgraded beyond the point of version 1.18.
While creating objects imperatively to optimize the turnaround time, in practice you will most certainly want to rather use the declarative approach. A YAML manifest file represents the ultimate source of truth of a Kubernetes object. Version-controlled files can be audited, shared and store a history of changes in case you need to revert to a previous revision.
Other Notable Commands
So far we only talked about object creation with the imperative and declarative approach using the run and create command. The kubectl executable offers other notable commands in the realm of object management.
Deleting an Object
At any given time, you can delete a Kubernetes object. During the exam, the need may arise if you made a mistake while solving a problem and want to start from scratch to ensure a clean slate. In a work environment, you will want to delete objects that are not needed anymore. The delete command offers two options: deleting an object by providing the name or deleting an object by pointing to the YAML manifest that created it.
$ kubectl delete pod frontend
pod "frontend" deleted
$ kubectl delete -f pod.yaml
pod "frontend" deleted
Editing a Live Object
Say you already created an object and you wanted to make further changes to the live object. You have the option to modify the object in your editor of choice from the terminal using the edit command. After saving the object definition in the editor, Kubernetes will try to reflect those changes in the live object.
$ kubectl edit pod frontend
Replacing a Live Object
Sometimes, you will just want to replace the definition of an existing object declaratively. The replace command overwrites the live configuration with the one from the provided YAML manifest. The YAML manifest you feed into the command must be a complete resource definition as observed with the create command.
$ kubectl replace -f pod.yaml
Updating a Live Object
Finally, I want to briefly explain the apply command and the main difference to the create command. The create command instantiates a new object. Trying to execute the create command for an existing object will produce an error. The apply command is meant to update an existing object in its entirety or just incrementally. That’s why the provided YAML manifest may be a full definition of an object or a partial definition e.g. just the number of replicas for a Deployment. Please note that the apply command behaves like the create command if the object doesn’t exist yet, however, the YAML manifest will need to contain a full definition of the object.
$ kubectl apply -f pod.yaml
pod/frontend configured
In the next section, we’ll put our knowledge in practice by creating and interacting with Pods.
Understanding Pods
The most important primitive in the Kubernetes API is the Pod. A Pod lets you run an application inside of a container represented by a Docker image. In practice, you will often encounter a one to one mapping between a Pod and a container, however, there are use cases we’ll discuss in a later chapter that benefit from running more than a single container.
In addition to just running a container, a Pod can consume other services like a persistent storage, configuration data and much more. Therefore, think of a Pod as a wrapper for running containers including the mediator functionality with other Kubernetes objects.
Before jumping deeper into the coverage of a Pod, let’s first explore the role Docker plays in the Kubernetes ecosystem.
Containerization with Docker
Kubernetes is a container orchistrator that uses a container runtime to instantiate containers inside of Pods. By default, this container runtime is Docker. While it is not strictly necessary to understand Docker as a whole for the exam, you should at least be familiar with its basics. In this section, we’ll talk about Docker’s foundational concepts and commands. It is safe to skip this section if you are already familiar with Docker.
Basic Docker Concepts
A container packages an application into a single unit of software including its runtime environment and configuration. This unit of software usually includes the operating system, the application’s source code or the binary, its dependencies and other system tools deemed necessary. The declared goal of a container is to decouple the runtime environment from the application to avoid the “works on my machine” problem.
The process of bundling an application into a container is commonly-referred to as “containerization”. Containerization works based on instructions defined in a so-called Dockerfile. The Dockerfile explicitly spells out what needs to happen when the software is built. The result of the operation is a image. The image is usually published to a registry for consumption by other stakeholders. Docker Hub is the primary registry for Docker images available for public use. Figure 2-4 illustrates the concepts in the context of containerizing an application.

Figure 2-4. Containerization Process
To summarize, the Dockerfile is a blueprint of how the software should be built, the image is the artifact produced by the process, and the container is an running instance of the image serving the application. Let’s have a look at a more concrete example.
Example: Containerizing a Java-Based Application
Let’s assume, we’d want to containerize a web application written in Java. The application doesn’t write core functionality from scratch but uses the Spring Boot framework as external library. In addition, we’ll want to control the runtime behavior with the help of environment variables. For example, you may want to provide URLs and credentials to connect to other services like a database. We’ll talk through the process step by step and execute the relevant Docker commands from the terminal. If you want to follow along, you can download a sample application from the project generator Spring Initalizr.
Before we can create the image, we’ll have to write a Dockerfile. The Dockerfile can reside in any directory and is essentially a plain-text file. The instructions below use the OpenJDK distribution of Java 11 as the base image. A base image contains the operating system and the necessary tooling, in this case Java. Moreover, we include the binary file, an executable Java archive (JAR), into the directory /app of the image. Finally, we define the Java command that executes the program and expose the port 8080 to make the application accessible when run in a container. Example 2-1 outlines an sample Dockerfile.
Example 2-1. Dockerfile for building a Java application
FROM openjdk:11-jre-slim
WORKDIR /app
COPY target/java-hello-world-0.0.1.jar java-hello-world.jar
ENTRYPOINT ["java", "-jar", "/app/java-hello-world.jar"]
EXPOSE 8080
With the Dockerfile in place, we can go ahead and create the image. The following command provides the name of the image and the tag. The last argument points to the context directory. A context directory contains the Dockerfile as well as any directories and files that are supposed to be included in the image. Here, the context directory is the current directory we reside in referenced by ..
$ docker build -t java-hello-world:1.0.0 .
Sending build context to Docker daemon   8.32MB
Step 1/5 : FROM openjdk:11-jre-slim
 ---> 973c18dbf567
Step 2/5 : WORKDIR /app
 ---> Using cache
 ---> 31f9c5f2a019
Step 3/5 : COPY target/java-hello-world-0.0.1.jar java-hello-world.jar
 ---> Using cache
 ---> 6a1deee17e9d
Step 4/5 : ENTRYPOINT ["java", "-jar", "/app/java-hello-world.jar"]
 ---> Using cache
 ---> 52a91ca70d86
Step 5/5 : EXPOSE 8080
 ---> Using cache
 ---> 3e9c22451a17
Successfully built 3e9c22451a17
Successfully tagged java-hello-world:1.0.0
As indicated by the terminal output, the image has been created. You might have noticed that the base image has been downloaded as part of the process. Both images can be found in your local Docker Engine environment by running the following command.
$ docker images
REPOSITORY         TAG           IMAGE ID       CREATED              SIZE
java-hello-world   1.0.0         3e9c22451a17   About a minute ago   213MB
openjdk            11-jre-slim   973c18dbf567   20 hours ago         204MB
It’s time to run the application in a container. The run command points to an image and executes its logic in a container.
$ docker run -d -p 8080:8080 java-hello-world:1.0.0
b0ee04accf078ea7c73cfe3be0f9d1ac6a099ac4e0e903773bc6bf6258acbb66
We told the command to forward the port 8080 accessible on localhost to the container port 8080. This means we should now be able to resolve the application’s endpoint from the local machine. As you can see in the following command, a simple curl to the root context path renders the message “Hello World!”.
$ curl localhost:8080
Hello World!
To publish an image to a registry, you’ll potentially have to do some prework. Most registries require you to provide a prefix that signifies the username or hostname as part of the image name. For example, Docker Hub requires you to provide the username. My username is bmuschko and therfore I have to retag my image before pushing it. If the registry is protected, you will also have to provide the credentials. For Docker Hub, we are logging in with username.
$ docker login --username=bmuschko
Password: *****
WARNING! Your password will be stored unencrypted in /Users/bmuschko/
.docker/config.json.
Configure a credential helper to remove this warning. See
https://docs.docker.com/engine/reference/commandline/login/#credentials-store

Login Succeeded
$ docker tag java-hello-world:1.0.0 bmuschko/java-hello-world:1.0.0
$ docker push bmuschko/java-hello-world:1.0.0
The push refers to repository [docker.io/bmuschko/java-hello-world]
be6f48684f94: Pushed
ff3b0a3f736e: Pushed
a346421f0657: Mounted from library/openjdk
cab8f1f311d9: Mounted from library/openjdk
0a71386e5425: Mounted from library/openjdk
ffc9b21953f4: Mounted from library/openjdk
1.0.0: digest: sha256:aafd2ab53ba3ff66fe66d7ffc118c7a8ea993472132d1bdf417a
62e212f3dcfd size: 1578
You experienced one of the most common developer workflows: containerizing an application and pushing the image to a registry. There’s far more to learn about Docker, but that is outside the scope of this book and we won’t dive any deeper here. Refer to the Docker documentation for more information.
Creating Pods
In this chapter, we will only look at the creation of a Pod running a single container. Jump right over to the chapter 4, “Multi-container Pods”, if you want to learn more about Pods that run more than one container. That chapter explains applicable design patterns and how to interact with individual containers using kubectl.
The Pod defintion needs to state an image for every container. Upon creating the Pod object, imperatively or declaratively, the Kublet will check if the image already exists locally. If the image doesn’t exist yet, the Kublet will download it from a registry. By default the registry is Docker Hub. As soon as the image exists on the node, the container is instantiated and run. Figure 2-4 demonstrates the execution flow on a high-level.
Figure 2-5. Kubelet interation with Docker images
The run command is the central entry point for creating Pods imperatively. Let’s talk about its usage and the most important command line options you should memorize and practice. Say you wanted to run a Hazelcast instance inside of a Pod. The container should use the latest Hazelcast image, expose port 5701, and define an environment variable. In addition, we’ll also want to assign two labels to the Pod. The following command combines of this information and does not require any further editing of the live object.
$ kubectl run hazelcast --image=hazelcast/hazelcast --port=5701
  --env="DNS_DOMAIN=cluster" --labels="app=hazelcast,env=prod"
The run command offers a wealth of command line options. Execute the kubectl run --help or refer to the Kubernetes documentation for a broad overview. For the CKAD exam, you will not need to understand each and every command. Table 2-1 lists the most commonly-used options.
| Option | Example Value | Description |
|---|---|---|
|
nginx |
The image for the container to run. |
|
8080 |
The port that this container exposes. |
|
- |
Deletes the Pod after command in the container finishes. |
|
PROFILE=dev |
The environment variables to set in the container. |
|
app=frontend |
A comma-separated list of labels to apply to the Pod. |
Some developers are more used to the creation of Pods from a YAML manifest. Probably you are already accustomed to the declarative approach because you are using it at work. You can express the same configuration for the Hazelcast Pod by opening the editor, copying a Pod YAML code snippet from the Kubernetes online documentation and modifying it to your needs. Example 2-2 shows the Pod manifest saved in the file pod.yaml.
Example 2-2. Pod YAML manifest
apiVersion: v1
kind: Pod
metadata:
  name: hazelcast
  labels:
    app: hazelcast
    env: prod
spec:
  containers:
  - env:
    - name: DNS_DOMAIN
      value: cluster
    image: hazelcast/hazelcast
    name: hazelcast
    ports:
    - containerPort: 5701
Creating the Pod from the manifest is straightforward. Simply use the create or apply command.
$ kubectl create -f pod.yaml
pod/hazelcast created
Listing Pods
Now that you created a Pod, you can further inspect its runtime information. The kubectl command offers a command for listing all Pods running in the cluster: get pods. The following command renders the Pod named hazelcast:
$ kubectl get pods
NAME        READY   STATUS    RESTARTS   AGE
hazelcast   1/1     Running   0          17s
Real-world Kubernetes clusters can run hundreds of Pods at the same time. If you know the name of the Pod of interest, its often times easier to query by name. We’d still only see a single Pod.
$ kubectl get pods hazelcast
NAME        READY   STATUS    RESTARTS   AGE
hazelcast   1/1     Running   0          17s
Pod Lifecycle Phases
It’s absolutely possible that the status of the Pod doesn’t show a Running status right away when listing the Pods. It usually takes a couple of seconds to retrieve the image and start the container. Upon Pod creation, the object goes through several lifecycle phases, as shown in Figure 2-6.

Figure 2-6. Pod Lifecycle Phases
Understanding the implications of each phase is important as it gives you an idea about the operational status of a Pod. For example, during the exam you may be asked to identify a Pod with an issue and further debug the object. Table 2-1 describes all Pod lifecycle phases.
| Option | Description |
|---|---|
|
The Pod has been accepted by the Kubernetes system, but one or more of the container images has not been created. |
|
At least one container is still running, or is in the process of starting or restarting. |
|
All containers in the Pod terminated successfully. |
|
Containers in the Pod terminated, as least one failed with an error. |
|
The state of Pod could not be obtained. |
Rendering Pod Details
The rendered table produced by the get command provides high-level information about a Pod. But what if you needed to have a deeper look at the details? The describe command can help.
$ kubectl describe pods hazelcast
Name:               hazelcast
Namespace:          default
Priority:           0
PriorityClassName:  <none>
Node:               docker-desktop/192.168.65.3
Start Time:         Wed, 20 May 2020 19:35:47 -0600
Labels:             app=hazelcast
                    env=prod
Annotations:        <none>
Status:             Running
IP:                 10.1.0.41
Containers:
  ...
Events:
  ...
The terminal output contains the metadata information of a Pod, the containers it runs and the event log, such as failures when the Pod was scheduled. The example output above has been condensed to just show the metadata section. You can expect the output to be very lengthy.
There’s a way to be more specific about the information you want to render. You can combine the describe command with a Unix grep command. Say you wanted to identify the image for running in the container.
$ kubectl describe pods hazelcast | grep Image:
    Image:          hazelcast/hazelcast
Accessing Logs of a Pod
As application developers, we know very well what to expect in the log files produced by the application we implemented. Runtime failures may occur when operating an application in a container. The logs command downloads the log output of a container. The output below indicates that the Hazelcast server started up successfully.
$ kubectl logs pod/hazelcast
...
May 25, 2020 3:36:26 PM com.hazelcast.core.LifecycleService
INFO: [10.1.0.46]:5701 [dev] [4.0.1] [10.1.0.46]:5701 is STARTED
It’s very likely that more log entries will be produced as soon as the container receives traffic from end users. You can stream the logs with the command line option -f. This option is helpful if you want to see logs in real-time.
Kubernetes tries to restart a container under certain conditions, such as if the image cannot be resolved on the first try. Upon a container restart, you will not have access to the logs of the previous container anymore; the logs command only renders the logs for the current container. However, you can still get back to the logs of the previous container by adding the -p command line option. You may want to use the option to identify the root cause that triggered a container restart.
Executing a Command in Container
There are situation that require you to log into the container and explore the file system. Maybe you want to inspect the configuration of your application or debug the current state of your application. You can use the exec command to open a shell in the container to explore it interactively, as shown below.
$ kubectl exec -it hazelcast -- /bin/sh
# ...
Notice that you do not have to provide the resource type. This command only works for a Pod. The two dashes (--) separate the exec command and its options from the command you want to run inside of the container.
It’s also possible to just execute a single command inside of a container. Say you wanted to render the environment variables available to containers without having to be logged in. Just remove the interactive flag -it and provide the relevant command after the two dashes.
$ kubectl exec hazelcast -- env
...
DNS_DOMAIN=cluster
Deleting a Pod
Sooner or later you will want to delete a Pod. During the exam, you may be asked to remove a Pod. Or possibly, you made a configuration mistake and want to start the question from scratch.
$ kubectl delete pod hazelcast
pod "hazelcast" deleted
Keep in mind that Kubernetes tries to delete a Pod gracefully. This means that the Pod will try to finish active requests to the Pod to avoid unnecessary disruption to the end user. A graceful deletion operation can take anywhere from 5-30 seconds, time you don’t want to waste during the exam. See chapter 1 for more information on how to speed up the process.
An alternative way to delete a Pod is to point the delete command to the YAML manifest you used to create it. The behavior is the same.
$ kubectl delete -f pod.yaml
pod "hazelcast" deleted
Configuring Pods
The CKAD curriculum expects you to feel comfortable with editing YAML manifests either as files or as live object representations. In this section, I want to point you to some of the typical configuration scenarios you may face during the exam. Later chapters will deepen your knowledge by touching on other configuration aspects.
Declaring Environment Variables
Applications need to expose a way to make their runtime behavior configurable. For example, you may want to inject the URL to an external web service or declare the username for a database connection. Environment variables are a common option to provide this runtime configuration.
Avoid creating container images per environment
It might be tempting to say “hey, let’s create a container image for any target deployment environment I need including its configuration”. That’s a bad idea. One of the practices of Continuous Delivery is to only build a deployable artifact for a commit once. In this case, the artifact is the container image. Deviating configuration runtime behavior should be controllable by injecting runtime information when instantiating the container. You can use environment variables to control the behavior as needed.
Defining environment variables in a Pod YAML manifest is relatively easy. Add or enhance the section env of a container. Every environment variable consists of a key-value pair, represented by the attributes name and value. Kubernetes does not enforce or sanitize typical naming conventions for environment variable keys. It’s recommended to follow the standard of using upper-case letters and the underscore character (_) to separate words.
To illustrate a set of environment variables, have a look at Example 2-3. The code snippet describes a Pod that runs a Java-based application using the Spring Boot framework.
Example 2-3. Dockerfile for building a Java application
apiVersion: v1
kind: Pod
metadata:
  name: spring-boot-app
spec:
  containers:
  - image: bmuschko/spring-boot-app:1.5.3
    name: spring-boot-app
    env:
    - name: SPRING_PROFILES_ACTIVE
      value: prod
    - name: VERSION
      value: '1.5.3'
The first environment variable named SPRING_PROFILES_ACTIVE defines a pointer to a so-called profile. A profile contains environment-specific properties. Here, we are pointing to the profile that configures the production environment. The environment variable VERSION specifies the application version. Its value corresponds to the tag of the image and can be exposed by the running application to display the value in the user interface.
Defining a Command with Arguments
Many container images already define an ENTRYPOINT or CMD instruction. The command assigned to the instruction is automatically executed as part of the container startup process. For example, the Hazelcast image we used earlier defines the instruction CMD ["/opt/hazelcast/start-hazelcast.sh"].
In a Pod definition, you can either redefine the image ENTRYPOINT and CMD instructions or assign a command to execute for the container if hasn’t been specified by the image. You can provide this information with the help of the command and args attributes for a container. The command attribute overrides the image’s ENTRYPOINT instruction. The args attribute replaces the CMD instruction of an image.
Imagine you wanted to provide a command to an image that doesn’t provide one yet. As usual there are two different approaches, imperatively and declaratively. We’ll generate the YAML manifest with the help of the run command. The Pod should use the busybox image and execute a shell command that renders the current date every 10 seconds in an infinite loop.
$ kubectl run mypod --image=busybox -o yaml --dry-run=client
  > pod.yaml -- /bin/sh -c "while true; do date; sleep 10; done"
You can see in the generated pod.yaml file shown in Example 2-4 that the command has been turned into an args attribute. Kubernetes specifies each argument on a single line.
Example 2-4. A YAML file containing a args attribute
apiVersion: v1
kind: Pod
metadata:
  creationTimestamp: null
  labels:
    run: mypod
  name: mypod
spec:
  containers:
  - args:
    - /bin/sh
    - -c
    - while true; do date; sleep 10; done
    image: busybox
    name: mypod
    resources: {}
  dnsPolicy: ClusterFirst
  restartPolicy: Never
status: {}
You could have achieved the same by a combination of the command and args attributes if you were to hand-craft the YAML manifest. Example 2-5 shows the different approach.
Example 2-5. A YAML file containing a command and args attribute
apiVersion: v1
kind: Pod
metadata:
  creationTimestamp: null
  labels:
    run: mypod
  name: mypod
spec:
  containers:
  - command: ["/bin/sh"]
    args: ["-c", "while true; do date; sleep 10; done"]
    image: busybox
    name: mypod
    resources: {}
  dnsPolicy: ClusterFirst
  restartPolicy: Never
status: {}
You can quickly verify if the declared command actually does its job. First, we create the Pod instance, then we tail the logs.
$ kubectl create -f pod.yaml
pod/mypod created
$ kubectl logs pod/mypod -f
Fri May 29 00:49:06 UTC 2020
Fri May 29 00:49:16 UTC 2020
Fri May 29 00:49:26 UTC 2020
Fri May 29 00:49:36 UTC 2020
...
Summary
Kubernetes represents its functionality for deploying and operating a cloud-native application with the help of primitives. Each primitive follows a general structure: the API version, the kind, the metadata and the desired state of the resources, also called the spec. Upon creation or modification of the object, the Kubernetes scheduler automatically tries to ensure that the actual state of the object follows the defined specification. Every live object can be inspected, edited and deleted.
The portion “Core Concepts” of the curriculum puts a strong emphasis on the concept of a Pod. The Pod is a Kubernetes primitive responsible for running an application in a container. Kubernetes uses Docker as its default container runtime technology. A Pod can define one or many containers that use a container image. Upon its creation, the container image is resolved and used to bootstrap the application. Every Pod can be further customized with the relevant YAML configuration.
Kubectl acts as a CLI-based client for the interacting with the Kubernetes cluster. You can use its commands and flags to manage Kubernetes objects.
Exam Essentials
- Understand how to manage Kubernetes objects
-
In Kubernetes, you can create objects with the imperative or declarative approach. The imperative approach is the most time-efficient way to create objects. For Pods, use the command
kubectl run, for any other resource use the commandkubectl create. Furthermore, practice editing live objects withkubectl editand know how to delete them viakubectl delete. - Know how to interact with Pods
-
A Pod runs an application inside of a container. You can check on the status and the configuration of the Pod by inspecting the object with the
kubectl getorkubectl describecommands. Make yourself familiar with the lifecycle phases of a Pod to be able to quickly diagnose error conditions. The commandkubectl logscan be used to download the container log information without having to shell into the container. Use the commandkubectl execto further explore the container environment e.g. to check on processes or to examine files. - Advanced Pod configuration options
-
Sometimes you have to start with the YAML manifest of a Pod and then create the Pod declaratively. This could be the case if you wanted to provide environment variables to the container or declare a custom command. Practice different configuration options by copy-pasting relevant code snippets from the Kubernetes documentation.
Sample Exercises
-
Create a new Pod named
nginxrunning the imagenginx:1.17.10. Expose the container port 80. The Pod should live in the namespace namedckad. -
Get the details of the Pod including its IP address.
-
Create a temporary Pod that uses the
busyboximage to execute awgetcommand inside of the container. Thewgetcommand should access the endpoint exposed by thenginxcontainer. You should see the HTML response body rendered in the terminal. -
Get the logs of the
nginxcontainer. -
Add the environment variables
DB_URL=postgresql://mydb:5432andDB_USERNAME=adminto thenginxcontainer. -
Open a shell for the
nginxcontainer and inspect the contents of the current directoryls -l. -
Create a YAML manifest for a Pod named
loopthat runs thebusyboximage in a container. The container should run the following command:for i in {1..10}; do echo "Welcome $i times"; done. Create the Pod from the YAML manifest. What’s the status of the Pod? -
Edit the Pod named
loop. Change the command to run in an endless loop. Each iteration shouldechothe current date. -
Inspect the events and the status of the Pod
loop. -
Delete the namespace
ckadand its Pods.
Answers to Sample Exercises
-
You can either use the imperative approach or the declarative approach. First, we’ll look at creating the namespace with the imperative approach.
$ kubectl create namespace ckad
Create the Pod.
$ kubectl run nginx --image=nginx:1.17.10 --port=80 --namespace=ckad
Alternatively, you can use the declarative approach. Create a new YAML file called
ckad-namespace.yamlwith the following contents:apiVersion: v1 kind: Namespace metadata: name: ckad
Create the namespace from the YAML file.
$ kubectl create -f ckad-namespace.yaml
Create a new YAML file called
nginx-pod.yamlwith the following contents:apiVersion: v1 kind: Pod metadata: name: nginx spec: containers: - name: nginx image: nginx:1.17.10 ports: - containerPort: 80Create the Pod from the YAML file.
$ kubectl create -f nginx-pod.yaml --namespace=ckad
-
You can use the command line option
-o wideto retrieve the IP address of the Pod.$ kubectl get pod nginx --namespace=ckad -o wide
The same information is available if you query for the Pod details.
$ kubectl describe pod nginx --namespace=ckad | grep IP:
-
You can use the command line option
--rmand--itto start a temporary Pod.$ kubectl run busybox --image=busybox --rm -it -n ckad -- wget -O- 10.1.0.66:80
-
To download the logs, use a simple
logscommand.$ kubectl logs nginx --namespace=ckad
-
Editing the live object is forbidden. You will receive an error message if you try to add the environment variables.
$ kubectl edit pod nginx --namespace=ckad
You will have to recreate the object with a modified YAML file, but first you’ll have to delete the existing object.
$ kubectl delete pod nginx --namespace=ckad
Edit the existing YAML file
nginx-pod.yaml.apiVersion: v1 kind: Pod metadata: name: nginx spec: containers: - name: nginx image: nginx:1.17.10 ports: - containerPort: 80 env: - name: DB_URL value: postgresql://mydb:5432 - name: DB_USERNAME value: adminApply the changes.
$ kubectl create -f nginx-pod.yaml --namespace=ckad
-
Use the
execcommand to open interactive shell to the container.$ kubectl exec -it nginx --namespace=ckad -- /bin/sh # ls -l
-
Combine the command line options
-o yamland--dry-run=clientto write the generated YAML to a file. Make sure to escape the double-quote characters of the string rendered by theechocommand.$ kubectl run loop --image=busybox -o yaml --dry-run=client -- /bin/sh -c "for i in {1..10}; do echo "Welcome $i times"; done" > pod.yamlCreate the Pod from the YAML file.
$ kubectl create -f pod.yaml
The status of the Pod will say
Completedas the executed command in the container does not run in an infinite loop.$ kubectl get pod loop
-
The ontainer command cannot be changed for existing Pods. Delete the Pod so you can modify the manifest file and recreate the object.
$ kubectl delete pod loop
Change the YAML file content.
apiVersion: v1
kind: Pod
metadata:
  creationTimestamp: null
  labels:
    run: loop
  name: loop
spec:
  containers:
  - args:
    - /bin/sh
    - -c
    - while true; do date; sleep 10; done
    image: busybox
    name: loop
    resources: {}
  dnsPolicy: ClusterFirst
  restartPolicy: Never
status: {}
Create the Pod from the YAML file.
$ kubectl create -f pod.yaml
-
You can describe the Pod events by grepping for the term.
$ kubectl describe pod loop | grep -C 10 Events:
-
You can simply delete the namespace which will delete all objects within the namespace.
$ kubectl delete namespace ckad