Chapter 7. Mobile Workflows
Program testing can be a very effective way to show the presence of bugs, but is hopelessly inadequate for showing their absence.
Edsger Dijkstra
Coverage of DevOps wouldn’t be complete without talking about mobile development and smartphones, which is the fastest growing segment of computer ownership. The past decade has seen a meteoric rise in smartphone usage, with billions of smartphones owned globally, as shown in Figure 7-1.

Figure 7-1. Number of smartphone users in the world from 2012 through 2023 according to Statista (prediction for 2023 marked with *)
Smartphone ownership is expected to continue to rise since many large countries such as India and China have less than 70% ownership. With over 3.6 billion smartphones in the world today and an expected 4.3 billion smartphones by the year 2023, this is a market and user base that can’t be ignored.
Smartphones also have another property that makes DevOps an essential practice, which is that they fall into a class of internet connected devices where continuous updates are expected by default, because they are targeted at consumers who are less technical and need to maintain their devices with minimal user involvement. This has been propelled by the app ecosystem built around smartphones, which makes downloading new software and receiving software updates easy and relatively low risk for end users.
There are several functional reasons you may want to update your app:
-
Adding new features for users: Most apps are released quickly and with a minimum viable set of features to reduce time to market. This allows for frequent small feature updates to add useful functionality for end users.
-
Fixing bugs and improving the stability of your application: More mature applications have lots of updates that fix small bugs, stability issues, and user experience improvements. These changes are typically minor and can be released at a very frequent cadence.
-
Patching security vulnerabilities or exploits: Mobile applications typically have a very large attack surface which includes the locally installed app, the backend that supplies data, and user authentication workflows for app and cloud service logins.
In addition to those reasons, a lot of app updates are driven by the need to increase market share and improve engagement with users. Some examples of updates that help to grow market share of your app include the following:
-
Aligning with major platform releases - Whenever a major platform release occurs, apps that are certified against the new version and updated to take advantage of new functionality will see an increase in downloads.
-
Raising visibility of your app in the store - App stores reward apps that frequently update by retaining user ratings between releases and highlighting new releases. The release notes also gives you a chance to increase searchable content in the store. In contrast, if your app stagnates with no updates, then it will naturally drop in search engine optimization.
-
Reminding current users about the existence of your application to increase utilization - Mobile platforms prompt users about updates to their existing apps and sometimes display badges or other reminders that will increase engagement.
The top applications in the app stores know the importance of continuous updates and update very frequently. According to appbot, of the 200 top free apps, the median time since the last update was 7.8 days! With this pace of updates, if you do not make use of a continuous release process, you won’t be able to keep up.
Java developers have some great options for building mobile applications. These include mobile-focused web development with responsive web apps that adapt to constrained devices. Also dedicated mobile applications written in Java for Android devices. And finally several cross-platform options for building applications that work across Android and iOS devices, including Gluon Mobile and Electron.
This chapter focuses primarily on Android application development; however, all the same mobile DevOps techniques and considerations apply across these Java-based mobile platforms.
Fast-paced DevOps workflows for mobile
Here are some of the business benefits you will realize from investing in mobile DevOps:
-
Better customer experience: With the easy and accessible rating systems available in the app store, customer experience is king. By being able to respond quickly to customer issues and test on large variety of devices, you will ensure an optimal customer experience.
-
Faster innovation: By continuously releasing to production you will be able to get new features and capabilities to your customers at a higher velocity than your competitiors.
-
Higher software quality: With the large number and high fragmentation of Android devices, it is impossible to thoroughly test your application manually. But with an automated mobile testing strategy that hits the key device characteristics of your user base, you will reduce the number of issues reported by end users.
-
Reduced risk: The majority of executable code in modern applications has open source dependencies that expose you to known security vulnerabilities. By having a mobile DevOps pipeline that allows you to test new versions of dependencies and update frequently, you will be able to quickly fix any known vulnerabilities in your application before they can be taken advantage of.
The same principles and best practices outlined in the rest of this book apply for mobile application development, but are amplified 10x by the size and expectations of this market. When planning out a mobile DevOps pipeline for Android devices, here are the stages you need to consider:
-
Build - Android build scripts are usually written in Gradle. As a result, you can use any continuous integration server of your choice, including Jenkins, CircleCI, Travis CI, or JFrog Pipelines.
-
Test
-
Unit tests: Android unit tests are typically written in JUnit, which can easily be automated. Higher level Android unit tests are often written in some sort of UI test framework like Espresso, Appium, Calabash, or Robotium.
-
Integration tests: Besides testing your own application, it is important to test interactions between applications with tools like UI Automator that are focused on integration testing and can test across multiple Android applications.
-
Functional tests: Overall application verification is important. You can do this manually, but automated tools can simulate user input like the previously mentioned UI automation tools. Another option is to run robotic crawler tools like Google’s App Crawler in order to inspect your application’s user interface and automatically issue user actions.
-
-
Package - In the package step you aggregate all of the scripts, configuration files, and binaries needed for deployment. By using a package management tool like Artifactory you retain all the build and test information and can easily trace dependencies for traceability and debugging.
-
Release - One of the best parts of mobile app development is that releasing mobile applications ends with the app store submission and the final deployment to devices is managed by the Google Play infrastructure. The challenging parts are that you have to prepare your build to make sure the app store submission is successsful, and you’ll be penalized for any mistakes in building, testing, and packaging by delays if you do not fully automate this.
As you can see, the biggest difference in DevOps for Android development comes with testing. There is a lot of investment in UI test frameworks for Android apps, because automated testing is the only solution to the problem of testing across a highly fragmented device ecosystem. We will find out exactly how severe the Android device fragmentation is in the next section, and talk about ways to mitigate this later in the chapter.
Android Device Fragmentation
The iOS ecosystem is tightly controlled by Apple, which limits the number of hardware models available, the variations in screen size, and the set of hardware sensors and features on their phones. Since 2007 when the first iPhone debuted only 29 different devices have been produced, only 7 of which are currently sold.
In contrast, the Android ecosystem is open to a plethora of different device manufacturers who customize everything from the screen size and resolution to the processor and hardware sensors, and even produce unique form factors like foldable screens. There are over 24,000 different devices from 1,300 different manufacturers, which is 1000x more fragmentation than iOS devices. This makes testing for Android platforms much more difficult to execute on.
When it comes to fragmentation, several key differences make it hard to uniformly test different Android devices:
-
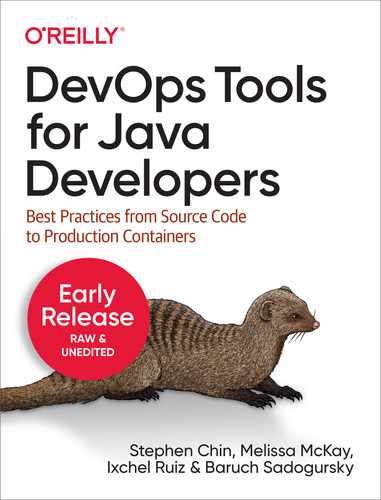
Android Version - Android devices manufacturers do not always provide updates for older devices to the latest Android version, creating a situation where users are stuck on old Android OS versions until they buy a new device. As shown in Figure 7-2 the dropoff in use of old Android versions is very gradual, with active devices still running 7+ year old Android 4.x releases, including Jelly Bean and KitKat.
-
Screen Size and Resolution - Android devices come in a wide array of different form factors and hardware configurations with a trend towards larger and more pixel dense displays. A well designed application needs to scale to work well across a range of different screen sizes and resolutions.
-
3D Support - Particularly for games, it is critical to know what level of 3D support you will get on devices both in terms of APIs and also performance.
-
Hardware Features - Most Android devices come with the basic hardware sensors (camera, accelerometer, GPS), but there is a lot of variation for support of newer hardware APIs like NFC, barometers, magnetometers, proximity and pressure sensors, thermometers, and so on.
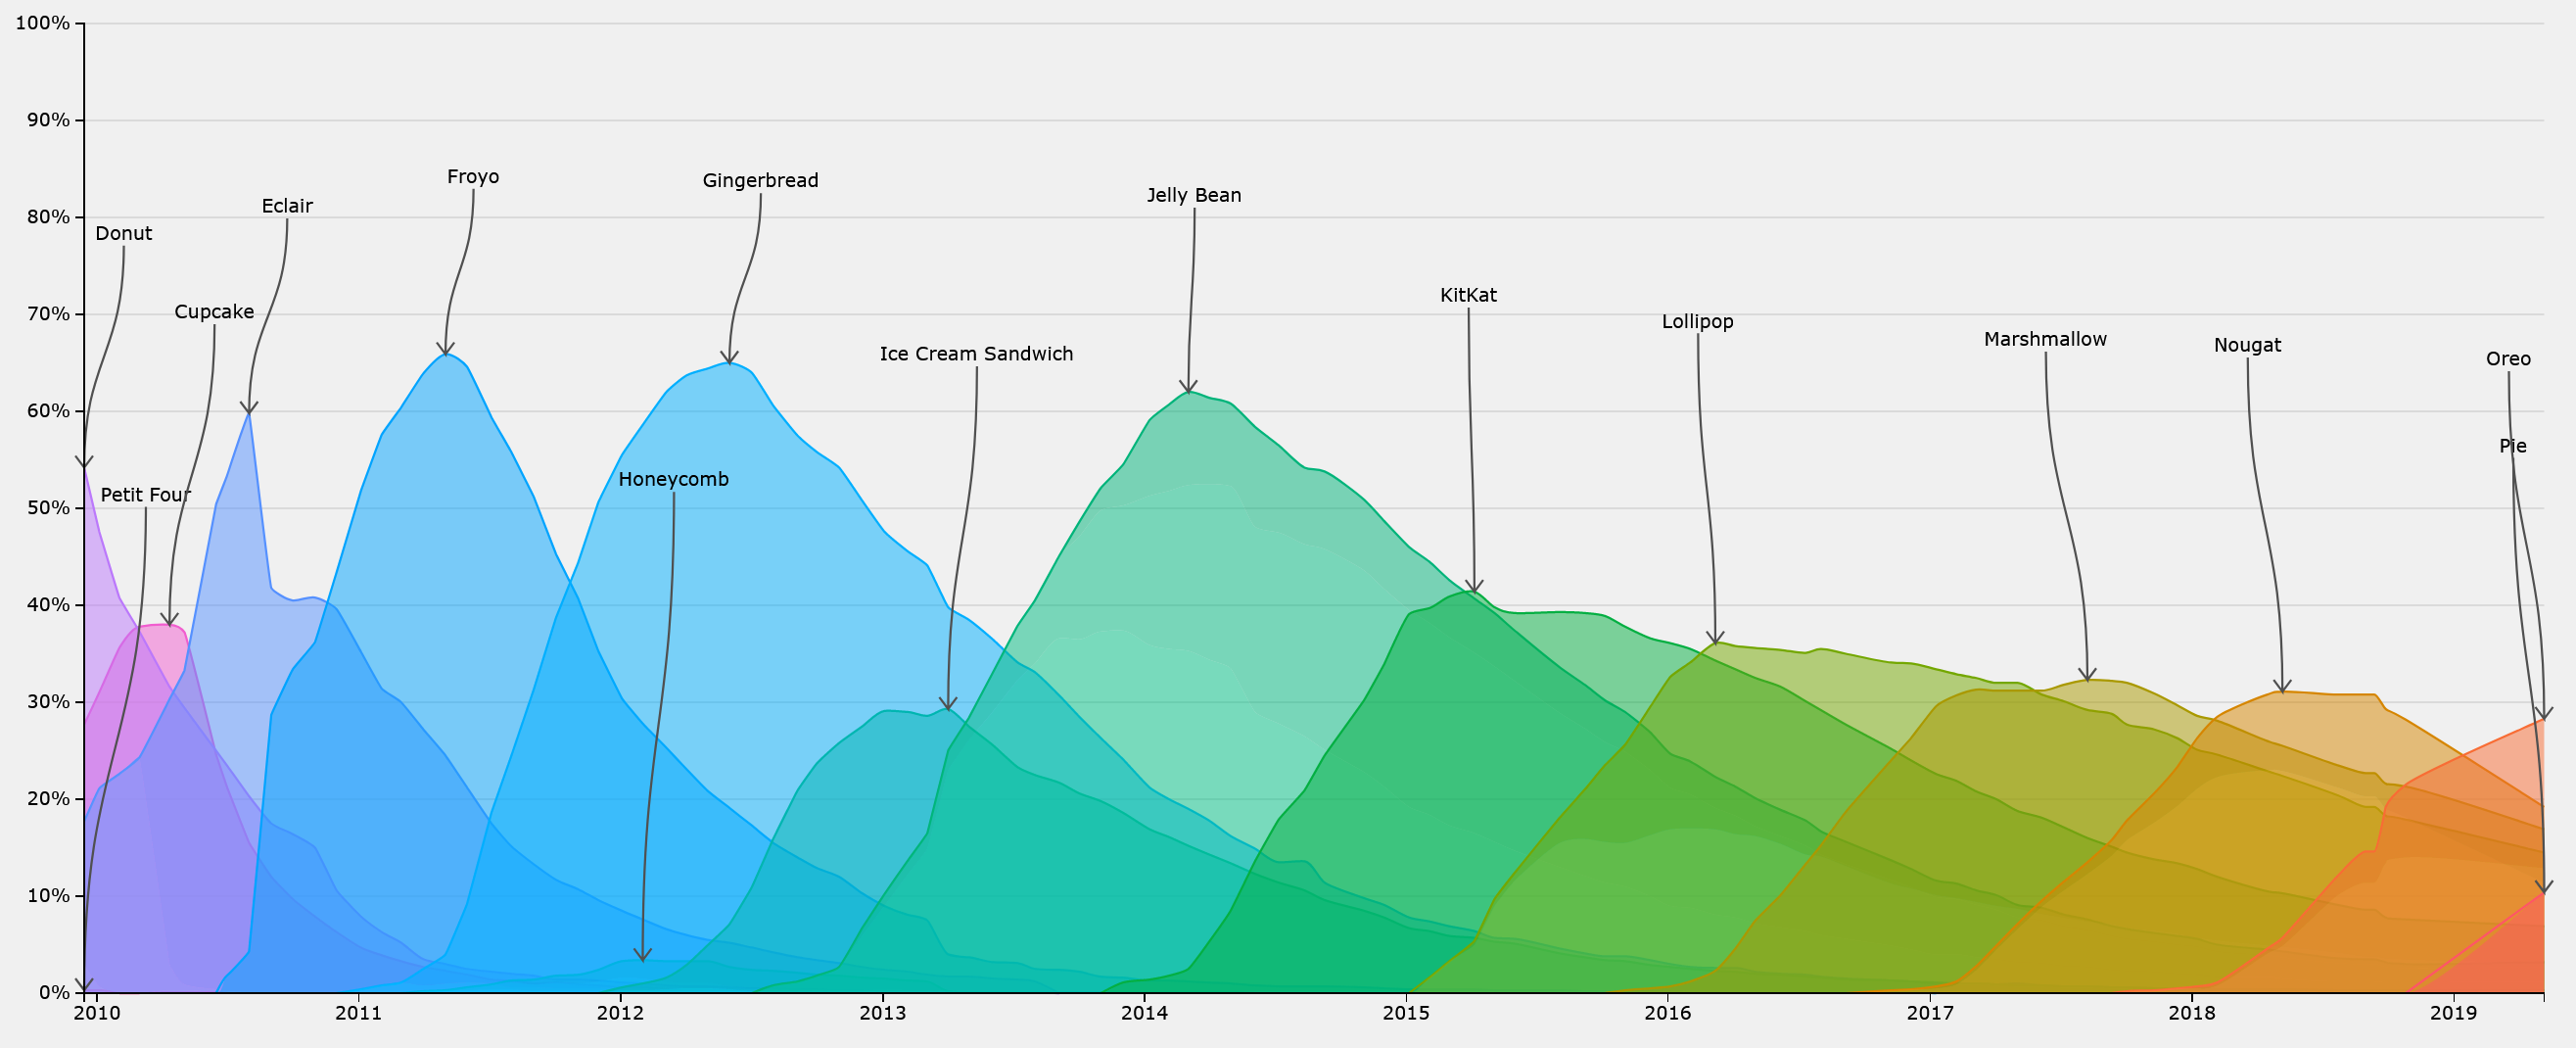
Figure 7-2. Percentage of devices utilizing major Android versions from 2010 through 20201
Android OS Fragmentation
Android version fragmentation affects device testing at two different levels. The first is the major Android version, which determines how many different Android API versions you need to build for and also test against. And the second is the OS customization done by original equipment manufacturers (OEMs) to support specific hardware configurations.
In the case of iOS, since Apple controls the hardware and the operating system, it is able to push out updates for all supported devices simultaneously. This keeps the adoption level of minor updates for performance and security fixes very high. Apple also puts a lot of features and marketing into major releases to push the installed base to upgrade to the latest version quickly. As a result, Apple was able to achieve 86% adoption of iOS 14 only seven months after its initial release.
The Android market is significantly more complex since OEMs modify and test custom versions of Android OS for their devices. Also, they are reliant on System on Chip (SoC) manufacturers to provide code updates for different hardware components. This means that devices created by major vendors are likely to receive only a couple major OS version updates, and devices from smaller vendors may never see an OS upgrade even when they are under support.
To help you decide how far back you should support different Android OS versions, Google provides information in Android Studio on the device adoption by API level. The distribution of users as of August 2021 is shown in Figure 7-3. To achieve > 86% adoption comparable to the latest iOS version you need to support at least Android 5.1 Lollipop, which is a release that came out in 2014. Even then you are still missing out on over 5% of users who are still using Android 4 based devices.
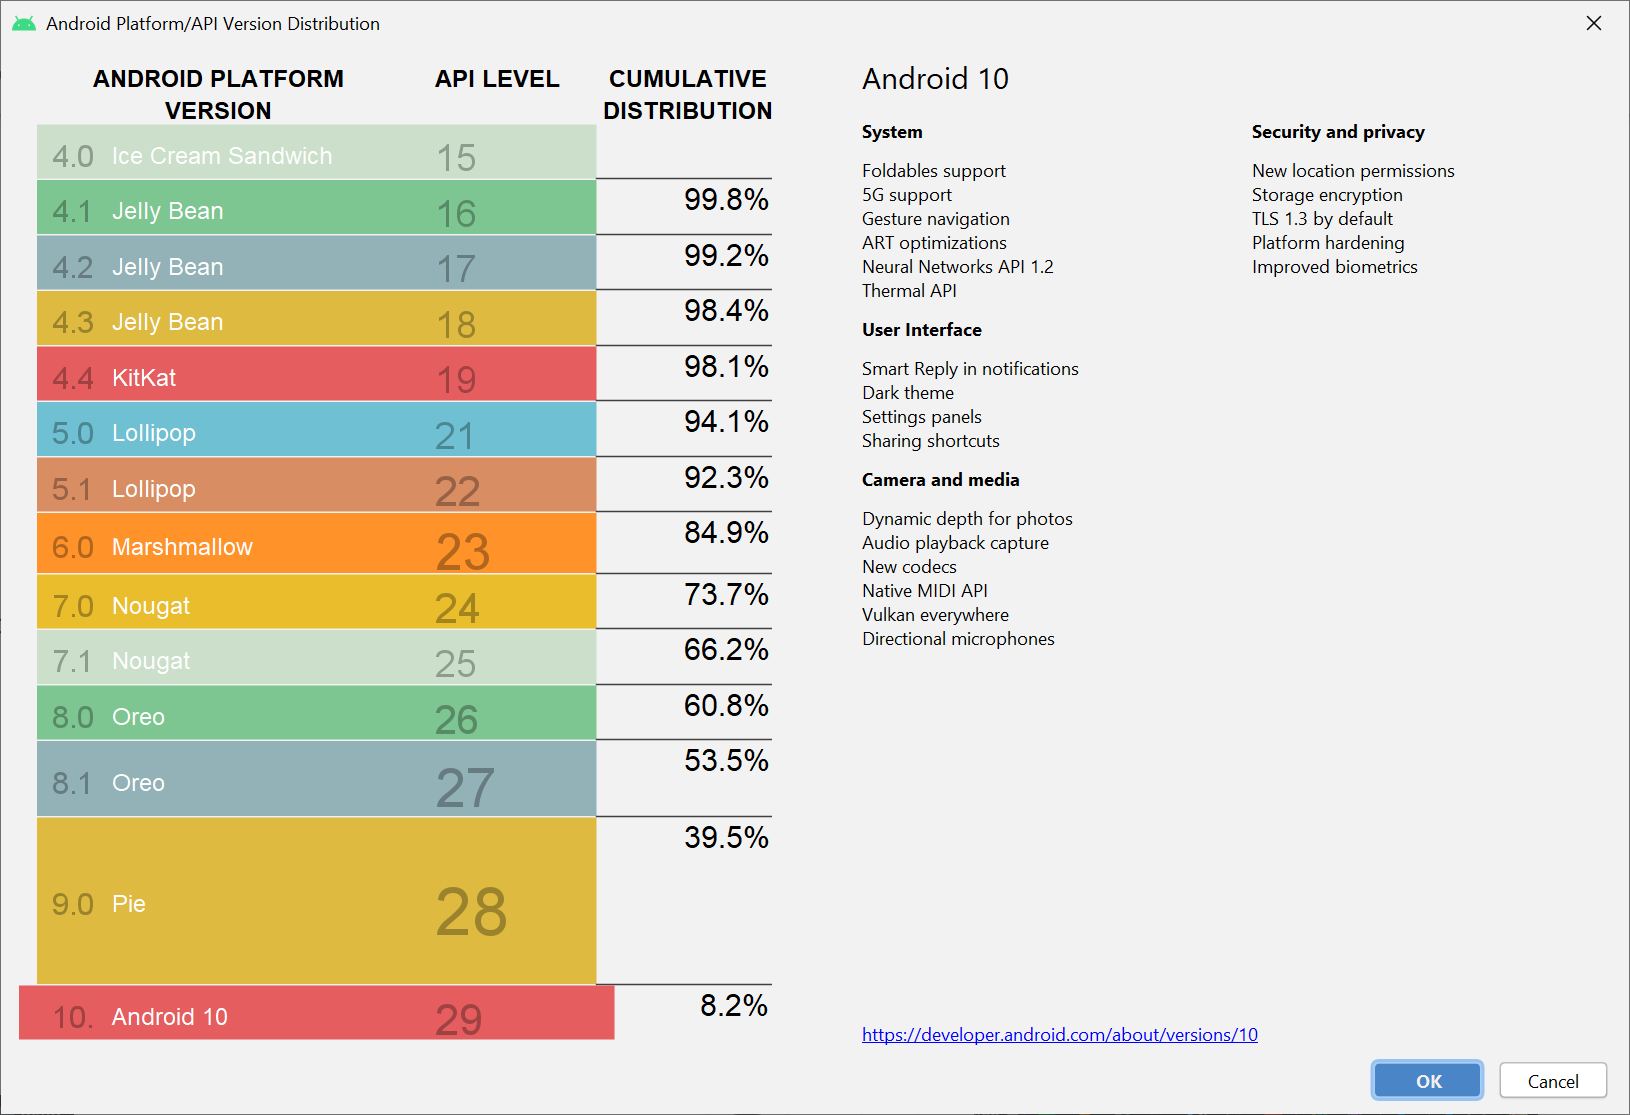
Figure 7-3. Screenshot of Android Studio showing the distribution of users on different versions of the Android platform (Android 11 has < 1% adoption)
To further complicate the situation, every OEM modifies the Android OS it ships for its devices, so it is not enough to simply test one device per major Android version. This is a result of the way Android uses the Linux kernel to access hardware devices.
The Linux kernel is the heart of the operating system, and provides the low-level device driver code to access cameras, accelerometers, the display, and other hardware on the device. To the Linux kernel that Android is based on, Google adds in Android specific features and patches, SoC vendors add in hardware specific support, and OEMs further modify it for their specific devices. This means that each device has a range of variation in performance, security, and potential bugs that could affect your application when a user runs it on a new device.
Google worked towards improving this situation with Android 8.0 Oreo, which includes a new hardware abstraction layer that allows device-specific code to run outside the kernel. This allows OEMs to update to new Android kernel versions from Google without waiting for device driver updates from SoC vendors, which reduces the amount of redevelopment and testing required for OS upgrades. However, other than Pixel devices that Google handles OS updates for, the majority of Android device upgrades are in the hands of OEMs, which are still slow to upgrade to new Android versions.
Building for Disparate Screens
Given the diversity in hardware manufactures and over 24,000 models, as discussed in the previous section, it should be no surprise that there is also a huge variation in screen sizes and resolutions. New screen dimensions are constantly being introduced, such as the enormous HP Slate 21, which uses a 21.5 inch touchscreen, and the Galaxy Fold with a vertical 1680x720 cover display that opens to reveal a double-wide inner display with a resolution of 2152x1536.
Besides the huge variation in screen sizes, there is a constant battle over achieving higher pixel density as well. Higher pixel densities allow for clearer text and sharper graphics, providing a better viewing experience.
The current front runner in pixel density is the Sony Xperia XZ, which packs a 3840x2160 USH-1 display in a screen that measures only 5.2 inches diagonally. This gives a density of 806.93 PPI, which is getting close to the maximum resolution the human eye can distinguish.
Applied Materials, one of the leading manufacturers of LCD and OLED displays, did research on human perception of pixel density on handheld displays. They found that at a distance of 4 inches from the eye a human with 20/20 vision can distinguish 876 PPI2. This means that smartphone displays are quickly approaching the theoretical limit on pixel density; however, other form factors like virtual reality headsets may drive the density even further.
To handle variation in pixel densities, Android categorizes screens into the following pixel density ranges:
-
ldpi - ~120dpi (.75x scale): Used on a limited number of very low resolution devices like the HTC Tattoo, Motorola Flipout, and Sony X10 Mini, all of which have a screen resolution of 240x320 pixels.
-
mdpi: ~160dpi (1x scale): This is the original screen resolution for Android devices such as the HTC Hero and Motorola Droid
-
tvdpi - ~213dpi (1.33x scale): Resolution intended for televisions such as the Google Nexus 7, but not considered a “primary” density group
-
hdpi - ~240dpi (1.5x scale): The second generation of phones such as the HTC Nexus One and Samsung Galaxy Ace increased resolution by 50%
-
xhdpi - ~320dpi (2x scale): One of the first phones to use this 2x resolution was the Sony Xperia S, followed by phones like the Samsung Galaxy S III and HTC One
-
xxhdpi - ~480dpi (3x scale): The first xxhdpi device was the Nexus 10 by Google, which was only 300dpi but needed large icons since it was in tablet form factor
-
xxxhdpi - ~640dpi (4x scale): This is currently the highest resolution used by devices like the Nexus 6 and Samsung S6 Edge
As displays continue to increase in pixel density, Google probably wishes it had chosen a better convention for high resolution displays than just adding more “x"s!
To give the best user experience for your end users, it is important to have your application look and behave consistently across the full range of different available resolutions. Given the wide variety of different screen resolutions it is not enough to simply hard code your application for each resolution.
Here are some best practices to make sure that your application will work across the full range of resolutions:
-
Always use density independent and scalable pixels
-
Density independent pixels (dp) - Pixel unit that adjusts based on the resolution of the device. For an mdpi screen 1 pixel (px) = 1 dp. For other screen resolutions px = dp * (dpi / 160).
-
Scalable pixels (sp) - Scalable pixel unit used for text or other user resizable elements. This starts at 1 sp = 1 dp and adjusts based on the user defined text zoom value.
-
-
Provide alternate bitmaps for all available resolutions
-
Android allows you to provide alternate bitmaps for different resolutions by putting them in subfolders named “drawable-?dpi” where “?dpi” is one of the supported density ranges.
-
The same applies for your app icon, except you should use subfolders named “mipmap-?dpi” so that the resources are not removed when you build density-specific APKs, because app icons are often upscaled beyond the device resolution.
-
-
Better yet, use vector graphics whenever possible
-
Android Studio provides a tool called “Vector Asset Studio that allows you to convert an SVG or PSD into an Android Vector file that can be used as resource in your application as shown in Figure 7-4.
-

Figure 7-4. Conversion of an SVG file to an Android Vector format resource
Building applications that cleanly scale to different screen sizes and resolutions is complicated to get right and therefore needs to be tested on different resolution devices. To help out with focusing your testing efforts, Google provides user-mined data on the usage of different device resolutions as shown in Table 7-1.
| ldpi | mdpi | tvdpi | hdpi | xdpi | xxhdpi | Total | |
|---|---|---|---|---|---|---|---|
Small |
0.1% |
0.1% |
0.2% |
||||
Normal |
0.3% |
0.3% |
14.8% |
41.3% |
26.1% |
82.8% |
|
Large |
1.7% |
2.2% |
0.8% |
3.2% |
2.0% |
9.9% |
|
Xlarge |
4.2% |
0.2% |
2.3% |
0.4% |
7.1% |
||
Total |
0.1% |
6.2% |
2.7% |
17.9% |
45.0% |
28.1% |
As you can see, some resolutions are not very prevalent and, unless your application targets these users or legacy device types, you can purne them from your device-testing matrix. LDPI is used on only a small segment of Android devices and with only 0.1% market share — few applications are optimized for this very small resolution screen. Also, tvdpi is a niche screen resolution with only 2.7% usage and can be safely ignored since Android will automatically downscale hdpi assets to fit this screen resolution.
This still leaves you with five different device densities to support and a potentially innumerable number of screen resolutions and aspect ratios to test. I discuss testing strategies later, but you will likely be using some mix of emulated devices and physical devices to make sure that you provide the best user experience across the very fragmented Android ecosystem.
Hardware and 3D Support
The very first Android device was the HTC Dream (aka T-Mobile G1) shown in Figure 7-5. It had a medium density touchscreen of 320x480px, a hardware keyboard, speaker, microphone, five buttons, a clickable trackball, and a rear-mounted camera. While primitive by modern smartphone standards, it was a great platform to launch Android, which lacked support for software keyboards at the time.
Figure 7-5. The T-Mobile G1 (aka. HTC Dream), which was the first smartphone to run the Android operating system. Photo used under Creative Commons license.
By comparison with modern smartphone standards this was a very modest hardware set. The Qualcomm MSM7201A processor that drove the HTC Dream was a 528 MHz ARM11 processor with support for only OpenGL ES 1.1. In comparison, the Samsung Galaxy S21 Ultra 5G sports a 3200 x 1440 resolution screen with the following sensors:
-
2.9 GHz 8-core processor
-
ARM Mali-G78 MP14 GPU with support for Vulkan 1.1, OpenGl ES 3.2, and OpenCL 2.0
-
Five cameras (1 front, 4 rear)
-
Three microphones (1 bottom, 2 top)
-
Stereo speakers
-
Ultrasonic fingerprint reader
-
Accelerometer
-
Barometer
-
Gyro sensor (gyroscope)
-
Geomagnetic sensor (magnetometer)
-
Hall sensor
-
Proximity sensor
-
Ambient light sensor
-
Near-field communication (NFC)
The flagship Samsung phones are at the high end of the spectrum when it comes to hardware support, and include almost all of the supported sensor types. Phones meant for mass market may choose to use less powerful chipsets and leave off sensors to reduce cost. Android uses the data from the available physical sensors to also create some “virtual” sensors in software that are used by applications:
-
Game rotation vector: Combination of data from the accelerometer and gyroscope
-
Gravity: Combination of data from the accelerometer and gyroscope (or magnetometer if no gyroscope is present)
-
Geomagnetic rotational vector: Combination of data from the accelerometer and magnetometer
-
Linear acceleration: Combination of data from the accelerometer and gyroscope (or magnetometer if no gyroscope is present)
-
Rotation vector: Combination of data from the accelerometer, magnetometer, and gyroscope
-
Significant motion: Data from the accelerometer (and possibly substitutes other sensor data when in low power mode)
-
Step detector/counter: Data from the accelerometer (and possibly substitutes other sensor data when in low power mode)
These virtual sensors are only available if a sufficient set of physical sensors are present. Most phones contain an accelerometer, but may choose to omit either a gyroscope or magnetometer or both, reducing the precision of motion detection and disabling certain virtual sensors.
Hardware sensors can be emulated, but it is much harder to simulate real world conditions for testing. Also, there is much more variation in hardware chipset and SoC vendor driver implementation, producing a huge test matrix required to verify your application across a range of devices.
The other aspect of hardware that is particularly important for game developers, but increasingly is part of the basic graphics stack and expected performance of applications, is 3D API support. Almost all mobile processors support some basic 3D APIs, including the first Android phone, which had support for OpenGL ES 1.1, a mobile-specific version of the OpenGL 3D standard. Modern phones support later versions of the OpenGL ES standard including OpenGL ES 2.0, 3.0, 3.1, and now 3.2.
OpenGL ES 2.0 introduced a dramatic shift in the programming model, switching from a functional pipeline to a programmable pipeline, allowing for more direct control to create complex effects through the use of shaders. OpenGL ES 3.0 further increased the performance and hardware independence of 3D graphics by supporting features like vertex array objects, instanced rendering, and device independent compression formats (ETC2/EAC).
OpenGL ES adoption has been rather quick with all modern devices supporting at least OpenGL ES 2.0. According to Google’s device data shown in Figure 7-6, the majority of devices (67.54%) support OpenGL ES 3.2, the latest version of the standard released on August 2015.
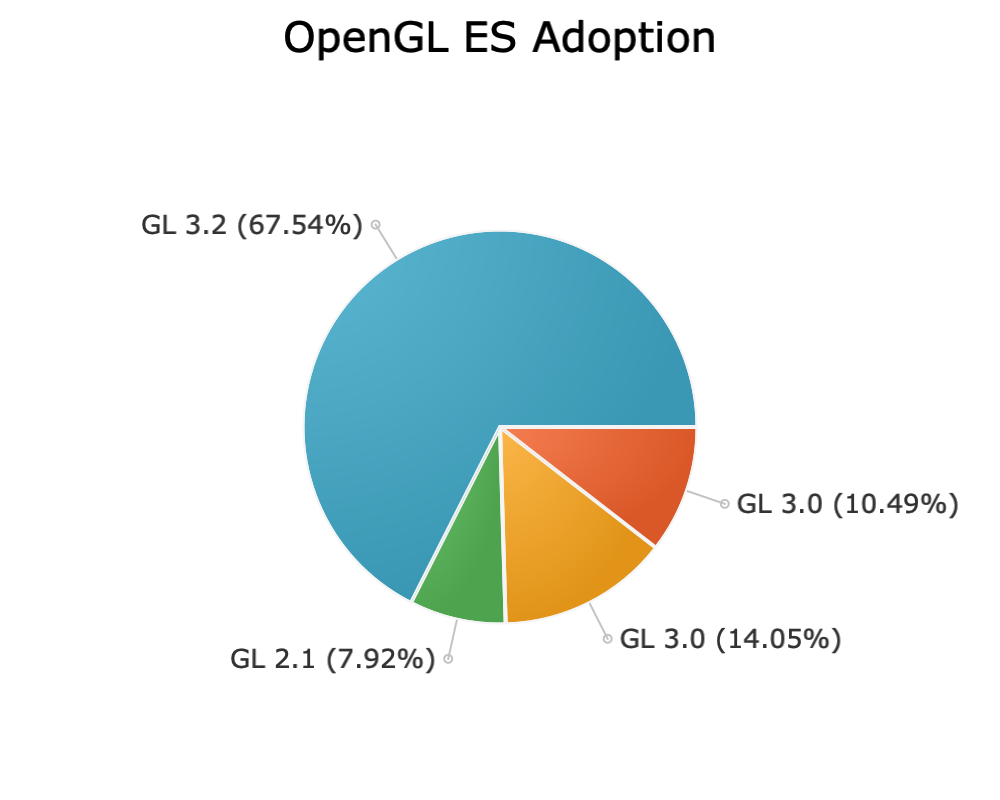
Figure 7-6. Percentage of Android devices adopting different versions of OpenGL ES from Google’s Distribution Dashboard.
Vulkan is a newer graphics API that modern graphics chipsets support. It has the advantage of being portable between desktop and mobile allowing for easier porting of desktop code as computing platforms continue to converge. Also, it allows an even finer level of control over threads and memory management, and an asynchronous API for buffering and sequencing commands across multiple threads, making better use of multi-core processors and high-end hardware.
Since Vulkan is a newer API, adoption has not been as quick as OpenGL ES; however, 64% of Android devices have some level of Vulkan support. According to Google’s device statistics visualized in Figure 7-7 this is split between Vulkan 1.1, which is supported by 42% of devices, and the remaining 22% of devices that only support the Vulkan 1.0.3 API level.
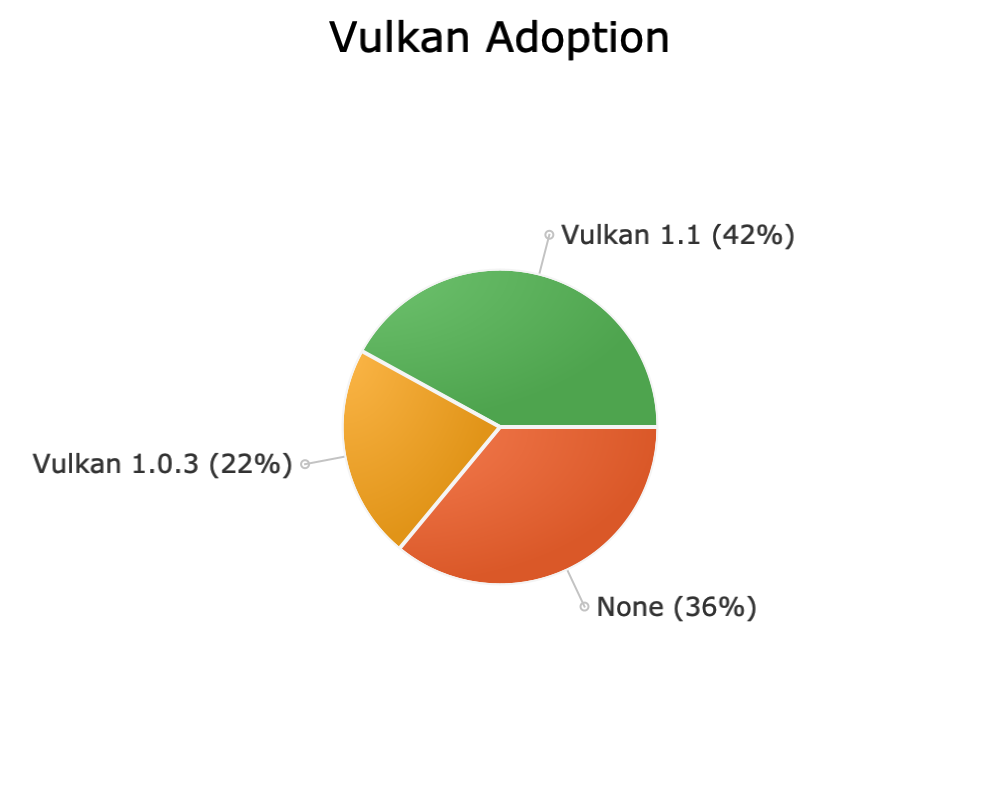
Figure 7-7. Percentage of Android devices adopting different versions of Vulkan from Google’s Distribution Dashboard.
Similar to hardware sensor testing, there are a large variety of 3D chipsets implemented by different manufacturers. Therefore, the only way to reliably test for bugs and performance issues in your application is to execute on device testing of different phone models, covered in the next section.
Continuous Testing on Parallel Devices
The last section discussed the large amount of fragmentation in the Android device ecosystem. This is forced both by technogical factors like the Android OS architecture as well as the complex ecosystem of OEMs and SoC vendors. Also, the sheer popularity of the Android platform, with 1,300 manufacturers producting over 24,000 devices, creates a continuous testing and deployment challenge.
Device emulators are great for development and basic testing of applications, but cannot possibly simulate the complex interactions of unique hardware configurations, device drivers, custom kernels, and real-world sensor behavior. Therefore, a high level of manual and automated testing on devices is required to ensure a good experience for end users.
There are two basic approaches to doing hardware testing at scale. The first is to build out your own device lab with shared devices. This is a practical approach to get started with testing since you likely have a large collection of Android devices available that could be put to better use with proper infrastructure and automation. However, depending upon the number of device configurations you want to support this can be quite a large and expensive endeavor. Also, the ongoing maintenance and upkeep for a large device farm can be quite costly both in materials and labor.
The second option is to outsource your device testing to a cloud service. Given the advances in remote control of Android devices and stability of the platform, it is very convenient to be able to select your matrix of devices and have your automated tests fired off in the cloud. Most cloud services offer detailed screenshots and diagnostic logs that can be used to trace build failures and also the ability to manually control a device for debugging purposes.
Building a Device Farm
Building your own device farm, even at a small scale, is a great way to leverage Android devices that you already have and increase their utility for your entire organization. At scale, device farms can significantly reduce the run rate cost of Android development once you have made the upfront investment in hardware. Keep in mind, though, running a large device lab is a full time job and has ongoing costs that need to be accounted for.
A popular open source library for managing Android devices is Device Farmer (formerly Open STF). Device Farmer allows you to remote control an Android device from your web browser with a real-time view of the device screen, as shown in Figure 7-8. For manual tests you can type from your desktop keyboard and use your mouse to input single or multitouch gestures. For automated tests there is a REST API that allows you to use test automation frameworks like Appium.
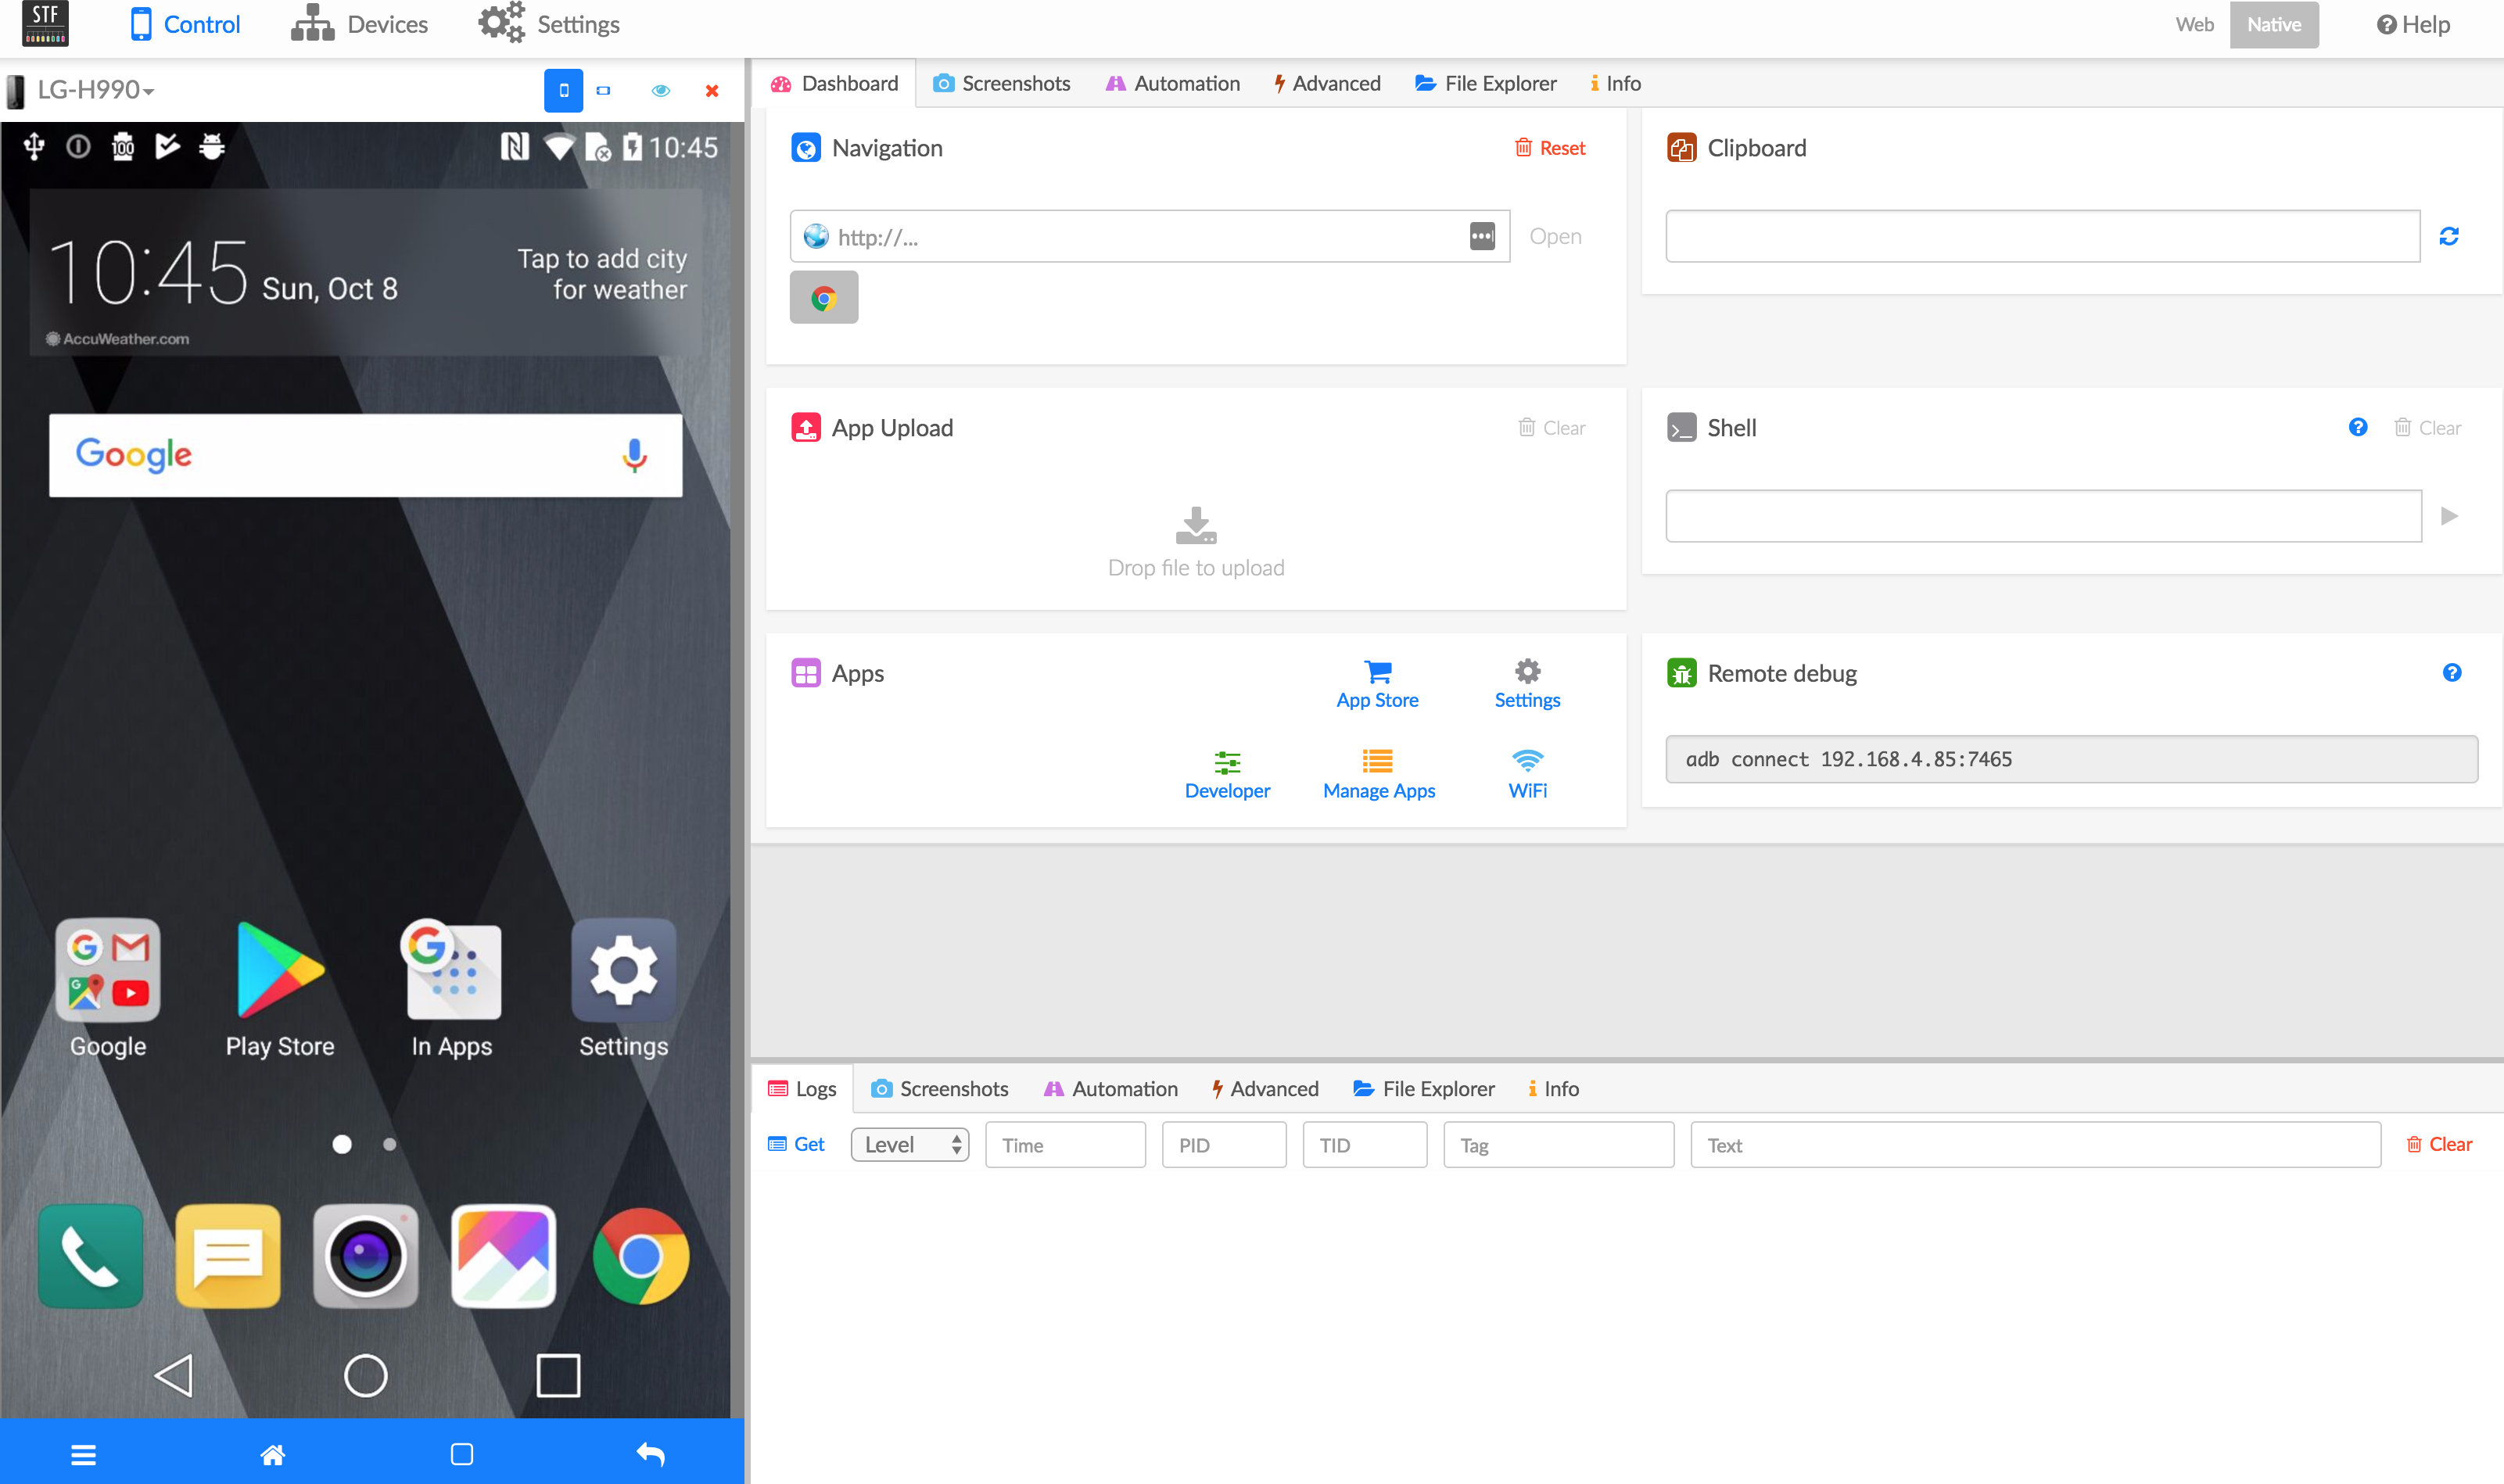
Figure 7-8. Device Farmer user interface. Photo used under Creative Commons.
Device Farmer also helps you to manage your inventory of devices. It shows you which devices are connected, who is using each device, and the hardware spec for your devices, and it assists with physically locating devices in a large lab.
Finally, Device Farmer also has a system for booking and partitioning groups of devices. You can split your device inventory into distinct groups that have owners and associated properties. These groups can then be permanently allocated to projects or organizations or they can be booked for a specific time period.
To set up a device lab you will also need hardware to support the devices. The basic hardware setup includes the following:
-
Driver computer - Even though Device Farmer can run on any operating system, it is recommended to run it on a Linux-based host for ease of administration and the best stability. A good option for getting started with this is a compact, but powerful, computer like the Intel NUC.
-
USB hub - Both for device connectivity and also to supply stable power, a powered USB hub is recommended. Getting a reliable USB hub is important since this will affect the stability of your lab.
-
Wireless router - The devices will get their network connectivity from a wireless router, so this is an important part of the device setup. Having a dedicated network for your devices will increase reliability and reduce contention with other devices on your network.
-
Android devices - And the most important part, of course, is having plenty of Android devices to test against. Start with devices that are the most common and popular with your target user base and add additional devices to hit the desired test matrix of Android OS versions, screen sizes, and hardware support as discussed in the previous section.
-
Plenty of cables - You will need longer cables than usual to do efficient cable management of devices to the USB hub. It is important to leave enough space between individual devices and hardware components in order to avoid overheating.
With a little bit of work you will be able to create a fully automated device lab similar to Figure 7-9, which was the world’s first conference device lab featured at the beyond tellerrand conference in Düsseldorf, Germany.

Figure 7-9. Open device lab at the beyond tellerrand conference in Düsseldorf, Germany. Photo used under Creative Commons.
Device Farmer is split up into microservices to allow for scalability of the platform to thousands of devices. Out of the box you can easily support 15 devices, after which you will run into port limitations with ADB. This can be scaled out by running multiple instances of the Device Farmer ADB and Provider services up to the limit of the number of USB devices that your machine can support. For Intel architectures this is 96 endpoints (including other peripherals) and for AMD you can get up to 254 USB endpoints. By using multiple Device Farmer servers you can scale into the thousands of devices, which should be enough to support mobile testing and verification of enterprise Android applications.
One example of a large-scale mobile device lab is Facebook’s mobile device lab at its Prineville, Oregon data center shown in Figure 7-10. They build a customer server rack enclosure for holding mobile devices that is deigned to block Wi-Fi signals to prevent interference between devices in their data center. Each enclosure can support 32 devices and is powered by 4 OCP Leopard servers that connect to the devices. This provides a stable and scalable hardware setup that allowed the company to reach to its target device farm size of 2000 devices.
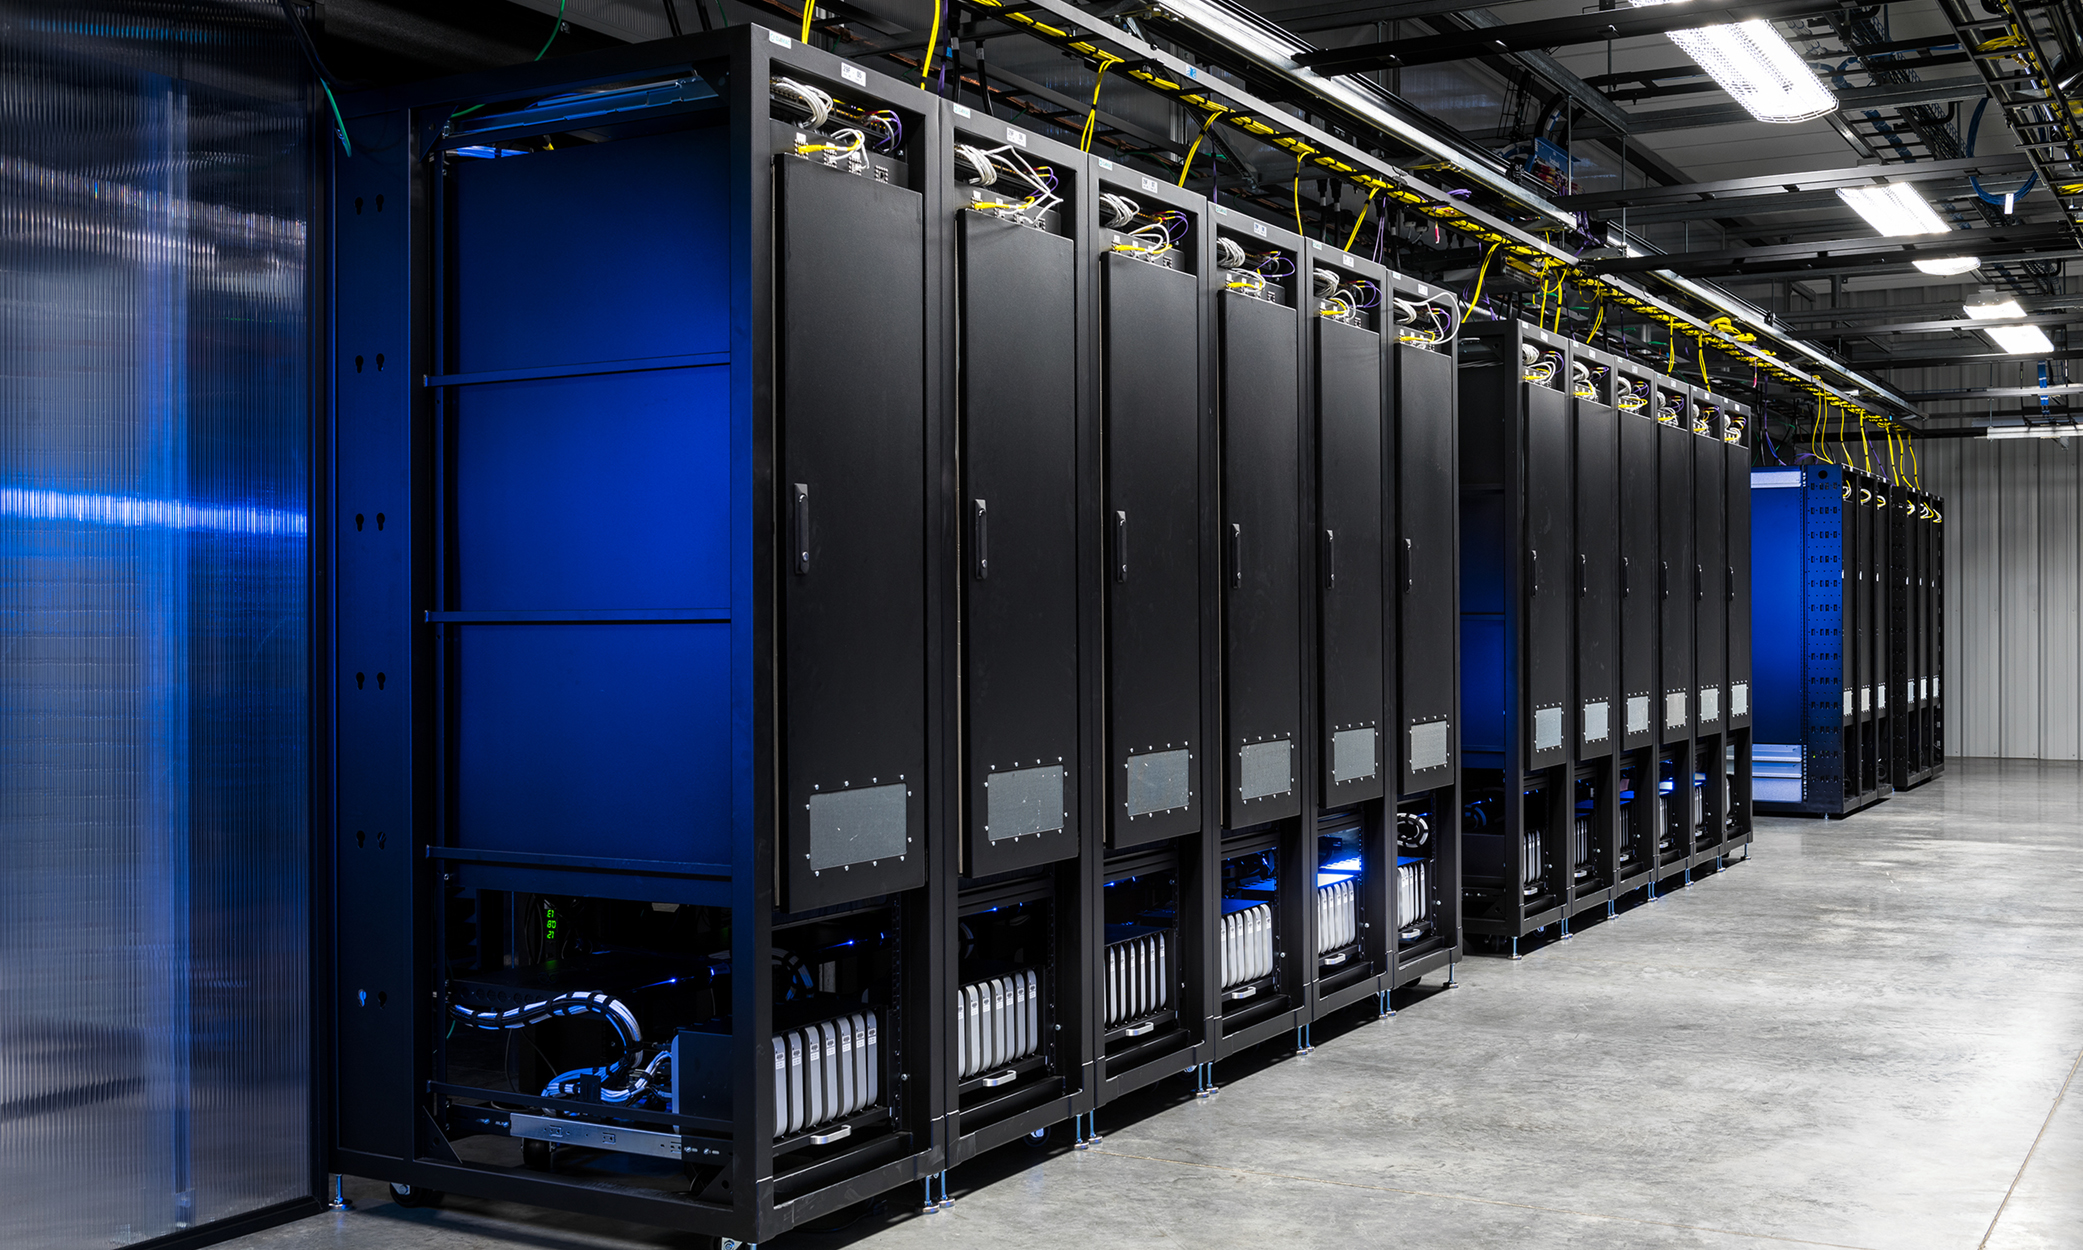
Figure 7-10. The Facebook mobile device lab in their Prineville data center3
There are some challenges of running a large scale device lab:
-
Device maintenance: Android devices are not meant to be run 24/7 for automated testing. As a result, you are likely to experience higher than normal device failure and have to replace batteries or entire devices every year or two. Spacing out devices and keeping them well cooled will help with this.
-
Wi-Fi interference/connectivity: Wi-Fi networks, especially consumer targeted Wi-Fi routers, are not highly stable especially with a large number of devices. Reducing the broadcast signal power of the Wi-Fi routers and making sure they are on non-competing network bands can reduce interference.
-
Cable routing: Running cables between all the devices and the USB hubs or computers can create a tangled mess. Besides being hard to maintain, this can also cause connectivity and charging issues. Make sure to remove all loops in the cables and use shielded cables and ferrite cores as necessary to reduce electromagnetic interference.
-
Device reliability: Running a device lab on consumer devices comes along with the general risk that consumer devices are not reliable. Limiting automated test runs to a finite duration will help prevent tests from becoming blocked on non-responsive devices. Between tests some housekeeping to remove data and free memory will help with performance and reliability. Finally, both the Android devices and also the servers running them will need to be rebooted periodically.
Tip
It is easy to get started on a small scale with devices you already own and can improve the ability to test across a range of devices and fire off automated test in parallel. At large scale this is an effective solution to solve testing across the fragmented Android ecosystem, but comes with high up-front costs and ongoing support and maintenance.
The next section talks about device labs that you can get started with today on a simple pay-as-you-go basis.
Mobile Pipelines in the Cloud
If the prospect of bulding your own device lab seems daunting, an easy and inexpensive way to get started with testing across a large range of devices is to make use of a device farm running on public cloud infrastructure. Mobile device clouds have the advantage of being easy to get started with and maintenance free for the end user. You simply select the devices you want to run tests on and fire off either manual or automated tests of your application against a pool of devices.
Some of the mobile device clouds also support automated robot tests that will attempt to exercise all the visible UI elements of your application to identify performance or stability issues with your application. Once tests are run you get a full report of any failures, device logs for debugging, and screenshots for tracing issues.
There are a large number of mobile device clouds available with some dating back to the feature phone era. However, the most popular and modern device clouds have ended up aligning with the top three cloud providers, Amazon, Google, and Microsoft. They all have sizeable investments in mobile test infrastructure that you can try for a reasonable price and have a large range of emulated and real devices to test against.
AWS device farm
Amazon offers a mobile device cloud as part of its public cloud services. Using AWS Device Farm you can run automated tests on a variety of different real world devices using your AWS account with.
The steps to create a new AWS Device Farm test are as follows:
-
Upload your APK file: To start, upload your compiled APK file or choose from recently updated files.
-
Configure your test automation: AWS Device Farm supports a variety of different test frameworks including Appium tests (written in Java, Python, Node.js, or Ruby), Calabash, Espresso, Robotium, or UI Automator. If you don’t have automated tests, they provide two different robot app testers called Fuzz and Explorer.
-
Select devices to run on: Pick the devices that you want to run your test on from a user created pool of devices or their default pool of the five most popular devices as shown in Figure 7-11.
-
Setup the device state: To setup the device before starting the tests, you can specify data or other dependent apps to install, set the radio states (Wi-Fi, Bluetooth, GPS, and NFC), change the GPS coordinates, change the locale, and setup a network profile.
-
Run your test: Finally, you can run your test on the selected devices with a specificed execution timeout of up to 150 minutes per device. If you tests execute more quickly this can finish earlier, but this also sets a maximum cap on the cost of your test run.
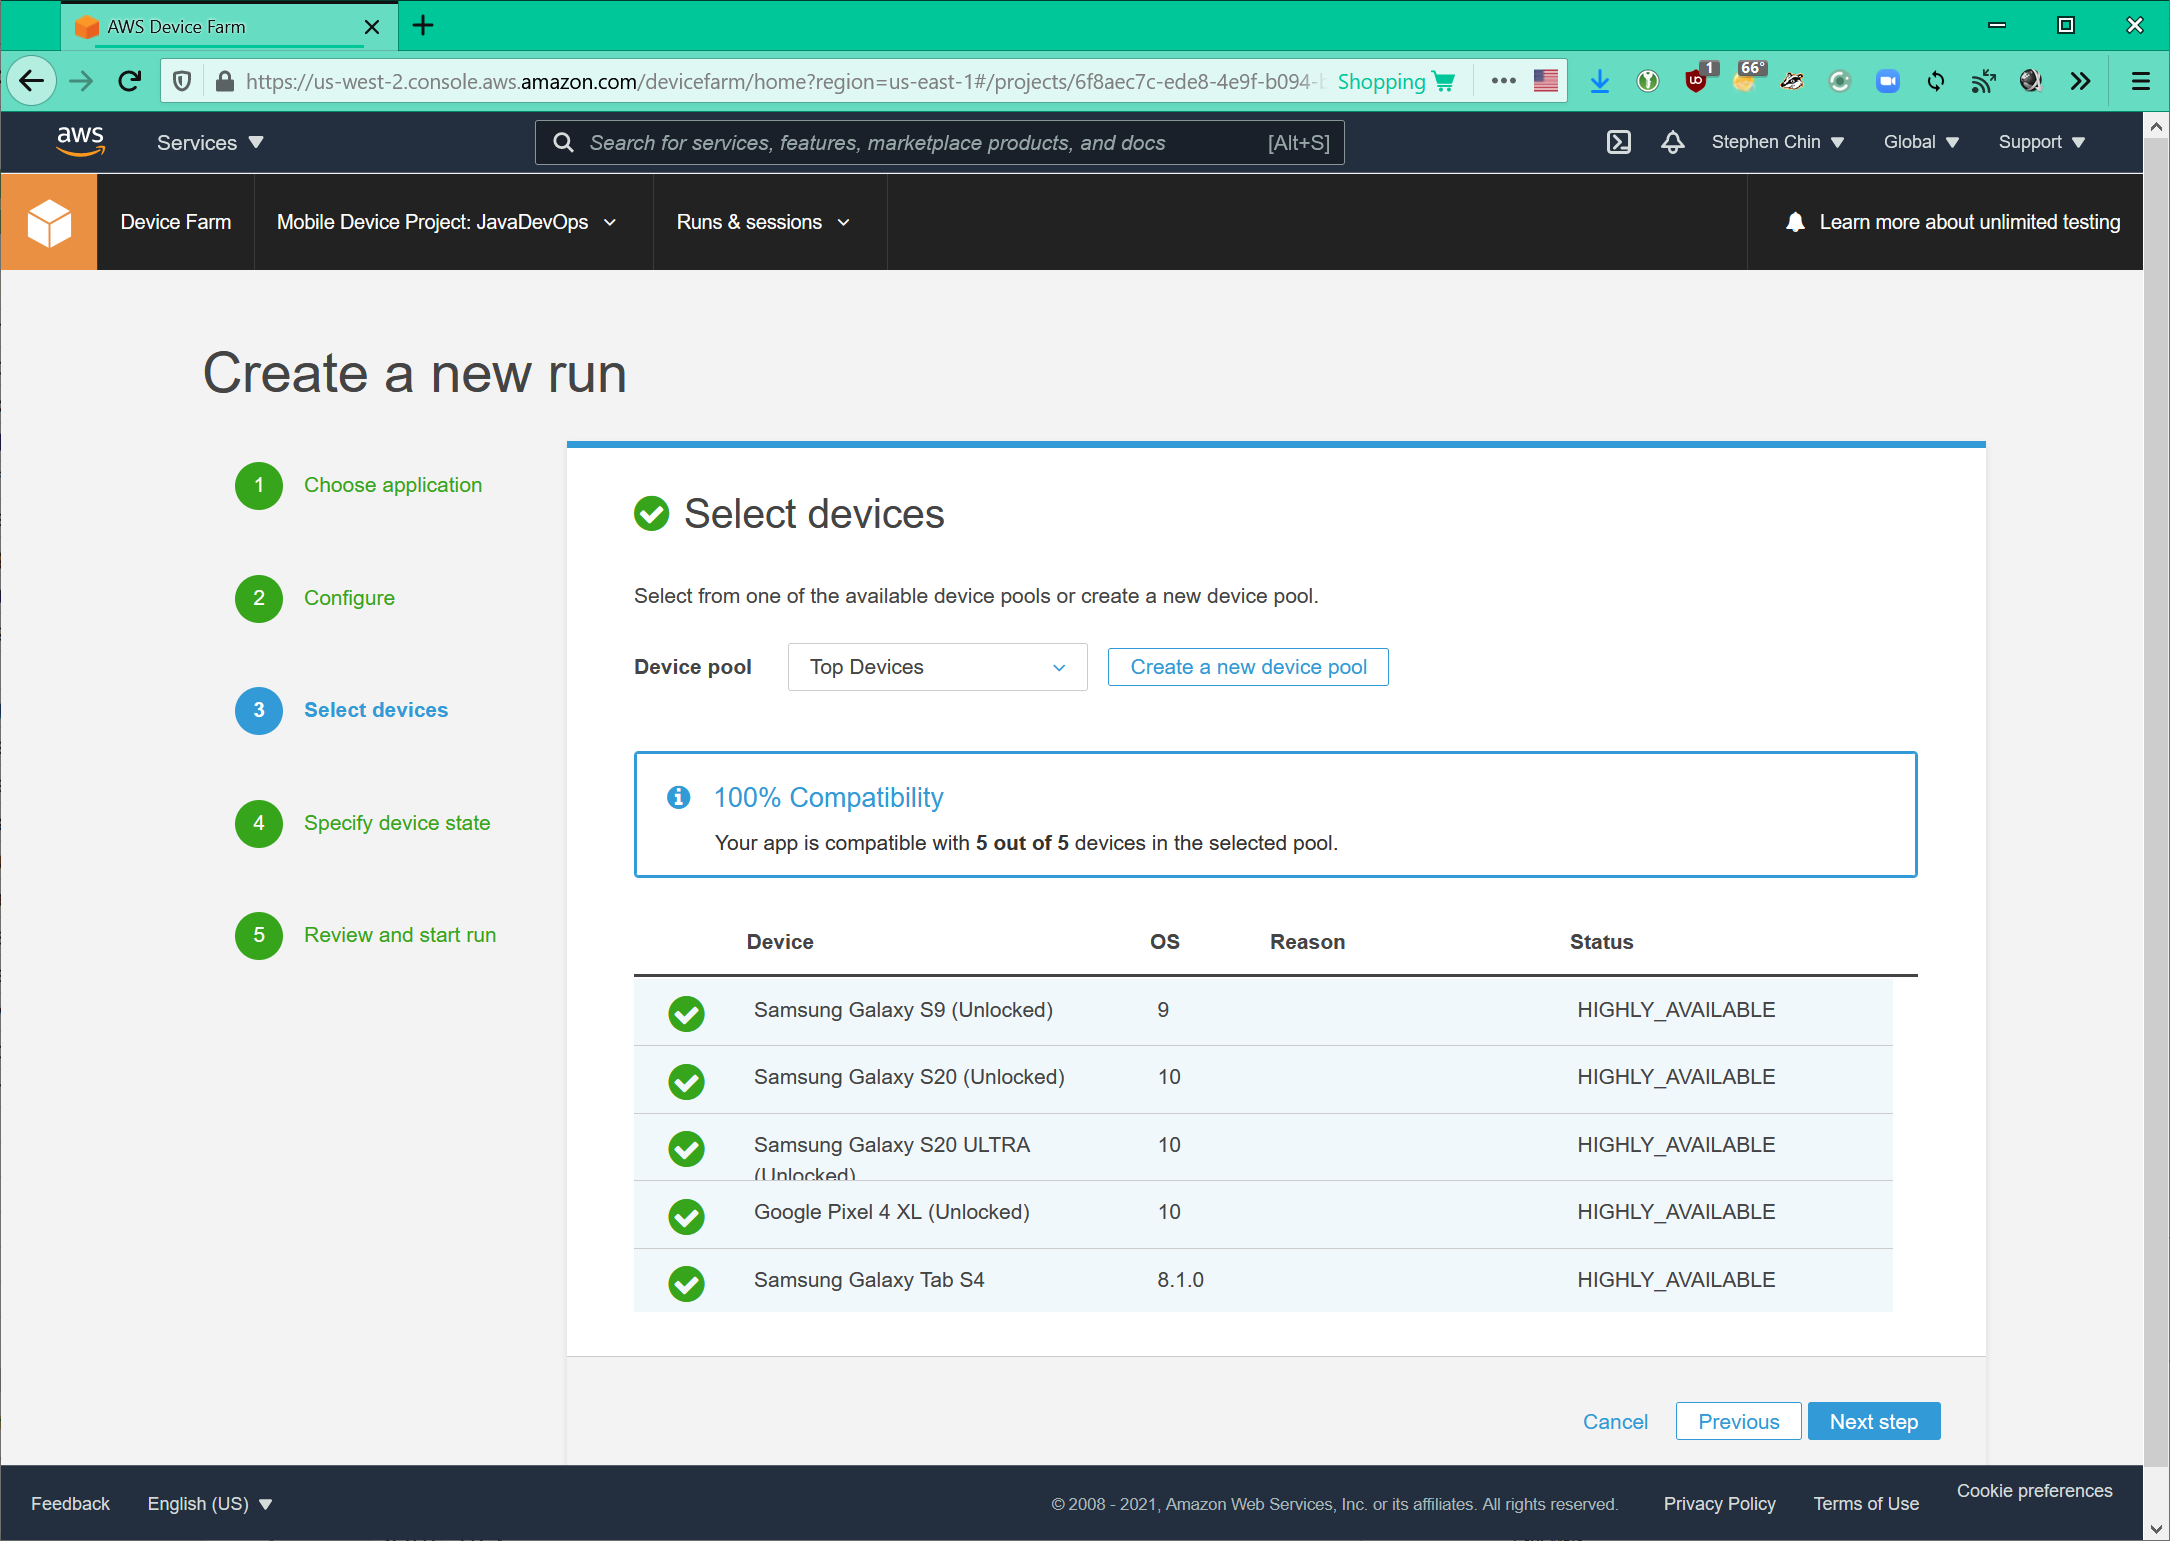
Figure 7-11. Configuration for selecting devices to run on in the AWS Device Farm wizard
AWS Device Farm offer a free quota for individual developers to get started with test automation, low per-minute pricing for additional device testing, and monthly plans to do parallel testing on multiple devices at once. All of these plans operate on a shared pool of devices, which at the time of writing included 91 total devices, 54 of which were Android devices, as shown in Figure 7-12. However, most of these devices were highly available, indicating that they had a large number of identical devices to test against. This means that you are less likely to get blocked in a queue or have a device you need to test against become unavailable.

Figure 7-12. List of available devices in the AWS Device Farm
Finally, AWS Device Farm offers a couple integrations to run automated tests. From within Android Studio you can run tests on the AWS Device Farm using its Gradle plug-in. If you want to launch AWS Device Farm tests from your continuous integration system, Amazon offers a Jenkins plugin that you can use to start device tests right after your local build and test automation completes.
Google Firebase Test Lab
After Google’s acquisition of Firebase, it has been continually expanding and improving the offering. Firebase Test Lab is its mobile device testing platform that provides very similar functionality to AWS Device Farm. To get started, Google offers a free quote for developers to run a limited number of tests per day. Beyond that you can upgrade to a pay-as-you-go plan with a flat fee per device hour.
Firebase Test Lab offers several different ways you can fire tests off on the service:
-
Android Studio - Firebase Test Lab is integrated in Android Studio and allows you to run tests in their mobile device cloud just as easily as you would on local devices.
-
Firebase Web UI - From the Firebase web console you can upload your APK and will start by running your first app in an automated Robo test as shown in Figure 7-13. In addition, you can run your own automated tests using Espresso, Robotium, or UI Automator. For game developers there is also an option to run an integrated game loop that simulates user scenarios.
-
Automated Command Line Scripts - You can easily integrate Firebase Test Lab into your continuous integration system using its command-line API. This allows you to integrate with Jenkins, CircleCI, JFrog Pipelines, or your favorite CI/CD system.
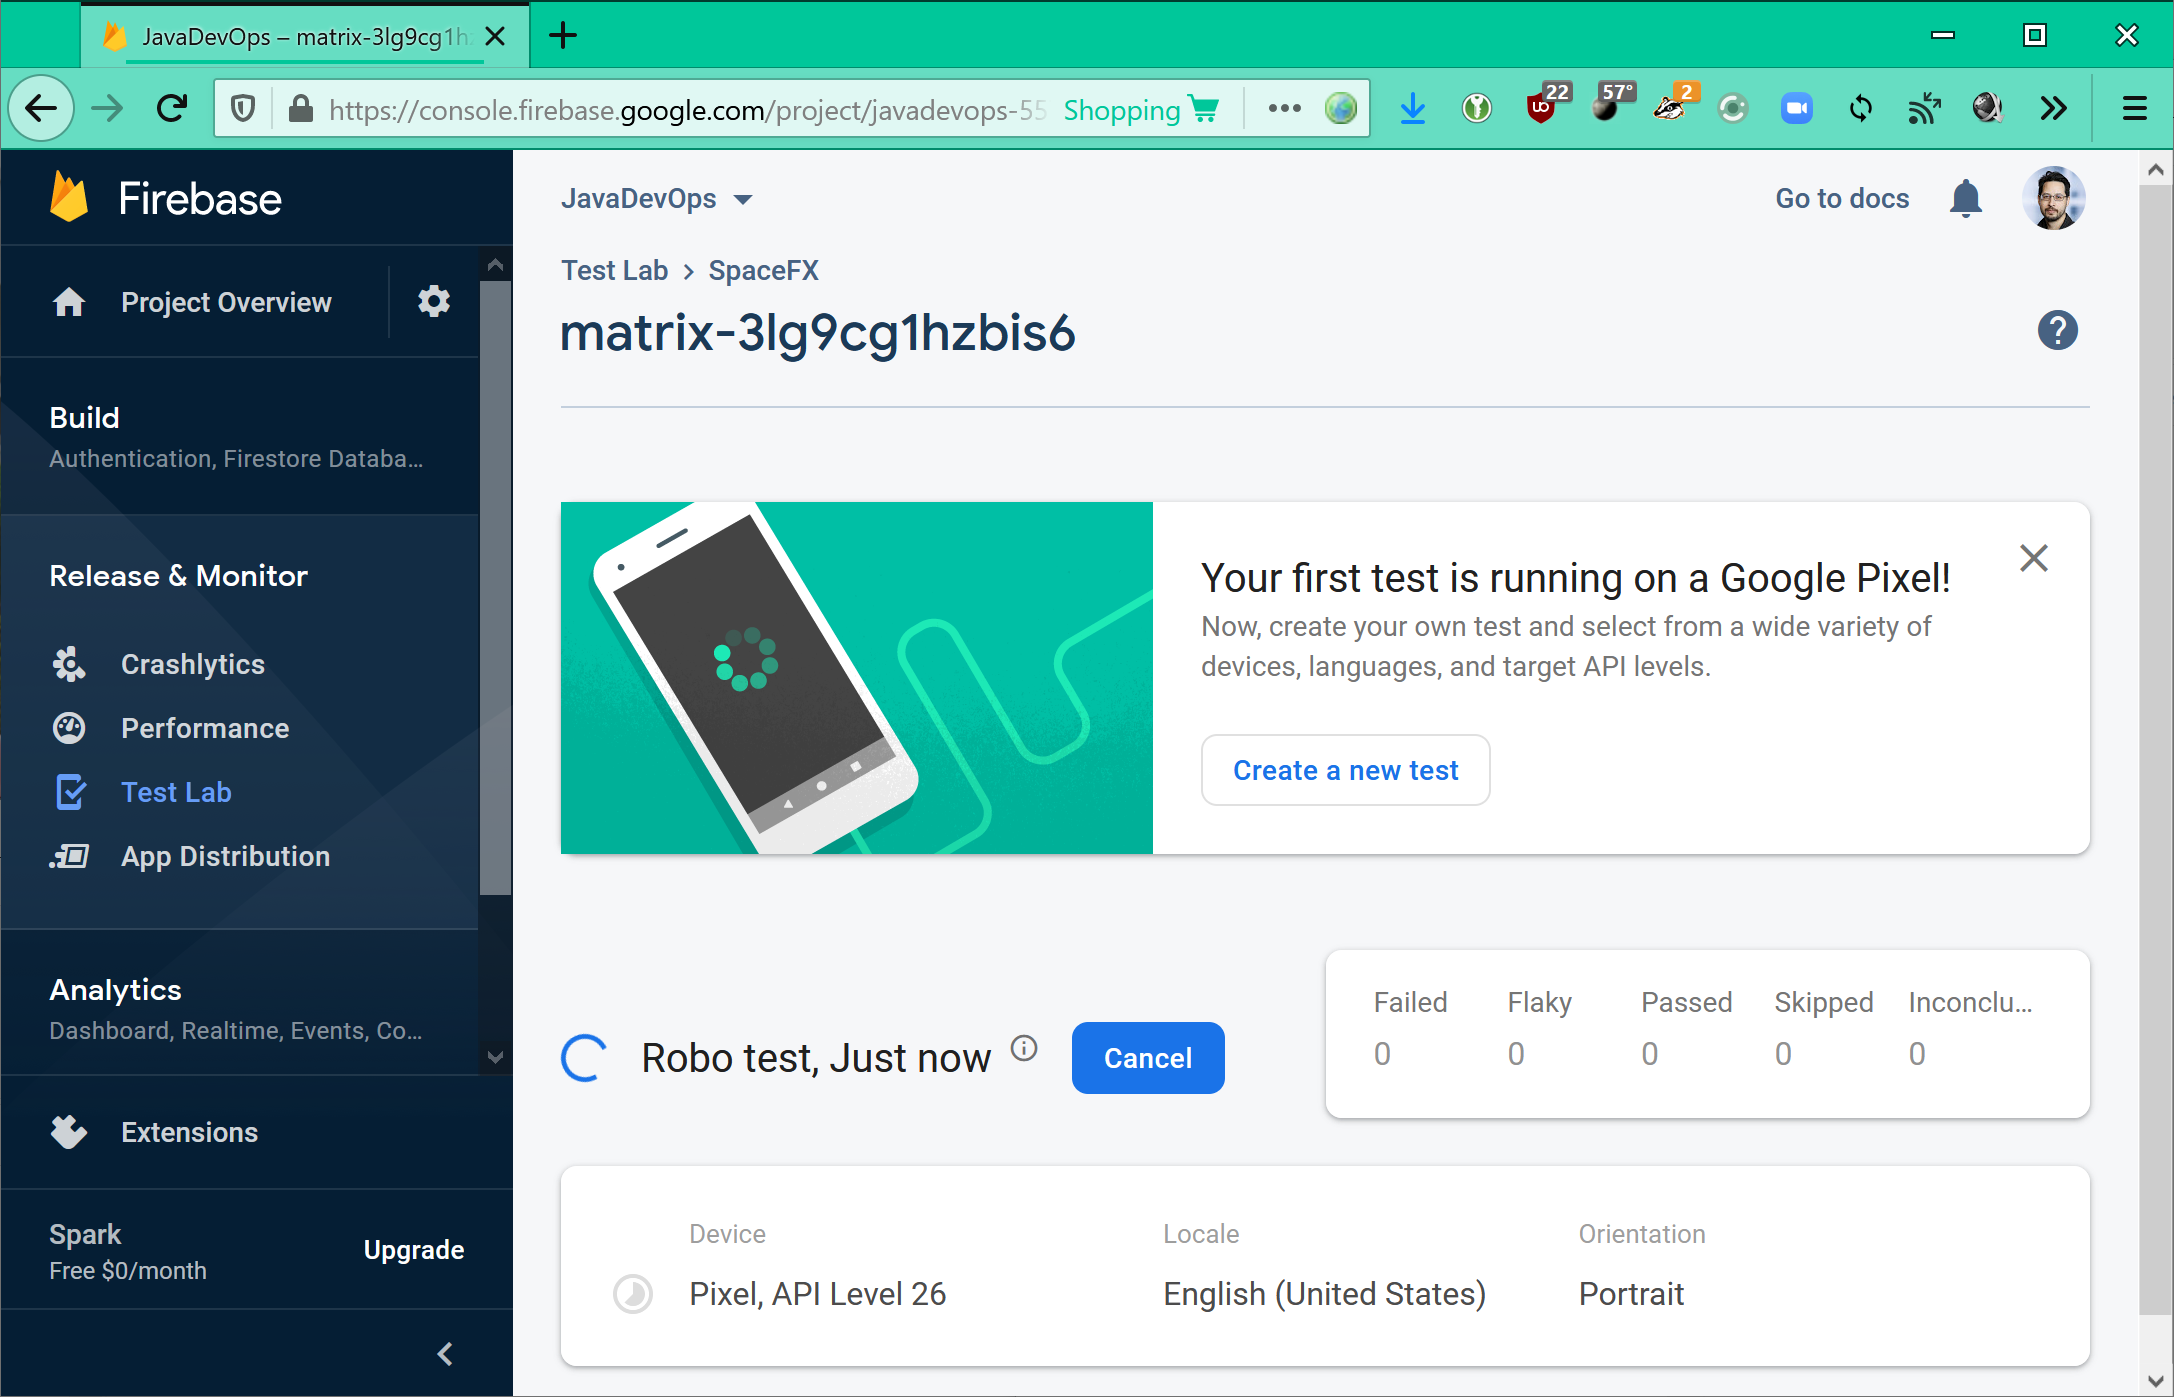
Figure 7-13. Firebase web user interface running an automated Robo test
As of the time of writing, Firebase Test Lab offered a larger collection of Android devices than AWS Test Lab with 109 devices supported, as well as multiple API levels for popular devices. Given the tight integration with Google’s Android tooling and also the generous free quota for individuals, this is an easy way to get your development team started building test automation.
Microsoft Visual Studio App Center
Microsoft Visual Studio App Center, formerly Xamarin Test Cloud, offers the most impressive device list of any of the clouds, with 349 different Android device types for you to run tests on, as shown in Figure 7-14. However, unlike AWS Device Farm and Firebase Test Lab, there is no free tier for developers to use the service. What Microsoft does offer is a 30 day trial on its service to use a single physical device to run tests, and paid plans where you pay by the number of concurrent devices you want to use, which makes sense for large enterprises.

Figure 7-14. Visual Studio App Center device selection screen
Visual Studio App Center also is missing some of the user friendly features like a robot tester and simple test execution via the web console. Instead it focuses on the command-line integration with the App Center Command Line Interface (CLI). From the App Center CLI you can easily fire off automated tests using Appium, Calabash, Espresso, or XamarainUITest. Also, this makes integration with CI/CD tools straightforward.
Overall, Visual Studio App Center wins on device coverage and has a clear focus on Enterprise mobile device testing. However, for independent developers or smaller teams it is less approachable and has higher up-front costs, but will work well as you scale.
Planning a Device Testing Strategy
Now that you’ve seen the basics of both setting up your own device lab and leveraging cloud infrastructure, you should have a better idea about how these map on to your mobile device testing needs.
These are advantages of going with a cloud service:
-
Low startup costs: Cloud plans often offer a limited number of free device tests for developers and utilization based pricing for testing on devices. When starting out with device testing this is the easiest and least costly way to begin exploring manual and automated device testing.
-
Large selection of devices: Since cloud testing providers support a large installed base of customers they have a huge inventory of current and legacy phones to test against. This makes it possible to precisely target the device types, profiles, and configurations that your users are most likely to have.
-
Fast scaleout: App development is all about viral marketing and scaling quickly. Rather than investing in costly infrastructure upfront, cloud services allow you to scale up the testing as the size and popularity of your application requires a larger device test matrix.
-
Reduced capital expenditures: Building a large device lab is a costly upfront capital expenditure. By paying as you go for cloud infrastructure you can delay the costs, maximizing your capital efficiency.
-
Global access: With remote and distributed teams becoming the norm, clouds by design allow for easy access from your entire team no matter where they are located.
However, even given all of these benefits, the traditional approach of building a device lab has some unique advantages. Here are some reasons you may want to build your own device lab:
-
Reduced cost at scale - The total cost of ownership for a device lab that you run and maintain at scale is much lower than the total monthly costs from a cloud provider over the device’s usable lifetime. For a small team this threshold is hard to hit, but if you are a large mobile corporation this can be significant savings.
-
Fast and predictable cycle time - With control over the device farm you can guarantee that the tests will run in parallel and complet in a predictable timeframe to enable responsive builds. Cloud providers have limited device availability and queued wait times for popular configurations that can limit your ability to iterate quickly.
-
No session limits - Device clouds typically put hardcoded session limits on their service to prevent tests from hanging due to test or device failure. As the complexity of your test suite grows, a 30 minute hard limit can become an obstacle to completing testing of a complex user flow.
-
Regulatory requirements - In certain regulated industries such as finance and defense, security requirements can restrict or prohibit the ability to deploy applications and execute tests outside of the corporate firewall. This class of corporations would require an on-premise device lab setup.
-
IoT device integration - If your use case requires the integration of mobile devices with IoT devices and sensors, this is not a configuration cloud providers would provide as a service out of the box. As a result you are probably better off creating a device lab with the IoT and mobile configuration that best matches your real world scenario.
Tip
In some scenarios it also makes sense to do a mix of both cloud testing and local device lab testing. Based on your specific requirements for cycle time, maintenance cost, device scale-out, and regulatory requirements, this can allow you to get the best of both approaches to testing.
Summary
Android is the most popular mobile platform on the planet, because of the huge ecosystem of manufacturers and application developers. However, this is also the challenge with Android development, because it has produced an incredibly fragmented device market with thousands of manufacturers producing tens-of-thousands of devices. Given the scale of fragmentation and device inconsistency in the mobile space, having a fully automated DevOps pipeline for mobile development is a necessity for success.
The equivalent to DevOps for web application development would be if instead of three major browsers there were thousands of unique browser types. You would be forced to automate to obtain any level of quality assurance, which is exactly why there is so much focus in the mobile space on UI test automation running on real devices.
Using the tools and techniques you learned in this chapter, paired with the overall DevOps knowledge on source control, build promotion, and security, you should be ahead of your mobile DevOps peers to face the challenge of continuous deployments to millions of devices globally.
1 https://www.bidouille.org/misc/androidcharts
2 https://blog.appliedmaterials.com/think-your-smartphone-resolution-good-think-again
3 Antoine Reversat (https://engineering.fb.com/2016/07/13/android/the-mobile-device-lab-at-the-prineville-data-center/), “The mobile device lab at the Prineville data center”