Chapter 2. Where Can I Write SQL Code?
This chapter covers three places to write SQL code.
1. RDBMS Software
If you want to write SQL code, you’ll have to first download an RDBMS like MySQL, PostgreSQL, SQLite, Microsoft SQL Server or Oracle. The nuances of each RDBMS are highlighted in this section.
2. Database Tools
The most basic way to use an RDBMS is through a terminal window, which is a text-only black and white screen. Most people use a database tool instead, which is a more user-friendly application that connects to an RDBMS behind the scenes. This section goes through how to connect a database tool to an RDBMS.
3. Other Programming Languages
SQL can be written within many other programming languages. This chapter focuses on two in particular - Python and R. They are popular open source programming languages used by data scientists and data analysts, who often need to write SQL code as well. Instead of switching back and forth between Python / R and an RDBMS, you can connect Python / R directly to an RDBMS and write SQL code within Python / R. This section walks through how to do so step by step.
RDBMS Software
This section includes installation instructions and short code snippets for the five RDBMS’s that are covered in this book.
Which RDBMS to Choose?
If you are working at a company that is already using an RDBMS, you will need to use the same one.
If you are working on a personal project, you’ll need to decide which RDBMS to use. You can refer back to the RDBMS Comparison Table to review the details of some popular ones.
What is a Terminal Window?
I’ll often refer to a terminal window in this chapter because it is the most basic way to interact with an RDBMS.
-
On macOS and Linux, use the Terminal application
-
On Windows, use the Command Prompt application
Once you open up a terminal window, you’ll see a command prompt, which looks like a > followed by a flashing box. It means that it’s ready to take in text commands from the user.
Tip
The next sections include links to download installers for macOS, Windows and Linux.
On macOS though, I would recommend using Homebrew for installations instead. It is a package manager that makes installations a lot easier. First install Homebrew from the link above, and then you’ll be able to run the homebrew install commands in the following sections.
SQLite
SQLite is free and the most lightweight install, meaning that it doesn’t take much space on your computer and is extremely quick to set up. For Windows and Linux, SQLite Tools can be downloaded here. macOS comes with SQLite already installed.
Tip
The simplest way to start using SQLite is to open a terminal window and type sqlite3. With this approach however, everything is done in memory, meaning that changes will not be saved once you close SQLite.
> sqlite3
If you want your changes to be saved, you should connect to a database upon opening with the following syntax:
> sqlite3 my_new_db.db
The command prompt for SQLite looks like this:
sqlite>
Some quick code to test things out:
sqlite> CREATE TABLE test (id int, num int);
sqlite> INSERT INTO test VALUES (1, 100), (2, 200);
sqlite> SELECT * FROM test LIMIT 1;

1|100
To show databases, show tables and exit:
sqlite> .databases
sqlite> .tables
sqlite> .quit
Tip
If you want to display column names in your output, type:
sqlite> .headers on
To hide them again, type:
sqlite> .headers off
MySQL
MySQL is free, even though it is now owned by Oracle. MySQL Community Server can be downloaded under the MySQL Community Downloads here. On macOS, alternatively, you can do the installation with Homebrew by typing brew install mysql in the Terminal.
The command prompt for MySQL looks like this:
mysql>
Some quick code to test things out:
mysql> CREATE TABLE test (id int, num int);
mysql> INSERT INTO test VALUES (1, 100), (2, 200);
mysql> SELECT * FROM test LIMIT 1;

+------+------+
| id   | num  |
+------+------+
|    1 |  100 |
+------+------+
1 row in set (0.00 sec)
To show databases, switch databases, show tables and exit:
mysql> show databases;
mysql> connect another_db;
mysql> show tables;
mysql> quit;
PostgreSQL
PostgreSQL is free and often used alongside other open source technologies. PostgreSQL can be downloaded here. On macOS, alternatively, you can do the installation with Homebrew by typing brew install postgresql in the Terminal.
The command prompt for PostgreSQL looks like this:
postgres=#
Some quick code to test things out:
postgres=# CREATE TABLE test (id int, num int);
postgres=# INSERT INTO test VALUES (1, 100), (2, 200);
postgres=# SELECT * FROM test LIMIT 1;

 id | num
----+-----
  1 | 100
(1 row)
To show databases, switch databases, show tables and exit:
postgres=# l
postgres=# c another_db
postgres=# d
postgres=# q
Tip
If you ever see postgres-#, that means that you’ve forgotten a semicolon. Type ; and you should see postgres=# again.
If you ever see :, that means you’ve been automatically switched to the vi text editor and you can exit by typing q.
Microsoft SQL Server
Microsoft SQL Server is proprietary and works on Windows and Linux machines. It can also be installed via Docker. SQL Server Express, the free edition, can be downloaded here.
The command prompt for Microsoft SQL Server looks like this:
1>
Some quick code to test things out:
1> CREATE TABLE test (id int, num int);
2> go
1> INSERT INTO test VALUES (1, 100), (2, 200);
2> go
1> SELECT TOP 1 * FROM test;
2> go

id     num
------ ------
     1    100

(1 rows affected)
To show databases, switch databases, show tables and exit:
1> SELECT name FROM master.sys.databases;
2> go
1> USE another_db;
2> go
1> SELECT * FROM information_schema.tables;
2> go
1> quit
Oracle
Oracle is proprietary and works on Windows and Linux machines. Oracle Database Express Edition, the free edition, can be downloaded here.
The command prompt for Oracle looks like this:
SQL>
Some quick code to test things out:
SQL> CREATE TABLE test (id int, num int);
SQL> INSERT INTO test VALUES (1, 100);
SQL> INSERT INTO test VALUES (2, 200);
SQL> SELECT * FROM test WHERE ROWNUM <=1;

        ID        NUM
---------- ----------
         1        100
To show databases, show tables and exit:
SQL> SELECT * FROM global_name;
SQL> SELECT table_name FROM user_tables;
SQL> quit
Database Tools
Instead of working with an RDBMS directly, most people will use a database tool to interact with a database. A database tool comes with a nice Graphical User Interface (GUI) that allows for users to point, click and write SQL code in a user-friendly setting.
Behind the scenes, the database tool is using a database driver, which is software that helps the database tool talk to a database. Figure 2-1 shows the visual differences between accessing a database through a terminal window versus a database tool.
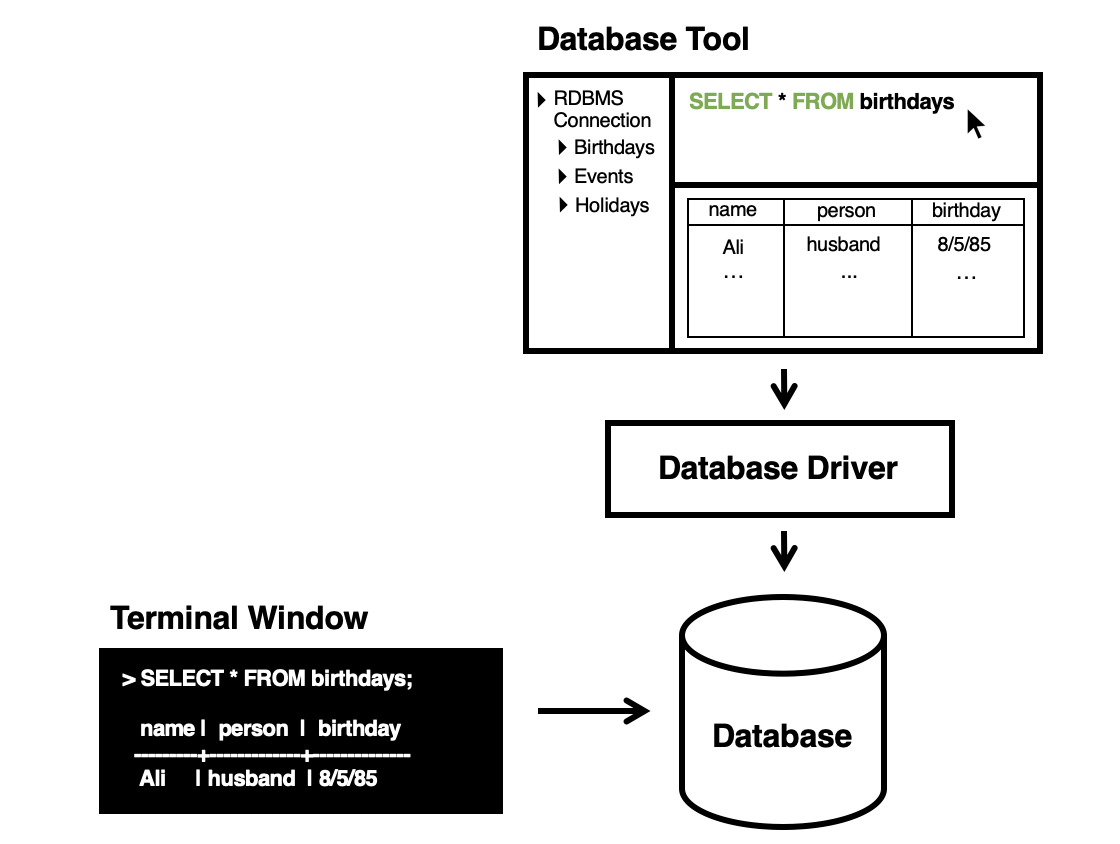
Figure 2-1. Accessing an RDBMS through a terminal window versus a database tool
There are a number of database tools available. Table 2-1 lists out popular database tools for each RDBMS. Many database tools, including the ones below, are free to download and use.
| RDBMS | Database Tool | Details |
|---|---|---|
SQLite |
DB Browser for SQLite |
- Different developer than SQLite - One of several tool options for SQLite |
MySQL |
MySQL Workbench |
- Same developer as MySQL - Listed in the MySQL Community downloads |
PostgreSQL |
pgAdmin |
- Different contributors than PostgreSQL - Included with the PostgreSQL install |
Microsoft SQL Server |
Microsoft SQL Server Management Studio |
Developed by Microsoft |
Oracle |
Oracle SQL Developer |
Developed by Oracle |
Multiple |
DBeaver |
- Can connect to multiple RDBMS’s including all five above - One of many tool options for connecting to a variety of RDBMS’s |
Connect a Database Tool to a Database
When opening up a database tool, the first step is to connect to a database. This can be done in several ways.
1. Create a Database
You can create a brand new database by writing a CREATE DATABASE my_new_db; statement, followed by creating tables to populate the database.
More details can be found in the Creating Databases chapter.
2. Open a Database
You may have downloaded or been given a my_new_db.db file. This .db file will already contain a bunch of tables. You can simply open it up within a database tool and start interacting with the database.
3. Connect to a Database
You may want to work with a database that is either on your computer or on a remote server, meaning that the data is on a computer located elsewhere. This is extremely common these days with cloud computing, where people use servers owned by companies like Amazon, Google or Microsoft.
To connect to a database, you’ll need to fill out the following information within the database tool:
1. Host: Where the database is located
-
If the database on your computer, then this should be
localhostor127.0.0.1. -
If the database is on a remote server, then this should be the IP address of that computer (Example:
123.45.678.90).
2. Port: How to connect to the RDBMS
Keep the default port number. It will be different for each RDBMS.
-
MySQL:
3306 -
PostgreSQL:
5432 -
Microsoft SQL Server:
1433 -
Oracle:
1521
3. Username: Your username for the database
Different users have different permissions to a database, whether that be read or write access. You’ll need to provide your credentials before interacting with the database.
4. Password: Your password associated with the username
If you don’t remember setting up a password for your user, try leaving this field blank.
Once you fill in those fields correctly, you should have access to the database. You can now use the database tool to find the tables and fields you are interested in, and start writing SQL code.
Other Programming Languages
SQL can be written within a number of other programming languages. This chapter focuses on two popular open source ones: Python and R.
As a data scientist or data analyst, you likely do your analysis in Python or R, but need to write SQL queries to pull data from a database.
This approach is fine for doing a quick, one-time export. However, if you need to continuously edit your SQL query or are working with multiple queries, this can get annoying very quickly.
The next sections focus on this second workflow. At a high-level, these are the steps for connecting Python or R to a database.
0. Prerequisite: Things you should know upfront:
-
Which RDBMS you are trying to connect to
-
The location of the database, whether it is on your computer or a remote server
-
Your username and password for the database
1. One Time: Install a database driver and/or an interface on your computer, which are software that allow for Python or R to communicate with a database.
2. Each Time: Import the necessary package(s) into Python or R and setup a database connection.
Connect Python to a Database
This section walks through the following steps:
-
Install a Database Driver / Interface for Python
-
Set Up a Database Connection in Python
-
Write SQL Code in Python
Step 1: Install a Database Driver / Interface for Python
There are many driver options to choose from. This section has sample code for one popular driver for each RDBMS.
The installation can be done via either pip or conda. The following code should be run in a terminal window.
SQLite
No install necessary (Python 3 comes with sqlite3)
MySQL
pip install mysql-connector-python
conda install -c conda-forge mysql-connector-python
PostgreSQL
pip install psycopg2
conda install -c conda-forge psycopg2
Microsoft SQL Server
pip install pyodbc
conda install -c conda-forge pyodbc
Oracle
pip install cx_Oracle
conda install -c conda-forge cx_oracle
Step 2: Set Up the Database Connection in Python
The following code should be written in Python.
SQLite
import sqlite3
conn = sqlite3.connect('my_new_db.db')
MySQL
import mysql.connector
conn = mysql.connector.connect(host='localhost',
                database='my_new_db',
                user='alice',
                password='password')
PostgreSQL
import psycopg2
conn = psycopg2.connect(host='localhost',
                database='my_new_db',
                user='alice',
                password='password')
Microsoft SQL Server
import pyodbc

# Connecting to SQL Server Express
conn = pyodbc.connect(driver='{SQL Server}',
              host='localhostSQLEXPRESS',
              database='my_new_db',
              user='alice',
              password='password')
Oracle
import cx_Oracle

# Connecting to Oracle Database Express Edition
conn = cx_Oracle.connect(dsn='localhost/XE',
                         user='alice',
                         password='password')
Tip
Not all arguments are required. If you exclude an argument completely, then the default value will be used.
-
For example, the default host is localhost, which is your computer.
-
If no user and password were set up, then those arguments can be left out.
Warning
The above code is fine to test out a connection to a database, but in reality, you should not be saving your password within a script for everyone to see.
There are multiple ways to avoid doing so, including generating an SSH key, setting environment variables or creating a configuration file. These options however, all require additional knowledge of computers or file formats.
The most straightforward approach, in my opinion, is to save your username and password in a separate python file, and then call that file within your database connection script. While this is less secure than the other options, it is the quickest start.
Create a db_config.py file with the following code:
user = "alice"
pwd = "password"
In the python script that connects to a database, you can import the config file:
import cx_Oracle
import db_config

conn = cx_Oracle.connect(dsn='localhost/XE',
       user=db_config.user,
       password=db_config.pwd)
Step 3: Write SQL Code in Python
Once the connection is made, the following Python code works for any RDBMS.
Write a query and output a list of tuples for each row of data.
cursor = conn.cursor()
cursor.execute('SELECT * FROM test;')
result = cursor.fetchall()
print(result)
[('1', '100'),
 ('2', '200')]
Write a query and output a dataframe.
# pandas must already be installed
import pandas as pd

df = pd.read_sql('''SELECT * FROM test;''', conn)
print(df)
print(type(df))

id  num
0   1  100
1   2  200
<class 'pandas.core.frame.DataFrame'>
Once you are done using the database, close the connection.
cursor.close()
conn.close()
Warning
When using cx_Oracle in Python, you must remove the semicolon at the end of all queries to avoid getting an error message.
Connect R to a Database
This section walks through the followiing steps:
-
Install a Database Driver / Interface for R
-
Set Up a Database Connection in R
-
Write SQL Code in R
Step 1: Install a Database Driver / Interface for R
There are many driver options to choose from. This section has sample code for one popular driver for each RDBMS.
The following code should be written in R.
SQLite
install.packages("RSQLite")
MySQL
install.packages("RMySQL")
PostgreSQL
install.packages("RPostgres")
Microsoft SQL Server
On Windows, the ODBC driver is pre-installed. On Mac OS or Linux, you’ll need to download it here.
install.packages("odbc")
Oracle
Download ROracle here.
setwd("the_folder_where_you_downloaded_ROracle")

# Update the name of the .zip file based on the latest version
install.packages("ROracle_1.3-2.zip", repos=NULL)
Step 2: Set Up the Database Connection in R
The following code should be written in R.
SQLite
library(DBI)
con <- dbConnect(RSQLite::SQLite(), 'my_new_db.db')
MySQL
library(RMySQL)
con <- dbConnect(RMySQL::MySQL(),
        host='localhost', dbname='my_new_db',
        user='alice', password='password')
PostgreSQL
library(RPostgres)
con <- dbConnect(RPostgres::Postgres(),
        host='localhost', dbname='my_new_db',
        user='alice', password='password')
Microsoft SQL Server
library(DBI)
con <- DBI::dbConnect(odbc::odbc(),
        Driver = 'SQL Server',
        Server = 'localhost\SQLEXPRESS',
        Database = 'my_new_db',
        User='alice',
        Password='password',
        Trusted_Connection = 'True')
Oracle
library(ROracle)
drv <- dbDriver('Oracle')
con <- dbConnect(drv, 'alice', 'password',
        dbname='my_new_db')
Tip
Not all arguments are required. If you exclude an argument completely, then the default value will be used.
-
For example, the default host is localhost, which is your computer.
-
If no user and password were set up, then those arguments can be left out.
Warning
The above code is fine to test out a connection to a database, but in reality, you should not be saving your password within a script for everyone to see.
There are multiple ways to avoid doing so, including encrypting credentials with the keyring package, creating a configuration file with the config package, setting up environment variables with an .Renviron file or recording the user and password as a global option in R with the options command.
The most straightforward approach, in my opinion, is to have RStudio prompt you for your password instead.
Instead of this:
con <- dbConnect(...,
    PWD = 'password',
    ...)
Do this:
install.packages('rstudioapi')
con <- dbConnect(..., PWD = rstudioapi::askForPassword("password?"),
...)
Step 3: Write SQL Code in R
Once the connection is made, the following R code works for any RDBMS.
Show all tables in the database.
dbListTables(con)
[1] "test"
For Microsoft SQL Server, include the schema name to limit the number of tables displayed: dbListTables(con, schema="dbo"). dbo stands for database owner and it is the default schema in Microsoft SQL Server.
Take a look at a table in the database.
dbReadTable(con, "test")
  id num
1  1 100
2  2 200
For Oracle, the table name is case-sensitive.
Write a query and output a dataframe.
df <- dbGetQuery(con, "SELECT * FROM test
                       WHERE id = 2")
print(df); class(df)

  id num
1  2 200
[1] "data.frame"
For when you are done using the database.
dbDisconnect(con)
It is always good practice to close the database connection to save resources.